Windows Azure and Cloud Computing Posts for 7/11/2011+
| A compendium of Windows Azure, Windows Azure Platform Appliance, SQL Azure Database, AppFabric and other cloud-computing articles. |

Note: This post is updated daily or more frequently, depending on the availability of new articles in the following sections:
- Azure Blob, Drive, Table and Queue Services
- SQL Azure Database and Reporting
- Marketplace DataMarket and OData
- Windows Azure AppFabric: Apps, Access Control, WIF and Service Bus
- Windows Azure VM Role, Virtual Network, Connect, RDP and CDN
- Live Windows Azure Apps, APIs, Tools and Test Harnesses
- Visual Studio LightSwitch and Entity Framework 4.1+
- Windows Azure Infrastructure and DevOps
- Windows Azure Platform Appliance (WAPA), Hyper-V and Private/Hybrid Clouds
- Cloud Security and Governance
- Cloud Computing Events
- Other Cloud Computing Platforms and Services
To use the above links, first click the post’s title to display the single article you want to navigate.
Azure Blob, Drive, Table and Queue Services
No significant articles today.
<Return to section navigation list>
SQL Azure Database and Reporting
The SQL Azure Team reported SQL Server Code Name “Denali” CTP3 and SQL Server 2008 R2 SP1 are HERE!
Today we are excited to announce the release of SQL Server Code Name “Denali” Community Technology Preview 3 (CTP3). This CTP release represents a significant milestone for customers and partners looking to experience the extensive new value delivered in Denali.
SQL Server Code Name “Denali” CTP3 brings a huge number of new capabilities for customers to explore and test. Product highlights for this CTP include:
- Greater availability. Deliver the required 9s and data protection you need with AlwaysOn which delivers added functionality over CTP1.
- Blazing-fast performance. Get unprecedented performance gains with Project “Apollo,” a new column store index that offers 10-100x star join or similar query performance improvements available for the first customer preview.
Breakthrough insight. Unlock new insights with rapid data exploration across your organization with Project “Crescent,” available to customers for the first time. Get your hands on the data exploration and visualization tool that everyone is talking about and enables end users to explore data at the speed of thought.- Credible, consistent data. Provide a consistent view across heterogeneous data sources with the BI Semantic Model (BISM) a single model for Business Intelligence applications, from reporting and analysis to dashboards and scorecards. Make data quality a part of everyday life with the Master Data Services add-in for Excel and new Data Quality Services that is integrated with third party data providers through Windows Azure Marketplace. Customers can test this functionality for the first time and put data management and cleansing tools in the hands of those who need it. Available integrated Marketplace providers include:
- Cdyne: CDYNE Phone Verification will validate the first 7 digits of your phone number(s) and return what carrier the phone number id is assigned to, whether it is a cellular number or a land line, the telco, and additional information including time zone, area code and email address if it is a cellular number
- Digital Trowel: Powerlinx allows users to send data for refinement and enhancement and receive back cleansed and enriched data. The database contains 10 million company website addresses, 25 million detailed company profiles, and 25 million executives, including 5 million in-depth profiles with email addresses and phone numbers.
- Loqate: The Loqate Verify enables users to parse, standardize, verify, cleanse, transliterate, and format address data for 240+ world countries.
- Loqate: The Geocode enables a latitude-longitude coordinate to be added to any world address with worldwide coverage to city or postal code for over 120 countries
- Melissa Data: WebSmart Address Check parses, standardizes, corrects and enriches U.S. and Canadian addresses to increase deliverables, reduce wasted postage and printing, and enhance response
- Productive development experience. Optimize IT and developer productivity across server and cloud with Data-tier Application Component (DAC) parity with SQL Azure and SQL Server Developer Tools code name “Juneau” for a unified and modern development experience across database, BI, and cloud functions. Additionally, Express customers can test a new LocalDB version for fast, zero-configuration installation.
Today, you have the chance to preview and test these marquee capabilities and the upgrade or migration experience. CTP3 is a production quality release that includes access to upgrade and migration tools like Upgrade Advisor, Distributed Replay and SQL Server Migration Assistant (SSMA). Upgrade Advisor and Distributed Replay allow you to perform thorough analysis and testing of your current SQL Server applications before upgrading so you know what to expect. You can also use SSMA to automate migrate non-SQL Server databases to SQL Server Code Name “Denali”. For more detailed information about the new SQL Server Migration Assistant v5.1, visit the SSMA team blog.
Download the bits here, test the new functionality and submit feedback back to us to help us deliver a high-quality release!
But wait – there’s more…
…SQL Server 2008 R2 SP1 is also available!In addition to the CTP3 for SQL Server Code Name “Denali,” today we’re also excited to release SQL Server 2008 R2 SP1 to customers.
SQL Server 2008 R2 SP1 contains cumulative updates for SQL Server 2008 R2 and fixes to issues that have been reported through our customer feedback platforms. These include supportability enhancements and issues that have been reported through Windows Error Reporting. The following highlight a few key features with enhancements in this CTP:
- Dynamic Management Views for increased supportability
- ForceSeek for improved querying performance
- Data-tier Application Component Framework (DAC Fx) for improved database upgrades
- Disk space control for PowerPivot
Customers running SQL Server 2008 R2 can download SP1 starting today!
From the download site’s “What’s New in SQL Server 2008 R2 Service Pack 1?” section:
Data-tier Application Component Framework (DAC Fx) for improved database upgrades:
The new Data-tier Application (DAC) Framework v1.1 and DAC upgrade wizard enable the new in-place upgrade service for database schema management. The new in-place upgrade service will upgrade the schema for an existing database in SQL Azure and the versions of SQL Server supported by DAC. A DAC is an entity that contains all of the database objects and instance objects used by an application. A DAC provides a single unit for authoring, deploying, and managing the data-tier objects. For more information, see Designing and Implementing Data-tier Applications.[Emphasis added.]
Cihan Biyikoglu posted Shipping Fast and Scoping Right – Sharding to Federations v1 in a few months - from PDC 2010 to 2011 to the SQL Azure team blog on 7/11/2011:
We first talked about SQL Azure Federation in Nov 2010 at PDC. We are getting ready to ship federations before the end of the calendar year 2011. It has been an amazing journey and with over a 100 customer[s] in the federation technology preview program, we are fully charged. Thanks for a great deal of interest. You can still apply if you would like to get access to the early bits through the link in the following post; http://blogs.msdn.com/b/cbiyikoglu/archive/2011/05/12/federations-product-evaluation-program-now-open-for-nominations.aspx
One of the interesting stories that com up with federations is the scope we picked for the first release. Given we had multiple releases a year with SQL Azure, we picked an aggressive scope and chosen to iterate over the federations functionality. I get feedback about additional functionality folks would like to see but I believe we got the scope right for most folks with great data-dependent routing through USE FEDERATION and repartitioning operations through ALTER FEDERATION statements for v1.
For those of you asking for additional functionality I am happy to tell you that we’ll obviously continue to make improvement to federations after v1. I also would like to explain how we scoped v1 for federations. As a team we looked at many customer who are using the sharding pattern in SQL Azure and found many instances of the 80-20 rule.
- Most people wanted ALTER FEDERATION … SPLIT and not need MERGE: Turns out SQL Azure databases can already do scale-up elasticity with options to set the database size from 1GB to 50GB. Federation members can be set to any EDITION and MAXSIZE and take advantage of the pay as you go model. that mean a 50GB member that splits into 20GB and 30GB databases continue to pay the same $ amount as we only charge for the used GBs. In v1, we do not provide MERGE but give you DROP to get rid of your members if you don’t want to keep them around.
- Most people want to use the same schema in each federation member: Turns out most folks want to use the identical schema across federation members. Most tools will simplify schema management based around identical schemas even though it is possible to have completely different schemas across federations member if you want to. Independent schema per federation member also allow big data apps to update schema eventually as opposed to immediately (a.k.a in a single transaction).
- Most people wanted to control the distribution of data with federations: This is why we started with RANGE partitioning first as opposed to other flavors of partitioning styles such as HASH. Turns out, RANGE also provided easy ways to simulate HASH or ROUNDROBIN. RANGE also provides a reliable way to keep track of where each atomic unit lands as repartitioning operations take place and optimizes better for the repartitioning operations such as SPLIT.
- Most people wanted to iterate over atomic units from low-to-high and not high-to-low; This is why the range partitioning represents an low inclusive and high exclusive range for each federations member. A federation member reports its range through sys.federation_member_distributions view and range_low and range_high columns. The values of 100, 200 respectively for these columns indicate that 100 is included in the range of the federation member and value 200 reside in the adjacent federation member.
This is just a few but gives you the idea… Yes, we could have waited to add these all before we shipped v1 but that would hold up the existing feature set that seems to satisfy quite a few customers out there. Worth a mention that, we made sure that there isn’t any architectural limitation that would prevent us from adding support for any remaining items above and we can add them anytime.
We are mo[s]tly done with v1 but it still isn’t too late to impact our scope. So keep the feedback coming on scope of v1, vnext or any other area. Reach me; through the blog or email me at cihangib@microsoft.com…
Keshava Kumar reported on 7/11/2011 "End of Support" announcement for SQL Server Migration Assistant v4.2 family of products (support ends on July 15th, 2012):
- SQL Server Migration Assistant 2005 for Access v4.2
- SQL Server Migration Assistant 2008 for Access v4.2
- SQL Server Migration Assistant 2005 for MySQL v1.0
- SQL Server Migration Assistant 2008 for MySQL v1.0
- SQL Server Migration Assistant 2005 for Oracle v4.2
- SQL Server Migration Assistant 2008 for Oracle v4.2
- SQL Server Migration Assistant 2005 for Sybase ASE v4.2
- SQL Server Migration Assistant 2008 for Sybase ASE v4.2
The download links for these products will be removed on August 15th, 2011 even though we continue to support these product versions through July 15th 2012.
What does “End of Support” mean for SSMA v4.2?
At the end of the support phase for SSMA v4.2 product family, customers will not have access to the following:
- SSMA v4.2 products download pages
- Free or paid assisted support options
- New security updates or non-security hotfixes
- Updates to online content (Knowledge Base articles, etc.), the existing content will be available at least for the next 12 months from the date of this announcement
Guidance for customers
Microsoft advises customers to migrate to the latest supported SSMA product release and/or Service Pack which can be obtained from the Microsoft SQL Server website. There is no upgrade path from previous version of SSMA to the latest, hence customers need to:
- Uninstall SSMA v4.2 product
- Install the latest version of SSMA product (latest download links are available from SSMA team blog)
Microsoft Support Lifecycle
The Microsoft Support Lifecycle (MSL) policy provides transparent and predictable information about the support lifecycle of Microsoft products. More information is available on the following MSL Web site:
http://support.microsoft.com/lifecycle.
Wellys Lee described How SSMA Estimates Manual Conversion Time in a 7/11/2011 post:
Those manual estimation time was calculated based on the actual average time it takes by our developers and testers to fix the issue. The manual estimation is intended to help you further quantify the complexity of the issue to help planning the database migration.
However, you should be aware of the assumption and limitation of the manual conversion time estimate:
- The estimated manual conversion time was calculated based on the time it takes to resolve the issue using a specific approach. Often, there are more than one approach to resolve the issue. The actual hours to complete the migration and resolving the issue depends on the approach taken. For example when encountering Oracle User Defined Type (UDT), SSMA raised an error and the estimate was calculated based on the assumption that the UDT is converted to SQL Server TVP (as described in this article). However, you could also develop custom CLR type and convert the TVP to the CLR type -- in which case the actual conversion time will be vastly different.
- Every migration error is assumed to be independent and the total estimated manual conversion time sums the estimate from individual errors. This may not be the case. You may have the same errors across multiple objects, in which once you resolve one error, you could copy and paste the solution to another object which would reduce the resolution time. Another example, you may have one underlying issue manifested in multiple errors. Consider the example in the screenshot above where SSMA is not able to convert INTERVAL data type. This results in the error for the function return type (line 6 on original Oracle source code) and expression to calculate the value (line 10 on the original Oracle source code). The two issues are dependent each other and the return type depends on converted expression.
In addition, the manual estimate hours depends on the skills of resources performing the migration. In order to resolve the issue, you will need to understand the original Oracle source and understand how best to redesign the statement in SQL Server. Thus, you need resource with knowledge of both Oracle and SQL Server. If you do not have resource with knowledge in both technologies, then you need to have separate resources (Oracle DBA and SQL Server developer) collaborating to resolve the issue. In this case, you need to factor the number of resources to your project planning.
I often find customers use the estimated manual conversion time as a comparative number to rank complexity between one schema/database to another.
The manual conversion time can also be useful to estimate rough order of magnitude (ROM) estimation, but for more accurate project costing and time estimate, it is best to have the actual person(s) performing the migration to review the error list in detailed, considering the dependencies and skill level, then refine the estimate accordingly.

<Return to section navigation list>
MarketPlace DataMarket and OData
The Windows Azure Team (@WindowsAzure) posted Just Announced: Windows Azure Marketplace Expands Application Selling Capabilities In US Markets on 7/12/2011:
Launched last November, the Windows Azure Marketplace is an online marketplace for developers to share, find, buy and sell building block components, training, service templates, premium data sets plus finished services and applications needed to build Windows Azure applications. Today at WPC 2011 in Los Angeles, we are pleased to announce that we have expanded the capability of the marketplace to sell finished applications built on Windows Azure in US markets. We will expand this capability to additional geographies in the coming months.
Benefits of the Windows Azure Marketplace include:
- Global Reach: Windows Azure Marketplace provides a destination in cloud for Windows Azure based partner’s applications. This will make it easy for customers and partners to find various types of applications. Windows Azure Marketplace has pre-built integration with Office, SQL Server, Bing which enables information Workers to find Data and services from applications they use everyday.
- Premium Experiences: Windows Azure Marketplace is a curated marketplace for applications and data by trusted Microsoft partners. It provides easy interface to discover, subscribe and purchase applications and datasets.
- Secure Platform: Windows Azure Marketplace is built on secure commerce platform with integrated billing and reporting. It also provides consistent, flexible and context optimized APIs to access data and web services.
Click here to read the full press release to learn more about this announcement.
Click here to explore Windows Azure Marketplace and click here to learn more on how to get involved with the Windows Azure Marketplace.
<Return to section navigation list>
Windows Azure AppFabric: Apps, Access Control, WIF and Service Bus
Vittorio Bertocci (@vibronet) reported the availability of Updated Windows Azure Access Control Service Cmdlets: Modules, Continuation and Backup/Restore! in a 7/12/2011 post:
As promised yesterday [see post below], here there’s one of the deliverables I mentioned. About one month ago we published the first release of a set of PowerShell cmdlets for ACS: wrappers for the ACS management APIs, which allow you to easily script tasks such as wiping a namespace, adding an OpenID provider, automating often-used provisioning flows and much more.
The cmdlets were sample quality, but that didn’t prevent you from jumping on it with enthusiasm and give us a lot of great feedback: I credit especially the hosts and the audience of the Powerscripting podcast, who were so kind to have me on one episode and provide passionate commentary on what we had to improve.
Well, I am happy to announce that many of the requested improvements are here! If you head to http://wappowershell.codeplex.com/, you’ll find a new drop of the ACS cmdlets waiting for you. It’s the file ACSCmdlets20110711.exe, for good measure I took down the old one.
Make no mistake: this is still sample quality, but we added some features which will make those even more useful. Here there’s a list:
Snap-ins are out of fashion? Try our Modules
Hal and Jonathan had no doubt: our choice of delivering the cmdlets via snap-in was anachronistic, and we absolutely had to move things in a module.
We decided to offer that as an option at install time: now when you unpack the sample you will be prompted to choose if you want to use a module or a snap-in, perhaps if you are running an older version of PowerShell.No more “plurals”
Another thing the Powerscripting crew was adamant about was the presence of one “singular” and one “plural” commands for every entity (ie Get-Rule and Get-Rules). As it turns out, the common practice in PowerShell is to have just the “singular” version and cleverly use the parameters (or lack thereof) to let PowerShell figure out the multiplicity of the result. That’s exactly what we’ve done! In our case, it’s the presence of the –Name parameter which determines if we are interested in one specific entity or a collection. The snippet below, helpfully provided by Lito from our friends at Southworks, hopefully gets the point across:
# retrieve the full list of Identity Providers
> Get-IdentityProvider –Namespace $yourNamespace –ManagementKey $yourManagementKey
# retrieve a single Identity Provider
> Get-IdentityProvider –Namespace $yourNamespace –ManagementKey $yourManagementKey –Name “Windows Live ID”
Your list exceeds the 100 entries? Try our new Get API
The feedback for this feature came from a colleague, who was very happy of the cmdlets until he discovered that he never managed to get result sets with more than 100 elements (he had the need to get MANY MORE). The ACS management API indeed cap their result to 100 elements, but as good OData citizens they also support continuation tokens. In the first release we didn’t handle those hence you were limited to what you get in the first shot to the API. This release does handle continuation tokens. It does so transparently, without surfacing the continuation token itself and forcing you to make multiple calls: we retrieve all the results for you, and if you want to break things down you can use the tools that PowerShell offers (like the classic | more).
# retrieve the full list of rules from a RuleGroup
> Get-Rule -GroupName $ruleGroup -Namespace $namespace -ManagementKey $managementKey | more
Add-, Get- and Remove- cmdlets for SeviceIdentities and ServiceIdentityKeys
You asked to be able to handle ServiceIdentity and associated keys: we obliged. Just make sure that you don’t fall in the fallacy of misusing them to use ACS as an identity provider, instead of unleashing its true federation provider potential.
> Add-ServiceIdentity -ServiceIdentity <ServiceIdentity>
> Add-ServiceIdentity –Name <String> –Description <string>
> Get-ServiceIdentity [-Name <string>]
> Remove-ServiceIdentity -Name <string>
> Add-ServiceIdentityKey -ServiceIdentityKey <ServiceIdentityKey> -ServiceIdentityName <String>
> Add-ServiceIdentityKey -Key <String> [-EffectiveDate <DateTime>] [-ExpirationDate <DateTime>] -ServiceIdentityName <String> [-Name <String>]
> Add-ServiceIdentityKey -Password <String> [-EffectiveDate <DateTime>] [-ExpirationDate <DateTime>] -ServiceIdentityName <String> [-Name <String>]
> Add-ServiceIdentityKey -Certificate <X509Certificate2> -ServiceIdentityName <String> [-Name <String>]
> Get-ServiceIdentityKey [-Id <Int64>] [-ServiceIdentityName <String>]
> Remove-ServiceIdentityKey -Id <Int64>
Add- cmdlets now can take an entire object as a parameter
We are getting closer to the entrée of this release, and the update discussed here is what makes it at all possible.
In the former release every Add- cmdlets took the attributes constituting the entity to be created as individual parameters. That worked, especially thanks to the fact that we picked meaningful defaults should the cmdlet be called with some omitted parameter. However it made especially hard to concatenate Add- with other commands, like a Get-, without adding complicated parsing logic that would break down the object coming from Get- in the individual parameters that Add- required. Well, get this: now all the Add- cmdlets accept also entire objects as parameters, making possible some interesting tricks like the one below:
# retrieve an Identity Provider from one namespace and add it to another one
> $RP = Get-RelyingParty -Name “Name Here” -MgmtToken $sourceNamespaceToken
> Add-RelyingParty -RelyingParty $RP -MgmtToken $targetNamespaceToken
You see where I am getting at here, right?
Backup and restore an ACS namespace
Enabling backup and restore was one of the main reasons for which we thought of creating a PowerShell cmdlets sample in the first place: with this release we are finally able to demonstrate that in a reasonably short and easy to read script.
In the cmdlets installation folder, sub-folder sampleScript/, you’ll find a series of sample scripts which can be used for save, restore or even transfer an entire namespace at once. Let’s play! Open a PowerShell prompt and navigate to the sampleScript folder. Pick an ACS namespace you like, retrieve the management key and enter something to the effect of
.\ExportNamespace.ps1 "myNamespace" "8m+1[.key.]mUE=" "c:\temp\myNamespace.acsns"
You’ll get the following output:
Importing AcsManagement Module...
Getting all the Identity Providers from myNamespace namespace...
Getting all the Relying Parties from myNamespace namespace...
Getting all the Rule Groups from myNamespace namespace...
Getting all the Service Keys from myNamespace namespace...
Getting all the Service Identities from myNamespace namespace...
Serializing all the information in myNamespace namespace to the c:\temp\myNamespace.acsns file...Done
Looks pretty simple! Let’s see what have we got in myNamespace.acsns. The namespace I used is pretty rich, resulting in a 32K file, hence dumping it here would not make a lot of sense. However take a look of the screenshot of the file as shown by XML Notepad:
Yessirs, that is an XML representation of your namespace! The script that generated this file is surprisingly simple and readable:
Param($sourceNamespace = "[your namespace]",
$sourceManagementKey = "[your namespace management key]",
[string]$fileToExport = "[path to output file]")function Get-ScriptDirectory
{
$Invocation = (Get-Variable MyInvocation -Scope 1).Value
Split-Path $Invocation.MyCommand.Path
}$scriptDirectory = Get-ScriptDirectory
Set-Location $scriptDirectory.\AddSnapInAndModule.ps1
$sourceToken = Get-AcsManagementToken -Namespace $sourceNamespace -ManagementKey $sourceManagementKey
$acsNamespaceInfo = New-Object Microsoft.Samples.DPE.ACS.ServiceManagementTools.PowerShell.Model.ServiceNamespace"Getting all the Identity Providers from $sourceNamespace namespace..."
$acsNamespaceInfo.IdentityProviders = Get-IdentityProvider -MgmtToken $sourceToken"Getting all the Relying Parties from $sourceNamespace namespace..."
$acsNamespaceInfo.RelyingParties = @()
foreach ($s in Get-RelyingParty -MgmtToken $sourceToken)
{
$acsNamespaceInfo.RelyingParties += @(Get-RelyingParty -MgmtToken $sourceToken -Name $s.Name)
}"Getting all the Rule Groups from $sourceNamespace namespace..."
$acsNamespaceInfo.RuleGroups = @()
foreach ($s in Get-RuleGroup -MgmtToken $sourceToken)
{
$acsNamespaceInfo.RuleGroups += @(Get-RuleGroup -MgmtToken $sourceToken -Name $s.Name)
}"Getting all the Service Keys from $sourceNamespace namespace..."
$acsNamespaceInfo.ServiceKeys = Get-ServiceKey -MgmtToken $sourceToken"Getting all the Service Identities from $sourceNamespace namespace..."
$acsNamespaceInfo.ServiceIdentities = Get-ServiceIdentity -MgmtToken $sourceToken"Serializing all the information in $sourceNamespace namespace to the $fileToExport file..."
if (! [System.IO.Path]::IsPathRooted("$fileToExport"))
{
$fileToExport = Join-Path "$scriptDirectory" "$fileToExport"
}
$acsNamespaceInfo.Serialize($fileToExport)""
"Done"In fact, there is nothing difficult about the above script: it’s more or less the same foreach applied in turn to IPs, RPs, rule groups & rules, service identities and keys.
Now that you have all your namespace in file you can restore it in its entirety via ImportNamespace.ps1. In fact, nothing prevents you from applying those settings even to a different ACS namespace! The CloneNamespace.ps1 demonstrates exactly that scenario.Well, that’s it! Play with the cmdlets and let us know what you like, what you dislike and what you’d like to see: I’ll make sure to pass the feedback appropriately. As you know by now, I moved to the product team I won’t be driving the next release of the ACS cmdlets; in fact, without the kind help of Wade who took care of some last minute logistic details even this release would not have been in your hands now: thanks Wade!
And since we are on the thanks section, I wanted to take this chance to express my gratitude to the good folks at Southworks, with whom I worked very closely for the last few years, and to whom I owe my current caramel addiction (dulche de leche, to be precise). From the first identity training kits to the monumental work in FabrikamShipping SaaS, going through the identity labs in the windows azure platform training kit, keynote demos and occasional projects, the partnership with Tim, Matias, Lito, Johnny, PC, Iaco (signor Iacomuzzi!), Ariel, Nahuel, Diego, Fernando, Mariano, Nicholas, the “other Matias” and many others (sorry guys for not remembering all the names!) has been invaluable. You are probably not going to miss my OCS-grade nitpicking and inflexible quasi-religious ideas about how claims based identity should be messaged, but I will miss your professionalism, flexibility, exceptional work ethic, will to burn the midnight oil (remember that night in which the fire alarm rang in B18 (or was B24?) and when we came out we were practically the only ones in the place?) and especially all the common ground we built over the years. Best of luck you guys!


Steve Peschka described Troubleshooting Blank Response Pages When Using Federation with ACS and Facebook in a 7/12/2011 post:
I've had this scenario come up a few times now when working through various federation scenarios. These cases always involve using Facebook as an oAuth source for login, or Azure's AppFabric ACS as a federated identity provider. The common behavior is that you are doing something either interactively through the browser or programmatically by making a POST to ACS.
In either case, you get an error in the response, but the error is generally nondescript. For example, when using Facebook's oAuth feature you get redirected to their site to login, you enter your credentials, and then you get redirected back to your application. When there is a problem though, in most cases the browser will just say you got a 400 response and the server encountered an error. That's it. Same thing when programmatically posting to ACS - when there's a problem you will often get a 400 type response back that often says "page not found" or something similar. How does that help you? It doesn't!
Sadly, what I've discovered is the best thing to do when you see these pages is to use Fiddler (www.fiddler2.com). You will find significantly more details in the Fiddler response then the browser will ever show you. For example, with one of the ACS issues I saw in Fiddler that the response included details that said the POST message was incorrectly formatted. Ah, yeah, that's a lot more useful than "page not found', which doesn't make sense to begin with. Or with Facebook, we discovered that in Fiddler the response actually said you're redirecting back to an invalid or untrusted URI. Yeah, that's a lot more useful than just giving me a 400 error and saying bad request.
So that's the point - when you get to these apparent dead ends, fire up Fiddler and look at the details of the responses to try and find actual useful details about what has happened.
Vittorio Bertocci (@vibronet) reported his promotion to Principal Program Manager in the identity product team in a Ch-ch-ch-changes post of 7/11/2011:
[Dave, forgive me for lifting your headline. it’s just too good a fit for the occasion]
Claims based identity has been my passion for the last few years, or at least the one passion I have I could talk about in public: and talked about it I have, at literally hundreds of events big and small, in form of samples, hands-on labs, whitepapers, articles, videos, books; to customers, partners, students, colleagues, journalists and anybody who would care (or pretend) to listen. In the years in which I have been the identity evangelist, claims-based identity has gone from arcane code samples that few brave would would dare picking up to a fully mainstream technology, recognized by everybody and used by many, with the shift to the cloud providing even further acceleration. I am not taking any credit for it, mind you, just stating some facts.
As much as I’m excited to jump on this new adventure, I cannot help but feel a sting of sadness in leading the Evangelism group. Through the 6 years I’ve been working there, I’ve received nothing but trust in me and my ideas, and empowerment to put them in practice. I have learned a ton and grew really a lot: who would have thought that I went from being incomprehensible to nearly everyone to get #2 spot among the PDC10 speakers, #6 at TechEd EU 10, deliver keynotes in fronts of thousands, and many other great personal satisfactions I would have never thought within my reach?
If you would have told me back in 2005, when I moved to the US, I would have told you you are nuts. I am convinced this is largely thanks to my immediate team: I’ve been lucky to share meeting room and backstages with a long series of peers and leaders, many of whom I now call friends. Thank you guys, I have learned so much from all of you!
What does this change mean to you, my loyal reader? At least at first, not much. I was focused on identity, developers and the cloud, and that’s what I will be keep focusing on. I’ll keep showing up at events, albeit considerably less often (goodbye, Diamond status with Delta!).
There is a pipeline of deliverables I contributed to, which will progressively surface during the next few weeks as part of the output of the Windows Azure Evangelism Team: I’ll blog about it, as usual.
After that, you’ll likely no longer see posts on big samples (a’ la FabrikamShipping or Umbraco integration). Most of my energies will go directly in the product (tools, SDK samples, etc), hence that’s what I’ll talk about (when the time is right, of course). I will also come back to some of the more abstract posts I was used to write few years back, and I will ask much more often for your input!
In fact, I want to start RIGHT NOW. Here there’s a short survey on WIF and ACS, which I’ve been circulating with some MVPs and would like to open to everyone now. This is your chance to let us know what we need to improve: take advantage of it, while my enthusiasm for new challenges is at its peak!

Andy Cross (@andybareweb) described Hello World with Azure AppFabric Caching Service (v1.0) in a 7/11/2011 post:
The Windows Azure AppFabric provides middleware services that can be combined to build scalable, speedy cloud applications. The Azure AppFabric Caching Service is a distributed, in-memory application cache that is abstracted to the point where next to no management is required for the user to consume it. Simply plug in your data and accelerate.
Without delving into the details of how the AppFabric Caching Service works, it is best to summarise it as a way of storing and retrieving the same objects or data between multiple Windows Azure Instances, standalone applications or services. They AppFabric Caching Service is not tied to Windows Azure and you can use it from anywhere, but for the purpose of this blog we will use it in a basic Web Role.
Sign up and Configuration
Firstly, set up our account, and then we must configure our access to the AppFabric Caching Service. This is done by using the http://windows.azure.com portal. Go to the “Service Bus, Access Control and Caching” option found at the bottom left of the screen.

How to find Caching details
Once you have done this, you will be presented with a blank screen, waiting for you to set up services within the Azure AppFabric. Click on the Cache child of the AppFabric options:

Click here!
Next we need to create a new Cache within AppFabric, to allow us to separate our cached data from everyone else.

Click to create a new Cache
The screen will display a series of options, such as the service name that you want to give your cache. Fill this screen in as you wish:

Details of new Cache service
Once you click “Create Namespace”, the Azure AppFabric Service will be created. It may take a few moments, in my case it took around 60 seconds. In the meanwhile, the screen will show the progress of the setup action.

Setup beginning

ActivatingActive
From this point on, the cache is ready for you to access. All you need to do is setup your client and then start consuming your new cache.
Using an AppFabric Cache
By this point you have an active cache in your account, but nothing using it. For the purpose of this post, we will create a Console Application, connect it to the cache and consume it. I chose to use a Console Application as it runs completely outside of the Azure runtime (either dev or server fabrics). This is a proof that you can use the Azure AppFabric cache in any legacy system or in an Azure system with no difference. The only considerations you may have are to latency ; the Azure data centres will have lower latency to Azure AppFabric Cache than a console application running on your local machine.
To begin, we will create a Console Application and add an app.config into it.

Create a Console ApplicationAdd an app.config to the application
Now that we have a skeleton project, our next task is to configure the application by putting details into its App.config file.
Go back to the Windows.Azure.com portal, and click on the “View Client Configuration” button.

A very helpful button
This will show a sample configuration file that we can then copy into our project.

A very helpful screen!
You can select the details in this window by clicking and dragging over the text. Once you have this, you can copy it with Ctrl+C, and then paste it into the app.config file you created earlier.

The copied app.config
There are some parts of this document that you don’t want in this example. The sessionState and outputCache nodes are for web applications, and aren’t relevat to us. Delete these sections.

Delete this for our use
This makes our app.config a bit trimmer!

Now we can start writing some code!

A quick bit of coding later...
We soon run into problems looking for Microsoft.ApplicationServer.Caching, Microsoft.ApplicationServer.Caching.Core and System.Web. The first two you can find in C:\Program Files\Windows Azure AppFabric SDK\V1.0\Assemblies\NET4.0\Cache, the latter you can find in your reference assemblies.

A couple of build errorsAdd a reference and then a using statement...We're good to go!
Add the rest of our Program:

The rest of our program
Run the console application!
If you have any connectivity issues (maybe a local firewall or similar, you might get an error like this:

A network firewall blocks my traffic
Once you remedy this (hint: talk to your network admin!) it should be smooth sailing
")
"world" is my program saying hello
Running the program multiple times shows that it actually has to “remove” the previously added keys in order for it to proceed. Otherwise an error is thrown where a key is found in the cache already. You can easily debug the application to see this.
Here is my source: CachingConsoleApp
Studio Pešec (@studiopesec) posted Windows Azure AppFabric Queue Quick-start on 6/28/2011 (missed when published):
In this installment, we’ll take a look at how to use AppFabric Queues. We’ll start with taking a look at what queues are, and what topics are, and most importantly, why we need it. We will try and examine a couple real-world examples and try and implement a simple example.
Sometimes you want to allow your services to communicate directly via HTTP (using WCF for example), and sometimes you want to write logic to communicate via a database. But one important communication type is a queue. A queue can be useful for decoupling, scalability and extensibility.
1. Decoupling & scalability
Suppose we are writing a web application that allows its visitors to submit a tax report. The submission has a deadline. It is around that date that the usage of the application usually spikes. Most of the times, the application (front-end) does not need to perform any complicated processing, it just needs to register the submission, the submitter and the time.
A typical load on a deadline-haunted application.
The application is usually hosted on different servers than the application that performs the actual processing of the submission. If we decouple these two systems using a queue, we can achieve (1) load balancing on our application servers; they only dequeue the submissions when they finish processing the previous one, and (2) scalability. Because we just enqueue a submission, we can have several back-end servers dequeuing. Due to the nature of the queue, these can be transactional, so if we loose a server during the processing of a submission it can be returned to the queue and picked up by another server. With some careful monitoring of the queue, we can also fine-tune our hosted solution by either spinning new instances (if running in the cloud) or adding more servers (if hosted on-premise).
Another important part is decoupling the functionality on a per-queue basis. For example, while the front-end application takes the submission, there might be more than one different actions that need to be taken. For example, a submission needs to be processed, the submitter needs to be credited with a certain amount of points or logged to have performed an action. The application can simply enqueue two messages in two separate queues (or in AppFabric Topics, but we’ll get to that later) and someone will handle the processing without the front-end needing to know anything about it.
2. Extensibility through decoupling
The same decoupling mechanics also bring an important feature, extensibility. Because the two parts of our system are separated – decoupled, we can change either one of them without affecting the other. But it also means that the two parts don’t have to be written in the same language, using the same technology etc. They don’t even have to be located in the same physical location. This gives the developers great flexibility.
3. Queues, topics, subscriptions, pub/sub
Microsoft’s Queue offerings, while they consisted of MSMQ were missing a crucial part of the messaging infrastructure present for a long time in the competition. It was an enqueue/dequeue based model, nothing more. There was one entry point, and without some loops, one exit point. Sure, you could get around with using multiple queues as above, but there has always been a better way – a topic-based system.
Wikipedia says:
In a topic-based system, messages are published to "topics" or named logical channels. Subscribers in a topic-based system will receive all messages published to the topics to which they subscribe, and all subscribers to a topic will receive the same messages. The publisher is responsible for defining the classes of messages to which subscribers can subscribe.
So, if we look back to our submission application, we already said we need to split the processing to two parts; one for the submission and one for our applicant. But why would we need the front-end application to be aware of this fact? We can have one queue, let’s call it ProcessingSystemQueue and one topic, TaxSubmissions. Why would we have one queue I hear you ask? Well, maybe there are several applications connected to the same back-end but performing different tasks… In any case, we create a topic. This is where our submissions will be going to. Our back-end processing applications will be our subscribers, creating subscriptions to the topic. We will have two, a SubmissionSubscription and ApplicantSubscription.
Thankfully, with AppFabric, Microsoft added support for these concepts.
4. Tax Submission Application
To demonstrate, we’ll create an MVC3 Intranet Application (I don’t want any special membership logic, but I need to be able to differentiate users). This application will be used to Submit a Tax Form. We will provide two views, the Submitters, and an Administrator’s view, that will allow processing the requests.
For making this easier to develop, we’ll run locally, but use the AppFabric anyway. I will be using the AppFabric Labs, which is a free playground.
In the Management portal, we start of with creating a New Namespace under the AppFabric Services. I will name my namespace TaxSample. When the namespace is activated, we can retrieve the required data – issuer, and key.
While we wait for the activation, we can install WindowsAzure.ServiceBus NuGet Package to our application.
As we do that, we return to collect the information for our new Namespace. If using the Labs subscription, click on the View under Default Key and note the information. I’ll add them to my Application’s Settings. Protip when working with Application Settings, make sure to Disable generate default value in code:
You need to do this for each setting individually. Thanks Microsoft. Right, now let’s get back to our application. I have noted three things, AzureIssuer, AzureKey and AzureNamespace. We will need all three to create a connection to AppFabric.
We will allow our users to submit a Refund request based on overpaid tax. To keep it simple, this is our view model:
[Serializable]
public class RefundRequest
{
[Display(Name = "Issuer")]
public string IssuerName { get; set; }
[Display(Name = "Reason for refund")]
public string Reason { get; set; }
[Display(Name = "Desired refund amount")]
public decimal Amount { get; set; }
}
Notice how it’s decorated with a Serializable attribute? You’ll see why later…
We create a RequestController, and add a Refund action and two accompanying views (one for get and one for post). Now comes the magic part. In the post action, we need to submit the message to our queue for processing.
var message = Microsoft.ServiceBus.Messaging.BrokeredMessage.CreateMessage(request);
QueueHelper.SubmitMessage(message);
Funny guy, I know. Now, to dive into the code above, the CreateMessage part creates a BrokeredMessage with the RefundRequest as the message’s payload. This is why the Serializable attribute was on the RefundRequest model. You will probably notice, in the API, that the parameter says serializableObjects.
The QueueHelper is something I wrote to try and get most of the code into one place, to help you study the example.
public static void SubmitMessage(BrokeredMessage message)
{
var topicClient = _messagingFactory.CreateTopicClient(TopicName);
using (var sender = topicClient.CreateSender())
{
sender.Send(message);
}
topicClient.Close();
}
You need a messaging factory already created, which implies having a service URI, credentials, etc. I have written a method, named SetUpTopicAndSubscriptions(); but I initially wanted it to run on Application_Start. However, this revealed a bug/design decision made by the AppFabric Team. My workaround for this was to create a static constructor (my QueueHelper class is already static) and call the SetUp there. It’s a safe assumption that at that time, the response object will already be available.
public static void SetUpTopicAndSubscriptions()
{
try
{
// create credentials first
var credentials =
TransportClientCredentialBase
.CreateSharedSecretCredential(
Settings.Default.AzureIssuer,
Settings.Default.AzureKey);
// create a service URI
 var uri = ServiceBusEnvironment.CreateServiceUri("sb",
Settings.Default.AzureNamespace, String.Empty);
// namespace client & messaging factory
_nameSpaceClient = new ServiceBusNamespaceClient(uri, credentials);
_messagingFactory = MessagingFactory.Create(uri, credentials);
// create the topic (this is our first failing point)
_topic = _nameSpaceClient.CreateTopic(TopicName);
// add subscriptions to the topic, if it was created
_submissionSub = _topic.AddSubscription(SubmissionSubscription);
_applicantSub = _topic.AddSubscription(ApplicantSubscription);
}
catch (MessagingEntityNotFoundException) { }
catch (MessagingEntityAlreadyExistsException)
{
_topic = _nameSpaceClient.GetTopic(TopicName);
_submissionSub = _topic.GetSubscription(SubmissionSubscription);
_applicantSub = _topic.GetSubscription(ApplicantSubscription);
}
}
This is the main logic of creating the topic. I’ve taken the liberty to emphasize a part of the code that creates the service URI. The reason for this is that the third argument, the Service Path, would allow you to specify a direct service path, e.g. sb://mynamespace.appfabriclabs.com/ServicePath, but the functionality does not work much as expected (it throws an Endpoint not found when you create a sender, even though it works when you create a Topic) and will supposedly be removed in the next version of the API.
Now that we have managed to send a message, we should probably be able to read something from the queue. In order to facilitate this process and keep it simple, we will implement a non-real-world example, where a message is dequeued on a request of a Review Page. I intentionally didn’t want to use an intermediate database etc.,
Here is the GetNextMessage code:
public static BrokeredMessage GetNextMessage(string subscriptionName)
{
SubscriptionClient client;
if (subscriptionName == ApplicantSubscription)
{
client = _messagingFactory.CreateSubscriptionClient(_applicantSub);
}
else if (subscriptionName == SubmissionSubscription)
{
client = _messagingFactory.CreateSubscriptionClient(_submissionSub);
}
else
{
throw new NotSupportedException(subscriptionName);
}
using (var reciver = client.CreateReceiver(<strong>ReceiveMode.PeekLock</strong>))
{
BrokeredMessage message;
if (reciver.TryReceive(TimeSpan.FromSeconds(5), out message))
{
// we'll complete the message, based on assumptions,
// don't do this in production code.
message.Complete();
return message;
}
else
{
return null;
}
}
}
In production code, we will usually call a method instead of return message; and based on the return value of that method, call Complete(), Defer() or DeadLetter() on the message. For the sake of simplicity, we kept it straightforward.
Another important part in the code is when you create the receiver, you are able to specify the receive mode. The mode can currently be either PeekLock or ReceiveAndDelete. The difference between the two is that with PeekLock, the messages are locked but remain in the queue until one of the three operations above is called (Complete, Defer, DeadLetter) while with ReceiveAndDelete, the message is removed from the queue immediately. For fault-tolerance, where you cannot afford to miss a message, you want to lock the message until you complete your processing; effectively making it a two stage process.
5. Trying the application yourself
We packaged the application in a downloadable zip so you can download it here. Make sure to edit the configuration file and input the settings (issuer name and key, as well as the service namespace you have created in the management application).
Special note:
For the sample application, make sure Windows Authentication is enabled. Please consult the MSDN documentation for more information.
Some good resources:


Studio Pešec is a software development organization in Ljubljana, Slovenia
Suren Machiraju described Using Azure AppFabric Service Bus from Ruby Apps in a 7/11/2011 post:
This article provides information on working with the Windows Azure AppFabric Service Bus from the Ruby programming language. This article assumes that you are familiar with Ruby, and have access to the Windows Azure AppFabric labs site (AppFabricLabs.com.) For more information on Ruby, see ruby-lang.org.
Introduction
Sure, for both the basics are building a REST client, but when it comes to the details such as what Ruby packages to use to communicate in ways that mimic what is done in the .NET samples, things may become more confusing than they need to be, primarily owing to a lack of documentation on this.
This blog will walk thru the high level pieces you need in order to leverage AppFabric Queues from Ruby. We will focus on leveraging Queues directly, but provide a complete library that includes support for Topics and Subscriptions (as well as code samples that show how to use them from Ruby).
We will also show how to implement a client in Ruby; the steps taken serve to illustrate what one would need to perform from other non-.NET languages which offer a REST enabled client – we intentionally try to keep the Ruby specifics to a minimum and emphasize the more universal REST aspects.
Example Scenario – A Simple Rails App
To drive the implementation, let’s think through a simple scenario that would be common for a Ruby on Rails application (see the figure below). Let’s say we have a web page that takes some input representing work to be performed and pushes it to an AppFabric Queue. A backend process pulls the enqueued item from the queue and processes it. In this blog, we show how you would build the communication for both sending messages to the queue from the web app and retrieving messages from the queue from within the worker process.
Want to Play Along?
Before we dive in, feel free to set yourself to follow along with the sample code, we won’t show too much code in the blog in an effort to emphasize the approach, but the sample contains the complete code. If you are a .NET developer programming in Visual Studio 2010, Ruby may be unfamiliar- but the setup is easy and we encourage you to try out the provided sample code. If you are an experienced Ruby developer, you can skip over the first of the setup steps and directly go to downloading and running the code (Steps 3 and 4).
Quick Environment Setup
- Ensure you have created your AppFabric ServiceBus namespace. Follow the instructions here.
- Download and Install Ruby 1.8.7. We suggest getting a distribution from RubyInstaller.org
- Next, install the Rails-Client gem (a gem is like an assembly or library). This gem provides a handy REST enabled Client that is used by the source code we provide to interact with the ACS and AppFabric Queue services. To install it, after installing Ruby, fire up a command prompt and run the following command:
gem install rest-client- The sample code as stand-alone Ruby files or the IronRuby (see the notes for additional information) project are available with this publication for download. .
- Open Program.rb and set your service namespace, service identity name and service identity password at the top, based on the values you acquired after setting up your namespace.
- Run the code by opening a command prompt (cmd.exe,) and navigating to the directory where you extracted the sample code, and then execute the following command:
ruby Program.rbYou should see output similar to the following:
Using scope URI of http://RubyQueue.servicebus.appfabriclabs.com
Authenticating via ACS
net.windows.servicebus.action=Listen%2cManage%2cSend&http%3a%2f%2fschemas.micros
oft.com%2faccesscontrolservice%2f2010%2f07%2fclaims%2fidentityprovider=https%3a%
2f%2fRubyQueue-sb.accesscontrol.appfabriclabs.com%2f&Audience=http%3a%2f%2fRubyQ
ueue.servicebus.appfabriclabs.com&ExpiresOn=1308769516&Issuer=https%3a%2f%2fruby
queue-sb.accesscontrol.appfabriclabs.com%2f&HMACSHA256=RqUmM7TYUd3KuA44V7n%2bOHV
dNTaQC11nmfOnubxwH8s%3d
Queue Management – Create Queue
……….
Overview of the Sample Code
The sample library has a handful of files providing support for Queues, Topics and Subscriptions. For this blog we will focus on these 4 ruby files that provide support for Queues:
Under the WAZ\AppFabric\ folder
- AccessControl.rb – helper library for using ACS v2 from Ruby to acquire Simple Web Tokens used in communicating with Queues.
- QueueClient.rb – helper library for sending messages to and receiving messages from Azure AppFabric Queues May 2011 CTP.
- QueueManagement.rb – helper library for creating, enumerating and deleting Queues with the Azure AppFabric Queues May 2011 CTP.
- Note 1: There are no hard coded paths in Program.rb. This folder structure is how Ruby deals with namespaces.
Note 2: The sample code is not repackaged as a GEM…since it’s not a library per se, but rather sample code that could become a good library.
Program.rb – a simple console application that walks thru all operations you might want to perform with Queues using REST:
- Authenticating with ACS to get a Simple Web Token
- Creating a new Queue
- Getting a single Queue Description
- Enumerating all Queues
- Sending a message to a Queue
- Atomically receiving and deleting the message
- Peek lock receiving a message
- Unlocking a peek-locked message
- Deleting a peek-locked message
- Deleting a Queue
- How to enable communication inspection with Fiddler by configuring the proxy
Note that the sample library is focused on using simple Queues and does not demonstrate how to use Topics or Subscriptions (though it is readily extended to this).
Sidebar – What about IronRuby?
IronRuby 1.1.3 provides Visual Studio integration for Ruby 1.9.2, but it does not implement the complete Ruby specification- and the limitations prevent running our sample code. You can, however, benefit from the syntax coloring and project templates by installing IronRuby and using it to edit your code or to read thru the samples we provide– just be sure to run your code using a more complete Ruby interpreter (like the one from RubyInstaller.org). An interesting aside, if you prefer to use IronRuby, you *could* theoretically use the .NET client assemblies for the Service Bus (as IronRuby enables you to call .NET code from Ruby), so you would probably not use the Rest Client we demonstrate here. For convenience, we include the sample code as an IronRuby project as well.
Sidebar – Can you run Ruby within Windows Azure?
What’s more, if you want to cloud host this code (or any Ruby on Rails application) you are completely able to within a Windows Azure Worker Role. I do plan to provide the sample code in a future blog, for now I list out the general steps below:
- Create a Visual Studio Cloud Project
- Include the Rails Application & Ruby Runtime Binaries in the Role (or install the runtime with a startup task)
- Create RoleEntryPoint that launches a Process which executes the ruby program or web server (like WEBrick) and keeps it alive (it can simply periodically check if the process is still running).
- Configure input endpoints to map to the ports on which the web server (e.g., WEBrick) is listening.
The link http://archive.msdn.microsoft.com/railsonazure has some additional details around this.
Send and Receive Communication
Let’s take a closer look at how communication actually happens in order for both the Ruby on Rails web application and the worker process to communicate with the Service Bus Queue in the manner described in the over view. The AppFabric Queues offer two approaches for receiving data from a Queue: one that retrieves and deletes the messages in a single operation and another that that enables you to lock a message and decide later whether to delete it or return it to the queue. We will look at both but begin by looking at the simpler case which retrieves and deletes a message from the queue as a single operation as shown in the figure below. The details of each step will be described in the sections that follow.
- ACS is the security mechanism for controlling interaction with the Service Bus. The Ruby logic running within the Rails web app needs to acquire an Access Token from the AppFabric Access Control service in order to use the Service Bus.
- ACS returns the token in the form of a Simple Web Token within the body of the response.
- The Ruby logic needs to extract just the WRAP SWT from the response and place it in the Authorization header when making a POST against the Queue. The payload of the message is wrapped in an entry and sent as the body of the POST.
- If successful, the Queue returns a 201 Created status code.
- Meanwhile, the Worker Process running some Ruby code also needs to request an access token from ACS.
- ACS provides the SWT in the same way as before.
- To retrieve and delete a message as an atomic operation, the worker process sends a DELETE request to the Queue, including the access token in the authorization header.
- When a message is present, a response with a code of 200 OK is returned, along with a body that contains the entry payload. The worker process can then take action on this message, which is no longer present in the queue.
Let’s take a look at the details behind this pattern of communication, starting with the authentication with ACS.
Authenticating via ACS
Before you can make your first call against AppFabric Queues, you will need to be able to authenticate with ACS. Let’s take a look at what it takes to perform some basic authentication with ACS using Ruby. The approach is to use ACS’s support for Simple Web Tokens.
This amounts to constructing a request that looks like the following:
Sample ACS Token Request
POST https://rubytest-sb.accesscontrol.appfabriclabs.com/WRAPv0.9/ HTTP/1.1
Accept: */*; q=0.5, application/xml
Content-Type: application/x-www-form-urlencoded
Accept-Encoding: gzip, deflate
Content-Length: 140
Host: rubytest-sb.accesscontrol.appfabriclabs.com
wrap_name=owner&wrap_password=xwCOTgOHT%2Fw8daI9mhCA8Vm0SlKYPKZojYfYCafsRaU%3D&wrap_scope=http%3A%2F%2Frubytest.servicebus.appfabriclabs.com
Within this request the key items are to:
- Use a POST verb
- Set the Content-Type header to:
application/x-www-form-urlencoded- Target the WRAP endpoint of ACS, at:
https://{serviceNamespace}-sb.accesscontrol.appfabriclabs.com/WRAPv0.9/- Include your namespace’s Issuer as the wrap_name in the body
- Include your namespace’s Key as wrap_password in the body.
- Include your namespace as the wrap_scope in the body.
Next, you need to extract the token from the response. The complete response looks like the following:
Sample ACS Token Response
HTTP/1.1 200 OK
Cache-Control: private
Content-Type: application/x-www-form-urlencoded; charset=us-ascii
Server: Microsoft-IIS/7.0
Set-Cookie: ASP.NET_SessionId=sjnd1145ejbpynmkcmtdlj55; path=/; HttpOnly
X-AspNetMvc-Version: 2.0
X-AspNet-Version: 2.0.50727
X-Powered-By: ASP.NET
Date: Mon, 30 May 2011 19:08:48 GMT
Content-Length: 544
wrap_access_token=net.windows.servicebus.action%3dListen%252cManage%252cSend%26http%253a%252f%252fschemas.microsoft.com%252faccesscontrolservice%252f2010%252f07%252fclaims%252fidentityprovider%3dhttps%253a%252f%252frubytest-sb.accesscontrol.appfabriclabs.com%252f%26Audience%3dhttp%253a%252f%252frubytest.servicebus.appfabriclabs.com%26ExpiresOn%3d1306783728%26Issuer%3dhttps%253a%252f%252frubytest-sb.accesscontrol.appfabriclabs.com%252f%26HMACSHA256%3d7u4ZYF2M%252fX8qLg2meV2xASQT00np536D6JaSEKjAB%252bI%253d&wrap_access_token_expires_in=1200
The value you are after for the access token is only the portion that follows wrap_access_token and does not include the wrap_access_token_expires value. You also have to URL-decode this value. From the previous request, the final decoded SWT value we are after looks like:
net.windows.servicebus.action=Listen%2cManage%2cSend&http%3a%2f%2fschemas.microsoft.com%2faccesscontrolservice%2f2010%2f07%2fclaims%2fidentityprovider=https%3a%2f%2frubytest-sb.accesscontrol.appfabriclabs.com%2f&Audience=http%3a%2f%2frubytest.servicebus.appfabriclabs.com&ExpiresOn=1306783739&Issuer=https%3a%2f%2frubytest-sb.accesscontrol.appfabriclabs.com%2f&HMACSHA256=ebfBpf%2fCKEoIxEqXzFtImTv2Z8Zk9NhqHvtjB%2fKv8b0%3d
Ruby Code
The Ruby code which implements this request and extracts the token from the response is shown in the complete listing for the AccessControl.rb (shown at the end of this blog). Getting a token from ACS in Ruby, then amounts to making the following calls (from Program.rb):
scopeUri = WAZ::AppFabric::AccessControl.get_scope(serviceNamespace)
accessToken = WAZ::AppFabric::AccessControl.get_access_token(serviceNamespace, scopeUri, serviceIdentityName, serviceIdentityPassword)
With this, we have the token necessary to begin communicating with the Queue. Note that these tokens eventually expire, so if you will be caching this value, you may have to build logic to periodically renew the token by repeating the request. �
Queue Runtime – Sending Messages
Now the application is ready to send messages to the queue. This amounts to constructing a request that looks like the following:
Sample Send to Queue Request
POST https://rubytest.servicebus.appfabriclabs.com/testqueue/messages HTTP/1.1
Accept: */*; q=0.5, application/xml
Content-Type: application/atom+xml;type=entry;charset=utf-8
Accept-Encoding: gzip, deflate
Authorization: WRAP access_token=”net.windows.servicebus.action=Listen%2cManage%2cSend&http%3a%2f%2fschemas.microsoft.com%2faccesscontrolservice%2f2010%2f07%2fclaims%2fidentityprovider=https%3a%2f%2frubytest-sb.accesscontrol.appfabriclabs.com%2f&Audience=http%3a%2f%2frubytest.servicebus.appfabriclabs.com&ExpiresOn=1306783739&Issuer=https%3a%2f%2frubytest-sb.accesscontrol.appfabriclabs.com%2f&HMACSHA256=ebfBpf%2fCKEoIxEqXzFtImTv2Z8Zk9NhqHvtjB%2fKv8b0%3d”
Content-Length: 110
Host: rubytest.servicebus.appfabriclabs.com
<entry xmlns=’http://www.w3.org/2005/Atom’><content type=’application/xml’>Hello, from Ruby!</content></entry>
Within this request the key steps are to:
- Use the POST verb
- Set the Content-Type header to:
application/atom+xml;type=entry;charset=utf-8- Target the queue by name by posting to:
https://{serviceNamespace}.servicebus.appfabriclabs.com/{queueName}/messages- Include the previously acquired access token in the Authorization header. This has a very particular form for the value which is (note the space after WRAP, it’s not an underscore):
WRAP access_token=”{access token value}”- The body of the request needs to include the message content in an envelope that looks like the following:
<entry xmlns=’http://www.w3.org/2005/Atom’>
<content type=’application/xml’>
{message content}
</content>
</entry>A successful response to this will take the following form:
Sample Send to Queue Response
HTTP/1.1 201 Created
Content-Type: application/xml; charset=utf-8
Server: Microsoft-HTTPAPI/2.0
Date: Mon, 30 May 2011 19:08:59 GMT
Content-Length: 0
Ruby Code
The implementation for this is straightforward, consisting of the send, generate_send_request_uri, generate_queue_payload and generate_request as shown in the full listing of QueueClient.rb (provided at the end of this blog). Therefore sending a message to the AppFabric Queue from Ruby simply becomes this (as shown in Program.rb):
sendMessageResponse = WAZ::AppFabric::QueueClient.send(serviceNamespace, queueName, accessToken,
‘Hello, from Ruby!’)Queue Runtime – Receiving Messages
Now that we have a message in the queue, our worker process will need to be able to retrieve it. As we said previously, there are two approaches.
Receive & Delete Retrieval
Here we show how to retrieve and delete the message in a single operation. This is accomplished by making a request of the following form:
Sample Receive & Delete Request
DELETE https://rubytest.servicebus.appfabriclabs.com/testqueue/messages/head?timeout=60 HTTP/1.1
Accept: */*; q=0.5, application/xml
Accept-Encoding: gzip, deflate
Authorization: WRAP access_token=”net.windows.servicebus.action=Listen%2cManage%2cSend&http%3a%2f%2fschemas.microsoft.com%2faccesscontrolservice%2f2010%2f07%2fclaims%2fidentityprovider=https%3a%2f%2frubytest-sb.accesscontrol.appfabriclabs.com%2f&Audience=http%3a%2f%2frubytest.servicebus.appfabriclabs.com&ExpiresOn=1306783739&Issuer=https%3a%2f%2frubytest-sb.accesscontrol.appfabriclabs.com%2f&HMACSHA256=ebfBpf%2fCKEoIxEqXzFtImTv2Z8Zk9NhqHvtjB%2fKv8b0%3d”
Content-Length: 0
Host: rubytest.servicebus.appfabriclabs.com
The key points to structuring this request are:
- Use the DELETE verb
- Target the head of the messages in the desired queue by submitting to the following URL. The timeout represents an HTTP long polling feature where the server will hold the request waiting for a message to appear until the specified time elapses. The timeout value is specified as an integer without units (like “30″ for a thirty second timeout).
https://{serviceNamespace}.servicebus.appfabriclabs.com/{queueName}/messages/head?timeout={time}- Include the previously acquired access token in the Authorization header.
A successful response to this will include the next message from the head of the queue and take the following form:
Sample Receive & Delete Response
HTTP/1.1 200 OK
Content-Type: application/atom+xml;type=entry;charset=utf-8
Server: Microsoft-HTTPAPI/2.0
X-MS-DELIVERY-COUNT: 0
X-MS-LOCKED-UNTIL: Mon, 30 May 2011 19:09:30 GMT
X-MS-MESSAGE-ID: fa42914d3f7b4a8abc8437d29e9a3c03
X-MS-SEQUENCE-NUMBER: 1
X-MS-SIZE: 110
Date: Mon, 30 May 2011 19:08:59 GMT
Content-Length: 110
<entry xmlns=’http://www.w3.org/2005/Atom’><content type=’application/xml’>Hello, from Ruby!</content></entry>
Ruby Code
Our sample library shows this approach in Ruby, as implemented by the receive method in QueueClient.rb (shown in the complete listing at the end of this blog). With that in place, using Ruby to retrieve and delete a message looks like the following:
receiveMessageResponse = WAZ::AppFabric::QueueClient.receive(serviceNamespace, queueName, accessToken)
Peek-Lock Retrieval
Now, let’s look at an alternative approach to retrieving a message, whereby the worker process instead must explicitly delete the message when it has completed its processing. Moreover, it only has a specific window of time (say 30 seconds) in which to delete the message or the Queue automatically makes the message available to another caller (as you might desire in case the worker process that originally acquired the message crashed before completion). If the worker process determines it cannot process the message, it could elect to unlock the message and thereby explicitly release the message back into the queue (perhaps for another attempt). This form of retrieving a message is referred to as a Peek-Lock and completion is signaled by a call to Delete the Peek Locked Message and releasing the message by calling Unlock.
Let’s start with the approach for Peek-Lock retrieval. This is a request that takes the form:
Sample Peek-Locked Request
POST https://rubytest.servicebus.appfabriclabs.com/testqueue/messages/head?timeout=60 HTTP/1.1
Accept: */*; q=0.5, application/xml
Accept-Encoding: gzip, deflate
Authorization: WRAP access_token=”net.windows.servicebus.action=Listen%2cManage%2cSend&http%3a%2f%2fschemas.microsoft.com%2faccesscontrolservice%2f2010%2f07%2fclaims%2fidentityprovider=https%3a%2f%2frubytest-sb.accesscontrol.appfabriclabs.com%2f&Audience=http%3a%2f%2frubytest.servicebus.appfabriclabs.com&ExpiresOn=1306783739&Issuer=https%3a%2f%2frubytest-sb.accesscontrol.appfabriclabs.com%2f&HMACSHA256=ebfBpf%2fCKEoIxEqXzFtImTv2Z8Zk9NhqHvtjB%2fKv8b0%3d”
Content-Length: 0
Host: rubytest.servicebus.appfabriclabs.com
Within this request, the key steps are:
- Use the POST verb
- Target the head of the messages in the desired queue by submitting to the following URL (it’s the same URL used by the Receive and Delete). Again specify a timeout for HTTP long polling:
https://{serviceNamespace}.servicebus.appfabriclabs.com/{queueName}/messages/head?timeout={time}- Include the previously acquired access token in the Authorization header.
A successful request, when a message is present, will return a response similar to the following:
Sample Peek-Locked Response
HTTP/1.1 200 OK
Content-Type: application/atom+xml;type=entry;charset=utf-8
Server: Microsoft-HTTPAPI/2.0
X-MS-MESSAGE-LOCATION: https://rubytest.servicebus.appfabriclabs.com/testqueue/Messages/5743357095e34fe59cf8f9d9b16366ea
X-MS-LOCK-ID: 0c23bb07-1ffb-4c9d-89a0-ed7d3df2c71f
X-MS-LOCK-LOCATION: https://rubytest.servicebus.appfabriclabs.com/testqueue/Messages/5743357095e34fe59cf8f9d9b16366ea/0c23bb07-1ffb-4c9d-89a0-ed7d3df2c71f
X-MS-DELIVERY-COUNT: 0
X-MS-LOCKED-UNTIL: Mon, 30 May 2011 19:09:30 GMT
X-MS-MESSAGE-ID: 5743357095e34fe59cf8f9d9b16366ea
X-MS-SEQUENCE-NUMBER: 2
X-MS-SIZE: 110
Date: Mon, 30 May 2011 19:08:59 GMT
Content-Length: 110
<entry xmlns=’http://www.w3.org/2005/Atom’><content type=’application/xml’>Hello, from Ruby!</content></entry>
Before you move on to processing the message body, you should capture the values of the X-MS-MESSAGE-ID and X-MS-LOCK-ID headers. Then go ahead and process the message body. When you have completed processing successfully (and want to delete the peek-locked message from the queue), you need to send a request similar to the following:
Sample Delete Request
Accept: */*; q=0.5, application/xml
Accept-Encoding: gzip, deflate
Authorization: WRAP access_token=”net.windows.servicebus.action=Listen%2cManage%2cSend&http%3a%2f%2fschemas.microsoft.com%2faccesscontrolservice%2f2010%2f07%2fclaims%2fidentityprovider=https%3a%2f%2frubytest-sb.accesscontrol.appfabriclabs.com%2f&Audience=http%3a%2f%2frubytest.servicebus.appfabriclabs.com&ExpiresOn=1306783739&Issuer=https%3a%2f%2frubytest-sb.accesscontrol.appfabriclabs.com%2f&HMACSHA256=ebfBpf%2fCKEoIxEqXzFtImTv2Z8Zk9NhqHvtjB%2fKv8b0%3d”
Content-Length: 0
Host: rubytest.servicebus.appfabriclabs.com
The key parts to constructing this request are:
- Use the DELETE verb
- Target the specific message and lock by providing the message id and lock id values captured previously in the request URL:
https://{serviceNamespace}.servicebus.appfabriclabs.com/{queuePath}/messages/{messageId}?lockId={lockId}- Include the previously acquired access token in the Authorization header.
A successful response to this request should be of the form:
Sample Delete Peek-Locked Message Response
HTTP/1.1 200 OK
Content-Type: application/xml; charset=utf-8
Server: Microsoft-HTTPAPI/2.0
Date: Mon, 30 May 2011 19:09:00 GMT
Content-Length: 0
Ruby Code
The QueueClient.rb with its peekLock and deletePeekedMessage methods implement this logic in Ruby. Using the QueueClient then takes the following pattern (from Program.rb):
peeklockMessageResponse = WAZ::AppFabric::QueueClient.peeklock(serviceNamespace, queueName, accessToken)
messageId = peeklockMessageResponse.headers[:x_ms_message_id]
lockId = peeklockMessageResponse.headers[:x_ms_lock_id]
deletelockedMessageResponse = WAZ::AppFabric::QueueClient.deletePeekedMessage(serviceNamespace, queueName, accessToken, messageId, lockId)
If instead of deleting the message, you wish to unlock it, you must send a request of the form:
Sample Unlock Request
Accept: */*; q=0.5, application/xml
Accept-Encoding: gzip, deflate
Authorization: WRAP access_token=”net.windows.servicebus.action=Listen%2cManage%2cSend&http%3a%2f%2fschemas.microsoft.com%2faccesscontrolservice%2f2010%2f07%2fclaims%2fidentityprovider=https%3a%2f%2frubytest-sb.accesscontrol.appfabriclabs.com%2f&Audience=http%3a%2f%2frubytest.servicebus.appfabriclabs.com&ExpiresOn=1306783739&Issuer=https%3a%2f%2frubytest-sb.accesscontrol.appfabriclabs.com%2f&HMACSHA256=ebfBpf%2fCKEoIxEqXzFtImTv2Z8Zk9NhqHvtjB%2fKv8b0%3d”
Content-Length: 0
Host: rubytest.servicebus.appfabriclabs.com
The key parts to this request are:
- Use the DELETE verb
- Target a slightly different URL which names both the message id and lock id previously acquired. Notice it includes the lock id in the path instead of as a query parameter as was done for deleting a peek locked message:
https://{serviceNamespace}.servicebus.appfabriclabs.com/{queuePath}/messages/{messageId}/{lockId}- Include the previously acquired access token in the Authorization header.
The successful response to this request is the same (HTTP 200 OK) as that shown for the Delete Peek-Locked Message.
Ruby Code
Again, the QueueClient.rb shows the complete Ruby implementation, you would call it as follows (as shown in Program.rb):
peeklockMessageResponse = WAZ::AppFabric::QueueClient.peeklock(serviceNamespace, queueName, accessToken)
messageId = peeklockMessageResponse.headers[:x_ms_message_id]
lockId = peeklockMessageResponse.headers[:x_ms_lock_id]
unlockMessageResponse = WAZ::AppFabric::QueueClient.unlockPeekedMessage(serviceNamespace, queueName, accessToken, messageId, lockId)
Queue Management – Creating, Inspecting and Deleting Queues
Beyond enabling run-time operations, the REST API to the Service Bus Queues also enables you to create, delete and inspect queue metadata. Given what we’ve already shown how to use the runtime operations, using these features will appear as old-hat. Requests need to first acquire an access token from ACS and then call the appropriate method. Let’s take a look at these.
Creating Queues
If a purely non-.NET scenario, someone would need to create the queue for our web app or worker process to use.
Creating a queue is performed by building a request as follows:
Sample Creating a Queue Request
PUT https://rubytest.servicebus.appfabriclabs.com/testqueue HTTP/1.1
Accept: */*; q=0.5, application/xml
Content-Type: application/atom+xml;type=entry;charset=utf-8
Accept-Encoding: gzip, deflate
Authorization: WRAP access_token=”net.windows.servicebus.action=Listen%2cManage%2cSend&http%3a%2f%2fschemas.microsoft.com%2faccesscontrolservice%2f2010%2f07%2fclaims%2fidentityprovider=https%3a%2f%2frubytest-sb.accesscontrol.appfabriclabs.com%2f&Audience=http%3a%2f%2frubytest.servicebus.appfabriclabs.com&ExpiresOn=1306783739&Issuer=https%3a%2f%2frubytest-sb.accesscontrol.appfabriclabs.com%2f&HMACSHA256=ebfBpf%2fCKEoIxEqXzFtImTv2Z8Zk9NhqHvtjB%2fKv8b0%3d”
Content-Length: 693
Host: rubytest.servicebus.appfabriclabs.com
<entry xmlns=’http://www.w3.org/2005/Atom’><content type=’application/xml’><QueueDescription xmlns:i=”http://www.w3.org/2001/XMLSchema-instance” xmlns=”http://schemas.microsoft.com/netservices/2010/10/servicebus/connect”> <LockDuration>PT30S</LockDuration> <MaxQueueSizeInBytes>104857600</MaxQueueSizeInBytes> <RequiresDuplicateDetection>false</RequiresDuplicateDetection> <RequiresSession>false</RequiresSession> <DefaultMessageTimeToLive>P10675199DT2H48M5.4775807S</DefaultMessageTimeToLive> <DeadLetteringOnMessageExpiration>false</DeadLetteringOnMessageExpiration> <DuplicateDetectionHistoryTimeWindow>PT10M</DuplicateDetectionHistoryTimeWindow></QueueDescription></content></entry>
The key parts to creating a new Queue request are:
- Use the PUT verb
- Target a URL that includes the namespace and name of the queue you wish to create.
https://{serviceNamespace}.servicebus.appfabriclabs.com/{queuePath}- Include the previously acquired access token in the Authorization header.
- Set the Content-Type to
application/atom+xml;type=entry;charset=utf-8Send a queue description in the body of the message. A queue description has the form (see the MSDN documentation for details on each field):
<entry xmlns=’http://www.w3.org/2005/Atom’>
<content type=’application/xml’>
<QueueDescription xmlns:i=\”http://www.w3.org/2001/XMLSchema-instance\” xmlns=\”http://schemas.microsoft.com/netservices/2010/10/servicebus/connect\”>
<LockDuration>PT30S</LockDuration>
<MaxQueueSizeInBytes>104857600</MaxQueueSizeInBytes>
<RequiresDuplicateDetection>false</RequiresDuplicateDetection>
<RequiresSession>false</RequiresSession>
<DefaultMessageTimeToLive>P10675199DT2H48M5.4775807S</DefaultMessageTimeToLive>
<DeadLetteringOnMessageExpiration>false</DeadLetteringOnMessageExpiration>
<DuplicateDetectionHistoryTimeWindow>PT10M</DuplicateDetectionHistoryTimeWindow>
</QueueDescription>
</content>
</entry>Ruby Code
The logic for queue management is within the QueueManagement.rb file, and create_queue is the method which can be called to create the new Queue. For example, creating a new queue looks as follows in Ruby:
createQueueResponse = WAZ::AppFabric::QueueManagement.create_queue(serviceNamespace, queueName, accessToken)
Queue Descriptions & Enumerating Queues
Once a queue is created, the queue descriptions can be retrieved later. This can be useful to verify configuration or to see the values applied to queues created using default settings.
A request for a particular queue within a namespace is built to the form:
Sample Getting a Queue Description Request
GET https://rubytest.servicebus.appfabriclabs.com/testqueue HTTP/1.1
Accept: */*; q=0.5, application/xml
Accept-Encoding: gzip, deflate
Authorization: WRAP access_token=”net.windows.servicebus.action=Listen%2cManage%2cSend&http%3a%2f%2fschemas.microsoft.com%2faccesscontrolservice%2f2010%2f07%2fclaims%2fidentityprovider=https%3a%2f%2frubytest-sb.accesscontrol.appfabriclabs.com%2f&Audience=http%3a%2f%2frubytest.servicebus.appfabriclabs.com&ExpiresOn=1306783739&Issuer=https%3a%2f%2frubytest-sb.accesscontrol.appfabriclabs.com%2f&HMACSHA256=ebfBpf%2fCKEoIxEqXzFtImTv2Z8Zk9NhqHvtjB%2fKv8b0%3d”
Content-Length: 0
Host: rubytest.servicebus.appfabriclabs.com
The key parts to this request are:
- Use the GET verb
- Target the queue by name:
https://{serviceNamespace}.servicebus.appfabriclabs.com/{queueName}- Include the previously acquired access token in the Authorization header.
The successful response to this takes the form (notice the queue description in the response body):
Sample Getting a Queue Description Response
HTTP/1.1 200 OK
Content-Type: application/atom+xml;type=entry;charset=utf-8
Server: Microsoft-HTTPAPI/2.0
Date: Mon, 30 May 2011 19:08:59 GMT
Content-Length: 980
<entry xmlns=”http://www.w3.org/2005/Atom”><id>https://rubytest.servicebus.appfabriclabs.com/testqueue</id><title type=”text”>testqueue</title><published>2011-05-30T19:08:58Z</published><updated>2011-05-30T19:08:58Z</updated><author><name>rubytest</name></author><link rel=”self” href=”https://rubytest.servicebus.appfabriclabs.com/testqueue”/><content type=”application/xml”><QueueDescription xmlns=”http://schemas.microsoft.com/netservices/2010/10/servicebus/connect” xmlns:i=”http://www.w3.org/2001/XMLSchema-instance”><LockDuration>PT30S</LockDuration><MaxQueueSizeInBytes>104857600</MaxQueueSizeInBytes><RequiresDuplicateDetection>false</RequiresDuplicateDetection><RequiresSession>false</RequiresSession><DefaultMessageTimeToLive>P10675199DT2H48M5.4775807S</DefaultMessageTimeToLive><DeadLetteringOnMessageExpiration>false</DeadLetteringOnMessageExpiration><DuplicateDetectionHistoryTimeWindow>PT10M</DuplicateDetectionHistoryTimeWindow></QueueDescription></content></entry>
Similarly, a list of descriptions for all queues at a certain point in the namespace’s hierarchy can be achieved with:
Sample Enumerating All Queue Descriptions Request
GET https://rubytest.servicebus.appfabriclabs.com/$Resources/Queues HTTP/1.1
Accept: */*; q=0.5, application/xml
Accept-Encoding: gzip, deflate
Authorization: WRAP access_token=”net.windows.servicebus.action=Listen%2cManage%2cSend&http%3a%2f%2fschemas.microsoft.com%2faccesscontrolservice%2f2010%2f07%2fclaims%2fidentityprovider=https%3a%2f%2frubytest-sb.accesscontrol.appfabriclabs.com%2f&Audience=http%3a%2f%2frubytest.servicebus.appfabriclabs.com&ExpiresOn=1306783739&Issuer=https%3a%2f%2frubytest-sb.accesscontrol.appfabriclabs.com%2f&HMACSHA256=ebfBpf%2fCKEoIxEqXzFtImTv2Z8Zk9NhqHvtjB%2fKv8b0%3d”
Content-Length: 0
Host: rubytest.servicebus.appfabriclabs.com
The key parts to this request are:
- Use the GET verb
- Target the special $Resources/Queues path
https://{serviceNamespace}.servicebus.appfabriclabs.com/$Resources/QueuesInclude the previously acquired access token in the Authorization header.
The successful response to this contains all the queue descriptions for that level in the namespace hierarchy:
Sample Enumerating All Queue Descriptions Response
HTTP/1.1 200 OK
Content-Type: application/atom+xml;type=feed;charset=utf-8
Server: Microsoft-HTTPAPI/2.0
Date: Mon, 30 May 2011 19:08:59 GMT
Content-Length: 1258
<feed xmlns=”http://www.w3.org/2005/Atom”><title type=”text”>Queues</title><id>https://rubytest.servicebus.appfabriclabs.com/$Resources/Queues</id><updated>2011-05-30T19:08:59Z</updated><link rel=”self” href=”https://rubytest.servicebus.appfabriclabs.com/$Resources/Queues”/><entry xml:base=”https://rubytest.servicebus.appfabriclabs.com/$Resources/Queues”><id>https://rubytest.servicebus.appfabriclabs.com/testqueue</id><title type=”text”>testqueue</title><published>2011-05-30T19:08:58Z</published><updated>2011-05-30T19:08:58Z</updated><author><name>rubytest</name></author><link rel=”self” href=”../testqueue”/><content type=”application/xml”><QueueDescription xmlns=”http://schemas.microsoft.com/netservices/2010/10/servicebus/connect” xmlns:i=”http://www.w3.org/2001/XMLSchema-instance”><LockDuration>PT30S</LockDuration><MaxQueueSizeInBytes>104857600</MaxQueueSizeInBytes><RequiresDuplicateDetection>false</RequiresDuplicateDetection><RequiresSession>false</RequiresSession><DefaultMessageTimeToLive>P10675199DT2H48M5.4775807S</DefaultMessageTimeToLive><DeadLetteringOnMessageExpiration>false</DeadLetteringOnMessageExpiration><DuplicateDetectionHistoryTimeWindow>PT10M</DuplicateDetectionHistoryTimeWindow></QueueDescription></content></entry></feed>
Ruby Code
Within QueueManagement.rb, this logic is exposed by the get_queue and list_queues methods. Their use is as follows:
getQueueResponse = WAZ::AppFabric::QueueManagement.get_queue(serviceNamespace, queueName, accessToken)
listQueuesResponse = WAZ::AppFabric::QueueManagement.list_queues(serviceNamespace, accessToken)
Deleting Queues
There are limits to the number of queues that you can create, and one way to manage that is to delete unused queues.
You delete a queue by creating a request with the following structure:
Sample Delete Queue Request
DELETE https://rubytest.servicebus.appfabriclabs.com/testqueue HTTP/1.1
Accept: */*; q=0.5, application/xml
Accept-Encoding: gzip, deflate
Authorization: WRAP access_token=”net.windows.servicebus.action=Listen%2cManage%2cSend&http%3a%2f%2fschemas.microsoft.com%2faccesscontrolservice%2f2010%2f07%2fclaims%2fidentityprovider=https%3a%2f%2frubytest-sb.accesscontrol.appfabriclabs.com%2f&Audience=http%3a%2f%2frubytest.servicebus.appfabriclabs.com&ExpiresOn=1306783739&Issuer=https%3a%2f%2frubytest-sb.accesscontrol.appfabriclabs.com%2f&HMACSHA256=ebfBpf%2fCKEoIxEqXzFtImTv2Z8Zk9NhqHvtjB%2fKv8b0%3d”
Content-Length: 0
Host: rubytest.servicebus.appfabriclabs.com
The key parts to constructing this request are:
- Use the DELETE verb
- Target the queue by namespace and queue name:
https://{serviceNamespace}.servicebus.appfabriclabs.com/{queueName}- Include the previously acquired access token in the Authorization header.
The successful response to this request is the same (HTTP 200 OK) as that shown for the Delete Peek-Locked Message.
Ruby Code
Within QueueManagement.rb, this logic is exposed by the delete_queue method and is used as follows:
deleteQueueResponse = WAZ::AppFabric::QueueManagement.delete_queue(serviceNamespace, queueName, accessToken)
Limitations to using REST Clients with Service Bus Queues
Compared to using the AppFabric Service Bus with the .NET client provided by the Azure AppFabric SDK, a REST client has some limitations (in the current CTP form) that apply to more advanced features. For the purposes of sending to and receiving from Queues, Topics or Subscriptions the REST API are simple, powerful and all you need. For details on the specific limitations, see the documentation.
Examining Communication with Fiddler
The source code of Program.rb contains the following line commented out:
###### OPTIONAL: Enable the Fiddler Proxy (if running Fiddler) #########
#RestClient.proxy = “http://127.0.0.1:9999/”
#########################################################################
If you want to use Fiddler debugging proxy to monitor HTTP traffic between your local Ruby application and the AppFabric Queues or ACS, start by installing Fiddler from http://www.fiddler2.com/fiddler2/ and configure the port to listen on in the Fiddler Options (as shown in the screenshot below).
After setting the port, uncomment the RestClient.proxy line in Program.rb and set the port value. For example, if the port is 9999, then the code would look like:
###### OPTIONAL: Enable the Fiddler Proxy (if running Fiddler) #########
RestClient.proxy = “http://127.0.0.1:9999/”
#########################################################################
Note: Port 9999 is more convenient for .NET developers running Azure emulator so that it and Fiddler don’t conflict.
Ruby Source Code
The complete listing for the sample client application in Program.rb and the three files that make up the Queue client library are [available in the original post]. …
Sample Code
Available for download from here:
- Stand-alone Ruby files [AppFabricQueuesRubyClientV2.zip]
- IronRuby [AppFabricQueuesRubyClient_IronRuby.zip]
Conclusion
The blog article shows how to access Service Bus Queues from Ruby using the sample. Additionally the article also provides information on obtaining authentication tokens from Windows Azure AppFabric ACS, as operations against the AppFabric Service Bus require authentication.
Note: There are a few frowny face icons in the code snippets occurring everywhere we have :x. The Word blogging platform I am using is interpreting the :x sequence as an image. I tried marking these code sections as “code” formatting however is not correcting that problem. Once I figure this out, I will update the article.
Acknowledgements
Significant contributions of Manuel Ocampo, Larry Franks, Tim Wieman, Valery Mizonov and Zoiner Tejada are acknowledged.


<Return to section navigation list>
Windows Azure VM Role, Virtual Network, Connect, RDP and CDN
No significant articles today.
<Return to section navigation list>
Live Windows Azure Apps, APIs, Tools and Test Harnesses
Steve Fox announced New SharePoint and Windows Azure Developer Training Kit Ships! in a 7/12/2011 post:
This is now the third release of the SharePoint and Windows Azure training kit, which adds four additional modules:
Using Windows Azure Blob Storage with SharePoint 2010
This unit provides an overview of Windows Azure Data Storage and various Blob storage related artifacts and interfaces. It also explains how to integrate Azure Blobs with SharePoint 2010 for elastic storage.
Azure Hosted Application Design Pattern for SharePoint
This unit explains the Windows Azure Hosted Application Design Pattern and associated development patterns. It also explains the SharePoint 2010 Sandbox Solutions and challenges associated with it.
Using Windows Azure with SharePoint Event Handlers
This unit introduces Azure Worker Roles and details how to call and communicate with Worker Roles from a SharePoint Event Handler.
Using Windows Azure with SharePoint Workflow
This unit explains how to call and communicate with Worker Roles from a Workflow. It also introduces Pluggable Services and how to use it with Azure Worker Roles.
You can download the newly updated kit today from here: http://msdn.microsoft.com/en-us/spazuretrainingcourse.

Kevin Kell posted Interoperability in the Cloud to the Learning Tree blog on 7/7/2011 (missed when posted):
One of the nice things about cloud computing is that it allows for choice.
That is, I am free to choose from any and all available technologies at any time. Yes, vendor lock-in is a concern, but I am not really that concerned about it! Here’s why: In the cloud, there are almost always multiple ways to make something work. A bold assertion perhaps, but here is what I mean.
Let’s say you come from a Windows programming background. Let’s say you want to deploy a simple contact management application to the Cloud. Cool. The Azure Platform has you covered. You could easily create and deploy your app to Azure. Probably you need some kind of persistent storage and, being a relational database kind of person, you choose SQL Azure.
So, here is that app: http://mycontacts.cloudapp.net/ (you may see a certificate warning you can ignore — I assure you the site is safe!)

Now let’s say you really like the relational database that SQL Azure offers, but, for some reason, you don’t want to host your application on Windows Azure. Why not? Well, for one thing, it may be too expensive, at least for what you want to do right now. How can we reduce the startup cost? Sure, if this application goes viral you may need to scale it … but for now what? Maybe you could choose to deploy to an EC2 t1.micro Instance, monitor it, and see what happens.
So, here is that app: http://50.18.104.190/MyContacts/:

If some readers recognize this application as one created with Visual Studio LightSwitch they are correct! The same app has been seamlessly deployed both to Azure and EC2 right from within Visual Studio. They both hit the same backend database on SQL Azure.
Here are the Economics:

There are differences, of course. Azure is a PaaS whereas EC2 is IaaS. If you are unclear on the difference please refer to this excellent post by my colleague Chris Czarnecki.
The point is developers (and organizations) have choice in the cloud. Choice is a good thing. In the future perhaps I will port the front end to Java and host it on Google App Engine, but that is a topic for another time!
Go ahead … add yourself to my contacts. Let’s see how this thing scales!
Screen captures added.
Maarten Balliauw (@maartenballiauw) described A hidden gem in the Windows Azure SDK for PHP: command line parsing in a 7/11/2011 post:
It’s always fun to dive into frameworks: often you’ll find little hidden gems that can be of great use in your own projects. A dive into the Windows Azure SDK for PHP learned me that there’s a nifty command line parsing tool in there which makes your life easier when writing command line scripts.
Usually when creating a command line script you would parse $_SERVER['argv'], validate values and check whether required switches are available or not. With the Microsoft_Console_Command class from the Windows Azure SDK for PHP, you can ease up this task. Let’s compare writing a simple “hello” command.
Command-line hello world the ugly way
$command = null;
$name = null;

if (isset($_SERVER['argv'])) {
    $command = $_SERVER['argv'][1];
}

// Process "hello"
if ($command == "hello") {
    $name = $_SERVER['argv'][2];
    echo "Hello $name";
}
Pretty obvious, no? Now let’s add some “help” as well:
$command = null;
$name = null;

if (isset($_SERVER['argv'])) {
    $command = $_SERVER['argv'][1];
}

// Process "hello"
if ($command == "hello") {
    $name = $_SERVER['argv'][2];
    echo "Hello $name";
}
if ($command == "") {
    echo "Help for this command\r\n";
    echo "Possible commands:\r\n";
    echo " hello - Says hello.\r\n";
}
To be honest: I find this utter clutter. And it’s how many command line scripts for PHP are written today. Imagine this script having multiple commands and some parameters that come from arguments, some from environment variables, …
Command-line hello world the easy way
With the Windows Azure for SDK tooling, I can replace the first check (“which command do you want”) by creating a class that extends Microsoft_Console_Command. Note I also decorated the class with some special docblock annotations which will be used later on by the built-in help generator. Bear with me :-)
/**
 * Hello world
 *
 * @command-handler hello
 * @command-handler-description Hello world.
 * @command-handler-header (C) Maarten Balliauw
 */
class Hello
    extends Microsoft_Console_Command
{
}
Microsoft_Console_Command::bootstrap($_SERVER['argv']);
Also notice that in the example above, the last line actually bootstraps the command. Which is done in an interesting way: the arguments for the script are passed in as an array. This means that you can also abuse this class to create “subcommands” which you pass a different array of parameters.
To add a command implementation, just create a method and annotate it again:
/**
 * @command-name hello
 * @command-description Say hello to someone
 * @command-parameter-for $name Microsoft_Console_Command_ParameterSource_Argv --name|-n Required. Name to say hello to.
 * @command-example Print "Hello, Maarten":
 * @command-example   hello -n="Maarten"
 */
public function helloCommand($name)
{
    echo "Hello, $name";
}
Easy, no? I think this is pretty self-descriptive:
- I have a command named “hello”
- It has a description
- It takes one parameter $name for which the value can be provided from arguments (Microsoft_Console_Command_ParameterSource_Argv). If passed as an argument, it’s called “—name” or “-n”. And there’s a description as well.
To declare arguments, I’ve found that there’s other sources for them as well:
- Microsoft_Console_Command_ParameterSource_Argv – Gets the value from the command arguments
- Microsoft_Console_Command_ParameterSource_StdIn – Gets the value from StdIn, which enables you to create “piped” commands
- Microsoft_Console_Command_ParameterSource_Env – Gets the value from an environment variable
The best part: help is generated for you! Just run the script without any further arguments:
(C) Maarten Balliauw

Hello world.

Available commands:
  hello                     Say hello to someone

    --name, -n              Required. Name to say hello to.


    Example usage:
      Print "Hello, Maarten":
      hello -n="Maarten"

  <default>, -h, -help, help Displays the current help information.
Magic at its best! Enjoy!
Best of luck, Vittorio, in your new position.
<Return to section navigation list>
Visual Studio LightSwitch and Entity Framework 4.1+
Beth Massi (@bethmassi) explained Relating and Editing Data from Multiple Data Sources on the Same Screen in LightSwitch on 7/11/2011:
In my last article I showed how to connect LightSwitch to SharePoint data in order to pull users’ Task Lists into your LightSwitch applications. If you missed it:
Using SharePoint Data in your LightSwitch Applications
There we created a screen that pulled up the logged in users’ tasks from SharePoint so they could modify them directly. We created a new screen to do this which presented just the data from SharePoint. In this post I want to show you how you can relate SharePoint data to data stored in the database and then present that on a single screen. There are a couple lines of code you need to write when you want to edit data from multiple data sources regardless if that data is coming from SharePoint or another data source like an external database. For a video demonstration of this technique please see: How Do I: Save Data from Multiple Data Sources on the Same Screen?
Relating Entities Across Data Sources
One of the most compelling features in LightSwitch is its ability to relate entities (tables or lists) across disparate data sources. For instance you could have a product catalog database which only stores product details and relate that to another table in a completely separate order management database. Or you could relate a list of issues stored in SharePoint to a customer table in a database. In this example I’m going to do just that, I want to display Customer Issues stored in SharePoint on the same screen as my Customer details stored in my database.
So I’ve set up a list called Customer Issues based on the Issues template in SharePoint. I’ve modified the list to also include an additional required text field called Customer ID.
We’ll use this to relate the Customer record in our database. For this example, we’ll auto-generate the CustomerID in LightSwitch to be a GUID (global unique identifier) but you could choose to use any field shared across the data sources. So I’ve created a Customer table in my LightSwitch application with the following properties:
Notice in the properties window that I’ve also set the CustomerID property to be included in the Unique Index and unchecked Display by Default since we are going to auto generate this value. Drop down the Write Code button at the top of the designer and select the Customer_Created method and write this code:
Private Sub Customer_Created()
    Me.CustomerID = Guid.NewGuid.ToString
End Sub
Next we need to connect to SharePoint and relate our CustomerIssue list to the Customer. As I showed in the last post you can connect to SharePoint by right-clicking on the Data Sources node in the Solution Explorer (or click the “Attach to External Data Source” button at the top of the Data Designer), then select SharePoint as the data source type. Click Next and specify your SharePoint site address. LightSwitch will present all the Lists defined in the site. I’ll select CustomerIssues and that will automatically pull in the UserInformationList since this is related to CustomerIssues.
Click Finish and this will display the CustomerIssue entity in the Data Designer. Next we need to set up the relation to our Customer table. Click the “Relationship” button at the top of the designer and in the To column select Customer. Then you will need to select the Foreign and Primary keys below. This is the CustomerID field we added which is the “Primary” or unique key on the Customer.
Notice that a dotted line is drawn between related entities across data sources. This means that LightSwitch cannot enforce the referential integrity of the data but it can relate the data together. In other words, we cannot prohibit the deletion of a Customer if there are still Issues in SharePoint but we can relate the data together if it exists.
Creating Screens with Multiple Data Sources
Creating a screen that displays data across multiple data sources is a no brainer – it’s the same steps you would use for any other data in the system. Click the “Screen” button at the top of the Data Designer or right-click on the Screens node in the Solution Explorer to add a new screen. For this example I’ll use the List and Details Screen. Select the Customer as the screen data and include the CustomerIssues.
At this point let’s hit F5 to build and run the application and see what we get so far. Create some new customers in the system. Notice however that the CustomerIssues grid is read only. At this point we can’t edit any of the SharePoint data, notice how all the Add, Edit, Delete buttons are disabled.
Why is this happening? The reason is because LightSwitch needs some more information from us in order to save the data properly. Specifically, it needs to know the order in which to save the data. LightSwitch can’t arbitrarily pick an order because in most systems the order is very important. In our case I want to make sure the Customer data is saved successfully before we attempt to save any issues to SharePoint.
Enabling Editing of Data from Multiple Data Sources
What we need to do is write a couple lines of code. Close the application and go back to the CustomerListDetail screen we created. Drop down the Write Code button and select the CustomerListDetail_InitializeDataWorkspace and CustomerListDetail_Saving methods to create the stubs. In the InitializeDataWorkspace method you should notice a parameter saveChangesTo. This parameter is used to tell the screen to enable editing of the data, we just need to add the data sources we want to work with to the list. Then in the Saving method we need to specify the order in which we want to save the changes. To access the data sources you use the DataWorkspace object.
Public Class CustomersListDetailPrivate Sub CustomersListDetail_InitializeDataWorkspace( saveChangesTo As System.Collections.Generic.List(Of Microsoft.LightSwitch.IDataService)) saveChangesTo.Add(Me.DataWorkspace.ApplicationData) saveChangesTo.Add(Me.DataWorkspace.Team_SiteData) End Sub Private Sub CustomersListDetail_Saving(ByRef handled As Boolean) Me.DataWorkspace.ApplicationData.SaveChanges() Me.DataWorkspace.Team_SiteData.SaveChanges() handled = True End Sub End ClassNow run the application again and this time you will be able to add, edit and delete Customer Issues and save them to SharePoint. And if you look in SharePoint you will see that LightSwitch automatically set the CustomerID for us as specified by the relationship.
By the way, this technique is not specific to SharePoint. You can relate data from other external data sources like databases as well and the same code would need to be added in order to support saving across them on a single screen. LightSwitch does almost all of the heavy lifting for us but it’s important in this case to be explicit about how our data is updated so that it ends up being saved correctly in any scenario.


Paul Patterson listed Microsoft LightSwitch – Top 10 Fundamentals for LightSwitch Newbies on 7/11/2011:
Who doesn’t like lists? Well here is a top ten list of recommended learnings for all you aspiring (Newbie) developers who want to take a dive into the shallow end of the Microsoft Visual Studio LightSwitch pool.
If I were to talk to someone who has little or no software development experience, here is the list of things that I would recommend they should first understand before firing up LightSwitch…
1. Patience and Perseverance
Be patient, and persevere! It’s only a freakin’ computer. It’s not like it whispers how much it loves you nor swaddles you during an episode of Bones! (Unless you live in a more liberal country like Amsterdam where they have mechanical devices for all sorts of things.)
Personally, I learn best from first making mistakes or learning from others who have already made the mistakes. Like it or not, you are going to make mistakes, but if you do you are going to certainly learn from them. It was a long time ago that I accepted that I will make mistakes when dealing with technology. It’s in my nature to break things and then try to put them back together. Sometimes breaking things represents the “mistake” that I need to fix. If you learn to accept that mistakes will be made, then the learning will happen much more easily.
2. What is a Database
Microsoft LightSwitch is a software development tool that takes a data centric approach to building applications. Understanding today’s database design concepts will go a long way to helping you feel more comfortable with what you are doing in LightSwitch.
Understanding fundamental concepts such as; the types of data, tables, queries, and relationships is key to designing the data for your LightSwitch application. LightSwitch presents the development environment to you in a data centric way, so understanding these concepts will make for a much more intuitive sense when using the designer dialogues and windows.
3. Business Rules and Requirements
Do not put the cart before the horse. You need to understand why you are creating an application, and for what reason. It is way to easy to build the perfect something for the wrong reasons.Without even thinking about how the application will look, think about what you want for the application, and why. Write it down if necessary. Then step away and then come back to it later. Don’t go down a path only to find you are going in the wrong direction. It will take that much more time to go back and get back on the right path. Time is money!
4. What is a LightSwitch Application
Understand the fundamental features of LightSwitch. At a high-level, get to know the features of LightSwitch and the type of applications you can build with it. Then ask yourself, ”Is LightSwitch the right tool for the job?”
You may already have the tools that could easily satisfy your requirements. Maybe Microsoft Access could do the job, or maybe a simple Excel workbook could take care of the problem. Using any development tool comes at a cost, so why spend money and resources on something that may not even be necessary.
Conversely, will you be able to do everything you want to do using LightSwitch?
5. Visual Studio
Microsoft Visual Studio is the integrated development environment (the “IDE”) used for LightSwitch. Understanding the way Visual Studio looks and feels will make you feel much more comfortable when you start using the development tools.
6. The (LightSwitch) Development Approach
Like I said before, LightSwitch uses a “data centric” approach to application development. This means that data is first defined and then the screens are designed to use the data. Understanding this is important to understanding LightSwitch.
7. Security
LightSwitch provides for some really intuitive features that allow you to easily implement security in your application – if you want it. If you need to create security for your application, I would recommend that you gain a fundamental understand of “role-based” security. In a nuts shell, options for configuring security in LightSwitch consists of; authenticating a user into the application (logging on) and authorizing the user to do stuff in the application (like adding or editing data). Roles can be created and assigned users, from which the roles can then be defined with specific authorization (such as accessing specific screens, for example).
- Microsoft LightSwitch Security – Microsoft
- Implementing Security in a LightSwitch Application – Beth Massi
8. Inputs and Outputs
Understanding the difference between inputs (what goes into the “system”) and what is output (what the system spits out) can be a challenge for some. People often confuse inputs with outputs, and vice versa. For the most part, it is the inputs that need to be defined for anything that needs to be stored in a database. The outputs are those bits of data that are resulted from a process or function in the application; such as a calculated value based on one or more inputs. As a general rule of thumb, I tell people that if a piece of data can be derived from one or more existing data inputs, then that piece of data can be considered an output.
9. Reporting
Next to designing the data, and the screens to capture the data, reporting will arguably be the most requested requirement of a LightSwitch application. Most LightSwitch applications will be to created for the purpose of capturing information that will be later reported on. LightSwitch has built-in capabilities to report on data, such as exporting in formats such as CSV and Excel. For printed reports, you will need to have some level of understanding of report fundamentals, such as; report sections, groupings, and formatting options.
10 Additional LightSwitch Resources
Unless you are psychic, or have the patience to make a LOT of mistakes before getting things right, chances are you’ll need some help from people smarter than you (or with more permanent facial scars from breaking things in a bigger way and more often).
There are buckets of information out there for LightSwitch. Do a simple Google search for “Microsoft LightSwitch” and you’ll find plenty of resources that you can leverage and learn from (my own site included).
- Index of LightSwitch Articles on PaulSPatterson.com
- LightSwitch Forums – Microsoft
- Microsoft LightSwitch – Microsoft
- LightSwitch Help Website – Michael Washington
- Alessandro Del Sole
And don’t be afraid to ask questions. Don’t assume that you are the only person out there trying something unique. As the LightSwitch community evolves, so will the amount of collective knowledge that will be available. There are lots of people out there who are more than willing to hold your hand while you learn to walk.
If you are a newbie, what kinds of questions would you want to know? If you are a seasoned pro and you happened upon this post, tell me what words of wisdom would you pass on to the those who have not yet been hazed by the development team veterans? I would love to hear from you.
The ADO.NET Team announced availability of EF 4.1 Language Packs in a 7/11/2011 post:
A while back we announced the release of Entity Framework 4.1 (EF 4.1). Today we are making a series of language packs available that provide localized resources for EF 4.1.
What’s a Language Pack?
The language packs add a set of localized resources to an existing EF 4.1 install. Each language pack contains the following localized resources:
- Intellisense files for DbContext and Code First API surface
Once installed these are automatically picked up by Visual Studio based on your culture settings- Satellite assembly containing localized exception messages
Once installed the localized messages are picked up at runtime based on the culture of the executing application- DbContext item templates for Model First & Database First
Once installed these are automatically picked up by Visual Studio based on your culture settingsWhat Languages?
Language packs are available in the following languages:
- Chinese (Simplified)
- Chinese (Traditional)
- French
- German
- Italian
- Japanese
- Korean
- Russian
- Spanish
Installing Language Packs
You can install one or more language packs by downloading a standalone installer, the language packs require you to have EF 4.1 installed.
Support
This release can be used in a live operating environment subject to the terms included in the installer. The ADO.NET Entity Framework Forum can be used for questions relating to this release.
Return to section navigation list>
Windows Azure Infrastructure and DevOps
Eric Knorr asserted “Software as a service and big data get the buzz, but the hottest area of the cloud is dev, test, and deploy -- at a faster and larger scale than ever” in a deck for his What the cloud really means for developers post of 7/11/2011 to InfoWorld’s Modernizing IT blog:
If indeed we are headed for a future in the cloud, developers are the big winners. And I'm not talking about that relatively small number of developers who frequent a PaaS (platform as a service) like Azure, CloudFoundry, Force.com, or Google App Engine. I'm talking about everyday dev and test infrastructure for whatever big new app needs to be built and deployed across hundreds or thousands of servers in private or public clouds.
Traditionally, developers have had a fraught relationship with operations. Sure, programmers do much of the coding on their own machines, but when it's time to get serious about an enterprise-grade application, someone has to stand up the testing environment to ensure availability, reliability, and scalability of the application, not to mention security. Operations people, who have other stuff on their plates, tend to be tasked with the job -- and sometimes they don't quite nail down the specific requirements needed for a real-world test.
That can lead to applications that are not properly tested before they're deployed. Yes, developers can be sloppy -- or sometimes too demanding -- in specifying their requirements, so I'm not saying that it's all ops' fault. But the point is: There has to be a better way than laborious manual deployment and configuration of such environments.
In fact, the most practical use of cloud computing today is to provide developers with the self-service tools they need to provision their own dev and test environments, either in a private cloud, a generic IaaS (infrastructure as a service) cloud such as Amazon Web Services, or in a PaaS cloud. On the private cloud side, HP and IBM even have appliance-like blade servers configured for precisely this purpose. Typically, you get a preinstalled app server, workflow tools, resource monitoring, and other stuff you need to get work under way.
Read more: next page ›
Herman Mehling asked “What are the best -- and least risky -- ways to embrace the public cloud for your business-critical apps? Read on” in a deck for his 3 Tips for Deploying Business-critical Apps on the Public Cloud article of 7/11/2011 for DevX.com (site registration required):
Many organizations realize there are significant advantages to moving their business-critical applications to the public cloud. With competitive pressures becoming stronger all the time, the heat is on to make development cycles more agile and applications more dynamic.
One of the most famous companies running its business-critical apps in the public cloud is Netflix, which is currently running thousands of nodes on Amazon EC2.
"Netflix realized it could not innovate rapidly if it stayed in the data center," says Boris Livshutz, senior engineer, AppDynamics. "Netflix needed the public cloud to drive explosive growth. Many companies have come to the same conclusion and are rushing to join Netflix in the cloud."
But, you might ask, what are the best and least risky ways to embrace the public cloud and maximize the cloud's much-touted benefits?
Livshutz offers some tips.
Public Cloud Deployment Tip #1. Use Performance Analytics
There is no easy way to predict your application's performance on cloud resources. With such technical names as "small," "medium," and "large," how can you even begin to estimate capacity needs for your application? The cloud is a mysterious place with computing resources that bear no resemblance to the systems in the data center, and a successful transition will require arduous analysis.
Livshutz recommends using analytics on top of Application Performance Management (APM) data.
"You can do all this in a few straightforward steps," he says. "By comparing performance data from your current application to that from your test environment in the cloud, you can accurately estimate your cloud capacity requirements."
Public Cloud Deployment Tip #2. Compare Data Center and Cloud Capacities
First, you need access to performance data from your APM system. Second, you need to test your app with simulated load on the cloud environment that you intend to use. Most importantly, your APM system must run on both old and new environments and record the performance characteristics.
The idea, says Livshutz, is to compare the capacity of a machine in a data center against the capacity of computing nodes in the cloud to discover just how many nodes you'll need to match the performance of your data center.
"To do this, you compare the throughput of a single application running in your data center against the throughput for the new cloud environment," he says.
The unit of measurement to use for this is RATU (Response Acceptable Throughput per computing Unit).
"Once you decide what response-time is currently acceptable for your application, you can find the largest load that meets this limit within, say, 2 standard deviations," says Livshutz. "Then, divide this throughput number by the number of machines the application is running on. For simplicity, I'm assuming the hardware is uniform, but if it's not then you can compute a weighted average. " …
Read more: Next Page: Predicting Public Cloud App Performance ![]()
<Return to section navigation list>
Windows Azure Platform Appliance (WAPA), Hyper-V and Private/Hybrid Clouds
Mark Kromer (@mssqldude) asserted SQL Server Private Cloud – Not for VMs Only in a 7/11/2011 post:
I was working with a partner architect last week on a ideas for a SQL Server architecture that would best fit a large customer that we are working with. We both were starting from the same place in our architecture discussion of private cloud with automated database provisioning massive server consolidation.
What was interesting is that we both called this “private cloud”, yet he was assuming no virtualization – just automate the provisioning based on application catogorization and consolidate under specific SQL Server instances. I had the same ideas, but ASSUMED virtualization.
The moral of this story, for me anyway, is not get caught into thinking too black box, that is, that to achieve many of the same benefits of a virtualized private cloud, that you must fully adopt virtualization. Now that being said, I prefer VMs as a consolidation practices generally speaking, because of the OS isolation and elastic scale.
But a key think to remember is that you can still take advantage of overall data center automation with private cloud on bare metal database instances, not just virtualized. I was sent a link to this Charles Joy demonstration of using the beta of System Center’s new Orchestrator (formerly Opalis) which is automating SQL Server. So certainly VMs are not mandatory for many of the private cloud benefits.
Anuradha Shukla reported myhosting.com Leverages Microsoft to Launch Private Cloud Services in an 7/11/2011 post to the CloudTweaks blog:
myhosting.com is using Microsoft System Center Orchestrator (formerly Opalis) automation to launch private cloud services. The virtual hosting and virtual servers are accessible to individuals, small and mid-sized businesses and any company who want comprehensive web hosting services. Users will benefit from speed, stability and reduced downtime that are at the core of the newly expanded cloud hosting services.
Owned and managed by SoftCom Inc., myhosting.com is a privately held company headquartered in Toronto, Canada. SoftCom provides reliable and cost effective Email and Web Hosting services to more than 10 million customers with in 140 countries worldwide. The company notes that based on the Microsoft Dynamic Data Center Toolkit for Hosters, it provides high-availability Virtual Dedicated Services (VDS) that deliver flexible, scalable IT solutions for customers.
“Windows VDS and virtual server hosting services are designed to meet the demands of businesses that need servers to operate in the new cloud environments with minimal downtime,” said Jeremy Adams, product manager of myhosting.com.
myhosting.com worked with Microsoft and their partners to design an optimally configured Hyper-V cluster solution that ensured workload is seamlessly moved to an alternate virtual machine. This ensures that outages related to scheduled patching can be easily avoided.
“Existing customers of myhosting.com will benefit from improved service because of the addition of Microsoft’s Dynamic Data Center Toolkit to enhance myhosting.com’s Hyper-V based private cloud services,” said Anil Reddy, director, Microsoft Server and Tools Business. “In addition, myhosting.com will be able to reach a new breed of customer who previously hadn’t considered a hosted option. New customers will see the value in this highly available, scalable private cloud platform built on Windows Server Hyper-V.”
John Treadway (@JohnTreadway) posted The Hybrid Enterprise – Beyond the Cloud on 7/11/2011:
In the past few months we (at Unisys) have been rolling out a new strategic concept we call the Hybrid Enterprise. Normally I don’t use this forum to talk about Unisys but, as one of the lead authors of this strategy, in this case I’ll make an exception. The starting point for this hybrid enterprise concept is the realisation that cloud data center capabilities don’t replace traditional IT – at least not in the foreseeable future. They just add new models and resulting complexity.
We started with two primary models of infrastructure delivery – internal data centers and outsourcing/managed services. Now we add at least three more – internal private clouds, hosted private clouds and public clouds.
But it gets worse from there. There are many types of public clouds with many different operating models. If my company starts using clouds from Unisys, Amazon, Rackspace and Microsoft – they are all very different. Yet, for IT to really have a leading role in this movement, they all need to be embraced for appropriate use. And there are impacts across several areas: security, governance, application architectures and more.
The hybrid enterprise approach reflects the reality that end-user IT organizations are facing today. Cloud doesn’t make it easier to run IT – quite the opposite. But it’s still worth it.

<Return to section navigation list>
Cloud Security and Governance
No significant articles today.
<Return to section navigation list>
Cloud Computing Events
Joe Panettieri (@joepanettieri, pictured below) reported Microsoft’s Ballmer: Cloud Momentum Replaces Cloud Fears from Microsoft’s Worldwide Partner’s Conference (WPC) 2011 in Los Angeles:
Microsoft CEO Steve Ballmer today conceded that the company’s all-in cloud strategy initially was a bit scary. But partner fears have subsided as Microsoft’s cloud platforms have matured, Ballmer asserted today during his keynote at Microsoft Worldwide Partner Conference 2011 (WPC11) in Los Angeles. Moreover, more than 500 channel partners are now part of the Microsoft Cloud Accelerate program, Channel Chief Jon Roskill confirmed to Talkin’ Cloud this evening.
Ballmer and Roskill addressed roughly 12,000 channel partners earlier today — covering everything from Microsoft’s cloud strategy to next moves in the SMB market.
Reflecting on the 2010 partner conference, Ballmer said the “all in” cloud bet initially triggered fear, uncertainly and doubt among some channel partners. But in the past 12 months, Windows Azure, System Center, Visual Studio, Active Directory and other Microsoft services have gained key on-premise and cloud capabilities to give customers more flexibility to mix and match between public and private clouds, Ballmer asserted.
Meanwhile, Jenni Flinders, VP of US partner strategy and programs at Microsoft, is meeting with a range of MSPs and building deeper relationships with partners that understand recurring revenues but haven’t yet embraced Office 365, Talkin’ Cloud has heard. The VIP meetings include prime seating during Microsoft’s keynotes.
On the cloud compensation front, Microsoft will now pay cloud partners monthly rather than quarterly, Roskill confirmed to me this evening.
Attendance at WPC 2011 seems strong — there are 15,000 people here, roughly 12,000 of which are partners. But a healthy dose of cloud skepticism remains. Many partners are opting for third-party hosting providers because they don’t fully trust Microsoft’s billing and customer management strategies in the cloud.
Still, Roskill points to some clear successes in the cloud. Sometime this week, he notes, Microsoft will announce that 500 partners are now part of the Cloud Accelerate program. To join the program, partners must have at least three customers with a combined 500 users running various online services.
…
Read More About This Topic
Varun Chhabra of the Microsoft Server and Cloud Platform Team recommended Make the Most of Your WPC Experience in a 7/11/2011 post:
The 2011 Microsoft Worldwide Partner Conference (WPC) is kicking off today, and with over 12,000 attendees expected, it promises to be an exciting event. The Server and Cloud team at Microsoft has been working furiously over the last few months to make this a successful event for our partners. Over the next few days, our team will provide you regular updates about the announcements and events at WPC. As with all WPCs, there’s a lot going on at the event, so we’d like to highlight some locations and events that our core infrastructure partners will find useful.
- Breakout Sessions: You can find a complete list of the Server and Cloud breakout sessions here. Our sessions cover a variety of topics, ranging from the how the Private Cloud can help expand your business, to a preview of the benefits that the upcoming System Center 2012 release can bring to your infrastructure practice. Each session will have partner speakers featured as well, so be sure to add these sessions to your schedule builder!
- Private Cloud and Platform Servers Booth: Please visit our booth (#1221) in the Solutions Innovation Center. In addition to demos of our latest products, you will find some really exciting offerings there:
- In partnership with Microsoft, Global Knowledge (2011 Learning Partner of the Year) is offering partners who visit our booth a discount of at least 20% off the list price on qualifying Microsoft Virtualization and Systems Center courses across the world.
- In partnership with Dell and HP, we shall be running live Private Clouds in our booth. Come see a real private cloud in action!
- Happy Hour with Server and Tools Execs: Join us at the Server and Tools Lounge (located at LACC West near the entrance close to Staples Center) on Monday, July 11th from 4:30-6:30.
- Programs and offers: At WPC, we will be announcing a number of new programs for our partners – be sure to ask our team at the Private Cloud booth about:
- Private Cloud, Management and Virtualization DPS Program (PVDPS) - click here to find out more
- Changes to our Management and Virtualization Solution Incentive Program (SIP)
- The Cloud Assessment Tool
- The MPN Private Cloud Sales Specialist program
Stay up to date with the latest Server and Cloud information! Follow us on twitter (@MSServerCloud) on our blog (http://blogs.technet.com/b/server-cloud) and “Like” us on Facebook (http://www.facebook.com/Server.Cloud) to get access to WPC 2011 previews. And don’t forget tag your own twitter messages with #hyperv and #WPC11
Please remember that this is your event, and we want to hear from you! Please let us know what you liked, and didn’t like, at WPC 2011.We’ll be back over the next few days with many more updates for you.
<Return to section navigation list>
Other Cloud Computing Platforms and Services
John Treadway (@JohnTreadway) asked Citrix + Cloud.com = OpenStack Leadership? in a 7/12/2011 post to his CloudBzz blog:
TechCrunch reported today that Citrix has acquired Cloud.com for > $200m. This is a great exit for a very talented team at Cloud.com and I’m not surprised at their success. Cloud.com has had great success in the market, especially in the last 12 months. This is both in the service provider space and for internal private clouds. Great technology, solid execution.
Citrix has been a fairly active member in the OpenStack community, most recently with their Olympus Project announcement in May. The stated goal there is…
a tested and verified distribution of … OpenStack, combined with a cloud-optimized version of XenServer.
Cloud.com has also been visible in OpenStack though there has not been a lot of detail on their commitment. Cloud.com’s CloudStack is also a multi-hypervisor solution with support for vSphere and KVM in addition to XenServer. I would assume that to continue to be the case – selling in the enterprise means bowing to the reality of a VMware dominant position. However, I would expect an ever-tighter value prop with XenServer and that’s okay.
So will Citrix clarify the Cloud.com/OpenStack position? That’s almost a given and in-fact I do expect a strong push to dominate commercial OpenStack based on the feature/function lead that Cloud.com gives them. Given the support for other hypervisors, this does put more pressure on Piston as a startup targeting the OpenStack space. However, the Piston team is very smart (led by Joshua McKenty) and I would not worry about them just yet.
No matter what happens from here, it has to be a great day for the Cloud.com team. Savor it and enjoy – and then get back to work!
Jeff Barr (@jeffbarr) announced EC2 Spot Pricing - Now Specific to Each Availability Zone in a 7/11/2011 post to the Amazon Web Services blog:
We have made an important change to the way pricing works for EC2 Spot Instances. We are replacing the original Region-based pricing information with more detailed information that is specific to each Availability Zone. This change ensures that both the supply (the amount of unused EC2 capacity) and the demand (the amount and number of bids for the capacity) reflect the status of a particular Availability Zone, enabling you to submit bids that are more likely to be fulfilled quickly and to use Spot Instances in more types of applications.
As you may know, Spot Instances allow you to bid for unused EC2 capacity, often allowing you to significantly reduce your Amazon EC2 bill. After you place a bid, your instances continue to run as long as the bid exceeds the current Spot Market price. You can also create persistent requests that will automatically be considered again for fulfillment if you are ever outbid.
Over the last year and a half, our customers have successfully leveraged Spot Instances to obtain compute cycles at substantial discounts for use cases like batch processing, scientific research, image processing and encoding, data and web crawling, testing, and financial analysis. Here are some examples:
Social analytics platform BackType (full case study) uses Spot Instances to handle large-scale Hadoop-based batch data processing (tens of terabytes of data representing over 100 billion records). They have been able to reduce their costs by up to 66% when compared to On-Demand instances. Their Spot strategy includes placing high bids to reduce the chance of being interrupted (they pay the current price regardless of their bid, so this does not increase their operating costs).
Monitoring and load testing company BrowserMob (full case study) uses a combination of Spot and On-Demand instances to meet their capacity needs. Their provisioning system forecasts capacity needs 5 minutes ahead of time and submits suitably priced bids for Spot Instances, resorting to On-Demand instances as needed based on pricing and availability.
Biotechnology drug design platform Numerate (full case study) has incorporated Amazon EC2 as a production computational cluster and Amazon S3 for cache storage. Numerate enjoys around 50% cost savings by using Amazon EC2 Spot Instances after spending just 5 days of engineering effort.
Image rendering tool Litmus (full case study) takes snapshots of an email in various email clients and consolidates the images for their customers. Litmus enjoys a 57% cost savings by using Amazon EC2 Spot Instances for their compute needs.When Spot Instances were first launched, there was a Spot Price for each EC2 instance type and platform (Linux/Unix or Windows) in each Region:
This model worked well but we think we can do even better based on your feedback. We have made some improvements to the Spot Instance model to make it easier for you to implement a cost-effective bidding strategy.
- The market price for each type of Spot Instance is now specific to an Availability Zone, not a Region.
- We will now publish historical pricing for each Availability Zone. This change will provide fine-grained data that you can use to determine a suitable bid for capacity in a particular Availability Zone. Because this will make a great deal of additional data available to you, we have made an API change to allow you to paginate the results of the DescribeSpotPriceHistory function.
- Spot requests that target a particular Availability Zone now have a greater chance of being fulfilled.
With these changes you now have the information needed to do additional fine tuning of your Spot requests. In particular, we believe that these changes will allow you to more easily use Spot Instances for applications that are sensitive to latency or that need to run in a particular Availability Zone in order to be co-located with other services or data. For example, it will now be easier for AWS to run a set of Hadoop-based processed in the same Availability Zone, paving the way for you to use Spot Instances with Elastic MapReduce.
It’s easy to get started. Simply go to the AWS Management Console and launch an instance like normal. In the Request Instance Wizard, click the Request Spot Instance radio button to set your bid to the maximum that you are willing to pay for an instance hour of the desired instance type. Here's a screenshot of a persistent request for four Micro instances at a maximum price of $0.01 (one penny) per hour per instance:
I will look forward to hearing about the ways that you find to put Spot Instances to use in your application.
Read More:
- Werner Vogels: Spot Instances - Increased Control.
- EC2 Documentation: Introduction to Spot Instances.
- EC2 Spot Instances Home Page.
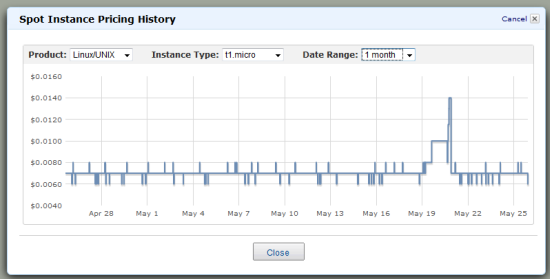
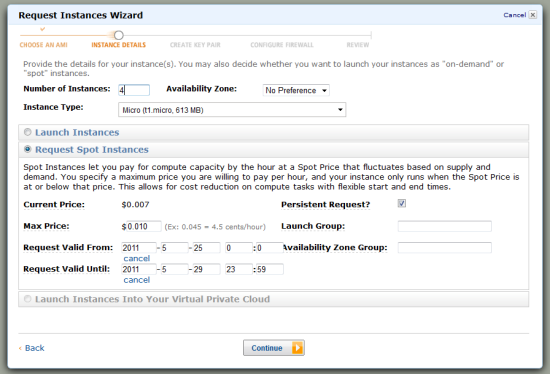
Werner Vogels (@Werner) added details of Spot Instances - Increased Control in a 7/11/2011 blog post:
Today we announced the launch of an exciting new feature that will significantly increase your control over your Amazon EC2 Spot instances. With this change, we will improve the granularity of pricing information you receive by introducing a Spot Instance price per Availability Zone rather than a Spot Instance price per Region.
Since the launch of Spot Instances in December 2009, we have heard from a large number of customers, like Scribd, University of Melbourne/University of Barcelona, Numerate, DNAnexus, and Litmus that Spot is a great way of reducing their bills with reported savings as high as 66%. As a part of that process, we also realized that there were a number of latency sensitive or location specific use cases like Hadoop, HPC, and testing that would be ideal for Spot. However, customers with these use cases need a way to more easily and reliably target Availability Zones.
As defined, Spot Instances allow customers to bid on unused Amazon EC2 capacity and run those instances for as long as their bid exceeds the current Spot Price. The challenge with these use cases was that Spot Instances were priced based on supply and demand for a Region, however Spot Instance capacity was constrained per Availability Zone. So, if we wanted to fulfill a request targeted at a particular Availability Zone, we could potentially have to interrupt more than one instance in multiple other Availability Zones.
Rather than causing volatility in the market, we are announcing a shift in the Spot pricing methodology. Now Spot Instance prices will be based on the supply and demand for a specific Availability Zone. By shifting the unit of capacity we are pricing against, customers bidding strategy will directly determine whether or not they are fulfilled. Existing customers who do not target their bids will have their instances automatically launched into the lowest priced Availability Zone available at the time the bid is fulfilled.
We have already seen customers successfully run HPC workloads, Hadoop-based jobs (as shown in the BackType case study), and testing simulations (as shown in the BrowserMob case study) on Spot. However, we are hopeful that this change will make it even easier for newer customers to immediately start capturing significant savings. Moreover, this change blazes the way for us to introduce Spot integration with Elastic Map Reduce.
To get started using Spot or for more details visit the Amazon EC2 Spot Instance web page, the AWS developer blog, and the EC2 Release Notes.
Barton George (@barton808, pictured below) posted Hadoop Summit: Chatting with Cloudera’s VP of Product on 7/11/2011:
The next in my series of videos from the Hadoop Summit features Cloudera‘s Vice President of product, Charles Zedlewski. If you’re not familiar with Cloudera you can think of them as the Red Hat of Hadoop world.
I sat down with Charles to learn more about Cloudera, what they do and where they came from.
Some of the ground Charles covers:
- Cloudera’s founding, what its original goals and vision were and where its founders came from.
- (1:35) What Cloudera does for customers 1) packages Hadoop and 2) helps them run it in production environments.
- (3:27) What channels Cloudera leverages and where they play in the ecosystem
- (4:11) Charles’ thoughts on the Yahoo spin-out Hortonworks and how it might affect Cloudera.
Extra-credit reading
Pau for now…
Barton George (@barton808, pictured below) posted Hadoop Summit: Talking to the CEO of MapR on 7/10/2011:
I got some time with their CEO and co-founder John Schroeder to learn more about MapR:
Some of the ground John covers
- The announcements they made at the event
- (0:16) How John got the idea to start MapR: what tech trends he was seeing and what customer problems was he learning about.
- (1:43) How MapR’s approach to Hadoop differs from Cloudera (and Hortonworks)
- (3:49) How the Hadoop community is growing, both with regards to Apache and the commercial entities that are developing, and the importance of this growth.
Extra-credit reading
- MapR Technologies Announces Availability of the Industry’s Easiest, Fastest and Most Dependable Distribution for Apache Hadoop
- MapR Announces Partner Program to Expand Use of Hadoop
Pau for now…
<Return to section navigation list>


0 comments:
Post a Comment