Windows Azure and Cloud Computing Posts for 7/8/2011+
A compendium of Windows Azure, Windows Azure Platform Appliance, SQL Azure Database, AppFabric and other cloud-computing articles.

• Updated 7/9 and 7/10/2011 with new articles marked • from Eric D. Boyd, the Windows Azure Team, Avkash Chauhan, Jay Heiser, Carl Brooks, Chris Hoff, Mahesh Shand, Telerik, Avkash Chauhan, Apress, Nicole Haugen and Me.
Note: This post is updated daily or more frequently, depending on the availability of new articles in the following sections:
- Azure Blob, Drive, Table and Queue Services
- SQL Azure Database and Reporting
- Marketplace DataMarket and OData
- Windows Azure AppFabric: Apps, Access Control, WIF and Service Bus
- Windows Azure VM Role, Virtual Network, Connect, RDP and CDN
- Live Windows Azure Apps, APIs, Tools and Test Harnesses
- Visual Studio LightSwitch
- Windows Azure Infrastructure and DevOps
- Windows Azure Platform Appliance (WAPA), Hyper-V and Private/Hybrid Clouds
- Cloud Security and Governance
- Cloud Computing Events
- Other Cloud Computing Platforms and Services
To use the above links, first click the post’s title to display the single article you want to navigate.
Azure Blob, Drive, Table and Queue Services
Brent Stineman (@BrentCodeMonkey) explained Getting last 9 seconds of rows from an Azure Table in a 7/8/2011 post:
Just yesterday a question was posted on the Windows Azure forums regarding the best way to query an Azure Table for rows that occurred in the last 9 seconds. Steve Marx and I both responded with some quick suggestions but this weeks’ tip I wanted to give more of a working example.
First, I’m going to define my table using a partial date/time value for the partition key, and a full timestamp for the row key. The payload we’ll make a string just to round out my example. Here’s my table row represented as a class.
- public class TableRow : Microsoft.WindowsAzure.StorageClient.TableServiceEntity
- {
- public string Payload { get; set; }
- // required parameterless constructor
- public TableRow(): this(string.Empty) {}
- // overloaded version that sets payload property of row
- public TableRow(string _payload)
- {
- // PartitionKey goes to nearest minute
- DateTime tmpDT1 = DateTime.UtcNow; // capture single value to use for subsequent calls
- // format as ticks and set partition key
- PartitionKey =
- new DateTime(tmpDT1.Year, tmpDT1.Month, tmpDT1.Day, tmpDT1.Hour, tmpDT1.Minute, 0).Ticks.ToString(“d19″);
- // use original value for row key, but append guid to help keep unique
- RowKey = String.Format(“{0} : {1}”, tmpDT1.Ticks.ToString(“d19″), Guid.NewGuid().ToString());
- // just make it empty
- Payload = _payload;
- }
- }
Note that I’ve overloaded the constructor so that’ it’s a tad easier to insert new rows by simply creating with a payload property. Not necessary, but I like convenience. I also built out a simple table class which you can do by following the hands on lab link I posted above.
Now I’m going to use a worker role (this is Windows Azure after all) to insert two messages every second. This will use the TableRow class and its associated service context. Here’s how my run method looks…
- public override void Run()
- {
- // This is a sample worker implementation. Replace with your logic.
- Trace.WriteLine(“WorkerRole1 entry point called”, “Information”);
- // create storage account
- var account = CloudStorageAccount.FromConfigurationSetting(“AzureStorageAccount”);
- // dynamically create the tables
- CloudTableClient.CreateTablesFromModel(typeof(SampleTableContext),
- account.TableEndpoint.AbsoluteUri, account.Credentials);
- // create a context for us to work with the table
- SampleTableContext sampleTable = new SampleTableContext(account.TableEndpoint.AbsoluteUri, account.Credentials);
- int iCounter = 0;
- while (true)
- {
- // there really should be some exception handling in here…
- sampleTable.AddRow(string.Format(“Message: {0}”, iCounter.ToString()));
- Thread.Sleep(500); // this allows me to insert two messags every second
- Trace.WriteLine(“Working”, “Information”);
- }
- }
Ok. now all that remains is to have something that will query the rows. I’ll create a web role and display the last 9 seconds of rows in a grid. I use the default ASP.NET web role template and use a gridview on the default.aspx page to display my results. I took the easy route and just plugged some code into the Page_Load event as follows:
- // create storage account
- var account = CloudStorageAccount.FromConfigurationSetting(“AzureStorageAccount”);
- // dynamically create the tables
- CloudTableClient.CreateTablesFromModel(typeof(SampleTableContext),
- account.TableEndpoint.AbsoluteUri, account.Credentials);
- // create a context for us to work with the table
- SampleTableContext tableContext = new SampleTableContext(account.TableEndpoint.AbsoluteUri, account.Credentials);
- // straight up query
- var rows =
- from sampleTable in tableContext.CreateQuery<ClassLibrary1.TableRow>(“Rows”)
- where sampleTable.RowKey.CompareTo((DateTime.UtcNow – TimeSpan.FromSeconds(9)).Ticks.ToString(“d19″)) > 0
- select sampleTable;
- GridView1.DataSource = rows;
- GridView1.DataBind();
This does the job, but if you wanted to leverage our per minute partition keys to help narrow down the need for any full-table scans, the query would look more like this:
- // partition enhanced query
- DateTime tmpDT1 = DateTime.UtcNow; // capture single value to use for subsequent calls
- DateTime tmpPartitionKey = new DateTime(tmpDT1.Year, tmpDT1.Month, tmpDT1.Day, tmpDT1.Hour, tmpDT1.Minute, 0);
- var rows =
- from sampleTable in tableContext.CreateQuery<ClassLibrary1.TableRow>(“Rows”)
- where
- (sampleTable.PartitionKey == tmpPartitionKey.AddMinutes(-1).Ticks.ToString(“d19″) || sampleTable.PartitionKey == tmpPartitionKey.Ticks.ToString(“d19″))
- && sampleTable.RowKey.CompareTo((DateTime.UtcNow – TimeSpan.FromSeconds(9)).Ticks.ToString(“d19″)) > 0
- select sampleTable;
So there you have it! I want to come back and visit this topic again soon as I have some personal questions about the efficiency of the linq based queries to Azure storage that are generated by this. But I simply don’t have the bandwidth today to spend on it.
Anyways, I’ve posted the code from my example if you’d like to take a look. Enjoy!

<Return to section navigation list>
SQL Azure Database and Reporting
My (@rogerjenn) Sharding relational databases in the cloud article of 7/7/2011 for SearchCloudComputing.com begins:
Web commerce, social media, mobile communication and machine-to-machine traffic generates terabytes or petabytes of data that enterprise IT departments must store and process. For users dealing with this data in cloud-oriented databases, learning sharding best practices is an important step in the cloud planning process.
Be prepared to shard relational databases that must handle Big Data in the cloud.
Sharding is a process where tables are partitioned into manageable-sized disk files. Some highly elastic key-value data stores -- such as Amazon Simple DB, Google App Engine's data store or Windows Azure Tables -- and document databases like CouchDB, MongoDB or RavenDB can handle the Big Data in these tables with aplomb. MongoDB features built-in automatic sharding; RavenDB will gain this capability in the near future. Autosharding balances the size of shards automatically …

Read more (requires site registration). Note that a correction to my post is pending. The correction reflects elimination of data ingress charges by Microsoft for Windows Azure and SQL Azure, as well as by Amazon Web Services for RDS, S3 and EBS.
• The following table lists the Web-accessible resources I used to write the article:
For more details about sharding SQL Azure tables, read my Build Big-Data Apps in SQL Azure with Federation cover story for the 3/2011 issue of Visual Studio Magazine.
Full disclosure: I’m a paid contributor to SearchCloudComputing.com.
• Avkash Chauhan described the cause of a Windows Azure Worker Role Recycling due to an exception as "System.Data.SqlClient.SqlException: at System.Data.SqlClient.SqlCommand.RunExecuteReaderTds" error in a 7/8/2011 post:
Recently I was working on an issue and found the worker role was keep recycling. After I logged into Azure VM and looked as Application Event Log, I found the following exception was logged every 30 seconds:
Log Name: Application
 Source: .NET Runtime
 Date: 7/6/2011 9:39:28 PM
 Event ID: 1026
 Task Category: None
 Level: Error
 Keywords: Classic
 User: N/A
 Computer: <Machine_Name>
 Description:
 Application: WaWorkerHost.exe

 Framework Version: v4.0.30319
 Description: The process was terminated due to an unhandled exception.

 Exception Info: System.Data.SqlClient.SqlException
 Stack:
 at System.Data.SqlClient.SqlCommand.RunExecuteReaderTds(System.Data.CommandBehavior, System.Data.SqlClient.RunBehavior, Boolean, Boolean)
 at System.Data.SqlClient.SqlCommand.RunExecuteReader(System.Data.CommandBehavior, System.Data.SqlClient.RunBehavior, Boolean, System.String, System.Data.Common.DbAsyncResult)
 at System.Data.SqlClient.SqlCommand.InternalExecuteNonQuery(System.Data.Common.DbAsyncResult, System.String, Boolean)
 at System.Data.SqlClient.SqlCommand.ExecuteNonQuery()
 at <custom_reference>.SqlErrorLog.Log(Elmah.Error)
 at <custom_reference>.WorkerRole.GenException(System.Exception)
 at <custom_reference>.WorkerRole.DequeueMessages()
 at <custom_reference>.WorkerRole.Run()
 at Microsoft.WindowsAzure.ServiceRuntime.RoleEnvironment.StartRoleInternal()
 at Microsoft.WindowsAzure.ServiceRuntime.Implementation.Loader.RoleRuntimeBridge.<StartRole>b__1()
 at System.Threading.ExecutionContext.Run(System.Threading.ExecutionContext, System.Threading.ContextCallback, System.Object, Boolean)
 at System.Threading.ExecutionContext.Run(System.Threading.ExecutionContext, System.Threading.ContextCallback, System.Object)
 at System.Threading.ThreadHelper.ThreadStart()
Investigation and Solution:

<Return to section navigation list>
MarketPlace DataMarket and OData
Jenni Ripley reported WCF Data Services June CTP: LINQ Improvements and Properties on Derived Types in a 7/8/2011 post to the InfoQ News blog:
The WCF Data Services June 2011 CTP includes Any/All operators for LINQ, support for properties and inheritance on derived types, and an OData serializer/deserializer. This release targets .NET 4 and Silverlight 4; support for Windows 7 Phone is not yet included.
LINQ Any/All
The Any and All set operators were previously unsupported in WCF Data Services, but they have been added in the June CTP.
Properties on Derived Types
Previous versions of WCF Data Services supported relationships and inheritance, but would throw an exception if derived types had relationships with other types. According to Microsoft, "WCF Data Services now supports both exposing and consuming models which have properties (primitive, complex & navigation) defined on subtypes of the the base type associated with the set."
OData Support
WCF Data Services supports serialization for non-binary Atom and JSON formats. This release includes an OData serializer and deserializer for use in client or server stacks.The WCF Data Services team notes that the first two items are among the top three requested new features. The third is support for the Enum data type, which was recently added to the Entity Framework as part of the June CTP. This would seem to indicate that Enum support in WCF will happen as well, though nothing has been officially announced.
No significant articles today.
<Return to section navigation list>
Windows Azure AppFabric: Apps, Access Control, WIF and Service Bus
Paolo Salvatore described Exploring Topics and Queues by Building a Service Bus Explorer Tool–Part 1 in a 7/8/2011 post:
The Community Technology Preview (CTP) of Windows Azure AppFabric that was released in May 2011 introduced Queues and Topics that constitute the foundation of a new cloud-based messaging and integration infrastructure that provides reliable message queuing and durable publish/subscribe messaging capabilities to both cloud and on-premises applications based on Microsoft and non-Microsoft technologies.
The new messaging functionality can be seamlessly accessed by .NET applications via a brand-new managed API (Microsoft.ServiceBus.Messaging) or WCF thanks to a new binding (ServiceBusMessagingBinding) as well as by any Microsoft or non-Microsoft applications that support HTTP requests via a REST API over HTTPS. In order to exploit the messaging capabilities introduced by Queues and Topics, it’s necessary to create a namespace on the Windows Azure Management Portal. However, the latter does not provide any user interface to administer, create and delete Topic and Queue entities.
To accomplish this task, you can use both the .NET API or the REST-style interface exposed by the new messaging platform. For this reason, I decided to build a Windows Forms application that allows to connect to a given Service Bus namespace to create, delete and test messaging entities.
This post is the first of a multi-part article where I will explain the functioning and implementation details of my tool whose source code is available on MSDN Archive for use or modification by any developer. In particular, in the first part I will explain how to use my tool to manage and test Queues and Topics whereas in the second post I will go through the code and explain the approach I followed to realize the application.
The following section provides basic information on the Queue and Topic entities in Windows Azure AppFabric Service Bus. For more information, see the following articles:
“Introducing the Windows Azure AppFabric Service Bus May 2011 CTP” article on the AppFabric Team Blog.
“Understanding Windows Azure AppFabric Queues (and Topics)” video on the AppFabric Team Blog.
“Announcing the Windows Azure AppFabric June CTP!” article on the AppFabric Team Blog.
“An Introduction to Service Bus Queues” article on the AppFabric Team Blog.
“An Introduction to Service Bus Topics” article on the AppFabric Team Blog.
“Windows Azure AppFabric Service Bus Queues and Topics” on Neil Mackenzie's Blog.
“Windows Azure AppFabric Learning Series” available on CodePlex.
Queues
Queues provide messaging capabilities that enable a large and heterogeneous class of applications running on premises or in the cloud to exchange messages in a flexible, secure and reliable fashion across network and trust boundaries.
Queues are hosted in Windows Azure by a replicated, durable store infrastructure. The maximum size of a queue during the CTP is 100MB, which is expected to rise to 1GB (or more) for production. The maximum message size is 256KB, but the use of sessions allows creating unlimited-size sequences of related messages. Queues functionality are accessible through the following APIs:
- The new messaging API available via the new Microsoft.ServiceBus.Messaging assembly
- WCF via the new ServiceBusMessagingBinding
- An extension of the Service Bus REST API.
Queue entities provide the following capabilities:
- Session-based correlation, meaning that you can build multiplexed request/reply paths in a easy way.
- Reliable delivery patterns such as Peek/Lock.
- Transactions support to ensure batches of messaging operations (both send and receive) are committed atomically.
- Detection of inbound message duplicates, allowing clients to send the same message multiple times without adverse consequences.
- Dead-letter facility for messages that cannot be processed or expire before being received.
- Deferring messages for later processing. This functionality is particularly handy when messages are received out of the expected sequence and need to be safely put on the side while the process waits for a particular message to permit further progress or when messages need to be processed based on a set of properties that define their priority during a traffic peak.
In the .NET API the message entity is modeled by the BrokeredMessage class that exposes various properties such as MessageId, SessionID and CorrelationId that can be used to exploit capabilities such as automatic duplicate detection or session-enabled communications. A QueueDescription object can be used to specify the metadata that models the behavior of the queue being created:
- The DefaultMessageTimeToLive property specifies the default message time to live value.
- The DuplicateDetectionHistoryTimeWindow property defines the duration of the duplicate detection history.
- The EnableDeadLetteringOnMessageExpiration property allows to enable\disable the dead-lettering on message expiration.
- The LockDuration property defines the duration of the lock used by a consumer when using the PeekLock receive mode. In the ReceiveAndDelete receive mode, a message is deleted from the queue as soon as it is read by a consumer. Conversely, in the PeekLock receive mode, a message is hidden from other receivers until the timeout defined by the LockDuration property expires. By that time the receiver should have deleted the message invoking the Complete method on the BrokeredMessage object.
- The MaxQueueSizeInBytes property defines the maximum queue size in bytes.
- The RequiresDuplicateDetection property enables\disables duplicate message detection. Since metadata cannot be changed once a messaging entity is created, modifying the duplicate detection behavior requires deleting and recreating the queue. The same principle applies to any other metadata.
- The RequiresSession property enables\disables sessions.
The use of Queues permits to flatten a highly-variable traffic into a predictable stream of work and distribute the load across a set of worker processes which size can vary dynamically to accommodate the incoming message volume. In a Competing Consumers scenario, when a publisher writes a message to a queue, multiple consumers compete with each other to receive the message, but only one of them will receive and process the message in question.
In a service-oriented or a service bus architecture composed of multiple, heterogeneous systems, interactions between autonomous systems are asynchronous and loosely-coupled. In this context, the use of messaging entities like Queues and Topics (see the next section) allows to increase the agility, scalability and flexibility of the overall architecture and helps decreasing the loose coupling of individual systems.
For more information on Queues, see the following articles:
- “Introducing the Windows Azure AppFabric Service Bus May 2011 CTP” article on the AppFabric Team Blog.
- “Understanding Windows Azure AppFabric Queues (and Topics)” video on the AppFabric Team Blog.
- “An Introduction to Service Bus Queues” article on the AppFabric Team Blog.
- “Windows Azure AppFabric Service Bus Queues and Topics” on Neil Mackenzie's Blog.
- “Windows Azure AppFabric Learning Series” available on CodePlex.
Topics
Topics extends the messaging features provided by Queues with the addition of Publish-Subscribe capabilities.
A Topic entity consists of a sequential message store like a Queue, but it supports up to 2000 (this number is subject to vary in the future) concurrent and durable subscriptions which relay message copies to a poll of worker processes. Each Subscription can define one or multiple Rule entities. Each Rule specifies a filter expression that is used to filter messages that pass through the subscription and a filter action that can modify message properties. In particular, the SqlFilterExpression class allows to define a SQL92-like condition on message properties:
- OrderTotal > 5000 OR ClientPriority > 2
- ShipDestinationCountry = ‘USA’ AND ShipDestinationState = ‘WA’
Conversely, the SqlFilterAction class can be used to modify, add or remove properties, as the filter expression is true and the message selected, using a syntax similar to that used by the SET clause of an UPDATE SQL-command.
- SET AuditRequired = 1
- SET Priority = 'High', Severity = 1
Each matching rule generates a separate copy of the published message, so any subscription can potentially generate more copies of the same message, one for each matching rule. As Queues, Topics support a Competing Consumers scenario: in this context, a subscritpion can have a single consumer that receives all messages or a set of competing consumers that fetch messages on a first-come-first-served basis. Topics are the excellent messaging solution to broadcast messages to many consumer applications or distribute the work load across multiple sets of competing worker processes.
The following section provides basic information on the Queue and Topic entities in Windows Azure AppFabric Service Bus. For more information, see the following articles:
- “Introducing the Windows Azure AppFabric Service Bus May 2011 CTP” article on the AppFabric Team Blog.
- “Understanding Windows Azure AppFabric Queues (and Topics)” video on the AppFabric Team Blog.
- “An Introduction to Service Bus Topics” article on the AppFabric Team Blog.
- “Windows Azure AppFabric Service Bus Queues and Topics” on Neil Mackenzie's Blog.
- “Windows Azure AppFabric Learning Series” available on CodePlex.
Solution
As I mentioned in the introduction, today the Windows Azure Platform Management Portal provides the ability to create, modify and delete a Service Bus namespace but it doesn’t offer any GUI to manage Queues and Topics entities.
A few months ago I created a Storage Services Explorer tool to handle Windows Azure Storage Services: Blobs, Queues and Tables, therefore I decided to undertake a similar project and develop a Service Bus Explorer to manage Topics and Queues. The following picture illustrates the architecture of the application:
In the remainder of the article I'll explain how to configure and use the Service Bus Explorer, whereas in the second part of this series I'll dive into the code and I'll provide technical details on the actual implementation.
Connecting to an existing Service Bus Namespace
When you launch the application, you can connect to an existing Service Bus namespace to manage its entities by choosing the Connect command under the File menu. This operation opens up a modal dialog shown in the picture below that allows you to enter the name of the Service Bus namespace that you want to connect to and the corresponding authentication credentials.
The Service Bus supports three different types of credential schemes: SAML, Shared Secret, and Simple Web Token, but this version of the Service Bus Explorer supports only Shared Secret credentials. However, you can easily extend my code to support other credential schemes. You can retrieve the issuer-secret key from the Windows Azure Platform Management Portal by clicking the View button highlighted in red in the picture below after selecting a certain namespace in the Service Bus section.
This opens up the modal dialog shown in the picture below where you can retrieve the key by clicking the Copy to Clipboard highlighted in red.
Note: by convention, the name of the Default Issuer is always owner.
For your convenience, the tool gives the possibility to define, in the configuration file, a connection string for the most frequently accessed namespaces. As you can see in the xml snippet below, each connection string is composed of 4 elements:
namespace: this property defines the Service Bus namespace.
servicePath: this property is optional and specifies the service path within the namespace.
issuerName: this field contains the Issuer Name. As mentioned above, by convention, the default value for this field is owner.
issuerSecret: this element contains the Issuer Secret that you can copy from the Windows Azure Platform Management Portal.
<?xml version="1.0"?>
<configuration>
  <configSections>
    <section name="serviceBusNamespaces"
             type="System.Configuration.DictionarySectionHandler,
                   System, Version=4.0.0.0, Culture=neutral, PublicKeyToken=b77a5c561934e089"/>
  </configSections>
  <system.diagnostics>
    <trace autoflush="true" indentsize="4">
      <listeners>
        <clear/>
        <add name="LogTraceListener"
             type="Microsoft.AppFabric.CAT.WindowsAzure.Samples.ServiceBusExplorer.LogTraceListener,
                   ServiceBusExplorer"
             initializeData="" />
      </listeners>
    </trace>
  </system.diagnostics>
  <serviceBusNamespaces>
    <add key="Northwind"
         value="namespace=northwind;servicePath=;issuerName=owner;issuerSecret=..."/>
    <add key="AdventureWorks"
         value="namespace=adventureworks;servicePath=;issuerName=owner;issuerSecret=..."/>
  </serviceBusNamespaces>
  <appSettings>
    <add key="debug" value="true"/>
    <add key="scheme" value="sb"/>
  </appSettings>
  <system.net>
    <connectionManagement>
      <add address="*" maxconnection="50"/>
    </connectionManagement>
  </system.net>
  <startup>
    <supportedRuntime version="v4.0" sku=".NETFramework,Version=v4.0"/>
  </startup>
</configuration>
If you define one or more namespaces in the configuration file, this give you the possibility to select one of them from the corresponding drop-down list and the fields within the modal dialog will be automatically populated with the corresponding connection string data.
Graphical User Interface
The GUI of the Service Bus Explorer is composed of following parts:
- The Service Bus Namespace Panel contains a TreeView control that allows to navigate, browse and select entity nodes. Each node is right-click enabled and offers the possibility to access a context-menu which commands depend on the selected entity.
- The Main Panel displays the information for the selected entity. Based on the command selected by the user, it provides the ability to create, delete or test the current entity.
- The Log Panel displays information and error messages. The log functionality comes in handy especially when you use the Service Bus Explorer to test existing Queue and Topic entities to trace down send and receive operations performed by publisher and consumer tasks. The Log Panel can be hidden by deselecting the Log Window option under the View menu. You can clear the log by selecting the Clear Log command under the Edit menu. Finally, you can save the log by selecting the Save Log As command under the Edit menu.
- The Menu bar contains the main menu that allows you to select commands and options. In particular, the commands displayed by the Edit menu varies based on the selected entity.
- The Status Bar shows the last message.
View a Queue
To view the properties of an existing queue in the Main Panel, you can just select the corresponding node in the TreeView.
As already mentioned above, the current version of the Service Bus (June 2011 CTP Refresh) does not allow to change the properties of an existing queue once created. The same principle applies to the other entities.
Create a Queue
To create a new queue in the current namespace, you can select the Queues node in the TreeView and then perform one of the following actions:
- Right-click the node and choose Create Queue from the context menu.
- Choose Create Queue command under the Edit menu.
This operation displays a custom control (see the picture below) in the Main Panel that allows you to specify the following properties for the new queue:
- Path: this field defines the path for the queue within the namespace.
- Max Queue Size In Bytes: this integer field provides the possibility to specify a value for the MaxQueueSizeInBytes property that defines the maximum queue size in bytes.
- Default Message Time To Live: this section gives the possibility to enter a TimeSpan value for the DefaultMessageTimeToLive property that specifies the default message time to live.
- Duplicate Detection History Time Window: this section gives the possibility to enter a TimeSpan value for the DuplicateDetectionHistoryTimeWindow property that defines the duration of the duplicate detection history.
- Lock Duration: this section gives the possibility to enter a TimeSpan value the LockDuration property that defines the duration of the lock used by a consumer when using the PeekLock receive mode. In the ReceiveAndDelete receive mode, a message is deleted from the queue as soon as it is read by a consumer. Conversely, in the PeekLock receive mode, a message is hidden from other receivers until the timeout defined by the LockDuration property expires. By that time the receiver should have deleted the message invoking the Complete method on the BrokeredMessage object.
- Enable Dead Lettering on Message Expiration: this checkbox specifies a Boolean value for the EnableDeadLetteringOnMessageExpiration property that provides the possibility to enable or disable the dead-lettering functionality on message expiration.
- Requires Duplicate Detection: this checkbox specifies a Boolean value for the RequiresDuplicateDetection property that gives the ability to enable or disable the duplicate message detection feature. Since metadata cannot be changed once a messaging entity is created, modifying the duplicate detection behavior requires deleting and recreating a queue. The same principle applies to the other entities.
- Requires Session: this this checkbox specifies a Boolean value for the RequiresSession property that allows to enable or disable sessions support on the queue being created.
If you don’t explicitly specify any value for one or more fields, when you click the Create button, the default value will be used for the corresponding properties.
Delete a Queue
To delete an existing queue, you can select the corresponding node in the TreeView and then perform one of the following actions:
- Right-click the node and choose Delete Queue from the context menu.
- Choose Delete Queue command under the Edit menu.
- Click the Delete button in the Main Panel.
Test a Queue
To test a queue in the current namespace, you can select the corresponding node in the TreeView and then perform one of the following actions:
- Right-click the node and choose Test Queue from the context menu.
- Choose Test Queue command under the Edit menu.
This operation shows a custom control (see the picture below) in the Main Panel that allows the user to specify the following options:
Message Text and Properties Section
- Message Text: you can use this field to enter a fixed TEXT or XML message.
- Message Properties: you can use the DataGridView control to define the key\value pairs that will be added to the Properties dictionary of a BrokeredMessage object.
Sender Section
- MessageId: you can use this field to specify the MessageId property of a BrokeredMessage object.
- SessionId: you can use this field to define the SessionId property of a BrokeredMessage object.
- Label: you can use this field to specify the Label property of a BrokeredMessage object.
- Task Count: this integer field can be used to define the number of publisher tasks that will be used to send messages.
- Msg Count: this integer field can be used to specify the number of messages that to write to the queue.
- Use Transaction: when this option is checked, each sender task will write messages to the queue within the context of a TransactionScope object. This allows sending a batch of messages within as a unit of work.
- Commit Transaction: when this and Use Transaction options are checked, sender tasks will commit the TransactionScope object. You can check the Use Transaction option and uncheck Commit Transaction option to simulate an unsuccessful transaction.
- Update MessageId: when this option is checked, the tool will generate a different MessageId for each outbound message. You can disable this option when testing the duplicate message detection feature of a queue.
- Enable Logging: when this option is checked, sender tasks will log the text and properties of transmitted messages.
- One Session/Task: when this option is checked, each sender task will use a different value for the SessionId property. This feature allows to test session-enabled queues with multiple sender and consumer tasks.
Receiver Section
- Use Transaction: when this option is checked, each receiver task will retrieve messages from the queue within the context of a TransactionScope object. This allows receiving a batch of messages within as a unit of work.
- Commit Transaction: when this and Use Transaction options are checked, receiver tasks will commit the TransactionScope object. You can check the Use Transaction option and uncheck Commit Transaction option to simulate an unsuccessful transaction.
- Receive Message: when this option is checked, the tool creates a set of consumer tasks to receive messages from the queue. You can disable this option if you want to use the tool just to write messages to a queue, but not to consume them.
- Enable Logging: when this option is checked, consumer tasks will log the text and properties of received messages.
- Task Count: this integer field can be used to define the number of consumer tasks that will be used to receive messages from the queue.
- Timeout: this integer field specifies the timeout in seconds for receiver tasks.
You can enable logging to trace the content and properties of sent and received messages and keep track of performance statistics:
Sender Tasks
- Message Count
- Messages Sent/Sec
- Total Elapsed Time (ms)
- Average Send Time (ms)
- Minimum Send Time (ms)
- Maximum Send Time (ms)
Receiver Tasks
- Message Count
- Messages Received/Sec
- Total Elapsed Time (ms)
- Average Receive Time (ms)
- Minimum Receive Time (ms)
- Maximum Receive Time (ms)
The following picture shows an example of the information that you can track and eventually archive by saving the log.
View a Topic
To view the properties of an existing topic in the Main Panel, you can just select the corresponding node in the TreeView.
As already mentioned above, the current version of the Service Bus (June 2011 CTP Refresh) does not allow to change the properties of an existing topic once created. The same principle applies to the other entities.
Create a Topic
To create a new topic in the current namespace, you can select the Topics node in the TreeView and then perform one of the following actions:
- Right-click the node and choose Create Topic from the context menu.
- Choose Create Topic command under the Edit menu.
This operation displays a custom control (see the picture below) in the Main Panel that allows you to specify the following properties for the new topic:
- Path: this field defines the path for the topic within the namespace.
- Max Topic Size In Bytes: this integer field provides the possibility to specify a value for the MaxTopicSizeInBytes property that defines the maximum topic size in bytes.
- Max Number of Correlation Filters: this integer field provides the possibility to specify a value for the MaximumNumberOfCorrelationFilters property that defines the maximum number of correlation filters for the new topic.
- Max Number of Sql Filters: this integer field provides the possibility to specify a value for the MaximumNumberOfSqlFilters property that defines the maximum number of SQL filters for the new topic.
- Max Number of Subscriptions: this integer field provides the possibility to specify a value for the MaximumNumberOfSubscriptions property that defines the maximum number of subscriptions for the new topic.
- Default Message Time To Live: this section gives the possibility to enter a TimeSpan value for the DefaultMessageTimeToLive property that specifies the default message time to live.
- Duplicate Detection History Time Window: this section gives the possibility to enter a TimeSpan value for the DuplicateDetectionHistoryTimeWindow property that defines the duration of the duplicate detection history.
- Enable Dead Lettering on Filter Evaluation Exceptions: this checkbox specifies a Boolean value for the EnableDeadLetteringOnFilterEvaluationExceptions property that provides the possibility to enable or disable the dead-lettering functionality when exceptions occur during a filter evaluation.
- Enable Dead Lettering on Message Expiration: this checkbox specifies a Boolean value for the EnableDeadLetteringOnMessageExpiration property that provides the possibility to enable or disable the dead-lettering functionality on message expiration.
- Requires Duplicate Detection: this checkbox specifies a Boolean value for the RequiresDuplicateDetection property that gives the ability to enable or disable the duplicate message detection feature. Since metadata cannot be changed once a messaging entity is created, modifying the duplicate detection behavior requires deleting and recreating a topic. The same principle applies to the other entities.
- Requires Session: this this checkbox specifies a Boolean value for the RequiresSession property that allows to enable or disable sessions support on the queue being created.
If you don’t explicitly specify any value for one or more fields, when you click the Create button, the default value will be used for the corresponding properties.
Delete a Topic
To delete an existing topic, you can select the corresponding node in the TreeView and then perform one of the following actions:
- Right-click the node and choose Delete Topic from the context menu.
- Choose Delete Topic command under the Edit menu.
- Click the Delete button in the Main Panel.
Test a Topic
To test a topic in the current namespace, you can select the corresponding node in the TreeView and then perform one of the following actions:
- Right-click the node and choose Test Topic from the context menu.
- Choose Test Topic command under the Edit menu.
This operation shows a custom control (see the picture below) in the Main Panel that allows the user to specify the following options:
Message Text and Properties Section
- Message Text: you can use this field to enter a fixed TEXT or XML message.
Message Properties: you can use the DataGridView control to define the key\value pairs that will be added to the Properties dictionary of a BrokeredMessage object.
Sender Section
- MessageId: you can use this field to specify the MessageId property of a BrokeredMessage object.
- SessionId: you can use this field to define the SessionId property of a BrokeredMessage object.
- Label: you can use this field to specify the Label property of a BrokeredMessage object.
- Task Count: this integer field can be used to define the number of publisher tasks that will be used to send messages.
- Msg Count: this integer field can be used to specify the number of messages that to write to the topic.
- Use Transaction: when this option is checked, each sender task will write messages to the topic within the context of a TransactionScope object. This allows sending a batch of messages within as a unit of work.
- Commit Transaction: when this and Use Transaction options are checked, sender tasks will commit the TransactionScope object. You can check the Use Transaction option and uncheck Commit Transaction option to simulate an unsuccessful transaction.
- Update MessageId: when this option is checked, the tool will generate a different MessageId for each outbound message. You can disable this option when testing the duplicate message detection feature of a queue.
- Enable Logging: when this option is checked, sender tasks will log the text and properties of transmitted messages.
- One Session/Task: when this option is checked, each sender task will use a different value for the SessionId property. This feature allows to test session-enabled queues with multiple sender and consumer tasks.
Receiver Section
- Use Transaction: when this option is checked, each receiver task will retrieve messages from the topic within the context of a TransactionScope object. This allows receiving a batch of messages within as a unit of work.
- Commit Transaction: when this and Use Transaction options are checked, receiver tasks will commit the TransactionScope object. You can check the Use Transaction option and uncheck Commit Transaction option to simulate an unsuccessful transaction.
- Receive Message: when this option is checked, the tool creates a set of consumer tasks to receive messages from the queue. You can disable this option if you want to use the tool just to write messages to a queue, but not to consume them.
- Enable Logging: when this option is checked, consumer tasks will log the text and properties of received messages.
- Task Count: this integer field can be used to define the number of consumer tasks that will be used to receive messages from the queue.
- Timeout: this integer field specifies the timeout in seconds for receiver tasks.
- Subscription: you can use this drop-down list to select a subscription to receive messages written to the topic.
You can enable logging to trace the content and properties of sent and received messages and keep track of performance statistics:
Sender Tasks
- Message Count
- Messages Sent/Sec
- Total Elapsed Time (ms)
- Average Send Time (ms)
- Minimum Send Time (ms)
- Maximum Send Time (ms)
Receiver Tasks
- Message Count
- Messages Received/Sec
- Total Elapsed Time (ms)
- Average Receive Time (ms)
- Minimum Receive Time (ms)
- Maximum Receive Time (ms)
The following picture shows an example of the information that you can track and eventually archive by saving the log.
View a Subscription
To view the properties of an subscription associated to a certain topic, you can expand the Subscriptions node under the topic node and select the corresponding subscription node, as illustrated in the picture below.
Add a Subscription
To add a new subscription to an existing topic, you can select the topic node in the TreeView and then perform one of the following actions:
- Right-click the topic node and choose Add Subscription from the context menu.
- Expand the topic node, right-click the Subscriptions node under the latter and choose Add Subscription from the context menu.
- Choose Add Subscription command under the Edit menu.
This operation displays a custom control (see the picture below) in the Main Panel that allows you to specify the following properties for the new subscription:
- Name: this field defines the name for the subscription being created.
- Default Message Time To Live: this section gives the possibility to enter a TimeSpan value for the DefaultMessageTimeToLive property that specifies the default message time to live.
- Lock Duration: this section gives the possibility to enter a TimeSpan value the LockDuration property that defines the duration of the lock used by a consumer when using the PeekLock receive mode. The default value is 30 seconds.
- Enable Dead Lettering on Filter Evaluation Exceptions: this checkbox specifies a Boolean value for the EnableDeadLetteringOnFilterEvaluationExceptions property that provides the possibility to enable or disable the dead-lettering functionality when exceptions occur during a filter evaluation.
- Enable Dead Lettering on Message Expiration: this checkbox specifies a Boolean value for the EnableDeadLetteringOnMessageExpiration property that provides the possibility to enable or disable the dead-lettering functionality on message expiration.
- Requires Session: this this checkbox specifies a Boolean value for the RequiresSession property that allows to enable or disable sessions support on the new subscription.
- Default Rule: Sql Filter Expression: this field defines the SQL filter expression for the default rule.
- Default Rule: Sql Filter Action: this field defines the SQL filter action for the default rule.
Remove a Subscription
To remove an existing subscription, you can select the corresponding node in the TreeView and then perform one of the following actions:
- Right-click the node and choose Remove Subscription from the context menu.
- Choose Remove Subscription command under the Edit menu.
- Click the Remove button in the Main Panel.
View a Rule
To view the properties of an rule associated to a certain subscription, you can expand the Rules node under the subscription node and select the corresponding rule node, as illustrated in the picture below.
Add a Rule
To add a new rule to an existing subscription, you can select the subscription node in the TreeView and then perform one of the following actions:
- Right-click the subscription node and choose Add Rule from the context menu.
- Expand the subscription node, right-click the Rules node under the latter and choose Add Rule from the context menu.
- Choose Add Rule command under the Edit menu.
This operation displays a custom control (see the picture below) in the Main Panel that allows you to specify the following properties for the new rule:
- Name: this field defines the name for the new rule.
- Is Default Rule: this checkbox can be used to indicate that the rule being created is the default rule for the current subscription. If the subscription in question already owns a default rule, this field is disabled.
- Sql Filter Expression: this field defines the SQL filter expression for the new rule.
- Sql Filter Action: this field defines the SQL filter action for the new rule.
Remove a Rule
To remove an existing rule, you can select the corresponding node in the TreeView and then perform one of the following actions:
- Right-click the node and choose Remove Rule from the context menu.
- Choose Remove Rule command under the Edit menu.
- Click the Remove button in the Main Panel.
Conclusions
I strongly encourage you to download and customize my code it to better accommodate your needs. As always, I invite you to share with me your feedbacks, ideas and comments, not only on my tool but also (and above all) on the new messaging entities in the Service Bus. In the second part of this article I’ll illustrate the implementation details of the solution.


Wade Wegner (@WadeWegner) announced on 7/8/2011 that Episode 50 - Matt Winkler Builds an AppFabric Application is the latest Cloud Cover video episode:
Join Wade and Steve each week as they cover the Windows Azure Platform. You can follow and interact with the show at @CloudCoverShow.
In the news:
Client Side Tracing for Windows Azure AppFabric Caching
- Windows Azure Diagnostics API and Service Runtime API References Improved
- Just Released: StockTrader 5.0
- Windows Azure Deployments and the Virtual IP
Be sure to check out http://windowsazure.com/events to see events where Windows Azure will be present!


<Return to section navigation list>
Windows Azure VM Role, Virtual Network, Connect, RDP and CDN
No significant articles today.
<Return to section navigation list>
Live Windows Azure Apps, APIs, Tools and Test Harnesses
• Telerik updated their Sitefinity on Windows Azure page on 7/8/2011:
Sitefinity on Windows Azure
Sitefinity brings your web site to the cloud by offering native support for Windows Azure and SQL Azure. Sitefinity supports multi-instance Azure deployments, as well as session state providers and web-farms. This enables your organization to rapidly scale computing capacity to manage spikes in visitor traffic. In addition, Sitefinity customers can take full advantage of Azure’s fully-redundant highly-available infrastructure.
Getting Started in 3 Easy Steps

*If you are interested in activating a Windows Azure trial account, please drop an e-mail to sales@sitefinity.com and we will provide you with the credentials.
…
• Avkash Chauhan explained troubleshooting Windows Azure Package Deployment Failed with Error - "There was no endpoint listening at https://management.core.windows.net/" in a 7/8/2011 post:
In an recent issue, trying to upload a new Windows Azure Package (CSPKG & CSCFG) to Windows Azure Management Portal. caused problems. The same steps were working fine forever, however suddenly the following error occurred:
 8:43:09 PM - Preparing...
 8:43:09 PM - Connecting...
 8:43:10 PM - There was no endpoint listening at https://management.core.windows.net/<Subscription_GUID>/services/hostedservices/datacenter-1/certificates that could accept the message. This is often caused by an incorrect address or SOAP action. See InnerException, if present, for more details.
 8:43:10 PM - Deployment failed
Based on the error description, creating and uploading a new certificate did not solve the problem, and trying to go to the next screen returned following error message:
 There was no endpoint listening at https://management.core.windows.net/<Subscription_ID>/services/hostedservices that could accept the message. This is often caused by an incorrect address or SOAP action. See InnerException, if present, for more details.
 Unable to connect to the remote server
 No connection could be made because the target machine actively refused it 127.0.0.1:8888
Investigation and Solution:
After some investigation, the real culprit appeared as Proxy Server settings in the development machine. The development machine was using a proxy server, which was causing this problem. So the problem was related to the proxy server, which was acting in middle between the computer and Windows Azure Management Portal. After removing the proxy settings and following the same steps, the problem was resolved.
Tim Anderson (@timanderson) explained Hands on debugging an Azure application – what to do when it works locally but not in the cloud in a 7/8/2011 post:
I have been writing a Facebook application hosted on Microsoft Azure. I hit a problem where my application worked fine on the local development fabric, but failed when deployed to Azure. The application was not actually crashing; it just did not work as expected. Specifically, either the Facebook authentication or the ASP.NET Forms Authentication was failing; when I tried to log on, the log on failed.
I tried IntelliTrace. It is easy to set up, just check the box when deploying.
Once deployed, I tried the application. Clicked the Log On button, after which the screen flashed but still asked me to Log On. The log on had failed.
I closed the app, opened Server Explorer in Visual Studio, drilled down into the Windows Azure Compute node and selected View IntelliTrace Logs.
The logs took a few minutes to download. Then you can view is the IntelliTrace log summary, which includes a list of exceptions. You can double-click an exception to start an IntelliTrace debug session.
Useful, but I still could not figure out what was wrong. I also found that IntelliTrace did not show the values for local variables in its debug sessions, though it does show exceptions in detail.
Now, if you really want to debug and trace an Azure application you had better read this MSDN article which explains how to create custom debugging and trace agents and write logs to Azure storage. That seems like a lot of work, so I resorted to the old technique of writing messages to HTML.
At this point I should mention something you must do in order to debug on Azure and remain sane. This is to enable WebDeploy:
It is not that hard to set up, though you do need to enable Remote Desktop which means a trip to the Azure management portal. In my case I am behind a firewall so I needed to configure Web Deploy to use the standard SSL port. All is explained here.
Why use Web Deploy? Well, normally when you deploy to Azure the service actually builds, copies and spins up a new virtual machine image for your app. That process is fundamental to Azure’s design and means there are always at least two copies of the VM in existence. It is also slow, so if you are making changes to an app, deploying, and then testing, you will spend most of your time waiting for Azure.
Web Deploy, by contrast, writes to your existing instance, so it is many times quicker. Note that once you have your app working, it is essential to deploy it properly, since Azure might revert your app to the last VM you created.
With Web Deploy enabled I got back to work. I discovered that FormsAuthentication.SetAuthCookie was not working. The odd thing being, it worked locally, and it had worked in a previous version deployed to Azure.
Then I began to figure it out. My app runs in a Facebook canvas. Since the app is served from a different site than Facebook, cookies may be rejected. When I ran the app locally, the app was in a different IE security zone, so different rules applied.
But why had it worked before? I realised that when it worked before I had used Google Chrome. That was it. IE worked locally; but only Chrome worked when deployed.
I have given up trying to fix the specific problem for the moment. I have dug into it a little, and discovered that cookie handling in a Facebook canvas with IE is a long-standing problem, and that the Facebook C# SDK may have bugs in this area. It is not essential for my sample.
The time has not been wasted though as I have learned a bit about Azure debugging. I was also amused to discover that my Azure VM has activation problems:
Related posts:


<Return to section navigation list>
Visual Studio LightSwitch
• Nicole Haugen described how to Prevent a Security Hole with Access Control - Securing Logic Tier in her first post to her LightSwitch Rocks! blog on 7/10/2011:
I recently joined the Visual Studio LightSwitch team and so far have spent most of my time learning about everything that LightSwitch has to offer. With all that I’ve been learning, I thought this blog would be a perfect opportunity to share some of my new found knowledge. I can’t help but be reminded of my childhood and the lessons taught by the Saturday morning cartoon Schoolhouse Rock! Granted, my blog may be missing the colorful animations, upbeat songs, and unforgettable lyrics, but I do promise to share my experiences as a LightSwitch newbie with an occasional attempt at rhyming; hence the title LightSwitch Rocks!
Inspired by Schoolhouse Rock! episodes with catchy titles such as “Conjunction Junction” and “My Hero, Zero”, my first blog post is appropriately called “Prevent a Security Hole with Access Control.” This is the first of three planned posts:
- The first will focus on securing data on the logic tier
- The second will show how to customize the application’s presentation according to the user’s security permissions
- The third will focus on how to ensure that an entity has read-only access
Scenario: Expense Report Tracker
Let’s begin by creating a LightSwitch project called “ExpenseReportTracker” with two entities that are used to track the status of expense reports; note that ExpenseReport has a one-to-many relationship with ExpenseItems.
Two types of users will use this application:
- Employees that create and save expense reports for approval
- Managers that approve or reject employees’ expense reports
When an employee creates and saves an expense report, the report’s Status is automatically defaulted to “Pending.” The assigned Approver (e.g. manager) can then change the Status of the report to either “Approved” or “Rejected.”


Based on the above scenario, let’s look at the security rules that we want to enforce depending on the type of user:
- An employee cannot delete an expense report
- An employee cannot modify an expense report’s Status; this prevents employees from approving\rejecting expense reports
- Once a manager has set an expense report’s Status to “Approved” or “Rejected”, an employee can no longer make modifications to the report
Creating Permissions
Since we have two types of users, there are two permissions that we need to create in the Application Properties designer; one that will be assigned to employees and another for managers.

Enforcing Security on the Logic Tier
Now that we have permissions created for employees and managers, let’s look at how to use these permissions to enforce the security rules for our application.
Using Entity Set “Can” Methods
Our first security rule means:
- When the current user is assigned to a role with ManageExpenseReportPermission, then the user can delete expense reports; otherwise, the user should be prevented from deleting an expense report
This type of rule applies to all expense reports; not a particular instance of an expense report. Based on this, we can add this permission check to the ExpenseReport entity set’s CanDelete method. This method is added by opening ExpenseReports in the entity designer and selecting “ExpenseReports_CanDelete” from the “Write Code” drop-down menu.

Here’s the code that is written in the “ExpenseReports_CanDelete” method:
C#
partial void ExpenseReports_CanDelete(ref bool result)
{
result = this.Application.User.HasPermission(Permissions.ManageExpenseReportPermission);
}VB
Private Sub ExpenseReports_CanDelete(ByRef result As Boolean)
    result = Me.Application.User.HasPermission(Permissions.ManageExpenseReportPermission)
End Sub
The benefit of using the “Can” method is two-fold; when it returns false, the user is prevented from performing the Delete operation. In addition, the application will automatically disable the Delete button on a screen that is displayed to the user.
If you need to enforce security for a specific entity instance or check a data value on an entity, then you will need to instead use the save pipeline’s methods.
Using Save Pipeline Methods
Our second and third security rules require us to check data on specific entity instances, therefore we will need to use the save pipeline methods. These security rules can be interpreted as follows:
- When the current user is assigned to a role with EmployeeExpenseReportPermission, the user cannot modify the Status property
- Similarly, if the user is assigned the EmployeeExpenseReportPermission, the user cannot modify an expense report that has already been approved\rejected
These checks can be added to the ExpenseReports Updating method. This method is added by opening ExpenseReports in the entity designer and selecting “ExpenseReports_Updating” from the “Write Code” drop-down menu. Notice that this method passes in the current entity instance as a parameter.
C#
partial void ExpenseReports_Updating(ExpenseReport entity)
{
    if (Application.Current.User.HasPermission(
        Permissions.EmplyeeExpenseReportPermission))
    {
        if (entity.Details.Properties.Status.IsChanged)
        {
            throw new Exception(
                "Permission denied: Unable to change expense report " +
                "status. Report Id: " + entity.ReportId);
        }

        if (entity.Details.Properties.Status.Value != "Pending")
        {
            throw new Exception(
                "Permission denied: Unable to change an expense report" +
                 "that has already been 'Approved' or 'Rejected'." +
                 "Report Id: " + entity.ReportId);
        }
    }
}
VB
Private Sub ExpenseReports_Updating(entity As ExpenseReport)

If Application.Current.User.HasPermission(
     Permissions.EmployeeExpenseReportPermission) Then If entity.Details.Properties.Status.IsChanged Then Throw New Exception(
               "Permission denied: Unable to change expense " +
               "report status. Report Id: " + entity.ReportId)
          End If If entity.Details.Properties.Status.Value <> "Pending" Then Throw New Exception(
                "Permission denied: Unable to change an expense " +
                "report that has already been 'Approved' or " +
                "'Rejected'. Report Id: " + entity.ReportId)
          End If End If End Sub
You may have also noticed that we have a gap in our security because an employee can still potentially modify ExpenseItems that belong to an ExpenseReport that has already been approved\rejected. To bridge this gap, we need to add the following code to the “ExpenseItems_Inserting”, “ExpenseItems_Updating”, and “ExpenseItems_Deleting” methods. These methods are added via the “Write Code” drop-down menu that is available in the entity designer for ExpenseItems.
C#
partial void ExpenseItems_Inserting(ExpenseItem entity) { if (Application.Current.User.HasPermission( Permissions.EmplyeeExpenseReportPermission) && entity.ExpenseReport.Status != "Pending") { throw new Exception("Permission Denied: Unable to modify " + "expense report that has already been 'Approved' or " + "'Rejected'. Report id: " + entity.ExpenseReport.ReportId); } } partial void ExpenseItems_Updating(ExpenseItem entity) { if (Application.Current.User.HasPermission( Permissions.EmplyeeExpenseReportPermission) && entity.ExpenseReport.Status != "Pending") { throw new Exception("Permission Denied: Unable to modify " + "expense report that has already been 'Approved' or " + "'Rejected'. Expense report id:" + entity.ExpenseReport.ReportId); } } partial void ExpenseItems_Deleting(ExpenseItem entity) { if (Application.Current.User.HasPermission( Permissions.EmplyeeExpenseReportPermission) && entity.ExpenseReport.Status != "Pending") { throw new Exception("Unable to modify expense report that has " + "already been 'Approved' or 'Rejected'. Expense report id: " + entity.ExpenseReport.ReportId); } }
VB
Private Sub ExpenseItems_Inserting(entity As ExpenseItem)

     If Application.Current.User.HasPermission(
        Permissions.EmployeeExpenseReportPermission) And entity.ExpenseReport.ReportId Then Throw New Exception("Permission Denied: Unable to modify " +
            "expense report that has already been 'Approved' or " +
            "'Rejected'. Report id: " + entity.ExpenseReport.ReportId)
     End If End Sub Private Sub ExpenseItems_Updating(entity As ExpenseItem)

     If Application.Current.User.HasPermission(
        Permissions.EmployeeExpenseReportPermission) And entity.ExpenseReport.ReportId Then Throw New Exception("Permission Denied: Unable to modify " +
              "expense report that has already been 'Approved' or " +
              "'Rejected'. Report id: " + entity.ExpenseReport.ReportId)
     End If End Sub Private Sub ExpenseItems_Deleting(entity As ExpenseItem)

      If Application.Current.User.HasPermission(
         Permissions.EmployeeExpenseReportPermission) And entity.ExpenseReport.ReportId Then Throw New Exception("Permission Denied: Unable to modify " +
             "expense report that has already been 'Approved' or " +
             "'Rejected'. Report id: " + entity.ExpenseReport.ReportId)

      End If End Sub
This check prevents employees from inserting, updating, and deleting ExpenseItems for a report that already has the Status set to either “Approved” or “Rejected”.
It is important to note that when an exception is thrown in the save pipeline methods that the changes are rolled back and the user is displayed a dialog box with the specified exception message.
Summary
The first step to properly securing an application is to secure your data on the logic tier by adding permission checks. This post has shown how to do this by adding permission checks to both the entity set “Can” methods and save pipeline methods.
Next time I will extend the “Expense Report Tracker” scenario to show how you can customize the appearance of screens according to the underlying security permissions for the user.
Thanks for joining me for my first blog post!


• Apress (@Apress) announced that Pro Visual Studio LightSwitch 2011 by Tim Leung and Yann Duran will publish about 12/15/2011:
Pro Visual Studio LightSwitch 2011 shows users how to get the most from this innovative product by going beyond the "one-click-and-you're-done" mentality. Authors Tim Leung and Yann Duran cover this breakthrough product and discuss advanced topics for power users and developers.
- ISBN13: 978-1-4302-4008-2
- 500 Pages
- User Level: Intermediate
- Publishing December 15, 2011
Pro Visual Studio LightSwitch 2011 answers these questions and more as authors Tim Leung and Yann Duran—both awarded Microsoft 2011 Community Contributor Awards for their LightSwitch expertise—cover this breakthrough product and its operations and structure under the covers.
For serious developers building, enhancing and deploying advanced business applications using LightSwitch, Pro Visual Studio LightSwitch 2011 is the guide for going beyond the "click-and-you're-done" interface, while still maintaining the elegance and convenience of rapid application development.
What you’ll learn
With Pro Visual Studio LightSwitch 2011, learn how to:For more advanced LightSwitch users, see how to:
- Add visibility through with Relationships and Details screens
- Use customized queries, sorts and filters, and reporting
- Customize displays via user controls
- Use multiple line-of-business data sources to aggregate reports
- Handle events in code and debug applications
- Master the intricacies of complex user interface design
- Secure your applications through authentication
- Write custom .NET code to enhance LightSwitch
- Deploy maintainable LightSwitch projects
Who this book is for
Pro Visual Studio LightSwitch 2011 is a book designed for any software developer who wants to take advantage of the rapid application deployment (RAD) experience offered by LightSwitch. It is ideal reading for those wanting to build and design applications correctly from the onset.
Those who have grasped the basics of LightSwitch and are looking to do more will benefit greatly from this book. Anyone struggling to design complex screens and queries in order to meet user requirements will find the answers in this book.
• Mahesh Chand reported C# Corner launches a new section on Visual Studio LightSwitch 2011 on 7/8/2011:
C# Corner, one of the most popular online communities for C# and Microsoft .NET developers with over 3.2 million monthly active users announced today that it has launched a new section on Visual Studio LightSwitch 2011.
The LightSwitch 2011 section covers articles, tutorials, forums, blogs, news and resources related to Visual Studio LightSwitch 2011.
Our author Jaganathan Bantheswaran has already contributed over 2 dozens of articles.
Check it out here: Visual Studio LightSwitch 2011
When I added this article, Jaganathan was the only contributor to the section.
The Visual Studio LightSwitch Team (@VSLightSwitch) announced a Document Toolkit Extension for LightSwitch in a 7/8/2011 post:
You can download and install the Document Toolkit directly from Visual Studio LightSwitch via the Extension Manager or you can download it manually from the Visual Studio Gallery. The following tutorials provide step-by-step instructions on installing and using Document Toolkit for LightSwitch.
Installing Document Toolkit for LightSwitch
Using the Document Viewer
How To Create And Use A Table of DocumentsFor more details about Document Toolkit see http://firstfloorsoftware.com/DocumentToolkit and stay tuned for more extensions available from our partners.
Paul Patterson described Microsoft LightSwitch – Using DevExpress XtraReports for Parameterized Reporting in a 7/7/2011 post:
Beta 2 has been out for some time now and I have had plenty of opportunity to make, and break, some interestingly creative solutions. This particular post is about how to create parameterized reporting via an intuitive LightSwitch specific reporting extension from DevExpress.
Enter the DevExpress XtraReports LightSwitch Extension. DevExpress has beaten the competition to market with a reporting toolset that is integrated into the LightSwitch development environment. The XtraReports tools already exist for .Net development, however DevExpress has packaged up their existing SilverLight based XtraReports components and made them available for use by wrapping them up in a pleasant to use LightSwitch extension.
In this post, I am going to step through the processes I used to create a LightSwitch application that uses a parameterized XtraReports report. For this application, the report is going to one that displays the data for an invoice that gets selected in the application screen.
Download Stuff First
Before you do anything, download and launch the DevExpress Visual Studio Controls trial package here: https://www.devexpress.com/ClientCenter/Downloads/#Trials . There is no need to install the entire package of goodies. Only install the LightSwitch Reporting tools (which are noted as Free!).
Fire it Up!
To get started, I launched Visual Studio and selected to create a new LightSwitch application. My application was named LSInvoiceD. I actually meant to name it something else, but my big fat fingers slipped and ended up typing something else. Oh well.
The first thing I did in my new LightSwitch application was create a couple of tables. This is so that I can enter some information that will later be used by my invoice report I am going to create. Here is the first table that I created, named “InvoiceHeader”…
Then I created an “InvoiceDetail” table…
Note the ExtendedPrice field. I created the ExtendedPrice field as a “Computed” field.
When clicking on the Edit Method link, I update the ExtendedPrice_Compute method to look like this…
        Private Sub ExtendedPrice_Compute(ByRef result As Decimal)
            result = Quantity * UnitPrice
        End Sub
The above code will calculate and return a value for the field that represents the extended price for the line item.
Next, back in the InvoiceDetail designer, I add a relationship to the InvoiceHeader table. As shown here…
Super. I only need a couple of tables to demonstrate the reporting here, so that is enough with the tables.
Now to go and add a screen to the application. Here is the one I added…
Next, I am going to set up my new LightSwitch application to use the DevExpress XtraReports extension.
I open the properties dialog for the application. In the Extensions tab I selected the DevExrepss.XtraReports.LightSwitch extension; which was made available because I installed the DevExpress tools.
Now to use the extension.
I also make sure to build the solution, just to keep things in check.
Back in the solution explorer, I Right-Click the Data Sources folder and select Add Data Source…
In the resulting Attach Data Source Wizard, I select to add a WCF RIA Service…
Through the extensibility available in LightSwitch, the capabilities of using XtraReports are exposed via WCF RIA Services. This is the beauty of LightSwitch; in that as a developer, you don’t need to worry about that behind the scenes plumbing. Extensions like these make it simple to do these kinds of things without wiring all that up manually.
In the next dialog of the wizard, I select the XtraReportsService in the available list of classes, and click the Next button…
After a moment the wizard should show the “entities” that are available via the WCF service. I checked the top level node so that everything is selected.
Once completed, LightSwitch displays the selected entity in the designer window…
I closed the designer.
Building a Report
Now for some report designing fun…
Back in the Solution Explorer, I change the view to File View…
I Right-click the Server project and select to add a new item…
In the Add New Item dialog, I add an XtraReport class named InvoiceReport.vb to my Server project…
This opens the XtraReport designer. I love this designer. I had no previous experience with the XtraReports components, and I was able to pick up on how to configure and use the designer in no time at all.
For a great overview of how to use the report designer in LightSwitch, check out the DevExpress help web site here: http://documentation.devexpress.com/#XtraReports/CustomDocument9901
The first thing I did was configure the report with a datasource. The datasource I wanted to use is my InvoiceDetails table…
Next, from the Field List panel, I drag and drop fields from the data source onto the detail area of the report designer. For example…
Because I only want details for a specific invoice, I need to add a parameter to the report. To do this, I right-click the Paremeters item in the Field List, and select Add Parameter…
With the newly created parameter, I update the parameter properties as so…
Now to configure the report to filter the datasource based on the parameter. To do that, I click the report designer smart tag, and select to update the Filter String property…
Next, I configure the filter string as so…
..and then, click through the value selector until you see the parameter selected..
Save everything.
Now, to make sure that my application can use the report, I need to make some tweaks to the report class itself. This is because of the Visual Studio templates that are used. For some reason, a namespace declaration is required for the report classes ( I found out this the hard way, so now it is the easy way for you
).
I select Show All Files icon in the top of the Solution Explorer panel.
First, I open the InvoiceReport.vb file by right-clicking it and selecting theView Code. Then I wrap the class in LightSwitchApplication namespace as shown in the below code…
Namespace LightSwitchApplication

    Public Class InvoiceReport

    End Class

End Namespace
Next, I do the same thing for the InvoiceReportDesigner.vb file (the partial class used by the designer). This file is located under the InvoiceReport.vb file in the solution explorer folder view.
Save everything. Then go back to the Solution Explorer and go back into the Logical View of the solution. Then build the solution.
Viewing the Report
Back in the logical view of the solution, I opened the screen that I created for my invoice information. I want to create a button on the screen so that, when clicked, the report I built will open and filter the details based on the invoice I have selected in the screen.
With the screen designer open, I click the Add Data Item button. In the Add Data Item dialog, I create a Method named ShowInvoice and click OK.
Next, I drag and drop the ShowInvoice screen item to the Command bar used for the Invoice Headers…
Now I right-click the ShowInvoice command bar item, and select the Edit Execute Code.
This opens the code used for the ShowInvoice method. I edit the code in the editor to this…
Imports DevExpress.Xpf.Printing

Namespace LightSwitchApplication

    Public Class InvoiceHeadersListDetail

        ' Define a ReportPreviewModel variable.
        Private paramModel As ReportPreviewModel

        Private Sub ShowInvoice_Execute()

            ' create a new ReportPreviewModel object.
            paramModel = New ReportPreviewModel
            ' Add a handler to the ReportPreviewModel
            AddHandler paramModel.RequestDefaultParameterValues, AddressOf RequestDefaultParameter

            ' Show the report using the ReportPreviewModel. This will cause the
            ' RequestDefaultParameterValues event handler to fire below, setting the parameter.
            ReportPreview.Show("LightSwitchApplication.InvoiceReport", paramModel)

        End Sub

        Private Sub RequestDefaultParameter(ByVal sender As Object, e As EventArgs)

            ' Set the SelectedInvoiceHeaderID parameter to the selected
            ' InvoiceHeader ID
            paramModel.Parameters("SelectedInvoiceHeaderID").Value = Me.InvoiceHeaders.SelectedItem.Id

        End Sub

    End Class

End Namespace
I saved this and cleaned and rebuilt the solution. With no errors, I ran the bad boy…
So far so good. I added some data (shown above) and saved it. Then, I selected the first invoice and clicked the Show Invoice button…
…and presto, the report ran using the selected invoice id as a parameter…
Great! Now, with a little creativity, I’ll simply make some updates to the design of the report, and presto….
Isn’t that super cool?!?
Now that this parameterized reporting functionality is available, and easy to use, we should be able to create some very interesting solutions.


Return to section navigation list>
Windows Azure Infrastructure and DevOps
Gartner published a Gartner Says Worldwide Software as a Service Revenue Is Forecast to Grow 21 Percent in 2011 press release on 7/6/2011:
Worldwide software as a service (SaaS) revenue is forecast to reach $12.1 billion in 2011, a 20.7 percent increase from 2010 revenue of $10 billion, according to Gartner, Inc. The SaaS-based delivery will experience healthy growth through 2015, when worldwide revenue is projected to reach $21.3 billion.
Gartner defines SaaS as software that is owned, delivered and managed remotely by one or more providers. The provider delivers an application based on a single set of common code and data definitions, which is consumed in a one-to-many model by all contracted customers anytime on a pay-for-use basis, or as a subscription based on use metrics."After more than a decade of use, adoption of SaaS continues to grow and evolve within the enterprise application markets," said Tom Eid, research vice president at Gartner. "This is occurring as tighter capital budgets demand leaner alternatives, popularity and familiarity with the model increases, and interest in platform as a service (PaaS) and cloud computing grows."
"Initial concerns about security, response time and service availability have diminished for many organizations as SaaS business and computing models have matured and adoption has become more widespread," Mr. Eid said. "Usage and vendors' on-demand ecosystems continue to evolve to provide additional business and technology services, more vertical-specific functionality, and stronger communities of partners and buyers."
During the past two years, the significant industry buzz surrounding SaaS and other off-premises models has shifted to cloud computing. Cloud computing is a broad concept, of which SaaS is only one variation, representing the application layer of the overall cloud architectural stack. However, SaaS has been a lead indicator of the cloud concept for some time. Gartner estimates that 75 percent of current SaaS delivery, as measured by revenue, could be regarded as cloud services, and this could exceed 90 percent by 2015 as the SaaS model matures and converges with cloud service models.
Customer relationship management (CRM) continues to be the largest market for SaaS. SaaS revenue within the CRM market is forecast to reach $3.8 billion in 2011, up from $3.2 billion in 2010. Gartner expects SaaS to represent nearly 32 percent of the CRM market's total software revenue in 2011.
"The market landscape for on-demand CRM continues to evolve and mature as the availability and use of SaaS solutions become more pervasive," Mr. Eid said. "Greater market competition and increased focus on megavendors reinforce the legitimacy of on-demand solutions, mitigating initial objections about security and availability for many, as acceptance of SaaS as a viable model for enterprise computing services grows."
SaaS revenue within the content, communications and collaboration (CCC) market is on pace to surpass $3.3 billion in 2011, up from $2.8 billion in 2010. The CCC market continues to show the widest disparity of SaaS revenue generation, with SaaS representing just 5 percent of enterprise content management (ECM) in 2010 but approximately 83 percent of Web conferencing.
The proportion of enterprise resource planning (ERP) revenue attributed to SaaS overall is still in the single digits, at approximately 7 percent of the overall ERP market. ERP SaaS offerings contributed approximately $1.5 billion to the SaaS market in 2010, and by year-end 2011, Gartner expects this to increase to $1.7 billion. The penetration of SaaS within ERP varies greatly between subsegments, with human capital management (HCM) being the most penetrated (in terms of adoptions and revenue growth) and enterprise asset management (EAM) and manufacturing being relatively unaffected by SaaS.
Additional information is available in the Gartner report "Forecast: Software as a Service, Worldwide, 2010-2015, 1H11 Update." The report is available on Gartner's website at http://www.gartner.com/resId=1728009.
<Return to section navigation list>
Windows Azure Platform Appliance (WAPA), Hyper-V and Private/Hybrid Clouds
Mike Laverick described Cloud management with Microsoft Concero: Battling VMware vCloud Director in a 7/2011 post to SearchServerVirtualization.com:
If you’re looking at Microsoft’s Project Concero for cloud management, consider the product’s maturity, features and integration with your existing virtual infrastructure.
When compared with VMware vCloud Director, Microsoft Concero’s pros and cons come to light. Neither product has everything you need for cloud management, but each offers some compelling points. VCloud Director, for instance, includes the technology you need to bring automation to your cloud, whereas Microsoft Concero offers greater integration with Hyper-V.
VMware vCloud Director vs. Microsoft Concero
Comparing Microsoft and VMware’s cloud management tools is not exactly an apples-to-apples evaluation. VMware vCloud Director has been available for more than a year, and Project Concero is only in public beta.
Microsoft announced Project Concero at TechEd 2011, and much of the content for this self-service cloud management tool is now freely available online. Concero is a Microsoft IIS “application” -- a Web portal that sits between the end consumer and pools of Hyper-V servers managed by System Center Virtual Machine Manager (SCVMM). You can also make Microsoft Concero aware of Windows Azure subscriptions. (See Figure 1.)
Figure 1
Microsoft Concero’s architecture. (Click image for an enlarged view.)VMware vCloud Director, announced at VMworld 2010, manages Infrastructure as a Service architectures by controlling security, virtual machine (VM) provisioning, billing and self-service access. VCloud Director requires additional tools, such as an Oracle database. And to take advantage of advanced features, it must interact with other vendors’ products through application programming interfaces. …
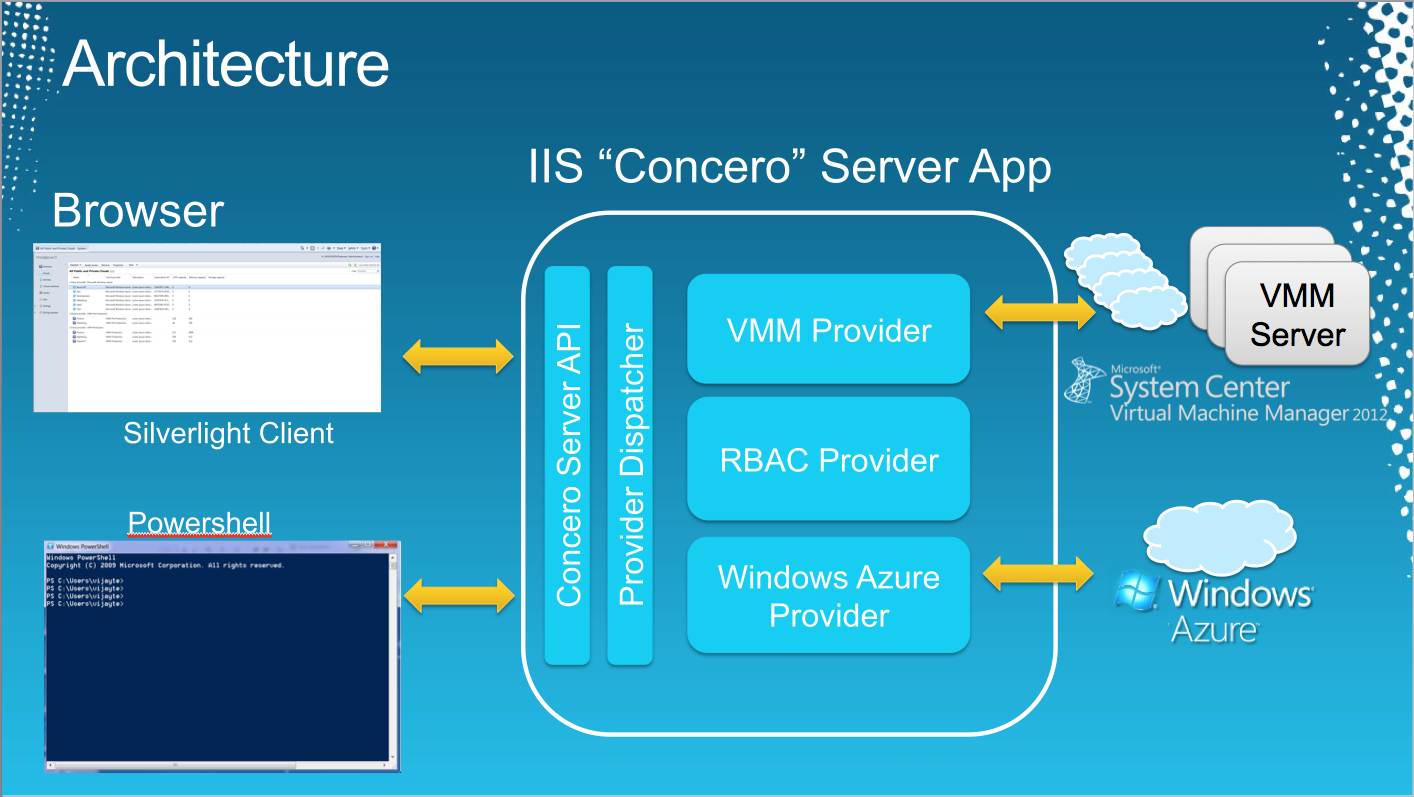
Mike continues with “Points for Microsoft Concero” and “Does Microsoft Concero fit the automation bill?” topics.
Full disclosure: I’m a paid contributor to TechTarget’s SearchCloudComputing.com blog, which is a sister publication to SearchServerVirtualization.com.
Cisco Systems published The Building Blocks For Private Cloud: Automation, Virtualization, And Cloud Service Management white paper on 7/1/2011 (Missed when published.) From the introduction (requires site registration for download):
When most people think of virtualization, they think primarily, or at least initially, of one-off server consolidation projects. However, almost 60% of organizations also obtain long-term benefits from greatly improved flexibility and agility.
This agility and automation in turn can form the basis of self-service IT. As routine tasks like provisioning are automated, business users can initiate build-out of standardized service offerings themselves, on a pay-per-use basis. IT staff, meanwhile, can be freed up or reassigned to more strategic and value-added activities.This in turn can start to form the basis of cloud computing – convenient, on-demand network access to a shared pool of configurable computing resources that can be rapidly provisioned and released with minimal management effort.
Looking at the essential characteristics of cloud computing – on-demand self-service, broad network access, resource pooling, rapid elasticity, and measured service – it is clear that Infrastructure Automation, Virtualization, and Service Management are fundamental building blocks for Private Cloud. And a critical and indispensible component of a private cloud is the Service Catalog – such as provided by newScale – providing a menu of standard cloud service offerings and a self-service “store-front” for IT.This EMA White Paper examines in more detail these building blocks for private cloud computing – automation, virtualization, and cloud service management – and provides EMA’s recommendations for a phased approach to cloud computing, based on EMA’s maturity model, research data, and enterprise activities, with prescriptive approach and some sample use cases to help get started.

<Return to section navigation list>
Cloud Security and Governance
• Jay Heiser posted Bach to Basics: Why You Should Care About Cloud Internals to his Gartner blog on 7/8/2011:
Just as the transition from a physically-secure batch-oriented environment to a remotely-accessible multi-tasking/multi-user environment had huge implications for security, the evolution from multi-user host-based environments to multi-tenant cloud-based environments represents an equally significant security challenge. The very idea of computer security only became necessary in the early 1960s when a more flexible and complex architecture attempted to provide service to multiple entities simultaneously, without the benefit of their physical presence.
To the extent that cloud computing truly does represent a new model, with greater flexibility, higher complexity, and a multi-entity support concept, it represents a complex engineering and architectural task. A traditional operating system such as Linux, must allow the safe and reliable co-existence of a set of users, ensuring that they all can gain access to memory, storage, processing, and peripherals, without interference or unauthorized access. It must allow for privileged users who have the ability to maintain, repair, backup, and restore the system and users. A cloud computing has those same needs, but they are extended across a virtualized storage and processing environment that not only consists of multiple hosts, it frequently consists of multiple sites. Instead of a flat entity base with a loose sort of group support, cloud environments are intended to support multiple tenants, each of which has its own user base.
Back in the day, I learned Unix security from the ground up, working my way through Kochan and Wood, recoding some of their security tools in C because the shell scripts didn’t all work on the CCI Power 6/32 where I cut my sysadmin teeth. I poured through Maurice Bach’s Design of the Unix Operating System. We used to argue about which version of Unix was most secure, but even the differences between SysV and BSD were pretty minor in comparison. [Links added.]
There are a huge number of people who understand *nix and Windows internals, but how many can claim the same about any of the proprietary public cloud environments? I’d like to think that quite a lot of people know quite a lot about Xen, but as you get more proprietary, where’s the Bach book on internals? How much like a hypervisor is a fabric controller? If Google and Salesforce aren’t using virtual machines, are they still clouds?
A wide variety of engineering tradeoffs are being made in the designs of different cloud models, and the degree to which the protection of data can be guaranteed while it is at rest, and while it is being accessed, likely varies. We shouldn’t assume that all clouds are created equal, because they vary quite a bit under the hood. I’m quite happy to use any old cloud for personal tasks that don’t involve anything sensitive, as long as I can back up my data outside of the cloud and repurpose it if the cloud blows away. For enterprise use involving sensitive data or processes, I don’t know how you can make an adequate with risk decision without knowing at least as much about the cloud internals as I know about Unix internals.
Unfortunately, in the face of a nested set of distributed services, any single one of which might be as complex as a traditional OS, and in the face of implacable vendor opacity, the cloud security community is mostly shying away from the same close examination of architecture, design, and coding that was once considered crucial in computer security. Cloud assessments have a discouraging tendency to concentrate on well-understood things that fit easily on a checklist, such as password aging, and fire suppression. You may be comfortable with today’s complex computing environments, trusting the vendor assurances that because they are sitting in a SAS70 ‘certified’ facility that your data is safe, but it would be inaccurate to assume that the digital exploit community shares that lack of curiosity about the underlying technology.


Jay Heiser is a Gartner research vice president specializing in the areas of IT risk management and compliance, security policy and organization, forensics, and investigation.
• Chris Hoff (@Beaker) appears in Intel’s 00:02:23 Trusting the Cloud with Intel Trusted Execution Technology YouTube video produced in 5/2011 (missed when posted):
Since Hoff appeared in the video, he’s moved from the right to the left coast to take a new job with Juniper Networks.
<Return to section navigation list>
Cloud Computing Events
• The Windows Azure Team (@WindowsAzure) suggested Windows Azure Sessions Not To Miss at WPC11 Next Week in a 7/8/2011 post:
If you’re still putting the final touches on your schedule for WPC11 next week in Los Angeles, here are four sessions you won’t want to miss. Each of these sessions will focus on the latest Windows Azure news and opportunities for partners. All times PDT. Note: session locations are subject to change; please check onsite for any room changes.
What’s New on Windows Azure (SC06)
- Tuesday, July 12 1:30 PM - 2:30 PM
- Room 502A, Los Angeles Convention Center (LACC)
- Speakers: Devesh Satyavolu, Doug Hauger, Prashant Ketkar
Find out the latest news about cloud comuting and Windows Azure. Learn about our profitability models, hear from partners who have grown their business in the cloud and get the latest information on new offers, product roadmap, partner programs and incentives to begin utilizing the cloud to your benefit.
Cloud Ascent: Learn How to Evolve Your SI Business with Windows Azure (CLD07)
- Tuesday, July 12 3:00 PM - 4:00 PM
- Room 502B, LACC
- Speakers: Amanda Mesler, Bertrand Masson, Carolina Uzcategui, Niraj Nagrani, Tilak Yalamanchili
Learn how you can make your cloud based practice more profitable while enhancing your value and offerings to your customers. During this session several systems integrator partners will share their first hand experiences with Windows Azure and how their customers have benefited from getting on the cloud.
Grow Your Business with Windows Azure Marketplace (AP13)
- Tuesday, July 12 4:30 PM - 5:30 PM
- Room 153AB, LACC
- Speaker(s): Niraj Nagrani, Sudhir Hasbe
This session will describe how ISVs and Data Providers can leverage Windows Azure Marketplace to grow their business and how other ISVS are participating in Windows Azure Marketplace to drive new business.
Websites and Profitability in the Cloud with Windows Azure (CLD10)
- Tuesday, July 12 4:30 PM - 5:30 PM
- Room 502B, LACC
- Speaker(s): Devesh Satyavolu, Mark Stephens, Shaun Walker, Vince Mayfield
In this session, the Windows Azure team will talk about how to build a profitable cloud based business that provides highly scalable, fast, rich web experiences. Hear directly from our partners who have launched sites on Windows Azure and how they’ve used the cloud to transform their business and pass on the benefits to their customers.
Click here to learn more about WPC11. Can’t make it to the conference? Then be sure to check out “MPN Live from WPC11” – a Roundtable Live Stream Talk Show Web Series, on Location from the MPN Booth in the Solution Innovation Center.
• Eric D. Boyd (@ericdboyd) will present Moving Web Apps to the Cloud at WI .NET User Group on 7/12/2011, according to a 7/8/2011 post:
As a developer with years of experience developing web apps using ASP.NET, SQL Server, Windows Server and Active Directory, how do you move to the cloud with Windows Azure? How can you apply your existing skills and experience to developing cloud apps in Windows Azure?
These are common questions that get raised when considering Cloud Computing, PaaS and Windows Azure. Often, developers and technology managers have applications that come to mind when hearing about Windows Azure, but they are existing apps that were designed to run on-premise and not in Windows Azure. Since the apps already exist and it doesn’t make sense to throw them away and start over, Windows Azure seems out of reach.
Next Tuesday, July 12, 2011, at 7PM, I will be presenting on this very topic at the WI .NET User Group. We will take a simple, ASP.NET web app, designed to run in the traditional data center, and walk through the migration to Windows Azure. We’ll discuss the important considerations, practices, architectural differences, challenges, advantages and economic benefits to consider when migrating to Windows Azure.
If you are planning to attend, please take a moment to register for the event. There will be FREE pizza and soda sponsored by Centare. And I will bring some additional cloud giveaways.
One important detail to take note of, we will not be meeting at the normal Direct Supply location, but instead at Northwoods Software. Thanks to Northwood Software for providing the location this month.
Northwoods Software Development, Inc
4600 West Schroeder Drive
Brown Deer, WI 53223
Map & Directions
Eric is Director, Chicago + Cloud Practice at @Centare.
The Windows Azure (@WindowsAzure) Team listed Windows Azure Sessions Not To Miss at WPC11 Next Week in a 7/8/2011 post:
If you’re still putting the final touches on your schedule for WPC11 next week in Los Angeles, here are four sessions you won’t want to miss. Each of these sessions will focus on the latest Windows Azure news and opportunities for partners. All times PDT. Note: session locations are subject to change; please check onsite for any room changes.
What’s New on Windows Azure (SC06)
Tuesday, July 12 1:30 PM - 2:30 PM
Room 502A, Los Angeles Convention Center (LACC)
Speakers: Devesh Satyavolu, Doug Hauger, Prashant Ketkar
Find out the latest news about cloud computing and Windows Azure. Learn about our profitability models, hear from partners who have grown their business in the cloud and get the latest information on new offers, product roadmap, partner programs and incentives to begin utilizing the cloud to your benefit.Cloud Ascent: Learn How to Evolve Your SI Business with Windows Azure (CLD07)
Tuesday, July 12 3:00 PM - 4:00 PM
Room 502B, LACC
Speakers: Amanda Mesler, Bertrand Masson, Carolina Uzcategui, Niraj Nagrani, Tilak Yalamanchili
Learn how you can make your cloud based practice more profitable while enhancing your value and offerings to your customers. During this session several systems integrator partners will share their first hand experiences with Windows Azure and how their customers have benefited from getting on the cloud.Grow Your Business with Windows Azure Marketplace (AP13)
Tuesday, July 12 4:30 PM - 5:30 PM
Room 153AB, LACC
Speaker(s): Niraj Nagrani, Sudhir Hasbe
This session will describe how ISVs and Data Providers can leverage Windows Azure Marketplace to grow their business and how other ISVS are participating in Windows Azure Marketplace to drive new business.Websites and Profitability in the Cloud with Windows Azure (CLD10)
Tuesday, July 12 4:30 PM - 5:30 PM
Room 502B, LACC Speaker(s): Devesh Satyavolu, Mark Stephens, Shaun Walker, Vince Mayfield
In this session, the Windows Azure team will talk about how to build a profitable cloud based business that provides highly scalable, fast, rich web experiences. Hear directly from our partners who have launched sites on Windows Azure and how they’ve used the cloud to transform their business and pass on the benefits to their customers.Click here to learn more about WPC11. Can’t make it to the conference? Then be sure to check out “MPN Live from WPC11” – a Roundtable Live Stream Talk Show Web Series, on Location from the MPN Booth in the Solution Innovation Center.
O’Reilly Media announced the Oscon Open Source Convention 2011 will be held in Portland, OR on 7/25 to 7/29/2011:
What do you do once you’ve changed the world? Do it again.
Join today’s open source innovators, builders, and pioneers July 25-29 as they gather at the Oregon Convention Center in Portland, Oregon, to share their expertise and experience, explore new ideas, and inspire each other.
Learn first-hand how new developments in open source are shaping the future. Challenge your assumptions, fire up your imagination, and kick your brain into high gear. Rub shoulders with open source rock stars—and have some serious fun with 2000+ people like you.
With over a dozen tracks and hundreds of sessions, you’ll find a wealth of leading-edge information on open source languages and platforms, with practical tutorials, inspirational keynote presentations, a jam-packed Expo Hall, fun networking events and activities, and the best "hallway track" around.
OSCON 2011 Tracks

<Return to section navigation list>
Other Cloud Computing Platforms and Services
• Carl Brooks (@eekygeeky) asked Is VMware vCloud Express in trouble? and answered “Yes” in a 7/8/2011 post to the SearchCloudComputing blog:
Only two years after VMware announced vCloud Express, the program appears to be foundering, undone by a lack of both serious interest from end users and of compelling remuneration for providers.
We measure traction across our whole vCloud initiative, and it's been very positive.
Joe Andrews, director of product marketing at VMware
vCloud Express was launched in 2009 as way for managed hosting providers with a VMware customer base to offer an Amazon Web Services (AWS) style cloud service, fully automated, self-service, and elastic, on-demand computing through APIs or a Web portal. It was touted as compatible with most virtualized enterprise infrastructure and a way for providers to entice enterprise IT to use the cloud for things like test and development.
However, so far only two service providers remain in the program out of the original five. Those five providers included Terremark, Hosting.com, Logica (in the UK), Melbourne IT (in Australia) and BlueLock. Terremark and Hosting.com are the only ones still in vCloud Express. Only one new provider, Virtacore, has been added.
All have expanded cloud computingofferings in various flavors, but vCloud Express hasn't hit the mark, it seems. BlueLock, a strong VMware partner and vCloud tester, ended its vCloud Express service in favor of the more elaborate vCloud DataCenter service. …
Carl continues with “The reasoning behind the downfall,” “User dissatisfaction is evident” and “vCloud Express still pushes forward” topics.
Full disclosure: I’m a paid contributor to SearchCloudComputing.com.
Oren Eini (a.k.a., Ayende Rahien, @Ayende) wrote The Pain of Implementing LINQ Providers for the July 2011 issue of the Association for Computing Machinery’s ACM Queue proceedings. From the introduction:
It's no easy task for NoSQL
I remember sitting on the edge of my seat watching the 2005 PDC (Professional Developers Conference) videos that first showed LINQ (Language Integrated Query). I wanted LINQ: it offered just about everything that I could hope for to make working with data easy.
The impetus for building queries into the language is quite simple; it is something that is used all the time; and the promise of a unified querying model is good enough, even before you add all the language goodies that were dropped on us. Being able to write in C# and have the database magically understand what I am doing? Awesome! Getting compilation errors from Visual Studio, rather than runtime errors at testing (or worse, production)? Wonderful! Getting rid of most SQL injection issues? Amazing!
Then .NET 3.5 rolled around, and we had LINQ, and I found myself in quite a pickle. There are actually two sides to the LINQ story: the consumer side and the implementer side. For the consumer, it is all sunshine and flowers, but for the implementers it is doom, gloom with just a tad of despair. And even for the consumers, past the initial love at first sight phase, they are issues that require handling. Let me focus first on the consumer side. …

Ayende knows whereof he speaks. He’s implemented LINQ providers for the open-source NHibernate object/relational mapping (O/RM) tool and RavenDB, his NoSQL document database for .NET. He notes in the “Summary” section, “[I]t actually took more time to build the LINQ provider for RavenDB than it took to build RavenDB itself.”
Jinesh reported AWS Import/Export Now Supports Amazon EBS in a 6/7/2011 post:
I am very excited to announce support for importing data into Amazon Elastic Block Store (EBS) using AWS Import/Export. Until now, AWS Import/Export allowed you to move large amounts of data into and out of Amazon S3 using portable storage devices by using Amazon’s high-speed internal network and bypassing the Internet. All you have to do is load up the data on an eSATA or USB drive and ship it to us.
Now, AWS Import/Export supports importing data directly into Amazon EBS snapshots. Once loaded into an Amazon EBS snapshot, you can create a volume based on that snapshot and attach it to an Amazon EC2 instance, or you can share that snapshot with others. The process is very simple:
If you have large amounts of data to load and an Internet connection with limited bandwidth, the time required to prepare and ship a portable storage device to AWS can be a small percentage of the time it would take to transfer your data over the internet. If loading your data over the Internet would take more than a few days, you should consider using AWS Import/Export.

<Return to section navigation list>


0 comments:
Post a Comment