Windows Azure and Cloud Computing Posts for 3/5/2012+
| A compendium of Windows Azure, Service Bus, EAI & EDI Access Control, Connect, SQL Azure Database, and other cloud-computing articles. |
Note: This post is updated daily or more frequently, depending on the availability of new articles in the following sections:
- Windows Azure Blob, Drive, Table, Queue and Hadoop Services
- SQL Azure Database, Federations and Reporting
- Marketplace DataMarket, Social Analytics and OData
- Windows Azure Access Control, Service Bus, and Workflow
- Windows Azure VM Role, Virtual Network, Connect, RDP and CDN
- Live Windows Azure Apps, APIs, Tools and Test Harnesses
- Visual Studio LightSwitch and Entity Framework v4+
- Windows Azure Infrastructure and DevOps
- Windows Azure Platform Appliance (WAPA), Hyper-V and Private/Hybrid Clouds
- Cloud Security and Governance
- Cloud Computing Events
- Other Cloud Computing Platforms and Services
Azure Blob, Drive, Table, Queue and Hadoop Service
Joe Giardino of the Windows Azure Storage Team posted a Windows Azure Storage Client for Java Overview on 3/5/2012:
We released the Storage Client for Java with support for Windows Azure Blobs, Queues, and Tables. Our goal is to continue to improve the development experience when writing cloud applications using Windows Azure Storage. This release is a Community Technology Preview (CTP) and will be supported by Microsoft. As such, we have incorporated feedback from customers and forums for the current .NET libraries to help create a more seamless API that is both powerful and simple to use. This blog post serves as an overview of the library and covers some of the implementation details that will be helpful to understand when developing cloud applications in Java. Additionally, we’ve provided two additional blog posts that cover some of the unique features and programming models for the blob and table service.
Packages
The Storage Client for Java is distributed in the Windows Azure SDK for Java jar (see below for locations). For the optimal development experience import the client sub package directly (com.microsoft.windowsazure.services.[blob|queue|table].client). This blog post refers to this client layer.
The relevant packages are broken up by service:
Common
com.microsoft.windowsazure.services.core.storage – This package contains all storage primitives such as CloudStorageAccount, StorageCredentials, Retry Policies, etc.
Services
com.microsoft.windowsazure.services.blob.client – This package contains all the functionality for working with the Windows Azure Blob service, including CloudBlobClient, CloudBlob, etc.
com.microsoft.windowsazure.services.queue.client – This package contains all the functionality for working with the Windows Azure Queue service, including CloudQueueClient, CloudQueue, etc.
com.microsoft.windowsazure.services.table.client – This package contains all the functionality for working with the Windows Azure Table service, including CloudTableClient, TableServiceEntity, etc.
Services
While this document describes the common concepts for all of the above packages, it’s worth briefly summarizing the capabilities of each client library. Blob and Table each have some interesting features that warrant further discussion. For those, we’ve provided additional blog posts linked below. The client API surface has been designed to be easy to use and approachable, however to accommodate more advanced scenarios we have provided optional extension points when necessary.
Blob
The Blob API supports all of the normal Blob Operations (upload, download, snapshot, set/get metadata, and list), as well as the normal container operations (create, delete, list blobs). However we have gone a step farther and also provided some additional conveniences such as Download Resume, Sparse Page Blob support, simplified MD5 scenarios, and simplified access conditions.
To better explain these unique features of the Blob API, we have published an additional blog post which discusses these features in detail. You can also see additional samples in our article How to Use the Blob Storage Service from Java.
Sample – Upload a File to a Block Blob
// You will need these imports
import com.microsoft.windowsazure.services.blob.client.CloudBlobClient;
import com.microsoft.windowsazure.services.blob.client.CloudBlobContainer;
import com.microsoft.windowsazure.services.blob.client.CloudBlockBlob;
import com.microsoft.windowsazure.services.core.storage.CloudStorageAccount;

// Initialize Account
CloudStorageAccount account = CloudStorageAccount.parse([ACCOUNT_STRING]);

// Create the blob client
CloudBlobClient blobClient = account.createCloudBlobClient();

// Retrieve reference to a previously created container
CloudBlobContainer container = blobClient.getContainerReference("mycontainer");

// Create or overwrite the "myimage.jpg" blob with contents from a local
// file
CloudBlockBlob blob = container.getBlockBlobReference("myimage.jpg");
File source = new File("c:\\myimages\\myimage.jpg");
blob.upload(new FileInputStream(source), source.length());
(Note: It is best practice to always provide the length of the data being uploaded if it is available; alternatively a user may specify -1 if the length is not known)
Table
The Table API provides a minimal client surface that is incredibly simple to use but still exposes enough extension points to allow for more advanced “NoSQL” scenarios. These include built in support for POJO, HashMap based “property bag” entities, and projections. Additionally, we have provided optional extension points to allow clients to customize the serialization and deserialization of entities which will enable more advanced scenarios such as creating composite keys from various properties etc.
Due to some of the unique scenarios listed above the Table service has some requirements and capabilities that differ from the Blob and Queue services. To better explain these capabilities and to provide a more comprehensive overview of the Table API we have published an in depth blog post which includes the overall design of Tables, the relevant best practices, and code samples for common scenarios. You can also see more samples in our article How to Use the Table Storage Service from Java.
Sample – Upload an Entity to a Table
// You will need these imports
import com.microsoft.windowsazure.services.core.storage.CloudStorageAccount;
import com.microsoft.windowsazure.services.table.client.CloudTableClient;
import com.microsoft.windowsazure.services.table.client.TableOperation;

// Retrieve storage account from connection-string
CloudStorageAccount storageAccount = CloudStorageAccount.parse([ACCOUNT_STRING]);

// Create the table client.
CloudTableClient tableClient = storageAccount.createCloudTableClient();

// Create a new customer entity.
CustomerEntity customer1 = new CustomerEntity("Harp", "Walter");
customer1.setEmail("Walter@contoso.com");
customer1.setPhoneNumber("425-555-0101");

// Create an operation to add the new customer to the people table.
TableOperation insertCustomer1 = TableOperation.insert(customer1);

// Submit the operation to the table service.
tableClient.execute("people", insertCustomer1);
Queue
The Queue API includes convenience methods for all of the functionality available through REST. Namely creating, modifying and deleting queues, adding, peeking, getting, deleting, and updating messages, and also getting the message count. Here is a sample of creating a queue and adding a message, and you can also read How to Use the Queue Storage Service from Java.
Sample – Create a Queue and Add a Message to it
// You will need these imports
import com.microsoft.windowsazure.services.core.storage.CloudStorageAccount;
import com.microsoft.windowsazure.services.queue.client.CloudQueue;
import com.microsoft.windowsazure.services.queue.client.CloudQueueClient;
import com.microsoft.windowsazure.services.queue.client.CloudQueueMessage;
// Retrieve storage account from connection-string
CloudStorageAccount storageAccount = CloudStorageAccount.parse([ACCOUNT_STRING]);

// Create the queue client
CloudQueueClient queueClient = storageAccount.createCloudQueueClient();

// Retrieve a reference to a queue
CloudQueue queue = queueClient.getQueueReference("myqueue");

// Create the queue if it doesn't already exist
queue.createIfNotExist();

// Create a message and add it to the queue
CloudQueueMessage message = new CloudQueueMessage("Hello, World");
queue.addMessage(message);
Design
When designing the Storage Client for Java, we set up a series of design guidelines to follow throughout the development process. In order to reflect our commitment to the Java community working with Azure, we decided to design an entirely new library from the ground up that would feel familiar to Java developers. While the basic object model is somewhat similar to our .NET Storage Client Library there have been many improvements in functionality, consistency, and ease of use which will address the needs of both advanced users and those using the service for the first time.
Guidelines
- Convenient and performant – This default implementation is simple to use, however we will always be able to support the performance-critical scenarios. For example, Blob upload APIs require a length of data for authentication purposes. If this is unknown a user may pass -1, and the library will calculate this on the fly. However, for performance critical applications it is best to pass in the correct number of bytes.
- Users own their requests – We have provided mechanisms that will allow users to determine the exact number of REST calls being made, the associated request ids, HTTP status codes, etc. (See OperationContext in the Object Model discussion below for more). We have also annotated every method that will potentially make a REST request to the service with the @DoesServiceRequest annotation. This all ensures that you, the developer, are able to easily understand and control the requests made by your application, even in scenarios like Retry, where the Java Storage Client library may make multiple calls before succeeding.
- · Look and feel –
- Naming is consistent. Logical antonyms are used for complimentary actions (i.e. upload and download, create and delete, acquire and release)
- get/set prefixes follow Java conventions and are reserved for local client side “properties”
- Minimal overloads per method. One with the minimum set of required parameters and one overload including all optional parameters which may be null. The one exception is listing methods have 2 minimum overloads to accommodate the common scenario of listing with prefix.
- Minimal API Surface – In order to keep the API surface smaller we have reduced the number of extraneous helper methods. For example, Blob contains a single upload and download method that use Input / OutputStreams. If a user wishes to handle data in text or byte form, they can simply pass in the relevant stream.
- Provide advanced features in a discoverable way – In order to keep the core API simple and understandable advanced features are exposed via either the RequestOptions or optional parameters.
- Consistent Exception Handling - The library immediately will throw any exception encountered prior to making the request to the server. Any exception that occurs during the execution of the request will subsequently be wrapped inside a StorageException.
- Consistency – objects are consistent in their exposed API surface and functionality. For example a Blob, Container, or Queue all expose an exists() method
Object Model
The Storage Client for Java uses local client side objects to interact with objects that reside on the server. There are additional features provided to help determine if an operation should execute, how it should execute, as well as provide information about what occurred when it was executed. (See Configuration and Execution below)
Objects
StorageAccount
The logical starting point is a CloudStorageAccount which contains the endpoint and credential information for a given storage account. This account then creates logical service clients for each appropriate service: CloudBlobClient, CloudQueueClient, and CloudTableClient. CloudStorageAccount also provides a static factory method to easily configure your application to use the local storage emulator that ships with the Windows Azure SDK.
A CloudStorageAccount can be created by parsing an account string which is in the format of:
"DefaultEndpointsProtocol=http[s];AccountName=<account name>;AccountKey=<account key>"Optionally, if you wish to specify a non-default DNS endpoint for a given service you may include one or more of the following in the connection string.
“BlobEndpoint=<endpoint>”, “QueueEndpoint=<endpoint>”, “TableEndpoint=<endpoint>”Sample – Creating a CloudStorageAccount from an account string
// Initialize Account
CloudStorageAccount account = CloudStorageAccount.parse([ACCOUNT_STRING]);
ServiceClients
Any service wide operation resides on the service client. Default configuration options such as timeout, retry policy, and other service specific settings that objects associated with the client will reference are stored here as well.
For example:
- To turn on Storage Analytics for the blob service a user would call CloudBlobClient.uploadServiceProperties(properties)
- To list all queues a user would call CloudQueueClient.listQueues()
- To set the default timeout to 30 seconds for objects associated with a given client a user would call Cloud[Blob|Queue|Table]Client.setTimeoutInMs(30 * 1000)
Cloud Objects
Once a user has created a service client for the given service it’s time to start directly working with the Cloud Objects of that service. A CloudObject is a CloudBlockBlob, CloudPageBlob, CloudBlobContainer, and CloudQueue, each of which contains methods to interact with the resource it represents in the service.
Below are basic samples showing how to create a Blob Container, a Queue, and a Table. See the samples in the Services section for examples of how to interact with a CloudObjects.
Blobs
// Retrieve reference to a previously created container
CloudBlobContainer container = blobClient.getContainerReference("mycontainer");

// Create the container if it doesn't already exist
container.createIfNotExist()
Queues
// Retrieve a reference to a queue
CloudQueue queue = queueClient.getQueueReference("myqueue");

// Create the queue if it doesn't already exist
queue.createIfNotExist();
Tables
Note: You may notice that unlike blob and queue the table service does not use a CloudObject to represent an individual table, this is due to the unique nature of the table service which will is covered more in depth in the Tables deep dive blog post. Instead, table operations are performed via the CloudTableClient object:
// Create the table if it doesn't already exist
tableClient.createTableIfNotExists("people");
Configuration and Execution
In each maximum overload of each method provided in the library you will note there are two or three extra optional parameters provided depending on the service, all of which accept null to allow users to utilize just a subset of the features they require. For example to utilize only RequestOptions simply pass in null to AccessCondition and OperationContext. These objects for these optional parameters provide the user an easy way to determine if an operation should execute, how to execute it, and retrieve additional information about how it was executed when it completes.
AccessCondition
An AccessCondition’s primary purpose is to determine if an operation should execute, and is supported when using the Blob service. Specifically, AccessCondition encapsulates Blob leases as well as the If-Match, If-None-Match, If-Modified_Since, and the If-Unmodified-Since HTTP headers. An AccessCondition may be reused across operations as long as the given condition is still valid. For example, a user may only wish to delete a blob if it hasn’t been modified since last week. By using an AccessCondition, the library will send the HTTP "If-Unmodified-Since" header to the server which may not process the operation if the condition is not true. Additionally, blob leases can be specified through an AccessCondition so that only operations from users holding the appropriate lease on a blob may succeed.
AccessCondition provides convenient static factory methods to generate an AccessCondition instance for the most common scenarios (IfMatch, IfNoneMatch, IfModifiedSince, IfNotModifiedSince, and Lease) however it is possible to utilize a combination of these by simply calling the appropriate setter on the condition you are using.
The following example illustrates how to use an AccessCondition to only upload the metadata on a blob if it is a specific version.
blob.uploadMetadata(AccessCondition.generateIfMatchCondition(currentETag), null /* RequestOptions */, null/* OperationContext */);Here are some Examples:
//Perform Operation if the given resource is not a specified version:
AccessCondition.generateIfNoneMatchCondition(eTag)

//Perform Operation if the given resource has been modified since a given date:
AccessCondition. generateIfModifiedSinceConditionlastModifiedDate)

//Perform Operation if the given resource has not been modified since a given date:
AccessCondition. generateIfNotModifiedSinceCondition(date)

//Perform Operation with the given lease id (Blobs only):
AccessCondition. generateLeaseCondition(leaseID)

//Perform Operation with the given lease id if it has not been modified since a given date:
AccessCondition condition = AccessCondition. generateLeaseCondition (leaseID);
condition. setIfUnmodifiedSinceDate(date);
RequestOptions
Each Client defines a service specific RequestOptions (i.e. BlobRequestOptions, QueueRequestOptions, and TableRequestOptions) that can be used to modify the execution of a given request. All service request options provide the ability to specify a different timeout and retry policy for a given operation; however some services may provide additional options. For example the BlobRequestOptions includes an option to specify the concurrency to use when uploading a given blob. RequestOptions are not stateful and may be reused across operations. As such, it is common for applications to design RequestOptions for different types of workloads. For example an application may define a BlobRequestOptions for uploading large blobs concurrently, and a BlobRequestOptions with a smaller timeout when uploading metadata.
The following example illustrates how to use BlobRequestOptions to upload a blob using up to 8 concurrent operations with a timeout of 30 seconds each.
BlobRequestOptions options = new BlobRequestOptions();

// Set ConcurrentRequestCount to 8
options.setConcurrentRequestCount(8);

// Set timeout to 30 seconds
options.setTimeoutIntervalInMs(30 * 1000);

blob.upload(new ByteArrayInputStream(buff),
     blobLength,
     null /* AccessCondition */,
     options,
     null /* OperationContext */);
OperationContext
The OperationContext is used to provide relevant information about how a given operation executed. This object is by definition stateful and should not be reused across operations. Additionally the OperationContext defines an event handler that can be subscribed to in order to receive notifications when a response is received from the server. With this functionality, a user could start uploading a 100 GB blob and update a progress bar after every 4 MB block has been committed.
Perhaps the most powerful function of the OperationContext is to provide the ability for the user to inspect how an operation executed. For each REST request made against a server, the OperationContext stores a RequestResult object that contains relevant information such as the HTTP status code, the request ID from the service, start and stop date, etag, and a reference to any exception that may have occurred. This can be particularly helpful to determine if the retry policy was invoked and an operation took more than one attempt to succeed. Additionally, the Service Request ID and start/end times are useful when escalating an issue to Microsoft.
The following example illustrates how to use OperationContext to print out the HTTP status code of the last operation.
OperationContext opContext = new OperationContext();
queue.createIfNotExist(null /* RequestOptions */, opContext);
System.out.println(opContext.getLastResult().getStatusCode());
Retry Policies
Retry Policies have been engineered so that the policies can evaluate whether to retry on various HTTP status codes. Although the default policies will not retry 400 class status codes, a user can override this behavior by creating their own retry policy. Additionally, RetryPolicies are stateful per operation which allows greater flexibility in fine tuning the retry policy for a given scenario.
The Storage Client for Java ships with 3 standard retry policies which can be customized by the user. The default retry policy for all operations is an exponential backoff with up to 3 additional attempts as shown below:
new RetryExponentialRetry(
    3000 /* minBackoff in milliseconds */,
    30000 /* delatBackoff in milliseconds */,
    90000 /* maxBackoff in milliseconds */,
    3 /* maxAttempts */);
With the above default policy, the retry will approximately occur after: 3,000ms, 35,691ms and 90,000ms
If the number of attempts should be increased, one can use the following:
new RetryExponentialRetry(
    3000 /* minBackoff in milliseconds */,
    30000 /* delatBackoff in milliseconds */,
    90000 /* maxBackoff in milliseconds */,
    6 /* maxAttempts */);
With the above policy, the retry will approximately occur after: 3,000ms, 28,442ms and 80,000ms, 90,000ms, 90,000ms and 90,000ms.
NOTE: the time provided is an approximation because the exponential policy introduces a +/-20% random delta as described below.
NoRetry - Operations will not be retried
LinearRetry - Represents a retry policy that performs a specified number of retries, using a specified fixed time interval between retries.
ExponentialRetry (default) - Represents a retry policy that performs a specified number of retries, using a randomized exponential backoff scheme to determine the interval between retries. This policy introduces a +/- %20 random delta to even out traffic in the case of throttling.
A user can configure the retry policy for all operations directly on a service client, or specify one in the RequestOptions for a specific method call. The following illustrates how to configure a client to use a linear retry with a 3 second backoff between attempts and a maximum of 3 additional attempts for a given operation.
serviceClient.setRetryPolicyFactory(new RetryLinearRetry(3000,3));Or
TableRequestOptions options = new TableRequestOptions();
options.setRetryPolicyFactory(new RetryLinearRetry(3000, 3));
Custom Policies
There are two aspects of a retry policy, the policy itself and an associated factory. To implement a custom interface a user must derive from the abstract base class RetryPolicy and implement the relevant methods. Additionally, an associated factory class must be provided that implements the RetryPolicyFactory interface to generate unique instances for each logical operation. For simplicities sake the policies mentioned above implement the RetryPolicyFactory interface themselves, however it is possible to use two separate classes
Note about .NET Storage Client
During the development of the Java library we have identified many substantial improvements in the way our API can work. We are committed to bringing these improvements back to .NET while keeping in mind that many clients have built and deployed applications on the current API, so stay tuned.
Summary
We have put a lot of work into providing a truly first class development experience for the Java community to work with Windows Azure Storage. We very much appreciate all the feedback we have gotten from customers and through the forums, please keep it coming. Feel free to leave comments below,
Joe Giardino
Developer
Windows Azure StorageResources
Get the Windows Azure SDK for Java
Learn more about the Windows Azure Storage Client for Java
- Windows Azure Storage Client for Java Tables Deep Dive
- Windows Azure Storage Client for Java Blob Features
- Windows Azure Storage Client for Java Storage Samples
- How to Use the Blob Storage Service from Java
- How to Use the Queue Storage Service from Java
- How to Use the Table Storage Service from Java
- Windows Azure SDK for Java Developer Center
Learn more about Windows Azure Storage
Joe Giardino of the Windows Azure Storage Team also posted detailed Windows Azure Storage Client for Java Tables Deep Dive and Windows Azure Storage Client for Java Blob Features articles on 3/5/2012.
Robin Cremers (@robincremers) posted a very detailed Everything you need to know about Windows Azure Table Storage to use a scalable non-relational structured data store article on 3/4/2012:
In my attempt to cover most of the features of the Microsoft Cloud Computing platform Windows Azure, I’ll be covering Windows Azure storage in the next few posts.
You can find the Windows Azure Blog Storage post here:
Everything you need to know about Windows Azure Blob Storage including permissions, signatures, concurrency, …
Why using Windows Azure storage:
- Fault-tolerance: Windows Azure Blobs, Tables and Queues stored on Windows Azure are replicated three times in the same data center for resiliency against hardware failure. No matter which storage service you use, your data will be replicated across different fault domains to increase availability
- Geo-replication: Windows Azure Blobs and Tables are also geo-replicated between two data centers 100s of miles apart from each other on the same continent, to provide additional data durability in the case of a major disaster, at no additional cost.
- REST and availability: In addition to using Storage services for your applications running on Windows Azure, your data is accessible from virtually anywhere, anytime.
- Content Delivery Network: With one-click, the Windows Azure CDN (Content Delivery Network) dramatically boosts performance by automatically caching content near your customers or users.
- Price: It’s insanely cheap storage
The only reason you would not be interested in the Windows Azure storage platform would be if you’re called Chuck Norris …
Now if you are still reading this line it means you aren’t Chuck Norris, so let’s get on with it.The Windows Azure Table storage service stores large amounts of structured data. The service is a NoSQL datastore which accepts authenticated calls from inside and outside the Azure cloud. Azure tables are ideal for storing structured, non-relational data. Common uses of the Table service include:
- Storing TBs of structured data capable of serving web scale applications
- Storing datasets that don’t require complex joins, foreign keys, or stored procedures and can be denormalized for fast access
- Quickly querying data using a clustered index
- Accessing data using the OData protocol and LINQ queries with WCF Data Service .NET Libraries
You can use the table storage service to store and query huge sets of structured, non-relational data, and your tables will scale as demand increases.
If you do not know the OData protocol is and what is used for, you can find more information about it in this post:
WCF REST service with ODATA and Entity Framework with client context, custom operations and operation interceptorsThe concept behind the Windows Azure table storage is as following:
There are 3 things you need to know about to use Windows Azure Table storage:
- Account: All access to Windows Azure Storage is done through a storage account. The total size of blob, table, and queue contents in a storage account cannot exceed 100TB.
- Table: A table is a collection of entities. Tables don’t enforce a schema on entities, which means a single table can contain entities that have different sets of properties. An account can contain many tables, the size of which is only limited by the 100TB storage account limit.
- Entity: An entity is a set of properties, similar to a database row. An entity can be up to 1MB in size
1. Creating and using the Windows Azure Storage Account
To be able to store data in the Windows Azure platform, you will need a storage account. To create a storage account, log in the Windows Azure portal with your subscription and go to the Hosted Services, Storage Accounts & CDN service:
Select the Storage Accounts service and hit the Create button to create a new storage account:
Define a prefix for your storage account you want to create:
After the Windows Azure storage account is created, you can view the storage account properties by selecting the storage account:
The storage account can be used to store data in the blob storage, table storage or queue storage. In this post, we will only cover table storage. One of the properties of the storage account is the primary and secondary access key. You will need one of these 2 keys to be able to execute operations on the storage account. Both the keys are valid and can be used as an access key.
When you have an active Windows Azure storage account in your subscription, you’ll have a few possible operations:
- Delete Storage: Delete the storage account, including all the related data to the storage account
- View Access Keys: Shows the primary and secondary access key
- Regenerate Access Keys: Allows you to regenerate one or both of your access keys. If one of your access keys is compromised, you can regenerate it to revoke access for the compromised access key
- Add Domain: Map a custom DNS name to the storage account blob storage. For example map the robbincremers.blob.core.windows.net to static.robbincremers.me domain. Can be interesting for storage accounts which directly expose data to customers through the web. The mapping is only available for blob storage, since only blob storage can be publicly exposed.
Now that we created our Windows Azure storage account, we can start by getting a reference to our storage account in our code. To do so, you will need to work with the CloudStorageAccount, which belongs to Microsoft.WindowsAzure namespace:

We create a CloudStorageAccount by parsing a connection string. The connection string takes the account name and key, which you can find in the Windows Azure portal. You can also create a CloudStorageAccount by passing the values as parameters instead of a connection string, which could be preferable. You need to create an instance of the StorageCredentialsAccountAndKey and pass it into the CloudStorageAccount constructor:
The boolean that the CloudStorageAccount takes is to define whether you want to use HTTPS or not. In our case we chose to use HTTPS for our operations on the storage account. The storage account only has a few operations, like exposing the storage endpoints, the storage account credentials and the storage specific clients:
The storage account exposes the endpoint of the blob, queue and table storage. It also exposes the storage credentials by the Credentials operation. Finally it also exposes 4 important operations:
- CreateCloudBlobClient: Creates a client to work on the blob storage
- CreateCloudDrive: Creates a client to work on the drive storage
- CreateCloudQueueClient: Creates a client to work on the queue storage
- CreateCloudTableClient: Creates a client to work on the table storage
You won’t be using the CloudStorageAccount much, except for creating the service client for a specific storage type.
2. Basic operations for managing Windows Azure table storage
There are 2 levels to be working with the windows azure table storage, which is the table and the entity.
To manage the windows azure tables, you need to create an instance of the CloudTableClient through the CreateCloudTableClient operation on the CloudStorageAccount:
The CloudTableClient exposes a bunch of operations to manage the storage tables:
- CreateTable: Create a table with a specified name. If the table already exists, a StorageClientException will be thrown
- CreateTableIfNotExist: Create a table with a specified name, only if the table does not exist yet
- DoesTableExist: Check whether a table with the specified name exists
- DeleteTable: Delete a table and it’s content from the table storage. If you attempt to delete a table that does not exist, a StorageClientException will be thrown
- DeleteTableIfExist: Delete a table and it’s content from the table storage, if the table exists
- ListTables: List all the tables or all the tables with a specified prefix that belong to the storage account table storage
- GetDataServiceContext: Get a new untyped DataServiceContext to query data with table storage
Creating a storage table:
If you run this code, a storage table will be created with the name “Customers”.
To explore my storage accounts, I use a free tool called Azure Storage Explorer which you can download on codeplex:
http://azurestorageexplorer.codeplex.com/You can see your storage tables and storage data with the Azure Storage Explorer after you connect to your storage account:
3. Creating Windows Azure table storage entities with TableServiceEntity
Entities map to C# objects derived from TableServiceEntity. To add an entity to a table, create a class that defines the properties of your entity and that derives from the TableServiceEntity.
The TableServiceEntity abstract class belongs to the Microsoft.WindowsAzure.StorageClient namespace. The TableServiceEntity looks as following:
There are 3 properties to the TableServiceEntity:
- PartitionKey: The first key property of every table. The system uses this key to automatically distribute the table’s entities over many storage nodes
- RowKey: A second key property for the table. This is the unique ID of the entity within the partition it belongs to.
- TimeStamp: Every entity has a version maintained by the system which is used for optimistic concurrency. The TimeStamp value is managed by the windows azure platform
Together, an entity’s partition and row key uniquely identify the entity in the table. Entities with the same partition key can be queried faster than those with different partition keys. Deciding on the PartitionKey and RowKey is a discussion on itself and can make a large difference on the performance of retrieving data. We will not discuss best practices for chosing partitions keys
We create a class Customer, which will contain some basic information about a customer:
We have a few properties which store information about the customer. Finally we have 2 constructors set for the Customer class:
- No parameters: Sets the PartitionKey and RowKey by default. For now we set the PartitionKey to Customers and we assign the RowKey a unique identifier, so each entity has a unique combination
- Take the partition key and row key as a parameter and set them to the related properties that are defined on the base class, which is the TableServiceEntity
You can write the constructors also like this, but that’s up to preference:
It simply calls into the base class constructor, which is the TableServiceEntity, which takes a partition key and row key as parameters. This is all that’s necessary to store the entities at the Windows Azure table storage. You take these 2 steps to be able to use the class for the table storage:
- Derive the class from TableServiceEntity
- Set the partition key and row key on the base class, either through the base class constructor or through direct assignment
4. Storing and retrieving table storage data with the TableServiceContext
To store and retrieve entities in the Windows Azure table storage, you will need to work with a TableServiceContext, which also belongs to the Microsoft.WindowsAzure.StorageClient namespace.
If we have a look in the framework code at the TableServiceContext, it looks like this:
The Windows Azure TableServiceContext object is derived from the DataServiceContext object provided by the WCF Data Services. This object provides a runtime context for performing data operations against the Table service, including querying entities and inserting, updating, and deleting entities. The DataServiceContext belongs to the System.Data.Services.Client namespace.
The DataServiceContext is something you already might have seen with Entity Framework and WCF Data Services. I already covered the DataServiceContext. Read chapter 2. Querying the WCF OData service by a client DataServiceContext
WCF REST service with ODATA and Entity Framework with client context, custom operations and operation interceptorsIf you are not familiar with Entity Framework, you can find the necessary information in the articles about Entity Framework on the sitemap:
http://robbincremers.me/sitemap/From this point on, I’ll assume you are familiar with retrieving and storing data with Entity Framework, lazy loading, change tracking, LINQ and the Odata protocol.
The CloudTableClient exposes a GetDataServiceContext operation, which returns a TableServiceContext object for performing data operations against the Table service. To use the TableServiceContext provided by the GetDataServiceContext operation, you would use some code looking like this:
If you would execute the code to add a customer to the Customers table:
You can see the Customer got added to the Customers table and the FirstName and Lastname property got added to the structure of the table.
We are using some common Entity Framework code for retrieving entities and storing entities. The SaveChangesWithRetries operation is an operation added on the TableServiceContext, which is basically an Entity Framework SaveChanges operation with a retry policy in case a request would fail. The only annoying issue with working with the TableServiceClient.GetDataServiceContext is that you get a non-strongly typed context, by which I mean you get a context without the available tables that are exposed. You need to define the return type and the table name every time you use the CreateQuery operation. If you have are having 10 or 20+ tables exposed in your table storage, it’ll start being a mess to know what tables are being exposed and to define the table names with every single operation you execute with the context.
A preferred possibility is to create your own context that derives from the TableServiceContext and which allows you to define what tables are being exposed through the context:
We write a class that derives from the TableServiceContext. The constructor of our custom context calls to the base constructor of the TableServiceContext, which looks like this:
You need to pass the endpoint uri of the Windows Azure table storage and you need to pass a StorageCredentials. We decided to add our CloudStorageAccount details in the context itself, that way we do not have to pass the storage account details into the constructor of our custom context.
We also expose 1 operation, which is an IQueryable<Customer>, which should look familiar if you know the basics about Entity Framework. It basically wraps the CreateQuery<T> code with the table name you want the query to run on. We specified the Customers table name in a private field in the context.
You can also add some operations for managing entities if you want to make your client code less verbose:
Doing it this way, you don’t need to share the CustomersTableName variable anywhere outside of the custom context, but again, this is up to preference. If you would run an example with the provided code, the operations will behave as we expect them to.
Personally I prefer creating a custom class deriving from the TableServiceContext. It will allow you to manage your exposed tables a lot more and it will keep your data access code in a single location, instead of spread all over. Adding strongly typed data operations for the entity types is just providing an easier use of the context for other people and avoids people needing to know what the table names are outside of our context code.
The TableServiceContext does not add much functionality to the DataServiceContext, except for this:
- SaveChangesWithRetries: Save changes with retries, depending on the retry policy
- RetryPolicy: Allows you to specify the retry policy when you want to save changes with retries
It is suggested to save your entities with retries due to the state of the internet. Setting the RetryPolicy on your custom context is done like this:
You set it to a RetryPolicies retry policy value. There are 3 possible RetryPolicy values:
- NoRetry: A retry policy that performs no retries.
- Retry: A retry policy that retries a specified number of times, with a specified fixed time interval between retries.
- RetryExponential: A policy that retries a specified number of times with a randomized exponential backoff scheme. The delay between every retry it takes will be increasing. The minimum delay and maximum delay is defined by the DefaultMinBackoff and DefaultMaxBackoff property, which you can pass along in one of the RetryExponential policies as a parameter
The RetryExponential retry policy is the default retry policy for the CloudBlobClient, CloudQueueClient and CloudTableClient objects
5. Understanding the structure of windows azure table storage
Windows Azure Storage Tables don’t enforce a schema on entities, which means a single table can contain different entities that have different sets of properties. This might require some mind switch to move from thinking in the relational model that has been used for the last decades.
When we added a customer to the our windows azure table storage table, it had the following properties:
Let’s suppose we would have a CustomerDetails class:
The CustomersDetail class sets the partition key to “CustomersDetails” and the row key is being passed on as a parameter. The customer id will be the row key that is specified for the customer instance. Our class has 3 properties defined, of which 1 is identical to the Customer class.
Since we like working with a types TableServiceContext, we will add some code to our custom context to make our or the developers lives a bit easier:
Notice we store the CustomerDetails entities also in the Customers table.You could store the CustomerDetails entities in a separate table, but we decided to place them in the same table as the Customers entities.
If we run some code to store a new Customer and CustomerDetails entity in our windows azure table storage table:
PS: This code can be optimized by changing your custom TableServiceContext to not save each entity when adding it and creating a SaveChangesBatch operation that saves all the changes in a batch. However, this again belongs to the scope of Entity Framework
The Customers table in our windows azure table storage will be looking like this:
Both our Customer and our CustomerDetails entity have been saved in the same table, even though their structure is different. Notice that the FirstName property value is set for both entities, since they both share this property. The Email and Phone property is set for the CustomerDetails entity, while it is not for the Customer entity, while the LastName property is set for the Customer entity and not for the CustomerDetails entity.
Tables don’t enforce a schema on entities, which means a single table can contain entities that have different sets of properties. A property is a name-value pair. Each entity can include up to 252 properties to store data. Each entity also has 3 system properties that specify a partition key, a row key, and a timestamp. Entities with the same partition key can be queried more quickly, and inserted/updated in atomic operations. Both the entities are unique defined by the combination of the partition and row key.
At start you might question why you would store different entity types in the same table. We are used to think in our used relational model, which has a schema for each table and in there each table matches to 1 single entity type. However saving different entity types in the same table can be interesting if they share the same partition key, which would result in the fact that you can query these entities a lot faster then you would have split them in two different tables.
You could save different entity types in the same table if they are related and you need to often load them all together. If you save them in the same table and they all have the same partition key, you’ll be able to load the related data really quickly, where as in the relation model you would have to join a bunch of tables to get the necessary information.
6. Managing concurrency with Windows Azure table storage
Just as with all other data services, the Windows Azure table storage provides an optimistic concurrency control mechanism. The optimistic concurrency control in Windows Azure table storage is being done by the Timestamp property on the TableServiceEntity. This is the same as the Etag concurrency mechanism.
The issue is as following:
- Client 1 retrieves the entity with a specified key.
- Client 1 updates some property on the entity
- Client 2 retrieves the same entity.
- Client 2 updates some property on the entity
- Client 2 saves the changes on the entity to table storage
- Client 1 saves the changes on the entity to table storage. The changes client 2 made to the entity were overwritten and are lost since those changes were not retrieved yet by client 1.
The idea behind the optimistic concurrency is as following:
- Client 1 retrieves the entity with the specified key. The Timestamp is currently 01:00:00 in table storage
- Client 1 updates some property on the entity
- Client 2 retrieves the same entity. The Timestamp is currently 01:00:00 in table storage
- Client 2 updates some property on the entity
- Client 2 saves the changes on the entity to table storage with a Timestamp of 01:00:00. The Timestamp of the entity in table storage is 01:00:00, the provided Timestamp on the entity by the client is 01:00:00, so the client had the latest version of the entity. The update is being validated and the entity is updated. The Timestap property is being changed to 01:00:10 in table storage.
- Client 1 saves the changes on the entity to table storage with a Timestamp of 01:00:00. The Timestamp of the entity in table storage is 01:00:10, the provided Timestamp on the entity by the client is 01:00:00, so the client does not have the latest version of the entity since both Timestamp properties do not match. The update fails and an exception is being returned to the client.
Some dummy code in the console application to show this behavior of optimistic concurrency control through the Timestamp property:
Running the console application twice and updating the 2nd client first and afterwards attempting to save the update on the 1st client:
You will get an optimistic concurrency error: The update condition specified in the request was not satisfied, meaning that we tried to update an entity that was already updated by someone else since we received it. That way we avoid overwriting updated data in the table storage and losing the changes made by another user. The exception you get back is a DataServiceClientException. You can provide a warning to the client that the item has already been changed since he retrieved it and to give him the option whether he wants to reload the latest version, or overwrite the latest version with his version.
If you would want to overwrite the latest version with an older version, you’ll need to disable the optimistic concurrency mechanism. You can disable this default behavior of the optimistic concurrency by detaching the object and reattaching it with the AttachoTo operation and using the overload operation where you can pass a Etag string, like this:
We add a property to our custom TableServiceContext to specify we want to use optimistic concurrency or not. If we update a customer and the optimistic concurrency is not enabled, we will detach and reattach the customer with a an Etag value of “*”.
The great thing is that optimistic concurrency is enabled by default in table storage. You do not need to write any additional code like with everything else. Optimistic concurrency is very light-weight so it’s useful to have. In case you would need to disable it, you have the possibility to do so, but it’s a bit verbose.
7. Working with large data sets and continuation tokens
A query against the Table service may return a maximum of 1,000 items at one time and may execute for a maximum of five seconds. If the result set contains more than 1,000 items, if the query did not complete within five seconds, or if the query crosses the partition boundary, the response includes headers which provide the developer with continuation tokens to use in order to resume the query at the next item in the result set.
Note that the total time allotted to the request for scheduling and processing the query is 30 seconds, including the five seconds for query execution.
If you are familiar with the WCF Data Services, then this concept will be familiar to you. It allows the client to keep retrieving information when the service is exposing data through paging.
We will add some table storage data to our table:
Notice we run some iteration of adding 100 entities, and every 100 entities we submit the changes with a SaveChangesOptions of Batch, which will batch all the requests in a single request, which will be a lot faster then doing 100 requests separately. We only pay the request latency once instead of 100 times for each batch. Using batching is higly recommended when inserting or updating multiple entities.
To use batching, you need to fulfill to the following requirements:
- All entities subject to operations as part of the transaction must have the same PartitionKey value
- An entity can appear only once in the transaction, and only one operation may be performed against it
- The transaction can include at most 100 entities, and its total payload may be no more than 4 MB in size.
You can find some more textual information about continuation tokens and partition boundaries by Steve Marx:
http://blog.smarx.com/posts/windows-azure-tables-expect-continuation-tokens-seriouslyIf we look in our azure storage explorer, we will see we currently have 3.721 Customer entities in our Customers table:
If we want to retrieve all customer entities from our storage, by default we would have used a normal LINQ query like this:
If you would run this code:
Windows Azure table storage by design only allows a maximum retrieval of 1000 entities in an operation, so we are getting returned at 1000 entities. However we still want to get the other entities and that’s where the continuation tokens come in play. You can write the continuation processing yourself, but there is also an extension for the IQueryable we can use:
We use the AsTableServiceQuery extension method on the IQueryable which returns a CloudTableQuery<T> instead of an IQueryable<T>. The CloudTableQuery derives from IQueryable and IEnumerable and adds functionality to handle with continuation tokens. If you would execute the code above:
All the entities are being returned now if we use the CloudTableQuery instead of the IQueryable. If I disable the HTTPS on the CloudStorageAccount (to see what request are being send out, otherwise you’ll only see encrypted mambo jumbo) and run Fiddler while we retrieve our customers:
You notice the single request we did by code is getting split up in multiple requests to the table storage behind the scenes. Since we are retrieving 3721 entities, and the maximum entities returned is 1000, the request is being split up in 4 requests. The first request will return 1000 entities and a continuation token. To request the next 1000 entities, we do another request and pass the continuation token along. We keep repeating this until we no longer receive a continuation token, which means all data has been received. The continuation token basically exists of the next partition key and the next row key it has to start retrieving information from again, which makes sense.
8. Writing paging code with ResultContinuation and ResultSegment<T>
The CloudTableQuery also exposes a few other useful operations:
- Execute: Execute a query with the retry policy which returns an the data directly as IEnumerable<T>
- BeginExecuteSegmented / EndExecuteSegmented: An asynchronous execution of the query which returns as a result segment, which is of type ResultSegment<T>
Both these operations allows you to pass a ResultContinuation so you can retrieve the next set of data based on the continuation token. Suppose we want to retrieve all the entities in the Customers table by doing the continuation token paging ourselves:
We run through the following steps to retrieve all windows azure table entities with continuation tokens:
- Create our CloudTableQuery through the AsTableServiceQuery extension method
- Invoke the EndExecuteSegmented operation and we specify the BeginExecuteSegmented operation as the callback operation. The BeginExecuteSegmented operation takes a ContinuationToken, an async callback and and state object as parameters. We pass the callback and state object as null. We pass the ContinuationToken in here if the ResultSegment response is not null. This operation returns a ResultSegment<T>.
- We get the IEnumerable<T> from the ResultSegment by the Results property and add it to our list of customers
- We keep repeating step 2 and 3 as long the ResultSegment.ContinuationToken is different from null.
The first time we execute this the ResultSegment<t> reponse is set to null, so the first Execute operation it will pass a null into the ContinuationToken parameter. This makes sense, since a continuation token can only be retrieved when you did the first data request and it would appear there are more results then what is being retrieved. The ResultSegment we will get back will contain the first 1000 Customer entities and it will also contain a ContinuationToken. Since the ContinuationToken is different from null, it will execute the query again, but this time the response variable will be set and the ContinuationToken will be passed along in the BeginExecuteSegmented, meaning the next series of entities will be retrieved.
If our Customers table would contain less then 1000 entities, the ResultSegment Results property would be populated with the retrieved entities, but the ContinuationToken would be set to null, since there are no possible entities to be retrieved after this request. Since the ContinuationToken would be set to null, we would jump out of the loop.
If you would execute this, it would retrieve the full 3721 entities from our table storage:
For each 1000 entities we retrieve, we get a continuation token back. With this continuation token, we do another request which returns the next set of results. We keep doing this until we no longer get a continuation token.
One of the main reasons doing the continuation token paging yourself is when you want to implement paging in your application. If you retrieve 10 entities in your application, you might provide a link to get to the next page. To get those next 5 entities, you would need to pass along the continuation token that was provided after you requested the first 5 entities.
I wrote some code to add 16 customers to the table storage for testing with paging. They look like this:
You might notice they RowKey is different. I changed the generation of the row key from guid to a datetime calculation:
This makes sure the latest entity insert ends up at top of the table. Tables are being sorted by the partition and row key. It’s a common way to create unique row key’s which result in the latest inserted item being added on top of the table.
We are going from the idea that we have a web page that shows 5 results in a grid and provides a link to see the next 5 results. When you click the link, the 5 next results get loaded. I wrote some code the simulate this behavior in a console application. Internally the ResultContinuation class looks like this:
The operations are defined as internal, which means we can’t access some of the values we need. We need to be able to pass the necessary information of the ResultContinuation to our website, so that when the user clicks the link for the next page, we know the user wants to get the next page, which corresponds with a certain ResultContinuation. That’s why the ResultContinuation derives from IXmlSerializable. It allows you to serialize the ResultContinuation to an xml string or deserialize it back to the ResultContinuation object. After we serialized it to an xml string, we can pass it along to the client, which can return it to us at a later moment to retrieve the next set of entities.
First up I wrote 2 operations to serialize the ResultContinuation to a xml string and the deserialize the xml string back to a ResultContinuation.
When we get the first 5 entities, we will serialize the ResultContinuation to an xml string and pass this xml string to the client. If the client wants to get the next 5 pages, he simply has to pass this xml string back to us, which we will serialize back into a ResultContinuation. With the ResultContinuation object we can invoke the BeginExecuteSegmented operation and pass the continuation token along, which will fetch the next series of entities.
We have an operation which gets 5 entities from the table storage, depending on a continuation token:
If a xml token is being passed along, we serialize it back to a ResultContinuation and this continuation token is being used to get the next series of entities. If the xml token is empty, which will be on the first request, then the first 5 entities are being retrieved. In the response we get back, we check if there is a ContinuationToken present and if there is, we serialize it to xml and pass it back to the client. If there is no continuation token available, we simply return an empty string, which would mean there are no more entities available after this current set of entities.
The client code could like this to simulate the paging:
When executing the console application it starts by listing the first 5 properties:
It will get a xml continuation token back, so the client knows there are more entities to be retrieved. When we press any key, we call the GetResultSet operation again and pass this xml continuation token. The operation will deserialize the xml continuation token back to a ResultContinuation, which will be passed along in our BeginExecuteSegmented operation.
If we hit any key, it will receive the next 5 values:
When we keep paging, we keep getting the next 5 results. We are able to keep paging as long there are results after the current set of data. When we are retrieving the 4th set of 5 entities, only 1 entity is being returned and there is no continuation token returned, resulting in the fact that we are done paging.
If you would want to go back to a previous page, you can store the tokens in a variable or in session state. That way you could go back to a previous page by providing a token that you already used before to page forward. I will not write dummy code since it would look very similar to the previous example, but the scenario would be like this:
- First 5 entities are being returned and a continuation token of “getpage2″ is being returned
- We invoke the operation again and pass the “getpage2″ continuation token along
- We will get the next set of 5 entities and a continuation token of “getpage3″ is being returned
- We invoke the operation again and pass the “getpage3″ continuation token along
- We will get the next set of 5 entities and a continuation token of “getpage4″ is being returned
- At this point want to get back to the previous page of 5 entities so we invoke the operation again and pass the “getpage2″ continuation token instead of the “getpage4″ continuation token. Since we are at page 3, we need to pass the continuation token we got when retrieving page 1.
- We will get the 5 entities that belong to page 2 and a continuation token of “getpage3″ is being returned
You implemented a previous and next paging mechanism with table storage. The only thing you will need to account for is to store the continuation tokens and the paging indexing. You can wrap this up in a nice wrapper, which abstracts this away from you code. If you are using a web application, you’ll need to store this in session state.
PS: Do not store your session state on your machine itself. When using session state with windows azure you’ll need to account for the round-robin load balancing so you’ll need to make sure your session state is shared over all your instances. You can store your session state in the Windows Azure distributed caching service or you can store it in SQL azure or table storage.
9. Why using Windows Azure Table Storage
The storage system achieves good scalability by distributing the partitions across many storage nodes.
The system monitors the usage patterns of the partitions, and automatically balances these partitions across all the storage nodes. This allows the system and your application to scale to meet the traffic needs of your table. That is, if there is a lot of traffic to some of your partitions, the system will automatically spread them out to many storage nodes, so that the traffic load will be spread across many servers. However, a partition i.e. all entities with same partition key, will be served by a single node. Even so, the amount of data stored within a partition is not limited by the storage capacity of one storage node.
The entities within the same partition are stored together. This allows efficient querying within a partition. Furthermore, your application can benefit from efficient caching and other performance optimizations that are provided by data locality within a partition. Choosing a partition key is important for an application to be able to scale well. There is a tradeoff here between trying to benefit from entity locality, where you get efficient queries over entities in the same partition, and the scalability of your table, where the more partitions your table has the easier it is for Windows Azure Table to spread the load out over many servers.
You want the most common and latency critical queries to have the PartitionKey as part of the query expression. If the PartitionKey is part of the query, then the query will be efficient since it has to only go to a single partition and traverse over the entities there to get its result. If the PartitionKey is not part of the query, then the query has to be done over all of the partitions for the table to find the entities being looked for, which is not as efficient. A table partition are all of the entities in a table with the same partition key value, and most tables have many partitions. The throughput target for a single partition is:
- Up to 500 entities per second
- Note, this is for a single partition, and not a single table. Therefore, a table with good partitioning, can process up to a few thousand requests per second (up to the storage account target)
Windows Azure table storage is designed for high scalability, but there are some drawbacks to it though:
- There is no possibility to sort the data through your query. The data is being sorted by default by the partition and row key and that’s the only order you can retrieve the information from the table storage. This can often be a painful issue when using table storage. Sorting is apparently an expensive operation, so for scalability this is not supported.
- Each entity will have a primary key based on the partition key and row key
- The only clustered index is on the PartitionKey and the RowKey. That means if you need to build a query that searches on another property then these, performance will go down. If you need to query for data that doesn’t search on the partition key, performance will go down drastically. With the relational database we are used to make filters on about any column when needed. With table storage this is not a good idea or you might end up with slow data retrieval.
- Joining related data is not possible by default. You need to read from seperate tables and doing the stitching yourself
- There is no possibility to execute a count on your table, except for looping over all your entities, which is a very expensive query
- Paging with table storage can be of more of a challenge then it was with the relational database
- Generating reports from table storage is nearly impossible as it’s non-relational
If you can not manage with these restrictions, then Windows Azure table storage might not be the ideal storage solution. The use of Windows Azure table storage is depending on the needs and priorities of your application. But if you have a look at how large companies like Twitter, Facebook, Bing, Google and so forth work with data, you’ll see they are moving away from the traditional relational data model. It’s trading some features like filtering, sorting and joining for scalability and performance. The larger your data volume is growing, the more the latter will be impacted.
This is an awesome video of Brad Calder about Windows Azure storage, which I suggest you really have a look at:
http://channel9.msdn.com/Events/BUILD/BUILD2011/SAC-961TSome tips and tricks for performance for .NET and ADO.NET Data Services for Windows Azure table storage:
http://social.msdn.microsoft.com/Forums/en-US/windowsazuredata/thread/d84ba34b-b0e0-4961-a167-bbe7618beb83
The Windows Azure Storage Team have promised secondary indexes to provide sorting Windows Azure table rowsets by other than PartitionKey and RowKey values for several years, but haven’t yet delivered.
Robin Cremers (@robincremers) described Everything you need to know about Windows Azure Blob Storage including permissions, signatures, concurrency, … in detail on 2/27/2012 (missed when posted):
In my attempt to cover most of the features of the Microsoft Cloud Computing Windows Azure, I’ll be covering Windows Azure storage in the next few posts.
Why using Windows Azure storage:
- Fault-tolerance: Windows Azure Blobs, Tables and Queues stored on Windows Azure are replicated three times in the same data center for resiliency against hardware failure. No matter which storage service you use, your data will be replicated across different fault domains to increase availability
- Geo-replication: Windows Azure Blobs and Tables are also geo-replicated between two data centers 100s of miles apart from each other on the same continent, to provide additional data durability in the case of a major disaster, at no additional cost.
- REST and availability: In addition to using Storage services for your applications running on Windows Azure, your data is accessible from virtually anywhere, anytime.
- Content Delivery Network: With one-click, the Windows Azure CDN (Content Delivery Network) dramatically boosts performance by automatically caching content near your customers or users.
- Price: It’s insanely cheap storage
The only reason you would not be interested in the Windows Azure storage platform would be if you’re called Chuck Norris …
Now if you are still reading this line it means you aren’t Chuck Norris, so let’s get on with it, as long as it is serializable.In this post we will cover Windows Azure Blob Storage, one of the storage services provided by the Microsoft cloud computing platform. Blob storage is the simplest way to store large amounts of unstructured text or binary data such as video, audio and images, but you can save about anything in it.
The concept behind the Windows Azure Blog storage is as following:
There are 3 things you need to know about to use Windows Azure Blob storage:
- Account: Windows Azure storage account, which is the account, containing blob, table and queue storage. The storage account blob storage can contain multiple containers.
- Container: blob storage container, which behaves like a folder in which we store items
- Blob: Binary Large Object, which is the actual item we want to store in the blob storage
1. Creating and using the Windows Azure Storage Account
To be able to store data in the Windows Azure platform, you will need a storage account. To create a storage account, log in the Windows Azure portal with your subscription and go to the Hosted Services, Storage Accounts & CDN service:
Select the Storage Accounts service and hit the Create button to create a new storage account:
Define a prefix for your storage account you want to create:
After the Windows Azure storage account is created, you can view the storage account properties by selecting the storage account:
The storage account can be used to store data in the blob storage, table storage or queue storage. In this post, we will only cover the blob storage. One of the properties of the storage account is the primary and secondary access key. You will need one of these 2 keys to be able to execute operations on the storage account. Both the keys are valid and can be used as an access key.
When you have an active Windows Azure storage account in your subscription, you’ll have a few possible operations:
- Delete Storage: Delete the storage account, including all the related data to the storage account
- View Access Keys: Shows the primary and secondary access key
- Regenerate Access Keys: Allows you to regenerate one or both of your access keys. If one of your access keys is compromised, you can regenerate it to revoke access for the compromised access key
- Add Domain: Map a custom DNS name to the storage account blob storage. For example map the robbincremers.blob.core.windows.net to static.robbincremers.me domain. Can be interesting for storage accounts which directly expose data to customers through the web. The mapping is only available for blob storage, since only blob storage can be publicly exposed.
Now that we created our Windows Azure storage account, we can start by getting a reference to our storage account in our code. To do so, you will need to work with the CloudStorageAccount, which belongs to Microsoft.WindowsAzure namespace:

We create a CloudStorageAccount by parsing a connection string. The connection string takes the account name and key, which you can find in the Windows Azure portal. You can also create a CloudStorageAccount by passing the values as parameters instead of a connection string, which could be preferable. You need to create an instance of the StorageCredentialsAccountAndKey and pass it into the CloudStorageAccount constructor:
The boolean that the CloudStorageAccount takes is to define whether you want to use HTTPS or not. In our case we chose to use HTTPS for our operations on the storage account. The storage account only has a few operations, like exposing the storage endpoints, the storage account credentials and the storage specific clients:
The storage account exposes the endpoint of the blob, queue and table storage. It also exposes the storage credentials by the Credentials operation. Finally it also exposes 4 important operations:
- CreateCloudBlobClient: Creates a client to work on the blob storage
- CreateCloudDrive: Creates a client to work on the drive storage
- CreateCloudQueueClient: Creates a client to work on the queue storage
- CreateCloudTableClient: Creates a client to work on the table storage
You won’t be using the CloudStorageAccount much, except for creating the service client for a specific storage type.
2. Basic operations for managing blob storage containers
A blob container is basically a folder in which we place our blobs. You can do the usual stuff like creating and deleting blob containers. There is also a possibility to set some permissions and metadata on our blob container, but those will be covered in the next chapters after we looked into the basics of the CloudBlobContainer and the CloudBlob.
Creating a blob container synchronously:
You start by creating the CloudBlobClient from the CloudStorageAccount through the CreateCloudBlobClient on the CloudStorageAccount. The CloudBlobClient exposes a bunch of operations which will be used to manage blob containers and to manage and store blobs. To create or retrieve a blob container, you use the GetContainerReference operation. This will return a reference to the blob container, even if the container does not exist yet. The reference does not execute a request over the network. It simply creates a reference with the values the container would have, and is returned as a CloudBlobContainer.
To create the blob container, you invoke the Create or CreateIfNotExists operation on the CloudBlobContainer. The Create operation will return a StorageClientException if the container you are trying to create already exists. You can also use the CreateIfNotExists operation, which only attempts to create the container if it does not exist yet. As a parameter you pass the name of the container. Important is to know a blob container can only contain numbers, lower case letters and dashes and has to be between 3 and 24 characters.
For almost every synchronous operation there is an asynchronous operation available as well.
Creating the blob container asynchronously by the BeginCreateIfNotExists and EndCreateIfNotExists operation:
It follows the default Begin and End pattern of the asynchronous operations. If you are a fan lambda expressions (awesomesauce), you can avoid splitting up your operation with a lambda expression:
You could do almost anything asynchronous, which is highly recommended. If my Greek ninja master would see me writing synchronous code, he would most likely slap me, but for demo purposes I will continue using synchronous code throughout this post, since this might be easier to follow and understand for the some people.
Deleting a blob container is as straight forward as creating one. We simple invoke the Delete operation on the CloudBlobContainer, which will execute a request to the REST storage interface:
There is 1 remark about this piece of code, and it is the Exists operation. By default, there is no operation to check whether a blob container already exists or not. I added an extension method on the CloudBlobContainer, which will check whether the blob container exists. This way of validation the existence of the container was suggested by Steve Marx. We will come back to FetchAttributes method in a later chapter.
I added an identical extension method to check if a Blob exists:
If you do not know what extension methods are, you can find an easy article about it here:
Implementing and executing C# extension methodsTo explore my storage accounts, I use a free tool called Azure Storage Explorer which you can download on codeplex:
http://azurestorageexplorer.codeplex.com/When you created the new blob container, you can view and change it’s properties with the Azure Storage Explorer:
I manually uploaded an image to the blob container so we have some data to test with.
There are a few other operations exposed on the CloudBlobClient, which you might end up using:
- ListContainers: Allows you to retrieve a list of blob containers that belong to the storage account blob storage. You can list all containers are search by a prefix.
- GetBlobReference: Allows you to retrieve a CloudBlob reference through the absolute uri of the blob.
- GetBlockBlobReference: See chapter 9
- GetPageBlobReference: See chapter 9
- SetMetadata: See chapter 4
- SetPermissions: See chapter 6
- FetchAttributes: See chapter 4
One thing that might surprise you is that it is not possible to nest one container beneath another.
3. Basic operations for storing and managing blobs
Blob stands for Binary Large Object, but you can basically store about anything in blob storage. Ideally it is build for storing images, files and so forth. But you can just as easily serialize an object and store it in blob storage. Let’s cover the basics for the CloudBlob.
There are a few possible operations on the CloudBlob to upload a new blob in a blob container:
- UploadByteArray: Uploads an array of bytes to a blob
- UploadFile: Uploads a file from the file system to a blob
- UploadFromStream: Uploads a blob from a stream
- UploadText: Uploads a string of text to a blob
There are a few possible operations on the CloudBlob to download a blob from blog storage:
- DownloadByteArray: Downloads the blob’s contents as an array of bytes
- DowloadText: Downloads the blob’s contents as a string
- DownloadToFile: Downloads the blob’s contents to a file
- DownloadToStream: Downloads the contents of a blob to a stream
There are a few possible operations on the CloudBlob to delete a blob from blog storage:
- Delete: Delete the blob. If the blob does not exist, the operation will fail
- DeleteIfExists: Delete the blob only if it exists
A few other common operations on the CloudBlob you might run into:
- OpenRead: Opens a stream for reading the blob’s content
- OpenWrite: Opens a stream for writing to the blob
- CopyFromBlob: Copy an existing blob with content, properties and metadata to a new blob
They all work identical, so we will only cover the upload and download of a file to blob storage, to show as an example.
Uploading a file to blob storage:
In the GetBlobReference we pass along the name we want the blob to be called in the Windows Azure blob storage. Finally we upload our local file to blob storage. Retrieving a file from blob storage:
Both operations have in common that they get a CloudBlob through the GetBlobReference operation. In the upload operation we used the GetBlobReference on the CloudBlobContainer, while in the download operation we used the GetBlobReference operation on the CloudBlobClient. They both return the same result, the only difference is they take different parameters.
- CloudBlobClient.GetBlobReference: Get a blob by providing the relative uri to the blob. The relative uri is of format “blobcontainer/blobname”
- CloudBlobContainer.GetBlobReference: Get a blob by providing the name of the blob. The blob is being search in the blob container we are working with.
Both the operations also allow you to get the blob by specifying the absolute uri of the blob.
Deleting a blob from blob storage:
There are a few other operations exposed on the CloudBlobClient, which you might end up using:
- SetMetadata: See chapter 4
- SetPermissions: See chapter 6
- SetProperties: See chapter 5
- CreateSnapshot: Snapshots provide read-only versions of blobs. Once a snapshot has been created, it can be read, copied, or deleted, but not modified. You can use a snapshot to restore a blob to an earlier version by copying over a base blob with its snapshot
4. Managing user-defined metadata on blob containers and on blobs
Managing used-defined metadata is identical for both the blob container as for the blob. Both the CloudBlobContainer as the CloudBlob exposes the same operations which allow us to manage the metadata.
Using metadata could be particularly interesting when you want to add some custom information to the blob or the blob container. Some examples to use metadata:
- A metadata property “author” that defines who created the blob container or the blob
- A metadata property “changedby” that defines which user issued the last change on the blob
- A metadata property “identifier” that defines a unique identifier for the blob, which could be needed when retrieving the blob
- …
Adding metadata is done through the Metadata property, which takes a NameValueCollection of the metadata items you want to add. Retrieving the metadata information is done by returning the Metadata property, which returns a NameValueCollection. Before we return the Metadata property, we invoke the FetchAttributes operation. This operation makes sure the blob’s system properties and user-defined metadata is populated and the latest values are retrieved. It is advised to always invoke the FetchAttributes operation when trying to retrieve blob properties or metadata.
Working with metadata on the CloudBlobContainer:
Working with metadata on the CloudBlob is identical to working with metadata on the blob container:
Metadata allows you to easily store and retrieve custom properties with your blob or blob container.
5. Managing properties like HTTP headers on blobs
On the CloudBlob there is a property Properties exposed, which holds a list of defined blob properties. The following properties are exposed through the blob properties:
- CacheControl: Get or set the cache-control HTTP header for the blob, which allows you to instruct the browser to cache the blob item for a specified time
- ContentEncoding: Get or set the content-encoding HTTP header for the blob, which is used to define what type of encoding was used on the item. This is mainly used when using compression.
- ContentLanguage: Get or set the content-language HTTP header for the blob, which is used to define what language the content is at.
- Length: Get-only property to get the size of the blob in bytes
- ContentMD5: Get or set the content-MD5 HTTP header for the blob, which is used as A Base64-encoded binary MD5 sum of the content of the response
- ContentType: Get or set the content-type HTTP header for the blob, which is used to specify the mime type of the content
- ETag: Get-only property for the Etag HTTP header for the blob, which is an identifier for a specific version of a resource. The ETag value is an identifier assigned to the blob by the Blob service. It is updated on write operations to the blob. It may be used to perform operations conditionally, providing optimistic concurrency control. We will look into this in a following chapter.
- LastModifiedUtc: Get-only property which returns the last modified date of the blob
- BlobType: Get-only property which returns the type of the blob
- LeaseStatus: Get-only property which returns the lease status of the blob. We will get to leasing blobs in a following chapter.
Now I believe it might be pretty obvious to why some of these properties can be of crucial use. Retrieving or changing the property HTTP headers are pretty easily done. Retrieving a blob property:
The default content-type of our image is set to application/octet-stream:
If we check that in our browser:
Ideally this should be set to content-type image/jpeg, or some browsers might not parse the image as an image, but as a file that will be downloaded. So we will change the content-type to image/jpeg instead for this blob:
Saving the properties on the blob is done by calling the SetProperties method. If you run the client console application, the Content-Type header for the blob will change and next time you retrieve the blob with the new content-type header:
Setting some Blob properties like the Cache-Control, Content-Type and Content-Encoding HTTP headers can be very important on how the blob is being send to the client. If you upload a file in blob storage that is compressed with GZIP and you do not provide the content-encoding property on the blob, then the clients will not be able to read the retrieved blob. If you do set the correct HTTP header, the client will know the resource is being compressed with gzip and be able to take the necessary steps to read this compressed file.
If you are providing images directly from blob storage onto your website, you might wanto set the Cache-Control property so the header is being added to the requests. That way the images will not be retrieved on every single request, but will be cached in the client browser for the duration you specified.
6. Managing permissions on a blob container
When you create a default blob container, the blob container will be created as a private container by default. Meaning the content of the container is not publicly exposed for anonymous web users. If we create a default blob container called “images”, it will look like this in the Azure Storage Explorer:
Notice the images container has a lock image on the folder, meaning it is a private container. We have an image “robbin.jpg” uploaded in the images blob container. If you would attempt to view the image by your browser:
Now let’s suppose we want the image to be publicly available for our web application for example. In that case, we would have to change the permissions. To change the permissions on the blob container, you need the following code:
We create an operation on which you can pass the blob container name and pass the BlobContainerPublicAccessType as a parameter. Then we update the CloudBlobContainer with the new permission by the SetPermissions operation on the CloudBlobContainer. The BlobContainerPublicAccessType is an enumeration which currently holds 3 possible values:
- Blob: Blob-level public access. Anonymous clients can read the content and metadata of blobs within this container, but cannot read container metadata or list the blobs within the container.
- Container: Container-level public access. Anonymous clients can read blob content and metadata and container metadata, and can list the blobs within the container.
- Off: No anonymous access. Only the account owner can access resources in this container.
By default the Permissions are set to Off, which means only the account owner can access the resources in the blob container. We want the images to be publicly exposed for our web application. We will change the permission of our “images” blob container to the Blob permission:

If we run the code in our console application, the permission level of the blob container will be changed from Off to Blob. If we attempt to retrieve the resource by it’s uri:Setting the permissions on the blob container to Public is mainly used when you want the users to browse through the content your blob container has. If you don’t want people to see the full content of your blob container, you set the blob container permissions to Blob, which results that the blob can be retrieved, without users knowing the full content of your blob container.
If you do not want to expose the blobs to the public, you set the blob container access level to private. There is also a possibility to define access to blobs in a private blob container. There is where a shared access policies and shared access signatures come in.
7. Managing shared access policies and shared access signatures
There is also a possibility to set more precise permissions on a blob or a blob container. Shared Access Policies and Shared Access Signatures (SAS) allow us to define a custom permission on a blob or blob container for specific rights, within a specific time frame.
There are 2 things that come forward:
- Shared Access Policy: The shared access policy, represented by a SharedAccessPolicy object, defines a start time, an expiry time, and a set of permissions for shared access signatures to a blob resource
- Shared Access Signature: A Shared Access Signature is a URL that grants access rights to containers and blobs. By specifying a Shared Access Signature, you can grant users who have the URL access to a specific blob or to any blob within a specified container for a specified period of time. You can also specify what operations can be performed on a blob that’s accessed via a Shared Access Signature
We will run through a few steps to cover the Shared Access Signature and the Shared Access Policy.
We start by adding some code in our console application to create a shared access signature for our image blob:We get the specific blob we want to get a shared access signature for and we create a shared access signature by using the GetSharedAccessSignature operation on the CloudBlob. The operation takes a SharedAccessPolicy object, on which we can specify a few values:
- SharedAccessStartTime: Takes a datetime specifying the start time of the access signature. If you do not provide a datetime, the default value will be the moment of creation
- SharedAccessExpiryTime: Takes a datetime specifying when the access signature will expire. After expiration, the signature will no longer be valid to execute the operations on the resource
- Permissions: Takes a combination of SharedAccessPermissions. These permissions define the rights the shared access signature is granted on the resource
SharedAccessPermissions is an enumeration, which has the following possible values:
- Delete: Grant delete access
- Write: Grant write access
- List: Grant listing access
- Read: Grant read access
- None: No access granted
In this case we set the permissions to the resource only to Read permission and the shared access signature is only valid from this moment until 1 minute in the future. This means the resource will only be accessible with the shared access uri for the next 1 minute after creation. After expiration, you will not be able to access the resource anymore with the shared access uri. Also note we use DateTime.UtcNow to pass a datetime for the start date and expiration date, which is advised to avoid issues.
We write the shared access signature, the blob uri and the shared access uri to the output window. The shared access uri is the combination of the blob uri and the shared access signature, which results in a compelete uri. If we run the client console application:
The shared access signature is being written to the output window. Finally we also written the complete shared access uri to the output window, which is the of the format bloburi/signature. If we visit the shared access uri within the minute of running the client console application (the images blob container is set to private access level, so the resources are not being exposed publicly):
If you try to access the resource with the shared access uri after 1 minute, you’ll be receiving an error, because the shared access signature expired:
So even though the blob container is set to private access, we can expose certain resources with the shared access signature. We can trade the shared access signature with some users or applications for them to access the resource. Let’s have a look at the generated shared access signature for our blob:
You will see a few parameters in the generated signature:
- se: Stands for the signature expiration date
- sr: Stands for the signature resource type. The value is set to b, which stands for blob. The other possible value is c, which stands for container
- sp: Stands for the signature permissions. The value is set to r, which stands for read. If the value would rwdl, it would stand for read write delete list
- sig: Stands for the signature that is being used as a validation mechanism
- ss: Stands for the signature start date. Is not added in this signature since we did not specify the signature start date
One of the issues that arises with these shared access uri’s is that when you create a shared access signature that is valid for let’s say 1 month. You pass this shared access uri to one of the customers, so he can access the resource. However if the customer’s shared access signature is being compromised after 1 week, you will have to invalidate this shared access signature. But since the signature is generated with the storage account primary key, the shared access signature will stay valid as long it is not expired and as long the signature will validate against our storage account primary key. So to solve the compromised shared access signature, you have to regenerate the storage account primary key, which results in all shared access signatures being invalidated. This is obviously not an ideal situation and regenerating your storage account keys each time something might get compromised will make you end up being bald …. That’s where the shared access policy comes in.
Let’s create a Shared Access Policy for our images blob container:
We create a new BlobContainerPermissions collection, which holds the permissions set on the blob container. You could get the existing permissions by using the Permissions property on the CloudBlobContainer. We create 2 new shared access policies by the SharedAccessPolicy. The “readonly” shared access policy has only read rights, while the “writeonly” shared access policy only has write rights. We do not define an expiration date for the shared access policies, since the expiration date will be set by our blob requesting a shared access signature for a shared access policy. Finally we save the new shared access policies by the SetPermissions operation which takes a BlobContainerPermissions instance.
For our specific blob image, we want to create a shared access signature for a customer. Instead of specifying a new shared access policy with all attributes, we only specify a shared access policy with an expiration date and we pass the name of container-level access policy we want to create a shared access signature on:
The GetSharedAccessSignature operation uses the 2nd overload now, where you can pass a container-level access policy:
If we run the console application now:
Notice our shared access signature is looking differently. There is a new parameter in the signature, which is the si parameter. The si stands for signature identifier, which points to the shared access policy name the signature is created on. The sp parameter, which stands for the rights, is no longer present, since we specified that parameter already in the shared access policy. If you would specify the rights again in the signature you create on the container-level shared access policy, you’ll get an exception when trying to use the signature.
If we visit the blob image with the readonly signature we created:
If we now generate a blob signature for the “writeonly” access policy and visit the resource with the shared access uri:
Which makes sense since we did not specify read rights for the writeonly access policy.
Now let’s suppose the shared access signature we traded with a customer has gotten compromised. Instead of regenerating the storage account primary key and having suicide feelings, we simple change or revoke the shared access policy. You can see the shared access policies on the blob container with the Azure storage explorer:
You can change the policies, change the rights or simple make the policy expire if it has been compromised, which will disable the compromised access signature, without breaking everything else that uses the storage account. For some reason the Shared Access Policies do not show the start and expiry date … Weird stuff, but not important.
You can generate a shared access signature on blob container level or on blob level. If you generate it on blob container level, it can be used to access any blob in the container. If it is generated on blob level, it is only valid to access that one specific blob. Shared access policies are being placed on the blob container level.
Accessing resources with a shared access key can be done with the CloudBlobClient:
Instead of using the default CreateCloudBlobClient method on the CloudStorageAccount, we create a new CloudBlobClient like shown above. We are able to pass a StorageCredentialsSharedAccessSignature with the shared access signature into the CloudBlobClient constructor. All the operations you will execute with the CloudBlobClient will be working with the shared access signature.
8. Managing concurrency with Windows Azure blog storage
Just as with all other data services, the Windows Azure blob storage provides a concurrency control mechanism:
- Optimistic concurrency with the Etag property
- Exclusive write rights concurrency control with blob leasing
The issue is as following:
- Client 1 retrieves the blob.
- Client 1 updates some property on the blob
- Client 2 retrieves the blob.
- Client 2 updates some property on the blob
- Client 2 saves the changes on the blob to blob storage
- Client 1 saves the changes on the blog to blog storage. The changes client 2 made to the blob were overwritten and are lost since those changes were not retrieved yet by client 1.
The idea behind the optimistic concurrency is as following:
- Client 1 retrieves the blob. The Etag is currently 100 in blob storage
- Client 1 updates some property on the blob
- Client 2 retrieves the blob. The etag is currently 100 in blob storage
- Client 2 updates some property on the blob
- Client 2 saves the changes on the blob to blob storage with etag 100. The Etag of the blob in blog storage is 100, the provided etag by the client is 100, so the client had the latest version of the blob. The update is being validated and the blob is updated. The Etag is being changed to 101.
- Client 1 saves the changes on the blog to blog storage with etag 100. The Etag of the blog in blog storage is 101, the provided etag by the client is 100, so the client does not have the latest version of the blob. The update fails and an exception is being returned to the client.
Some dummy code in the console application to show this behavior of optimistic concurrency control through the Etag:
We get the current Etag value of the blob through the CloudBlob.Properties.ETag property. Then we write the Etag to the output window. Then we add a metadata item to the blob and we update the metadata of the blob to blob storage. The only difference now compared to before is that we pass a BlobRequestOptions with the operation. In the BlogRequestOptions we specify an AccessCondition of AccessCondition.IfMatch(etag), meaning that the blog request only will succeed if the access condition is fulfilled, which is that the etag of the blob in blog storage has to match the etag we pass along. The etag we pass along is the etag we got from the blob when we retrieved it. The BlobRequestOptions can be provided to almost every operation that interacts with the Windows Azure blog storage.
If we run this console application twice and update the second blob before the first blob, we will get an error when trying to update the first blob:
We are getting an error: The condition specified using HTTP conditional header(s) is not met, meaning that we tried to update a blob that was already updated by someone else since we received it. That way we avoid overwriting updated data in the blob storage and losing the changes made by another user.
Now it’s also possible to control concurrency on blob storage through blob leases. A lease will basically lock the blob so that other users can not modify it while it is being locked. If someone else tries to update the blob while it is locked, he will get an exception and will have to wait until the blob is unlocked to be able to update it. Once the client has updated the blob, he releases the blob lease, so that other users can modify the blob. Leasing blobs guarantee exclusive write rights.
Ideally, you will go with optimistic concurrency, since leasing blobs is expensive and locking resources might hurt performance and create bottle-necks. Personally I would always go with optimistic concurrency as it’s easy to implement and does not hurt your application performance.
If you really need to use the blob leasing concurrency control, you can find more information about leasing blobs here: http://blog.smarx.com/posts/leasing-windows-azure-blobs-using-the-storage-client-library
9. Page blobs vs block blobs: the difference
There are two sorts of blobs. You can either use a page blob or a block blob.
MSDN information on a Block blob:
Block blobs let you upload large blobs efficiently. Block blobs are comprised of blocks, each of which is identified by a block ID. You create or modify a block blob by writing a set of blocks and committing them by their block IDs. Each block can be a different size, up to a maximum of 4 MB. The maximum size for a block blob is 200 GB, and a block blob can include no more than 50,000 blocks. If you are writing a block blob that is no more than 64 MB in size, you can upload it in its entirety with a single write operation. (Storage clients default to 32 MB, settable using the SingleBlobUploadThresholdInBytes property.)
When you upload a block to a blob in your storage account, it is associated with the specified block blob, but it does not become part of the blob until you commit a list of blocks that includes the new block’s ID. New blocks remain in an uncommitted state until they are specifically committed or discarded. Writing a block does not update the last modified time of an existing blob.
Block blobs include features that help you manage large files over networks. With a block blob, you can upload multiple blocks in parallel to decrease upload time. Each block can include an MD5 hash to verify the transfer, so you can track upload progress and re-send blocks as needed. You can upload blocks in any order, and determine their sequence in the final block list commitment step. You can also upload a new block to replace an existing uncommitted block of the same block ID. You have one week to commit blocks to a blob before they are discarded. All uncommitted blocks are also discarded when a block list commitment operation occurs but does not include them.
You can modify an existing block blob by inserting, replacing, or deleting existing blocks. After uploading the block or blocks that have changed, you can commit a new version of the blob by committing the new blocks with the existing blocks you want to keep using a single commit operation. To insert the same range of bytes in two different locations of the committed blob, you can commit the same block in two places within the same commit operation. For any commit operation, if any block is not found, the entire commitment operation fails with an error, and the blob is not modified. Any block commitment overwrites the blob’s existing properties and metadata, and discards all uncommitted blocks.
Block IDs are strings of equal length within a blob. Block client code usually uses base-64 encoding to normalize strings into equal lengths. When using base-64 encoding, the pre-encoded string must be 64 bytes or less. Block ID values can be duplicated in different blobs. A blob can have up to 100,000 uncommitted blocks, but their total size cannot exceed 400 GB.
If you write a block for a blob that does not exist, a new block blob is created, with a length of zero bytes. This blob will appear in blob lists that include uncommitted blobs. If you don’t commit any block to this blob, it and its uncommitted blocks will be discarded one week after the last successful block upload. All uncommitted blocks are also discarded when a new blob of the same name is created using a single step (rather than the two-step block upload-then-commit process).
MSDN information on a Page blob:
Page blobs are a collection of 512-byte pages optimized for random read and write operations. To create a page blob, you initialize the page blob and specify the maximum size the page blob will grow. To add or update the contents of a page blob, you write a page or pages by specifying an offset and a range that align to 512-byte page boundaries. A write to a page blob can overwrite just one page, some pages, or up to 4 MB of the page blob. Writes to page blobs happen in-place and are immediately committed to the blob. The maximum size for a page blob is 1 TB.
In most cases you will be using block blobs. By default when you upload a blob to blob storage, it will be a block blob. One of the key scenario’s for page blobs are cloud drives. However cloud drives do not belong to the scope of this post now. However if you are interested in how to work with page blobs, you can find the necessary information here: http://blogs.msdn.com/b/windowsazurestorage/archive/2010/04/11/using-windows-azure-page-blobs-and-how-to-efficiently-upload-and-download-page-blobs.aspx
When working with the CloudBlob, the blob type is being abstracted from us. However you can work with page or block blobs by using the CloudBlockBlob and CloudPageBlob:
10. Streaming large files as block blobs to blob storage
If you would want to upload a large file as block blob, then the information about block blocks of chapter 9 provides most of the information.
To upload a large file to blob storage while streaming it, we will go through a few steps:
- Open a FileStream on the file
- Calculate how many blocks of 4 MB this file will generate. 4 MB blocks are the maximum allowed block size
- Read a 4 MB buffer from the file with the FileStream
- Create a block id. In chapter 9 it says all block id’s are of equal length, so we will convert the block id to a base64 string to get equal length block id’s for all blocks
- Upload the block to blob storage by the PutBlock method on the CloudBlockBlob
- Add the block id to a list of block id’s we’ve been uploading. The block will be added in uncommited state.
- Keep repeating step 3 to 6 until the FileStream is completely read
- Execute a PutBlockList of the entire list of block id’s we uploaded to blob storage. This will commit all the blocks we uploaded to the CloudBlockBlob.
Some example code just to show the concept of how the block uploading works. This does not include retry policy nor exception handling:
The code that streams the file from disk into blocks and uploads the blocks to blob storage:
This code could be particularly interesting when you want to stream upload blobs with a WCF service. However if you are using a CloudBlob, this is already getting handled for you by default. If you use a decompiler, like the Telerik JustDecompile and have a look at the CloudBlob implementation in the Microsoft.WindowsAzure.StorageClient.dll , you will find the following in the upload of a CloudBlob.
You can download the free Telerik JustDecompile here:
http://www.telerik.com/products/decompiler.aspxInternally if you upload a CloudBlob, there’s a piece of code like this in there:
If will check whether the file length is larger then the SingleBlobUploadTresholdInBytes property that is set on the CloudBlobClient. If the blob size is larger then the maximum single upload size of a blob, it will internally automatically switch over to uploading the blob with Blocks. So basically you do not have to bother with CloudBlockBlobs to do optimized uploading, unless you have to to interact with some other code which for example accepts a stream and you do not want to load the stream entirely into memory.
I suggest if you want to use your own mechanism to stream a file into blob blocks and upload the blocks to blob storage, you have a look at some of the internal implementation of the storage client. You will find highly optimized code there to do parallel and asynchronous block upload there.
<Return to section navigation list>
SQL Azure Database, Federations and Reporting
Neil MacKenzie (@mknz) posted an Introduction to SQL Azure Federations on 3/5/2012:
SQL Azure Federations is the managed sharding technology that provides scale-out data and scale-out performance to SQL Azure. A single SQL Azure database can contain up to 150GB of data and is hosted as one of many tenants in a physical server in a Windows Azure datacenter. SQL Azure Federations removes the size and performance limits inherent to the multi-tenant nature of SQL Azure.
Cihan Biyikoglu has done an awesome job priming the pump on SQL Azure Federations by posting an enormous number of posts explaining the technology. Cihan and Scott Klein did a short introduction to SQL Azure Federations during the recent Learn Windows Azure event. I did a post on SQL Azure Federations in the middle of last year. This post is really a narrative for the SQL Azure Federations presentation I did at SQL Saturday 109 at Microsoft Silicon Valley. (Thanks to Mark Ginnebaugh and Ross Mistry for doing a great job organizing the event.)
Motivation – Scalability
The computing industry has long had a history of trying to solve a performance problem by scaling up the performance of the system used to solve it by adding more cores, more memory, more whatever. However, the cost of scaling up a single system becomes prohibitive as it gets built of ever-more specialized and exotic componentry. Essentially, the price-performance curve for scaling up a system becomes the limiting feature in the utility of a scaling-up to solve a performance problem.
It has been recognized for many years that scaling out by using many instances of commodity hardware can be a very cost effective way of improving performance. The supercomputing industry in the 1980s essentially become a battle between companies using the fastest hardware available regardless of cost and other companies using large numbers of inexpensive cores. This battle has clearly been won by the scale-out vendors since the fastest computer in the World today is the Fujitsu K computer with 705,024 SPARC64 2GHz cores.
The rise of Google, and its datacenters filled with inexpensive commodity hardware, demonstrated to everyone how a scale-out system was able to work at internet scale in a way that would have been impossible for a scale-up system. Cloud services like Amazon EC2 and Windows Azure further demonstrate the benefit of scale-out through their ability to provide on-demand compute at low cost.
Scale-out brings another benefit – system resilience. By using many systems to run a system, it becomes resilient to the failure of a small percentage of the systems. Windows Azure takes advantage of this in its use of rolling upgrades, which take up to 20% of the system down, when it performs system upgrades and in-place service upgrades.
Google’s use of scale-out also demonstrated the system resilience to be gained by scaling out. The service could survive the failure of one or more servers in a manner that would not have been possible in a scale-up system.
In a 1992 paper, David DeWitt and Jim Gray asked – Parallel Database Systems: the Future of Database Systems or a passing Fad? This paper discusses the scaling out of data by sharding (or partitioning) it among many systems, each of which manages a part of the data. As well as increasing the total amount of data that can be managed, data sharding improves performance and throughput by scaling out the systems processing the data.
DeWitt and Gray discuss three ways of distributing the data among shards: round robin, has bucket; and range (e.g. a-e, f-k, l-m, n-s, t-z). Range partitioning is easy to understand but can suffer from data and operational skew if care is not taken to ensure the data is distributed evenly across the shards. Foursquare suffered a multi-hour outage when data skew on a user table partitioned by user id caused the failure of a database server. Another problem with sharded data is the routing of database connections to the appropriate shard.
Sharding-as-a-Service
SQL Azure Federations is a managed sharding service for SQL Azure. It provides Transact-SQL support to manage sharded databases and to hide the complexity of routing connections to the appropriate shard. The SQL Azure section of the Windows Azure Portal has an area providing GUI support for many of the SQL Azure Federation management tasks.
In SQL Azure Federations, a federated database comprises a root database and one or federations each of which comprises a set of sharded databases referred to as federation members. There could, for example, be a customer federation with federation members containing customer data and a product federation with federation members containing product data. The root database and each federation member are normal SQL Azure databases which contain federation metadata.
A federation is specified by: the federation name; the distribution key which provides a name to use when specifying the column on which data in a table is to be partitioned; and the data type of that column. SQL Azure Federations supports only range distribution, and it is necessary to identify the range column in each federated table.
When using SQL Azure Federations, all connections are routed to the root database and a new USE FEDERATION statement is used to indicate to the SQL Azure service gateway where to route the connection. An important consequence of this is that the client does not have to open connections to individual federation members and consequently fragment the connection pool. This provides a significant performance benefit over a do-it-yourself sharding approach.
The root database and each federation member can be managed like other SQL Azure databases. For example, they can have different sizes and different schema. They can be accessed directly through SQL Server Management Studio and arbitrary SQL statements invoked in them. However, the full power of SQL Azure Federations is exposed only when the databases are accessed as federation members, via the Transact SQL extension statements, rather than by direct connection.
In each federated table – i.e. a table participating in a federation – the distribution key of the federation must be in the clustered index and each unique index. An implication of this is that it is not possible to ensure that a column is unique across the federation unless that column is the distribution key. Furthermore, non-federated tables in a federation member cannot have a foreign key relationship with a federated table.
A federated database contains three types of table:
- federated
- reference
- common
Federated tables contain the data that is federated across each federation member. Each federated table comprises only the part of the data in the distribution-key range allocated to that federation member. When the federation member is split, this data is distributed among the two new federation members. A federated table is created by appending FEDERATED ON to a CREATE TABLE statement. For example, with a federation with distribution key, CustomerId, and a table in which custId column contains the distribution valued the following defines it to be a federated table:
CREATE TABLE (…)
FEDERATED ON (Customerid = custId)Reference tables are normal tables existing in each federation member. They would typically be used for small amounts of reference data that does not need to scale with the federation. However, reference tables and their contents are copied to the new federation members formed when an existing federation member is split. Reference tables are created with the regular CREATE TABLE statement.
Common tables are normal tables existing in the root database. They would be typically be used for application data that does not need to be present in each federation member. They are created with the regular CREATE TABLE statement.
When a new federated or reference table is added to a federation it must be added separately to each member of the federation. The benefit of automatic data distribution for a federated table or automatic data copying for a reference table apply only when a federation member is split.
Federation Statements
SQL Azure Federations is supported by a number of new Transact SQL statements:
- CREATE FEDERATION
- USE FEDERATION
- ALTER FEDERATION
- DROP FEDERATION
The CREATE FEDERATION statement is invoked in the root database to create a new federation. It has the following syntax:
CREATE FEDERATION federation_name (distribution_name <data_type> RANGE)
The keyword RANGE is needed and serves as a reminder that the federation uses a range distribution. Note that the range of a federation member includes the low of the allocated range and excludes the high of the allocated range. The range is therefore closed on the lower end and open on the high end – i.e. [a, f).
federation_name specifies the name of the federation, distribution_namespecifies the name used to identify the range column in the federation. SQL Azure Federations supports only the following data types for the range columns:
- INT
- BIGINT
- UNIQUEIDENTIFIER
- VARBINARY( n ) - with n <= 900
For example:
CREATE FEDERATION CustomerFederation (CustomerId UNIQUEIDENTIFIER RANGE)
Note that the ordering of the GUIDs used in the UNIQUEIDENIFIER is non-obvious. For example, the value marked 8 is the most significant in the following:
00000000-0000-0000-0000-800000000000
The USE FEDERATIONstatement is used on a connection to indicate to the SQL Azure service gateway which database in the federated database subsequent Transact SQL statements should be routed. It comes in two forms.
The first form routes subsequent statements on the connection to the root database:
USE FEDERATION ROOT WITH RESET
The WITH RESET is necessary, and serves as a reminder that the connection is reset so that any existing context is deleted.
The second form routes subsequent statements on the connection to the appropriate federation member:
USE FEDERATION federation_name
(distribution_name = value)
WITH FILTERING={ON|OFF}, RESETfederation_name specifies the federation. ]distribution_name specifies a value identifying a federation member and can contain any value in the range allocated to the federation member. FILTERING=ON is provided to simplify the migration of legacy applications. When it is used, SQL Azure Federations appends a filter, specifying the distribution_name value, to every Transact SQL statement sent subsequently on the connection. This filter restricts the statements to only the federated data associated with that value. FILTERING=OFF allows subsequent statements to be used against any data in the associated federation member.
The ALTER FEDERATIONis used to split a federation member and to drop a federation member.
The ALTER FEDERATION … SPLIT AT statement is used to split a federation member in two and repartition the data in the member into the two new federation members. SQL Azure performs this split asynchronously and on completion it brings the new federation members online and drops the original federation member.
For example, consider a federation two members of which are defined by [100,400) and [400, 500). On completion of the following ALTER FEDERATION statement there will be three members in this range: [100,200), [200, 400) and [400, 500):
ALTER FEDERATION CustomerFederation
SPLIT AT (CustomerId = 200)The ALTER FEDERATION … DROP AT statement is used to drop a federation member and extend a neighboring range to cover the dropped member. The data of the dropped member is lost. There are two variants one specifying LOW and the other specifying HIGH. The LOW version extends the low end of a range through the federation member with the next lowest range and then drops the lower federation member. The HIGH version extends the high end of the range through the federation member with the next highest range and then drops the higher federation member.
For example, consider a federation with the following federation members for part of its range: [100,200), [200, 400) and [400, 500)
ALTER FEDERATION CustomerFederation
DROP AT (LOW CustomerId = 200)Leads to the following federation members: [100, 400), [400,500) in which all data in the original federation member [100, 200) has been deleted.
ALTER FEDERATION CustomerFederation
DROP AT (HIGH CustomerId = 200)Leads to the following federation members: [100, 400), [400,500) in which all data in the original federation member [200, 400) has been deleted.
The DROP FEDERATION statement stops any further connection attempts to the federation and then drops all federation members.
Dynamic Management Views
There are various DMVs to support the management and use of SQL Azure Federations:
The following DMVs provide metadata about the definition of the federations in a federated database
- sys.federations
- sys.federation_members
- sys.federation_distributions
- sys.federation_member_distributions
The following DMVs provide information about the history of changes in a federated database:
- sys.federation_history
- sys.federation_member_history
- sys.federation_distribution_history
- sys.federation_member_distribution_history
The following DMVs provide information about the asynchronous operations performed on a federated database:
The following DMVs provide information about errors that occur during the asynchronous operations performed on a federated database:
Of particular interest is the sys.federation_member_distributionDMV. In the root database this provides information on the range distributions for each federation member in the federated database. It has the following structure:
- federation_id int
- member_id int (database id)
- Distribution_name sysname
- Range_low sqlvariant
- Range_high sqlvariant
sys.federation_member_distribution is important because it can be used in the creation of fan-out queries against a federated database. The DMV can be queried to retrieve the Range_low values for the federation members since the low value is contained in the member. Separate connections can be opened and a USE FEDERATION statement invoked for each value of Range_low. Then the query can be invoked in parallel on each connection.
SQL Azure Federations Migration Wizard
George Huey has an article in MSDN Magazine on Scaling out with SQL Azure Federations. In the article, he introduces a SQL Azure Federations [Data] Migration Wizard which can be used to migrate data to a federated database.
For my take on SQL Azure Federations, see these recent OakLeaf posts:
- Adding Missing Rows to a SQL Azure Federation with the SQL Azure Federation Data Migration Wizard v1 (1/18/2012)
- Loading Big Data into Federated SQL Azure Tables with the SQL Azure Federation Data Migration Wizard v1.2 (1/17/2012)
- Creating a SQL Azure Federation in the Windows Azure Platform Portal (1/11/2012)
- Generating Big Data for Use with SQL Azure Federations and Apache Hadoop on Windows Azure Clusters (1/8/2012)
And these articles for other blogs:
- Upload Big Data to SQL Azure Federated Databases with BCP Automatically (ACloudyPlace, 1/18/2012)
- Sharding relational databases in the cloud (SearchCloudComputing.com, 7/2011)
Bruce Kyle posted Tips, Resources For Moving Your Database to SQL Azure to the US ISV Evangelism Blog on 3/5/2012:
Earlier this month Microsoft significantly reduced the cost of SQL Azure. SQL Azure is a great way to move your applications to the cloud.
Two recent blog posts provide a good starting point for learning about how you can migrate to SQL Azure.
In Migrating a SQL Server database to SQL Azure, Tim Heuer describes how he moved his SQL Server 2005 database used for his blog into SQL Azure. Tim wanted better up-time and did not want to spend the time maintaining the servers. He shows how to sign up create a database, create your data-tier application (dacpac file), and then migrate the data. His post provides some tips and gives you steps you can use.
Peter Laudati provides pointers to resources that show how you can get started in Get Started with SQL Azure: Resources. He’s organized the resources into three high-level categories:
- How to get started with SQL Azure.
- How to migrate data.
- How to achieve scale.
About SQL Azure
SQL Azure is a highly available and scalable cloud database service built on SQL Server technologies. With SQL Azure, developers do not have to install, setup or manage any database. High availability and fault tolerance is built-in and no physical administration is required. SQL Azure is a managed service that is operated by Microsoft and has a 99.9% monthly SLA.
<Return to section navigation list>
MarketPlace DataMarket, Social Analytics, Big Data and OData
No significant articles today.
<Return to section navigation list>
Windows Azure Access Control, Service Bus and Workflow
Brian Loesgen (@BrianLoesgen) reported New Azure ServiceBus Demo Available on 1/22/2012 (missed when published):
I’m pleased to announce that I FINALLY have finished and packaged up a cool little ServiceBus demo.
I say “finally” because this demo has a long lifeline, it began over a year ago. I enhanced it, and showed it to a colleague, Tony Guidici, for his comments. He ended up enhancing it, and putting it into his Azure book. I then took it back, enhanced it further, and, well, here it is. Thanks also to my colleagues David Chou and Greg Oliver for their feedback.
There are several resources associated with this demo:
- High def video walkthrough: http://youtu.be/xKHl87_BFT0
- Low def video walkthrough: http://youtu.be/c3KLhsjstco
- Complete source code, http://servicebuseventdemo.codeplex.com/
Note that this is based on the current-when-I-did-this version 1.6 of the Azure SDK and .NET libraries.
At a high level, the scenario is that this is a system that listens for events, and when critical events occur, they are multicast to listeners/subscribers through the Azure ServiceBus. The listeners use the ServiceBus relay bindings, the subscribers use the topical pub/sub mechanism of the ServiceBus.
Why relay *and* subscription? They serve different models. For example, using the subscription model, a listener could subscribe to all messages, or just a subset based on a filter condition (in this demo, we have examples of both). All subscribers will get all messages. By contrast, a great example of the relay bindings is having a Web service deployed on-prem, and remoting that by exposing an endpoint on the ServiceBus. The ServiceBus recently introduced a load balancing feature, where you could have multiple instances of the same service running, but if a message is received only one of them is called.
Both models work very well for inter-application and B2B scenarios. Note that this demo is intended to show the various parts of the ServiceBus, in a real world scenario you would likely not have a subscription listener that in turn publishes to a relay.
The moving parts in this particular demo look like this:
Subscriptions are shown above as ovals, the direct lines are relay bindings. The red lines are critical events, the black line is all events.
The projects in the solutions are:
Their purposes are:
Microsoft.Samples.ServiceBusMessaging
NuGet package to support push notificationsThere are a few things you’ll need to do in order to get the demo working. Remarkably few things actually, considering the number of moving parts in the flow diagram!
First off, in the admin portal, you will need to create two ServiceBus namespaces:
NOTE THAT SERVICEBUS NAMESPACES MUST BE GLOBALLY UNIQUE. The ones shown above are ones I chose, if you want to run the code you will have to choose your own and cannot re-use mine (unless I delete them).
The “eventpoint-critical” namespace is used for the relay bindings, the “eventpoint-topics” is used for the pub/sub (apparently you cannot use the same namespace for both purposes, at least at the time this was written). You don’t have to use those names, but if you change them, you’ll need to change them in the config file too, so I’d suggest just leaving it this way.
Because there are multiple types of apps, ranging from Azure worker roles through console and winforms apps, I created a single shared static config class that is shared among the apps. You can, and need to, update the app.config file with your appropriate account information:
Note: there are more things you need to change that did not fit in the screen shot, they will be self-evident when you look at the App.Config file.
To get the ServiceBus issuer name and secret, you may need to scroll as it is bottom-most right-hand side of the ServiceBus page:
Lastly, you’ll need to add the name/creds of your storage account to the Web and worker roles.
When you run the app, five visible projects will start, plus a web role and a worker role running in the emulator.
In the screen shot below, I generated 5 random messages. Three of them were critical, and you can see they were picked up by the console apps and the WinForms app.
Just as with Windows Azure queues, the Azure ServiceBus is a powerful tool you can use to decouple parts of your application. I hope you find this demo helpful, and that it gives you new ideas about how you can use it in your own solutions.
Thanks to Hanu Kommalapati (Hanuk) for the heads-up.
<Return to section navigation list>
Windows Azure VM Role, Virtual Network, Connect, RDP and CDN
No significant articles today.
<Return to section navigation list>
Live Windows Azure Apps, APIs, Tools and Test Harnesses
Sebastian W (@qmiswax) started a Windows Azure + MS CRM 2011 better together (part one) series on 3/5/2012:
Mindthecloud.net is starting series of articles about MS Dynamics CRM and Azure. The main idea is to popularize some of the Azure architectural patters that can be utilized with MS Dynamics CRM. You might ask why, well …I do believe that Azure is a complimentary part of some XRM based solutions, we can easy leverage some cloud capabilities that will allow us/you to build more effective, scalable, flexible with fresh enthusiastic approach (but with the business value) systems. Series of articles will focus primarily on helping the users/partners/architects/developers understand how to use Windows Azure + MS Dynamics CRM 2011. I don’t want to say that Azure is THE ONLY available solution for some of the scenarios I rather just show you where Azure services are useful, and shows how you can use them in your own solutions.
Every article will have business scenario, proposed solution, pros and cons, I thought about sample “trivial” implementation but that depends if there will be some interests. Let’s start then, I’m not going to write any introduction to Azure there is a lot of books/msdn articles which talk in details about every available Windows Azure service, just go to Azure Developer Centre and find a lot of videos guides etc. http://www.windowsazure.com/en-us/develop/overview/.
Business Problem
Company XYZ is using MS Dynamics CRM 2011 as system for creating orders. Dynamics CRM is hosted online (for that particular scenario it doesn’t matter where Dynamics CRM is hosted). Company XYZ has got business partner which fulfils their orders two branches in two different locations. Partner has business application which has to be hosted on premise in one of the locations where the stock is kept. Business decided that every 2 hours all orders created should be transferred to business partner, so we need secure reliable communication between CRM and this on-prem app without giving access to MS CRM for partner.
Solution
The proposed solution is one of many varieties which can be used to solve that business challenge. I’d like to use/utilise on of the fantastic capabilities which are offered by out of the box Windows Azure Integration with Microsoft Dynamics CRM. MS Dynamics CRM 2011 has been integrated with the Windows Azure platform by coupling the Microsoft Dynamics CRM event execution pipeline to the Windows Azure Service Bus so effectively during save/update operation we can send processed information to Azure Service Bus. MS CRM 2011 can send those messages to service bus using 4 different contracts: queued, one-way contract, two-way contract, or a REST contract if you want detailed information please have a look here http://msdn.microsoft.com/en-us/library/gg334766.aspx . A queued contract in our case is probably the most interesting one, is using Service Bus Queues. Lets’ have a look at diagram
Advantages
What that kind of approach gives us.
Proposed architecture is based on “brokered” messaging “pattern”. The core components of the Service Bus brokered messaging infrastructure are queues, topics, and subscriptions, for now we’re going to concentrate just at queues. MS CRM sends the processed entity (order) directly to prepared queue. That queue acts as a buffer and can store orders for certain period of time called default message time to live. (Can be set on message or if not queue settings apply) moreover partner will connect just to queue not directly to our CRM application. Azure Service Bus Queues are using ACS claims and can utilise roles with ACS roles, every request must be authenticated so our communication is secure. Well we met all business requirements and we achieved even more. Let’s look at benefits summary.
1) Separation of concerns/decoupling. Partner doesn’t have to connect directly to our MS CRM app.
2) Secure and reliable cross-boundary communication.
3) Load-levelling buffer this comes extra partner receiver application doesn’t have to be developed as super scalable app just in case we overstressed it by sending huge amount of orders , queue acts as an buffer prevents overload.
4) We didn’t touch that subject but we also we have load balancing.
5) From that pub/sub is just “behind the corner” but that will be subject of next article.p.s Credits to Marco Amoedo for review of that post.
All comments and suggestions are very welcome if someone is interested in sample implementation I can prepare step-by-step tutorial.
Jialiang Ge (@jialge) described Putting communities in the palms of our IT Pro and Developers in a 3/4/2012 post to the Microsoft All-In-One Code Framework blog:
The MSDN Forum Support team is releasing a cool “Microsoft Forums” mobile service. Here is their introduction:
“Microsoft Forums” Mobile service, built on our ground breaking Azure services, will put Communities right in the palms of our IT Pros and Developers!
Our PC gadgets made it easier for IT Pros and Developers to leverage and participate in our rich communities right from their desktop. Building upon that success, the mobile service we are launching today is expected to increase the ease and frequency with which our IT Pros and Developers will connect with the communities.
The more IT Pros and Developers connect with the communities, the richer and better our communities become.
Launch the browser on your phone now, type http://aka.ms/msforums and get connected! Please leverage and please share.
What is “Microsoft Forums”
“Microsoft Forums” allows you to easily access MSDN, TechNet and Office365 forums directly from your portable device. Users can keep track of hot and latest topics, "My" discussions (personalized discussion topics), Forum FAQs, or search content in the forums – all of this, while on the GO! In short, Microsoft Forums puts Microsoft Communities in the palms of our IT Pros and Developers.
Who will use the “Microsoft Forums”
IT Pros and Developers.
What devices does “Microsoft Forums” support
Get started with “Microsoft Forums” @Aka.ms/msforums on your smart phone
Liam Cavanagh (@liamca) continued his Cotega series with What I Learned Building a Startup on Microsoft Cloud Services: Part 7 – Cotega Updates and New Web Site on 3/4/2012:
I am the founder of a startup called Cotega and also a Microsoft employee within the SQL Azure group where I work as a Program Manager. This is a series of posts where I talk about my experience building a startup outside of Microsoft. I do my best to take my Microsoft hat off and tell both the good parts and the bad parts I experienced using Azure.
Today, I wanted to update you on the status of Cotega and let you know what I have been working on over the past few weeks.
First of all, thanks to all of you who have taken the time to use and provide feedback on the service. I have greatly appreciated your support. Over the past few weeks I have tried to consolidate your feedback and based on these suggestions, I have made a significant number of updates to the web site. Below, is a screen shot of the new dashboard page that now allows you to quickly visualize the state of your databases. In fact, from IE9 or higher, you can now copy and paste the charts.
There are a number of other updates that are meant to simplify the user experience and focus on the key tasks you have told me are important. In addition, “notifications” are now referred to as “monitoring agents”.
Over the next few weeks Cotega will transition from the current beta servers to the production servers. Although the service will still be in “beta” for a few additional weeks, it will allow the service to be hosted in its final location and allow me to add some final pieces such as the billing system. During this transition time, your notifications will need to be re-created and all archived data will be lost. If you wish to keep this data, it is recommended that you download this data using the “Logs” option. I will give you more notice once this transition gets closer.
Once again, thank-you for your support and I hope to continue to hear from you with your feedback, questions and suggestions. Please take a look at the updated service and let me know if you have any issues.
<Return to section navigation list>
Visual Studio LightSwitch and Entity Framework 4.1+
Paul Patterson described Microsoft LightSwitch – 8 Ways to Reporting and Printing Success in a 3/5/2012 post:
Integrated reporting and printing in Microsoft Visual Studio LightSwitch is arguably one the most hotly requested features being demanded by LightSwitch users today. In lieu of having out-of-the-box reporting capabilities within the LightSwitch development environment, here is a quick list of ways to mitigate your LightSwitch printing and reporting needs.
1. Keep it simple! Use the Editable Grid screen template.
When a customer asks you to build a report, what are they really asking for? Way too often I see people creating elaborate reporting solutions for simple reporting requests. In most cases a customer will be just as happy seeing the information displayed in tabular format on screen (a grid). All you have to do is ask, “Will the display of the report as a grid on a screen work for you?”
Using the LightSwitch editable grid screen template can solve most of your customer reporting requirements. A delete of the screen command bar save button and a quick configuration of a Use Read-Only property, and you’ll have a simple but effective tabular report.
2. The LightSwitch Filter Control.
A simple extension that packs a great deal of user value is the Microsoft authored LightSwitch Filter Control. This nifty little tool can be easily tacked on to grid control and provides the user with some additional flexibility in filtering the information being presented.
Enabling the extension is as simple as; creating a query for a data entity, adding a string filter, writing a one-liner of for the PreProcessQuery code, and tweaking a screen to use the Advanced Filter Builder.
3. ComponentOne OLAP Control
One of my favorite 3rd party LightSwitch extensions is the ComponentOne OLAP Control. This gem of an extension provides the opportunity to do so much, for so little. Features include; configurable OLAP grids, charting, exporting, and even saving and loading user defined views.
The standard version of this control costs about $300. Considering the features you get, and how much your time is worth, you do the math on the ROI – an easy sell.
ComponentOne Data Analysis OLAP Control for LightSwitch
4. Use a 3rd party Grid Control
The beauty of LightSwitch is its extensibility. With a little ingenuity a developer can quickly create and integrate (Silverlight) based controls into a LightSwitch application. Many 3rd party control vendors offer Silverlight data grid controls that have integrated features such as filtering, searching, and exporting. Spending a little extra time on integrating these controls can provide those additional features to allow for much more dynamic tabular reporting.
Image courtesy of Infragistics
Some of those vendors include; Telerik, Infragistics, DevExpress, and ComponentOne. Each has their strengths and weaknesses. For the most part, they each have some form of a SilverLight based grid control that can be used within LightSwitch.
Example Vendors:
5. Export to Excel
Most, if not all, of my customers are using Excel for some sort of business function. So, instead of reinventing the wheel, why not just export the data to tool that most are already familiar with anyway.
When I get a request to develop a report from LightSwitch one of the first things I ask is, “If we can export that information to Excel, will that meet your requirements?” Excel is a tool that customers are already familiar with. The opportunity to use Excel to further massage the data gives the user the value of added control of how they consume their information.
6. Export to Something Else
Hey, anything is possible. If someone needs that data to go somewhere else, then it can happen. The technology stack used for the LightSwitch plumbing is such that you can do virtually anything with it. For example, the newly integrated OData support in Visual Studio 2011 LightSwitch offers unlimited possibilities, including the ability to not only consume OData based information, but to also expose LightSwitch application data as OData.
There are examples out there of exporting LightSwitch data in different ways. Most notably is an example of exporting LightSwitch data to Word, which a great option for creating some slick mail merging type reports, among other things.
Exposing and Consuming OData in Microsoft Visual Studio LightSwitch
7. DevExpress Express Report Viewer for LightSwitch
If you absolutely need reporting capabilities where a printable document is required, the DevExpress Report Viewer control is perfect for you. Using DevExpress designers, reports are created and saved to your LightSwitch solution as class files. Then, through some simple coding efforts, the report can be called at runtime and displayed within the LightSwitch application screens.
This is another tool I lean on quite a bit. When my customer needs a printable report, I can quickly design the report to the exact specification the customer wants. The integrated features of the report viewer, such as exporting to many different formats, make this reporting option another great time saver.
8. Other 3rd Party Tools
As the LightSwitch ecosystem evolves, so will 3rd party vendor tools. Necessity is the mother of invention and with the demand for reporting and printing capabilities from LightSwitch, tool developers will start coming out with products to meet this demand. The DevExpress Express Report Viewer mentioned above is an excellent example of this.
Until those tools come out, look for 3rd party vendors that offer reporting and printing components based on SilverLight. Telerik, Infragistics, DevExpress, and ComponentOne are all good examples of vendors with SilverLight based reporting controls. Some of those vendors also offer support on how to implement their controls in LightSwitch.
Another great extension comes from Spursoft. Spursoft offers an a SQL Server Reporting Services extension that provides for presenting SSRS reports in LightSwitch.
Spursoft LightSwitch Extensions
Have any other ideas or insights into this whole LightSwitch printing and reporting stuff? I’d love to hear about it. Send me a note, or submit a comment and share with the community.
Return to section navigation list>
Windows Azure Infrastructure and DevOps
Mike Benkovitch (@mbenko) suggested Get Started with Cloud Computing and Windows Azure in a 3/5/2012 post to his BenkoBlog:
This is the first part of a series of blog posts I’m working on as part of the companion webcast series “Soup to Nuts Cloud Computing” in which we look at what it takes to get started with the tools and setup things you need to begin building Cloud applications. I will be focusing on Windows Azure as our target platform, but the topics we cover later on about architecting for scale, availability and performance apply across any Cloud Provider. I’m going to make the assumption that we’re on the same page as to what Cloud Computing is, which Wikipedia defines as
“Cloud computing is the delivery of computing as a service rather than a product, whereby shared resources, software, and information are provided to computers and other devices as a utility (like the electricity grid) over a network (typically the Internet).[1]"”
I like the definition on SearchCloudComputing - http://searchcloudcomputing.techtarget.com which describes it this way:
“A cloud service has three distinct characteristics that differentiate it from traditional hosting. It is sold on demand, typically by the minute or the hour; it is elastic -- a user can have as much or as little of a service as they want at any given time; and the service is fully managed by the provider (the consumer needs nothing but a personal computer and Internet access).”
Assuming we agree on what it is, Windows Azure provides what is called “Platform as a Service” or PaaS to customers who want to build scalable, reliable and performant solutions to business information problems. Windows Azure is available on a Pay as you Go, as a Subscription Benefit or on a Trial basis. These are associated with a subscription which you create as the management point of contact for your services. The services available are fairly broad and include some core services such as Compute, Storage and Database, but also include several additional services that can be used in conjunction with or separate from the core services including Identity Management (Access Control Services), Caching, Service Bus, Reporting Services, Traffic Management, Content Delivery Network and more.
Using these services we can build a variety of applications and solutions for websites, compute intensive applications, web API’s, social games, device applications, media intensive solutions and much more. The thing we need to get started is an account or subscription which provides the interface to provision and manage these services. Fortunately there are many ways to get started.
The Subscription. If you have an MSDN Subscription or are part of the Microsoft Partner Network or have signed up for BizSpark you already have Azure Benefits that you just need to activate. Simply go to http://bit.ly/bqtAzMSDN to see how to activate. If none of these apply you can also try out the Free 90 Day Azure Trial (http://aka.ms/AzureTrialMB) which includes a cap which prevents accidental overage. When you activate your subscription it will walk you thru a series of steps which are needed to get things set up.
The first page shows us what we get with the subscription. Next it confirms your identity by sending a confirmation code to your cell phone. The process then asks for credit card information to validate your identity and then activates your account. The process is very fast and responsive (unlike the old 30 day Azure Pass we had used at the Boot Camps in 2011 which could take up to 24-48 hours to activate the trial.
The Tools. Next we get the tools. because there are lots of platform developers out there, you can get the tools that work for you, whether it’s Visual Studio, Eclipse, PowerShell or just command line tools. You’ll want to download the SDK and tools by going to http://aka.ms/AzureMB and clicking the appropriate link.
Our First App. Now that we have our tools, let’s look at what is needed to build and deploy an app. In the webcast we showed how to take an existing application and add the pieces needed to deploy it to the cloud. We start out in a Visual Studio Solution that has a simple ASP.NET web application. After we’ve installed the tools for Visual Studio when you right click on the web project file you will see a new option on the context menu to Add a Windows Azure Deployment Project to the solution.
This adds a new project to the solution and includes a service definition file and a couple configuration files. The Service Definition file (*.csdef) describes how our cloud application looks, including what type of roles are included (think front end web servers and back end processing servers), the endpoints that will be serviced by the load balancer and any internal endpoints we plan to use, as well as any startup configuration we need to run when our instances start up.
<?xml version="1.0" encoding="utf-8"?>
<ServiceDefinition name="Soup2NutsSite.Azure1"
                   xmlns="http://schemas.microsoft.com/ServiceHosting/2008/10/ServiceDefinition">
  <WebRole name="Soup2NutsSite" vmsize="Small">
    <Sites>
      <Site name="Web">
        <Bindings>
          <Binding name="Endpoint1" endpointName="Endpoint1" />
        </Bindings>
      </Site>
    </Sites>
    <Endpoints>
      <InputEndpoint name="Endpoint1" protocol="http" port="80" />
    </Endpoints>
    <Imports>
      <Import moduleName="Diagnostics" />
    </Imports>
  </WebRole>
</ServiceDefinition>
The Service Configuration files (*.cscfg) include things like connection strings, certificates and other pieces of information used by our running service instances that we may change after deployment.
Deploy. After adding the Windows Azure Deployment Project you can publish it out to the cloud by right clicking and selecting Publish. A wizard is presented which walks you thru the steps to build a package of files which includes zipped and encrypted copies of all the code and resources the application requires, as well as the configuration files to make your application work. You sign into your Windows Azure subscription setup a management certificate which authorizes Visual Studio to make deployments on your behalf. You can pick the subscription you want to use and then create a hosted service name and select a data center or region to run it in.
You can choose to enable Remote Desktop, where it will ask for an admin user name you’d like to use to manage the service, and optionally enable Web Deploy which adds the necessary plumbing to support WebDav deployment of your web code (a nice development feature where you can update the code running the website without doing a full deployment of the hosted service). You end up with a Publish Summary that shows what and where you will deploy the site to.
Clicking Publish then goes thru the process of building your package, uploading it to the Windows Azure Management site, and starting your service. Visual Studio has a status window which shows where it’s at in the process, and you can see your deployment from the Windows Azure Management Portal and clicking on the “Hosted Services, Storage Accounts & CDN” button on the left panel of actions.
If you’re curious to see how much you’ve used of your subscription you can always go back to http://WindowsAzure.com and view your account details.
Conclusion. So that’s it. You can get started with Windows Azure and Cloud Computing very quickly, all you need is an active subscription, download the tools, and then do a quick deploy of a project. For details on things like pricing check out the page on http://WindowsAzure.com.
David Pallman posted On the Recent Windows Azure Leap Day Outage on 3/4/2012:
On February 29th Windows Azure suffered a widespread service disruption, which, per a Microsoft statement, appears to have been caused by a “a time calculation that was incorrect for the leap year”. By the time a fix was devised and rolled out and consequences of the original problem were dealt with, customers were back up and running as early as 3 am PT (most customers, as per the Microsoft statement)or as late as 5-6pm (which is what I and my customers experienced). From what I understand, there was an availability impact only and no data loss .
Now, armchair technologists everywhere are weighing in with their opinions, which range from “See, I told you so: the cloud is just hype. You’re a fool to use it for anything mission critical.” to “This isolated inciden tis not a big deal.” and even “It’s your fault for not knowing better and having a contingency plan.” Many rendering their opinion are exhibiting a bias, and while it may be human nature to color your opinion based on whether you are pro-Microsoft or not, I’m going to try to rise above that. While I am a Windows Azure MVP and a fan of the platform, and certainly wish this hadn’t happened, I’m going to offer my take with a sincere attempt to neither minimize the real problems this caused businesses nor overstate the implications.
Acknowledging the Impact
First, I want to openly recognize the impact of this outage. If you’re running your business on a cloud platform and it goes down for some or all of a business day, this is extremely devastating. The reimbursement a cloud provider will give you for downtime is nothing compared to the business revenue you may have lost and the damage to reputation you may have incurred. Moreover,if your business is down your customers are also impacted.
One aspect of this particular outage that may have been particularly upsetting to customers is that some services were out on a worldwide basis for a time, including service management and the management portal. That interfered with one of the recovery patterns in the cloud, which is to switchover to an alternative data center. It also made it impossible to make new emergency deployments. This appears to be due to the nature of the problem being a software bug that affected all data centers, rather than the “equipment failure in a single data center” scenario that often gets a lot of the attention in cloud reliability architecture.
How Reliable Should We Expect Cloud Platforms to Be?
Microsoft certainly isn’t the only cloud provider who has an occasional problem. Last April, Amazon had a significant multi-day outage due to a “remirroring storm”. The gallery of online providers with problems in recent years includes SalesForce.com, Google Gmail, Twitter, PayPal, and Rackspace. Think about your own data center or the company that you use for hosting, and they probably have had issues from time to time as well.
Yet, cloud providers make a big deal about their failure-resistant architectures, which feature high redundancy of servers and data, distribution of resources across fault zones, intelligent management, and first-rate datacenters and staff. Is it all hype, as some contend? Are cloud data centers no more reliable (or less reliable) than your own data center?
The truth is, cloud platforms are superbly engineered and do have amazing designs to uphold reliability—but, they have limits. Microsoft (or Amazon for that matter) can explain to you how their architecture and management safeguards your cloud assets so that even a significant equipment failure in a data center (such as a switch failure) doesn’t take out your application and data. This is not hype, it is true. But what about the statistical unlikelihood of multiple simultaneous failures? Or a software bug that affects all data centers? Cloud computing can't protect against every possibility. This does not mean the cloud should not be used; it does mean its reliability needs to be understood for what it is. Cloud data centers are extremely reliable, but they aren’t infallible. Just as it is statistically safer to fly than drive, we still have air disasters from time to time.
This recent outage illustrates the human factor in IT: people can and do make mistakes. While much of the magic in cloud data centers has come from automation and taking people out of the loop, people (and software written by people) will always be part of the mix. Since we won’t be minting perfect people anytime soon, the potential for human error remains. Of course, this is true of all data centers.
What Can Customers Do?
Having acknowledged the impact, let’s also point out that cloud providers do not promise 100% availability in the first place: typically, cloud platforms promise 3 to 3 ½ 9s for their services. That means you might be without a cloud service 6-8 hours a year even under the best of conditions—and need to plan for the possibility of being down for a business day, not knowing when that might be. While this recent outage was a bit longer than 8 hours for some customers, it was essentially being down for a day. Customers who took the SLA seriously and had made emergency provisions should have been able to switch to a contingency arrangement; those who never made those plans were stuck and felt helpless.
What should a contingency plan provide? It depends on how mission critical your cloud applications are and what you’re willing to pay for the insurance of extra availability. You can choose to wait out an outage; guard against single data center outages using alternative data centers; or have an alternative place to run altogether. Let this outage be the wake-up call to have an appropriate contingency plan in place.
<Return to section navigation list>
Windows Azure Platform Appliance (WAPA), Hyper-V and Private/Hybrid Clouds
Gartner (@Gartner_inc) asserted Special report shows hybrid it challenges longstanding practices of IT organizations and business models of traditional IT vendors in a deck to its Gartner Says Hybrid IT Is Transforming the Role of IT press release of 3/5/2012 (via the HPC in the Cloud blog):
Hybrid IT is transforming IT architectures and the role of IT itself, according to Gartner, Inc. Hybrid IT is the result of combining internal and external services, usually from a combination of internal and public clouds, in support of a business outcome.
In the Gartner Special Report, "Hybrid IT: How Internal and External Cloud Services are Transforming IT" (http://www.gartner.com/technology/research/technical-professionals/hybrid-cloud.jsp), analysts explained that hybrid IT relies on new technologies to connect clouds, sophisticated approaches to data classification and identity, and service-oriented architecture, and heralds significant change for IT practitioners.
"Many organizations have now passed the definitional stage of cloud computing and are testing cloud architectures inside and outside the enterprise and over time, the cloud will simply become one of the ways that we 'do' computing, and workloads will move around in hybrid internal/external IT environments," said Chris Howard, managing vice president at Gartner. "As a result, the traditional role of the enterprise IT professional is changing and becoming multifaceted. A hybrid IT model requires internal and external IT professionals to support the business capabilities of the enterprise."
Cloud computing's business model — the ability to rapidly provision IT services without large capital expenditures — is appealing to budget-minded executives. CEOs and CIOs are pressuring IT organizations to lower overhead by offloading services to cloud providers. However, when IT organizations investigate potential cloud services, the market's volatility reveals that not all cloud services are created equal.
"IT organizations are taking an 'adopt and go' strategy to satisfy internal customer IT consumerization and democratization requirements," Mr. Howard said. "Many IT organizations are adopting public cloud computing for noncritical IT services such as development and test applications, or for turnkey software as a service (SaaS) applications such as Web analytics and CRM that can holistically replace internal applications and enable access for a mobile workforce."
For critical applications and data, IT organizations have not adopted public cloud computing as quickly. Many IT organizations discover that public cloud service providers (CSPs) cannot meet the security requirements, integrate with enterprise management, or guarantee availability necessary to host critical applications. Therefore, organizations continue to own and operate internal IT services that house critical applications and data.
However, the public cloud has affected internal customers. Because of the pervasive growth of public clouds, many business units and internal customers have used and grown accustomed to IT as a service and have built business processes and budget plans with cloud computing in mind. Now these internal customers are demanding that IT organizations build internal private clouds that not only house critical applications, but also provide a self-service, quickly provisioned, showback-based IT consumption model.
"IT organizations that do not match the request for IT as a service run the risk of internal customers bypassing the IT organization and consuming IT services from the external cloud, thereby placing the company at greater risk," said Mr. Howard. "IT organizations realize that they not only need to compete with the public cloud consumption model, but also must serve as the intermediary between their internal customers and all IT services — whether internal or external."
IT organizations are becoming the broker to a set of IT services that are hosted partially internally and partially externally — hybrid IT architecture. By being the intermediary of IT services, IT organizations can offer internal customers the price, capacity and speed of provisioning of the external cloud while maintaining the security and governance the company requires, and reducing IT service costs.
This model of service delivery challenges both the longstanding practices of IT organizations and the business models of traditional IT vendors. Gartner expects that most organizations will maintain a core set of primary service providers (cloud and noncloud) extended by an ecosystem of edge providers who fulfill specific solution requirements.
"Hybrid IT is the new IT and it is here to stay. While the cloud market matures, IT organizations must adopt a hybrid IT strategy that not only builds internal clouds to house critical IT services and compete with public CSPs, but also utilizes the external cloud to house noncritical IT services and data, augment internal capacity, and increase IT agility," said Mr. Howard. "Hybrid IT creates symmetry between internal and external IT services that will force an IT and business paradigm shift for years to come."
Additional information is available in the Gartner Special Report "Hybrid IT: How Internal and External Cloud Services are Transforming IT" at http://www.gartner.com/technology/research/technical-professionals/hybrid-cloud.jsp. The Special Report includes video commentary of more than a dozen reports examining the various elements of Hybrid IT.
Kristian Nese (@KristianNese) described Installing Hyper-V in Windows Server "8" in a 3/4/2012 post:
First of all, I`m a though guy. Currently, I`m located in Seattle and I did a remote upgrade of one of my lab servers in Norway. And you know what? It just works.
So basically, I just want to cover the setup of a new Hyper-V host using some screen shots in case you`re not familiar with the process in the first place.
1. Either boot from DVD, VHD, or USB. In my example, I used a DVD. Select language, time and currency format and keyboard
2. Click Install now
3. Select which version you want to install. As you can see there are two versions. The server core (without a GUI) for smallest footprints and the traditional rich Windows Server with a GUI.
4. Read through the license terms and eventually accept it and move on.
5. Select which disk/partition you want to use. You can also select navigate to drive options if you need additional options related to the selected disk.
6. Files will be copied to the disk and some reboots will be required through the process
7. The final bits are almost in place,
8. Enter an administrator password for the built-in admin account
9. Finalizing your settings before you`re good to go
The next thing that I want to do is quite obviously, enabling the Hyper-V role and see what`s changed in this build.
By default, Server Manager will launch after you’ve logged on to your Windows Server “8” [machine].
A nice, fresh-looking metro designed Server Manager that also shows some improvements on the management side, like adding several servers and also create a server group. All this for simplified management and streamlined actions across your Win8 servers.
If you click the ‘Manage’ button in the right corner, this will show some options for either the current local server or an remote server. To summarize, click here when you want to add new roles and features. (If you want to list all the administration tools available on the server, click ‘Tools’)
1. After you have clicked ‘Add roles’, you can choose from a Role-based or feature-based installation, or a Remote Desktop Services scenario-based installation. Select the first one since this is a traditional Hyper-V deployment on a single host.
2. Select a server from the server pool or a virtual hard disk. As mentioned above, you can add and create a server group. If you had several servers in this group,you could have selected a remote server and deployed Hyper-V. The VHD option is currently untested by me, but it`s pretty self-explained what this means. It will mount the VHD and enable roles/features within the file.
3. Navigate to the Hyper-V role and click Next.
4. You get information about the installation itself and what you`re able to do during the install, or simply do it afterwards.
5. Select a dedicated physical NIC presented in the host for the Virtual Switch (yes, it’s now called virtual switch instead of virtual network. Simplified, right?)
6. Some pretty new improvements related to VM migrations in this build, so you must decide which protocol you`d like to use for this purpose if you want to allow this server to send and receive live migrations of virtual machines. Also note that if you intend to cluster this Hyper-V host, you should not enable migration now, but configure it during the creation of your Hyper-V cluster –and use dedicated networks. BTW, this is very useful information at this stage.Remember in the 2008 R2 version, where you had to investigate to find the network for live migration, hidden on the settings of a random VM?
7. Select location for both virtual hard disks and VM config files. This server is not apart of a cluster so I will actually specify the locations at this time.
8. Confirm the selections and eventually mark the ‘Restart the destination server automatically if required.
Once it’s done, you are free to deploy virtual machines. Follow this blog to participate in the next excited post about the subject.
The Microsoft Case Studies Team asserted “Microsoft BizSpark One startup solves enterprise-class storage challenges with hybrid cloud approach” in a deck for its Sundance Looks to StorSimple to Simplify Its Massive Storage Needs feature story of 3/2/2012:
StorSimple takes an innovative approach to storage design, betting early on the Windows Azure platform and assembling a first-rate team to make cloud-integrated storage a reality for enterprise companies.
Like many other innovations, StorSimple’s breakthrough began with a fundamental observation followed by a simple question.
“Enterprises store a monumental amount of data every year, but up to 80 percent of that data is never or only rarely accessed,” says Ursheet Parikh, CEO and co-founder of StorSimple [pictured at right]. “We wondered, “What kind of storage system would accommodate enterprises’ actual data access requirements most effectively?” That question drove our design goals.”
Traditional storage is expensive. The inherent fragility of disk drives means that storage products wear out faster than other IT products, leading to high maintenance and replacement costs. Cloud storage shifts those costs and the technology refresh cycle to the cloud service provider, vastly reducing costs to enterprise companies.
“Cloud storage products are hard to build, and few manufacturers create enterprise-level products,” Parikh says. “Existing storage providers, the ones with the most expertise, had the least incentive to create cloud-based competition for their own incumbent business model. As an unencumbered startup, we had an opportunity to approach the problem from a new perspective, combining the established with the new.”
StorSimple Takes Off Quickly
In 2009 Parikh created a business plan for an enterprise-level storage company that he started presenting to Silicon Valley venture capital (VC) firms, in search of funding. Unbeknownst to Parikh, storage industry expert Guru Pangal, a pioneer in the early development of Fibre Channel and Small Computer System Interface (SCSI) technologies, was shopping around a similar business plan at the same time.
“The VC we both approached suggested Guru and I meet; we connected and we got along well, so we joined forces,” Parikh says. “Within a week of our first joint VC meetings, we had term sheets in hand for funding StorSimple.”
StorSimple’s innovative cloud-integrated enterprise storage approach quickly found traction with organizations worldwide because it combines on-premise and cloud capabilities in a more secure and transparent manner. Within a couple years of launch, StorSimple was providing cloud-integrated storage solutions for high-profile customers, including a large number of Fortune 1000 companies.
“Enterprises using StorSimple products find their storage costs plummeting, often by 60 percent to 80 percent compared with strictly on-premise storage,” Parikh says. “We let enterprises treat their data differently depending on the frequency of access required.”
Rapid customer traction has enabled StorSimple to grow quickly. Its more than 50 team members thrive in a company culture Parikh describes as based on intellectual honesty, accountability and passion: “We have a great team here that creates solid products that solve real customer problems.”
Taking Advantage of the Full Range of BizSpark Programs
Soon after StorSimple’s founding, one of the company’s board members introduced the two founders to a local Microsoft BizSpark director. In 2009 StorSimple joined the BizSpark program, in spring of 2010 the company became a BizSpark member, and in June 2011 StorSimple was recognized as the 2011 Microsoft BizSpark Partner of the Year.
In announcing that award, Dan’l Lewin, corporate vice president for Strategic and Emerging Business Development at Microsoft, says, “StorSimple has leveraged the full range of the BizSpark program’s offering, from world-class development tools to a global network of partners and customers. As a result, it has accelerated its business opportunity and increased its market presence while adding value for its investors.”
“The BizSpark program has been an important component of StorSimple’s rapid success,” Parikh says. “The association with Microsoft gave us instant credibility and exposure, and we’ve been able to achieve faster joint customer success than would have been expected for a startup. We work well on core issues, such as sales alignment and compensation alignment, that could be onerous without such close cooperation.”
The BizSpark connection also enabled StorSimple to discover more about Microsoft’s emphasis on and commitment to the Windows Azure cloud platform — and it opened the door to Microsoft’s inclusion of StorSimple demos as part of its prestigious and influential Microsoft Technology Center programs.
“I think Microsoft should get lot of credit for how they’re executing, especially for their cloud offerings,” Parikh says.
StorSimple Advantages in Action
StorSimple’s growing list of awards and high-profile testimonials attests to the effectiveness of its cloud-integrated enterprise storage solutions.
One StorSimple customer is the Sundance Institute, the nonprofit organization that runs the annual Sundance Film Festival as its most visible offering. The Sundance Institute’s need for storage capacity was growing faster than the organization’s existing storage area network (SAN) and direct attached storage could support.
“Now that anyone can run out and shoot HD video, we were ending up with gigabytes and gigabytes of film content needing storage,” says Justin Simmons, associate director of Technology Services for the Sundance Institute.
Compounding this ongoing challenge, during the months of the Sundance Film Festival, the institute’s staff doubles, festival logistics ramp up to support the 40,000 attendees, and the small IT staff has to scale quickly to support the expanded user community and the increased storage demands.
“We were looking for a new storage solution with on-premise storage and easy locations that also had a cloud tier, and when I heard it could really be done within one box with StorSimple, we recognized what a huge time and cost saver it would be for us,” Simmons says.
The Sundance Institute moved all its unstructured file storage to the StorSimple Solution. The impact was immediate: StorSimple’s de-duplication capabilities eliminated the Sundance Institute’s need for tape backup as it moved to the cloud. The institute also appreciated StorSimple’s certification and seamless operation with VMware and with its Microsoft products already in place, including Microsoft Exchange and Microsoft SharePoint, as well as the fact that StorSimple helps ensure the security of data residing in a public cloud by encrypting data in flight and at rest.
“StorSimple has freed up a lot of resources on our existing storage, so we are able to delay or potentially entirely put off what would have been a very expensive new SAN purchase,” Simmons says. “And instead of spending potentially half her time managing backups, our system administrator is no longer buried under a backup storage shell game. With StorSimple backing up straight to the cloud, she can now use her time to work on new projects and new initiatives for the Sundance Institute.”
<Return to section navigation list>
Cloud Security and Governance
Philip Cox wrote Strategy: How to Manage Identity in the Public Cloud for InformationWeek::Reports, who published it on 3/5/2012:
How to Manage Identity in the Public Cloud
As companies' use of public cloud-based services is increases, identity management becomes a more critical and complicated issue for enterprise IT professionals. There are several identity management models that companies can leverage, and each has its benefits and drawbacks. Companies will need to consider, among other things, the current and future scope of their public cloud app usage; the need for single sign-on capabilities; internal and industry security requirements; the identity management systems already in place; and the availability of development resources. (S4410312)
Table of Contents
3 Author’s Bio
4 Executive Summary
5 Cloud Complicates Identity Management
5 Figure 1: Identity Flows and Stores in the Cloud
6 Factors to Consider
7 I. Cloud Provider Identity Management7 Identity Management Basics
8 II. Synchronized Identities
8 III. Federation
9 Figure 2: Cloud Services Concerns
10 IV. Identity as a Service (IDaaS)
10 Questions to Ask
11 More Like ThisDownload
About the Author
Philip Cox is a principal consultant with SystemExperts. He is an industry-recognized consultant, author and lecturer. He specializes in TCP/IP-based distributed systems security, providing guidance on design, compliance and security testing. Philip is part of the architecture and virtualization domain groups working on version 2 of the Cloud Security Alliance Guide. He is also a member of the PCI special interest groups for scoping and virtualization. He authored the Windows 2000 Security Handbook and was technical editor of Building Internet Firewalls, 2nd Edition, and Hacking Linux Exposed.
<Return to section navigation list>
Cloud Computing Events
Jim O’Neil (@jimoneil) reported Virtualization Deep Dive Day 2012–March 10 on 3/5/2012:
While I spend most of my time in the trenches talking about software development for the cloud, it’s important to realize that virtualization technologies are one of the primary reasons the cloud exists. Without it the economies of scale, elasticity, and rapid provisioning would be nearly impossible.
Here’s a great chance to get some deep background on just that technology! The Virtualization Group-Boston is sponsoring this 4th annual event, held this year at The Lantana in Randolph, MA, Saturday, March 10th, from 8 a.m. to 5 p.m.
The line-up includes some fantastic speakers in this space, including Brian Madden, who will deliver the keynote on the topic of the current state of virtualization of desktop, and Paul Thurrott, presenting on WIndows 8 Hyper V. My IT Pro colleague, Dan Stolts, will be delivering a couple of sessions, including one discussing what every IT Admin should know about the cloud, and there’s more as you can see from the schedule below:
There is a small fee of $25 to cover the venue and logistic costs of the event, which wouldn’t have been possible without the tremendous support of the sponsors, including Microsoft, Citrix, Coraid, Desktone, Veeam, StarWind Software, AppZero, Leostream, Virtual Bridges, TechTarget and more!

Moving Data to the CloudView more PowerPoint from adwaitu
<Return to section navigation list>
Other Cloud Computing Platforms and Services
Bill Claybrook reported Open source cloud platforms: Moving from hype to production in a 3/5/2012 post to TechTarget’s SearchCloudComputing.com blog:
Enterprises with strong development teams or business-specific applications may eschew commercial cloud services providers in search of open source cloud options. Open source cloud platforms like Eucalyptus, OpenStack and Abiquo have momentum to succeed with enterprises building private clouds.
But several questions remain about how one open source cloud services provider differs from the next. Who will come out on top? Will Eucalyptus Systems make its mark against growing competition from OpenStack? Can OpenStack make the move from an overhyped project to a production-quality cloud alternative? Will Red Hat define its ambiguous cloud strategy? And what about hypervisor-agnostic companies like Abiquo? Who will move into the limelight and into enterprises’ private cloud adoption plans?
Abiquo
Abiquo is an open source software company with an enterprise cloud product that allows customers to rapidly build and manage fully automated and governed, self-service, multi-stack, multi-hypervisor clouds – private, public or hybrid. Abiquo integrates with an enterprise’s installed hypervisor and storage management tools; it supports all major hypervisors and allows you to manage a virtualized infrastructure through a single “pane of glass.” You do not have to switch among multiple user interfaces.According to Forrester Research, Abiquo is listed near the top of 15 private cloud products, a list that includes BMC, CA Technologies, HP, IBM, Microsoft and VMware.
Canonical
For the past few years, Canonical has been aligned with the open source cloud project, Eucalyptus, to create Ubuntu Enterprise Cloud (UEC). However, in February 2011, Canonical joined forces with OpenStack and later that year switched to OpenStack for its Ubuntu cloud foundation technology. OpenStack currently makes up the core of the Ubuntu Cloud; Ubuntu has been named the lead host and guest operating system on HP’s OpenStack-based cloud.These changes won’t affect current releases of Eucalyptus-based UEC, according to Canonical. Eucalyptus will still be available for download and supported by Canonical. Customers that have deployed private clouds on Eucalyptus-based UEC will continue to receive maintenance through April 2015. Ubuntu will provide tools that automate the migration from a Eucalyptus-based UEC to an OpenStack-based UEC.
Eucalyptus Systems
Eucalyptus Systems offers production-ready releases of the open source Eucalyptus cloud project code. It also provides commercial plug-ins, including support for VMware’s hypervisor. Support for KVM and Xen is baked into the Eucalyptus project code, and it supports much of the Amazon EC2 API.Eucalyptus Systems charges an annual subscription fee, like Red Hat and other open source cloud providers, which encompasses technical support and access to the company’s commercial plug-ins. Eucalyptus Systems’ plug-ins give companies the capability to blend VMware, KVM and Xen assets into a single cloud fabric while ensuring compatibility with existing public cloud options that are compatible with Amazon Elastic Compute Cloud (EC2).
Main strengths of Eucalyptus Systems’ open source product are that it’s low cost, installed in production environments, supports VMware and Amazon EC2, and allows enterprises to move workloads back and forth between Amazon EC2 public clouds and Eucalyptus-based private clouds.
OpenStack
OpenStack is an open source community of technologists, developers, researchers and corporations that share resources, technology and ideas to develop open source products for cloud computing. One main goal of the OpenStack initiative is to remove cloud customer fear of proprietary vendor lock-in. OpenStack is currently the most hyped open source platform for building private and public clouds.NASA and Rackspace were the first primary OpenStack supporters. Now a number of large companies such as Cisco, Dell, HP and Intel have voiced support for OpenStack. As noted previously, Canonical dropped Eucalyptus as it core cloud technology in favor of OpenStack. And Microsoft is actively involved in OpenStack supporting Hyper-V integration.
OpenStack API modules are compatible with other APIs such as Amazon EC2, Xen, and KVM. Tools exist to move virtual servers from OpenStack to Amazon EC2.
OpenStack appeals to organizations with technical expertise looking for low-cost, open-source development options. A number of companies, including Rackspace, Citrix and Mirantis, have developed for-cost support programs for OpenStack users.
Vendors such as HP view OpenStack as the platform of choice for building public clouds as well as private clouds. NASA uses OpenStack for its internal, private cloud. Rackspace uses OpenStack ObjectStorage in its cloud storage platform; Cisco built a Network as a Service (NaaS) around OpenStack. OpenStack holds the most promise for becoming a standard, making hybrid clouds a reality and reducing the impact of lock-in.
Red Hat
CloudForms, an Infrastructure as a Service (IaaS) product and OpenShift, a Platform as a Service (PaaS) product, are Red Hat’s cloud computing offerings. CloudForms enables companies to create and manage private cloud environments. Red Hat claims CloudForms lets users manage applications versus managing virtual servers.OpenShift creates an application development environment. Red Hat argues OpenShift is more portable than other PaaS products because it allows customers to migrate deployments to other cloud computing vendor environments using the DeltaCloud API, also an open source project. …
Read more: Bill continues with an “Open source cloud takeaways” conclusion.
Full disclosure: I’m a paid contributor to TechTarget’s SearchCloudComputing.com blog.
<Return to section navigation list>


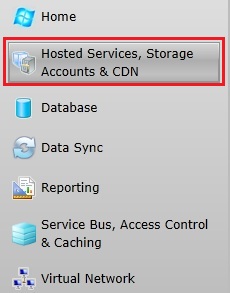
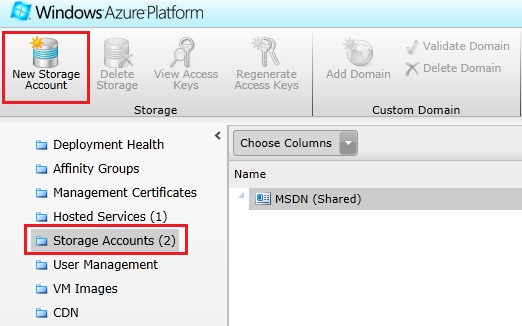
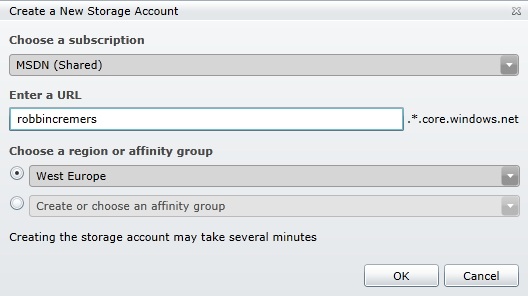
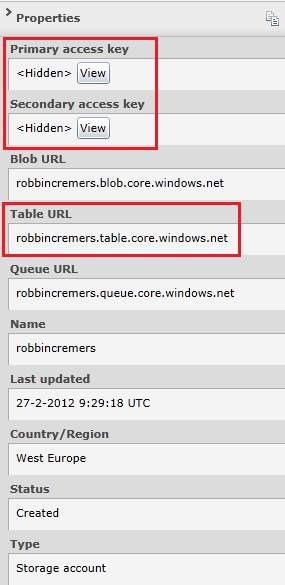


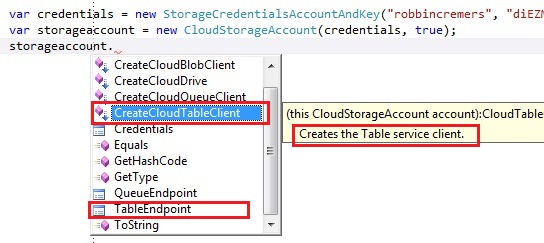
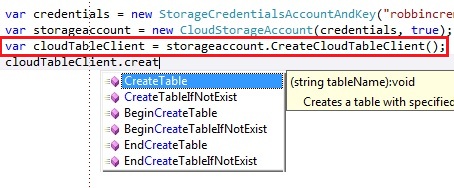


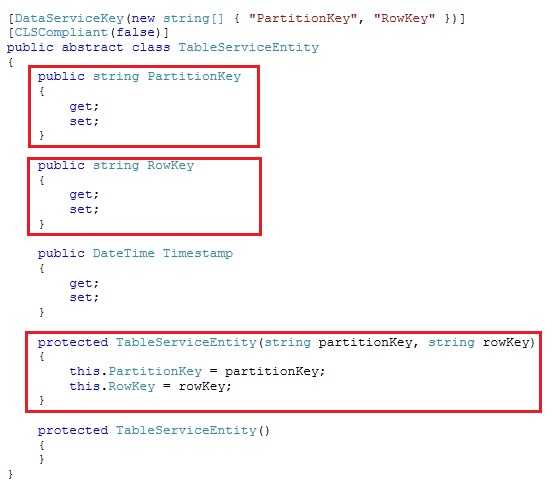
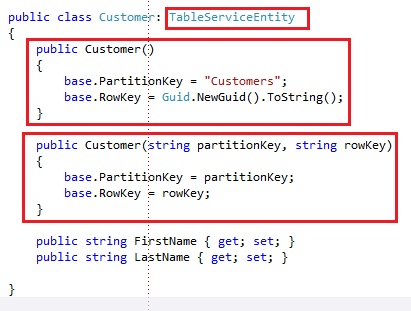
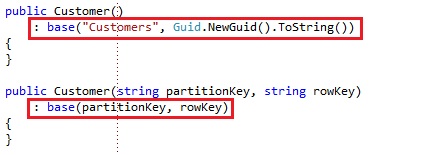
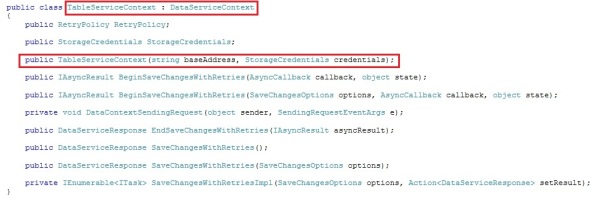
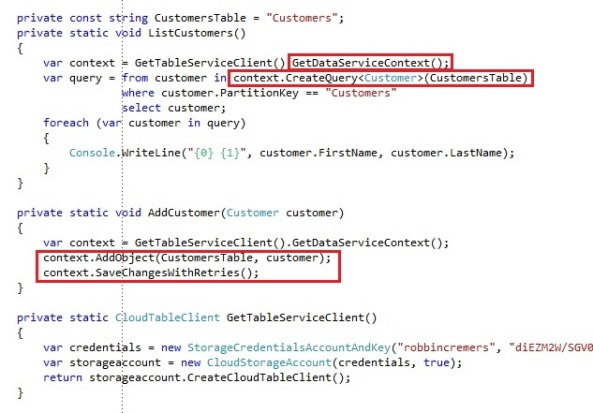

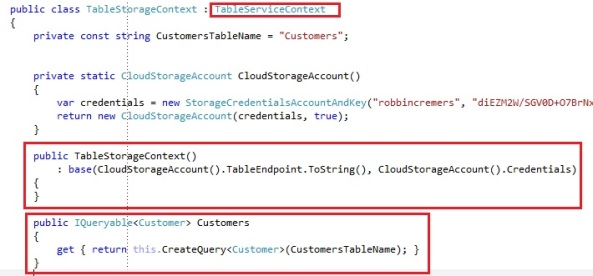
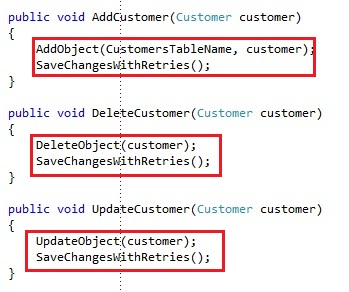

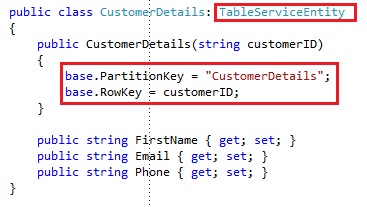
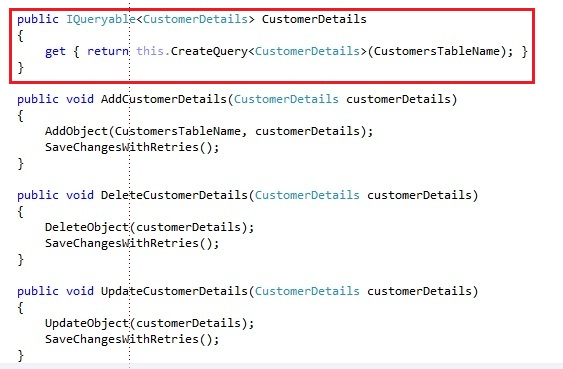
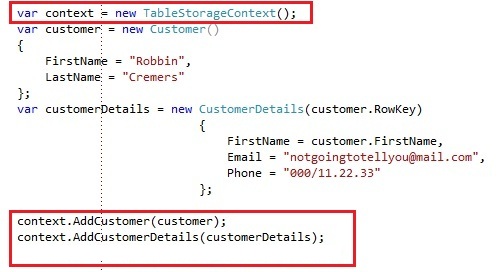

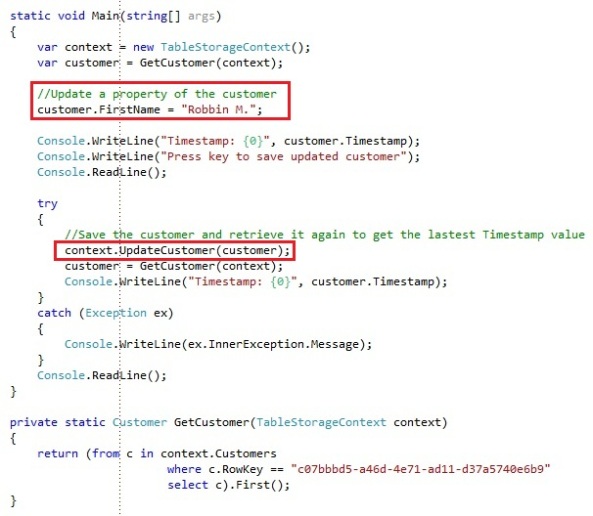
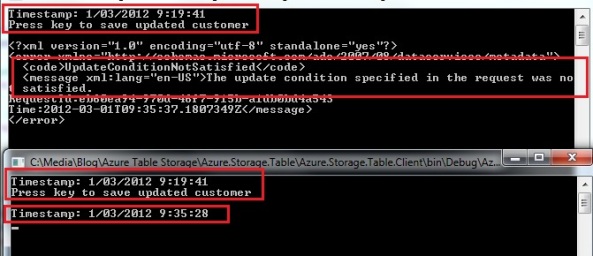
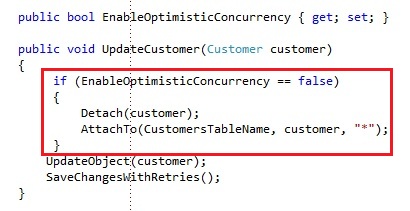
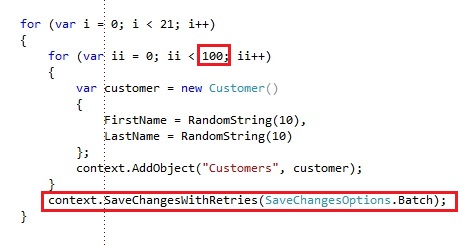


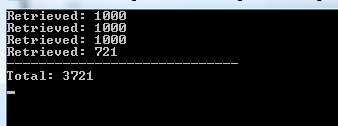
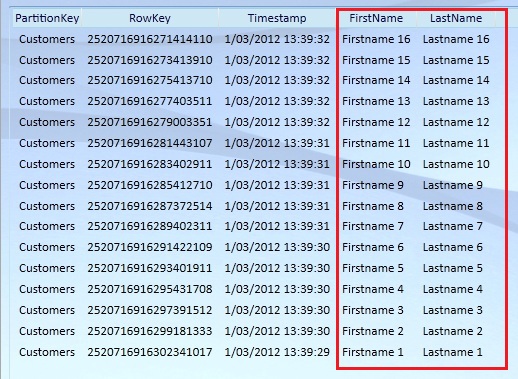

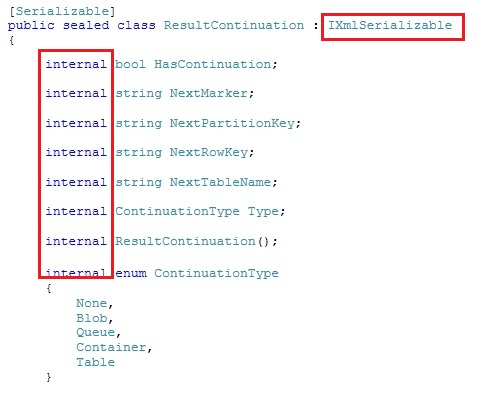

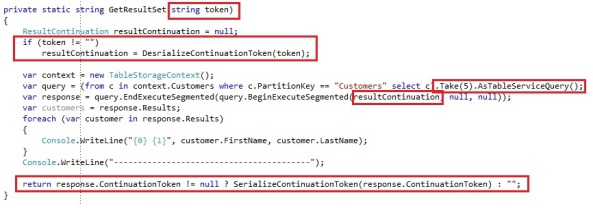
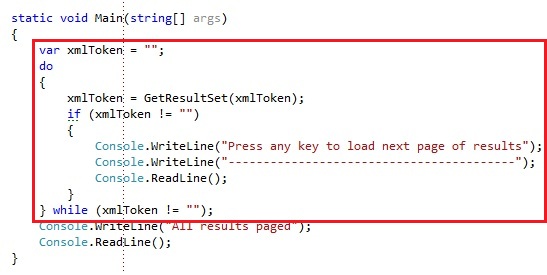

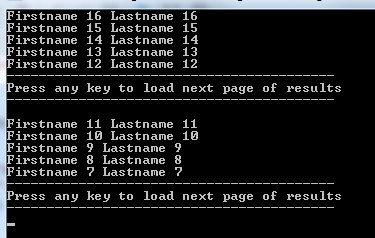
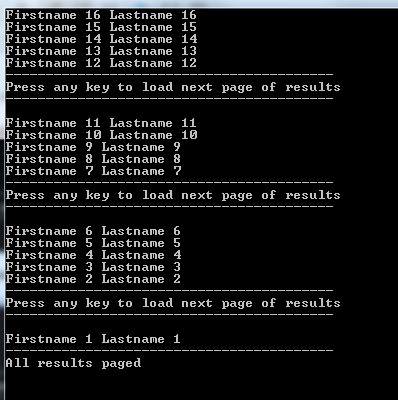
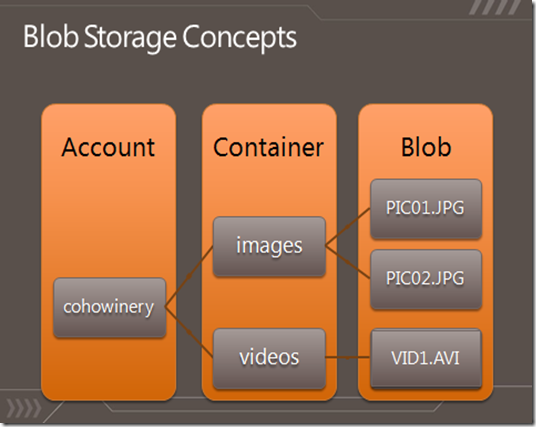
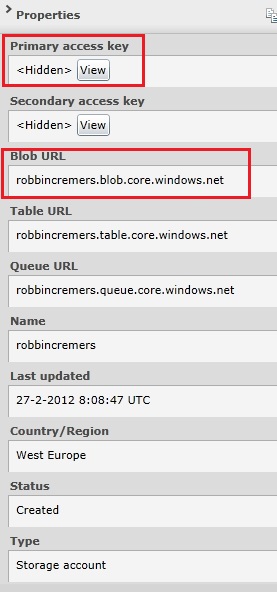

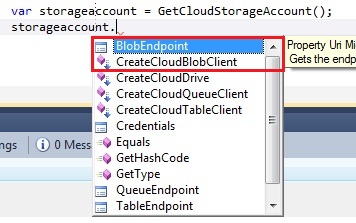


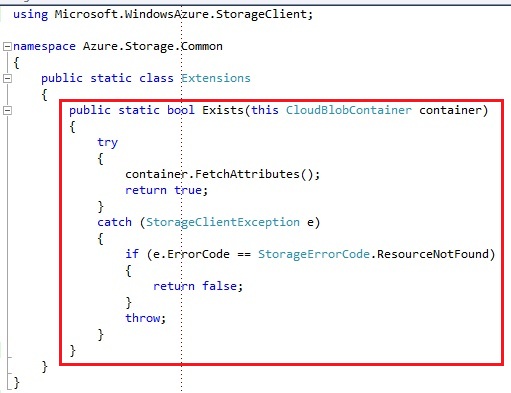
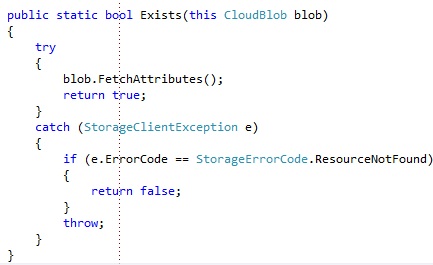
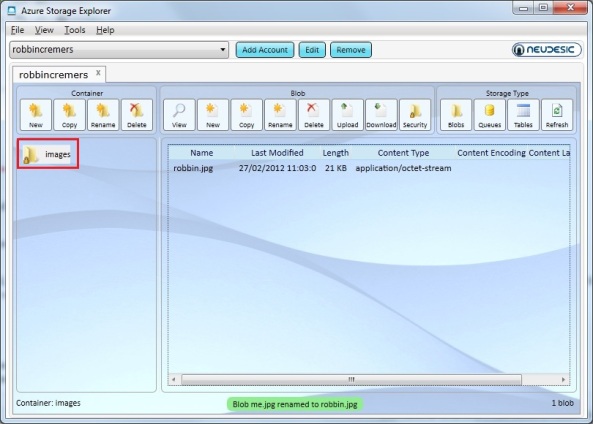


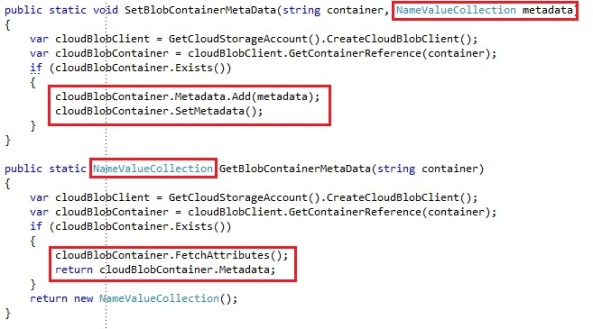
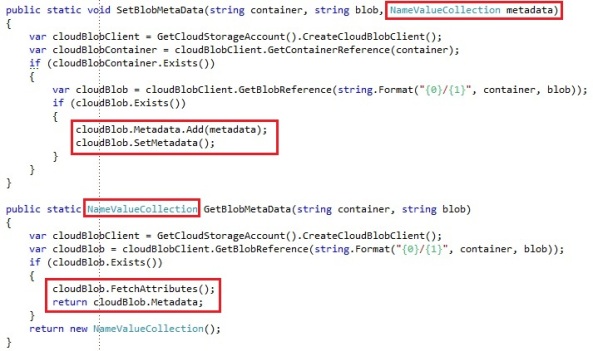



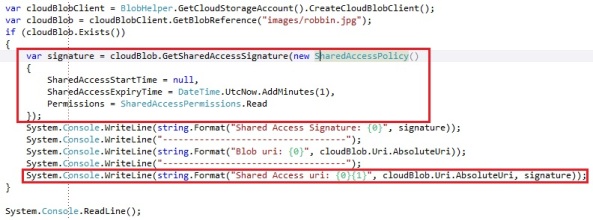
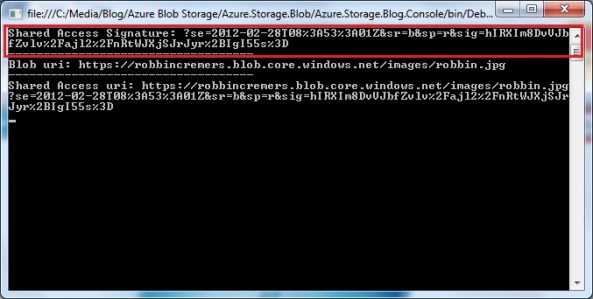

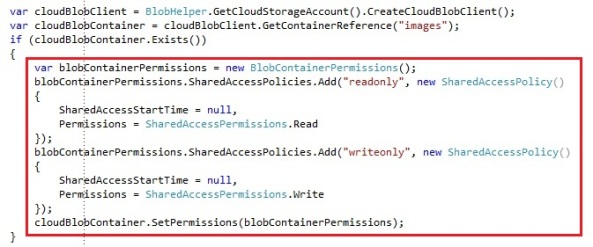


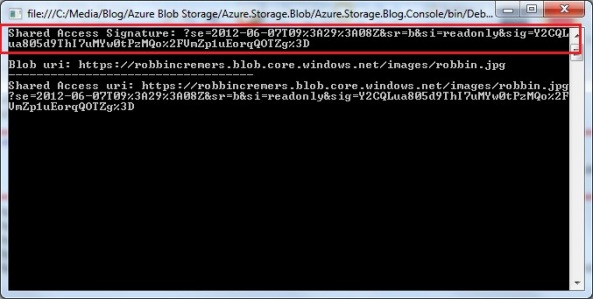


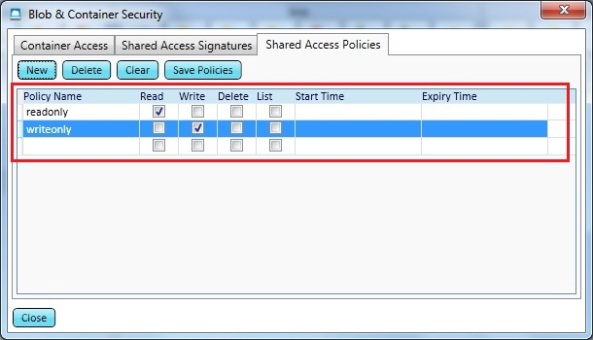

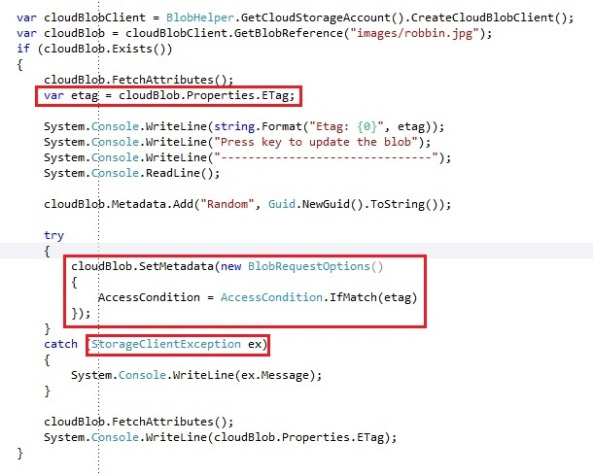
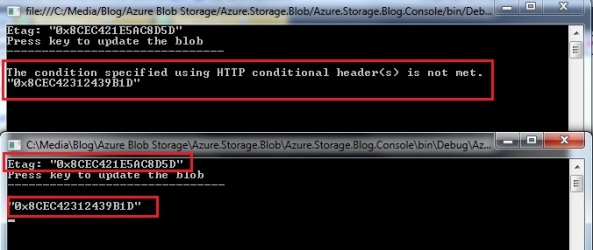

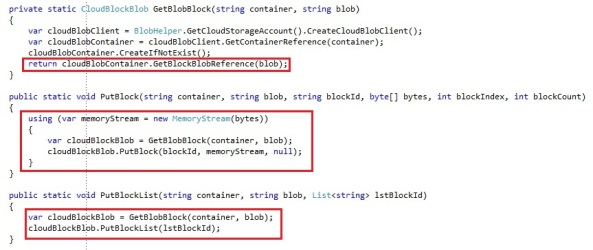
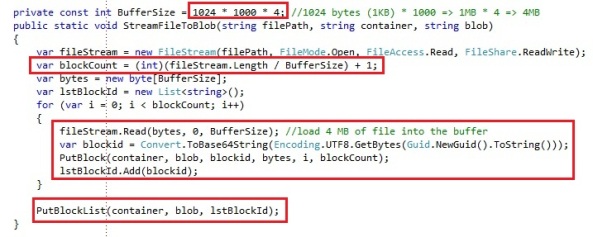


0 comments:
Post a Comment