Windows Azure and Cloud Computing Posts for 8/27/2012+
| A compendium of Windows Azure, Service Bus, EAI & EDI,Access Control, Connect, SQL Azure Database, and other cloud-computing articles. |

• Updated 8/29/2012 with new content marked •, including Windows Azure Training Kit content for Windows Azure Mobile Services.
Check the Windows Azure SQL Database, Federations and Reporting, Mobile Services section for all important posts about SQL Azure Mobile Services by Microsoft employees and Windows Azure MVPs.
Note: This post is updated daily or more frequently, depending on the availability of new articles in the following sections:
- Windows Azure Blob, Drive, Table, Queue and Hadoop Services
- Windows Azure SQL Database, Federations and Reporting, Mobile Services
- Marketplace DataMarket, Cloud Numerics, Big Data and OData
- Windows Azure Service Bus, Access Control, Caching, Active Directory, and Workflow
- Windows Azure Virtual Machines, Virtual Networks, Web Sites, Connect, RDP and CDN
- Live Windows Azure Apps, APIs, Tools and Test Harnesses
- Visual Studio LightSwitch and Entity Framework v4+
- Windows Azure Infrastructure and DevOps
- Windows Azure Platform Appliance (WAPA), Hyper-V and Private/Hybrid Clouds
- Cloud Security and Governance
- Cloud Computing Events
- Other Cloud Computing Platforms and Services
Azure Blob, Drive, Table, Queue and Hadoop Services
• Alexander Negrash (@NegrashS) announced the availability of CloudBerry Cloud Migrator in an 8/29/2012 message:
We are proud to announce the beta availability of Cloud Migrator, the service that allows users transfer their files across different cloud storage services without installing any additional software. All copy operations run inside the cloud (on the EC2 machine) and managed through the web interface.
The service allows users to copy files between different locations or accounts within one cloud storage provider as well as between different cloud storages.
The service supports data migration between Amazon S3, Windows Azure Blob Storage, Rackspace Cloud Files.
Cloud Migrator also supports FTP so it can be used to easily copy/move files from an FTP server to any of the supported cloud storage accounts with no need to implement complicated scripts.
CloudBerry Cloud Migrator is available at http://sync.cloudberrylab.com/


Nati Shalom described Making Hadoop Run Faster in an 8/28/2012 post to the HighScalability blog:
One of the challenges in processing data is that the speed at which we can input data is quite often much faster than the speed at which we can process it. This problem becomes even more pronounced in the context of Big Data, where the volume of data keeps on growing, along with a corresponding need for more insights, and thus the need for more complex processing also increases.
Batch Processing to the Rescue
Hadoop was designed to deal with this challenge in the following ways:
1. Use a distributed file system: This enables us to spread the load and grow our system as needed.
2. Optimize for write speed: To enable fast writes the Hadoop architecture was designed so that writes are first logged, and then processed. This enables fairly fast write speeds.
3. Use batch processing (Map/Reduce) to balance the speed for the data feeds with the processing speed.
Batch Processing Challenges
The challenge with batch-processing is that it assumes that the feeds come in bursts. If our data feeds come in on a continuous basis, the entire assumption and architecture behind batch processing starts to break down.
If we increase the batch window, the result is higher latency between the time the data comes in until the time we actually get it into our reports and insights. Moreover, the number of hours is finite -- in many systems the batch window is done on a daily basis. Often, the assumption is that most of the processing can be done during off-peak hours. But as the volume gets bigger, the time it takes to process the data gets longer, until it reaches the limit of the hours in a day and then we face dealing with a continuously growing backlog. In addition, if we experience a failure during the processing we might not have enough time to re-process.
Making Hadoop Run Faster
We can make our Hadoop system run faster by pre-processing some of the work before it gets into our Hadoop system. We can also move the types of workload for which batch processing isn't a good fit out of the Hadoop Map/Reduce system and use Stream Processing, as Google did.
Speed Things Up Through Stream-Based Processing
The concept of stream-based processing is fairly simple. Instead of logging the data first and then processing it, we can process it as it comes in.
A good analogy to explain the difference is a manufacturing pipeline. Think about a car manufacturing pipeline: Compare the process of first putting all the parts together and then assembling them piece by piece, versus a process in which you package each unit at the manufacturer and only send the pre-packaged parts to the assembly line. Which method is faster?
Data processing is just like any pipeline. Putting stream-based processing at the front is analogous to pre-packaging our parts before they get to the assembly line, which is in our case is the Hadoop batch processing system.
As in manufacturing, even if we pre-package the parts at the manufacturer we still need an assembly line to put all the parts together. In the same way, stream-based processing is not meant to replace our Hadoop system, but rather to reduce the amount of work that the system needs to deal with, and to make the work that does go into the Hadoop process easier, and thus faster, to process.
In-memory stream processing can make a good stream processing system, as Curt Monash’s
points out on his research traditional databases will eventually end up in RAM
You can read the full details on how this can be done here
<Return to section navigation list>
Windows Azure SQL Database, Federations and Reporting, Mobile Services
• The Windows Azure Mobile Team posted the following new Windows Azure Mobile Content for the Windows Azure Training Kit on GitHub:
- Presentation-Windows8AndWindowsAzureMobileServices: https://github.com/WindowsAzure-TrainingKit/Presentation-Windows8AndWindowsAzureMobileServices
- DevCamps-Windows8AndWindowsAzureMobileServices: https://github.com/WindowsAzure-TrainingKit/DevCamps-Windows8AndWindowsAzureMobileServices
- Demo-Windows8AndWindowsAzureMobileServices: https://github.com/WindowsAzure-TrainingKit/Demo-Windows8AndMobileServices
- HOL-Windows8AndWindowsAzureMobileServices: https://github.com/WindowsAzure-TrainingKit/HOL-Windows8AndMobileServices

Note: The PowerPoint presentation refused to open for me in PowerPoint 2013 but worked in PowerPoint 2010. (Thanks to Azure Insider Oliver Michalski for the heads-up.)
• David Pallman posted an Introducing Windows Azure Mobile Services for Windows 8 tutorial on 8/28/2012:
In this post I’ll introduce Microsoft’s latest Windows Azure service, Windows Azure Mobile Services. We’ll take a tour of the service and how it can be used with Windows 8 apps, the first type of mobile client Microsoft is supporting. You'll be amazed how easy it is to add a mobile back end in the cloud with this service. I've always felt web, mobile, and cloud complement each other extremely well, and this service makes doing that a cinch.
Why Mobile Services?
The Windows Azure platform makes a lot of sense as a back-end for mobile services, with its ability to easily scale and provide global presence. Up till now, building that back end has required developers to master multiple cloud services: you need Windows Azure Compute to host your web service, Windows Azure Storage or SQL Database to store data, Access Control Service for identity, and so on. Microsoft wanted to make it easier for mobile developers to more or less click a button and have an instant back-end. As you’ll see, they have indeed succeeded in pulling off that vision remarkably well.
This first incarnation of Mobile Services is designed for Windows 8 clients, with support for other mobile platforms to come in the future.
How to Access Mobile Services
Mobile Services is in preview, so you’ll first need to sign up for the preview at azure.com (navigate to ACCOUNT > preview features > Mobile Services).
Provisioning a Mobile Service in the Windows Azure Portal
Once you’ve been accepted for Mobile Services, you’ll notice a MOBILE SERVICES area now appears in the Windows Azure management portal. To provision a mobile service, click the New button at the bottom left and select MOBILE SERVICE.
In the dialogs that follow, specify a unique name for your service and whether to use an existing database or create a new one.
Very quickly thereafter, your mobile service will be provisioned. You’ll see a confirmation message at bottom.
Your service will appear in the MOBILE SERVICES area of the portal. Click the mobile service to set it up.
In the mobile service’s detail page, you’ll be guided through set up of the service. If you’re just trying this out for the first time, I suggest you choose the Create a new Windows 8 application option which is what we’re doing here.
As the wizard shows, there are three basic steps to setting up your service:
- Download the Windows Azure Mobile Service SDK and Visual Studio 2012 Express
- Create a database table
- Download and run your app
Let's continue down the sample application path.
Step 1: Install the Mobile Services SDK
You need the Windows Azure Mobile Services SDK in order to use Windows Azure Mobile Services. You can download the mobile services SDK and, if you also need it, Visual Studio 2012 Express by clicking on the appropriate links.
Setting up a Database Table
You need at least one SQL Database table as backing storage for your service. If you’re just taking the tour, you can let the wizard generate a To Do Item table for your service.
Step 3: Download and Run Your Windows 8 App
In this step the wizard generates a Windows 8 app for you (!) which you can download, which is pre-configured to access your back end and is ready to run. You can choose a WinJS (HTML5/JavaScript) or C# (.NET/XAML) download. We'll choose WinJS here.
Download the zip file, copy its contents to a file folder, and open the .sln file in Visual Studio.
Open the default.js file and you’ll see in the onactivated event that a client object is created for mobile services that specifies an application key.
Running the Sample Solution
Now press F5 to run the sample solution you downloaded. You’ll see a screen like this, which lets you enter and view To Do tasks.
Enter some items, by entering a task name and clicking Save. As you do so, each item appears to the right. You can get rid of a task by checking its check box.
Viewing the Data
Where is the To Do data stored? In a Windows Azure SQL Database. You can view the database in the Windows Azure portal by navigating to MOBILE SERVICES > your project > DATA > your database. Here we see the items we just entered.
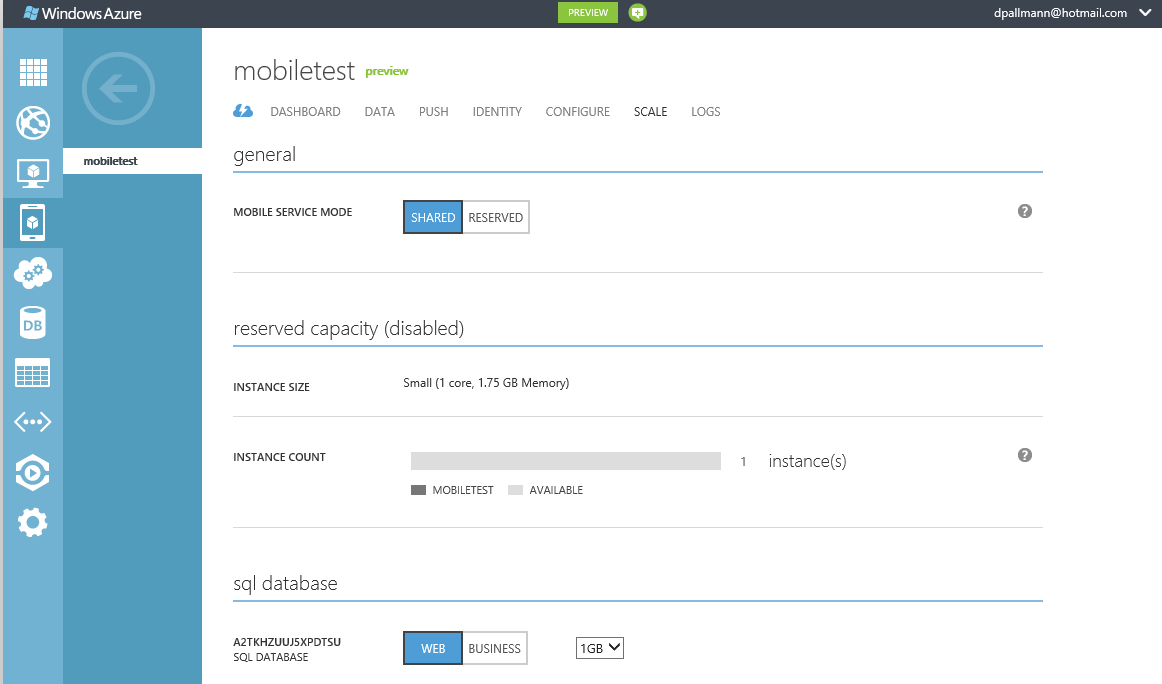
Scaling the Back End
Similar to Windows Azure Web Sites, you can scale the back end in portal using the SCALE area of the project detail page. Just add more instances when you need them.
Wrapping it up: Windows Azure Mobile Service for Windows 8
At this point, you should be saying Wow! We've gotten a cloud-based back end (a collective set of cloud services) provisioned and ready for use unbelievably quickly and effortlessly.We’ve just scratched the surface of what Windows Azure Mobile Services can do, but I hope this little tour gets across how easy and powerful it is and whets your appetite for exploring what the service can do for you. There’s plenty more functionality offered by Mobile Services, including authentication and push notifications. We’ll cover those and more in future posts.


I’m anxiously awaiting similar support for Android devices so I can create an app for my Nexus 7 tablet.
• Clint Edmonson (@clinted) rang in with Introducing Windows Azure Mobile Services on 8/28/2012:
Today I’m excited to share that the Windows Azure Mobile Services public preview is now available. This preview provides a turnkey backend cloud solution designed to accelerate connected client app development. These services streamline the development process by enabling you to leverage the cloud for common mobile application scenarios such as structured storage, user authentication and push notifications.
If you’re building a Windows 8 app and want a fast and easy path to creating backend cloud services, this preview provides the capabilities you need. You to take advantage of the cloud to build and deploy modern apps for Windows 8 devices in anticipation of general availability on October 26th. Subsequent preview releases will extend support to iOS, Android, and Windows Phone.
Features
The preview makes it fast and easy to create cloud services for Windows 8 applications within minutes. Here are the key benefits:
- Rapid development: configure a straightforward and secure backend in less than five minutes.
- Create modern mobile apps: common Windows Azure plus Windows 8 scenarios that Windows Azure Mobile Services preview will support include:
- Automated Service API generation providing CRUD functionality and dynamic schematization on top of Structured Storage
- Structured Storage with powerful query support so a Windows 8 app can seamlessly connect to a Windows Azure SQL database
- Integrated Authentication so developers can configure user authentication via Windows Live
- Push Notifications to bring your Windows 8 apps to life with up to date and relevant information
- Access structured data: connect to a Windows Azure SQL database for simple data management and dynamically created tables. Easy to set and manage permissions.
Pricing
One of the key things that we’ve consistently heard from developers about using Windows Azure with mobile applications is the need for a low cost and simple offer. The simplest way to describe the pricing for Windows Azure Mobile Services at preview is that it is the same as Windows Azure Websites during preview.
What’s FREE?
- Run up to 10 Mobile Services for free in a multitenant environment
- Free with valid Windows Azure Free Trial
- 1GB SQL Database
- Unlimited ingress
- 165MB/day egress
What do I pay for?
- Scaling up to dedicated VMs
- Once Windows Azure Free Trial expires - SQL Database and egress
Getting Started
To start using Mobile Services, you will need to sign up for a Windows Azure free trial, if you have not done so already. If you already have a Windows Azure account, you will need to request to enroll in this preview feature.
Once you’ve enrolled, this getting started tutorial will walk you through building your first Windows 8 application using the preview’s services.
The developer center contains more resources to teach you how to:
- Validate and authorize access to data using easy scripts that execute securely, on the server
- Easily authenticate your users via Windows Live
- Send toast notifications and update live tiles in just a few lines of code
Our pricing calculator has also been updated for calculate costs for these new mobile services.
Questions? Ask in the Windows Azure Forums. Feedback? Send it to mobileservices@microsoft.com.


Note: Corrected MailTo link from obileservices@microsoft.com.
Scott Guthrie (@scottgu) posted Announcing Windows Azure Mobile Services at 7:15 AM on 8/28/2012:
I’m excited to announce a new capability we are adding to Windows Azure today: Windows Azure Mobile Services
Windows Azure Mobile Services makes it incredibly easy to connect a scalable cloud backend to your client and mobile applications. It allows you to easily store structured data in the cloud that can span both devices and users, integrate it with user authentication, as well as send out updates to clients via push notifications.
Today’s release enables you to add these capabilities to any Windows 8 app in literally minutes, and provides a super productive way for you to quickly build out your app ideas. We’ll also be adding support to enable these same scenarios for Windows Phone, iOS, and Android devices soon.
Read this getting started tutorial to walkthrough how you can build (in less than 5 minutes) a simple Windows 8 “Todo List” app that is cloud enabled using Windows Azure Mobile Services. Or watch this video of me showing how to do it step by step.
Getting Started
If you don’t already have a Windows Azure account, you can sign up for a no-obligation Free Trial. Once you are signed-up, click the “preview features” section under the “account” tab of the www.windowsazure.com website and enable your account to support the “Mobile Services” preview. Instructions on how to enable this can be found here.
Once you have the mobile services preview enabled, log into the Windows Azure Portal, click the “New” button and choose the new “Mobile Services” icon to create your first mobile backend. Once created, you’ll see a quick-start page like below with instructions on how to connect your mobile service to an existing Windows 8 client app you have already started working on, or how to create and connect a brand-new Windows 8 client app with it:
Read this getting started tutorial to walkthrough how you can build (in less than 5 minutes) a simple Windows 8 “Todo List” app that stores data in Windows Azure.
Storing Data in the Cloud
Storing data in the cloud with Windows Azure Mobile Services is incredibly easy. When you create a Windows Azure Mobile Service, we automatically associate it with a SQL Database inside Windows Azure. The Windows Azure Mobile Service backend then provides built-in support for enabling remote apps to securely store and retrieve data from it (using secure REST end-points utilizing a JSON-based ODATA format) – without you having to write or deploy any custom server code. Built-in management support is provided within the Windows Azure portal for creating new tables, browsing data, setting indexes, and controlling access permissions.
This makes it incredibly easy to connect client applications to the cloud, and enables client developers who don’t have a server-code background to be productive from the very beginning. They can instead focus on building the client app experience, and leverage Windows Azure Mobile Services to provide the cloud backend services they require.
Below is an example of client-side Windows 8 C#/XAML code that could be used to query data from a Windows Azure Mobile Service. Client-side C# developers can write queries like this using LINQ and strongly typed POCO objects, which are then translated into HTTP REST queries that run against a Windows Azure Mobile Service. Developers don’t have to write or deploy any custom server-side code in order to enable client-side code below to execute and asynchronously populate their client UI:
Because Mobile Services is part of Windows Azure, developers can later choose to augment or extend their initial solution and add custom server functionality and more advanced logic if they want. This provides maximum flexibility, and enables developers to grow and extend their solutions to meet any needs.
User Authentication and Push Notifications
Windows Azure Mobile Services also make it incredibly easy to integrate user authentication/authorization and push notifications within your applications. You can use these capabilities to enable authentication and fine grain access control permissions to the data you store in the cloud, as well as to trigger push notifications to users/devices when the data changes. Windows Azure Mobile Services supports the concept of “server scripts” (small chunks of server-side script that executes in response to actions) that make it really easy to enable these scenarios.
Below are some tutorials that walkthrough common authentication/authorization/push scenarios you can do with Windows Azure Mobile Services and Windows 8 apps:
- Enabling User Authentication
- Authorizing Users
- Get Started with Push Notifications
- Push Notifications to multiple Users
Manage and Monitor your Mobile Service
Just like with every other service in Windows Azure, you can monitor usage and metrics of your mobile service backend using the “Dashboard” tab within the Windows Azure Portal.
The dashboard tab provides a built-in monitoring view of the API calls, Bandwidth, and server CPU cycles of your Windows Azure Mobile Service. You can also use the “Logs” tab within the portal to review error messages. This makes it easy to monitor and track how your application is doing.
Scale Up as Your Business Grows
Windows Azure Mobile Services now allows every Windows Azure customer to create and run up to 10 Mobile Services in a free, shared/multi-tenant hosting environment (where your mobile backend will be one of multiple apps running on a shared set of server resources). This provides an easy way to get started on projects at no cost beyond the database you connect your Windows Azure Mobile Service to (note: each Windows Azure free trial account also includes a 1GB SQL Database that you can use with any number of apps or Windows Azure Mobile Services).
If your client application becomes popular, you can click the “Scale” tab of your Mobile Service and switch from “Shared” to “Reserved” mode. Doing so allows you to isolate your apps so that you are the only customer within a virtual machine. This allows you to elastically scale the amount of resources your apps use – allowing you to scale-up (or scale-down) your capacity as your traffic grows:
With Windows Azure you pay for compute capacity on a per-hour basis – which allows you to scale up and down your resources to match only what you need. This enables a super flexible model that is ideal for new mobile app scenarios, as well as startups who are just getting going.
Summary
I’ve only scratched the surface of what you can do with Windows Azure Mobile Services – there are a lot more features to explore.
With Windows Azure Mobile Services you’ll be able to build mobile app experiences faster than ever, and enable even better user experiences – by connecting your client apps to the cloud.
Visit the Windows Azure Mobile Services development center to learn more, and build your first Windows 8 app connected with Windows Azure today. And read this getting started tutorial to walkthrough how you can build (in less than 5 minutes) a simple Windows 8 “Todo List” app that is cloud enabled using Windows Azure Mobile Services.
Hope this helps,
Scott


I’d like to see Windows Azure Mobile Services (WAMS) support Windows Azure Storage (tables and blobs), also.
Scott Guthrie (@scottgu) and Nick Harris (@CloudNick) produced an Introduction to Windows Azure Mobile Services Channel 9 video on 8/28/2012:
In this video Scott Guthrie shows how using Windows Azure Mobile Services one can add a cloud backend to a Windows 8 application in literally minutes.
Use Windows Azure Mobile Services to:
Create turnkey backend solutions to power your mobile apps.
- Accelerate your mobile app development. Incorporate structured storage, user authentication and push notifications in minutes.
- Create a straightforward and secure backend-as-a-service to handle common tasks and free yourself to focus on the front end that your users value.

Tip: You must run Visual Studio 2012 under Windows 8 to build Windows 8 apps.
Kirill Gavrylyuk (@kirillg_msft) posted Introducing Windows Azure Mobile Services: A Backend for Your Connected Client Apps at 7:42 AM on 8/28/2012:
Today we’re very excited to announce the Preview Release of Windows Azure Mobile Services! Mobile Services allow you to connect your Windows 8 apps to a cloud backend hosted in Windows Azure and easily store structured data, authenticate users, and send push notifications. More importantly, Mobile Services enables you to accomplish these tasks within minutes.
Mobile Services is the perfect partner for modern mobile apps because it reduces the friction associated with repeated common tasks as well as accelerates development and deployment. We’ll provide the backend you need so that you can deliver the experience your customers want. The ease and speed of developing with Mobile Services makes it ideal for when you want to get the next great idea to market as soon as possible.
Today, Mobile Services are available for Windows 8 apps, but subsequent preview releases will extend support to iOS, Android, and Windows Phone.
To start using Mobile Services, you will need to sign up for the Windows Azure free trial, if you have not done so already. If you already have a Windows Azure account, you will need to request to enroll in this preview feature. During preview, Mobile Services are free for your first ten Windows 8 applications running on shared instances.
Creating a Mobile Service is Easy
After you have either activated your Windows Azure free trial or enrolled in the Mobile Services preview, click the +NEW button at the bottom of the navigation pane.

Select ‘Mobile Service’ and then ‘Create.’

You will then be asked to either create a new SQL database or select an existing one. During the initial preview period, Mobile Services projects can only be deployed to the US-East datacenter. For this reason, international developers should expect additional latency.

In order to manage cost and latency, make sure that new SQL databases deploy to US-East and that existing ones are moved to that datacenter. Instructions on how to move a SQL database to a new datacenter can be found here and here.
To develop Windows 8 apps with Windows Azure Mobile Services, you will need to download Visual Studio 2012 Express and the Mobile Services Managed SDK. Then, it’s as simple as following the Quick Start guide.


Additional Resources
There are several resources available if you would like to learn more before you get started building your own Windows 8 apps. Scott Guthrie’s blog post shows how easy it is to get a ‘To Do’ app up and running using Mobile Services. Also, check out this video where Scott provides an introduction of Mobile Services. The developer center contains resources to teach you how to:
- Validate and authorize access to data using easy scripts that execute securely, on the server
- Easily authenticate your users via Windows Live
- Send toast notifications and update live tiles in just a few lines of code
Questions? Ask in the Windows Azure Forums. Feedback? Send it to mobileservices@microsoft.com.

Glenn Gailey (@ggailey777) posted Introducing Mobile Services—A Quick Start to Windows Store Apps with Windows Azure on 8/28/2012:
For those of you who have been following my blog, you know that I am very interested in the nexus of data services and mobile device apps, and especially OData Services and Windows Phone and Windows (8) Store apps. In most of the apps that I have written, I have been able to use some existing, public (and free) data, mostly OData feeds. Since your next “killer app” probably won’t leverage some pool of both free and useful data (we don’t need more than one Netflix app), it’s likely that either your customers will use your app to generate and store their own data, or you will be providing data to them.
I’ve been a fan of cloud-based data storage for apps, especially because in the app world, you have no idea of how many users will be using your app and services (usually only a limited number at first) and cloud services provide a simple way to scale, with adding or removing instances as needed. Of course, I the like Windows Azure offering, as I have written about Windows Azure and OData and Windows Phone. Today, there is a new service offering from Microsoft that I’ve been able to play around with for some time. This new Windows Azure service helps to solve the problem for mobile app developers of where to store their user’s data.
Backend Services in the Cloud for Windows Store Apps
I am excited to be able to finally talk about a cool new Windows Azure service service offering from Microsoft…
The vision for this new Windows Azure service offering is what one might call (unofficially) “Backend as a Service.” The goal of this new service is to make it as easy as possible to create a backend service to store data generated by your customers when using your apps, and to more easily integrate things like authentication and push notifications. Cloud storage enables your customers to access their own app data from any device on which your app runs, and on
lymultiple devices at once.This service is envisioned as a REST-based set of HTTP APIs that bring together the correct pieces of Windows Azure to provide data storage, authentication, and notifications, and business logic to help you write apps, without having to be an expert in the Windows Azure platform (which I can appreciate after publishing several OData services on Windows Azure).
Get Started with Mobile Services (for Free?)
Mobile Services makes it super easy to get started, with a bunch of helpful tutorials on the slick new Mobile Services dev center. The best place to get started is with the tutorial: Get started with Mobile Services. When you complete this tutorial (which takes only minutes), you create a new mobile service and download a working Visual Studio 2012 Express for Win8 project (in either C# or JavaScript) that already works against the new service. I mean, “F5 and go” works—a great starting point for a new Windows Store app.
I encourage you to at least try Mobile Services, even if you are a newbie on the Windows Azure platform. If you already have an active Windows Azure account, you will need to apply for access to the preview. There are instructions on how to do this linked from the Get started with Mobile Services tutorial.
If you’ve never has an account before, you are in luck because there is currently a 90-day “free trial” that includes the SQL Database required by Mobile Services.
What You Get in This Preview
Considering the fairly grand vision of what Mobile Services is going to be, there are limits to what you get in this initial preview release:
- Tricked-Out Management Portal
The Mobile Services part of the new Management Portal is pretty wicked and highly useful, especially the Quick Start.I’m not really sure how this can get better than it is now—it may be the single best feature of the preview.

- Rich support for Windows Store (Win8/WinRT) apps only
Although there are REST APIs available that you could access from any device, Microsoft is providing their first-class client library support for only Windows Store apps. Heck, they even generate for you a working Windows Store app project. I do hope to see support for iOS and (especially) Windows Phone being added in the near future.- Live Connect and Windows Notification Services integration
Authentication is limited to Live Connect, and Windows Notification Service (WNS) is the supported push notification provider, but this is what you would be doing for Windows Store apps anyway. Clearly, there are other authentication providers that need to be supported.- Storage in SQL Database
- OData-ish REST APIs
Mobile Services is currently based in Web API, so it’s not technically OData-compliant yet. However, they do already support most of the OData query operators ($select, $where, $skip, $take, $inlinecount), plus I don’t plan to call these REST APIs directly, although I have friends that love raw HTTP messaging.Yes, Mobile Services is a Real Thing
Finally, for those of you who don’t even pay attention to our new stuff unless ScottGu talks about it first…..


See SSWUG.org announced on 8/28/2012 an Online Course: Mastering SQL Azure on 9/13 through 10/12/2012 in the Cloud Computing Events section below.
<Return to section navigation list>
Marketplace DataMarket, Cloud Numerics, Big Data and OData
Andrew Brust (@andrewbrust) asserted “Enterprise software company Quest enters the Big Data space, and does it the Enterprise way. Future parent Dell must be proud” in an introduction to his Quest for Big Data post of 8/29/2012 to ZDNet’s Big Data blog:
Quest Software is a company that most people working in the Enterprise relational database world know well. Its Toad for Oracle product has been a favorite of developers and database administrators on the Oracle platform for a long time, and it is now available in versions for Microsoft’s SQL Server, IBM’s DB2 and Sybase as well. Quest’s LiteSpeed product performs database backups far more quickly than supported databases’ standard backup services. Quest also has products for performance monitoring, data protection and Windows Server management. And, in case you’ve had no access to technology news outlets all summer, Quest has agreed to be acquired by Dell.
So in a space dedicated to Big Data, why am I writing about a company with such buttoned-down Enterprise products, and customers to match, that is about to be acquired by the world’s #3 PC vendor? Because Big Data is going Enterprise and today Quest is announcing that it’s going Big Data with the release of its Toad Business Intelligence Suite.
BI and Big Data, oh my!
Toad BI Suite essentially combines two Quest products under the auspices of a third. Toad Data Point handles data import and export, while Toad Decision Point analyzes and visualizes data. Toad Intelligence Central integrates the two products, and facilitates collaborative workflow between the IT users of Data Point and the business users of Decision Point, to facilitate definition of an abstracted data model.
The Big Data angle to all of this is that Data Point can connect with both the conventional relational data sources that are Quest’s bread and butter, as well as cloud databases, BI databases and also Apache Hadoop. Like many BI products that offer Hadoop connectivity, Toad BI Suite can work with Hive to do so. However, unlike most such products, DataPoint also offers a native Hadoop connector and yet still allows querying via ANSI SQL. Quest also has also developed its own Sqoop connector for Oracle and brings that to bear in Data Point as well.
The elephant in the room
All three components of Toad BI Suite are Windows desktop applications. Does that run counter to the Linux, command line culture of the Hadoop world? You bet it does. But that doesn’t make the company naïve in its pursuit of a Big Data strategy. And there are a couple of reasons why.First, if Big Data is to become mainstream, then Big Data will have to mainstream its technology. And for a vast number of Enterprises today, that means entering the Windows ecosystem. Second, and perhaps more to the point, the Toad BI Suite isn’t about Quest moving into a new market; it’s about providing new connectivity and functionality to its existing customer base. Quest is delivering what its customers want: Big Data functionality in an Enterprise technology context. That makes a lot of sense and is, I suspect, emblematic of the value that Dell sees in Quest and its product portfolio.
I expect we’ll see more such assimilation of Big Data into the Enterprise data and data analytics platform. Big Data is part of that platform conceptually; Quest and other companies will, I think, make it part of the platform technologically as well. That the product is identified by the “BI” moniker rather than the “Big Data” one drives the argument home quite well. Let's keep an eye on how this trend might perpetuate and play out.

• Jim Erickson (pictured below) posted Big Data As You Go to the Information Management blog on 8/28/2012:
While making the rounds of news and reports this week I came across a note from Gartner Research VP David Newman, who was comparing the phenomenon of big data to what he called “open data,” a term to describe transparent availability of data streams and services through public sources and commercial services.
Newman was going over ground he’ll cover at Gartner’s flagship Symposium and IT Expo in Orlando in October and it’s not a new topic for him or others, but I think it’s a very underestimated one. Part of what Newman talks about is an economy based on data services, connecting the assets of governments, open projects and proprietary data streams as free or paid services.
It’s a topic that touches home for Internet commerce, the idea that data itself is destined to become its own currency, based on streams of connectivity and application programming interfaces (APIs) acting as a gateway or virtual point of sale system for conducting data commerce. Here at Information Management we spent a long cover story on the topic almost three years ago, maybe a little too early to the game. Even back then, an independent analyst named John Musser said “for every cloud platform, APIs are the glue of SaaS.”
In fact, API traffic was outstripping browser traffic years ago and repurposing proprietary information to stream as raw product was part of that picture. That’s been the case for information resellers like ADP, D&B and Hoovers, or TransUnion which years ago got out of the business of building websites for partners and got into the business of providing data for partners to use as they chose.
Though we’d found some of the same examples Gartner did, Newman has a different and even broader view than we took, extending to examples of data.gov projects in the U.S. and U.K. as examples of self-service data access. He also talks in terms of linked data and social data as platforms of data commerce and third parties acting as intermediaries or data brokers.
“More government agencies are opening their data to the public Web to improve transparency, and more commercial organizations are using open data are using the API as an alternative way of generating revenue,” Newman says. “New business models are emerging and it’s exciting for a data geek like me.”
The point, he told me, is that “big data makes you smarter but open data makes you richer.” The question for organizations is how they will use their own data alongside public and paid information to make money or get closer to customers.
It’s business context to the technicalities of data management that cut through hype, says Newman, who’s an experienced enterprise architect. “Really I’m trying to help other enterprise architects understand how to get to value because unfortunately we’re in an era where everybody is looking for a silver bullet. People hear big data and they think, ‘I have to have one of those.’”
It’s a data economy that’s presently full of challenges, in trust, complexity, cost and how to govern, walls are slowly coming down, Newman says. “I wasn’t the first to say this, but you could make a case that in ways this idea of open data it’s like an iTunes for raw data.” Financial and proprietary data aside, you can look no further than your dusty CD collection to imagine that might become the case in organizations, if it's not so already.

Scott Guthrie (@scottgu) reported Windows Azure Mobile Services (WAMS) provides RESTful JSON-based OData connectivity to Windows Azure SQL Database (WASDB) backends in the Windows Azure SQL Database, Federations and Reporting, Mobile Services section above.
<Return to section navigation list>
Windows Azure Service Bus, Access Control Services, Caching, Active Directory and Workflow
No significant articles today.
<Return to section navigation list>
Windows Azure Virtual Machines, Virtual Networks, Web Sites, Connect, RDP and CDN
Neil MacKenzie (@mknz) posted Windows Azure Cloud Services and Virtual Networks on 8/26/2012:
Windows Azure has historically been a pure PaaS solution with the deployment unit for compute being a hosted service comprising an optional web role and zero or more worker roles. Each role is deployed as one or more virtual machine instances. A hosted service formed a security boundary, with the only way to access role instances being through the load-balanced public input endpoint. Role instances inside a hosted service can communicate directly using internal endpoints which provided lower latency because they didn’t go through the Windows Azure load balancer.
Microsoft simultaneously announced a preview of Windows Azure Web Sites (WAWS) which provides a scalable, high-density, web hosting solution. The emphasis in WAWS is on ease of deployment which is far better with WAWS than it was with PaaS web roles. However, this ease of deployment comes with more restrictions on deployments than there had been with traditional PaaS web roles.
At any given time, a cloud service hosts either a PaaS deployment or an IaaS deployment – but not both. Either a PaaS service or an IaaS service can be deployed into an empty cloud service. Some of this functionality is not exposed on the Windows Azure Portal, and can only be achieved using either PowerShell or script cmdlets.
The (awesome) Windows Azure Platform Training Kit contains a hands-on lab (Windows Azure Web Sites and Virtual Machines using ASP.NET and SQL Server) which uses a Windows Azure Web Site as the front end for a Virtual Machine hosting SQL Server. This HOL uses a public endpoint for the SQL Server Virtual Machine – which consequently means there is a raw SQL Server endpoint sitting on the public internet.
Hanu Kommalapati has posted an interesting example which hosts a Cassandra cluster in 3 Virtual Machines with a front-end provided by a another Virtual Machine running a web server developed in Node.js. This example also uses a public endpoint for the Cassandra cluster – which consequently means there is a raw Cassandra endpoint sitting on the public internet.
Virtual Networks
Virtual Networks improves the composition of cloud services by allowing one or more of them to be added to a Virtual Network. Note that when a Virtual Network is used to host cloud services, the security boundary is extended to comprise all the cloud services in the Virtual Network. A cloud service in a Virtual Network can directly access individual instances in a second cloud service contained in the Virtual Network without going through the load balancer hosting a public input endpoint for the second cloud service. This means that once a traditional PaaS cloud service is added to a Virtual Network the cloud service no longer forms a security boundary and any open port on its role instances can be accessed by any instance of any cloud service in the Virtual Network. This is regardless of whether the cloud service is IaaS or PaaS.
A back-end data service, hosted on virtual machines in an IaaS cloud service, can be kept off the public internet but remain accessible to role instances hosted in a front-end PaaS cloud service. Similarly, an IaaS cloud service can access the role instances of a PaaS cloud service without any need for the latter to have (input) endpoints exposed to the internet.
The first example described earlier – a WAWS front end to a SQL Server back end – cannot use this technique because a WAWS website cannot be added to a Virtual Network. However, the example would work were the front-end website to be hosted by a PaaS web role located in the same Virtual Network as the back-end SQL Server Virtual Machine. The latter would not need a public endpoint it would only need an appropriately configured firewall. The second example can use this technique, with the Node.js cloud service having a public endpoint and the Cassandra cluster having no public endpoint.
A very important point is that the Virtual Network MUST be created before any cloud services are created in it since once a cloud service has been created it is not possible to migrate it into a Virtual Network.
Michael Washam describes this technique in one of the excellent posts on his blog.
Creating the Virtual Network
A Virtual Network is created using the Networks item in the preview Windows Azure Portal. This brings up a wizard which requests the following information:
The Virtual Networks page requests the following information:
- Name
- Affinity Group
The Address Space and Subnets page requests the following information:
- Address space (for the network) in the format a.b.c.d/x. For example:
- 10.10.0.0/16
- Address space for the subnets in the format a.b.c.d/x. For example:
- FrontEnd: 10.10.10.0/24
- BackEnd: 10.10.11.0/24
The DNS Servers and Local Networks page can be passed through without providing any information.
Once the virtual network has been created, its configuration can be viewed as follows:
Adding a Virtual Machine (IaaS cloud service) to the Virtual Network
An IaaS cloud service is added to the virtual network by creating it from the gallery and specifying the appropriate virtual network when asked for the Region/Affinity Group/Virtual Network. The appropriate subnet is selected on the VM Options page in the wizard, as follows:
Once the virtual machine has been created, remote desktop can be used to access it. The Window Firewall with Advanced Security application can then be used to modify the firewall as needed.
Adding a PaaS Cloud Service to the Virtual Network
A PaaS cloud service is added to a virtual network by adding a NetworkConfigurationsection to its Service Configuration file. This is located after the end of the Role section. For example:
<NetworkConfiguration>
  <VirtualNetworkSite name="SampleNetwork" />
  <AddressAssignments>
    <InstanceAddress roleName="ContactManager.Web">
      <Subnets>
        <Subnet name="FrontEnd" />
      </Subnets>
    </InstanceAddress>
  </AddressAssignments>
</NetworkConfiguration>
Services on role instances can be exposed to other virtual machines in the Virtual Network by modifying the firewall on each role instance.
Summary
The Windows Azure Virtual Network feature, currently in preview, provides the ability for cloud services to interact with each other without exposing services to the public internet. This is a significant enhancement since previously cloud services could not be grouped into composite services without exposing required endpoints to the public internet.


<Return to section navigation list>
Live Windows Azure Apps, APIs, Tools and Test Harnesses
• Martin Sawicki reported availability of the Windows Azure Plugin for Eclipse with Java - August 2012 Preview on 8/28/2012:
Gearing up for back to school, the Microsoft Open Technologies Inc. team has been busy updating the Windows Azure Plugin for Eclipse with Java.
This August 2012 Preview update includes some feedback-driven usability enhancements in existing features along with number additional bug fixes since the July 2012 Preview. The principal enhancements are the following:
- Inside the Windows Azure Access Control Service Filter:
- Option to embed the signing certificate into your application’s WAR file to simplify cloud deployment
- Option to create a new self-signed certificate right from the ACS filter wizard UI
- Inside the Windows Azure Deployment Project wizard (and the role’s Server Configuration property page):
- Automatic discovery of the JDK location on your computer (which you can override if necessary)
- Automatic detection of the server type whose installation directory you select
To find out how to install, go here.

Bruno Terkaly (@brunoterkaly) continued his Windows 8 series with another How To Take Photographs From Windows 8 Applications And Automatically Upload Them To The Cloud–Part 4 of 6 episode on 8/28/2012:
Testing Everything Locally First
We are now ready to begin some testing.
- Now would be a good time to connect your web cam.
- The great news is that the Azure SDK and tool and introduces two emulators.
- The first and later will let us emulate the web service running on our local machine.
- This means we do not need to deploy it to a data center to test it.
- The other emulator is the storage emulator.
- The storage emulator will allow us to save blobs locally, without requiring us to use a storage account of a data center.
- The system uses SQL server to emulate blob storage.
- This is all transparent to you so you do not need to worry about it.
- We will first run the web service.
- After running the web service we can test it with a simple browser.
- The browser is a great way to test your RESTful Web Service.
- The next step would be to test it with the Windows 8 application .
- The Windows 8 application can also use the storage emulator to upload the photograph as a blob.
- We can then use the built in tools of Visual Studio to inspect our pictures uploaded as blobs on our local machine
- When everything works as we expected, the next step is to try to deploy our web service to the cloud.
- We will also need to modify the web service to reflect the storage account that we will provision at up the portal.
Because we will be using the storage emulation environment, Our code and Visual Studio (Web service project) We'll need to be adjusted to reflect the local storage and connection parameters.
- Later, when we go to the portal to provision our storage account, we will once again modify the code of the web service, to reflect the storage account hosted in a data center. We wish to use the storage emulator and that is what the code above reflects.
- This is the crucial line of code that tells the system to use the local development storage account emulation environment :
- CloudStorageAccount storageAccount = CloudStorageAccount.DevelopmentStorageAccount;
ValuesController.cs// GET api/values/container/blobname public string Get(string container, string blobname) { try { // Make sure this line is commented out. //CloudStorageAccount storageAccount = CloudStorageAccount.Parse(CloudConfigurationManager.GetSetting("DataConnectionString")); // This tells our web service to use the storage emulator.If CloudStorageAccount storageAccount = CloudStorageAccount.DevelopmentStorageAccount; // Client object provides a client for accessing the Windows Azure Blob service. CloudBlobClient blobClient = storageAccount.CreateCloudBlobClient(); // All blobs are written into a container CloudBlobContainer blobContainer = blobClient.GetContainerReference(container); // Create container if does not exist. blobContainer.CreateIfNotExist(); // Mark the container of the image as public so that can be read by anyone. BlobContainerPermissions containerPermissions = new BlobContainerPermissions(); containerPermissions.PublicAccess = BlobContainerPublicAccessType.Blob; // Define a 4 hour window that the Windows 8 client can write to Azure Blob Storage. containerPermissions.SharedAccessPolicies.Add("mypolicy", new SharedAccessPolicy() { Permissions = SharedAccessPermissions.Write, // | SharedAccessPermissions.Read , //To be available immediately don't set SharedAccessStartTime = SharedAccessExpiryTime = DateTime.Now.Add(TimeSpan.FromHours(4)) }); // Set the permissions so that Windows 8 client can write to the container // for the 4 hours specified above. blobContainer.SetPermissions(containerPermissions); // Create the shared access signature that will be added to the URL. string sas = blobContainer.GetSharedAccessSignature(new SharedAccessPolicy(), "mypolicy"); // Creat the URI to be return to the Windows 8 client that will be used to write // to blob storage. return string.Format("{0}/{1}{2}", blobContainer.Uri, blobname, sas); } catch (Exception ex) { // Return error message to client. string error = ex.Message; return error; } }
Testing the Web service
- Recall that there are two projects.
- Return to the WebService project. Figure 1 above.
- Perform the following:
- From the Debug menu choose Start Debugging.
- You should see figure 2 above.
- It shows the emulators starting up.
- Two emulators
- Storage (Blob)
- Compute (Web Service)
Figure A represents the Default Start Page.
- You are looking at the startup screen for our ASP.NET Web API application.
- But the real goal of this section is to call into our custom get method that we just added.
- This get(string container, string blobname) method will return a shared access signature
- As you recall this method will return a shared access signature, given a container name and blob name .
- We will type the following URL into the address bar of the browser :
- http://127.0.0.1:81/api/values?container=brunophotos&blobName=brunopicture.jpg
- We will save that file. It is called values.json.
- Next, we will open up the file to view its contents.
- What we expect to see is a shared access signature that was created and sent by the web service.
- This is a good way to test our web service with a browser, before actually using the Windows 8 application to do the same thing.
- As you saw from the previous section, values.json should contain assured access signature created by the web service as a result of passing in the container and a blob name.
- The first parameter is container
- The value passed and was brunophotos
- The second parameter is blobname
- The value passed was brunopicture.jpg
- This approach is a great way to verify the web service running correctly
- Once we verify that the URL works correctly, we are ready to start testing a similar call from a Windows 8 application.
The above figure is the contents of values.json
- The URL you see in notepad reflects the contents of a shared access signature that was created by the web service.
- Any client with the http capabilities can retrieve a shared access signature as you see above
- Any client in posession of a shared access signature has the ability to write and manipulate the picture and container originally passed in.
- The first parameter is container
- The value passed and was brunophotos
- The second parameter is blobname
- The value passed was brunopicture.jpg
- In short, this means the shared access signature above can modify brunopicture.jpg and the container brunophotos For the four hour window of time specified in the web service code.
- We generated the shared access signature you see above with some simple boilerplate code.
- You can reuse the same code in your own applications .
Starting the Windows 8 Project, Taking a Photo, and Uploading it to the Cloud
- Notice that the URL and figure a matches the URL we just use with the browser.
- Further notice that this URL is working with the Local emulation environment installed with the Azure SDK.
- Notice the address of http://127.0.0.1:81/
- This is the local emulation environment.
- _photoSAS We'll be modified to include a container and a blobname.
- The blobname will essentially be the photo that this captured using the camera API
- We will once again modify _photoSAS once we have created a true storage account using the windows azure portal.
Your web service should still be running from a previous step in this post.
- We are ready to run the Windows 8 Project.
- Before running this application let's make sure that it will build correctly.
- From the Build menu, select Build Solution. See Figure A
- Assuming there are no errors, you are ready to run. From the Debug menu, select Start Debugging or simply hit the F5 key. See figure B.
- You should see 0 failed.
- Once the Windows 8 application starts up, you should see figure C, at which point you should click on the Capture Photo button.
Click anywhere on the Windows 8 application.
- Drag the handles to select the actual photo location.
- Notice how serious my expression is.
- Click OK.
Viewing the locally saved blobname using Visual Studio.
- In a future post, once we create a real storage account, We will be able to view the blob from anywhere with an Internet connection.
- But for now we're just testing the local environment.
- We will be able to test many things:
- We can verify that the web service will return a shared access signature that permits us from the Windows 8 application to create a container with a viewable picture .
- We can verify that the Windows 8 application saves the photograph locally and then uploads it as a stream of bytes to the Storage Service using the shared access signature provided by the web service
Viewing the photo in the cloud
- The photo has been uploaded to the emulated cloud. It is ready to view.
- Because we are running in the local emulation environment, the photo has been loaded on your own computer.
- If we had deployed the web service to the cloud and had pointed our Windows 8 application to the cloud, the photo would be in the cloud.
- The photo would then be available to anyone connected to the internet.
- To view the photo, you can use the built-in tooling in Visual Studio.
- Return to Visual Studio where we built the Web Service Project.
- From the View menu, select Server Explorer.
- Navigate to Windows Azure Storage/(Development)/Blobs/photocontainer
- You will see your photo in the container. In my case the photo is picture035.jpg.
- Right mouse click as seen in the figure above.
- Notice the url pointing to the blog is http://127.0.0.1:1000/devstoreaccount1/photocontainer/picture035.jpg
- The above url is almost the publicly available url that clients will use to view the uploaded photo.
- But because we are running locally, this won't be true.
- Once we use a REAL storage account, we will be able to show the photo to anyone with an internet connection.
Viewing the photo
- In the previous section we noticed that the url is pointing to the blob is:
- http://127.0.0.1:1000/devstoreaccount1/photocontainer/picture035.jpg
- We can now start Internet explorer and browse to that location using the URL above.
Future Posts
- Next Steps
- Deploying the Web Service to a Microsoft Data Center
- Adjusting the Windows 8 Client app to talk to our hosted service
- Download the free trial
- You will need a trial account for Windows Azure
- Please sign up for it here:
- http://www.microsoft.com/click/services/Redirect2.ashx?CR_CC=200114759


Bruno Terkaly (@brunoterkaly) continued his Windows 8 series with How To Take Photographs From Windows 8 Applications And Automatically Upload Them To The Cloud–Part 3 of 6 on 8/27/2012:
Creating a web service
We are ready to turn our attention to the web service that will allow us to upload the photo to the cloud
- We will need to return to the Windows 8 project later, once we have completed the cloud project which will provide the Shared Access Signature.
- As you recall, the Shared Access Signature is needed so that the Windows 8 application can upload the photo directly to the cloud.
- This bypasses the need to go through a web site (web role).
- We can save money and gain scale.
- We will start with the server-side/web services project.
- We will leverage the ASP.NET Web API, built into Visual Studio 2012.
- The Web API is a framework for building and consuming HTTP services that can reach a broad range of clients including browsers, phones and tablets.
- You can typically choose either of these two project types: (1) Windows Communication Foundation (WCF) ; or (2) ASP.NET Web API, which is included with MVC version 4.
- We will take the newer, more modern concepts that ASP.NET Web API brings to the table, truly embracing HTTP concepts (URIs and verbs).
- Also, the ASP.NET Web API can be used to create services that use more advanced HTTP features with greater ease - such as request/response headers, hypermedia constructs.
Building the Web Service
- Let's begin by starting Visual Studio 2012 as Administrator. Here are the steps to create the server-side web service, using the ASP.NET MVC 4 Web API:
- Click on the File menu and choose New/Project.
- Make sure the framework selected is .NET Framework 4
- Choose Cloud from installed templates
- Choose Windows Azure Cloud Service
- Enter a Name of WebService and Location of your choice.
- Click OK.
Choosing the correct web role
- Select ASP.NET MVC 4 Web Role
- Click the > button to move the ASP.NET MVC 4 Web Role to the right pane
- Click OK
Choosing Web API
- Select Web API for a project template
- Click OK
A variety of files will be generated by Visual Studio. This can be overwhelming but we only need to worry about a couple of files.
- RouteConfig.cs is used to map the URLs.
- The url portion of the route is simply a matching mechanism for the request.
- If the url matches a particular route, the framework binds the request to a specific controller and action method to handle the request.
- In short, the routing mechanism maps incoming URLs to the application, so that the right Controller and Action method executes to process them.
- ValuesController.cs is where we define the action methods that will handle the request, as expressed by the URL and verb used in the web request.
- VisualController.cs is an important file, because it contains the code that will execute when the Windows 8 client submits an HTTP request against the web service.
- This is where we will add some of our code to return the JSON data required by the Windows 8 application.
- The ValuesController class is generated by Visual Studio, and it inherits from ApiController, which returns data that is serialized and sent to the client.
RouteConfig.cs
- Your RouteConfig.cs file should look like this.
- Note that the following route is being added:
- api/{controller}/{container}/{blobname}
Figure 10 : MainWindow.xaml.cspublic class RouteConfig { public static void RegisterRoutes(RouteCollection routes) { routes.IgnoreRoute("{resource}.axd/{*pathInfo}"); routes.MapHttpRoute( name: "DefaultApi", routeTemplate: "api/{controller}/{id}", defaults: new { id = RouteParameter.Optional } ); // Add a route to support the passing of a container name // and the blob name, which is the picture uploaded from the // Windows 8 application. The URL below (issued by a Windows 8 Application) // resolves to call an action method in ValuesController.cs routes.MapHttpRoute( name: "DefaultApi2", routeTemplate: "api/{controller}/{container}/{blobname}" ); routes.MapRoute( name: "Default", url: "{controller}/{action}/{id}", defaults: new { controller = "Home", action = "Index", id = UrlParameter.Optional } ); } }
Modifiying the ValuesController.cs
- Once again, VisualController.cs is an important file, because it contains the code that will execute when the Windows 8 client submits an HTTP request against the web service.
- This is where we will add some of our code to return the Shared Access Signature required by the Windows 8 application.
- The ValuesController class is generated by Visual Studio, and it inherits from ApiController, which returns data that is serialized and sent to the client, automatically in JSON format.
- We will return a Shared Access Signature in JSON format.
- Note that the methods above - Get(), Post(), Put(), Delete() - map to specific CRUD operations and HTTP verbs executed by the Windows 8 application.
- This is the beauty of the ASP.NET Web API framework: it automatically routes the HTTP verbs used by the client directly to the methods defined in the VisualController class, minimizing potential programming mistakes.
- As you recall from the previous section, we modified the routing structures to support the passing of parameters.
- This means we need to add a third Get() method to ValuesController.cs.
ValuesController.cspublic class ValuesController : ApiController { // GET api/values public IEnumerable<string> Get() { return new string[] { "value1", "value2" }; } // GET api/values/5 public string Get(int id) { return "value"; } // POST api/values public void Post(string value) { } // PUT api/values/5 public void Put(int id, string value) { } // DELETE api/values/5 public void Delete(int id) { } }
Adding a new method
- Note that in the figure above we will add an additional method to support the passing of 2 parameters from the Windows 8 Application.
- This method will be called when the client issues the following web request:
- http://127.0.0.1:81/api/values?container=photocontainer&blobname=photo1.jpg
- You can see that the parameters embedded directly into the URL.
- The Web API framework will parse the parameters and map them to the parameters seen above (container, blobname)
- At the top of the ValuesController.cs file, you will need to add 2 using statements, as seen below:
- The using statements are needed because the code we are about to add leverages the assemblies in the Azure SDK.
ValuesController.csusing Microsoft.WindowsAzure; using Microsoft.WindowsAzure.StorageClient;
The final class is presented below.
- Some noteworthy points include:
- A storage account is needed. We get this by signing up to a free 90-day account with Azure. See end of this post.
- We can leverage the built in storage emulator which allows us to emulate cloud storage on our local system.
- But I want to show you how to deploy to a real data center
- In a future post we will make some trivial changes and deploy the Web Service to a Microsoft Data Center.
- Blobs are stored in containers.
- They are not stand alone.
- The Windows 8 Application passes in the container name, in addition to the photo name.
- The container is designated to be public, allowing any application with the photograph URL to download it.
- The main point of our Get() method is to return a Shared Access Signature.
- Creating a Shared Access Signature requires you to specify the permission level and the expiration time.
- You can think of a Shared Access Signature as a hall pass in a high school, allowing you to walk the hallways for a specified period of time.
- Once your hall pass expires you lose the right to walk the hallway.
- When the SAS expires you can no longer add/modify blobs (photos)
- Ultimately, the Get() method returns the Shared Access Signature to the Windows 8 application.
- The Shared Access Signature gives the Windows 8 application has 4 hours to write photos to the specified container.
ValuesController.cspublic class ValuesController : ApiController { // GET api/values public IEnumerable<string> Get() { return new string[] { "value1", "value2" }; } // GET api/values/container/blobname public string Get(string container, string blobname) { try { CloudStorageAccount storageAccount = CloudStorageAccount.Parse(CloudConfigurationManager.GetSetting("DataConnectionString")); //CloudStorageAccount storageAccount = CloudStorageAccount.DevelopmentStorageAccount; // Client object provides a client for accessing the Windows Azure Blob service. CloudBlobClient blobClient = storageAccount.CreateCloudBlobClient(); // All blobs are written into a container CloudBlobContainer blobContainer = blobClient.GetContainerReference(container); // Create container if does not exist. blobContainer.CreateIfNotExist(); // Mark the container of the image as public so that can be read by anyone. BlobContainerPermissions containerPermissions = new BlobContainerPermissions(); containerPermissions.PublicAccess = BlobContainerPublicAccessType.Blob; // Define a 4 hour window that the Windows 8 client can write to Azure Blob Storage. containerPermissions.SharedAccessPolicies.Add("mypolicy", new SharedAccessPolicy() { Permissions = SharedAccessPermissions.Write, // | SharedAccessPermissions.Read , //To be available immediately don't set SharedAccessStartTime = SharedAccessExpiryTime = DateTime.Now.Add(TimeSpan.FromHours(4)) }); // Set the permissions so that Windows 8 client can write to the container // for the 4 hours specified above. blobContainer.SetPermissions(containerPermissions); // Create the shared access signature that will be added to the URL. string sas = blobContainer.GetSharedAccessSignature(new SharedAccessPolicy(), "mypolicy"); // Creat the URI to be return to the Windows 8 client that will be used to write // to blob storage. return string.Format("{0}/{1}{2}", blobContainer.Uri, blobname, sas); } catch (Exception ex) { // Return error message to client. string error = ex.Message; return error; } } // GET api/values/5 public string Get(int id) { return "value"; } // POST api/values public void Post(string value) { } // PUT api/values/5 public void Put(int id, string value) { } // DELETE api/values/5 public void Delete(int id) { } }
Future Posts
- Some interesting posts still remain
- We still need to add the data connection string that will let the web service grant SASs to Windows 8 clients
- The current web service is not fully functional yet.
- That is the next post
- Next post:
- Add connection strings
- Deploying and
- Testing the Web Service
- Adjusting the Windows 8 Client app to talk to our hosted service
- Now is the time to download the free trial
- You will need a trial account for Windows Azure to do there exercises.
- Please sign up for it here:


Bruno Terkaly (@brunoterkaly) continued his series with How To Take Photographs From Windows 8 Applications And Automatically Upload Them To The Cloud–Part 2 of 6 on 8/26/2012:
Introduction - Building the Windows 8 Application
Time to Code
- There will be two projects: (1) Cloud Project and (2) Windows 8 Project.
30 Page Hands on Guide with Full Source Code
http://bit.ly/BrunoCoolCode
Taking Photos From Windows 8
- Visual Studio 2012 as Administrator.
- On the File menu and choose New/Project. See Figure 1.
- The Templates pane, choose Windows Store.
- The framework version, choose .NET Framework 4.5.
- The Project Type choose Blank App.
- Enter the Application Name and Location.
- Application Name = Windows8CameraApp
- Click OK
- We will add one TextBlock and one Button
- Note that Windows 8 apps are full screen and I only showed a subset in Figure 2.
Figure 3 - High Level Logic
- Before building this application, let's discuss what it does.
- Naturally, it requires a camera to work so if you don't have one built in, you can go purchase one for $20 or $30 US.
- The logic of the code works like this:
- Smile and click Capture Photo.
- A photo will get saved to disk.
- The Windows 8 Application will call into our web service (yet to be created) to get the Shared Access Signature.
- Once the Windows 8 Application has the Shared Access Signature, it is ready to start uploading the photo as a blob into Windows Azure storage.
- At this point, because the photo is made to be public, anyone can connect to it and view it.
Adding the TextBlock and Button
- From the View Menu, choose Solution Explorer.
- Right mouse click on MainPage.xaml and choose View Designer.
- Paste in the code in Figure 7.
- You should be replacing the existing Grid Declaration
- Notice that the code appears inside the <Grid> declaration.
Figure 7 : MainWindow.xaml<Page x:Class="Windows8CameraApp.MainPage" IsTabStop="false" xmlns="http://schemas.microsoft.com/winfx/2006/xaml/presentation" xmlns:x="http://schemas.microsoft.com/winfx/2006/xaml" xmlns:local="using:Windows8CameraApp" xmlns:d="http://schemas.microsoft.com/expression/blend/2008" xmlns:mc="http://schemas.openxmlformats.org/markup-compatibility/2006" mc:Ignorable="d"> <Grid Background="{StaticResource ApplicationPageBackgroundThemeBrush}"> <Grid.RowDefinitions> <RowDefinition Height="35"/> <RowDefinition/> </Grid.RowDefinitions> <TextBlock x:Name="InputTextBlock1" TextWrapping="Wrap" Grid.Row="0" Style="{StaticResource BasicTextStyle}" HorizontalAlignment="Left"> Use the CameraCaptureUI API to capture a photo.</TextBlock> <Button Grid.Row="1" x:Name="CaptureButton" Content="Capture Photo" Margin="0,0,10,0" VerticalAlignment="Top" Click="CapturePhoto_Click"> </Button> </Grid> </Page>
Adding the code behind - Figure 8a and 8b
- Note that button in Figure 6 has defined a click event (CapturePhoto_Click).
- But we haven't yet defined that event in our code behind.
- There is more than one way to do this.
- The easiest way is to double click on the Capture Photo button in design mode, as seen in Figure 8a.
- Once you do so, you should see the method definition in Figure 8b.
Figure 9: The code behind - adding code to take a photo
- Add the code as seen in Figure 10.
- The code is highly commented and is somewhat self explanatory.
- In short, the Windows 8 application requests a shared access signature and then uses it to save the freshly taken photo to Azure Blob Storage.
- Notice the async decoration.
- private async void CapturePhoto_Click(object sender, RoutedEventArgs e)
- Add the using statements in Figure 9.
- Note that the line string _photoSAS will be updated later.
- It will need to reflect that actual storage account that we create.
- This will be done at the Azure Portal.
Figure 10 : MainWindow.xaml.csprivate async void CapturePhoto_Click(object sender, RoutedEventArgs e) { // This url represents the template for the shared access signature. // If the web service were deployed to a Microsoft data center, this url // would need to be changed to reflect the location of the deployed instance // of the web service. This will get done in future post. string _photoSAS = "http://[**YOU WILL GET THIS FROM THE STORAGE ACCOUNT AT THE PORTAL**].cloudapp.net/api/values?container={0}&blobName={1}"; try { // Using Windows.Media.Capture.CameraCaptureUI API to capture a photo CameraCaptureUI dialog = new CameraCaptureUI(); // Define the aspect ratio for the photo Size aspectRatio = new Size(16, 9); dialog.PhotoSettings.CroppedAspectRatio = aspectRatio; // Perform a photo capture and return the file object StorageFile file = await dialog.CaptureFileAsync(CameraCaptureUIMode.Photo); if (file != null) { // Physically save the image to local storage BitmapImage bitmapImage = new BitmapImage(); using (IRandomAccessStream fileStream = await file.OpenAsync(FileAccessMode.Read)) { bitmapImage.SetSource(fileStream); } // Connect to the web service and request the shared access signature. // Shared access signature needed to write blob. using(HttpClient client = new HttpClient()) using (var response = await client.GetAsync(string.Format(_photoSAS, "photocontainer", file.Name))) { if (response.IsSuccessStatusCode) { // Retrieve Shared Access Signature from Web Service var sasUrl = await response.Content.ReadAsStringAsync(); // Trim any miscellaneous quotes sasUrl = sasUrl.Trim('"'); // Read the bytes from the picture so that they can be written to // Azure storage. using (var fileStream = await file.OpenStreamForReadAsync()) { // Load bytes of image into content object var content = new StreamContent(fileStream); // Content-Type will be image/jpeg content.Headers.Add("Content-Type", file.ContentType); // Write the bytes of the photo to blob storage using (var uploadResponse = await client.PutAsync(new Uri(sasUrl), content)) { if (uploadResponse.IsSuccessStatusCode) { // If successful, show on screen this.InputTextBlock1.Text = "Uploaded " + sasUrl; } } } } } } } catch (Exception ex) { this.InputTextBlock1.Text = "Error message = " + ex.Message; } }
Figures 11a and 11b : Solution Explorer : Package.appmanifest
- This allows your Windows 8 Application talk to webcam hardware.
- In order to use a web cam to take photos, you need to edit the application manifest file.
- The application manifest file can be edited by double clicking on Package.appmanifest.
- We will need to modify Capabilities and tell the Windows 8 application that we can use the camera or web cam.
- Click on the Capabilities tab and select Webcam as seen in Figure 11b.
Figure 12 : Running the application
- You are ready to run the application.
- Hit the F5 key or choose Start Debugging from the Debug menu.
- You will be presented with the interface as seen in Figure 12.
- Click Allow to permit the photo to be taken.
- I am actually happier than that photo indicates. :-)
- Once the application takes the photo and saves it, it ends up in a users AppData folder.
- On my machine, it was saved here.
- C:\\Users\\bterkaly\\AppData\\Local\\Packages\\8d4a3388-1c5f-42da-a299-de915896d7c6_d9fbpvqm16pa0\\TempState\\picture004.jpg
- In a future post, we will upload this photo to the cloud so the world could see it.
Figure lucky 13 - You will need a trial account for Windows Azure
- Please sign up for it here:


<Return to section navigation list>
Visual Studio LightSwitch and Entity Framework 4.1+
Andy Kung continued his series with Course Manager VS 2012 Sample Part 6 – Home Screen on 8/27/2012:
Hello LightSwitchers! I hope you’re all having fun and building cool stuff with RTM. In case you missed it, here are the previous posts:
Course Manager VS 2012 Sample Part 1 – Introduction
Course Manager VS 2012 Sample Part 2 – Setting up Data
Course Manager VS 2012 Sample Part 3 – User Permissions & Admin Screens
Course Manager VS 2012 Sample Part 4 – Implementing the Workflow
Course Manager VS 2012 Sample Part 5 – Detail ScreensYou can download the sample available in both VB and C# online here:
.jpg)
LightSwitch Course Manager End-to-End Application (Visual Studio 2012)
In this post, we will walk through how to design a “Home” screen.
Home Screen
In LightSwitch, you can indicate a screen to be the “start-up screen” of the application. Meaning, the screen will be automatically launched when you start the application. In our case, we want to create a home screen that provides some entry points for different workflows when the user first starts the application.
Creating a blank screen
Let’s first create blank screen to be our home screen. To create a blank screen, you can pick any screen template in the Add New Screen dialog and leave the Screen Data to be “(None).” In our case, we will pick list-detail screen template, name the screen “Home,” and leave the Screen Data “(None).”
Setting the start-up screen
Double click on Properties node in Solution Explore to open the application designer.
Select the “Screen Navigation” tab in the application designer. In the menu structure tree, select “Home” and click “Set” at the bottom. This will set the “Home” screen as the start-up screen of the application. Finally, use the up/down arrow buttons on the right to move the “Home” screen to the top of the menu.
If you hit F5 now, you will see the “Home” screen is automatically opened when you launch the application. The menu on the top also reflects the ordering you specified in the application designer.
Design Layout
We have a blank canvas on start-up. It’s time to use some creative juice in designing our home screen. Before we start, let’s draw out what we want to build… and this is what we have:
To sum up, we want:
- A title (for the application)
- A subtitle (for welcome message)
- A description (for instructions, news, etc.)
- An image icon and entry point (link) to each of our 4 main workflows (covered in my previous posts)
- Search students
- Create student
- Register course
- Course catalog
Let’s draw some boxes around the picture and see how we could create this structure. There are essentially 2 big groups vertically stacked on top of each other:
- Top group: Contains 3 rows of text
- Bottom group: Contains a group box that encloses a 4 x 2 table
Let’s go back to the IDE. Double click on “Home” in Solution Explorer to open the screen designer. We will first create the top and bottom group. Since they will be vertically stacked, change the root from “Columns Layout” to “Rows Layout.” Set the Vertical Alignment to “Top” in Properties window, so things will not stretch vertically.
Use the “Add” dropdown to add 2 groups under the Home screen node.
The bottom group is a group box, so we will use the Group Box Layout (which is a new addition in Visual Studio 2012). Change the display name of the group box to “Common Tasks” via Properties.
Adding static text
Now we’d like to add some title text to the screen. In our previous release, you would need to create a local property, write code to initialize the property, and add the control on the screen to achieve this. In Visual Studio 2012, LightSwitch has improved the experience for adding static text and images on the screen. To do so, select the group in which you’d like to add a text. Click the “+ Add” button and select “Add Text…”
Enter the text in the dialog and click OK.
That’s it! A label control (for displaying the text) is now added to the group.
Since we’re adding a title, we can choose a bigger font style from Properties.
If you run the application now, you will see the title appear on the screen in a larger and bold font.
You can follow the same steps to add a subtitle and description (with different font styles) to the screen.
Creating a table layout
We’re now ready to move on to the bottom group. If you look back at our drawing, we need a table under the group box control. The table consists of 4 columns and 2 rows. Why do we use a table layout instead of rows and columns layout here? Well, you certainly can. Table layout, however, lines things up better in this case. For example, if you need a larger margin between and image and text, you can adjust it for the entire column at once (instead of lining it up one by one). Plus, I need an excuse to show you the table layout :-)
Add a new group under the Group Box group. Change the control to Table Layout. Set the Horizontal alignment to “Left” in the Properties window.
Add 4 groups under the Table Layout. These groups will automatically be using the TableColumn Layout. They represent the 4 columns in our table.
Adding a static image
Now we’d like to add some images to the first and third column of the table. Similar to adding a static text, select the column node and click on “+ Add” button. Select “Add Image…” in the list.
Select an image from your computer and click OK.
An Image control is added under column 1. Set the image size to 80px x 80px via Properties.
Add another static image below the first. This image will appear as the 2nd row of column 1.
Follow what you’ve learned, add two rows of text in column 2, two rows of images in column 3, and two rows of text in column 4.
Let’s run the application and see where we are.
Adding a link to a screen
We’re almost there! We just need to add a link for each workflow. We can achieve this by adding a command that navigates to a workflow screen. Right click on the first static text (for searching students) and select “Add Button…”
In the dialog, name the method SearchStudents and click OK.
A command will be added. Change the control from Button to Link.
Double click on the command to go to the code. Write the following to launch the SearchStudent screen when the user clicks on the command.
Private Sub SearchStudents_Execute()
    Application.ShowSearchStudents()
End Sub
Follow the same steps to add the rest of links. Let’s run the application to see the home screen!
Conclusion
In this post, we learned how to set a start-up screen. We added static images and texts (with different fonts). Finally we use the table layout to line up items on our home screen. If you’ve been following the previous blog posts, you have just created the Course Manager app from scratch!
This concludes our Course Manager Sample series. For more LightSwitch training resources please head to the LightSwitch Developer Center. Thank you very much for following!


Return to section navigation list>
Windows Azure Infrastructure and DevOps
• Michael Collier (@MichaelCollier) described new Windows Azure Management Portal Preview features in his Windows Azure Mobile Services and More! post of 8/28/2012:
Earlier today Microsoft announced a few new updates for Windows Azure. This included a new Windows Azure feature, Windows Azure Mobile Services, as well as a few updates to the preview management portal.
- Scott Guthrie – “Announcing Windows Azure Mobile Services”
- Windows Azure Team Blog – “Introducing Windows Azure Mobile Services: A Backend for Your Connected Client Apps”
The biggest feature is the new Windows Azure Mobile Services. This new PREVIEW feature provides a “backend-as-a-service” for common tasks related to mobile applications. The initial release is being targeted at Windows 8 applications, with support for iOS, Android, and Windows Phone coming soon. Windows Azure Mobile Services should allow Windows 8 developers to quickly and easily add storage, user authentication, and push notifications to their application. Mobile Services are free for the first 10 Windows 8 applications. More details, including links to a tutorial, can be found at https://www.windowsazure.com/en-us/home/scenarios/mobile-services/. Note – you will need to request access to the preview service (just like is necessary for Media Services, Web Sites, and Virtual Machines).
Also, the columns in the portal are resizable and sortable – which should make it easier to see and find the data you’re looking for.

Finally, management certificates can now be uploaded and deleted from the preview portal.


David Linthicum (@DavidLinthicum, pictured below) asserted “Amazon's Werner Vogel[s] notes that customers struggle with value of the cloud beyond TCO; here's how to figure it out” in a deck for his Calculate 'return on agility' to find the cloud's real value post of 8/28/2012 to InforWorld’s Cloud Computing blog:
Werner Vogel[s], the CTO of Amazon.com, wrote a thoughtful blog last week that focuses on how to determine the true value of using its technology, looking at both total cost of ownership (TCO) and the return on agility. The blog stated that customers "struggle with how to account for the return on agility, the fact that they are now able to pursue business opportunities much faster at much lower cost points than before."
It's good to see this kind of thinking coming from a provider. I find that many vendors are clueless about the business-agility value of their own technology. I've written a ton on the value of agility, in the context of both SOA and cloud computing (which are directly related).
Here are a couple of key points:
- Agility is typically the core business value of cloud computing. TCO comes into play, but it's usually much higher than expected when all costs are considered over the long term. As I've stated a few times in this blog, cloud computing is not always cost-effective when considering tactical costs alone.
- The return on agility can be calculated, and I've done so successfully several times. You just need to do very deep analysis on the business to understand the behaviors and metrics over time. Most people who create a business case for cloud computing -- or any new technology or approaches, for that matter -- don't bother with the deeper analysis because it's both hard and complex.
The trouble is that business agility -- what we're really talking about here -- is one of those MBA terms that businesses neither understand nor have a clue as how to define in their own contexts. Those who don't bother to figure this out are doomed to not understanding why they should, or should not, move to cloud computing.
My suggestion is that companies need to get smarter about defining this value. Otherwise, we'll jump on any new trend in technology and chase the concept of ROI without truly knowing what's in it for the business. After all, ROI is not merely or even mainly reduced TCO.

Lori MacVittie (@lmacvittie) asserted “With performance rising as a concern for cloud computing adoption, the disparity between services in the data center and the cloud needs to be addressed” in an introduction to her The Challenges of Cloud: Infrastructure Diaspora post of 8/27/2012 to F5’s DevCentral blog:
One of the negative's of cloud computing is it's one-size-fits-all approach to infrastructure. A single load balancing system (and subsequently configuration) is considered acceptable for all applications. After all, it's just about distributing requests, isn't it?
Except it isn't, and neither are myriad other infrastructure services that provide not only customized services for applications but additional benefits not currently offered by what are commoditized versions of functionality.
Even assuming an organization is using a fairly non-customized Load balancer, there is a disparity between the algorithms supported by the industry and those supported today by cloud computing providers. If you don't think something as simple as the choice of a load balancing algorithm has an impact on availability and performance, think again. The reason there's a list of more than six "industry standard" algorithms is the maturation of distribution algorithms over time. Different methods are better suited to specific types of applications and usage patterns, while those same algorithms are wholly unsuited for others. Determining the best algorithm is part of the process of deploying said solutions, and one that's completely ignored by providers of cloud computing load balancing services.
Similarly, organizations that have deployed web application firewall or web filtering (web secure gateway in today's vernacular) solutions, recognize that the policies created and enforced by such solutions are not just application but URI specific, making shared, generic configurations almost completely useless. Such solutions must be deployed and configured on a per-application basis at a minimum, and the time and effort involved in doing so is generally non-trivial (though collaborative efforts around Persistent Threat Management offer a potential solution to drastically reducing the time required to configure WAF solutions for the most common threats).
NOT JUST COSTS, CAPABILITIES
Thus when organizations look outward to the cloud, it's not just a matter of costs but also capabilities that becomes important. Replication of infrastructure services is beginning to be recognized as an imperative. Given the rising importance of performance as a concern for cloud computing deployments, the impact of infrastructure diaspora on application performance should be treated with the seriousness it deserves.
"I don't feel that sticking your servers out there and saying, 'OK, you've got cloud now,' is the way to go," said Tom Hollingsworth, a senior network engineer with United Systems, an Oklahoma City-based value-added reseller (VAR). "I want to replicate [in the cloud with] as much functionality [customers] have for load balancers, firewalls and things like that."
Hollingsworth described a hypothetical situation where an enterprise has a mail server that has been tuned to a specific in-house load balancer and then wants to move that mail server to an IaaS provider that offers fundamentally different load balancing capabilities. Attempting to recreate those Layer 4-7 services from a data center to the cloud is complex, time-consuming and difficult to manage once you've got it up and running.
Many IaaS providers sell Layer 4-7 cloud networking services (firewalls, load balancers, application accelerators) to customers, but these services tend to be monolithic, feature-limited and in some cases proprietary.
There are myriad options in the TCP RFC that enable organizations to tune networking stacks to improve performance for a given application and its unique usage patterns. TCP window sizes, turning on or off Nagle, and controlling time-out values have a significant impact on not only performance but capacity of web applications. Eliminating the ability to tweak and tune these settings in a cloud computing environment removes a very important set of tools upon which the enterprise relies to address performance issues in the data center.
This infrastructure diaspora has other consequences, as well, including the introduction of a separate set of operational processes that must be managed along with existing procedures. This burdens operations with more management and monitoring duties, and introduces additional risk in the form of mis-configuration or missteps in deployment processes.
While some application delivery vendors have addressed this disparity with cloud-enabled ADN offerings, these are still not universally available or supported across all cloud computing offerings. Similarly, some customers will have no complementary offerings in their own data center (if they have a data center) but will still experience the same performance-degrading scenarios which could be addressed by more robust Layer 4-7 services in cloud computing environments.
The challenge for providers is balancing costs of their services versus costs to organizations who lose revenue due to applications exhibiting poor performance when deployed in their environment. The cost-benefit analysis for enterprises will certainly include this value, and thus providers who move to address the use of more robust application delivery services as a means to redress potential performance problems will be better positioned to vie for enterprise customers for whom performance is as important – or more so – than other inhibiting concerns.


Toddy Malenkov (@toddysm) posted Converting Single-Tenant to Multi-Tenant Apps on 8/23/2012 (missed when published):
Scott Chate, the VP or Product at Corent Technologies very well describes the characteristics of a successful SaaS application in hist post Convert your Web Application to a Multi-Tenant SaaS Solution from 2010. As per his post successful SaaS application must possess the following characteristics.
- It must support multi-tenancy
- It must offer self-service sign-up
- It must have subscription and billing mechanisms in place
- It must scale efficiently
- It must support monitoring and management of tenants
- It must support user authentication and authorization for each tenant
- It must support tenant customization
In order to achieve true multi-tenancy, which also allows the highest efficiency your application should be able to share the database and the application logic among tenants.
However what does this mean for application developers.
Database Redesign
The first step in the application redesign is the introduction of tenant identifier column in each database table and view. The tenant identifier is used to filter the data that belongs to a particular tenant. This has several implicatioins for the application developers:
- All database scripts need to be changed so they can include the tenant identifier. This includes creation scripts, updates to primary and foreign keys, stored procedures etc. For example if you have an order processing application and you used the order number as primary key you need to make sure that now the primary key includes also the tenant ID. Thus two different tenants can have the same order numbers if their policies require it.
- As part of the database redesign you need to update the indices on all tables so that these take into account the tenant id. This will make sure database queries that require tenant specific information are executed with the necessary performance in mind.
- Next you need to update all database queries made at the business logic tier and the tenant identifier. This has direct impact on the source code and depending on how well your application is architected this may be relatively easy or hard to do. If for example there is no designated data access layer and SQL queries are hardcoded and spread all across the code, changing those will be a nightmare.
- Last but not least you need to think how you can scale the database tier. Now that you store data from multiple tenants in the same database the chances are that you will reach the limit much faster than when you have separate database for each tenant. You need to think how to shard the data, and whether you will do this at the application tier or at the data tier.
Security
The next big topic you need to consider during the redesign process is the security. Although it is always about securing the data there are two aspects here:
- Security at runtime
- Security at the data tier
In the true-multitenancy case the business logic code is shared among multiple tenants. What that means is that the users from different tenants will be handled by the same code running not only on the same machine but even in the same process on that machine. In order to ensure that users from particular tenant never see the data of other tenants you need to be much more diligent about security.
Let's look at a particular scenario. Imagine that you have a mortgage calculator that calculates the monthly payments for a customer based on the principal amount of the loan and the length of the loan supplied by the customer, and the interest rate that you read from the database. Because the interest rate does not change very often and is the same for every customer you may be tempted to cache this in a static field in your application. This may work OK for a single-tenant application but if you want so have multiple banks using your application in a multi-tenancy scenarios it will be disastrous. The issue is that you cannot assume that all banks will offer the same interest rate to their customers and the code that reads the interest rate from the database will overwrite the static varieble for each tenant. In this case you will not only provide the end user with misleading information but will also expose competitive information to the rest of the tenants.
As we already discussed, on the data tier each tenant must be uniquely identified when accessing the data. You may want to create different logins for each tenant and give them permissions to just their view of the data or you may want to restrict the access to it by special WHERE clause to achieve the same. And of course each tenant may have different access permissions for users from different roles, so you will need to keep the user authorization code from your single-tenant app (maybe with some modifications).
Last but not least data access auditing is even more important for multi-tenant applications than for single-tenant ones. Now you need to keep track not only of which user accessed the data but to which tenant this user belongs to in order to be able to trace back any unauthorized access.
Scale and Performance
I've already touched a bit on this topic in the Database Redesign section when I discussed the need for data sharding but there are other things that you need to consider when you are converting your application to multi-tenant one.
One of them is the diverse set of tenants you may have. If we take the previous example, the mortgage calculator may be used by banks from any size - like small local banks and credit unions with just few thousand clients and by big banks with millions of clients. In a multi-tenant environment you cannot expect that each tenant will be the same size and you need to make sure that your application is able to serve them equally, and it is easy to scale out and in when the need arises. As part of the application design you need to take care of things like:
- Throttling the request of demanding tenants. Some times scaling out your application may require some time and it can vary from couple of seconds to tens of minutes or even may require manual intervention. In the mean time if your application is not able to throttle the requests from the one tenant that consumes all the resources you other tenants may be down. Hacker attacks or security issues may also be the reason for such spikes in particular tenant's activity.
- Avoiding code that stores the session state in memory on the server side. If you suddenly need to scale your application out the odds are that the next request from the user may not land on the same server and if the session state is stored in memory then they will lose all that information. You need to make sure that such state is stored either on the client size (browser cookie or local browser storage) or in a shared location like database. Although this one is true for every cloud application, not only multi-tenant ones, you need to keep in mind that scale out scenario is much more common in multi-tenant applications.
- Gracefully handle errors. Lot of things can go wrong when your application is under heavy load. Timeouts, session data loss, connectivity loss are just few of the causes for errors. You need to make sure that such fault scenarios are easy to recover from as well as on the server also on the client side.
Those are just some of the design considerations for multi-tenant applications. There are certainly platforms (like my current employer's Apprenda) that will do most of the work for you when you migrate your applications to multi-tenant ones, however you still need to be aware of possible areas where such automatic conversion cannot be done. Taking a closer look at your code is always necesary in conjunction with the automation platforms.

<Return to section navigation list>
Windows Azure Platform Appliance (WAPA), Hyper-V and Private/Hybrid Clouds
Neil McEvoy posted Private Cloud 2.0 – Windows 8 on 8/28/2012:
A key component for the enterprise IT team to consider as part of planning their Private Cloud strategy is the migration to Windows 8.
This is a massive evolution for Microsoft, nicely captured in this white paper from CSC and the Leading Edge forum: Windows 8 – A New Era for Microsoft (22-page PDF).
In this they describe how Microsoft is setting to achieve far more than just another incremental version release, but rather a reinvention of application architecture and development as a whole.
This is entirely logical as part of the overall Cloud wave, which is going to do that independent of whether Microsoft participates or not. This is another inflection point for them like their pivot for the Internet market.
Therefore this is likely to go hand in hand with their accompanying Private Cloud strategy, and this paper does an excellent job of explaining the IT spectrum that stretches from the ‘extra enterprise’ right through to consumer IT devices and encompasses this strategy.
They describe a three-tier stack featuring:
- Platforms and systems
- Frameworks and tools
- Applications and solutions
and the enabling relationships between these layers of the stack. Importantly it defines where and how Windows 8 stretches across server, PC and mobile functions in this spectrum, highlighting for Private Cloud:
As it turns out, many significant improvements and additions to Windows 8 are happening at the server level. Facing tough competition from VMware and others in large-scale enterprise virtualization, Microsoft has upgraded Hyper-V so it can support host servers with 160 cores and 2 terabytes of RAM, with new reliability and performance features that directly compete with the high-end enterprise hypervisors. Improved storage virtualization, support for advanced graphics for remote desktops, and faster networking performance options.
also
Although Windows Server 8 and Windows Azure are not yet interchangeable, Microsoft is working to bring them closer together. Windows Server 8 will purportedly support online backup to Azure, while extended features like WIndows Azure Active Directory and SQL Azure Data Sync bring the in-house world (private cloud?) closer to Microsoft’s cloud options.
This starts to yield some insights into setting an associated Cloud Migration strategy for older apps:
Microsoft has also expanded the virtualization options within the desktop version of Windows 8, where Hyper-V is available for use to support older versions of Windows and things like creaky old Visual Basic 6 applications. Although it’s not meant to scale as Hyper-V would on a server, the bundled hypervisor for Windows 8 will — depending on the age of the processor — take virtualization on the desktop much farther than previous Microsoft products. However, Windows 8 will not include an additional license for Windows XP; if you need to run Windows XP apps under Windows 8, you’ll need more Windows licenses.
<Return to section navigation list>
Cloud Security and Governance

<Return to section navigation list>
Cloud Computing Events
SSWUG.org announced on 8/28/2012 an Online Course: Mastering SQL Azure on 9/13 through 10/12/2012:
11 On-Demand Sessions Start on September 13th, 2012 and Ends October 12th, 2012
In a partnership agreement with Scott Klein, SSWUG.ORG’s virtual class will provide you with the skills you need to begin to master SQL Azure.
Course Overview
Session Descriptions
Throughout the 30-day course, you will learn about:
- Migration
- Security
- Backup and Restore Strategies
- Reporting
- Sharding and Federations
Course Structure and Cost
Upon registration and payment, you will receive an email with instructions on how to test your system in order to view the classes, as well as a link that will remain active for the 30 day on-demand period.
The course cost is $169 for full SSWUG.ORG members and $199 for non-members. The cost of the DVD with purchase of the course is an additional $199. The DVD costs $399 if you do not purchase a course seat. Course downloads and the ability to email questions to the instructor are included with course purchase only.
Once you have completed the course, you will have the opportunity to take a course quiz and receive a course certificate. After passing the quiz, please allow up to five business days after the course is finalized to receive your certificate (.PDF via e-mail).
Apparently, the folks at SSWUG.org didn’t get the memo about SQL Azure’s unfortunate rechristening as Windows Azure SQL Database (or WASD[B] for short).
Kristian Nese (@KristianNese) reported on 8/27/2012 a Windows Bootcamp in Norway in September 2012:
We’re getting close to a very exciting date. The date Windows Server 2012 becomes globally available.
Yes, there will be a virtual launch as a part of this, and I strongly recommend you to sign up for this event:
http://www.microsoft.com/en-us/server-cloud/new.aspx
And if you’re in Norway in September, you should also attend the Windows Bootcamp.
https://mspartner.microsoft.com/en/no/Pages/Training/WindowsBootcamp/Windows-bootcamp-speakers.aspx
We have a pretty awesome line-up of speakers this time, covering both the client and the server side.
In addition, some developers will be presenting for the developer community to teach and show what awesome applications you can create with the next generation of Microsoft’s operating systems.
I will have 4 sessions and cover Hyper-V and Windows Azure:
1. Hyper-V for Everyone – come and see what’s hot and new and why you should start to virtualize your mother’s house.
2. Overview of Networking in Hyper-V – See the enhancements in the extensible virtual switch, network virtualization and much more in this session.
4. Hyper-V Replica – Do you suffer from insomnia? Join this session to see how I can help you out of your misery.
I am looking forward to see you at Fornebu in September!

Alan Smith reported on 8/27/2012 Cloud-Burst 2012 - Windows Azure Developer Conference in Sweden on 9/27 through 9/29/2012:
- Connecting Devices to Windows Azure - Windows Azure Technical Evangelist Brady Gaster
- Grid Computing with 256 Windows Azure Worker Roles - Connected System Developer MVP Alan Smith
- ‘Warts and all’. The truth about Windows Azure development - BizTalk MVP Charles Young
- Using Azure to Integrate Applications - BizTalk MVP Charles Young
- Riding the Windows Azure Service Bus: Cross-‘Anything’ Messaging - Windows Azure MVP & Regional Director Christian Weyer
- Windows Azure, Identity & Access - and you - Developer Security MVP Dominick Baier
- Brewing Beer with Windows Azure - Windows Azure MVP Maarten Balliauw
- Architectural patterns for the cloud - Windows Azure MVP Maarten Balliauw
- Windows Azure Web Sites and the Power of Continuous Delivery - Windows Azure MVP Magnus Mårtensson
- Advanced SQL Azure - Analyze and Optimize Performance - Windows Azure MVP Nuno Godinho
- Architect your SQL Azure Databases - Windows Azure MVP Nuno Godinho
There will be a chance to get your hands on the latest Azure bits and an Azure trial account at the Hands-on Labs Day on Saturday (29th) with Brady Gaster, Magnus Mårtensson and Alan Smith there to provide guidance, and some informal and entertaining presentations.
Attendance for the conference and Hands-on Labs Day is free, but please only register if you can make it, (and cancel if you cannot).
Cloud-Burst 2012 event details and registration is here: http://www.azureug.se/CloudBurst2012/
Registration for Sweden Windows Azure Group Stockholm is here: swagmembership.eventbrite.com
The event has been made possible by kind contributions from our sponsors, Knowit, AddSkills and Microsoft Sweden.
<Return to section navigation list>
Other Cloud Computing Platforms and Services
Barb Darrow (@gigabarb) reported Rackspace snaps up Mailgun for its email smarts in an 8/18/2012 post to GigaOm’s Cloud blog:
Rackspace fresh on the heels of delivering its OpenStack private cloud, is buying Mailgun, a San Francisco startup that makes it easier for developers to build email services into their applications. Terms were not disclosed.
Mailgun APIs let users “send, receive and track email from within their applications – without managing an email server or becoming an expert in email setup, operations and deliverability,” according to a Rackspace statement. That is a big selling point for today’s developers who want to focus on providing their own features and functions without having to sweat the blocking and tackling of email and other basics.
Mailgun, part of the 2011 Ycombinator startup class, claims customers including Parse and The Financial Times. PaaS providers Heroku, AppFog and Engine Yard also integrate Mailgun into their services, Mailgun said.
According to the Mailgun blog, customers won’t be disrupted. It’s “business as usual. You do not need to make any changes to your code, account or anything else. Mailgun customers will not have to use Rackspace’s hosting products in order to use Mailgun, but you may want to when you see how awesome the integration is going to be :).”
Mailgun’s employees will move into Rackspace’s San Francisco SOMA office.
Rackspace hss been moderately active on the acquisition front. It bought Sharepoint 911 and Anso Labs in February, and Cloudkick in December 2010,

• Andrew Brust (@andrewbrust) asserted “Want to learn Hadoop without building your own cluster or paying for cloud resources? Then download Cloudera's Hadoop distro and run it in a virtual machine on your PC. I'll show you how.” as a deck for his Hadoop on your PC: Cloudera's CDH4 virtual machine post of 8/27/2012 to ZDNet’s Big Data Blog:![]()
Everyone's talking Big Data and Hadoop, but how can you start to learn the technology if you have to set up a whole cluster first? This isn't just about the servers, but also the Hadoop software itself, and various companion products like Hive and Pig. If you're Windows person without Linux/Unix skills, this may be more daunting still. But there is a solution.
Cloudera, maker of perhaps the most widely-deployed Hadoop distribution, offers a a pre-built, training-appropriate, 1-node Hadoop cluster in virtual machine (VM) form, and it's free. In this gallery, I'll show you the step-by-step of how to download, configure and use the VM, and how to get at the various Hadoop distro components within it.
To start, visit Cloudera's Web site to download the CDH4 (Cloudera Distribution including Apache Hadoop, version 4) VM, as shown here. The VM image is available in VMWare, Virtual Box and KVM formats. Our work here is done under VMWare.
If you're using Windows Server Hyper-V, you can download the VMWare image and convert it to VHD format. Windows 7 Virtual PC won't work as it only supports 32-bit VMs and the CDH4 image is a 64-bit VM.


Read the other nine pages of Andrew’s post here.
<Return to section navigation list>


0 comments:
Post a Comment