Windows Azure and Cloud Computing Posts for 7/20/2012+
| A compendium of Windows Azure, Service Bus, EAI & EDI,Access Control, Connect, SQL Azure Database, and other cloud-computing articles. |

• Updated 7/21/2012 8:00 AM with new articles marked •.
Note: This post is updated daily or more frequently, depending on the availability of new articles in the following sections:
- Windows Azure Blob, Drive, Table, Queue and Hadoop Services
- SQL Azure Database, Federations and Reporting
- Marketplace DataMarket, Social Analytics, Big Data and OData
- Windows Azure Service Bus, Access Control, Caching, Active Directory, and Workflow
- Windows Azure Virtual Machines, Virtual Networks, Web Sites, Connect, RDP and CDN
- Live Windows Azure Apps, APIs, Tools and Test Harnesses
- Visual Studio LightSwitch and Entity Framework v4+
- Windows Azure Infrastructure and DevOps
- Windows Azure Platform Appliance (WAPA), Hyper-V and Private/Hybrid Clouds
- Cloud Security and Governance
- Cloud Computing Events
- Other Cloud Computing Platforms and Services
Azure Blob, Drive, Table, Queue and Hadoop Services
• Nathan Totten (@ntotten) posted CloudCover Episode 84 - Windows Azure Storage Updates and a Preview of the Client Storage Library vNext on 7/20/2012:
Join Nate and Nick each week as they cover Windows Azure. You can follow and interact with the show at @CloudCoverShow.
In this episode, we are joined by Jai Haridas — Principal SDE Manager for Windows Azure Storage — and Joe Giardino — SDE for Windows Azure Storage — who show us the new features available in Windows Azure Storage. Additionally, Joe gives us a preview of the next release of the Windows Azure Storage libraries. Joe demonstrates how to use the future release of the storage libraries in a Windows 8 Metro App.
In the News:
No significant articles today.

<Return to section navigation list>
SQL Azure Database, Federations and Reporting
Cihan Biyikoglu (@cihangirb) asked EF (Entity Framework) Finally Open Source! Anyone up for contributing the Federations Support in EF? on 7/20/2012:
Finally, EF is open source and anyone can contribute. Many folks have been asking for EF to support federations. EF is the first to take this open source route in our data APIs and federations support is your chance to make your mark. You up for it?
http://weblogs.asp.net/scottgu/archive/2012/07/19/entity-framework-and-open-source.aspx

<Return to section navigation list>
MarketPlace DataMarket, Social Analytics, Big Data and OData
• Peter Horsman posted a Windows Azure Marketplace Update: New Features, Availability in 12 New Countries on 7/20/2012:
We are excited to announce the latest update to Windows Azure Marketplace, which brings some exciting new features, and commercial availability to 12 new countries. Now ISVs in 38 countries can benefit from the Windows Azure Marketplace.
New Features
- Integration of a self-publish app catalog in the Seller Dashboard,
- Availability of the Bing API exclusively through the Marketplace,
- Expanded offers through the introduction of Sample Data, and
- Integration of PowerPivot.
New Countries
Currently, the Windows Azure Marketplace serves approximately 50,000 users and more than 70,000 subscriptions.
The new release expands commercial availability to the following countries: Brazil, Chile, Colombia, Costa Rica, Greece, Israel, Luxembourg, Malaysia, Peru, Romania, South Korea, and Trinidad and Tobago.
Seller Dashboard Integration
Now ISVs can self-publish catalog apps through the Seller Dashboard. This more direct approach improves ease of use and supports faster time-to market for your apps.
Exclusive Availability of Bing API
We recently made the Bing API available through the Marketplace, and already there are thousands of users generating millions of transactions. Beginning 1 August 2012, Windows Azure Marketplace will be the only way to access the Bing API. Currently all Bing API offers include a free trial amount of 5,000 transactions to help you get started.
Introducing Sample Data
New functionality has been enabled that allows all Anonymous and Authenticated users to see Sample Data for selected data offers.
Sample data is a small subset of data that is being offered as published through the Marketplace. The purpose is to give you better insight into the shape and meaning of data offers, and to reduce the number of steps needed to get meaningful data views. It also gives publishers a great new way to promote and advertise their data.
Sample Data is available from the catalog and details pages of these offers:
US Air Carrier Flight Delays[*]
- ESRI - 2010 Key US Demographics by ZIP Code, Place and County (Trial)
- 2006 - 2008 Crime in the United States (Data.gov)
- London Borough Profiles
- European Greenhouse Gas Emissions
PowerPivot Makes BI Stronger
Microsoft Office has launched the Public Preview of Excel 2013! For the Windows Azure Marketplace this means new PowerPivot integration that a broad range of customers are sure to find very appealing to serve their Business Intelligence needs. Find a data set, build a query, pull it in and add the power of World Data to PowerPivot!
Make the most of this update! Explore the Windows Azure Marketplace and take advantage of these great new features.


Peter is a Sr. Partner & Channel Marketing Manager, Windows Azure Marketplace
* OakLeaf published the US Air Carrier Flight Delays dataset to the Windows Azure Marketplace DataMarket.
• Mark Stafford (@markdstafford) explained OData 101: What is JSON Light? in a 7/20/2012 post:
TL;DR: Tested against a real-world service, JSON Light results in a payload that is an order of magnitude smaller.
In this OData 101, we’ll take a short detour from code to understand the newest serialization format in the OData family: JSON Light.
What is JSON Light?
JSON Light is a new serialization format that is being added to the OData specification. Existing formats contain a lot of redundancy that can be optimized out. For example, consider the following real payloads:
JSON Light Format:
- {
- "odata.metadata":"http://services.odata.org/Experimental/OData/OData.svc/$metadata#ODataDemo.DemoService/Products/@Element",
- "ID":0,
- "Name":"Bread",
- "Description":"Whole grain bread",
- "ReleaseDate":"1992-01-01T00:00:00",
- "DiscontinuedDate":null,
- "Rating":4,
- "Price":"2.5"
- }
(Note: this is the JSON Light format as it is today, in prerelease bits. This format may change slightly before the bits are promoted to production.)
Atom Format:
- <entry xml:base="http://services.odata.org/Experimental/OData/OData.svc/"
- xmlns="http://www.w3.org/2005/Atom"
- xmlns:d="http://schemas.microsoft.com/ado/2007/08/dataservices"
- xmlns:m="http://schemas.microsoft.com/ado/2007/08/dataservices/metadata"
- xmlns:georss="http://www.georss.org/georss"
- xmlns:gml="http://www.opengis.net/gml">
- <id>http://services.odata.org/Experimental/OData/OData.svc/Products(0)</id>
- <category term="ODataDemo.Product" scheme="http://schemas.microsoft.com/ado/2007/08/dataservices/scheme" />
- <link rel="edit" title="Product" href="Products(0)" />
- <link rel="http://schemas.microsoft.com/ado/2007/08/dataservices/related/Category" type="application/atom+xml;type=entry" title="Category" href="Products(0)/Category" />
- <link rel="http://schemas.microsoft.com/ado/2007/08/dataservices/related/Supplier" type="application/atom+xml;type=entry" title="Supplier" href="Products(0)/Supplier" />
- <title type="text">Bread</title>
- <summary type="text">Whole grain bread</summary>
- <updated>2012-07-16T19:07:34Z</updated>
- <author>
- <name />
- </author>
- <link rel="http://schemas.microsoft.com/ado/2007/08/dataservices/relatedlinks/Category" type="application/xml" title="Category" href="Products(0)/$links/Category" />
- <link rel="http://schemas.microsoft.com/ado/2007/08/dataservices/relatedlinks/Supplier" type="application/xml" title="Supplier" href="Products(0)/$links/Supplier" />
- <content type="application/xml">
- <m:properties>
- <d:ID m:type="Edm.Int32">0</d:ID>
- <d:ReleaseDate m:type="Edm.DateTime">1992-01-01T00:00:00</d:ReleaseDate>
- <d:DiscontinuedDate m:null="true" />
- <d:Rating m:type="Edm.Int32">4</d:Rating>
- <d:Price m:type="Edm.Decimal">2.5</d:Price>
- </m:properties>
- </content>
- </entry>
JSON Verbose Format:
- {
- "d":{
- "__metadata":{
- "id":"http://services.odata.org/Experimental/OData/OData.svc/Products(0)",
- "uri":"http://services.odata.org/Experimental/OData/OData.svc/Products(0)",
- "type":"ODataDemo.Product",
- "properties":{
- "Category":{
- "associationuri":"http://services.odata.org/Experimental/OData/OData.svc/Products(0)/$links/Category"
- },
- "Supplier":{
- "associationuri":"http://services.odata.org/Experimental/OData/OData.svc/Products(0)/$links/Supplier"
- }
- }
- },
- "Category":{
- "__deferred":{
- "uri":"http://services.odata.org/Experimental/OData/OData.svc/Products(0)/Category"
- }
- },
- "Supplier":{
- "__deferred":{
- "uri":"http://services.odata.org/Experimental/OData/OData.svc/Products(0)/Supplier"
- }
- },
- "ID":0,
- "Name":"Bread",
- "Description":"Whole grain bread",
- "ReleaseDate":"1992-01-01T00:00:00",
- "DiscontinuedDate":null,
- "Rating":4,
- "Price":"2.5"
- }
- }
Why so much ceremony?
OData depends heavily upon sufficient metadata to describe payloads. This is evident in the Atom format, where each property has type information associated with it and multiple links are returned for each navigation property. There is also a lot of ceremony in JSON Verbose, though most of that ceremony is related to predictable and repetitive absolute URIs.
With JSON Light our goal was to reduce the ceremony as much as possible. We saw two clear places where ceremony could be removed:
- Type information; if the client already has a representation of the model, we don’t need to include the type information in the payload unless there is some ambiguity.
- Calculable information; most OData services follow a predictable set of conventions. If the service is following conventions, we should be able to calculate the URIs for many things, such as navigation links.
The
odata.metadataURIFor an average payload, that reduces our ceremony to one field: the
odata.metadataURI. Theodata.metadataURI appears once per payload and helps the client to disambiguate the payload. For instance, http://services.odata.org/OData/OData.svc/$metadata#ODataDemo.DemoService/Products/@Element means that the payload is a single Product entity, whereas http://services.odata.org/OData/OData.svc/$metadata#ODataDemo.DemoService/Products/ means that the payload is a feed of Product entities. For clients that correlate requests and responses or have a sufficiently advanced heuristic to read the payload, even this small amount of ceremony may be removed by asking the service not to return any metadata.Other metadata in JSON Light payloads
In addition to the odata.metadata URI, some JSON Light payloads will contain data that deviates from conventions, such as custom edit links. If a calculable field deviates from conventions, the server should include that field in the JSON Light payload.
Real-World Savings
So what does this mean in the real world? Based on the Northwind sample service:


Or represented visually:

The bytes-on-the-wire-savings of JSON Light are dramatic! Even with these relatively small feeds, the performance benefit would be substantial. The really exciting part is thinking about the bigger feeds, where the number of records are in the hundreds of thousands or millions of rows.
In summary, JSON Light brings a significantly more efficient wire format that matches beautifully with OData’s powerful URI queries. I’m looking forward to measuring the different on the Netflix feed once it supports JSON Light!
• Mark Stafford (@markdstafford) described OData 101: Building our first OData consumer in a 7/19/2012 post:
In this OData 101, we will build a trivial OData consumption app that displays some titles from the Netflix OData feed along with some of the information that corresponds to those titles. Along the way, we will learn about:
- Adding service references and how adding a reference to an OData service is different in Visual Studio 2012
- NuGet package management basics
- The LINQ provider in the WCF Data Services client
Getting Started
First we need to create a new solution in Visual Studio 2012. I’ll just create a simple C# Console Application:
From the Solution Explorer, right-click the project or the References node in the project and select Add Service Reference:
This will bring up the Add Service Reference dialog. Paste http://odata.netflix.com/Catalog in the Address textbox, click Go and then replace the contents of the Namespace textbox with Netflix:
Notice that the service is recognized as a WCF Data Service (see the message in the Operations pane).
Managing NuGet Packages
Now for the exciting part: if you check the installed NuGet packages (right-click the project in Solution Explorer, choose Manage NuGet Packages, and select Installed from the left nav), you’ll see that the Add Service Reference wizard also added a reference to the Microsoft.Data.Services.Client NuGet package!
This is new behavior in Visual Studio 2012. Any time you use the Add Service Reference wizard or create a WCF Data Service from an item template, references to the WCF Data Services NuGet packages will be added for you. This means that you can update to the most recent version of WCF Data Services very easily!
NuGet is a package management system that makes it very easy to pull in dependencies on various libraries. For instance, I can easily update the packages added by ASR (the 5.0.0.50403 versions) to the most recent version by clicking on Updates on the left or issuing the Update-Package command in the Package Manager Console:
NuGet has a number of powerful management commands. If you aren’t familiar with NuGet yet, I’d recommend that you browse their documentation. Some of the most important commands are:
Install-Package Microsoft.Data.Services.Client -Pre -Version 5.0.1-rc
Installs a specific prerelease version of Microsoft.Data.Services.ClientUninstall-Package Microsoft.Data.Services.Client -RemoveDependencies
Removes Microsoft.Data.Services.Client and all of its dependenciesUpdate-Package Microsoft.Data.Services.Client -IgnoreDependencies
Updates Microsoft.Data.Services.Client without updated its dependenciesLINQ Provider
Last but not least, let’s write the code for our simple application. What we want to do is select some of the information about a few titles.
The WCF Data Services client includes a powerful LINQ provider for working with OData services. Below is a simple example of a LINQ query against the Netflix OData service.
- using System;
- using System.Linq;
- namespace OData101.BuildingOurFirstODataConsumer
- {
- internal class Program
- {
- private static void Main()
- {
- var context = new Netflix.NetflixCatalog(new Uri("http://odata.netflix.com/Catalog"));
- var titles = context.Titles
- .Where(t => t.Name.StartsWith("St") && t.Synopsis.Contains("of the"))
- .OrderByDescending(t => t.AverageRating)
- .Take(10)
- .Select(t => new { t.Name, t.Rating, t.AverageRating });
- Console.WriteLine(titles.ToString());
- foreach (var title in titles)
- {
- Console.WriteLine("{0} ({1}) was rated {2}", title.Name, title.Rating, title.AverageRating);
- }
- }
- }
- }
In this sample, we start with all of the titles, filter them down using a compound where clause, order the results, take the top ten, and create a projection that returns only portions of those records. Then we write
titles.ToString()to the console, which outputs the URL used to query the OData service. Finally, we iterate the actual results and print relevant data to the console:
Summary
Here’s what we learned in this post:
- It’s very easy to use the Add Service Reference wizard to add a reference to an OData service
- In Visual Studio 2012, the Add Service Reference wizard and the item template for a WCF Data Service add references to our NuGet packages
- Shifting our distribution vehicle to NuGet allows people to easily update their version of WCF Data Services simply by using the Update-Package NuGet command
- The WCF Data Services client includes a powerful LINQ provider that makes it easy to compose OData queries
Sample source is attached; I’d encourage you to try it out!


• Mark Stafford (@markdstafford) explained OData 101: Constructing HTTP requests with Fiddler in a 7/19/2012 post:
TL;DR: Fiddler is an extremely useful tool for making ad-hoc OData requests. This tool is a must-have for any Web data developer’s arsenal.
Fiddler is a Web debugging proxy that makes it very easy to manipulate HTTP requests and responses. It’s an incredibly useful tool for debugging any client-side HTTP request/response on a Windows operating system. We will be using Fiddler in this instance to construct and manipulate requests to an OData service.
Cleaning up a session
When Fiddler launches, it will automatically begin capturing. We don’t need the capturing for this post, so let’s turn it off by going to File > Capture Traffic or pressing F12:
We can then delete whatever traffic Fiddler has already captured by using the Remove sessions toolbar button:
Composing a request
Now we can issue our first request. We will start by composing the request from scratch. Fiddler contains a request composer, which you can get to by going to View > Composer or pressing F9:
I like to give the request composer its own window by going to the Options tab and clicking Tear Off:
(This makes more sense to me as the main Fiddler window is now exclusively an HTTP sniffing tool.)
Now let’s execute our first request. Ensure that your request type is set to GET, enter a valid OData URL in the text box next to the request type (http://odata.netflix.com/v2/Catalog will return the Netflix service document) and click Execute.
If you used URL above, you should see two responses pop up in the Web Sessions list. The first response is simply a 301 redirecting you to the full URL, http://odata.netflix.com/v2/Catalog/. Had we started with that URL, the 301 would not have been returned.
Note: If you need to brush up on your HTTP status codes, the official spec is a great place to start and is surprisingly easy to read for a spec.
Reading a response
The 200 response is the one we care about. If you click on it in the Web Sessions list, you’ll see the details of the request/response appear in the pane to the right (you’ll need to have the Inspectors tab selected – or press F8 – to see the information):
I tend to use the Raw view most frequently, but I also use Headers, JSON and XML quite frequently. If I’m dealing with an XML or HTML payload, SyntaxView is also very useful:
Note the Find… and View In Notepad controls at the bottom of the request and response panes.
Manipulating request headers
With OData, it’s very important to be able to modify the request headers. We recommend that all OData clients always set a value for the Accept header and the MaxDataServiceVersion header. Fiddler allows us to add these headers in the Request Headers textbox:
Note that if a server is unable to respond with the appropriate payload version, it will return an error – but this is better than causing a potentially serious parsing error on the client.
Takeaways
- Fiddler is a powerful tool for constructing ad-hoc HTTP requests
- Always set a value for the Accept header and the MaxDataServiceVersion header on OData requests


Mark Stafford (@markdstafford) posted OData 101: Enabling JSON Light from the WCF DS 5.1.0-rc1 client on 7/20/2012:
TL;DR: You can tell the 5.1.0-rc1 version of Microsoft.Data.Services.Client to use JSON Light by providing an implementation of
Func<ModelResolverArgs, ModelResolverResult>as shown in this gist.In this OData 101 we’ll build a JSON Light enabled client. JSON Light is the newest format in the OData family. (For an overview of the benefits of JSON Light, check out this blog post.)
The need for a model
In many cases
$metadata(aka the Service Metadata Document) is used to generate proxy classes for accessing the service. These proxy classes are not strictly required, but greatly simplify the process of consuming an OData service.JSON Light benefits greatly from having a representation of the model client-side. It is possible to use JSON Light even if you don’t have the model, but we’ll cover that in a future blog post. For now, let’s assume that the model is required on the client.
Disclaimers
Before we get into the sample code, let’s cover a few disclaimers:
- This is sample code. It’s not intended to be production quality and there are a number of optimizations we’re foregoing for readability’s sake.
- We plan to ship some model resolvers out of the box, we just haven’t gotten there yet. For now you will need to supply the model resolver.
Code
We’ll walk through what the code is doing below, but let’s take a look at the code first:
- using System;
- using System.Collections.Generic;
- using System.Data.Services.Client;
- using System.Linq;
- using System.Text;
- using System.Xml;
- using Microsoft.Data.Edm;
- using Microsoft.Data.Edm.Csdl;
- using Microsoft.Data.Edm.Validation;
- using Scratch.NW;
- namespace Scratch
- {
- internal class Program
- {
- private static readonly Dictionary<Uri, IEdmModel> models = new Dictionary<Uri, IEdmModel>();
- private static void Main()
- {
- var context = new NorthwindEntities(new Uri("http://services.odata.org/Experimental/Northwind/Northwind.svc/"));
- // Note that for the release, code gen will likely provide a much friendlier alternative to this example
- context.Format.UseJson(args =>
- {
- Uri metadataUri = args.MetadataDocumentUri;
- if (!models.ContainsKey(metadataUri))
- {
- var xmlTextReader = new XmlTextReader(metadataUri.ToString());
- IEdmModel edmModel = null;
- IEnumerable<EdmError> errors = null;
- if (EdmxReader.TryParse(xmlTextReader, out edmModel, out errors))
- {
- models[metadataUri] = edmModel;
- }
- else
- {
- var errorMessageBuilder = new StringBuilder("Model creation failed; please resolve the following errors in the metadata document:");
- foreach (EdmError error in errors)
- {
- errorMessageBuilder.AppendLine(String.Format("t{0}", error.ErrorMessage));
- }
- throw new Exception(errorMessageBuilder.ToString());
- }
- }
- return new ModelResolverResult
- {
- ServiceModel = models[metadataUri]
- };
- });
- Category category = context.Categories.First();
- Console.WriteLine(category.CategoryName);
- foreach (Sales_Totals_by_Amount item in context.Sales_Totals_by_Amounts)
- {
- Console.WriteLine(item.SaleAmount);
- }
- }
- }
- }
Walkthrough
The interesting code starts on line 22 with the call to
context.Format.UseJson(). This is the call that enables JSON Light. Currently the API requires callers to pass the method an argument of typeFunc<ModelResolverArgs, ModelResolverResult>. This function will be used to get the model for a given URI. (We’ll come back to this part later.)The function that I’ve implemented in this sample will take the
MetadataDocumentUrifrom theModelResolverArgs, do a Web request to$metadata, and then parse that value into an EDM model that is returned on theModelResolverResult.Line 25 does some basic sanity checking to see whether or not we’ve already resolved the model. The model resolver func will be called every time a request is issued to an OData service, so we want to make sure we aren’t doing a new Web request to
$metadataevery time we send a request to the service.Lines 27-42 contain boilerplate code for parsing
$metadatainto an EDM model with EdmLib. On line 30 we check whether or not we were able to parse the model. If we were, we cache the model (on line 32). If model parsing failed, we throw (lines 36-41).On line 44 we return a new
ModelResolverResultpopulated with the cached EDM model.Trying it out
Now that we’ve walked through what the code does, let’s try it out and see it in action. Place a breakpoint on line 44 and start the application in debug mode. Examine the model in the
modelsdictionary and themetadataUri.Next, remove the breakpoint and fire up Fiddler. Run your application. You should see something like this in Fiddler:
The first request was the request for the data. When the client receives the response, it looks at the
odata.metadataURI in the response and sees that the response is of type http://services.odata.org/Experimental/Northwind/Northwind.svc/$metadata#ODataWebExperimental.Northwind.Model.NorthwindEntities/Sales_Totals_by_Amounts. The client will then call our model resolver func, passing in the part of the URI that can be passed to the server (everything before the #). Our model resolver then makes a request for$metadata(since we don’t have it cached yet), which you can see highlighted above.Writing a good model resolver is important for the prerelease bits. The model resolver above is a reasonable starting point, but clearly not issuing a Web request at all would be ideal.
Conclusion
JSON Light significantly improves the efficiency of OData wire formats. For JSON Light to work in an OData world, the client must have the model to parse the response properly. The model is currently provided to the client through the model resolver func,
Func<ModelResolverArgs, ModelResolverResult>. One such implementation is included above, however we plan to provide a better alternative in the full release.Please take the time to try out JSON Light and share your feedback!


<Return to section navigation list>
Windows Azure Service Bus, Access Control, Caching, Active Directory and Workflow
• My (@rogerjenn) Windows Azure Active Directory enables single sign-on with cloud apps article of 7/19/2012 for TechTarget’s SearchCloudComputing.com Website begins:
Microsoft’s Windows Azure Active Directory (WAAD) Developer Preview provides simple user authentication and authorization for Windows Azure cloud services. The preview delivers online demonstrations of Web single sign-on (SSO) services for multi-tenanted Windows Azure .NET, Java and PHP applications, and programmatic access to WAAD objects with a RESTful graph API and OData v3.0.
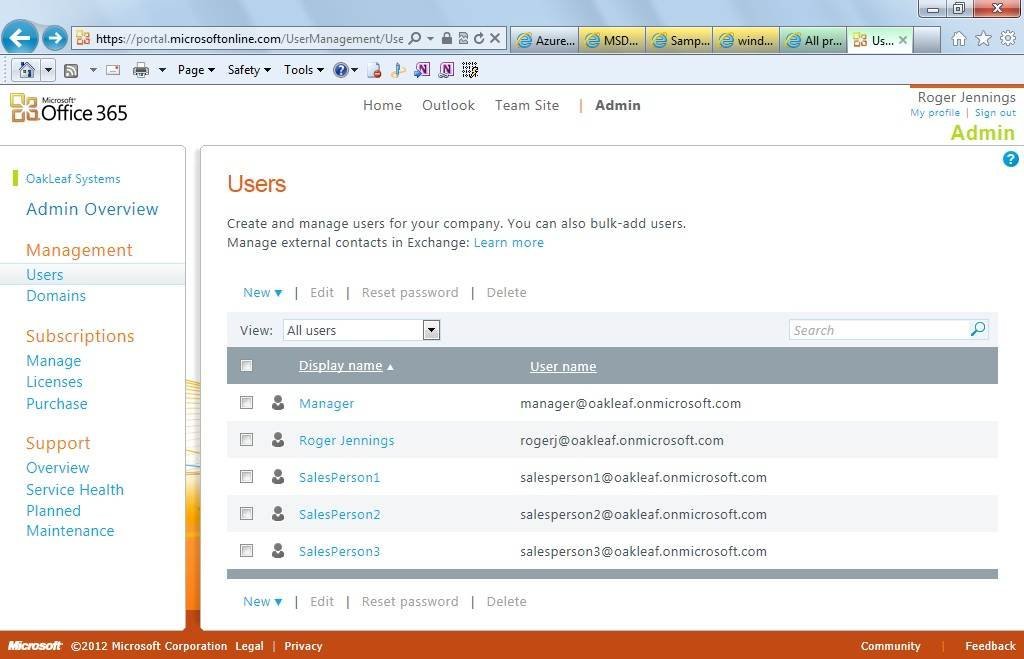
Figure 1. The Users page of the Office 365 Administrative portal enables adding detailed user accounts to an organization’s domain, oakleaf.onmicrosoft.com for this example.
Traditionally, developers provided authenticationfor ASP.NET Web applications with claims-based identity through Windows Azure Access Control Services (WA-ACS), formerly Windows Azure AppFabric Access Control Services.
According to Microsoft, WA-ACSintegrates with Windows Identity Foundation (WIF); supports Web identity providers (IPs) including Windows Live ID, Google, Yahoo and Facebook; supports Active Directory Federation Services (AD FS) 2.0; and provides programmatic access to ACS settings through an Open Data Protocol (OData)-based management service. A management portal also enables administrative access to ACS settings.
Running online Windows Azure Active Directory demos
Taking full advantage the preview’s two online demonstration apps requires an Office 365 subscription with a few sample users (Figure 1). Members of the Microsoft Partner Network get 25 free Office 365 Enterprise licenses from the Microsoft Cloud Essentials benefit; others can subscribe to an Office 365 plan for as little as $6.00 per month. According to online documentation, the WAAD team plans to add a dedicated management portal to the final version to avoid reliance on Office 365 subscriptions. Note: The preview does not support Windows 8, so you’ll need to use Windows 7 or Windows Server 2008 R2 for the demo.
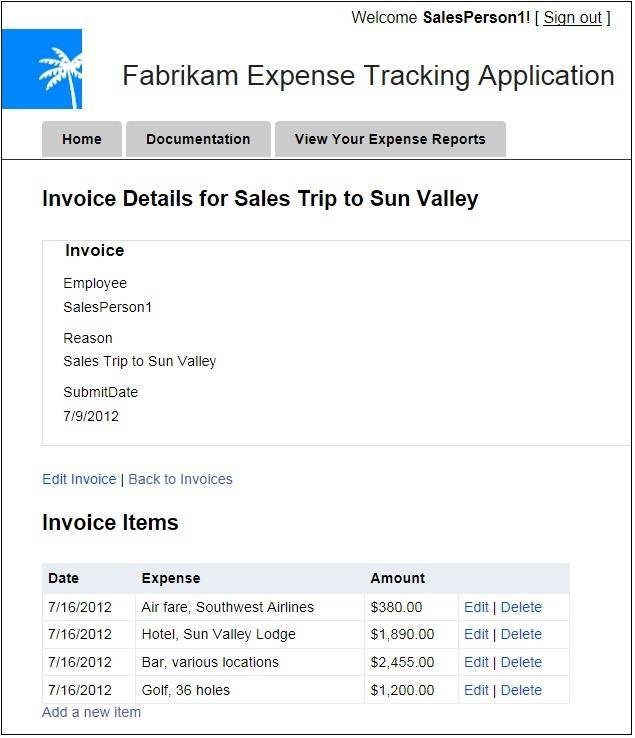
Figure 2. Use the Fabrikam demo to add or edit detail items of an expense report.
The preview also requires users to download an updated Microsoft Online Services Module for Windows PowerShell v1.0 for 32-bit or 64-bitsystems. You’ll also need to download and save a prebuilt PowerShell authorization script, which you execute to extract the application’s identifier (Application Principal ID), as well as the tenant identifier (Company ID) for the subscribing organization.
The Fabrikam Expense report demo is a tool used to show interactive cloud Web apps to prospective Windows Azure users (Figure 2). The preview also includes open source code developers can download from GitHub and use under an Apache 2.0 license. Working with the source code in Visual Studio 2010 or later requires the Windows Azure SDK 1.7, MVC3 Framework, WIF runtime and SDK, as well as Windows Communication Framework (WCF) Data Services 5.0 for OData v3 and .NET 4.0 or higher. With a bit of tweaking, this ASP.NET MVC3 app could manage expense reports for small- and medium-sized companies. …

Full Disclosure: I’m a paid contributor to TechTarget’s SearchCloud… .com Websites.
• Dan Plastina let Tejas Patel describe how to Configure SharePoint Online Preview to use Windows Azure AD Rights Management in a 7/19/2012 post to the Active Directory RMS blog:
Hi folks,
Here is the follow-up post to our earlier post where you can learn more about how to quickly enable Rights management capabilities within the SharePoint Online preview.
I'll let Tejas Patel, provide more details.
Thanks,
Dan
Hi, I'm Tejas, a program manager on the Windows Azure AD Rights Management team, and I just want to provide some quick "jump start" steps for how you try out and get a feel for using Windows Azure AD Rights Management.
Yesterday, we discussed how to enable Rights management capabilities in the Exchange Online Preview. Today, I'll be discussing how to enable Rights management in Sharepoint Online Preview via Windows Azure AD Rights Management. If you haven’t read this post you should before trying the steps to enable Rights management features in SharePoint Online Preview.
Enable SharePoint Online Preview rights management capabilities
- Login to the SharePoint Administration Center, click settings and then select to Use the IRM service specified in your configuration.
- Create a new site or go to an existing site and then click Documents, then the Library tab, and then Library Settings.
- Click on Information Rights Management and configure the Document library for rights management.
- You can now go back to the document library, add a new Word document to the library, and then upon opening the document in Word 2013 (if configured using the steps from this post), the document will be rights protected.
As always, please let us know if there are any questions or feedback. I'll be doing blog posts next week to help show you some of the other ways you can use Windows Azure AD Rights Management with the Office 365 preview.
See the Windows Azure Active Directory Rights Management Preview now available post of 7/14/2012 below to learn why you might be interested in WAAD RMS.
• Dan Plastina let Tejas Patel explain how to Configure Exchange Online Preview to use Windows Azure AD Rights Management in a 7/18/2012 post:
Hi folks,
Here is the follow-up post to our earlier post where you can learn more about how to quickly enable Rights management capabilities within the Exchange Online preview. The below might appear complicated at first blush, but will be replaced with a single check-box at release.
I'll let Tejas Patel, provide more details.
Thanks,
Dan
Hi, I'm Tejas, a program manager on the Windows Azure AD Rights Management team, and I just want to provide some quick "jump start" steps for how you try out and get a feel for using Windows Azure AD Rights Management.
Yesterday, we discussed how to enable Rights management capabilities in Windows Azure AD Rights Management and Office 2013 Preview. Today, I'll be discussing how to enable Rights management in Exchange Online Preview via Windows Azure AD Rights Management. If you haven’t read this post you should before trying the steps to enable Rights management features in Exchange Online Preview.
Here are the steps:
Enable Exchange Online Preview rights management capabilities
- Connect to your Exchange Online account by using Windows PowerShell
- Login with this command:
- $LiveCred = Get-Credential
3. Begin configuration of Exchange Online:
- $Session = New-PSSession -ConfigurationName Microsoft.Exchange -ConnectionUri https://ps.outlook.com/powershell/ -Credential $LiveCred -Authentication Basic –AllowRedirection
- Import-PSSession $Session
- Enable-OrganizationCustomization
4. Run the following commands to enable Rights management within Exchange Online:
- Set-IRMConfiguration –RMSOnlineKeySharingLocation "https://sp-rms.na.aadrm.com/TenantManagement/ServicePartner.svc"
- Import-RMSTrustedPublishingDomain -RMSOnline -name "RMS Online"
- Set-IRMConfiguration -InternalLicensingEnabled $true
For regions outside North America, please substitute .NA. with .EU. for the European Union, and .AP. for Asia
e.g.: https://sp-rms.eu.aadrm.com/TenantManagement/ServicePartner.svc
e.g.: https://sp-rms.ap.aadrm.com/TenantManagement/ServicePartner.svcOptionally test the configuration by running the following command:
- Test-IRMConfiguration -sender user@company.onmicrosoft.com
Start using IRM functionality in Outlook Web Access
- Log into Outlook Web access.
- Create a new mail message and add a recipient.
- Click the ellipsis( “…”) besides the “INSERT” option in the tool strip and then select set permissions.
- Select the “Do Not Forward” template.
- Send the message to a recipient that is using the Office 365 Preview.
- The recipient will be able to open the message in Outlook Web Access or Outlook 2013 Preview (if they have configured their computer for Rights management using the steps I provided in yesterday's post).
As always, please let us know if there are any questions or feedback. I'll be doing other blog posts later this week to help show you some of the other ways you can use Windows Azure AD Rights Management with the Office 365 preview. Tomorrow, I will be discussing how to enable SharePoint Online Preview rights management capabilities.
• Dan Plastina let Tejas Patel explain Enabling Windows Azure AD Rights Management in Office 365 Enterprise Preview in a 7/17/2012 post:
As promised, here is the follow-up post to our earlier announcement about the Windows Azure AD Rights Management preview where you can learn more about how to quickly enable Rights management capabilities within the Office 365 Enterprise preview. And yes, these steps will be simpler/fewer in the final release of Azure AD Rights Management.
I'll let Tejas Patel, our resident expert, give you the inside track here.
Thanks,
Dan
Hi, I'm Tejas, a program manager on the Windows Azure AD Rights Management team, and I just want to provide some quick "jump start" steps for how you try out and get a feel for using Windows Azure AD Rights Management.
As Dan mentioned, our service is available as a part of the Office 365 Enterprise Preview. Once you have signed up for the preview, enabling Rights management capabilities within the Office 365 preview just takes a few additional steps.
Today, I'll be discussing how to enable Rights management and then how you can configure Office 2013 Preview to begin using its capabilities.
Quick Start for using Windows Azure AD Rights Management and within Office 2013 Professional Plus
- Enable Windows Azure AD Rights Management for your organization:
- Download the Windows Azure AD Rights Management administration module (WindowsAzureADRightsManagementAdministration.exe) for Windows PowerShell from here.
- From the local folder where you downloaded and saved the Rights Management installer file, double-click WindowsAzureADRightsManagementAdministration.exe to launch installation of the Rights Management administration module
- Open Windows PowerShell
- Type the following commands:
- Import-Module AADRM
- Connect-AadrmService -Verbose
- Enter your Office 365 Preview credentials when prompted, for example “user@company.onmicrosoft.com”
- Type the following commands:
- Enable-Aadrm
- Disconnect-AadrmService
- Configure Office 2013 Preview for Windows Azure AD Rights Management
- Install Office Professional Plus 2013 Preview from the download site.
- From an elevated command prompt, run the following registry update command:
- reg add "HKEY_CURRENT_USER\SOFTWARE\Microsoft\Office\15.0\Common\DRM" /t REG_DWORD /v "UseRMSOnline" /d 1 /f
- This step will be necessary on each machine with Office 2013 that you will use for Rights management.
- Start using IRM functionality
- Open Word 2013 Preview
- Sign in to your Office applications using your Microsoft Office 365 credentials.
- Create a new document
- Go to “File”, “Protect Document”, “Restrict Access” and then to“Connect to Digital Rights Management Servers and get templates”
- After this operation completes you are bootstrapped to use IRM functionality
- You can now share files that are IRM protected with other individuals that have configured their machines and signed up for the Office 365 Preview
As always, please let us know if there are any questions or feedback. I'll be doing other blog posts later this week to help show you some of the other ways you can use Windows Azure AD Rights Management with the Office 365 preview.
If you're curious what's coming next, here's a look ahead:
- Tomorrow, I will be discussing enabling Exchange Online Preview rights management capabilities.
- Later this week on Thursday, I will be discussing how to enable SharePoint Online Preview rights management capabilities.
• Dan Plastina announced Windows Azure Active Directory Rights Management Preview now available in a 7/16/2012 post (missed when published):
We’re delighted to bring information protection and rights management to Microsoft’s Office 365 Preview cloud offering with the today’s beta launch of Windows Azure Active Directory Rights Management. With Windows Azure AD Rights Management, customers can protect their data by encrypting and managing access rights, including Office documents, Exchange email, and SharePoint document libraries across Office 365 preview services and applications. The technology is highly integrated into Office 2013 Preview, Exchange Online Preview, and SharePoint Online Preview, and offers a seamless experience for both end users and administrators in document authoring, email, and SharePoint publishing.
Some of the benefits include:
Safeguarded sensitive information
- Users can protect their data directly using the Office Suite and ISV rights-management enabled applications. No additional steps are required – authoring documents, sending email, and publishing to SharePoint offer a consistent data protection experience.
Protection travels with the data
- Customers remain in control of who has access to their data, whether in the cloud, existing IT infrastructure, or at the user’s desktop. Customers can choose to encrypt their data and restrict access according to their business requirements.
Integrated with Office 2013 Preview and Office 365 Preview services
- Consistent rights management policy and data protection is applied and enforced throughout the Office 365 services and Office applications. Users can author, access, and manage their information safely, whether from a mobile device, Windows desktop, file share, email, or SharePoint libraries. Customers can choose to collaborate and share their data securely with other Office 365 users, and know their policies are enforced consistently and their information remains protected.
Default information protection policies
- Administrators and users can use standard policies for many common business scenarios: "Company Confidential –Read Only" and "Do Not Forward." A rich set of usage rights are supported such as read, copy, print, save, edit, and forward to allow flexibility in defining custom usage rights.
Using Windows Azure AD Rights Management, all these scenarios are seamless enabled with no additional administrator installation or deployments required. Learn more about the Windows Azure AD Rights Management at our at Technet site.
Check back shortly for a follow on post from Tejas Patel, a program manager on the Windows Azure Active Directory Rights Management team, for detailed steps on how you can enable this with the Office 365 Preview.
• Vittorio Bertocci (@vibronet) posted Inside the Windows Azure Active Directory Web SSO Sample for Java on 7/17/2012:
By now I am sure you heard that the Windows Azure Active Directory Developer Preview is out.
We announced so many interesting news that you might just have missed an interesting fact: as part of this release we made available a couple of samples developed on… something other than Visual Studio. Namely, I am referring to the Windows Azure AD SSO sample for Java and the Windows Azure AD SSO sample for PHP.
We provided detailed instructions on how to operate the Java sample, and I am told that the PHP one won’t take long to bring out; however I think it would be interesting to provide you with some insights on how the project are structured and how they make the magic of claims-based identity happen. Add to it that my wife is out, and that if I’d watch without the series finale of Eureka I’d be in deep trouble… and you’ve got yourself a blog post.
Let’s start with the Java sample. One word of warning: I already wrote a tl; dr (thanks Ryan for labeling it that way) post on how web SSO works in the developer preview, and I am not going to repeat any of it here as most of it (modulo syntactic sugar) holds regardless of the language you use.
The Project
We wrote the Java sample as a JBoss project. Before you come down with a case of apophenia and read who-knows-what in it: when we first started to work on the code we were in contact with one partner who wanted to connect with Windows Azure Active Directory from a JBoss application (on Solaris!), hence it was natural for us to go that way. However it should be pretty easy for you (assuming that you know Java better than I do) to port the code to any other application server. Also, this would be a great time for me to thank the usual Southworks for their help on this project. Thanks guys!
We worked with JBoss Studio, from where I’ll take most of the following screenshots. Also, we leveraged Maven for handling the many dependencies on the project.
The project have two main components: a library you can reuse across different projects, and a sample JSP web application that shows those in action.
The package com.microsoft.samples.federation provides you with the basic building blocks for handling claims-based identity via WS-Federation in your Java applications. Here, I’ll tell you a secret: the main hard rock when dealing with those scenarios is the SAML token handling itself, crypto verification, canonicalization, the whole brouhaha. Everything else is just a matter of triggering validation at the right times and in the right places; even ws-federation itself is really not that hard. In that optic, com.microsoft.samples.federation does the easy part of the job: we’ll see i9t in details later. For the heavy lifting – the SAML token processing – why reinventing the wheel? We use OpenSAML, a well-known Java and C++ library for handling (I *absolutely* loathe the expression “cracking a token”) SAML tokens.
The package com.microsoft.samples.waad.federation augments the basic federation capabilities in the former package with elements that are specific to Windows Azure Active Directory, such as the SPN-based realm validation described in the SSO deep dive.
Handling Web SSO
How does the sample really work? In a nutshell: we put a blanket filter in front of all pages; that filter intercepts requests, redirects the unauthenticated ones to a login page and restores the claims from the session for the authenticated ones. The login page performs HRD and generates the proper signin message, taking care of indicating as ultimate return URL the address of a servlet which is equipped to extract tokens from wresult and process them as appropriate. Most of the token & session processing logic is provided by the class ConfigurableFederatedLoginManager and its ancestor FederatedLoginManager.
Too fast? OK, let’s go through the same flow more in details. Here there’s the structure of the web application:
The web site is really minimal, there’s one resource (index.jsp) and one page to host the HRD experience (login.jsp).
The WEB-INF/web.xml carries the config: you can see part of it on the right side of the screenshot. From the top:
- We define the FederationServlet, associated with the homonym class, that will take care of handling incoming tokens.
- We define a filter, FederationFilter, which has direct knowledge of the URL of the HRD page. The filter also defines a series of exceptions, most notably login.jsp and the servlet endpoint
…and now comes the fun part. Aided by a good glass of Duvell, I debated a bit with myself about what would be the best way of walking you though the various classes and explaining what they contribute to the authentication flow. I concluded that walking through the files would end up forcing me to create a full reference documentation suite, which I don’t have time to write (after all, an Eureka episode lasts barely one hour). Hence, the most concise way appeared to be creating a diagram of what happens from the first unauthenticated resource to the moment in which the caller finally gains access, and explains what happens at every stage. So, here you go:
Don’t be scared, you’ll see that it is fact pretty straightforward. Let’s dive in!
- A client browser requests index.jsp. The request gets intercepted by the FederationFilter.
- The filter passes the request to the ConfigurableFederatedLoginManager, the handyman of this sample. ConfigurableFederatedLoginManager indicates that the request is not authenticated (as in, there is no session with claims in it), hence the filter redirects to login.jsp (but not before augmenting the request with a return url pointing to index.jsp, so that we can get back to it upon successful authentication)
- login.jsp queries a repository of trusted issuers, which play the same role as TrustedIssuers.xml in the .NET sample, and uses the list of trusted IdPs to create a series of link which contain the correct WS-Federation signin requests for each of the Idps. NOTE: the requests are all designed to redirect authentication tokens back to the FederationServlet endpoint (https://localhost:8443/sample/wsfed-saml in this sample)
- The user clicks on a link, and the Windows Azure Active Directory user authentication dance begins
- Assuming that the user authentication took place successfully, the browser POSTs the resulting token to the servlet endpoint as instructed by step #3. The servlet also instantiates ConfigurableFederatedLoginManager and feed the incoming request to its authenticate method. The method uses the trusted issuers repository for retrieving the necessary validation coordinates, then proceeds to validate the incoming token (using various other classes in the process)\
- Upon successful authentication, the ConfigurableFederatedLoginManager saves the resulting principal (i.e. the claims) in the session
- ConfigurableFederatedLoginManager raises the event OnAuthenticationSucceed for a FederatedAuthenticationListener. This is a bit like implementing the SignedIn() event in WIF: in this sample we really don’t do anything with this, but that’s substantially a way of offering a place in the pipeline where you can add custom processing logic outside of the application proper.
- Once all the validations are done, ConfigurableFederatedLoginManager retrieves from the request context (wctx) the URL of the resource originally requested (index.jsp, in our case) and redirects to it
- Here we get through the same flow as #2; however this time ConfigurableFederatedLoginManager finds a session and successfully retrieves the associated claims, hence…
- …the request finally reaches index.jsp
…and that’s the core of it! The rest is largely filling in the blanks with proper WS-Federation syntax, handling all the windows azure active directory-specific things I described in the deep dive, and so on.
Summary
This is not a complete reference, but hopefully it explains enough of the flow that it will help you to find your way as you explore the sample source. Also note: if you observe the flow and the various artifacts, you’ll see how it hints to some interesting potential extensions. Say that in the future there will be another redirect-based protocol you want to support, like SAML-P or OpenID Connect: all you’d need to do would be to add a servlet for the new protocol, enhance the FederatedLoginManager to recognize and enforce the protocol-specific flows, and orchestrate calls to whatever other support classes (such as for different token formats) you’d want to onboard. Pretty neat.
Of course I fully expect that the Java experts among you will have a ton of feedback about how we could have done this more efficiently, and we look forward to hear from you: but the hope is that this will help you to connect to Windows Azure Active Directory in a way that is closer to the practices and tools you are used to work with.
Well, the Eureka series finale still awaits in the DVR downstairs: however it is now awfully late, hence I successfully avoided to watch it… for tonight. I guess that for tomorrow I’ll have to find something else to write about.
In the meanwhile, please send us your feedback on the dev preview of Windows Azure Active Directory! We already got very interesting observations from many of you guys (thank you!) but the game has just begun!


My (@rogerjenn) Designating Managers and Adding Direct Reports with Exchange in Office 365 Enterprise (E-3) Preview post updated 7/20/2012 begins:
Updated 7/20/2012: Added “Alternative Method for Adding the Manager/ReportsTo Property Value” section at the end of this post and the following paragraph:
If you don’t have a current Office 365 subscription and would rather use the free Office 365 Enterprise (E-3) Preview version, substitute the following steps for those in the A Guided Tour of the Windows Azure Active Directory Developer Preview Sample Application post’s “Designating Managers and Adding Direct Reports with Exchange” section:
1. Open the Office 365 Preview Admin Center:
2. Click Add New Users to open the New User Details section and type employee information:
3. Click Next to display the Settings page, accept the No option, and select the country in which the user is located, United States for this example:
4. Click Next to display the Licenses page and accept the default selection of all available features:
5. Click Next to Display the Email page and accept the default Adminstrator’s email account:
6. Click Create to display the Results page:
7. Repeat steps 2 through 6 for SalesPerson2 through SalesPerson4 and Manager. Click the + (Add) button in the Manage Users and Groups page to add the second and later user.
8. Optionally assign the Manager user the User Management Administrator role:
9. The users list appears as follows when you’re done:
Tip: See the “Alternative Method for Adding the Manager/ReportsTo Property Value to User Accounts” section near the end of this post. …


My (@rogerjenn) Adding Your Domain to a Windows Azure Active Directory in Office 365 Preview Enterprise (E3) Edition of 7/20/2012 begins:
If you have a custom domain registered for use with your Office 365 subscription, follow these steps to assign it to the Preview:
1. Open the Office 365 Preview Enterprise (E3) Edition administrative portal:
Following is the full text cut off above:
Your Microsoft Online Services account comes with a domain name — contoso.onmicrosoft.com — but if you have your own domain name already, you can use that domain name with Microsoft Online Services services too. To add your domain, click Add a domain.
If you don't already own a domain name, you can purchase one from a domain registrar, and then come back to add it to Microsoft Online Services.
3. Click the Add a Domain button to open the Specify a Domain page:
4. Click Next to display the Verify Domain page, select your domain registrar (Register.com for this example) from the first list and choose Add a TXT record in the Select a Verification Method list:
Note: Steps 5 through 9 are based on the instructions cut off above. Adding a TXT or MX record at other registrar’s sites follows a similar process. The Office 365 Team recommends using a TXT rather than a Mail Exchange (MX) record so as not to interfere with email operations. …


Brent Stineman (@BrentCodeMonkey) posted Service Bus and “pushing” notifications on 9/18/2012:
So the last several projects I’ve worked on, I’ve wanted to have a push notification system that I could use to send messages to role instances so that they could take actions. There’s several push notification systems out there, but I was after some simple that would be included as part of my Windows Azure services. I’ve put a version of this concept into several proposals, but this week finally received time to create a practical demo of the idea.
The concept is fairly simple. Messages are sent to a centralized topic for distribution. Each role instance then creates its own subscriber with the appropriate filter on it so it receives the messages it cares about. This solution allows for multiple publishers and subscribers and will give me a decent amount of scale. I’ve heard reports/rumors of issues when you get beyond several hundred subscribers, but for this demo, we’ll be just fine.
Now for this demo implementation, I want to keep it simple. It should be a central class that can be used by workers or web roles to create their subscriptions and receive notifications with very little effort. And to keep this simplicity going, give me just as easy a way to send messages back out.
NotificationAgent
We’ll start by creating a class library for our centralized class, adding references to it for Microsoft.ServiceBus (so we can do our brokered messaging) and Microsoft.WindowsAzure.ServiceRuntime (for access to the role environment). I’m also going to create my NotificationTopic class.
Note: there are several supporting classes in the solution that I won’t cover in this article. If you want the full code for this solution, you can download it here.
The first method we’ll add to this is a constructor that takes the parameters we’ll need to connect to our service bus namespace as well as the name/path for the topic we’ll be using to broadcast notifications on. The first of these is creating a namespace manager so I can create topics and subscriptions and a messaging factory that I’ll use to receive messages. I’ve split this out a bit so that my class can support being passed a TokenProvider (I hate demo’s that only use the service owner). But here is the important lines:
TokenProvider tmpToken = TokenProvider.CreateSharedSecretTokenProvider(issuerName, issuerKey);
Uri namespaceAddress = ServiceBusEnvironment.CreateServiceUri(“sb”, baseAddress, string.Empty);
this.namespaceManager = new NamespaceManager(namespaceAddress, tokenProvider);
this.messagingFactory = MessagingFactory.Create(namespaceAddress, tokenProvider);We create a URI and a security token to use for interaction with our service bus namespace. For the sake of simplicity I’m using issuer name (owner) an the service administration key. I’d never recommend this for a production solution, but its fine for demonstration purposes. We use these to create a NamespaceManager and MessagingFactory.
Now we need to create the topic, if it doesn’t already exist.
try
{
// doesn’t always work, so wrap it
if (!namespaceManager.TopicExists(topicName))
this.namespaceManager.CreateTopic(topicName);
}
catch (MessagingEntityAlreadyExistsException)
{
// ignore, timing issues could cause this
}Notice that I check to see if the topic exists, but I also trap for the exception. That’s because I don’t want to assume the operation is single threaded. With this block of code running in many role instances, its possible that between checking if it doesn’t exist and the create. So I like to wrap them in a try/catch. You can also just catch the exception, but I’ve long liked to avoid the overhead of unnecessary exceptions.
Finally, I’ll create a TopicClient that I’ll use to send messages to the topic.
So by creating an instance of this class, I can properly assume that the topic exists, and I have all the items I need to send or receive messages.
Sending Messages
Next up, I create a SendMessage method that accepts a string message payload, the type of message, and a TImeSpan value that indicates how long the message should live. In this method we first create a BrokeredMessage giving it an object that represents my notification message. We use the lifespan value that is passed in and set the type as a property. Finally, we send the message using the TopicClient we created earlier and do appropriate exception handling and cleanup.
try
{
bm = new BrokeredMessage(msg);
bm.TimeToLive = msgLifespan;
// used for filtering
bm.Properties[MESSAGEPROPERTY_TYPE] = messageType.ToString();
topicClient.Send(bm);
success = true;
}
catch (Exception)
{
success = false;
// TODO: do something
}
finally
{
if (bm != null) // if was created successfully
bm.Dispose();
}Now the important piece here is the setting of a BrokeredMessage property. It’s this property that can be used later on to filter the messages we want to receive. So let’s not forget that. And you’ll also notice I have a TODO left to add some intelligent exception handling. Like logging the issue.
Start Receiving
This is when things get a little more complicated. Now the experts (meaning the folks I know/trust that responded to my inquiry), recommend that instead of going “old school” and having a thread that’s continually polling for responses, we instead leverage async processing. So we’re going to make use of delegates.
First we need to define a delegate for the callback method:
public delegate bool RecieverCallback(NotificationMessage mesage, NotificationMessageType type);
We then reference the new delegate in the method signature for the message receiving starter:
public void StartReceiving(RecieverCallback callback, NotificationMessageType msgType = NotificationMessageType.All)
Now inside this method we first need to create our subscriber. Since I want to have one subscriber for each role instance, I’ll need to get this from the Role Environment.
// need to parse out deployment ID
string instanceId = Microsoft.WindowsAzure.ServiceRuntime.RoleEnvironment.CurrentRoleInstance.Id;
subscriptionName = instanceId.Substring(instanceId.IndexOf(‘.’)+1);SubscriptionDescription tmpSub = new SubscriptionDescription(topicName, subscriptionName);Now is the point where we’ll add the in a filter using the Property that we set on the notification when we created it.
{
Filter tmpFilter = new SqlFilter(string.Format(“{0} = ‘{1}’”, MESSAGEPROPERTY_TYPE, msgType));
subscriptionClient.AddRule(SUBFILTER, tmpFilter);
}I’m keeping it simple and using a SqlFilter using the property name we assigned when sending. So this subscription will only receive messages that match our filter criteria.
Now that all the setup is done, we’ll delete the subscription if it already exists (this gets rid of any messages and allows us to start clean) and create it new using the NameSpaceManager we instantiated in the class constructor. Then we start our async operation to retrieve messages:
asyncresult = subscriptionClient.BeginReceive(waittime, ReceiveDone, subscriptionClient);
Now in this, ReceiveDone is the callback method for the operation. This method is pretty straight forward. We make sure we’ve gotten a message (in case the operation simply timed out) and that we can get the payload. Then, using the delegate we set up earlier, And then we end by starting another async call to get another message.
if (result != null)
{
SubscriptionClient tmpClient = result.AsyncState as SubscriptionClient; BrokeredMessage brokeredMessage = tmpClient.EndReceive(result);
//brokeredMessage.Complete(); // not really needed because your receive mode is ReceiveAndDeleteif (brokeredMessage != null)
{
NotificationMessage tmpMessage = brokeredMessage.GetBody<NotificationMessage>();// do some type mapping here
recieverCallback(tmpMessage, tmpType);
}
}// do recieve for next message
asyncresult = subscriptionClient.BeginReceive(ReceiveDone, subscriptionClient);Now I’ve added two null checks in this method just to help out in case a receive operation fails. Even the, I won’t guarantee this works for all situations. In my tests, when I set the lifespan of a message to less than 5 seconds, still had some issues (sorting those out yet, but wanted to get this sample out).
Client side implementation
Whew! Lots of setup there. This is where our hard work pays off. We define a callback method we’re going to hand into our notification helper class using the delegate we defined. We’ll keep it super simple:
private bool NotificationRecieved(NotificationMessage message, NotificationMessageType type)
{
Console.WriteLine(“Recieved Notification”); return true;
}Now we need to instantiate our helper class and start the process of receiving messages. We can do this with a private variable to hold on our object and a couple lines into role’s OnStart.
tmpNotifier = new NotificationTopic(ServiceNamespace, IssuerName, IssuerKey, TopicName);
tmpNotifier.StartReceiving(new NotificationTopic.RecieverCallback(NotificationRecieved), NotificationMessageType.All);Now if we want to clean things up, we can also add some code to the role’s OnStop.
try
{
if (tmpNotifier != null)
tmpNotifier.StopReceiving();
}
catch (Exception e)
{
Console.WriteLine(“Exception during OnStop: “ + e.ToString());
}base.OnStop();And that’s all we need.
In Closing
So that’s it for our basic implementation. I’ve uploaded the demo for you to use at your own risk. You’ll need to update the WebRole, WorkerRole, and NotifierSample project with the information about your Service Bus namespace. To run the demo, you will want to set the cloud service project as the startup project, and launch it. Then right click on the NotifierSample project and start debugging on it as well.
While this demo may work fine for certain applications, there is definitely room for enhancement. We can tweak our message lifespan, wait timeouts, and even how many messages we retrieve at one time. And it’s also not the only way to accomplish this. But I think it’s a solid starting point if you need this kind of simple, self-contained notification service.
PS – As configured, this solution will require the ability to send outbound traffic on port 9354.

Matias Woloski (@woloski) described Simpler WIF integration for ASP.NET web application using NuGet and cloud friendly appSettings in a 7/19/2012 post to his Auth10 blog:
Last week we’ve spent some time contributing to Jabbr (the open source chat app based on SignalR). David Fowler, the main dev behind the project, expressed on twitter that it would be great to have enterprise sign-on support on Jabbr so that it could be used as a chat system on the enterprise.
We hosted a version of Jabbr using WIF in AppHarbor if you are curious about it http://jabbr-auth10.apphb.com/
We extracted what we learnt from this experience and packaged it into a couple of NuGets: Auth10.AspNet.SimpleConfig and Auth10.AspNet.SimpleConfig.WindowsAzureAD.IdentitySelector.
Screencast

What we’ve learnt from Jabbr
- There is a single page with the page structure and the rest is in JavaScript.
- Jabbr stores configuration items on appSettings to be cloud-friendly. Clouds like Windows Azure Web Sites or AppHarbor allows you to override config from appSetting but you can’t change complex config sections.
- Jabbr has its own mechanism to track a user logged in, they don’t use IPrincipal.
- Jabbr has two authentication mechanism: user and password or social identity providers (via JanRain)
- Once the user is logged in it will use SignalR in a trusted subsystem (i.e. trusting the cookie set on login)
- The Jabbr code is very clean and well structured!
In this scenario we needed non-intrusive, easy to integrate and minimum footprint code so that we don’t break things and adapt to whatever structure the application already have.
Less complexity, less footprint, less intrusive
Sometimes frameworks hide complexity away and leave us developers in hard to debug and extend systems. So we thought of doing this WIF integration using the least common denominator approach that everyone could understand.
We’ve spent some time packaging that in a seamless experience using NuGet.
Install-Package Auth10.AspNet.SimpleConfigThe NuGet package will add the following settings to
<appSettings><add key="fedauth.identityProviderUrl" value="https://auth10-preview.accesscontrol.windows.net/v2/wsfederation" /> <add key="fedauth.realm" value="urn.....ample-app" /> <add key="fedauth.replyUrl" value="" /> <add key="fedauth.certThumbprint" value="B538E6F6....B529F716" /> <add key="fedauth.requireSsl" value="true" /> <add key="fedauth.enableManualRedirect" value="false" />WIF SDK provides the Add STS reference wizard, we provide an equivalent to that in a form of a NuGet CmdLet. From the NuGet Package Manager console run the following:
Set-FederationParametersFromWindowsAzureActiveDirectory
		-realm urn...ample-app
		-serviceNamespace auth10-preview
That CmdLet will read the FederationMetadata and will fill the values of the configuration settings. We also provide a more generic CmdLet:
Set-FederationParametersFromFederationMetadataUrlandSet-FederationParametersFromFederationMetadataFileThe NuGet will also inject a slightly customized version of the WIF modules using App_Start WebActivator (or if it’s NET 3.5 the NuGet will add them under
<httpModules>).public static void PreAppStart() { DynamicModuleUtility.RegisterModule(typeof(CustomWSFederationAuthenticationModule)); DynamicModuleUtility.RegisterModule(typeof(CustomSessionAuthenticationModule)); }It will add the request validator that will allow tokens to be posted to the application.
<httpRuntime requestValidationMode="2.0"
			 requestValidationType="$rootnamespace$.FederatedIdentity.Infrastructure.AllowTokenPostRequestValidator" />
It will set the authentication mode to none and deny access to anonymous users. This is protecting the whole site but can be changed to use
[Authorize]attribute on MVC or another authorization mechanism.<authentication mode="None"> <authorization> <deny users="?" /> </authorization>It will add a static helper class with a few methods to allow triggering the login process programmatically instead of relying on the modules. It also provides the logoff methods that makes more explicit the logoff implementation.
FederatedIdentityHelper.LogOn([issuer], [realm], [homeRealm])

FederatedIdentityHelper.LogOff();

FederatedIdentityHelper.FederatedLogOff(idpSignoutUrl, [replyUrl]);
Adding an identity provider selector
Another thing we’ve extracted from this experience is the concept of the identity selector. If you run the following NuGet, it will add to your application a small JavaScript component that will query Windows Azure Active Directory and build a list of identity providers that are configured for your application.
Install-Package Auth10.AspNet.SimpleConfig.WindowsAzureAD.IdentitySelectorThis NuGet provides a small snippet that you can add wherever you want in your app to show the selector.
<script src="/Scripts/waad.selector.js" type="text/javascript"></script>
<script type="text/javascript">
    $("#logon").click(function () {
        window.waadSelector('auth10-preview',
                            'urn.....ample-app',
                            $("#identityProviderSelector"));

        // use jQuery UI to show the modal dialog (or any other javascript library)
        $("#identityProviderSelector").dialog({ modal: true });
        return false;
    });
</script>
The markup generated by the selector looks like this. We are generating CSS class with the pattern “selector-identityProvider” so that you could customize with a logo using CSS background-url for instance.
<div id="identityProviderSelector">
	<ul>
		<li>
			<a href="https://www.google.com/...."
				alt="Login with Google"
				class="selector-Google">Google</a>
		</li>
		<li>
			<a href="https://..."
				alt="Login with Contoso AD"
				class="selector-Contoso-AD">Contoso AD</a>
		</li>
	</ul>
</div>
This is a screenshot from the screencast showing the selector. This is using jQuery UI and a simple ul/li but you could customize it the way you want (like we did on https://auth10.com/account/logon).
Conclusion
Auth10 mission is to democratize federated identity, making it simpler and easier. We know the only way to do that is by helping you, developers, providing the less intrusive, transparent and clean integrations. Go ahead and try the NuGet packages and the Auth10 dashboard. Plaese let us know what you think and how can we help you.


Haishi Bai (@HaishiBai2010) suggested that you Get Started with Windows Azure Active Directory (Developer Preview) in a 7/19/2012 post:
Guide: Greetings! Just like going to most tourist attractions where you can get a bunch of brochures to read about historical contexts, cultural significance, and ticket prices etc., here’s a list of online resources (with no particular order) I recommend reading if you want to gain deeper understanding of the topic. Read them, then come back to continue with the free tour.
- Kim Cameron: Identity Management as a Service
- John Shewchuk: Reimaging Active Directory for the Social Enterprise (Part 1), (Part 2)
- Stuart Kwan: A Lap Around Windows Azure Active Directory (TechEd US 2012 session recording)
- Edward Wu: Directory Graph API: Drill Down (TechEd US 2012 session recording)
- Vittorio Bertocci: Single Sign On with Windows Azure Active Directory: a Deep Dive (where I stole some contents that you’ll see in the guided tour part)
What is Windows Azure Active Directory and why you need it
Windows Azure Active Directory is Active Directory as a service. The concept is simple - if you chose to, Microsoft will keep your organization’s Active Directory running in the cloud so it’s highly scalable and highly available, without you needing to worry about maintaining the infrastructure. Now, the question is, why would you choose to host your Active Directory on Windows Azure? From IT’s perspective, cost, scalability and availability are very good reasons to switch to Windows Azure Active Directory. For application designers and architects, it’s important to realize how Windows Azure Active Directory can improve your Software Relevancy. First, nowadays services and applications are consumed in various contexts and users expect consistent experience no matter if they are on corporate network or in public Internet. Second, as users consume more and more services from different providers, they need SSO experience so they can move among services freely and, further more, orchestrate the services for business needs. Both requirements call for a mechanism for users to carry the concept of “me” around the world, not just within corporate networks. While your applications and services are used in a much wider scope, it’s utterly important to make user identities adapted for the wild so that your software can remain relevant to the users.
Key differences in programming model (comparing to traditional LDAP programming)
Guide: Before I became a tour guide I was a programmer who happened to work with digital identities and WIF for several years. Here’s a list of things I want to call out for you developers (or us developers – I’m a bit confused if I can still call myself a developer. It there a once-a-developer-always-a-developer thing?)
- Instead of LDAP, you use RESTful API (Called Directory Graph API) and OData 3.0 for advanced query scenarios. Yep. No LDAP.
- Use OAuth 2.0 for authentication when you access your directory. Yep. No Kerbero.
- Your application needs to be “registered” to your Windows Azure Directory tenant to gain access to it – this is a common practice accessing protected services. You do this by creating Service Principles – see the next section for details.
Limitations of preview environment
Guide: Last warning - this is a previewed area. Many moving parts that could change over time. Enter at your own risk!
- Read access to Directory Graph API only.
- Admin access only. You either have access to everything or nothing. There’s no fine-granularity control.
- No production SLA.
- Interfaces may change.
Part I: Create a new Service Principal
- First, you have to become a valid Office 365 tenant. You can go to this page to get a 30-day free trail (you can pick either Small business plan or Midsize business and enterprise plan). When you do this, Microsoft automatically creates a new Windows Azure Active Directory that is associated with your Office 365 account. After you’ve got your free trail, explore the Office 365 page to try out features such as creating users and groups, assigning users to roles, as well as creating online Office documents.
- Second, you need to create a Service Principle that applications can use to authenticate themselves with when they try to access your directory. To do this, you need to get Office 365 cmdlets, which can be downloaded here. Follow instructions on the page to complete installation (you need both Sign-In Assistant and the PowerShell cmdlets).
- Open a PowerShell window, and import required modules:
import-module MSOnlineExtended import-module MSOnline- Connect to your Office 365 tenant. When you issue the following command, you’ll be prompted with a logon window. Enter the administrator credential you used when creating your Office 365 tenant (such as admin@xxx.onmicrosoft.com and password):
Connect-MsolService- Create a new Service Principle (you need to replay all {} parameters – see screenshot below for an example. If you are curious about the syntax of –ServicePrincipalName parameter, refer to Vittorio’s post):
New-MsolServicePrincipal -ServicePrincipalName @("{Principle Name}/localhost") -AppPrincipalID "{A GUID}" -DisplayName "{Display Name}" -Type Symmetric -Usage Verify -StartDate "{Start Date}" -EndDate "{End Date}"- The command should complete with a symmetric key (blurred out in the following picture) :

- Now setup the authentication reply-to Url for your application (replace highlighted parts to match with your environment):
$replyUrl = New-MsolServicePrincipalAddresses -Address "https://localhost/HelloWAAD"
Set-MsolServicePrincipal -AppPrincipalId "{AppPrincipalId from above result}" -Addresses $replyUrl
Part II: Hello World
Now it’s time to write some code! Here’s I’ll just provide step-by-step guides of writing a simple ASP.Net MVC 4 app that uses Windows Azure Active Directory as Identity Provider. I won’t bother to repeat why certain things have to be done – please read Vittorio’s wonderful post for detailed explanations.
- Open your browser and navigate to https://accounts.accesscontrol.windows.net/FederationMetadata/2007-06/FederationMetadata.xml?realm={your domain, for example haishi1.onmicrosoft.com}. This is where we get ws-Federation metadata. We also need the entityID, which is the part after @ of property entityID of root element - this is your tenant id.

- Start Visual Studio 2012 as an administrator.
- Create a new ASP.Net MVC 4 Web Application using Empty template.
- Change your project setting so the application is hosted at Url: https://localhost/HelloWAAD/. Create the virtual directory if necessary. Note your IIS need to have SSL enabled.
- Add a new HomeController using EmptyMVCController template.
- Add a new Home\Index.cshtml view without a layout page.
- Add a STS reference. Enter metadata address as what’s in step 1, and enter application realm in the format of spn:<service principle id>@<tenant id>. Complete the WIF configuration following the wizard.
- Modify web.config file to turn off client-side certificate validation by adding the following element to <system.identityModel>. We need to do this on the preview environment to ignore certificate validations. This should not be necessary (and essentially wrong) in production environment:
<certificateValidation certificateValidationMode="None" />- If you run the application now, you’ll be redirected to Office 365 login page (this will change in production environment). Once you logged in, you’ll be redirected back to the exciting empty home view. Now let’s add some stuff to it. Add the following code to display all the claim values WIF prepares for us using the security token:
var identity = (ClaimsIdentity)User.Identity; Response.Write("<table border='1'>"); foreach (var claim in identity.Claims) { Response.Write("<tr><td>" + claim.Type + "</td><td>" + claim.Value + "</td></tr>"); } Response.Write("</table>"); return View();- Run the application again you should see an output similar to this:

Summary
In this tutorial we provisioned a new Office 365 tenant, and we created a new ASP.Net MVC application that used Windows Azure Active Directory as its Identity Provider. By the time this post is written, there are other great samples already available. You can read more from the preview announcement post. Thank you and see you next time!


For a longer and more detailed guide to Windows Azure Active Directory in the Office 365 Preview, see my A Guided Tour of the Windows Azure Active Directory Developer Preview Sample Application article of 9/19/2012, as well as my A Guided Tour of the Graph API Preview’s Graph Explorer Application of the same date.
Manu Yashar-Cohen (@ManuKahn) posted Chrome Support for ACS with ADFS 2.0 Identity Provider on 7/16/2012 (missed when published):
When using Windows Azure's Access Control Service (ACS) to perform user authentication against an Active Directory Federated Service (ADFS) endpoint everything works well when using IE However, when using Chrome or Firefox the site continually prompts for credentials over and over again.
Why?
There are two options to solve this:
- Keep using IWA but turn off EPA in IIS for the website (described here)
- Turn off IWA in favor of Forms-based Authentication (described here)

<Return to section navigation list>
Windows Azure Virtual Machines, Virtual Networks, Web Sites, Connect, RDP and CDN
No significant articles today.
<Return to section navigation list>
Live Windows Azure Apps, APIs, Tools and Test Harnesses
• Brady Gaster (@bradygaster) posted Cloud Cover Shorts Episode 3 - Sage to Channel9 on 7/20/2012:
Cloud Cover Shorts are a new series from the cloud cover show. These videos will generally be 10 to 15 minute interviews with Windows Azure customers.
In this episode, niner Brady Gaster [pictured at right] interviews Lead Architect, Chad Busche from Sage to discuss the company's hybrid cloud solution, Sage Construction Anywhere. The organization chose Windows Azure due to the security features and fast deployment timeframe among other reasons. Tune in to see the full video and find out more.

Previous Cloud Cover Shorts (6/7/2012):
- Cloud Cover Shorts Episode 1 - Telvent
- Cloud Cover Shorts Episode 2 - ABBYY (Russian language video with English subtitles)
Infusion Development (@InfusionTweets) introduced on 7/19/2012 their 00:02:01 Personif video casting/audition service, which runs on Windows Azure:
Infusion won Microsoft Cloud Partner of the Year 2012 for our Personif Platform
Gianugo Rabellino (@gianugo) reported More of Microsoft’s App Development Tools Goes Open Source in a 7/19/2012 post:
Today marks a milestone since we launched Microsoft Open Technologies, Inc. (MS Open Tech) as we undertake some important open source projects. We’re excited to share the news that MS Open Tech will be open sourcing the Entity Framework (EF), a database mapping tool useful for application development in the .NET Framework. EF will join the other open source components of Microsoft’s dev tools – MVC, Web API, and Web Pages with Razor Syntax – on CodePlex to help increase the development transparency of this project.
MS Open Tech will serve as an accelerator for these projects by working with the open source communities through our new MS Open Tech CodePlex landing page. Together, we will help build out its source code until shipment of the next product version.
This will enable everyone in the community to monitor and provide feedback on code check-ins, bug-fixes, new feature development, and build and test the products on a daily basis using the most up-to-date version of the source code.
The newly opened EF will, for the first time, allow developers outside Microsoft to submit patches and code contributions that the MS Open Tech development team will review for potential inclusion in the products.
We were happy to see the welcoming response when Scott Guthrie announced a similar open development approach with ASP.NET MVC4 and Web API in March. He said they have found it to be a great way to build an even tighter feedback loop with developers – and ultimately deliver even better products as a result. Check out what Scott has to say about this new EF news on his blog today.
Together, this news further demonstrates how we want to enable our growing community of developers to build great applications. Take a look at the projects you’ll find on CodePlex:
- Entity Framework – The ADO.NET Entity Framework is a widely adopted Object/Relational Mapping (ORM) framework that enables developers to work with relational data as domain-specific objects, eliminating the need for most of the data access plumbing code that developers usually need to write
- ASP.net MVC 4 – this is the newest release of the ASP.net MVC (Model-View-Controller) framework. It is a web framework applying the MVC pattern to build web sites that separate data, presentation and actions.
- Web API – this is a framework that augments ASP.net MVC to expose easily XML and JSON APIs consumable by websites or mobile devices. You can view it as a special model that instead of returning HTML (views) returns JSON or XML (data)
- Web Pages/ Razor version 2, i.e. a view engine for MVC. It is a way to mix HTML and server code so that you can bind HTML pages to code and data.
We are proud to have created an engineering culture for open development through the people that work at MS Open Tech. We’ve grown into an innovative hub where engineers assemble to build, accept and contribute to open source projects. Today we profiled our new MS Open Tech Hub where engineering teams across Microsoft may be temporarily assigned to MS Open Tech to participate in the Hub, where they will collaborate with the community, work with the MS Open Tech full time employees contribute to MS Open Tech projects, and create open source engineering best practices. Read more about our Hub on our Port 25 blog and meet the team working on the Entity Framework, MVC, Web API, and Web Pages with Razor Syntax projects at MS Open Tech. We’re nimble and we have a lot of fun in the process.
Gianugo Rabellino
Senior Director Open Source Communities
Microsoft Open Technologies, Inc.
A subsidiary of Microsoft Corporation

David Gristwood (@ScroffTheBad) reported MLS Using Windows Azure in Education in a 7/17/2012 post:
MLS is the largest supplier of library automation software to schools and colleges in the UK, and their software is key to helping drive up literacy rates by proving engaging software that is fun to use and helps captures a child’s imagination.
Check out the short video to discover why they have moved the latest version of their software to the cloud and in particular, why they chose Windows Azure to help them scale up and down to meet demand, provide data redundancy and save them money.


<Return to section navigation list>
Visual Studio LightSwitch and Entity Framework 4.1+
• Michael Simons described Enhancements in Visual Studio 2012 for Sorting Data across Relationships (Michael Simons) in a 7/17/2012 post to the Visual Studio LightSwitch blog:
Sorting data across relationships is often required when building applications within LightSwitch. For example, suppose you are building a LightSwitch application that attaches to the Category and Product tables from the Northwind database.
You can probably imagine applications in which you would want to display products and have them sorted by their associated Category’s CategoryName. Within this blog post I will show you how this can be done with Visual Studio LightSwitch 2011 and how much easier it is to do with LightSwitch in Visual Studio 2012.
Visual Studio LightSwitch 2011
Suppose you want to create an editable grid screen that shows all of the Products sorted by the associated Category’s CategoryName then by the ProductName. In order to accomplish this, you would think you could simply create a grid based on the Products EntitySet, and then within the Products screen query define a sort on both the Category.CategoryName as well as the ProductName. Unfortunately this is not possible within Visual Studio LightSwitch 2011 because the query designer does not support defining sorts across relationships.

Notice Category is absent within the field picker control of the query designer.In order to define this sort you would need to create a modeled server query and write custom code within the query’s PreprocessQuery interception method. You would then base your editable grid screen on this modeled server query.
C#
partial void ProductsByCategory_PreprocessQuery(ref IQueryable<Product> query)
{
    query = query.OrderBy(p => p.Category.CategoryName).ThenBy(p => p.ProductName);
}
VB
Private Sub ProductsByCategory_PreprocessQuery(ByRef query As System.Linq.IQueryable(Of LightSwitchApplication.Product))
    query = From p In query
            Order By p.Category.CategoryName, p.ProductName
End Sub
Now when you run this application and open this screen, you may notice that LightSwitch by default provides functionality that allows the end users to click on the column headers in order to define their own sorts. This functionality is not enabled for all columns however. For example, LightSwitch does not allow a user to define a sort on columns bound to computed properties or columns bound to an associated entity. In this case that means the end user will not be able to sort on the Category column which displays the Summary Property of the associated Category entity. The column’s tooltip as shown below will indicate whether or not it can be sorted.
LightSwitch in Visual Studio 2012
Within Visual Studio 2012 sorting on data across relationships is a lot easier. The query designer now supports defining sorts across reference relationships. This avoids having to write custom code.
Additionally if a reference property is displayed on a screen, the end user will be able to sort on it. When the user clicks the column header, the data will be sorted on the summary property for the associated entity. This is only supported if the summary property is something that LightSwitch considers sortable (i.e. it is not a computed, binary, or virtual reference property).

Notice the end user has clicked on the Category column header to sort the data by the Category’s CategoryName.Conclusion
With LightSwitch in Visual Studio 2012 sorting across relationships has been expanded. It’s now a lot easier to set up and provides more functionality to the end user.


Kostas Christodoulou (@kchristo71) continued his series with Just Visiting or (not so) Simple Extension Methods (part 4) on 7/13/2012 (missed when published):
One of my favorite design patterns since the age of c++ is the Visitor Pattern. I will not explain here what the visitor pattern is. But, if you know how to use the design pattern this is a post worth reading.
One may ask what the visitor pattern has to do with LightSwitch. Well, it doesn’t! I mean not exclusively. But the code below provides a full visitor pattern implementation background that can also be used in LS. Also, a part of the implementation is ideal for LS, since one of the challenges I had to face, when trying to widely use the visitor pattern, was make it work for “sealed” classes, classes that were not written by me and could not easily fit to my –reflection based- visitor pattern implementation. To solve this the best thing I could think of was “wrapping”. And working with LS, most of the classes (apart from the ones that belong to the domain/datasource) are actually “sealed” in the way described above.(I have to note here that this reflection-based implementation is a revision of an implementation I found (if I recall correct) in CodeProject).
First the two basic interfaces that have to be defined:
The IVisitor interface that has to be implemented by the “worker” (or helper to follow the VB-oriented naming of the LS Team) class.
public interface IVisitor
{
  void VisitDefault(IVisitorTarget source);
}
Then the IVisitorTarget interface (implied above) that has to be implemented by the class to be “consumed/visited” by the Visitor.public interface IVisitorTarget { void Accept(IVisitor visitor); }
Ok, I know, nothing much up to now. But as I say “The longest journey starts with the first step”…(yes I am an old Chinese philosopher)
To have your visitor pattern in place you need an extension method to do the trick:public static bool ConcreteVisit(this IVisitorTarget target, IVisitor visitor) { Type[] types = new Type[] { target.GetType() }; MethodInfo mi = visitor.GetType().GetMethod("Visit", types); if (mi == null) return false; mi.Invoke(visitor, new object[] { target }); return true; }
Now that these pieces are in place let’s say we have a class called DisplayNameBuilder that implements the IVisitor interface. Also, let’s say we have a Customer entity in our datasource and we want it to implement the IVisitorTarget interface. All we have to do is open Customer entity in the designer, click Write Code and change the class declaration to:public partial class Model : IVisitorTarget
make sure you are using the namespace of the class where the above extension method is implemented and implement the IVisitorTarget interface like this:#region IVisitorTarget Members public void Accept(IVisitor visitor) { if (!this.ConcreteVisit(visitor)) visitor.VisitDefault(this); } #endregion
Also this is a sample implementation of the DisplayNameBuilder class:public class DisplayNameBuilder : IVisitor { public string Name{ get; private set; } public void VisitDefault(IVisitorTarget visitorTarget){ Name = visitorTarget.ToString(); } public void Visit(Customer visitorTarget){ Name = string.Format("{0}{1}{2}", visitorTarget.FirstName, string.IsNullOrWhiteSpace(visitorTarget.FirstName) ? "", " ", visitorTarget.LastName); } }
In the above code please note these:
- The code was written in Live Writer as it’s demo code, so maybe it does not compile as is.
- The customer is implied to have a nullable FirstName property and a not nullable LastName (which I believe it’s a fair assumption and I agree with me).
- The implementation, as obvious, is domain aware as it knows what Customer is. This implies that the ideal place for this class to live is in the Common project.
Now lets say you create a calculated string field in Customer entity called hmmmmm… DisplayName (surprised? It’s a gift I have regarding giving original names). This would be the code that would implement the calculation of DisplayName property:partial void DisplayName_Compute(ref string result) { DisplayNameBuilder builder = new DisplayNameBuilder(); this.Accept(builder); result = builder.Name; }
I HAVE to stress one more time that the code is for demonstration purposes only. It’s not just you, it IS too much fuss for nothing.
Ok, now it should be easier to understand the problem of using the visitor pattern with pre-defined classes. You cannot add the IVisitorTarget behavior to most of the classes, automatically generated by LS.
So this is the solution to the problem.public class IVisitorWrapper<TObjectType> : IVisitorTarget { public TObjectType Content { get; set; } #region IVisitorTarget Members public void Accept(IVisitor visitor) { if (!this.ConcreteVisit(this, visitor)) if (!this.VisitWrapper(this, visitor)) visitor.VisitDefault(this); } #endregion }
This is a wrapper class (one could say it is an IVisitorTarget decorator). If you are still with me and you keep on reading the code you have already noticed that VisitWrapper extension method is not yet defined, so this is it:public static bool VisitWrapper<TObjectType>(this IVisitorWrapper<TObjectType> wrapper, IVisitor visitor) { Type[] types = new Type[] { typeof(TObjectType) }; MethodInfo mi = visitor.GetType().GetMethod("Visit", types); if (mi == null) return false; mi.Invoke(visitor, new object[] { wrapper.Content }); return true; }
Now you can wrap any type of object and use the DisplayNameBuilder to build it’s display name. Also (as –I hope- you guessed) you have to implement the respective Visit method in DisplayNameBuilder in order not go get the type name back as Name.

Return to section navigation list>
Windows Azure Infrastructure and DevOps
• Himanshu Singh (@himanshuks, pictured below) posted How to Assess Costs of using Windows Azure for your Applications on 7/19/2012:
Editor’s Note: Today’s post comes from Sidney Higa, Principal Programming Writer in our Customer Experience team. This post provides an overview of a very useful paper about assessing costs associated with using Windows Azure for your applications.
Are you new to Windows Azure, and someone has asked you to plan and develop an application? "Sure," you reply, "no problem." And, by the way, can you figure out how much it will cost to run, on a monthly basis? That last bit might make take some thinking, especially for someone not familiar with WindowsAzure. But here's one way to approach the problem. We have created a paper, Windows Azure Cost Assessment, which gives you a good starting point. It features a framework and guidance gathered from customers who have already encountered the same situation.
A Solid Starting Point
- Standard Scalable Web Application with Storage
- Hybrid On-Premises Application Using Windows Azure Storage and SQL Database
- Background Processing Application
- Scalable Web Application With Scalable Background Processing
- Scalable Hybrid Web Application
The architectures show basic configurations of worker roles used in a basic scenario—like running an online storefront and catalog. These architectures are also extensible to accommodate more complex variations. The point is that you can choose one, and start to calculate how many Compute roles you will need to create your basic application. If you already know how much data resources you will require, you can also plug in that data into the model.
More Info
Given a basic architecture and your own implementation, the paper lists ideas, caveats, and strategies to be aware of as you plan and develop. For example, the basics of capacity planning are given with parameters unique to Windows Azure, such as auto-scaling of worker roles, or testing of low and high usage scenarios, or building-in minimal diagnostic and tracing counters to be used when auto-scaling. (You can only auto-scale effectively if you have some metrics to gauge with.)
With the basic information here, you will have a better grasp on what can seem like a daunting task. And we hope you won’t reach for an aspirin when asked “how much will it cost?”
Check out the paper here.

David Linthicum (@DavidLinthicum) stated “But Department of Defense's cloud plan could be at risk if it continues to rely on the same old IT contractors” in a deck for his article of 7/20/2012 for InfoWorld’s Cloud Computing blog:
The Department of Defense has released a cloud computing strategy that will move the organization's current applications from a "duplicative, cumbersome, and costly set of application silos to an end state designed to create a more agile, secure, and cost-effective service environment that can rapidly respond to changing mission needs." To move this effort along, the Defense Information Systems Agency (DISA) has been named as the "enterprise cloud service broker" to help maintain mission assurance and information interoperability.
I spent several days reading through the documents, which I found to be insightful and the basis of a sound plan. Now all we need is solid execution.
The DoD has identified four concurrent steps that enable a phased implementation of the DoD Enterprise Cloud Environment:
- Foster adoption of cloud computing
- Optimize data center consolidation
- Establish the DoD enterprise cloud infrastructure
- Deliver cloud services
This plan describes a defined transformation strategy that takes the DoD from its current state, preps the department for cloud computing, then concludes when DoD information systems can finally take advantage of public and private cloud computing providers or technology.
The plan is a very good start, but it also requires expert execution. I'm optimistic about the DoD's movement to the cloud, and I believe great benefits will follow. However, there's a danger that most of the procurement for the transition will go to the same companies DoD has long used for its IT -- and they may not have the same view toward the use of cloud computing.
The risk is that traditional contractors will talk up cloud computing and profess their support of the DoD's cloud strategies. But in practice, they'll implement the plan with old-fashioned technologies, perhaps labeling them "private clouds" to confuse the issue. In 10 years, the landscape could look the same, with the exact inefficiencies the DoD has today.
I hope DISA takes a governance role in moving this strategy forward, including monitoring progress over time. Moreover, I hope it brings in some of the more innovative cloud minds to jump on the right track from the get-go.

James Staten (@staten7) asked Are you opportunistic or strategic with your cloud investments? in a 7/18/2012 post to his Forrester Research blog:
Our latest survey on IT budgets and priorities shows that 35 percent of enterprises have a big focus on cloud computing (calling it a high or critical priority), but do we really know how best to apply that investment?
We continue to see a large disconnect between what the business wants from cloud services and what the IT department wants to offer and support. The short story is the business wants public cloud services (or something very, very close to this value proposition) for delivering new services and capabilities to market. Yet IT wants to offer private cloud solutions that improve operational efficiency and drive down overall IT costs. IT doesn't have its head in the sand about business' demands, they just have to balance these desires against what IT is measured on - the cost and security of services provided. And frankly they don't trust the public cloud.
Knowing the psychology above, how best can an enterprise set a winning cloud strategy? if it invests purely against the business care-abouts it may win time to market but risks investing ahead of its ability to support and protect the business. If it invests against the IT priorities it risks alienating the business, increasing circumvention and being a laggard competitively. The answer lies in striking an appropriate balance between these conflicting priorities and choosing a strategy that encourages the most collaboration between business and IT and accelerating everyone's experience level with these new technologies. And that balance will be different for every firm based on their competitive market, regulatory environment and geography. But in general, most enterprises are being far more conservative than they should.

Tim Huckaby (@TimHuckaby, pictured below) Interviews Brian Harry in Bytes by MSDN July 17: Brian Harry of 9/17/2012 (missed when published):
Join Tim Huckaby, Founder of InterKnowlogy and Actus Interactive Software, and Brian Harry, Technical Fellow for Microsoft, as they discuss Team Foundation Server (TFS), Cloud, Window Azure and Visual Studio. Brian talks about bringing TFS to cloud services and his favorite features. Find out how you can use Windows Azure to set up a new build and the cadence of feature releases. Great interview with the father of Visual SourceSafe!

David Linthicum (@DavidLinthicum) asserted “Enterprise IT has a disturbing tendency to get excited about technology rather than architecture and planning” in a deck for his Think through your cloud plans -- or else article of 7/17/2012 for InfoWorld’s Cloud Computing blog:
Most enterprise IT organizations focus more on technology than on thinking -- a sad tendency I've often pointed out. Thus, I was happy to see InfoQ's Mark Little review an article by Steve Jones of CapGemini. Both see the same lack of thought in how enterprises use technology. In fact, it's worse than not thinking -- there's an active dislike of deeper consideration that gets expressed as ignoring or even disparaging planning, architecture, and design in IT.
This sorry state is quite evident as cloud computing begins to take hold in the standard IT technology arsenal. The fact of the matter is that there are two worlds. One involves the hype and good feelings about next-gen IT, such as cloud computing, that tells us the technology itself will save us from the mistakes of the past. Then there's the world of planning, architecture, and design that makes the technology actually useful -- despite IT's aversion to this crucial stage.
Ironically, the past mistakes that the new technology will supposedly solve were largely caused by a lack of planning, architecture, and design -- it's that same naive tendency to chase after the latest hyped technology. PCs, client/server, distributed objects, ERP, and so on all offered new ways to do old things. But the lack of thinking around how to use these technologies effectively led to more complexity and less efficiency -- the opposite of the quick-fix magic we imagined.
This problem is not the fault of the hyped technology, nor of those who build and sell it. In many cases, the hyped technology works. Cloud computing is no exception. No, the blame lies with us in IT for succumbing to that magical thinking and the belief that new technology will wipe away our past problems and create a fantasy land of goodness. Funny enough, many in IT criticize users for the same thinking when they fall in love with iPhones, the latest version of Windows, or whatever new technology has gained their attention.
The core issue in IT is that the use of best practices such as architecture and design, which typically ensure success, are largely considered roadblocks as we run from one technology to another. Sadly, despite IT's common view of design and architecture as hindrances to productivity, they result in the exact opposite: better productivity and usage.
I suspect many IT professionals agree with me on this issue, but they're afraid to speak up, given the prevailing anti-intellectual culture. We'll see -- as we have with past "miracle" technologies -- many cloud computing projects on downward trajectories due to the lack of architecture and design. Many of these failed projects will end up back at the drawing board -- where they should've started in the first place.

<Return to section navigation list>
Windows Azure Platform Appliance (WAPA), Hyper-V and Private/Hybrid Clouds
Kristian Nese (@KristianNese) began a series with Introducing Windows Azure Services for Windows Server - Part 1 on 7/19/2012:
I had my first weeks of vacation for the first time in two years this summer.
And did I use my vacation well? It really depends. Of course, I had some amazing days with my son, playing around and do all the normal summer activity you would expect and also introduced him to the great world of Pink Floyd, mainly focusing on the “The Wall” album J
But of course, during the World Partner Conference in Toronto, Microsoft announced some news.
I had to pay close attention to this since I mainly work with the typical datacenter customers and partners, in other words: hosters and those organizations who`s adopting cloud computing.
“Bringing Windows Azure Services to Windows Server for Hosting Providers”.
Yes, they announced a very interesting project that will open some new doors for the service providers. With the SPF as part of the upcoming SP 1 release for System Center, this will lay the foundation for a very interesting year.
To get an overview of the announcement, the following will be available:
- Web Sites
- Virtual Machines
- Service Management Portal and API
Web Sites: Early in June, Microsoft announced several news related to their public cloud offerings through Windows Azure. The Web Sites functionality in “Windows Azure Services for Hosting Providers” use the same software as in Windows Azure. This is a shared web site hosting where you can easily scale up and down, as well as create reserved web sites. Quite interesting if you are considering to offer web hosting, or already does.
Virtual Machines: Is based on System Center (SPF) and Windows Server, providing APIs to VMM 2012 SP1 for the creation, updates and deletion of virtual machines. VMM is probably the most critical part in the private cloud environment and is essential to deliver IaaS.
Service Management Portal and API: Gives you an UI for both tenant and admin on Windows Server. Again, the same as in the new Windows Azure portal that was announced early in June. It`s based on IIS and the UI is created in HTML and is extensible and customizable for your own demands. The API uses a DB and provides services to tenants. Take a look at Apprenda that already has existing solutions based on this: http://apprenda.com
This will be brought to Windows Server (2012) and enables Hosting Service Providers to deliver Infrastructure as a Service and website hosting – in the same way as Windows Azure!
Before we`ll take a closer look at the “Windows Azure Services for Hosting Providers”, we will have to start with System Center 2012 – Service Provider Foundation, since this is a critical component in this architecture.
Service Provider Foundation (SPF) is currently available as a Community Technology Preview (2) and work together with System Center 2012 – Virtual Machine Manager SP1 CTP2.
SPF will expose the infrastructure of Virtual Machine Manager through a rich set of web services (supports REST-based requests using OData protocol) and gives you the ability to create, update and delete virtual machines (handled these requests through Powershell scripts) since SPF acts as an intermediary between web-based administration for client and server applications.
Question 1: When is SPF useful?
SPF is useful for service providers to offer IaaS to their customers, especially when they have already existing solutions like an in-house developed front-end portal, where their customers can interact. This means that SPF will allow the customers to access resources in the Service Provider Cloud (using this term to differ from Private and Public Cloud) without any changes to the existing solution.
The SPF uses a database for aggregation of tenant resources, and is managed with Powershell and Runbooks in Orchestrator.
Question 2: What if we don’t have any existing portal; can we still take advantage of SPF?
Consider SPF as a “cloud connection string”, which enable tenants to access cloud resources through a self-service portal. This means that System Center App Controller will be able to connect to SPF, letting the tenants create and deploy virtual machines and services in the Service Provider Cloud.
Also, if the tenants also have their own Private Cloud and a subscription in Windows Azure, they can deploy virtual machines and services in all those clouds by using their internal App Controller.
Examples of scenarios here is when they have reached their capacity in their Private Cloud, and also the limit on one of their Azure subscriptions. Instead of creating another Azure subscription and purchase hardware for their Private Cloud, they can scale out to the Service Provider Cloud – which may be closer to the tenants than one of Azure`s datacenters.
Question 3: As a Service Provider, what do we need in the backend and how is this interacting with SPF and “Windows Azure Services for Windows Server”?
If you are already familiar with System Center Virtual Machine Manager, you know that the Fabric must be prepared and available to function as foundation to deliver cloud services. Fabric includes hypervisors, storage and networking to host services and virtual machines.
Also, we will be introduced to something called Stamp, which represents a set of hardware for scaling the capacity in the datacenter and is allocated into groups, and assigned to tenants.
A tenant, which is a consumer of services from a service provider, will be accessing the portal (web site) where they can create and manage their own virtual machines and services, assigned to their user roles. The user roles will be a combination of a profile and scope that defines allowed actions and permissions to resources
SPF let the Service Provider present a seamless user experience to the tenants by using the SPF APIs to access the data, and is presented through the “Windows Azure Services for Windows Server” portal.
The Service Provider Foundation in System Center 2012 SP1 can be considered as a cloud gateway enabling tenants to access cloud resources through a self-service portal, and is requirement for the “Windows Azure Services for Windows Server”.
Windows Azure Services for Windows Server.
If we’re thinking of strategy, this a major enhancement In Microsoft`s way to deliver cloud services with a seamless experience, no matter where the services and virtual machines are running.
The Service Management API is meant for the service provider to offer services to tenants in a consistent way letting them subscribe to “plans” (service offerings). All this is delivered through the service management portal with the same metro-style that runs in Windows Azure, so that tenants can create and deploy services, VMs and also websites.
Both the portal and API are extensible and can be customized. Again, take a look at Apprenda ( http://apprenda.com ) if you`re looking for a good example.
Here`s an high-level overview of the architecture, and how this would look from a tenant and service provider perspective.
I`ll provide some examples in a blog series, where I also will cover the setup in the near future.


<Return to section navigation list>
Cloud Security and Governance
Francois Lascelles (@flascelles) reported Returning from #CIS2012 on 7/20/2012:
Cloud Identity Summit was definitely worth the trip. The talks were great, the audience was great, and the venue was outstanding. Sign me up for next year in Napa.
It’s beautiful and quiet at Vail Cascade this morning. As I stepped outside, I’m pretty sure I saw SAML scurrying away in the trees. This is weird given this week’s proclamations that SAML was dead. Although we’re not rid of SAML anytime soon, I do look forward to adoption in the enterprise for the new kid on the block: OpenID Connect. Easier federation, OpenID Connect style is already common for consumer identity providers; enterprise identity providers should take note and follow suit. As a vendor of API management infrastructure, it’s up to us to enable the enterprise to better reach out to its target audience. I see support for OpenID Connect as a key component in achieving this today.
My favorite proclamation of the week goes to Patrick Harding who declared in his talk titled “The Platiformication of the Enterprise is Upon us Again and they Forgot Security (Again)” that API Tokens are going to be “the currency of the API Economy”. The management of tokens and their lifecycle is indeed a crucial component of API management. Consider the case of a mobile application consuming an Enterprise API using an OAuth token. Such tokens are associated with the API provider, the user (subscriber), the mobile application and the mobile device. Each live token is potentially associated with multiple parties and one of the challenges of API token management is to enable control of the right tokens by the right parties.


Dave Shackleford (@daveshackleford) asserted No Infosec Sacred Cows in a 7/20/2012 post:
We have sacred cows in infosec, apparently. I read a blog post by Dave Aitel about security awareness yesterday that I really enjoyed – he took a very bold stance on a topic that everyone seems to have an opinion about. His argument? Security awareness is useless. Ditch it, and spend your time and money on technologies and techniques that actually control what users can do and what can happen to them.
Is he exactly right? No, probably not. But he took a stance, and got some thought-provoking dialogue going. What was incredibly disconcerting to me, however, was the vitriol people started spewing in the comments – how DARE he propose such a thing?! I tried commenting on the post but I think CSO flagged it and didn’t let me, and I was probably being a bit acidic in my comment, as well, but for different reasons. So a few things shook out, in essence here’s what I was trying to say:
- People, don’t be LEMMINGS. I saw a lot of people who were puffing out their chests as “leaders” in the infosec space spewing garbage about “people, process, technology” like they were attached to Shon Harris’ rear-end after having a love fest with her CISSP study guide. C’mon, just because it’s one of the “10 domains” doesn’t mean you have to evangelize.
- Most security awareness programs SUCK. I would be willing to bet the majority of the awareness proselytizers on the thread are doing the same old crap with some stupid Web-based Flash thingie that people click through as fast as they can, and a little printout goes in their HR folder of whatever. UGH. That doesn’t work, never has, and never will.
- Given that most programs suck, what is wrong with a contrarian view? Start a conversation on new methods of security awareness and protection, but don’t demonize Dave (who has likely seen more overall than most posters) for having the balls to suggest that something BLATANTLY NOT WORKING for most should be canned.
I generally think security awareness is ridiculous. Sure, sure, you need that compliance checkbox that asks for it. And OK, you have to TRY, I get that, too. But sometimes, we seem to cling desperately to ancient ideals and practices in this field that just might have run their course. I’m not ready to say security awareness is one of them….yet. But we can and should try to improve it, across the board, or find something else to do instead.


Srinivasan Sundara Rajan asserted “This one-off incident should not dampen enterprise enthusiasm for a road map to hybrid computing adoption” in a deck for his Cloud Security: Five Lessons from the Yahoo Password Breach article of 7/20/2012 for Ulitzer’s Cloud Security Journal blog:
Last week one news item that attracted media attention was the hacking of some nearly 450,000 passwords from Yahoo Service called ‘Yahoo Voice'. The communications on the incident state that, SQL Injection is the primary technique adopted by hackers to get the information out of databases and publish them.
As per further communications, we find the affected company taking more precautions to ensure that security is their highest priority. These events will also generally shake the Cloud Adoption at the enterprise level, where always the Fear, Uncertainty and Doubt in the minds of CIOs may increase due to these incidents.
However the following are the best practices and guidelines that should be adopted by any enterprise when adopting hybrid cloud computing and a one-off incident should not dampen their road map to hybrid computing adoption.
In other words the incident is not really due to the adoption of Cloud or a multi-tenant model rather from not following the age-old best practices. This also indicates the significance of Cloud Brokers or intermediaries who have substantial knowledge of enterprise computing paradigm to play an increasing role in ensuring enterprises adopt cloud computing in a secure manner.
Lessons Learned In Yahoo Password Hacking
1. Not Following Security Fundamentals During Development
Whatever the changes in technology are, the fundamentals of development and coding remains the same. Most times SaaS vendors have high pressure on time-to-market, which may at times make them work around on security fundamentals, which is not correct. If you are accepting input from the user, it needs to be validated always before the input is acted upon. Lack of validation of input is the root cause behind attacks like Cross-Site Scripting or SQL Injection. In a multi tenant world the risk of SQL Injection is increased many a fold, because the hacker could always enter the system as a legitimate user by creating an valid account and then start hacking the data other customers.I have earlier elaborated about SQL Injection In SaaS in an article in 2010 itself, whose thought process is still valid when it comes to developing SaaS and multi tenant applications.
2. Not Encrypting at the Database Level
Encryption of key data is one of the most important security aspect of any database in general and a multi tenant database in particular. However most times enterprises may take the path of encrypting at the Virtual Machine or Volume level, which means the Entire Disk even if it is physically stolen will not be useful to the hacker.While this is a very useful feature such level of encryption still not useful, when the hacker legitimately gets access to the virtual machine in which the database is hosted. So additionally database level encryption which further provides encryption at the user level, i.e only users who have got READ permissions on the database can view the data, will provide an added level of security.
In my earlier article on Protecting Data At Rest In Public Clouds, I have compared the options between middle ware vs RDBMS in protecting the data. As evident a combination of both would make the multi-tenant database highly secured.
3. Exposing Too Much Metadata
How many times you have a database table storing credit card information is named as ‘CREDIT_CARD' or the password column in a user database is named as PIN or Password. While the best practices of database design in the past indicated the use of correct column names, and meta data like comments at the database level, they may act detrimental to the sensitive data in a today's world.It is always advisable to avoid too much meta data from sensitive columns and keep them as part of the supporting documentation. There is no rule which states that a CREDIT CARD information is stored in a table named temp_t1 and let your application map temp_t1 is indeed a table containing credit card information.
4. Not Using Best of Features in the Databases
Today most of the software vendors have the pressure to make their product run against multiple databases . This provides them a much wider marketing capability. While this is important from the business perspective, due to this restriction we have seen the products that are using powerful RDBMS systems as a mere data store and not utilizing their best security features. This will result in reduced security at the database level because none of the security features are really used.In my earlier article on Implementing Multi Tenancy Using Oracle Virtual Private Database, I have elaborated on how the best features like VPD in Oracle provide lot of security features so that if properly applied, some data is not visible to a user unless the application sets the appropriate context. Similarly these features can mask a certain columns to be not visible when queried directly. Also the features like fine grained auditing provide lot of auditing features against database security breaches.
Also if database level security is properly applied, we could utilize roles, grants and privileges in such a manner that the database connections get only EXECUTE privileges on the stored procedures and no direct READ access to the underlying tables, these kind of design patterns protect the data further.
This points to the fact that the product vendors should concentrate on unique security features of the databases like Oracle, Sql Server and DB2 and implement them in their design apart from the application level security. The need for porting the application to multiple databases should not reduce the security needs of the application.
5. Not Masking the Data
Masking the data is about , taking the data in the current form and convert it into a different format for storage purposes. It is slightly different from the encryption that the data is in readable form but will not make any sense if you don't know the de-masking algorithm. Traditionally masking is only done when the production data is ported to a test or development machine and also when a production data is ported to a offshore development location.However we have not seen much instances of live production instances using masking techniques to protect the security information.
What is the golden rule that states that a social security number always to be stored as a single column of 9 characters and stored contiguously, what if the same is stored in three different columns with the numbers flipped and the application reverses them and forms into a proper social security number? This is just an example, the same principle can be applied to a credit card or a password or a pin, so that only application knows how to make meaning out of a masked sensitive data and not anyone else.
Summary
As indicated in the beginning of the articles, there will be a few instances of security breaches when so much new services are delivered over the public internet in a short time. However enterprises need not worry from them as they are not issues out of the fundamental concept of Cloud or Multi Tenancy itself, but because of the way the they are implemented. Adopting the best of design patterns like DAO access pattern which abstracts the database calls from the application and doing proper validation along with the database level protection techniques explained above, will prevent these incidents in the future.


Lori MacVittie (@lmacvittie) asserted “A new operational model for security operations can dramatically reduce risk” in an introduction to her Persistent Threat Management post of 9/14/2012 (missed when published):
Examples of devops focuses a lot on provisioning and deployment configuration. Rarely mentioned is security, even though there is likely no better example of why devops is something you should be doing. That’s because aside from challenges rising from the virtual machine explosion inside the data center, there’s no other issue that better exemplifies the inability of operations to scale manually to meet demand than web application security. Attacks today are persistent and scalable thanks to rise of botnets, push-button mass attacks, and automation.
Security operations, however, continues to be hampered by manual response processes that simply do not scale fast enough to deal with these persistent threats. Tools that promise to close the operational gap between discovery and mitigation for the most part continue to rely upon manual configuration and deployment. Because of the time investment required, organizations focus on securing only the most critical of web applications, leaving others vulnerable and open to exploitation.
Two separate solutions – DAST and virtual patching – come together to offer a path to meeting this challenge head on, where it lives, in security operations. Through integration and codification of vetted mitigations, persistent threat management enables the operationalization of security operations.
A New Operational Model
DAST, according to Gartner, “locates vulnerabilities at the application layer to quickly and accurately give security team’s insight into what vulnerabilities need to be fixed and where to find them.” Well known DAST providers like WhiteHat Security and Cenzic have long expounded upon scanning early and often and on the need to address the tendency of organizations to leave applications vulnerable despite the existence of well-known mitigating solutions – both from developers and infrastructure.
Virtual patching is the process of employing a WAF-based mitigation to virtually “patch” a security vulnerability in a web application. Virtual patching takes far less time and effort than application modification, and is thus often used as a temporary mitigation that enables developers or vendors time to address the vulnerability but reduces the risk of exploitation sooner rather than later.
Virtual patching has generally been accomplished through the integration of DAST and WAF solutions. Push a button here, another one there, and voila! Application is patched.
But this process is still highly manual and has required human intervention to validate the mitigation as well as deploy it. This process does not scale well when an organization with hundreds of applications may be facing 7-12 vulnerabilities per application. Adoption of agile development methodologies have made this process more cumbersome, as releases are pushed to production more frequently, requiring scanning and patching again and again and again.
The answer is to automate the discovery and mitigation process for the 80% of vulnerabilities for which there are known, vetted mitigating policies. This relieves the pressure on security ops and allows them to effectively scale to cover all web applications rather than just those deemed critical by the business.
AGILE meets OPS
This operational model exemplifies the notion of applying agile methodologies to operations, a.k.a. devops. Continuous iterations of a well-defined process ensure better, more secure applications and free security ops to focus on the 20% of threats that cannot be addressed automatically. This enables operations to scale and provide the same (or better) level of service, something that’s increasingly difficult as the number of applications and clients that must be supported explodes.
A growing reliance on virtualization to support cloud computing as well as the proliferation of devices may make for more interesting headlines, but security processes will also benefit from operations adopting devops. An increasingly robust ecosystem of integrated solutions that enable a more agile approach to security by taking advantage of automation and best practices will be a boon to organizations struggling to keep up with the frenetic pace set by attackers.


<Return to section navigation list>
Cloud Computing Events
Michael Collier (@MichaelCollier) requested Azure Insiders to publicize the Cloud Develop 2012 event, to be held at the Ohio Union, Columbus Ohio, on 8/8/2012:
CloudDevelop is the Midwest’s premier conference for cloud technologies and application development. CloudDevelop 2012 will be held on Friday, August 3rd in Columbus, OH in The Ohio State University’s Ohio Union.
The conference is dedicated to bringing together developers and IT professionals who work with a wide variety of cloud platforms and software languages. For cloud providers and tool vendors, CloudDevelop will be the perfect place to show off your products and services.

<Return to section navigation list>
Other Cloud Computing Platforms and Services
• My (@rogerjenn) Google Compute Engine: A Viable Public Cloud Infrastructure as a Service Competitor article of 7/19/2012 for Red Gate Software’s ACloudyPlace blog begins:
The public cloud-based Infrastructure as a Service (IaaS) marketplace heated up in June 2012. Microsoft announced new Windows Azure Virtual Machines, Virtual Networks, and Web Sites as a complete IaaS package at a Meet Windows Azure street festival in San Francisco’s Mission District on June 7. Derrick Harris outed budget-priced Go Daddy Cloud Servers in a June 16 post to Giga Om’s Structure blog. Finally, Google made the expected announcement of its new Compute Engine (GCE) service at its I/O 2012 Conference on June 28. Measured by press coverage, the GCE announcement made the biggest waves. Breathless tech journalists produced articles, such as the Cloud Times’ Google Compute Engine: 5 Reasons Why This Will Change the Industry, asserting GCE would be an IaaS game changer.
Au contraire. GCE is an immature, bare bones contender in a rapidly maturing, crowded commodity market. As of mid-2012, Google Cloud Services consist of a limited GCE preview, Google Big Query (GBQ), Google Cloud Storage (GCS, launched with BigQuery in May 2010) and Google App Engine (GAE, a PaaS offering, which became available as a preview in April 2008.) Market leader Amazon Web Services (AWS), as well as Windows Azure and Go Daddy, offer Linux and Windows Server images; GCE offers only Ubuntu Linux and CentOS images.
GCE Is a Limited Access, Pay-As-You Go Beta Service
Google is on-boarding a limited number of hand-picked early adopters who must specify the project they intend to run on GCE in a signup form text box. GCE currently is targeting compute-intensive, big data projects, such as the Institute for System Biology’s Genome Explorerfeatured in I/O 2012’s Day 2 Keynote (see Figure 1).
Figure 1 Genome Explorer Demo
Google Senior Vice President of Engineering (Infrastructure), Urs Hölzle, demonstrated the Institute for System Biology’s 10,000-core graphical Genome Explorer during Google I/O 2012’s day two keynote at 00:41:11 in the video archive. A transcript of Hölzle’s GCE announcement is available here.
Google is famous for lengthy preview periods. According to Wikipedia, Gmail had a five-year incubation as a preview, emerging as a commercial product in July 2009, and App Engine exited an almost three-and-one-half-year preview period in September 2011. Microsoft’s new IaaS and related offerings also are paid Community Technical Previews (CTPs), but Windows Azure CTPs most commonly last about six months. AWS is the IaaS price setter because of its dominant market position, and both Windows Azure and GCE prices approximate AWS charges for similarly scaled features (see Table 1.) Go Daddy’s Cloud Servers are priced to compete with other Web site hosters, such as Rackspace, and aren’t considered by most IT managers to be an enterprise IaaS option.


* Windows Azure Virtual Machine prices shown above are at release (general availability); prices are discounted 33% during the preview period.
** For Geo Redundant storage (GRS); Local Redundant Storage (LRS) is $0.093 per GB*Month.
*** Egress to Google data centers in different regions pricing is for the preview only; prices will increase to Internet rates upon general availability.ǂ AWS states, “One EC2 Compute Unit provides the equivalent CPU capacity of a 1.0-1.2 GHz 2007 Opteron or 2007 Xeon processor.” Google claims their standard core delivers 2.75 Google Compute Engine Units (GQs) and implies, without stating, that one GQ equals one EC2 Compute Unit. …
Full Disclosure: I’m a paid contributor to Red Gate Software’s ACloudyPlace Website.
James Hamilton claimed I/O Performance (no longer) Sucks in the Cloud in a 7/20/2012 post:
Many workloads have high I/O rate data stores at the core. The success of the entire application is dependent upon a few servers running MySQL, Oracle, SQL Server, MongoDB, Cassandra, or some other central database.
The best design patter[n] for any highly reliable and scalable application whether on-premise or in cloud hosted, is to shard the database. You can’t be dependent upon a single server being able to scale sufficiently to hold the entire workload. Theoretically, that’s the solution and all workloads should run well on a sufficiently large fleet even if that fleet has a low individual server I/O performance. Unfortunately, few workloads scale as badly as database workloads. Even scalable systems such as MongoDB or Cassandra need to have a per-server I/O rate that meets some minimum bar to host the workload cost effectively with stable I/O performance.
The easy solution is to depend upon a hosted service like DynamoDB that can transparently scale to order 10^6 transactions per second and deliver low jitter performance. For many workloads, that is the final answer. Take the complexity of configuring and administering a scalable database and give it to a team that focuses on nothing else 24x7 and does it well.
Unfortunately, in the database world, One Size Does Not Fit All. DynamoDB is a great solution for some workloads but many workloads are written to different stores or depend upon features not offered in DynamoDB. What if you have an application written to run on sharded Oracle (or MySQL) servers and each database requires 10s of thousands of I/Os per second? For years, this has been the prototypical “difficult to host in the cloud” workload. All servers in the application are perfect for the cloud but the overall application won’t run unless the central database server can support the workload.
Consequently, these workloads have been difficult to host on the major cloud services. They are difficult to scale out to avoid needing very high single node I/O performance and they won’t yield a good customer experience unless the database has the aggregate IOPS needed.
Yesterday an ideal EC2 instance type was announced. It’s the screamer needed by these workloads. The new EC2 High I/O Instance type is a born database machine. Whether you are running Relational or NoSQL, if the workload is I/O intense and difficult to cost effectively scale-out without bound, this instance type is the solution. It will deliver a booming 120,000 4k reads per second and between 10,000 and 85,000 4k random writes per second. The new instance type:
- 60.5 GB of memory
- 35 EC2 Compute Units (8 virtual cores with 4.4 EC2 Compute Units each)
- 2 SSD-based volumes each with 1024 GB of instance storage
- 64-bit platform
- I/O Performance: 10 Gigabit Ethernet
- API name: hi1.4xlarge
If you have a difficult to host I/O intensive workload, EC2 has the answer for you. 120,000 read IOPS and 10,000 to 85,000 write IOPS for $3.10/hour Linux on demand or $3.58/hour Windows on demand. Because these I/O workloads are seldom scaled up and down in real time, the Heavy Utilization Reserved instance is a good choice where the server capacity can be reserved for $10,960 for a three year term and usage is $0.482/hour.
- Amazon EC2 detail page: http://aws.amazon.com/ec2/
- Amazon EC2 pricing page: http://aws.amazon.com/ec2/#pricing
- Amazon EC2 Instance Types: http://aws.amazon.com/ec2/instance-types/
- Amazon Web Services Blog: http://aws.typepad.com/aws/2012/07/new-high-io-ec2-instance-type-hi14xlarge.html
- Werner Vogels: http://www.allthingsdistributed.com/2012/07/high-performace-io-instance-amazon-ec2.html
Adrian Cockcroft of Netflix wrote an excellent blog on this instance type where he gave benchmarking results from Netflix: Benchmarking High Performance I/O with SSD for Cassandra on AWS.
You can now have 100k IOPS for $3.10/hour.


Werner Vogels (@werner) riffed on Expanding The Cloud – High Performance I/O Instances for Amazon EC2 in a 7/19/2012 post:
AWS customers are bringing their most demanding workloads onto the cloud. These include the likes of high performance computation, for which we introduced the Cluster Compute and Cluster GPU instance types. Customers are also bringing workloads on AWS that require dedicated and high performance IO for which we are now introducing a new Amazon EC2 instance type, the High I/O Quadruple Extra Large (hi1.4xlarge), to meet their needs.
The hi1.4xlarge has 8 cores and 60.5GB of memory. Most importantly it has 2 SSDs of 1 TB each and a 10 Gb/s Ethernet NIC that using placement groups can be directly connected to other High I/O instances.
The SSDs will give you very high IO performance: for 4k random reads you can get 120,000 IOPS when using PV and 90,000 when using HVM or Windows. Write performance on SSDs is more variable depending on, among other things, the free space the disk, the fragmentation and the type of filesystem. With PV virtualization we are seeing between 10,000 and 85,000 IOPS for 4k random writes and with HVM between 9,000 and 75,000.
With 15K RPM magnetic disks you will see a bit over a hundred IOPS at best. While disk density is still increasing the access speeds are not and as such they will provide good sequential access, however random access is not improving at all. A 3 TB disk can be read in 8 hours sequentially but it will take 31 days to read using random I/O. Magnetic disks are rapidly starting to exhibit tape-like properties and with modern workloads being increasingly random, they are becoming less and less suitable as a storage system. Even though SSDs are still more expensive from a storage point of view they are a much more cost effective solution from an iops point of view.
Databases are one particular area that for scaling can benefit tremendously from high performance I/O. The I/O requirements of database engines, regardless whether they are Relational or Non-Relation (NoSQL) DBMS’s can be very demanding. Increasingly randomized access and burst IO through aggregation put strains on any IO subsystem, physical or virtual, attached or remote. One area where we have seen this particularly culminate is in modern NoSQL DBMSs that are often the core of scalable modern web applications that exhibit a great deal of random access patterns. They require high replication factors to get to the aggregate random IO they require. Early users of these High I/O instances have been able to reduce their replication factors significantly while achieving rock solid performance and substantially reducing their cost in the process. Read the great detail of Netflix's use of these instances for their Cassandra deployment.
Earlier this year I attended a panel on “Scaling to Infinity” with the top engineers from Netflix, Facebook, Tumblr, etc. In unison they proclaimed that in all of their systems the scaling bottleneck had been the database. These bottlenecks can often be attributed to constraints in the I/O system and the challenges of providing consistent I/O performance in systems that have not been designed for high performance I/O. The fast growing popularity of Amazon DynamoDB, which provides consistent read/write performance through an I/O provisioning interface, demonstrates that if the database can be configured such that it no longer is a bottleneck, applications can become much simple, and thus more reliable and scalable.
It is my expectation that with the increase of data-centric applications we will see more and more I/O hungry systems being built that require this type of rock solid High Performance I/O that the hi1.4xlarge can give you. For more details on the new instance type see the EC2 detail page and the AWS developer blog.
(As a side note: as others have observed, using a Log Structured Filesystem, such as NILFS, can significantly improve SSD write performance)


Jeff Barr (@JeffBarr) reported Amazon CloudWatch Monitoring Scripts for Microsoft Windows in a 7/19/2012 post:
A number of AWS services collect and then report various metrics to Amazon CloudWatch. The metrics are stored for two weeks and can be viewed in the AWS Management Console. They can also be used to drive alarms and notifications.
Applications can use CloudWatch's custom metrics facility to store any desired metrics. These metrics are also stored for two weeks and can be used as described above.
Each Amazon EC2 instance reports a number of metrics to CloudWatch. These metrics are collected and reported by the hypervisor, and as such reflect only the data that the hypervisor can see -- CPU load, network traffic, and so forth. In order to report on items that are measured by the guest operating system (Linux or Windows) you need to run a monitoring script on the actual system.
Today we are introducing a set of monitoring scripts for EC2 instances running any supported version of Microsoft Windows Server®. The scripts are implemented in Windows PowerShell and are provided in sample form so that you can examine and customize them as needed.
Four scripts are available (download or read more about the CloudWatch Monitoring Scripts for Windows):
- mon-put-metrics-mem.ps1 collects metrics related to system memory usage and sends them to CloudWatch.
- mon-put-metrics-disk.ps1 collects metrics related to disk usage and sends them to CloudWatch.
- mon-put-metrics-perfmon.ps1 collects metrics from PerfMon counters and sends them to CloudWatch.
- mon-get-instance-stats.ps1 queries CloudWatch and displays the most recent utilization statistics for the instance it was run on.
You will need to install and configure the AWS SDK for .NET in order to make use of the scripts.


Simon Munro (@SimonMunro) discusses AWS and high performance commodity in a 719/2012 post:
One of the primary influencers on cloud application architectures is the lack of high performance infrastructure — particularly infrastructure that satisfies the I/O demands of databases. Databases running on public cloud infrastructure have never had access to the custom-build high I/O infrastructure of their on-premise counterparts. This had led to the well known idea that “SQL doesn’t scale” and the rise of distributed databases has been on the back of the performance bottleneck of SQL. Ask any Oracle sales rep and they will tell you that SQL scales very well and will point to an impressive list of references. The truth about SQL scalability is that it should rather be worded as ‘SQL doesn’t scale on commodity infrastructure’. There are enough stories on poor and unreliable performance of EBS backed EC2 instances to lend credibility to that statement.
Given high performance infrastructure, dedicated network backbones, Fusion-IO cards on the bus, silly amounts of RAM, and other tweaks, SQL databases will run very well for most needs. The desire for running databases on commodity hardware comes largely down to cost (with influence of availability). Why run your database on hardware that costs a million dollars, licences that cost about the same and support agreements that cost even more, when you can run it on commodity hardware, with open-source software for a fraction of the cost?
That’s all very fine and well until high performance becomes commodity. When high performance becomes commodity then cloud architectures can, and should, adapt. High performance services such as DynamoDB do change things, but such proprietary APIs won’t be universally accepted. The AWS announcement of the new High I/O EC2 Instance Type, which deals specifically with I/O performance by having 10Gb ethernet and SSD backed storage, makes high(er) performance I/O commodity.
How this impacts cloud application architectures will depend on the markets that use it. AWS talks specifically about the instances being ‘an exceptionally good host for NoSQL databases such as Cassandra and MongoDB’. That may be true, but there are not many applications that need that kind of performance on their distributed NoSQL databases — most run fine (for now) on the existing definition of commodity. I’m more interested to see how this matches up with AWSs enterprise play. When migrating to the cloud, enterprises need good I/O to run their SQL databases (and other legacy software) and these instances at least make it possible to get closer to what is possible in on-premise data centres for commodity prices. That, in turn, makes them ripe for accepting more of the cloud into their architectures.
The immediate architectural significance is small, after all, good cloud architects have assumed that better stuff would become commodity (@swardley’s kittens keep shouting that out), so the idea of being able to do more with less is built in to existing approaches. The medium term market impact will be higher. IaaS competitors will be forced to bring their own high performance I/O plans forward as people start running benchmarks. Existing co-lo hosters are going to see one of their last competitive bastions (offering hand assembled high performance infrastructure) broken and will struggle to differentiate themselves from the competition.
Down with latency! Up with IOPS! Bring on commodity performance!


<Return to section navigation list>


0 comments:
Post a Comment