Windows Azure and Cloud Computing Posts for 7/6/2012+
| A compendium of Windows Azure, Service Bus, EAI & EDI,Access Control, Connect, SQL Azure Database, and other cloud-computing articles. |

•• Updated 7/10/2012 with new articles marked ••:
- Updates to Apache Hadoop on Windows Azure in the Azure Blob, Drive, Table, Queue and Hadoop Services section.
- Updates to Codename “Trust Services” in the Cloud Security and Governance section
• Updated 7/9/2012 with many new articles marked •.
Note: This post is updated daily or more frequently, depending on the availability of new articles in the following sections:
- Windows Azure Blob, Drive, Table, Queue and Hadoop Services
- SQL Azure Database, Federations and Reporting
- Marketplace DataMarket, Social Analytics, Big Data and OData
- Windows Azure Service Bus, Caching, Active Directory, and Workflow
- Windows Azure Virtual Machines, Virtual Networks, Web Sites, Connect, RDP and CDN
- Live Windows Azure Apps, APIs, Tools and Test Harnesses
- Visual Studio LightSwitch and Entity Framework v4+
- Windows Azure Infrastructure and DevOps
- Windows Azure Platform Appliance (WAPA), Hyper-V and Private/Hybrid Clouds
- Cloud Security and Governance
- Cloud Computing Events
- Other Cloud Computing Platforms and Services
Azure Blob, Drive, Table, Queue and Hadoop Services
•• Henry Zhang posted a Hadoop on Azure Service Updated on 6/29 message to the Apache Hadoop on Azure CTP Yahoo! Group on 7/9/2012:
We are pleased to inform you that we recently updated the HOA.com site with our latest service release on 6/29.
With this release:
We can now support 2.5x more preview clusters on HOA.com than before by providing a default 2 node cluster option; this way more people can try Hadoop on Azure preview for free
- Increased the preview cluster use duration from 48 hours + renewal to 5 days, no extension needed
- Enhanced logging and debugging efficiency by removing 98% of noises/false alarms and tuned highly actionable production alerts; this way we know faster when your cluster fails to create
faster- Fixed a bunch of key issues found in production, including hang job submission, sftp support with proper port toggling, head node backup/restore service
- Made investments in features that will become visible in the next service update (approximately 1 month from now)
Below [are] the Hadoop software versions hosted on Azure:
Component Version Hadoop Core 0.20.203.1 Hive 0.7.1 Pig 0.8.1 Mahout 0.5 Pegasus 2 SQOOP 1.3.1 Please let us know if you have any feedback and questions.
Thank you for Hadooping on Azure!
The Apache Hadoop on Windows Azure Team
![image_thumb11[1]](https://blogger.googleusercontent.com/img/b/R29vZ2xl/AVvXsEilkY2VO9ATQBOpocFYPFpIQqPDUHf2VcbKImUQcMKSlUcGZW4-Wbg58f70UETaS4w96K0jzPzWr43IGeesvJdaomZsZ3T-A1S4c4lFTCB819BnPQFJquUihdKOi1i3FmnTO-Mrf7w3/s1600-h/image_thumb11%25255B1%25255D%25255B2%25255D.png "image_thumb11[1]")
• Derrick Harris (@derrickharris) posted a Cloud computing and trickle-down analytics Research Note to GigaOm Pro on 7/4/2012 (missed when posted, requires free trial subscription). From the Summary:
Some people predict 2013 will be the year Hadoop becomes mainstream. Such an occurrence will only be possible if the technology trickles down to a broader base of users and lowers many of the barriers to adoption it carries today. A major limitation of big data, after all, is that the technologies used to analyze it are not easy to learn.
It doesn’t have to be that way, and this research note looks in detail at how components of technologies like Hadoop are finding their way into tools that target less-sophisticated users — from business users to receptionists to high school students. Thanks to cloud-based services, data visualization tools and more, analytics can be made easier, and maybe even fun.

The Apache Hadoop for Windows Azure preview’s Interactive Hive console greatly simplifies MapReduce programming. See the Apache Hadoop on Windows Azure from the SQL Server Team section of my Recent Articles about SQL Azure Labs and Other Added-Value Windows Azure SaaS Previews: A Bibliography of 6/30/2012 for more details.
Carl Nolan (@carl_nolan) described MapReduce Based Co-occurrence Approach to an Item Based Recommender in a 7/7/2012 post:
In a previous post I covered the basics for a Co-occurrence Approach to an Item Based Recommender. As promised, here is the continuation of this work, an implementation of the same algorithm using MapReduce. Before reading this post it will be worth reading the Local version as it covers the sample data and general co-occurrence concepts. Also, the MapReduce example will use the same data as the Local based approach and generate the same recommendations.
As always the complete Local and MapReduce code can be downloaded from:
http://code.msdn.microsoft.com/Co-occurrence-Approach-to-57027db7
As a recap, the approach taken for the item-based recommender will be to define a co-occurrence Matrix based on purchased items; products purchased for an order. The MapReduce variant, rather than creating a Matrix, will create a series of Sparse Vectors, so once again I will be using the Math.Net Numerics libraries. The actual Mapper and Reducer types will be written in F# and the job submitted using the “Generics based Framework for Composing and Submitting .Net Hadoop MapReduce Jobs”.
The MapReduce Approach
The approach one will have to take with MapReduce is a little different to the Local implementation. The objective of the MapReduce phases will be to construct a series of Sparse Vectors, where each Sparse Vector represents the co-occurrence recommendation values for a single product. One can think of this as the rows of a Sparse Matrix but constructed independently and possibly output across several files.
To perform the calculation one will have to run two consecutive jobs. The first MapReduce job will take in the order detail lines and for each order output the list of products, with an associated co-occurrence quantity. It is from this data that one can construct the co-occurrence product pairs and hence the necessary vector values.
The second MapReduce job will use as input the output from the previous job. The Map phase will take each order and corresponding product lists, emitting the co-occurrence product and quantity pairs. The Reduce phase then constructs the Sparse Vectors for each product.
To cover these processes the following F# Record definitions will be required:
type OrderDetail = { OrderId:int; OrderDate:DateTime; ProductId:int; OrderQty:int}
type ProductQuantity = { ProductId:int; Quantity:float}
type ProductQuantityList() =
inherit List<ProductQuantity>()
type ProductRecommendations = {ProductId:int; Offset:int; Recommendations:SparseVector}Using these type definitions the MapReduce job phases can be outlined as follows:

However, one has to remember that the actual input/output types are actually sequences (or IEnumerables in C#), of the specified types. Also, the key into the second mapper is actually derived from the input data as the first tab separated field, the data being the output from the previous MapReduce job.
This is the basic version of the type mappings, but for both Map stages there are optimizations one can take. Also, for the second MapReduce job a Combiner can be used that may help performance.
Note: The ProductQuantityList types exists solely to support Json Serialization, which is now used as the serialization format for all data in and out of the MapReduce jobs.
Order MapReduce Phase
The first, order processing, MapReduce job will take in the order detail lines and output, for each order, the list of products with an associated co-occurrence quantity. The main purpose of the Map phase will be to strip down the data into an order identifier and a ProductQuantity. In this case the quantity being emitted is the value adjusted for recent orders; as in the Local case. The Reduce phase just outputs the input sequence.
The core sequence code for this base Mapper would be:
seq {
let orderLine = Helpers.ParseInputData value
if orderLine.IsSome then
let order = orderLine.Value
let product = {
ProductQuantity.ProductId = order.ProductId;
Quantity = (min (float order.OrderQty) qtyMaximum) * (orderFactor order)
}
yield (getOrderKey order.OrderId, product)
}However, if one takes this approach one will not be taking advantage of the fact that the input data is sorted on the order identifier. If one assumes this, an optimization that one can easily take is rather than just emit a single ProductQuantity, emit the list of all the products for the each order. This would reduce the volume of output data and hence the work for the Shuffle and Sort phase. Of course for the case where the data is not sorted, or split across mappers, the Reducer will do the final aggregation of the data.
In this optimized version the types mapping becomes:

This leads to a full Mapper code listing of the following:
Order Mapper
- type OrderVectorMapper() =
- inherit MapperBaseText<ProductQuantityList>()
- // Configuration values
- let qtyMaximum = 5.0 // Maximum rating contribution for an item
- let recentFactor = 2.0 // Quantity increase factor for recent items
- let baseDate = DateTime.Today.AddMonths(-3) // Date for a recent item
- let products = ProductQuantityList()
- let mutable currentOrder = None
- // Converts an order Id to a string key
- let getOrderKey (orderId:int) =
- sprintf "%i" orderId
- /// Map the data from input name/value to output name/value
- override self.Map (value:string) =
- // Adds a quantity factor based on recent orders
- let inline orderFactor (order:OrderDetail) =
- if DateTime.Compare(order.OrderDate, baseDate) > 0 then
- recentFactor
- else
- 1.0
- // Process the order
- let orderLine =
- try
- Some(Helpers.ParseInputData value)
- with
- | :? System.ArgumentException -> None
- seq {
- if orderLine.IsSome then
- let order = orderLine.Value
- let product = {
- ProductQuantity.ProductId = order.ProductId;
- Quantity = (min (float order.OrderQty) qtyMaximum) * (orderFactor order)}
- if currentOrder.IsSome && not (order.OrderId = currentOrder.Value) then
- yield (getOrderKey currentOrder.Value, products)
- products.Clear()
- currentOrder <- Some(order.OrderId)
- products.Add product
- else
- Context.IncrementCounter("ORDERS", "Skipped Lines")
- }
- /// Output remaining Map items
- override self.Cleanup() = seq {
- if currentOrder.IsSome then
- yield (getOrderKey currentOrder.Value, products)
- }
To perform this optimization a ProductQuantityList is maintained and the corresponding sequence is emitted whenever the order identifier changes. The final Cleanup() step flushes any remaining values.
The calculation of the co-occurrence quantity is the same as in the Local case. The order quantity is used, capped at a maximum value. The quantity is also adjusted based on the order date. During the next MapReduce phase the final quantity is taken as the maximum of the quantity for each product.
As previously noted, in this case, the Reducer just re-emits the aggregated input data:
Order Reducer
- type OrderVectorReducer() =
- inherit ReducerBase<ProductQuantityList, ProductQuantityList>()
- /// Reduce the order data into a product list
- override self.Reduce (key:string) (values:seq<ProductQuantityList>) =
- let products = ProductQuantityList()
- values
- |> Seq.iter (Seq.iter products.Add)
- Seq.singleton (key, products)
To submit this job one would use the following command:
%HOMEPATH%\MSDN.Hadoop.MapReduce\Release\MSDN.Hadoop.Submission.Console.exe
  -input "recommendations/inputdata" -output "recommendations/workingdata"
  -mapper "MSDN.Recommender.MapReduce.OrderVectorMapper, MSDN.Recommender.MapReduce"
  -reducer "MSDN.Recommender.MapReduce.OrderVectorReducer, MSDN.Recommender.MapReduce"
  -file "%HOMEPATH%\MSDN.Recommender\Release\MSDN.Recommender.MapReduce.dll"
  -file "%HOMEPATH%\MSDN.Recommender\Release\MSDN.Recommender.dll"
The data from this MapReduce job is then fed into the next phase.
Product MapReduce Phase
The second, product processing, MapReduce job constructs the Sparse Vectors for each product identifier. The Map phase will take each order, and corresponding products and quantities, and emit the pairs of products along with the final co-occurrence quantity; being the maximum of the two possible values. The Reduce phase will sum all the co-occurrence values for each product, and construct the final product Sparse Vectors.
In this instance a Combine operation can be advantageous to performance. This will result in types mapping of:

If one takes this simple approach the base Map code would be along the lines of the following:
seq {
for (product1, product2) in ((deserialize value) |> pairs) do
let qty = max product1.Quantity product2.Quantity
yield getProductKey product1.ProductId, {ProductQuantity.ProductId = product2.ProductId; Quantity = qty}
yield getProductKey product2.ProductId, {ProductQuantity.ProductId = product1.ProductId; Quantity = qty}
}However, as in the first MapReduce job, there is an optimization one can take. The basic approach is to just parse the input data from the previous job and emit each product pair without aggregating any of the data. However, there is the option for aggregating data within a Mapper; thus reducing the data that needs to be parsed to the reducer and the overhead of the Shuffle and Sort phase.
To perform this optimization a Dictionary can be used, with the Key being a Tuple of the product pair, and the Value being the calculated co-occurrence quantity. Obviously one cannot indefinitely build up this Dictionary, so the values are emitted once a predefined Dictionary size is reached. At this point the in-Mapper aggregation reinitializes the Dictionary and starts again. Once again the final Cleanup() step flushes any remaining Dictionary values.
This leads to a full Mapper code listing of:
Product Mapper
- type ProductVectorMapper() =
- inherit MapperBaseText<ProductQuantity>()
- let maxSize = 1024*1024
- let prodPairs = Dictionary<int*int, float>(maxSize)
- // Converts an order Id to a string key
- let getProductKey (productId:int) =
- sprintf "%i" productId
- // Adds to the table
- let addRow idx qty =
- if prodPairs.ContainsKey idx then
- prodPairs.[idx] <- prodPairs.[idx] + qty
- else
- prodPairs.[idx] <- qty
- ()
- // Defines a sequence of the current pairs
- let currents = seq {
- for item in prodPairs do
- let (product1, product2) = item.Key
- yield getProductKey product1, {ProductQuantity.ProductId = product2; Quantity = item.Value}
- prodPairs.Clear()
- }
- /// Map the data from input name/value to output name/value
- override self.Map (value:string) =
- // Parses an input line of format List<ProductQuantity>
- let deserialize (input:string) =
- let keyValue = input.Split('\t')
- Helpers.ParseProductQuantityList (keyValue.[1].Trim())
- // calculates the pairs for an order
- let rec pairs (items:List<'a>) = seq {
- let count = items.Count
- match count with
- | 0 | 1 -> ()
- | 2 ->
- yield items.[0], items.[1]
- | _ ->
- for idxOut = 0 to (count - 2) do
- for idxIn = (idxOut + 1) to (count - 1) do
- yield (items.[idxOut], items.[idxIn])
- }
- // Define the sequence to return the product/product pairs information
- (deserialize value)
- |> pairs
- |> Seq.iter (fun (product1, product2) ->
- let qty = max product1.Quantity product2.Quantity
- addRow (product1.ProductId, product2.ProductId) qty
- addRow (product2.ProductId, product1.ProductId) qty)
- if prodPairs.Count > maxSize then
- currents
- else
- Seq.empty
- /// Output remaining Map items
- override self.Cleanup() =
- currents
A secondary optimization one can make for each Mapper is that of running a Combiner. If one has a large Dictionary object, then the need for a Combiner is diminished. However the code for such a Combiner just performs further quantity aggregations against the output for each Mapper:
Product Combiner
- type ProductVectorCombiner() =
- inherit CombinerBase<ProductQuantity>()
- /// Combine the data from input name/value to output name/value
- override self.Combine (key:string) (values:seq<ProductQuantity>) =
- let maxSize = 100000 // Expected number of product correlations
- let products = Dictionary<int, float>(maxSize)
- // Adds to the table
- let addRow idx qty =
- if products.ContainsKey idx then
- products.[idx] <- products.[idx] + qty
- else
- products.[idx] <- qty
- ()
- // Process the reducer input
- values
- |> Seq.iter (fun product -> addRow product.ProductId product.Quantity)
- seq {
- for item in products do
- yield key, {ProductQuantity.ProductId = item.Key; Quantity = item.Value}
- }
Once all the product pairs have been emitted by the Mapper, the Reducer can build a Sparse Vector for each product. This is done by aggregating all co-occurrence values as the element values of the Sparse Vector; much in the same way that the Sparse Matrix is constructed:
Product Reducer
- type ProductVectorReducer() =
- inherit ReducerBase<ProductQuantity, ProductRecommendations>()
- /// Reduce the data from input name/value to output name/value
- override self.Reduce (key:string) (values:seq<ProductQuantity>) =
- // Configuration values
- let entryThreshold = 20.0 // Minimum correlations for matrix inclusion
- let matrixSize = 5000 // Expected Correlations for Hash Table init
- let minItem = ref Int32.MaxValue
- let maxItem = ref 0
- let rcTable = Dictionary<int, float>(matrixSize)
- // Adds to the table
- let addRow idx qty =
- minItem := min idx !minItem
- maxItem := max idx !maxItem
- if rcTable.ContainsKey idx then
- rcTable.[idx] <- rcTable.[idx] + qty
- else
- rcTable.[idx] <- qty
- ()
- // Process the reducer input
- values
- |> Seq.iter (fun product -> addRow product.ProductId product.Quantity)
- let offset = !minItem
- let size = !maxItem + 1 - !minItem
- let items = seq {
- for item in rcTable do
- if item.Value > entryThreshold then
- yield (item.Key - offset, item.Value)
- }
- let recommendations = {ProductRecommendations.ProductId = Int32.Parse(key); Offset = offset; Recommendations = SparseVector.ofSeq size items}
- Context.IncrementCounter("PRODUCTS", "Recommendations Written")
- Seq.singleton (key, recommendations)
To submit this job one would use the following command:
%HOMEPATH%\MSDN.Hadoop.MapReduce\Release\MSDN.Hadoop.Submission.Console.exe
  -input "recommendations/workingdata/part-0000[012356789]" -output "recommendations/outputdata"
  -mapper "MSDN.Recommender.MapReduce.ProductVectorMapper, MSDN.Recommender.MapReduce"
  -reducer "MSDN.Recommender.MapReduce.ProductVectorReducer, MSDN.Recommender.MapReduce"
  -file "%HOMEPATH%\MSDN.Recommender\Release\MSDN.Recommender.MapReduce.dll"
  -file "%HOMEPATH%\MSDN.Recommender\Release\MSDN.Recommender.dll"
  -file "%HOMEPATH%\MSDN.Recommender\Release\MathNet.Numerics.dll"
  -file "%HOMEPATH%\MSDN.Recommender\Release\MathNet.Numerics.FSharp.dll"
If you review the previous code you will see that for each product, the Sparse Vector recommendations are accompanied with an Offset. This is the same offset as used in the Local version of the code, and represents the offset for the first product identifier. This is purely an optimization for querying the data.
The output from this job can then be saved and loaded into a Query engine to produce product recommendations.
Product Recommendations
Once the co-occurrence Sparse Vectors have been constructed they can be loaded into memory and queried in a very similar fashion to the Local case. To perform the loading, a Dictionary of objects is constructed where the Key is the product identifier and the value the ProductRecommendation type, containing the co-occurrence Sparse Vector:
Vector Builder
- module VectorLoader =
- // Defines a sequence of product vectors
- let private vectorFile (mappedfile:string) = seq {
- use reader = new StreamReader(Path.GetFullPath(mappedfile))
- while not reader.EndOfStream do
- let line = reader.ReadLine()
- let keyValue = line.Split('\t')
- let (_, value) = (Int32.Parse(keyValue.[0].Trim()), keyValue.[1].Trim())
- yield (Helpers.ParseVectorData value)
- reader.Close()
- }
- /// Loads a collection Product Vector file
- let GetProductVectors (filenames:string array) =
- let products = ConcurrentDictionary<int, ProductRecommendations>()
- filenames
- |> Array.iter (fun filename ->
- vectorFile filename
- |> Seq.iter (fun product -> products.TryAdd(product.ProductId, product) |> ignore))
- products
- /// Loads a single Product Vector file
- let GetProductVector (filename:string) =
- let products = ConcurrentDictionary<int, ProductRecommendations>()
- (vectorFile filename)
- |> Seq.iter (fun product -> products.TryAdd(product.ProductId, product) |> ignore)
- products
Once the Vectors have been loaded they can be queried in the same way as for the Local version. Basically, the Sparse Vector values for the products for which a recommendation is required are loaded into a PriorityQueue. The top X items are then de-queued and returned as the recommendations:
Vector Query
- type VectorQuery (filenames:string array) =
- let defaultRecommendations = 12
- let coVectors =
- match filenames with
- | [||] -> invalidArg "filename" "Filename cannot be an empty Array"
- | [| filename |] -> VectorLoader.GetProductVector(filename)
- | _ -> VectorLoader.GetProductVectors(filenames)
- let getQueueSV (products:int array) =
- // Define the priority queue and lookup table
- let queue = PriorityQueue(coVectors.Count)
- let lookup = HashSet(products)
- // Add the items into a priority queue
- products
- |> Array.iter (fun item ->
- if item >= 0 && coVectors.ContainsKey(item) then
- let product = coVectors.[item]
- let recommendations = product.Recommendations
- seq {
- for idx = 0 to (recommendations.Count - 1) do
- let productIdx = idx + product.Offset
- if (not (lookup.Contains(productIdx))) && (recommendations.[idx] > 0.0) then
- yield KeyValuePair(recommendations.[idx], productIdx)
- }
- |> queue.Merge)
- // Return the queue
- queue
- let getItems (queue:PriorityQueue<float, int>) (items:int) =
- let toDequeue = min items queue.Count
- seq { for i in 1 .. toDequeue do yield queue.Dequeue().Value }
- new(filename:string) =
- VectorQuery([| filename |])
- /// Get the requested number of Recommendations for a Product
- member self.GetRecommendations(product:int, items:int) =
- let queue = getQueueSV([| product |])
- getItems queue items
- /// Get the requested number of Recommendations for a Product Array
- member self.GetRecommendations(products:int array, items:int) =
- let queue = getQueueSV(products)
- getItems queue items
- /// Get the default number of Recommendations for a Product
- member self.GetRecommendations(product:int) =
- self.GetRecommendations(product, defaultRecommendations)
- /// Get the default number of Recommendations for a Product Array
- member self.GetRecommendations(products:int array) =
- self.GetRecommendations(products, defaultRecommendations)
Usage of the VectorQuery type is simply a matter of specifying which files to load and then calling GetRecommendations() function, in exactly the same way as for the Local case.
let itemQuery = VectorQuery(vectorFiles)
let recommendations = itemQuery.GetRecommendations(850, 100)The API also supports getting recommendations for a product array; namely a shopping basket.
Conclusion
One thing that is worth pointing out to conclude these blog posts, is that I have skipped over how to manage the caching of the Sparse Matrix and Vector values. The reality is one would need to only build/load the data once and cache the results. This cached value would then be used by the recommendations API rather than the filenames. The cache would also need to allow multiple threads to access the loaded data, and also manage refreshing of the data.
As a final reminder, to install the libraries from NuGet one can use the Manage NuGet Packages browser, or run these commands in the Package Manager Console:
Install-Package MathNet.Numerics
Install-Package MathNet.Numerics.FSharp


Mike Miller (@mlmilleratmit) explained Why the days are numbered for Hadoop as we know it in a 7/7/2012 post to GigaOm’s Structure blog:
Hadoop is everywhere. For better or worse, it has become synonymous with big data. In just a few years it has gone from a fringe technology to the de facto standard. Want to be big bata or enterprise analytics or BI-compliant? You better play well with Hadoop.
It’s therefore far from controversial to say that Hadoop is firmly planted in the enterprise as the big data standard and will likely remain firmly entrenched for at least another decade. But, building on some previous discussion, I’m going to go out on a limb and ask, “Is the enterprise buying into a technology whose best day has already passed?”
First, there were Google File System and Google MapReduce
To study this question we need to return to Hadoop’s inspiration – Google’s MapReduce. Confronted with a data explosion, Google engineers Jeff Dean and Sanjay Ghemawat architected (and published!) two seminal systems: the Google File System (GFS) and Google MapReduce (GMR). The former was a brilliantly pragmatic solution to exabyte-scale data management using commodity hardware. The latter was an equally brilliant implementation of a long-standing design pattern applied to massively parallel processing of said data on said commodity machines.
GMR’s brilliance was to make big data processing approachable to Google’s typical user/developer and to make it fast and fault tolerant. Simply put, it boiled data processing at scale down to the bare essentials and took care of everything else. GFS and GMR became the core of the processing engine used to crawl, analyze, and rank web pages into the giant inverted index that we all use daily at google.com. This was clearly a major advantage for Google.
Enter reverse engineering in the open source world, and, voila, Apache Hadoop — comprised of the Hadoop Distributed File System and Hadoop MapReduce — was born in the image of GFS and GMR. Yes, Hadoop is developing into an ecosystem of projects that touch nearly all parts of data management and processing. But, at its core, it is a MapReduce system. Your code is turned into map and reduce jobs, and Hadoop runs those jobs for you.
Then Google evolved. Can Hadoop catch up?
Most interesting to me, however, is that GMR no longer holds such prominence in the Google stack. Just as the enterprise is locking into MapReduce, Google seems to be moving past it. In fact, many of the technologies I’m going to discuss below aren’t even new; they date back the second half of the last decade, mere years after the seminal GMR paper was in print.

Here are technologies that I hope will ultimately seed the post-Hadoop era. While many Apache projects and commercial Hadoop distributions are actively trying to address some of the issues below via technologies and features such as HBase, Hive and Next-Generation MapReduce (aka YARN), it is my opinion that it will require new, non-MapReduce-based architectures that leverage the Hadoop core (HDFS and Zookeeper) to truly compete with Google’s technology. (A more technical exposition with published benchmarks is available at http://www.slideshare.net/mlmilleratmit/gluecon-miller-horizon.) …


Mike continues with descriptions of:
- Percolator for incremental indexing and analysis of frequently changing datasets
- Dremel for ad hoc analytics
- Pregel for analyzing graph data.
Full Disclosure: I’m a registered GigaOm Analyst.
The Datanami Team reported Ford Looks to Hadoop, Innovative Analytics in a 7/6/2012 post:
After a rocky few years, the American automobile industry is digging its way out from the rubble with a renewed approach to manufacturing, customer relations, and, as you might have guessed, analytics across its wide, diverse pools of information.
John Ginder, who serves as Ford’s Big Data Analytics lead and runs the Systems Analytics and Environmental Sciences team at Ford Research spoke this week about how his company, arguably one of the most data-driven in the industry, is contending with ever-growing, diverse data and the need for solid performance of that information.
He told Jason Hiner that big data offers big promise for a company like Ford, but there is still some “catching up” on the tools and usability end—at least for the mission-critical operations at a global automotive company. There are, however, some notable technologies on the horizon that are helping the automaker boost its ability to make use of vast pools of data, including the Hadoop framework.
Ginder says that the company recognizes that “the volumes of data we generate internally -- from our business operations and also from our vehicle research activities as well as the universe of data that our customers live in and that exists on the Internet -- all of those things are huge opportunities for us that will likely require some new specialized techniques or platforms to manage,”
He notes that to make use of this potentially valuable data, the company’s research arm is experimenting with Hadoop as they seek to to combine all of these various data sources they have access to.
One of the potential sources of complex data that has clear value for the company lies in their sensor networks. As Ginder stated, "Our manufacturing sites are all very well instrumented. Our vehicles are very well instrumented. They're closed loop control systems. There are many many sensors in each vehicle… Until now, most of that information was [just] in the vehicle, but we think there's an opportunity to grab that data and understand better how the car operates and how consumers use the vehicles and feed that information back into our design process and help optimize the user's experience in the future as well."
Despite significant progress at experimenting with new platforms and data sources, Ginder also remarked on the lack of tools that are sophisticated, reliable and simple enough to use that the company can democratize big data for wider use. As he told Jason Hiner, “We have our own specialists who are working with the tools and developing some of our own in some cases and applying them to specific problems. But, there is this future state where we'd like to be where all that data would be exposed. [And] where data specialists -- but not computer scientists -- could go in and interrogate it and look for correlations that might not have been able to look at before. That's a beautiful future state, but we're not there yet."
The end goal is clear, even if the tools have some catching up to do, says Ginder. He remarked on the new world of possibilities that could open up to Ford once they are able to better harness their wells of diverse data. From using camera , sensor and other driver data for uses beyond the driving experience to controlling airflow in the car based on external, real-time data sources, the Ford analytics lead remains hopeful about the future—if not wary of the stability of the newest data handling tools available now.

<Return to section navigation list>
SQL Azure Database, Federations and Reporting
• Tim Anderson (@timanderson) asserted Moving a database from on-premise to SQL Azure: some hassle on 7/8/2012:
I am impressed with the new Windows Azure platform, but when I moved a simple app from my local machine to Azure I had some hassle copying the SQL Server database.
The good news is that you can connect to SQL Azure using SQL Server Management studio. You need to do two things. First, check the server location and username. You should already know the password which you set when the database was created. You can get this information by going to the Azure portal, selecting the database, and clicking Show connection strings on the dashboard.
Second, open the SQL firewall for the IP number of your client. There is a link for this in the same connection string dialog.
Now you can connect in SQL Server Management Studio. However, you have limited access compared to what you get as an admin on your local SQL Server.
Here is the Tasks menu for an on-premise SQL Server database:

and here it is for a SQL Server Azure database:

Still, you can start Export Data or Copy Database from your on-premise connection and enter the Azure connection as the target. However, you should create the destination table first, since the Export Data wizard will not recreate indexes. In fact, SQL Azure will reject data imported into a table without at least one clustered index.
I tried to script a table definition and then run it against the SQL Azure database. You can generate the script from the Script Table as menu.

However even the simplest table will fail. I got:
Msg 40514, Level 16, State 1, Line 2
‘Filegroup reference and partitioning scheme’ is not supported in this version of SQL Server.when attempting to run the script on SQL Azure.
The explanation is here.
Windows Azure SQL Database supports a subset of the Transact-SQL language. You must modify the generated script to only include supported Transact-SQL statements before you deploy the database to SQL Database.
Fortunately there is an easier way. Right-click the table and choose Generate Scripts. In the wizard, click the Advanced button for Set Scripting Options.

Find Script for the database engine type, and choose SQL Azure:

You may want to change some of the other options too. This generates a SQL script that works with SQL Azure. Then I was able to use the Export Data wizard using the new table as the target. If you use Identity columns, don’t forget Enable identity insert in Edit Mappings.


Richard Conway (@azurecoder) described Tricks with IaaS and SQL: Part 2 – Scripting simple powershell activities and consuming the Service Management API in C# with Fluent Management in a 7/6/2012 post:
In the last blogpost we looked at how we could use powershell to build an IaaS deployment for SQL Server 2012. The usage was pretty seamless and it really lends itself well to scripted and unattended deployments of VMs. The process we went through showed itself wanting a little in that we had to build in some unwanted manual tasks to get a connection to the SQL Server. We looked at the provision of firewall rules, moving from Windows Authentication to Mixed Mode authentication and then adding a database user in an admin role.
The first part of the script will update the registry key so that we can test our SQL Server connection locally.
#Check and set the LoginMode reg key to 2 so that we can have mixed authentication
 Set-Location HKLM:\
 $registry_key = "SOFTWARE\Microsoft\Microsoft SQL Server\MSSQL11.MSSQLSERVER\MSSQLServer"
 var $item = (Get-ItemProperty -path $registry_Key -name LoginMode).loginmode
 If($item -eq 1) {
 # This is Windows Authentication we need to update
 Set-ItemProperty -path $registry_key -name "LoginMode" -value 2
 }
When this is done we’ll want to open up the firewall port on the machine. Whether we our goal is to use Windows Authentication or Mixed Mode, or only expose the SQL Server to a Windows network that we create as part of an application – so only available internally we’ll still need to open up that firewall port. We do this through the use of a COM object which will allow us to set various parameters such as a port number, range and protocol.
# Add a new firewall rule - courtesy Tom Hollander
 $fw = New-Object -ComObject hnetcfg.fwpolicy2
 $rule = New-Object -ComObject HNetCfg.FWRule
 $rule.Name = "SQL Server Inbound Rule"
 $rule.Protocol = 6 #NET_FW_IP_PROTOCOL_TCP
 $rule.LocalPorts = 1433
 $rule.Enabled = $true
 $rule.Grouping = "@firewallapi.dll,-23255"
 $rule.Profiles = 7 # all
 $rule.Action = 1 # NET_FW_ACTION_ALLOW
 $rule.EdgeTraversal = $false
 $fw.Rules.Add($rule)
Lastly, we will need to add a user that we can test our SQL Server with. This is done through SQL statements and stored procedures. You can see the use of sqlcmd here. This is by far the easiest way although we could have used SMO to do the same thing.
# add the new database user
 sqlcmd -d 'master' -Q "CREATE LOGIN richard1 WITH PASSWORD='icanconnect900'"
 sqlcmd -d 'master' -Q "EXEC sys.sp_addsrvrolemember @loginame = N'richard1', @rolename = N'sysadmin'"
Take all of this and wrap it into a powershell file “.ps1″.
The point of this second post was to show that you could do exactly what we did in the first post programmatically as well. This is what we’ve done through a branch of our Fluent Management library which will now support IaaS. One of the reasons we’ve been very keen to integrate IaaS programmatically is because we feel that the hybrid scenarios of PaaS and IaaS are a great mix so to be able to inevitably this mixture transactional in the same way is a good goal for us.
var manager = new SubscriptionManager(TestConstants.InsidersSubscriptionId);
 manager.GetVirtualMachinesManager()
 .AddCertificateFromStore(TestConstants.ManagementThumbprintIaaS)
 .CreateVirtualMachineDeployment()
 .AddToExistingCloudServiceWithName(TestConstants.CloudServiceNameIaaS)
 .WithDeploymentType(VirtualMachineTemplates.SqlServer2012)
 .WithStorageAccountForVhds(TestConstants.StorageServiceNameIaaS)
 .WithVmOfSize(VmSize.Small)
 .Deploy();
So in one line of code we now have the equivalent of the powershell script in the first part. Note that this is a blocking call. When this returns initially a 202 Accepted response is retuned and then we continue to poll in the background using the x-ms-request-id header as we previously did with PaaS deployments. On success Fluent Management will return unblock.
From the code there are key messages to take away.
- we continue to use our management certificate with the subscription activity
- we need to provide a storage account for the VHD datadisks
- we can control the size of VM which is new thing for us to be able to do in code (normally the VmSize is set in .csdef but in this case we don’t have one or a package)
- we have to have a cloud service already existing with which to add the deployment to
In many of the previous posts on this blog we’ve looked at the Service Management API in the context of our wrapper Fluent Management. The new rich set of APIs that have been released for Virtual Machines make for a good set of possibilities to do everything that is easy within the CLI and Powershell right now enabled within an application.

Brian Loesgen (@BrianLoesgen) explained Connecting Cold Fusion 10 to Azure SQL Database in a 7/5/2012 post:
This is easy to do, IF you have the right pieces.
For the connection string, you can use the JDBC connection string presented in the portal (see below).
For the JDBC driver, you need to be using Version 4. The reason is that earlier versions had problems with wildcard SSL certificates. You can download the driver at: http://www.microsoft.com/en-us/download/details.aspx?id=11774
We tested this using with Cold Fusion 10 installed in an Azure Virtual Machine.
Cihan Biyikoglu (@cihangirb) described Federations: What’s Next? Announcements from TechED 2012 in a 6/14/2012 post (missed when posted):
Federations have been available for 6 months in SQL Azure (now called Windows Azure SQL Database) as of today! In this post, I’ll first cover few of the improvements we have made to the SQL Database Federations and talk about a few of the announcement we made at Teched this week on what’s next for the technology.
RECENT IMPROVEMENT AVAILABLE TODAY
Improved Latency for USE FEDERATION: One of the recent changes that is key to performance of your scale-out systems is the improvements we made to the “USE FEDERATION” statement. With the improvement the latency of USE FEDERATION drastically improved. Internally with USE FEDERATION, we now have 2 types of caching.
- Connection Pool to the Backend: As applications go back to a hot member, with the pooled connections, they won’t have to reestablish new connections from the GW to the DB nodes in the system and will reuse the existing pooled connection lowering latency for the app.
- Caching of the Federation Map: USE FEDERATION is used for routing your connections to the given federation key value. This information reside in the root database but it is cached at the gateway layer in the system. This means the root database isn’t ever hit for executing the USE FEDERATION stmnt. This lowers latency and makes USE FEDERATION extremely efficient.
IMPROVEMENT COMING IN THE NEXT FEW MONTHS AND QUERTERS
Support for “Timestamp”, “Rowversion” and “Identity” on Reference Tables: With the upcoming update to SQL Azure, This will enable using IDENTITY property and timestamp data type on reference tables. Federated tables will still be restricted. This means your schema in the federation member can now have the following reference table without issues:
CREATE TABLE zipcodes(
id bigint identity primary key,
modified_date datetime2,
ts timestamp)Manual Setup with Data Sync Service: Within the next few months we will also have manual setup enabled with Data Sync Services. Data Sync Service can be used for operation like synchronization of reference data between federation members and root or for moving your data in federations to SQL Server or to other Windows Azure SQL dbs.
Federation SWITCH Operation: With the improvements in federations we will make moving federation members in and out for the federation easy as well though an ALTER FEDERATION statement. With the SWITCH IN and OUT operation, it becomes easy to compose and decompose federations. Note: The syntax shown below is just a placeholder and the final version may be different.
Database Copy (DBCopy) Support for Federations: We will also enable DBCopy command for federation root or member database. You will be able to point to a federation member of a root with copy database command.
CREATE DATABSAE [Customers-100-200]
AS COPY OF [system-d6c763f4-eda2-427e-af9e-3a8fedd4a16c]
IMPROVEMENTS FURTHER OUT ON THE ROADMAP:
Disaster Recovery with Federations: There are a number of disaster recovery improvements we are working on with Windows Azure SQL Database. The general idea is to enable better local and geographic disaster recovery scenarios for your critical data. To simplify DR, we will make point-in-time-restore operation available that enable you to recover from user and admin errors. With Geo-DR, we will enable ability to make your data redundantly available in multiple data center and continuously keep them in sync. You can find more information about them on this session from Sasha: Business Continuity Solutions in Microsoft SQL Azure
Point-in-time-Restore support with Federations: As we make point in time restore available, we will also enable the ability to do point in time restores of federation data in the root or the members. Point in time restore technology allows recovering from user and admin mistakes like dropping tables or deleting a whole bunch of rows accidentally. PITR allows travel back into time, much like database RESTORE command. Provide a data and time for a database and we can restore a snapshot of it for the given time slot..
Geo Disaster Recovery: Again as we make the geo disaster recovery features available with Windows Azure SQL Database (SQL Azure). You will be able to make the members and root geo redundant with the capabilities. that is you will be ale to have your data in multiple data centers to protect against data center level failures.
Love to hear feedback on all of these features. If you have questions, simply email through the blog or post comments.


<Return to section navigation list>
MarketPlace DataMarket, Social Analytics, Big Data and OData
• Chris Webb (@Technitrain) wrote Excel Opens Up Limitless Possibilities for BI as a guest post of 7/5/2012 for the Microsoft Business Intelligence team:
Today we’re excited to have a guest blog post by Microsoft MVP Chris Webb. Chris is a UK based consultant (http://www.crossjoin.co.uk/) and trainer (http://www.technitrain.com/) specialising in SQL Server Analysis Services, MDX, PowerPivot and DAX. He is the co-author of three books: “MDX Solutions”, “Expert Cube Development with SQL Server Analysis Services 2008” and “SQL Server Analysis Services 2012: The BISM Tabular Model”, and blogs regularly on Microsoft BI topics at http://cwebbbi.wordpress.com/
PowerPivot is an amazing self-service business intelligence tool – it can handle massive amounts of data and perform complex calculations at lightning speeds – but its true killer feature is the fact that it integrates so well with Excel. Not only is Excel the tool of choice for the vast majority of people who work with and analyze data as part of their jobs, which means that anyone that knows Excel automatically feels at home with PowerPivot, but Excel’s ubiquity means there is a vast array of other tools available that integrate with Excel and which therefore can be used for self-service BI alongside PowerPivot. In this post we’ll look at some free tools that can be used for BI purposes and see how Excel opens up limitless possibilities for BI.
First of all, we need some data to play with. Roger Jennings recently uploaded five months of FAA data on airline flight delays to the Windows Azure Marketplace and wrote a very detailed blog post on how you can import this data into PowerPivot and a number of other different tools here. This is a great dataset – large, detailed, and something that anyone who’s sat in an airport terminal waiting for a delayed flight will be interested in.
Assuming we’ve imported all this data into PowerPivot, how can we start to explore it? Roger’s post shows how to build a pivot table and start to look at average delays by carrier, but there are many other interesting types of analysis possible as well. The first thing we can look at is what the most popular routes and airports are. Taking data from December 2011, we can build a PivotTable in Excel from the PowerPivot data very easily and find the number of flights to and from each airport, but a PivotTable isn’t a great way to visualize this type of data as you can see:

One alternative is to use NodeXL, a tool that was developed in part by Microsoft Research, that makes it very easy to explore network graphs inside Excel. The screenshot below shows what it can do with the same data: the most connected airports such as JFK are at the center of the diagram, while the least connected such as WRG (Wrangell airport in Alaska) are at the edge. The opacity of the lines connecting the airports reflects the number of flights on a route.

It’s also very easy to zoom in and out, highlight a single airport such as Houston (HOU), and see the other airports you can fly to from there.

Maybe it would be better to see the airports on a map though? With a simple web search we can find a csv file with the latitudes and longitudes of all the airports of the world in it and csv files are usually very easy to import into PowerPivot. However, in this case there are a few issues with the data that cause problems for PowerPivot if you load it in directly: it contains a lot of airports that don’t have a three-letter IATA code and there are a few cases where the IATA code is duplicated. To clean up the data we can use a new tool from the SQL Azure Labs called Data Explorer which allows us to create automated procedures that clean, transform, filter and perform calculations on data and then load it directly into Excel. For this data, filtering on airports in the US which have a scheduled service and an IATA code avoids the problem:

With this hurdle overcome it is now very simple to plot each airport on a map using another tool from Microsoft Research called Layerscape. Layerscape is an Excel addin that allows you to take spatial data from Excel and visualize it using Microsoft World Wide Telescope; you can find a more detailed explanation of how it can be used with PowerPivot here and here on my blog.
In the screenshot below, the size of the marker used for each airport is related to the number of flights that originate from it:

It’s also very easy to zoom in, pan, tilt and explore your data once it’s in World Wide Telescope – here we can see more detail about the airports in the northwest of the USA with the number of flights now shown through different-sized circles:

What about those flight delays though? We can use the Excel Data Mining Addin to look at this: it makes it very easy to apply a number of machine learning and statistical techniques to data in Excel tables. The ‘Analyze Key Influencers’ functionality (there are good explanations of how to use this here and here) can help to determine what values in our data are associated with departure delays.

It reveals that one or two airlines and airports are by far the worst offenders as far as delayed flights go – but I won’t name them here for obvious reasons! Less controversially, we can see the influence that date had on departure delays, and from the results we can see that the 2011 holiday period was definitely a bad time to travel:

This has been a whirlwind tour of just a few of the tools that are out there that can help you analyze your data in Excel alongside PowerPivot. All of the tools that have been mentioned are capable of much, much more than I’ve had time to show, and there are hundreds of other tools out there from Microsoft and its partners that can be used for similar purposes – using Excel as the platform for your self-service BI opens up limitless possibilities. Hopefully you’ll have seen something to inspire you to look at your data in a new way!


Nicole Haugen described OData Consumption Validation in Visual Studio LightSwitch 2012 in a 7/5/2012 post to the Visual Studio LightSwitch Team blog:
Now that LightSwitch in Visual Studio 2012 supports the ability to consume OData feeds, there are a wide variety of feeds that can be used to build interesting LightSwitch applications, ranging from NetFlix to Dynamics CRM.
However, it’s important to remember that all feeds are not equal – each one may have varying levels of support for the underlying OData query operators that LightSwitch applications rely on. Behind the scenes, LightSwitch makes various optimizations to make it easier to consume these feeds. To find out more, refer to my recent blog post called "ODataConsumption Validation in LightSwitch Visual Studio 2012".

<Return to section navigation list>
Windows Azure Service Bus, Caching, Active Directory and Workflow
No significant articles today.
<Return to section navigation list>
Windows Azure Virtual Machines, Virtual Networks, Web Sites, Connect, RDP and CDN
My (@rogerjenn) Creating a Windows Azure Virtual Machine with Windows 2008 R2 Server Having Remote Desktop Services Enabled of 7/7/2012 begins:
Contents:
- Create a Windows Azure Virtual Network and Affinity Group
- Create an Empty Cloud Service for the Virtual Machine
- Deploy a Virtual Machine in the Cloud Service
- Install Active Directory with DCPromo
- Install Remote Desktop Services Features
- Manage Remote Desktop Services Features
My unfinished Installing Remote Desktop Services on a Windows Azure Virtual Machine running Windows Server 2012 RC post of 6/12/2012 describes the first stage of creating a Windows Azure Virtual Network (WAVN) that connects to an on-premises Windows network and uses Windows Azure Active Directory (WAAD) to provide single sign-on (SSO) for an enterprise’s Active Directory domain admins and users. The tutorial remains unfinished due to lack of assistance from the Windows Azure team for setting up a Cisco ASA 5500 Adaptive Security Appliance to work with the existing OakLeaf Systems Active Directory domain.
This article shows you how to accomplish a similar objective with a standard Windows Server 2008 R2 SP1(June 2012) image and a new Active Directory forest, including configuring and testing most RDS features. The procedure is based in part on the following Windows Azure documents:

And continues with a detailed tutorial for setting up and managing Active Directory and RDS on a Windows Server 2008 R2 SP1 (June 2012) instance.
Steve Plank (@plankytronixx) posted a Video: Another of my “cartoony” videos, this time explaining Windows Azure Virtual Machines on 7/5/2012:
Matias Woloski (@woloski) described Creating a SharePoint 2010 virtual machine in Windows Azure in a 7/4/2012 post:
During the last couple of days I’ve recorded a couple of screencast for Auth10 demonstrating how easy is to setup SharePoint 2010 to accept Google and ADFS identities. I decided to give a try to Windows Azure Virtual Machines and I have to say that I am very satisfied. I had a SharePoint vm running in less than 30 minutes.
How to create a Virtual Machine running SharePoint 2010 in Windows Azure
I wished there was a prepopulated image syspreped with SharePoint installed, but that wasn’t the case. So I had to start from a “Windows 2008 R2” image.
Disclaimer: Virtual Machines is a “preview” feature in Windows Azure today and this tutorial is not intended to have a production VM. It’s more about, having a SharePoint VM up and running quickly. If you want to create a farm and start from vhds created on Hyper-V on premises, I recommend this post from Steve Peschka: Creating an Azure Persistent VM for an Isolated SharePoint Farm
- Create a new virtual machine by choosing the Windows Server 2008 R2 image. I chose the “June” release, the “Small” size and an arbitrary dns name like “sp-auth10.cloudapp.net”. Important: don’t try to run SharePoint in an Extra Small instance because it’s way too heavy for such configuration
The provisioning will take 5 to 10 minutes and will create the VM and a 30GB VHD with the OS.
When you are done, connect to the VM via remote desktop (using the “Connect” button)
Download SharePoint Enterprise trial from http://www.microsoft.com/en-us/download/details.aspx?id=16631 and install it. The installation process is smooth if you choose all the defaults. It will also create a SQL Express instance in the VM, so no need to worry about it.
DONE. Enjoy SharePoint :). If you have the budget to leave the machine turned on go ahead (small instance 24x30 = $0.115 * 720 = 82USD / month + 30gb storage), otherwise read the next section.
How to turn on and off Virtual Machines using scripts and save some $
As I said at the beginning, I needed the VMs to record some screencasts for Auth10 and do some testing. So no need to have the VM running 24x7 and I didn’t want to pay for that either. I though that shutting down the VM from the management portal would do the trick, but unfortunately that’s not the case.
So I’ve learnt the trick from Michael Washam blog. It basically goes like this:
Export VM definition to a file
Export-AzureVM dns-name vm-name -Path c:\sharepointvm.xmlDelete VM (but not the vhd)
Remove-AzureVM dns-name vm-name
Remove-AzureService dns-name
When you want to start it again, import VM definition from a file
Import-AzureVM -Path 'c:\sharepointvm.xml' | New-AzureVM -ServiceName dns-name -location "East US"Note: I tried to achieve the same using the Azure CLI (
azure vm create-from vm.json) from a Mac but it does not work. Apparently there is something wrong on the json fields expected in create-from. I opened the issue in Github.Pricing
Windows Azure is cheaper than AWS for this usecase. When I created VM in AWS from a SharePoint AMI six months ago, I was forced to use a Large instance (not sure if that’s still the case today).
Large VM in AWS = $0.46/hr
Small VM in Windows Azure = $0.115/hr
Storage in AWS = $0.10 / GB
Storage in Windows Azure = $0.125
So let’s say you use the VM couple of days per week
Compute cost per month
8 hs x 2 days x 4 weeks = 64 hs => 29.44 USD in AWS
8 hs x 2 days x 4 weeks = 64 hs =>  7.36 USD in Windows Azure
Storage cost per month
30GB = 0.10 * 30 = 3 USD in AWS
30GB = 0.125 * 30 = 3.75 USD in Windows Azure
Storage transactions are depreciable in this case
Performance
I haven’t done any real measurement, all I can say is that Extra Small instance in Azure is a no-go. However, the small instance was good enough to do what I had to do. The Large VM on AWS was equally good. For the purpose of my tests it didn’t make a difference.
Turning it on/off
In terms of fleixibilty, AWS provides the ability to turn on and off the VM without having to “remove it” like we explained above. The time it takes to have the machine up and running after being turned off (or removed) is almost the same, with AWS being a little bit faster and easier (one-click vs scripts). It’s in the 5 to 10 minutes range.
SID
Another reason why I tried Windows Azure was because last week when I turned the AWS VM on, I realized there was some issue with the database and the NETWORK SERVICE user. I guess it was an issue with the SIDs changed. Not sure what caused that, but suddenly the VM was broken. Not sure if that will happen in Windows Azure, but that was annoying.
DNS name
Unless you use an elastic IP in AWS, every time you turn on the machine you get a different DNS so there is no way to have a fixed DNS name mapped to the VM. On the other hand, in Windows Azure you get always the same DNS name so you can create a CNAME record that works consistently. You could loose the DNS name if someone else provision a service under that DNS while your machine was turned off… but if you choose an obscure name I don’t see that happening (unless someone hates you :)
Conclusion
Next time I need to build a VM running Windows to test something out, I will probably go with Windows Azure Virtual Machines for the reasons explained above. There are still some rough edges and it’s in Preview state, but in general I am satisfied with the results.

<Return to section navigation list>
Live Windows Azure Apps, APIs, Tools and Test Harnesses
• Alex Homer asked Can I Afford the Cloud? for his five lightly-trafficked Web sites in a 7/5/2012 post:
Like many people I'm trying to evaluate whether I can save money by moving my lightly-loaded, community-oriented websites to Windows Azure instead of running them all on my own hardware (a web server in my garage). With the advent of the low-priced Web Sites model in Windows Azure (which I rambled on about last week), it seems like it should be a lot more attractive in financial terms than using the setup I have now.
At the moment I use a business-level ADSL connection that provides 16 fixed IP addresses and an SLA that makes the connection suitable for exposing websites and services over the Internet. With one exception the websites and services run on a single Hyper-V hosted instance of Windows Server 2008 R2, on a server that also hosts four other Hyper-V VMs. The web server VM exposes five websites; while also providing DNS services for my sites and acting as a secondary for a colleague (who provides the secondary DNS for my sites). The exception is the website running on a very old Dell workstation that displays local weather information captured from a weather monitoring station in my back garden.
In theory Windows Azure should provide a simple way to get rid of the Hyper-V hosted web server, and allow me to avoid paying the high costs of the business ADSL connection. I have a cable Internet connection that I use for my daily access to the wider world, and I could replace the ADSL connection with a simpler package at a considerably reduced cost to maintain backup and failover connectivity. I'd need to find a solution for the weather web server because it requires USB connectivity to the weather station hardware (which it why it runs on a separate server), but that's not a major issue and could be solved by posting data to a remote server over an ordinary Internet connection.
But I can run multiple sites in one Cloud Services Web role by using host headers, which gives me a marginal saving against the cost of the ADSL connection. Of course, according to the Windows Azure SLA I should deploy two instances of the role, which would double the cost. However, the expected downtime of a single role instance is probably less that I get using my own ADSL connection when you consider maintenance and backup for the Hyper-V role I use now.
Using a Virtual Machine seems like a sensible alternative because I can set it up as a copy of the existing server; in fact I could probably export the existing VHD as it stands and run it in Windows Azure with only minor alterations. Of course, I'd need SQL Server in the Virtual Machine as well as a DNS server, but that's all fully supported. If I could get away with running a small instance Virtual Machine, the cost is about the same as I pay for the ADSL connection. However, with only 1.75 GB of memory a small instance might struggle (the existing Hyper-V instance has 2.5 GB of memory and still struggles occasionally). A medium size instance with 3.5 GB of memory would be better, but the costs would be around double the cost of my ADSL line.
So what about the new Windows Azure Web Sites option? Disregarding the currently free shared model, I can run all five sites in one small reserved instance and use a commercial hosted DNS service. Without SQL Server installed, the 1.75 GB of memory should be fine for my needs. I also get a free shared MySQL database in that cost, but it would mean migrating the data and possibly editing the code to work with MySQL instead of SQL Server. A Windows Azure SQL Database for up to five GB of data costs around $26 per month so the difference over a year is significant, but familiarity with SQL Server and ease of maintenance and access using existing SQL Server tools would probably be an advantage.
Interestingly, Cloud Services and reserved Web Sites costs are the same when using Windows Azure SQL Database. However, the advantage of easier deployment from a range of development environments and tools would make Web Sites a more attractive option. It would also be useful for the weather website because the software I use to interface with it (Cumulus) can automatically push content to the website using FTP over any Internet connection.
So, summarizing all this I came up with the following comparisons (in US dollars excluding local taxes):

I only included one GB of outbound bandwidth because that's all I need based on average traffic volumes. However, bandwidth costs are very low so that even if I use ten times the estimated amount it adds only one dollar to the monthly costs. Also note that these costs are based on the July 2012 price list for Windows Azure services, and do not take into account current discounts on some services. For example, there is a 33% discount on the reserved Web Sites instance at the time of writing.
It looks like the last of these, one small reserved Web Sites instance with a MySQL database and externally hosted DNS is the most attractive option if I can manage with MySQL instead of Windows Azure SQL Database. However, what's interesting is that I can achieve a saving for my specific limited requirements, and that's without taking into account the hidden ancilliary costs of my on-premises setup such as maintaining and patching the O/S, licensing costs, electricity and use of space, etc.
And if the hardware in my garage fails, which I know it will some day, the cost of fixing or renewing it...


<Return to section navigation list>
Visual Studio LightSwitch and Entity Framework 4.1+
Paul van Bladel (@paulbladel) described how to Massage the LightSwitch web.config with web.config transformations in a 6/30/2012 post (missed when posted):
Introduction
Since the current Visual studio 2012 RC, it is possible to use web.config transformations. This was a feature missing in LightSwitch 2011 and also in the first beta of V2.
Why would I need web.config transformations?
Well, you don’t need web.config transformations to change the attribute values of your web.config. (e.g. changing a connectionstring between staging and production environment). For that, webdeploy has a neat parameterization system.
Nonetheless, if you want to change the shape of your web.config (e.g. adding an additional connection string because your security data are in a separate database) you will need web.config transformations.
How does web.config transformations work?
In fact, web.config transformations are not specifically a LightSwitch feature, but they are Visual studio feature (not bound to webdeploy).
You can find an excellent introduction over here: http://vishaljoshi.blogspot.be/2009/03/web-deployment-webconfig-transformation_23.html
In this post, I want to stick to a simple example.
An example
Imagine we want a second connection string in our project.
Simply update the file web.release.config as follows:
<configuration xmlns:xdt="http://schemas.microsoft.com/XML-Document-Transform">
  <connectionStrings>
    <add name="SecondConnectionString" connectionString="newstring"
       providerName="newprovider"
       xdt:Transform="Insert" />
  </connectionStrings>
Change your solution configuration now to “release” and publish your project to a .zip file.
You will see that the web.config inside the .zip package looks now as follows:
<connectionStrings>
    <add name="_IntrinsicData" connectionString="_IntrinsicData Placeholder" />
    <add name="SecondConnectionString" connectionString="newstring" providerName="newprovider"/>
  </connectionStrings>
The above example is a simple insert, but you can do whatever transformation.
Conclusion
Web.config transformations are very useful when using LightSwitch in an Enterprise scenario. It allows now to cope with different configuration scenario’s and to fully automate the deployment process via TFS build server. Many thanks to the LightSwitch product team for taking the time to add this to the product.


Return to section navigation list>
Windows Azure Infrastructure and DevOps
David Linthicum (@DavidLinthicum) posted Making sense of the cloud API war to TechTarget’s SearchCloudComputing.com blog on 7/5/2012:
Following the Google Compute Engine announcement last week, the cloud market has a new player in the world of IaaS, and yet another provider with yet another set of APIs.
APIs, or application programming interfaces, are nothing new; they give developers programmatic access to services. This includes cloud services, such as storing data, updating a database, moving data, pushing data into a queue, provisioning a server, etc.
APIs are important in the world of cloud computing because of how they’re used. Lines are being drawn around groups of cloud providers that rely on certain types of APIs. And enterprises are beginning to notice, and while it makes an interesting conversation, consumer concerns still surround vendor lock-in and portability issues.
Central to this issue is that Amazon Web Services (AWS) now dominates the market, making its API the de facto standard. And many companies use AWS, making it an “emerging standard” because of the availability of third-party support and skilled cloud developers -- even though the IP around the API belongs solely to AWS.
There are a few AWS clones out there using its API, including Citrix and Eucalyptus. Eucalyptus makes a private cloud version of AWS, and is compatible with AWS’s API. Thus, you should be able to move code from technology to technology without having to significantly rewrite it for the AWS public IaaS cloud to the Eucalyptus private IaaS cloud, for example.
On the other side of the API war stands all other cloud providers who want a stake in the fast-growing IaaS market, including HP, Rackspace, NASA, Cisco and many others that have joined OpenStack.
OpenStack provides an alternative to AWS -- a different set of APIs to leverage similar services, such as accessing storage and compute resources. However, the amount of OpenStack production deployments currently out there is still rather small, despite the fact that it’s been around for a few years.
The stakes are pretty high. If you go one way or the other, you’re committing to an API, and that means you bind your application to that API. If you want to move to other cloud providers in the future, or perhaps to a private cloud environment, you could discover that a lack of portability drives a significant rewrite, meaning more risks and additional costs.
So what’s an enterprise to do when comparing cloud provider APIs? Here are a few nuggets of advice.
- Create a long-term cloud computing strategy that defines your core requirements, including cloud services you plan to use now and in the future. Be sure to focus on performance, security and governance as well.
- Do your homework. Look at large IaaS providers, such as Rackspace, which supports OpenStack; AWS, which supports its own API; and all other cloud providers who remain in the mix. Look at the tradeoffs and keep an eye on the future.
- Do a proof-of-concept. This means testing the private or public cloud and using the API. Note the features and functions of the API, the ability to provision and scale your cloud, as well the ability to leverage cloud-based storage or compute resources.
The downside of the cloud API war is that many enterprises haven’t taken a stand. These companies plan to wait and see who wins the battle before they decide where to invest. The problem with this approach is enterprises miss the efficiency and value that cloud computing has to offer now, since I doubt this war will have a clear victor anytime soon.

Full Disclosure: I’m a paid contributor to SearchCloudComputing.com.
Brian Prince (@brianhprince) posted Windows Azure Web Sites vs. Cloud Apps to the US DPE Azure Connection blog on 7/5/2012:
We have several new ways for you to run your applications in the cloud, and developers want a little guidance on how to pick which options. I hope to provide a little guidance around that.
The Model of the Models
The next step up is PaaS, or Platform as a Service. We call this Cloud Apps. The cloud service provides the platform for you to run your applications. You get a modicum of control (mostly how the environment your app runs in is configured) and you gain a great deal of benefit from not having to support the lower levels of the infrastructure.
Then there is SaaS, which as been around the longest in one way or another. This is Software as a Service, with the most amount of abstraction from the infrastructure beneath the code that you write. We call this Web Sites.
As we move through these layers, we gain abstraction, and lose control. We have built all three of these types of clouds into Windows Azure so you can choose the type that works best for your app and your business.

First, what we already know
For years Windows Azure has had Cloud Apps. These are applications that are deployed to Windows Azure using the familiar Web Role and Worker Role format. Cloud Apps are a PaaS type of solution. We manage and give you a great platform to build your app on, while giving you some control of the environment. For example, you can tweak the standard image with startup tasks, configure what network traffic is allowed and so on.
Cloud Apps are great choice when you need a little bit of control, but you still don’t want to have to run the whole platform by yourself. If deploying a patch to your server doesn’t get you excited, then this is for you.
Cloud Apps will continue to be the place to go when you have complicated, mutli-tier apps. When you have a mixture of front end and back end servers that are all working together. Perhaps your app needs some customization in the environment, or you need that little bit of control to be able to deploy that COM object you are still dependent on. Do get this customization you can script it of just remote desktop in and make the change by hand.
Another reason to use Cloud Apps is to be able to leverage the new advanced networking that we have provided in the latest release. If you need to network your cloud servers to your on-premises servers, this is for you.
Cloud Apps also has that great production/staging slot system, making it super easy to deploy a new version with a VIP swap. And of course swapping back to the old version just as easily when things don’t go so well.
Web Sites for a truly hands off experience
So, you ask, when should you choose to use Windows Azure Web Sites? The most common reason is when what you are deploying is a pure or simple web application. If you don’t have other servers to deploy, and you just need an IIS container to run your code, then Web Sites is for you. This doesn’t mean that only simple web apps are a fit, you could have a very complex web app. What I mean is that you need a simple hosting environment, just an IIS container, and nothing more sophisticated than that.
If you are porting an existing web site, then Web Sites is probably the first stop for you as well. Just picking up your existing bits, and dropping them into our environment should be a fairly easy path to follow.
And of course, if you are launching an app built on one of the popular open source apps we have in the gallery, then that removes you from even having to deploy the app yourself. Read my post on how easy it is to deploy your blog on WordPress with Web Sites.
Web Sites still give you access to all of the other Windows Azure services like caching, service bus, SQL Database, and Storage.
The Cloud App deployment process requires building packages, and spinning up servers, which can take time. Web Site deployment process only requires ftp’ing or pushing over your bits. No delays, no hurdles, just deploy the way you are used to.
Prefer to push from GIT or TFS? We got that. Want to deploy with Web Deploy in VS? Check. Or just straight up connect with FTP to fiddle the bits directly? No problems.
Web Sites do start by running in a shared environment, where many customer’s sites are running on the same hardware, but with some process isolation. This is very common in almost all web hosting companies (cloud based or not). You can flip your site over to Reserved mode, where your sites are the only sites that are running on the hardware. When you do this you do leave the ‘free 10 sites’ area and move into having to pay for the hardware that you are using. But while we are in preview mode, that CPU costs are reduced. Official pricing will be available when we launch
Whereas Cloud Apps have about a 10-20 minute lag to spin up hardware, scaling up on the Reserved hardware is near instant, as that hardware is pre-allocated, and waiting for you. You can also scale up and down the number of servers, as in Cloud Apps.
The Short Answer
The short answer is:
Pick Web Sites:
- Just need IIS
- Ok running in shared space
- Don’t need or want any control below IIS
Pick Cloud Apps:
- You have sophisticated deployment and complex server needs
- Need some control of the platform, but I don’t want to manage patches
- You need isolated hardware
Pick VMs:
- Need total control
- What you are deploying isn’t cloud friendly
- Just trying to quickly migrate an existing infrastructure


Manu Cohen-Yashar explained How web roles can behave like a worker roles in a 7/4/2012 post:
The main difference between web and worker roles is the fact that web roles lives in IIS and so they are running in an application pool. Application pools are going down every X minutes (default is 20) if no request arrived. This is problematic for periodic tasks. If you want a timer to live for a long time and periodically send triggers.
All you need to do is run a simple startup task that will execute the following command in elevated mode:
%windir%\system32\inetsrv\appcmd set config -section:applicationPools -applicationPoolDefaults.processModel.idleTimeout:00:00:00
this command simply set the application pool timeout to zero (which means "never")
This way the most important difference between web role and worker role disappears.
Interesting…

Robin Shahan (@RobinDotNet) described Upgrading to Windows Azure Tools 1.7 in a 7/4/2012 post:
At GoldMail, we like to be using the most recent version of the Azure Tools and SDK for two reasons. One, we can take advantage of the newest features, and two, we don’t get too far behind, which may cause problems down the line. This can be problematic, as we have a lot of services, a lot of other work to do, and the Azure team is pushing out iterations pretty quickly. They were coming out every 3-4 months until this last one (June 2012), which was almost 7 months.
The new version of the Tools/SDK (1.7) will run side-by-side with the previous version (1.6) (thank you Microsoft!). From information provided at the MVP Summit, I knew this was going to be the case, so we updated to 1.6 in March, which was a small update that didn’t impact us. This would allow us more flexibility when updating to 1.7. …

Robin continues with:
- Upgrading from Tools 1.6 to Tools 1.7
- How do we schedule upgrading our services at GoldMail?
Gaurav Mantri (@gmantri) described How to move Windows Azure Virtual Machines from one Subscription to another in a 7/4/2012 post:
Quite recently I was helping somebody out on MSDN forums with a question about Windows Azure Virtual Machines (IaaS). One thing that came up on that thread is how would one move their VMs from one subscription to another. There could be many reasons as to why one would want to do this. One possible scenario is that you started trying these features out in a subscription which was tied to your personal account and now you want to move that to a subscription associated with your official account. Another reason could be that you wish to move VMs from one data center to another (e.g. EU to US). I found one way of doing so which I am about to describe in this post. To be honest, it is rather a very convoluted process. If you think of better ways to accomplish this or if you’re doing it some other way, please let me know by providing your comments.
How it is accomplished?
Again, I don’t really use VMs that much so I created a bunch of VMs using Windows Azure Platform Training Kit exercises. The one I followed is “Introduction To Windows Azure Virtual Machines” Hands On Lab. You can download the kit from here: http://www.microsoft.com/en-us/download/details.aspx?id=8396.
Once I completed the exercise, this is how things look on the portal for me. Essentially I have 2 VMs – One for the web server, one for the SQL Server and 4 Disks – 2 for VMs and 2 for SQL Server Data and Logs:


If I explore my Blob Storage, I will see 4 page blobs in “vhds” blob container. For obvious reasons, I used Cloud Storage Studio


When I run my application, this is what I see in the browser.

Now let’s try and move this application to another subscription.
Steps
I followed the steps below to move my VMs from one subscription to another.
Step 1 – Copy Blobs
First we’ll copy these blobs into a storage account in the target subscription. To do so, we can make use of Asynchronous Copy Blob functionality. You can read more about this functionality on Windows Azure Storage Team Blog here: http://blogs.msdn.com/b/windowsazurestorage/archive/2012/06/12/introducing-asynchronous-cross-account-copy-blob.aspx. I have also written a blog post with code sample to copy an object from Amazon S3 to Windows Azure Blob Storage. You can read that post here: http://gauravmantri.com/2012/06/14/how-to-copy-an-object-from-amazon-s3-to-windows-azure-blob-storage-using-copy-blob/ (You can download the source code of the Visual Studio project from here). All you have to do is provide appropriate values for various variables there. For “amazonObjectUrl” variable, you would need to provide the URL for the blobs. Richard Conway from ElastaCloud has also written a blog post about copying blobs across storage accounts which you can read here: http://blog.elastacloud.com/2012/07/04/copying-azure-blobs-from-one-subscription-to-another-with-api-1-7-1/. When copying blobs from source to target storage account, there are a few things to remember:
- Make sure that your target storage account is created after 7th June 2012 otherwise asynchronous copy blob operation will fail. If the target storage account is created before 7th of June 2012, you would need to first download the blobs on your computer and then upload them again as page blobs in the target storage account. You could use Cloud Storage Studio or any other storage explorer tool which supports downloading page blobs sparsely i.e. which only downloads the pages which are occupied or in other words downloads the pages containing non-zero bytes.
- Since the blob container holding your blobs has a private ACL, for asynchronous copy to work, either you would need to make that blob container public (not recommended) or generate a signed URL using Blob Shared Access Signature with at least “Read” permission on the blobs (recommended). Again you could use Cloud Storage Studio or any other storage explorer which allows generation of signed URLs.
After the copy operation is completed, I see the same 4 page blobs in my target storage account.

Step 2 – Create Disks
Next we’ll create disks from these page blob VHDs for our IIS Server and SQL Server. To do so, on the portal, click on Virtual Machines –> DISKS –> CREATE DISK and follow the wizard.


You would need to do for all 4 page blob VHDs. For the disks which contain the operating system, you would need to specify so by checking the checkbox which reads “This VHD contains an operating system”. Once you’re done with this, you should see the new disks in the portal.

Step 3 – Create VMs and Attach Disks
Next step would be to create VMs. To do so, on the portal click on NEW –> VIRTUAL MACHINE –> FROM GALLERY

On the subsequent screen, click on MY DISKS option and select one VM.


Once the VM has been set up and in running state, I can RDP into that box and see exact same settings as that of the previous one.

In my scenario, I will do the same thing for my SQL Server VM.


Since with the SQL Server VM in the 1st subscription we attached 2 disks (to store the data) we would need to do the same here as well. To do so, select the SQL Server VM and click on ATTACH icon on the bottom and choose ATTACH DISK option there.


In my case, I needed to do this 2 times as I had 2 data disks. Once I am done with all of these, this is what I see in the portal.

I was expecting to see my website up and running on my 2nd subscription but got an error instead. I guess the reason for that being my SQL Server VM (and hence SQL Server) was brought up before I could attach the disks containing data. I rebooted the SQL Server VM and once it came back up, I accessed my site and it was live and kicking!!!

Step 4 – Clean Up
Last and final step is clean up which is essentially deleting the VM and associated blobs from the source subscription. These are large blobs and you don’t want to pay for storing the blobs in case you don’t want to use them anymore. To clean up data from the source subscription:
- Detach the disks you attached.
- Delete the VMs
- Go into DISKS menu and delete those disks from there. IMPORTANT – Please note that deleting those disks from the portal doesn’t physically delete them from blob storage. This process just removes the locks (leases) from these disks so that you can delete them using any storage explorer. If you don’t need those disks anymore, please delete them to avoid storage charges.
- Now delete all the disks using a storage explorer.
Summary
In this blog post, we saw that how we can move Windows Azure VMs across subscriptions. Obviously my scenario was rather simple and the VMs were not in a complex configuration. By and large, this was all made possible by Windows Azure team’s foresight of keeping the virtual machine’s and other VHDs as page blobs in blob storage. Also having asynchronous blob copy functionality across storage accounts helped immensely by cutting down the blob copy time significantly. In my case both storage accounts were in the same region and I was able to transfer 4 blobs totaling 70 GB (30 GB + 30 GB + 5 GB + 5 GB) in less than a minute.
I hope you have found this information useful. As I said at the start of my blog post, if there are better ways to accomplish this please feel free to share by providing comments below. If you think I have made some errors and provided some incorrect information, please feel free to correct me by providing comment. I’ll fix those issues ASAP.
Many thanks to Vitor Tomaz, Neil Mackenzie, and Maarten Balliauw for reviewing this blog post and providing valuable feedback.
Stay tuned for more Windows Azure related posts. So Long!!!


Jay Heiser asserted Updating a cloud is like organ transplants without anesthesia in a 7/4/2012 post to his Gartner blog:
I managed to miss the excitement of yet another weather-related disaster by being in Japan during the the derecho incident that knocked out power to approximately 3 million customers, including my parents in Ohio and our house in Virginia, 400 miles away.
Another disaster that I just missed took place here in Japan, a major failure at a large and prominent cloud service provider, FirstServer. While this was extremely inconvenient for the approximately 5000 customers (1/10 of the total) who experienced unrecoverable data loss, it provided a great example to cite in my Disaster in the Cloud presentation, which I had been scheduled to present multiple times. Off the incident radar outside of the Japanese-speaking world, Gartner’s Tokyo-based security and consulting staff explained that this June 20th failure was a high-profile data loss event at a prominent national provider.
Like the gmail outage early last year, which required 4 days to recover service for what Google described as constituting only .02% of their user base, and an AWS incident about the same time that resulted in some permanent loss of data, the FirstServer incident was the result of a software upgrade.
It is hardly surprising that live upgrades of clouds sometimes result in failures. Replacing a code module within a running service is the equivalent of transplanting an organ without any anesthetic. Not only does the patient not have any anesthetic, the patient isn’t even lying down. The operation takes place while the patient is hard at work, performing heavy lifting on behalf of thousands of tenants simultaneously.
The economics of cloud computing drive service providers to make frequent software upgrades, and to do it without any downtime. Success in a highly-leveraged market is dependent upon providing as many forms of service to as many tenants as possible, virtually ensuring that most commercial clouds will be highly dynamic collections of interdependent software modules. The large number of customers makes it difficult or impossible to schedule downtime.
The good news is that a huge number of live upgrades take place without any negative impact. Failures have been relatively uncommon, and most have not yet resulted in unrecoverable data loss.
Cloud service buyers should ask current and potential providers about their software upgrade practices, but should not expect any agreement on the best practices for evaluating any particular provider’s practices. One thing I am confident about, however useful an ISO 27000 certification or a SOC2 or SOC3 assessment may be, it is unlikely to go into much depth on this increasingly critical topic.

<Return to section navigation list>
Windows Azure Platform Appliance (WAPA), Hyper-V and Private/Hybrid Clouds

<Return to section navigation list>
Cloud Security and Governance
•• The Codename “Trust Services” Lab Team sent an Announcement: Microsoft Codename "Trust Services" Lab Update message to registered users on 7/9/2012:
We are pleased to announce an update to the Microsoft Codename “Trust Services” Lab
The key additional features are:
Search on encrypted data
- Encryption of streams
- Role separation for administration, publishing and consumption of data protection
The above features were based on customer feedback received on the Lab release (February 2012).
The Portal Site provides the updated Trust Services SDK and additional information including videos, documents and samples for you to use in your applications to protect sensitive data stored on SQL Azure and Azure store.
[We] look forward to your participation.
Regards,
Trust Services Team

<Return to section navigation list>
Cloud Computing Events
My (@rogerjenn) Sessions at WPC 2012 Containing the Keyword “Azure... of 7/7/2012 begins:
Following are the 22 sessions at Microsoft’s Worldwide Partners Conference (WPC) 2012 being held in Toronto, Ontario on July 8 through 12, 2012:
DYN11 Microsoft Dynamics CRM—Demonstrating the Power of the Connected Cloud
- Session Type: Breakout Session
- Track: Microsoft Dynamics
- Speaker(s): Reuben Krippner
Session Details
- Reduce demonstration environment setup time from 40 hours to less than 1 hour.
- Deploy a "Business Solution from Microsoft" demo showcasing Microsoft Dynamics CRM Online, Microsoft Office 365, and Windows Azure.
- Tell a story about how sales organizations leverage social, mobile, and cloud-based business applications to amplify sales and drive productivity.
EP01i Leverage Channel Incentives to Drive Business Growth for Key Workloads and Solutions
- Session Type: Interactive Discussion
- Track: Enterprise
- Speaker(s): Laurent Mechain
Session Details
Learn about the new and updated Channel Incentives programs available for you to grow your business with Microsoft for key workloads and solutions (Office 365, Windows Azure, Windows Intune, Voice, Application Platform, Management, and Virtualization).


And continues with 20 more Azure-related session summaries.
Himanshu Singh (@himanshuks) reported The 2012 Microsoft Worldwide Partner Conference Starts July 8 in Toronto!
The 2012 Microsoft Worldwide Partner Conference (WPC), which will take place July 8-12 in Toronto, Canada, is almost here and this year’s conference is filled with an incredible agenda, including keynotes from Microsoft CEO Steve Ballmer and Satya Nadella, President, Server and Tools Business. The Server Data and Cloud track will cover Microsoft’s cloud technologies including Windows Azure with more than 20 cloud-focused sessions and several Windows Azure Breakout Sessions.
Here are a few Windows Azure Breakout Sessions to check out:
- Monday July 9; 3:00-4:00 PM - What’s New in Windows Azure (SDC21) Stephanie Ferguson, presenter
- Monday July 9; 4:30-5:30 PM - New Partner Opportunities on Windows Azure (SDC22) Joshua Waldo, presenter
- Tuesday, July 10; 2:00-3:00 PM – Windows Azure in the Enterprise (SDC23) Nelson Gonzalez and Rob Cocorocchia, presenters
- Tuesday, July 10; 2:00-3:00 PM - How SaaS Changes an ISV’s Business Model (ISV03) David Chappell, presenter
- Wednesday, July 11; 5:00-6:00 PM – Partner Opportunities and Customer Momentum in the Public Cloud (EPO9i) Rita Alexandrou, presenter
Registered attendees will also be able to network with partners before, during and after the event via WPC Connect and in person at partner-to-partner speed-networking events.
Attendees should check out the Conference Guide (PDF) now to make the most of this great event and maximize opportunities for networking.

Joe Panettieri (@joepanettieri) posted From Office 365 to Windows Azure: 5 Questions for Microsoft at the Worldwide Partners conference to the TalkinCloud blog on 7/6/2012:
From Office 365 to Windows Azure, it’s time for a Microsoft cloud computing reality check. During a sit-down with Microsoft Channel Chief Jon Roskill (pictured at right) next week, we’ll pose the following five questions. Our goal: To truly measure Microsoft’s cloud progress with channel partners.
The interview, scheduled for Microsoft Worldwide Partner Conference 2012 (WPC12, Toronto), will hopefully cover the following ground:
1. Cloud Partner Influence: In the traditional software market, partners influence roughly 90 to 95 percent of Microsoft’s annual revenues. But in the world of cloud services — where Office 365 and Windows Azure are emerging — what percentage of revenues do channel partners influence?
2. Office 365 First-Year Scorecard: Office 365, the SaaS platform offering Exchange Online, SharePoint Online and Lync Online, turned one year old in June 2012. Where did Office 365 show the greatest progress, and in what areas is Microsoft hoping to see/deliver more improvements? Also, how are Office 365 syndication services performing? The syndication services allow value-added partners (typically telcos) to wrap their own services around Office 365, and also allow the partners to control end-customer billing. Any updates on how the syndicators are performing?
3. Does Anybody Shop There?: The Office 365 Marketplace seeks to link channel partners and Office 365 ISVs to end-customers. But the marketplace has been extremely quiet. Is Microsoft taking any steps to generate some noise, excitement and engagement in the marketplace?
4. Surface Tablets Meet the Cloud: When Microsoft Surface tablets running Windows 8 and/or Windows RT arrive in late 2012, how might they integrate with Office 365 and Windows Azure applications? Any special integrations that will make Microsoft- and PC vendor tablets a better choice than Apple iPad and Google Android-powered tablets?
That’s all for now. I look forward to seeing Roskill and gaining his thoughts in a few days.
Read More About This Topic
<Return to section navigation list>
Other Cloud Computing Platforms and Services
• Xath Cruz posted Google Compute Engine: 5 Reasons Why This Will Change the Industry on 7/8/2012:
Google’s new IaaS offering, called Compute Engine, is one of the biggest things that has happened to the cloud computing industry in such a long time and here are five reasons why:
PaaS is still to[o] ambitious to work on a large scale
Microsoft’s failure to create a successful business out of Windows Azure as it was originally built and Google’s similar lack of success with the App Engine is any indication, it’s that Platform as a Service is still not ready, and is currently way behind Amazon Web Services. MS and Google still back PaaS, but they already know that IaaS is the way to go if they want to be competitive in the industry.
Openstack has become more important in the industry
Right now, Openstack is criticized for not being mature enough and having a development process that is significantly slower than Amazon’s AWS, but large enterprises have always been scared of being locked into a single cloud computing platform, especially now that they are moving towards hybrid cloud models that span both public and local clouds. Openstack is the one shining beacon of hope, all that’s needed is for Rackspace to build its Openstack-based cloud into something that can compete with Windows Azure, AWS, and Compute Engine when it comes to higher level services.
There’s no longer any sense in competing on scalability
With the market for price or scalability already cornered by Microsoft, AWS and Google, there’s really no sense in trying to drive prices down. Google and Amazon in particular are hard to beat, with Compute Engine being touted as half as expensive as other clouds, while AWS has a long history of cutting prices. All of these providers have the necessary volume to further cut prices, should it ever come down to a price war. So while there’s room for plenty of other cloud providers, they need to offer something different that will justify the higher price point.
Facebook needs to come out with its own IaaS
While Facebook’s offering will probably function differently due to the different set of developers they are targeting, there’s still a business potential in letting organizations build apps on the Facebook platform. And Facebook certainly has the ability to pull this off, based on their scale and infrastructure smarts. It is also interesting to see what they can come up with using their low power ARM processor-based servers, which they have been experimenting on for quite some time now.
Google may become the force to be reckoned with in the cloud
While still not mature enough, Google’s Compute Engine is poised to round out Google’s already impressive suite of cloud offerings around Chrome, Apps, and Drive. Google also has their App Engine under their sleeves, which is currently home to a million apps. It’s not much by industry standards, but a million apps is impressive considering the bad start resulting from angering many existing developers due to pricing changes last year. AWS is on a different path, with its focus on IaaS capabilities and their app marketplace, so right now only Microsoft is close to reaching the number of cloud products that Google has. VMware has a few things in place that will let them enter the industry, but right now they’re still a long way from being considered a real player in the cloud industry.
Related Articles:

Xath presents no evidence to support the “Microsoft’s failure to create a successful business out of Windows Azure as it was originally built and Google’s similar lack of success with the App Engine” assertions. I believe both Microsoft and Google have created successful businesses with Windows Azure and Google App Engine. Maybe not roaring business but successful.
And Google’s Compute Engine isn’t mature enough for what?
Finally, if Facebook lets “organizations build apps on the Facebook platform,” isn’t that PaaS, not IaaS?
Adron Hall (@adron) posted IaaS vs. PaaS or Infrastructure vs. Platform and I Want Beer NOW! on 7/6/2012:
A friend and now coworker of mine, Richard Seroter (@rseroter & Blog [see post below]) decided to do a comparo. I took the infrastructure based deployment, ala IaaS and he took the platform based deployment, ala PaaS. What we’ve done is taken a somewhat standard ASP.NET MVC with Entity Framework, a SQL Server Database, a UX & UI design and got it running locally. From there we then deployed the same application the two respective ways to deploy the web application to a live environment. He took the Tier 3 PaaS (Iron Foundry + Cloud Foundry for the win) and I took the tried and true method of deploying via Windows 2008 Server instances via the Tier 3 Infrastructure.
Here are the steps I went through and for his steps check out this blog article on the PaaS deployment.
Part #1 – Get Some Servers Setup
First things first, I need two instances. If you’re following along, you can basically use whatever instances or server you want. AWS, Rackspace, or Windows Azure. Based on that there may be a few steps here or there you may need to alter, add or subtract from the process. One for the ASP.NET MVC Application and one for the SQL Server Database. The web app server doesn’t need a ton of resources, so I built it and scaled back RAM and cores to a single core.

ASP.NET MVC Web Server (Click for full size image)
In the next step here I’ve selected additional software to be installed on the instance. I’ll need .NET 4.0 so I’ve added this as shown.

Selecting .NET 4.0 for Addition to the Instance (Click for full size image)
After setting up the web server I also setup a database server. For the database server I made sure to allocate some decent resource, setting up 2 cores and 8 GB RAM. I also added the SQL Server installation based on Tier 3′s software packages so it would install automatically when the image is created.

All My Instances Building & Running (Click for full size image)
When I setup the SQL Server instance, I used a blue print feature that allows the SQL Server to be installed directly on the image. This of course saved me a lot of time. But it does add to the deployment time of the instance in the cloud.
Part #2 – Setting up Windows Server 2008
The first thing we’ll need to do is log into these machines and configure them, standard infrastructure stuff. Open up the Server Manager (which launches automatically on instances) and verify that we have IIS installed on the web server.
Database Server

Server Manager (Click for full size image)
Next log into the database server and verify that the SQL Server is up, running and create the initial database.
Thusly…

Using SQL Server Management Studio checking that the SQL Server Exists
Once I had both of the servers up and running I got the application ready to deploy. First a little schema generation to use to deploy the database.

Don’t Use “Script Database as…” option, use the “Tasks” option…
Once the script is generated then transfer it and execute it against the database on the database server.

Execute the SQL Schema Create Script (Click image for full size)
Always a good thing, even if all green lights are seen on the SQL execution, go in and make sure the tables are all there.
Web Server

Publish (Click Full Image)
Publish Application (click for full size image)For the web server, as long as IIS is already installed, the setup is fairly easy. First snag the compiled bits that need deployed. We’ll do a direct drop onto the server and get it running.
To get the compiled bits, right click on the Visual Studio Project and select publish. Add a deployment scenario, which I did and set it up to just spit the bits out to a directory. There of course a multiple options at this point to use FTP, WebDav or whatever your choice is. I’m not a particular fan of any of those in particular, they’re all fairly easy.

Deployment Publication Options (Click for full size image)
Interuption!!!
At this point I actually got hit with the “.NET 4.0 isn’t installed…” which it should have been. I opened up windows update and realized that it had not successfully executed nor had the .NET 4.0 install. This happens with all sorts of instances, regardless of provider, so make sure that the bits we need are installed. Also, with Windows, it’s a really good idea to get windows update turned on.
Back to Deployment
Now that we have the built bits just copy them onto the web application server into the inetpub wwwroot directory. Once you have that copied over you would be able to navigate to the IP of the machine this is setup on. At this time you may also want to setup a cname or a-record to point to the IP, so you can use a friendlier URI.
Retrospective
Now think about what has just gone on for a moment. We had to literally build out machines, add software and more. There were a lot of steps. This takes anywhere from 30 minutes to a few hours of actual work. In a larger business or an enterprise environment it could get extended out even further. Because of the extra complexity it could also end up broken, requiring extra troubleshooting and coding. There could even be a host of odd one off configuration issues with the hosting software itself.
Imagine you wanted to host an ASP.NET, PHP, Ruby on Rails and a Node.js App on the Server. That would be almost impossible. Consider how much extra configuration knowledge an ops person would need to troubleshoot each one of those frameworks. Just sit back and contemplate the complexities involved for a moment. All the complexity goes away with something like Cloud Foundry or Open Shift. With someone managing that system for you, such as us here at Tier 3 with our Web Fabric PaaS, AppFog, Cloud Foundry, or one of the other providers even more of the complexities just disappear.
Time for Summary & Beer
With all the steps and individual tasks needed to get something running in an IaaS Environment, go check out how slick getting something up and running with a PaaS style environment. The juxtaposition between what Richard had to go through versus what I had to go through is pretty significant. Simply put, for the vast majority of all application development can be done against a PaaS Environment and likely should. Digging deeper into the infrastruture elements is rarely needed except in rare scaling circumstances, such as the volume that Facebook, LinkedIn or Netflix deal with. Even then, as has been stated by these companies, they have a PaaS of their own they often build software to. So why not have this ability where you build software?
One of my key metrics, and I’ll be elaborating on this metric more in the future, is when I get to head out of the office for the day, relax, have a beer, and think about what I’ll get to create next. I call this my “Beer Enabler Measure“. PaaS technologies make it much easier for me to get to the relaxing part of my day a lot faster than IaaS technologies, and both of these make sure that I’m not pulling an all nighter without a beer like traditional hosting environments often do.
In the end, sure, infrastructure can be important and can help in transitioning legacy applications into an easier to manage environment. Today though, if you’re doing web application dev of any type, it should be deployed against a PaaS Environment either private or public.

Richard Seroter (@rseroter) posted IaaS vs. PaaS: Deploying a Web Application on 7/6/2012:
My buddy and partner-in-crime, Adron Hall, built a web application that we at Tier 3 plan on using for our internal/external product catalog [see post above.] He initially deployed the app (ASP.NET + SQL Server DB) to our IaaS fabric, but wanted to compare THAT experience with the steps to deploy to our PaaS (Web Fabric) instead. So, while Adron has written up his experience on the IaaS side, I thought I’d throw out my experience taking an existing web app and deploying it to our PaaS.
Adron had the source control for the application in a private Github and I used the very nice Github for Windows to pull it.

After opening the solution in Visual Studio, I could see that Adron’s solution had four projects (and a set of database creation scripts, because he’s a nice guy).

The primary project, Catalog, was an ASP.NET MVC application that interacts with a SQL Server database for storing and returning details about our products. To successfully push this to the Tier 3 Web Fabric (or any PaaS, really), I needed to do three things:
- Deploy this application to the PaaS fabric.
- Create the database in a PaaS-accessible repository.
- Update (if necessary) the database connection string for the web application.
That SHOULD be a lot simpler than building out a multi-node server environment, installing software, opening ports and all that infrastructure stuff that gets in the way of deploying cool software. It’s definitely necessary to have SOMEONE doing all that great infrastructure stuff, but preferably, not me. Let’s walk through the three steps I just outlined.
1. Deploy this application to the PaaS fabric.
The firs thing that I did was right-click the Catalog project in Visual Studio and select “Publish.” This built the project and gave me a deploy-ready version of the application on my file system.

Unlike other PaaS platforms that are completely multi-tenant, a Tier 3 Web Fabric environment is instantiated for each customer. Anybody can go into our Control Portal and provision themselves a dedicated PaaS that supports all sorts of frameworks/languages while being physically separated from other customers. In this case, Adron created a Web Fabric environment that this web application would get deployed to. I opened up the Cloud Foundry Explorer tool, added an entry (with credentials) for the Web Fabric environment, and chose to “Push” my application.

After choosing a name for my application and selecting the provisioning size, I was good to go.

In a few seconds, my application was running on Web Fabric. From start to finish, this first step (“deploy app to PaaS”) took less than three minutes.

2. Create the database in a PaaS-accessible repository
Our application was up and running but clicking through it reveals the obvious: there’s no database yet! This next step required me to provision a database that my web application could access. Fortunately for me, “SQL Server databases” is one of the many Web Fabric services available to developers. From the Cloud Foundry Explorer, I added an instance of this database service.

With the service created, I bound it to my CatalogSample application. Binding a service to an application caused my application’s web.config to get updated with connection details for the (database) service.

I wanted to run Adron’s database scripts against the instance so that I could get the tables our application needed, so I took advantage of the Cloud Foundry Caldecott technology which lets you tunnel into a service and interact with it. In this case, it’s very easy to create a quick connection to my SQL Server service, and then use the SQL Management Studio against my database.

With my tunnel up and running, and credentials returned, I could then open up SQL Management Studio and connect. After running Adron’s script, I then saw a multiple of tables in my database.

At this point, I had my application deployed and database provisioned. This particular step took about 3 minutes total. In the final step, I needed to update the connection strings in Adron’s web application so that they pointed to my Web Fabric database service.
3. Update (if necessary) the database connection string for the web application.
As I mentioned earlier, when you bind a Web Fabric application service to an application, the application’s configuration file gets updated with connection details. What this means is that a new connection string named “Default” is added to the web.config. If you already have one named “Default”, then that connection string is overwritten with the details for the Web Fabric database. This is GREAT when you want to develop against a local DB, but be confident that the push to a public PaaS won’t require code/config changes.
So how did I get ahold of this new connection string? From the Cloud Foundry Explorer, I browsed to my application and opened the web.config file.

I could see the new, appended “Default” connection string in the Web Fabric application.

I simply took that connection string and replaced the values in Adron’s other two connection strings. Moving forward, I’ll harass Adron into using a single “Default” connection string that gets rewritten on deployment. After republishing my application, and doing another push to Web Fabric from the Cloud Foundry Explorer, our application was now fully operational. I could browse, create, edit and delete records in this data-driven product catalog application.

This final step took me a couple minutes to complete.
Summary
Not every application will cleanly migrate to the cloud, or offer the right cost savings to justify the effort (as Christian Reilly pointed out in a series of tweets with me and a corresponding link to his great post on the topic). But in this exercise, I took an existing, data-driven ASP.NET MVC application and moved the entire thing to the Tier 3 Web Fabric in about 10 minutes. Don’t forget to check out Adron’s post to see how he did this deployment to an IaaS environment.
There are reasons to take an existing application and move it to an IaaS-like environment instead of a PaaS, but as you’ve seen here, it’s REALLY straightforward to use a PaaS and avoid the messiness of the underlying hosting infrastructure!


Matt Weinberger reported Netflix Reinforces Dedication to Amazon Web Services After Outage in a 7/6/2012 post to Silicon Angle’s DevOps blog:
Somewhere along the line, Netflix became the bellwether for cloud development, as its immensely successful video streaming service has put it in the spotlight, both for its usage of scalable public cloud infrastructure and its custom with Amazon Web Services for the same.
And now, in the wake of last weekend’s great Amazon Web Services outage, Netflix has reaffirmed its commitment to the provider and given an overview of the lessons learned.
The outage, as you likely know by now, was caused last Friday evening by an electrical storm in the North Virginia AWS Availability Zone (AZ). For Netflix, even though AWS came back up 20 minutes after the initial failure, an API backlog and capacity problems held up the vital AWS Elastic Load Balancing (ELB) service from its normal performance baseline.
In practical terms, this meant Netflix customers were finding themselves attempting to connect to unhealthy instances that weren’t properly deregistering with ELB, causing a “black hole” of an unavailable zone to emerge. And network calls into that black hole were just left hanging.
As the Netflix blog entry put it:
In our middle tier load-balancing, we had a cascading failure that was caused by a feature we had implemented to account for other types of failures. The service that keeps track of the state of the world has a fail-safe mode where it will not remove unhealthy instances in the event that a significant portion appears to fail simultaneously. This was done to deal with network partition events and was intended to be a short-term freeze until someone could investigate the large-scale issue. Unfortunately, getting out of this state proved both cumbersome and time consuming, causing services to continue to try and use servers that were no longer alive due to the power outage.
Fortunately for those Netflix users, some of the company’s much-touted open source and other internal cloud resiliency projects paid off. Regional isolation of the issue meant that European customers were left unaffected. And Cassandra, Netflix’s cross-region distributed cloud persistence store, kept a third of the regional nodes running with no loss in availability.
Chaos Gorilla, one of Netflix’s roster of Simian Army cloud availability loss simulation tools (which also includes the recently open-sourced Chaos Monkey), is designed to simulate the failure of an AWS availability zone, and if nothing else, this incident is helping Netflix refine its approach.
The final word: Netflix says that the cloud is rapidly maturing, and that it’s working with Amazon Web Services to help these kinds of cases from ever happening again. What’s more, despite any Amazon outages, Netflix says that it’s still seen a general rise in availability since it moved from its data center to Amazon’s public cloud.
So that’s a strong vote for public cloud from Netflix. But despite the company’s prominence, many are still wary of cloud availability disruptions, and these outages only make them more so. It’s just a matter of learning from mistakes, refining your approach and moving forward.
Netflix Reinforces Dedication to Amazon Web Services After Outage is a post from: SiliconANGLE
We're now available on the Kindle! Subscribe today.In the same vein:
- Cloud Failure Is Inevitable: Learn From the Crash and Move On
- Netflix Brings Cluster, Application Management to Amazon Web Services with Asgard Open Source Tool
- What We Learned From The Amazon Web Services Apocalypse
- Core Microsoft Office 365 Exec Defects to Amazon Web Services
- Eucalyptus Systems Gets Agile, Open Sources Its Cloud Platform
- SAP Expands Its Amazon Web Services Play With All-in-One
Jeff Barr (@jeffbarr) announced Multiple IP Addresses for EC2 Instances (in a Virtual Private Cloud) in a 7/6/2012 post:
Amazon EC2 instances within a Virtual Private Cloud (VPC) can now have multiple private or public IP addresses. This oft-requested feature builds upon several other parts of AWS including Elastic IP Addresses and Elastic Network Interfaces.
Use Cases
Here are some of the things that you can do with multiple IP addresses:
- Host multiple SSL websites on a single instance. You can install multiple SSL certificates on a single instance, each associated with a distinct IP address.
- Build network appliances. Network appliances such as firewalls and load balancers generally work best when they have access to multiple IP addresses on a network interface.
- Move private IP addresses between interfaces or instances. Applications that are bound to specific IP addresses can be moved between instances.
The Details
When we launched the Elastic Network Interface (ENI) feature last December, you were limited to a maximum of two ENI's per EC2 instance, each with a single IP address. With today's release we are raising these limits, allowing you to have up to 30 IP addresses per interface and 8 interfaces per instance on the m2.4xl and cc2.8xlarge instances, with proportionally smaller limits for the less powerful instance types. Inspect the limits with care if you plan to use lots of interfaces or IP addresses and expect to switch between different instance sizes from time to time.
When you launch an instance or create an interface, a private IP address is created at the same time. We now refer to this as the "primary private IP address." Amazingly enough, the other addresses are called "secondary private IP addresses." Because the IP addresses are assigned to an interface (which is, in turn attached to an EC2 instance), attaching the interface to a new instance will also bring all of the IP addresses (primary and secondary) along for the ride.
You can also allocate Elastic IP addresses and associate them with the primary or secondary IP addresses of an interface. Logically enough, the Elastic IP's also come along for the ride when the interface is attached to a new instance. You will, of course, need to create an Internet Gateway in order to allow Internet traffic into your VPC.
In addition to moving interfaces to other instances, you can also move secondary private IP addresses between interfaces or instances. The Elastic IP associated to the secondary private IP will move with the private IP to its new home.
As I mentioned when we launched the ENI feature, each ENI has its own MAC Address, Security Groups, and a number of other attributes. With today's release, these attributes apply to all of the IP addresses associated with the ENI.
In order to make use of multiple interfaces and IP addresses, you will need to configure your operating system accordingly. We are planning to publish additional documentation and some scripts to show you how to do this. Code and scripts running on your instance can consult the EC2 instance metadata to ascertain the current ENI and IP address configuration.
Console Support
The VPC tab of the AWS Management Console includes full support for this feature. You can manage the IP addresses associated with each interface of a running instance:
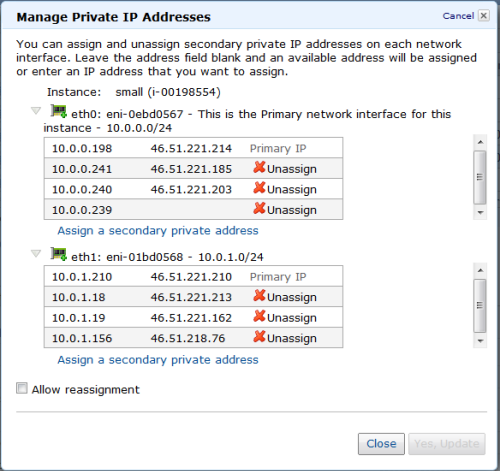
You can associate IP addresses with network interfaces:
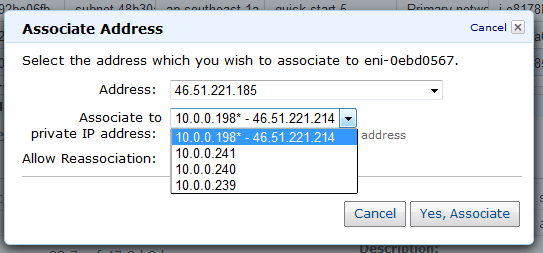
You can set up interfaces and IP addresses when you launch a new instance:
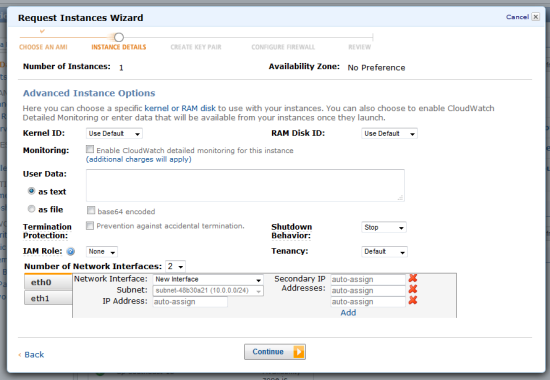
Pricing
You can use one Elastic IP Address per instance at no charge (as long as it is mapped to an EC2 instance), as has always been the case. We are reducing the price for Elastic IP Addresses not mapped to running instances to $0.005 (half of a penny) per hour in both EC2 and VPC.Each additional Elastic IP Address on an instance will also cost you $0.005 per hour. We have also changed the billing model for Elastic IP Addresses to prorate usage, so that you'll be charged for partial hours as appropriate.
There is no charge for private IP addresses.
I hope that you have some ideas for this important new feature, and that you are able to make good use of it.


<Return to section navigation list>


0 comments:
Post a Comment