Windows Azure and Cloud Computing Posts for 4/12/2012+
| A compendium of Windows Azure, Service Bus, EAI & EDI Access Control, Connect, SQL Azure Database, and other cloud-computing articles. |
Note: This post is updated daily or more frequently, depending on the availability of new articles in the following sections:
- Windows Azure Blob, Drive, Table, Queue and Hadoop Services
- SQL Azure Database, Federations and Reporting
- Marketplace DataMarket, Social Analytics, Big Data and OData
- Windows Azure Access Control, Identity and Workflow
- Windows Azure VM Role, Virtual Network, Connect, RDP and CDN
- Live Windows Azure Apps, APIs, Tools and Test Harnesses
- Visual Studio LightSwitch and Entity Framework v4+
- Windows Azure Infrastructure and DevOps
- Windows Azure Platform Appliance (WAPA), Hyper-V and Private/Hybrid Clouds
- Cloud Security and Governance
- Cloud Computing Events
- Other Cloud Computing Platforms and Services
Azure Blob, Drive, Table, Queue and Hadoop Services
David Linthicum (@DavidLinthicum) asserted “Big data and cloud computing hold great promise, but keep an eye on the key questions around this pairing” in an introduction to his Big data and cloud computing: Watch out for these unknowns article of 4/13/2012 for InforWorld’s Cloud Computing blog:
The concept of big data is simple, as most good ideas are. Big data gives us the ability to use commodity computing to process distributed queries across multiple data sets and return result sets in record time. Cloud computing provides the underlying engine, typically through the use of Hadoop. Because these commodity server instances can be rented as needed, big data becomes affordable for most enterprises.
We always make discoveries as we use new technology, both good and bad. In the case of big data, the path to success will come with key lessons. But given the novelty of big data in real-world deployments, there are major questions for which we don't yet have answers -- so be extra careful in these areas.
Management of both structured and unstructured data, which is an advantage of using a nonrelational database, could mean that the unstructured data is much harder to deal with in the longer term. At some point, we'll have to make tough calls around converting unstructured data to structured form. The trouble is that many of the initial design database implementations will be difficult to change once they're in production.
The cost of using local servers is going to be high for those who won't, or can't, move to cloud-based platforms. We're talking hundreds to thousands of servers that have to be loaded, powered, and maintained. Although you can avoid the cost of traditional enterprise software licensing, the raw processing power required will still drive many big data implementations over budget. I suspect many big data efforts will initially occur within data centers, where the big data expenses are intermingled with the overall data center costs; count on the final tallies to be a surprise.
Cloud-based big data servers are not at all the same. Amazon Web Services provides very different offerings than Google, for example, and capabilities differ between any pair of platforms you compare. Thus, the amount of time, effort, and talent required to get big data projects to their end state also vary, due to differences in technology. I suspect one or two platforms will emerge as the clear paths to success, but we're not there yet.
So far, I’ve found Microsoft’s Apache Hadoop on Windows Azure CTP to be easy to use and quite performant. I’ll be testing Hive with Windows Azure blob storage and 16-million row files next week. Stay tuned.
Avkash Chauhan (@avkashchauhan) described Processing [a] Million Songs Dataset with Pig scripts on Apache Hadoop on Windows Azure in a 4/12/2012 post:
The Million Song Dataset is a freely-available collection of audio features and metadata for a million contemporary popular music tracks.
Its purposes are:
To encourage research on algorithms that scale to commercial sizes
To provide a reference dataset for evaluating research
As a shortcut alternative to creating a large dataset with APIs (e.g. The Echo Nest's)
To help new researchers get started in the MIR field
Full Info: http://labrosa.ee.columbia.edu/millionsong/
Download Full 300GB full data Set: http://labrosa.ee.columbia.edu/millionsong/pages/getting-dataset
MillionSongSubset 1.8GB DataSet:
To let you get a feel for the dataset without committing to a full download, we also provide a subset consisting of 10,000 songs (1%, 1.8 gb) selected at random:MILLION SONG SUBSET: http://static.echonest.com/millionsongsubset_full.tar.gz
It contains "additional files" (SQLite databases) in the same format as those for the full set, but referring only to the 10K song subset. Therefore, you can develop code on the subset, then port it to the full dataset.
To Download 5GB, 10,000 songs subset use link below: http://aws.amazon.com/datasets/1330518334244589
To Download any single letter slice use link below: http://www.infochimps.com/collections/million-songs
Once you download you can copy the data directly to HDFS using:
>Hadoop –fs –copyFromLocal <Path_to_Local_Zip_File>
<Folder_At_HDFS>
Once file is available you can verify it at HDFS as below:
grunt> ls /user/Avkash/
hdfs://10.114.238.133:9000/user/avkash/Z.tsv.mNow you can run following PIG scripts on the Million Songs Data Subset:
grunt> songs = LOAD 'Z.tsv.m' USING PigStorage('\t') AS (track_id:chararray, analysis_sample_rate:chararray, artist_7digitalid:chararray, artist_familiarity:chararray, artist_hotttnesss:chararray, artist_id:chararray, artist_latitude:chararray, artist_location:chararray, artist_longitude:chararray,artist_mbid:chararray, artist_mbtags:chararray, artist_mbtags_count:chararray, artist_name:chararray, artist_playmeid:chararray, artist_terms:chararray, artist_terms_freq:chararray, artist_terms_weight:chararray, audio_md5:chararray, bars_confidence:chararray, bars_start:chararray, beats_confidence:chararray, beats_start:chararray, danceability:chararray, duration:chararray, end_of_fade_in:chararray, energy:chararray, key:chararray, key_confidence:chararray, loudness:chararray, mode:chararray, mode_confidence:chararray, release:chararray, release_7digitalid:chararray, sections_confidence:chararray, sections_start:chararray, segments_confidence:chararray, segment_loudness_max:chararray, segment_loudness_max_time:chararray, segment_loudness_max_start:chararray, segment_pitches:chararray, segment_start:chararray, segment_timbre:chararray, similar_artists:chararray, song_hotttnesss:chararray, song_id:chararray, start_of_fade_out:chararray, tatums_confidence:chararray, tatums_start:chararray, tempo:chararray, time_signature:chararray, time_signature_confidence:chararray, title:chararray, track_7digitalid:chararray, year:int);

grunt> filteredsongs = FILTER songs BY year == 0 ;

grunt> selectedsong = FOREACH filteredsongs GENERATE title, year;

grunt> STORE selectedsong INTO 'year_0_songs' ;

 grunt> ls year_0_songs
 hdfs://10.114.238.133:9000/user/avkash/year_0_songs/_logs <dir>
 hdfs://10.114.238.133:9000/user/avkash/year_0_songs/part-m-00000<r 3> 15013
 hdfs://10.114.238.133:9000/user/avkash/year_0_songs/part-m-00001<r 3> 12772

 grunt> songs1980 = FILTER songs BY year == 1980 ;

 grunt> selectedsongs1980 = FOREACH songs1980 GENERATE title, year;

 grunt> dump selectedsongs1980;
 …….
 (Nice Girls,1980)
 (Burn It Down,1980)
 (No Escape,1980)
 (Lost In Space,1980)
 (The Affectionate Punch,1980)
 (Good Tradition,1980)

 Now Joining these two results selectedsong and selectedsong1980
 [Inner Join is Default]
 grunt> final = JOIN selectedsong BY $0, selectedsongs1980 BY $0;

 grunt> dump final;

 (Burn It Down,0,Burn It Down,1980)


 Now Joining these two results selectedsong and selectedsong1980

 [Adding LEFT, RIGHT, FULL]


 grunt> finalouter = JOIN selectedsong BY $0 FULL, selectedsongs1980 BY $0;

 grunt> dump finalouter;

 (Sz,0,,)
 (Esc,0,,)
 (Aida,0,,)
 (Amen,0,,)
 (Bent,0,,)
 (Cute,0,,)
 (Dirt,0,,)
 (Rome,0,,)
 ….
 (Tongue Tied,0,,)
 (Transferral,0,,)
 (Vuelve A Mi,0,,)
 (Blutige Welt,0,,)
 (Burn It Down,0,Burn It Down,1980)
 (Fine Weather,0,,)
 (Ghost Dub 91,0,,)
 (Hanky Church,0,,)
 (I Don't Know,0,,)
 (If I Had You,0,,)
 ….
 (The Eternal - [University of London Union Live 8] (Encore),0,,)
 (44 Duos Sz98 (1996 Digital Remaster): No. 5_ Slovak Song No. 1,0,,)
 (Boogie Shoes (2007 Remastered Saturday Night Fever LP Version),0,,)
 (Roc Ya Body "Mic Check 1_ 2" (Robi-Rob's Roc Da Jeep Vocal Mix),0,,)
 (Phil T. McNasty's Blues (24-Bit Mastering) (2002 Digital Remaster),0,,)
 (When Love Takes Over (as made famous by David Guetta & Kelly Rowland),0,,)
 (Symphony No. 102 in B flat major (1990 Digital Remaster): II. Adagio,0,,)
 (Indagine Su Un Cittadino Al Di Sopra Di Ogni Sospetto - Kid Sundance Remix,0,,)
 (Piano Sonata No. 21 in B flat major_ Op.posth. (D960): IV. Allegro non troppo,0,,)
 (C≤rtame Con Unas Tijeras Pero No Se Te Olvide El Resistol Para Volverme A Pegar,0,,)
 (Frank's Rapp (Live) (24-Bit Remastered 02) (2003 Digital Remaster) (Feat. Frankie Beverly),0,,)
 (Groove On Medley: Loving You / When Love Comes Knocking / Slowly / Glorious Time / Rock and Roll,0,,)
 (Breaking News Per Netiquettish Cyberscrieber?s False Relationships In A Big Country (Album Version),0,,)

 Using LIMIT:

 grunt> finalouter10 = LIMIT finalouter 10;

 grunt> dump finalouter10;

 (Sz,0,,)
 (Esc,0,,)
 (I&I,0,,)
 (Uxa,0,,)
 (ZrL,0,,)
 (AEIO,0,,)
 (Aces,0,,)
 (Aida,0,,)
 (Amen,0,,)
 (Bent,0,,)
Barb Darrow (@gigabarb) listed support for Hadoop as the first of 6 signs Microsoft has got its mojo back in a 3/22/2012 post to GigaOm’s Structure blog (missed when published):
Two star hires and a well-reviewed phone-and-tablet OS do not necessarily remake a company, but they do ease the perception — prevalent in recent years — that Microsoft is on its last legs.
There appears to be a big change in that perception compared to last year when there were public calls, based on Microsoft’s sluggish stock performance, for CEO Steve Ballmer to step down. Several attendees at this week’s Structure: Data 2012 conference seemed newly bullish on Microsoft’s prospects. Here are six reasons why:
1: Embrace of Hadoop
Even hard-core Microsoft skeptics are impressed with the company’s new found Hadoop love. Since October, the company’s worked with Hortonworks to make Hadoop work well with Windows — sacrificing its own Dryad big data framework in the process. Hadoop is already available in beta on Microsoft Windows Azure. (Azure also won a big customer in Movideo which is moving its online video archives to the Microsoft platform.)
…
<Return to section navigation list>
SQL Azure Database, Federations and Reporting
Cihan Biyikoglu (@cihangirb) continued his series with Scale-First Approach to Database Design with Federations: Part 2 – Annotating and Deploying Schema for Federations on 4/12/2012:
In part 1, I focused on modeling your data for scale. That was the first step in the scale-first design process. Scale-first data modeling focuses on table groups that needs scale and federations and federation keys that help surround these table groups for configuring their scale characteristics. In this post, we focus on the next step: the schema deployment. We’ll talk about how to annotate the schema definition and deploy it for matching the scalable data model you want to achieve. [Link to Part 1 added.]
Lets start with the basics: an overview of the schema model in federations.
Schema Model in Federations:
Different from a single database schema, with federations schema is distributed. Some parts of the schema live in the root database while other parts of the schema are scaled out to federations. This distribution is important to note because in the absence of distributed queries, only the local schema is visible when you connect to root or a member. you can discover other members or the root from a member but you cannot yet access anything other than the local schema.
Here is a quick examples: with schema with federations is that each db in the system, lets imagine Root db has table#1 and table#2 and member#1 in federation#1 has table#3 and federation#2 has a member#1 with table#4 in it. In this setup, table#3 is not visible in the root. table# 1, table#2 or table#4 are not visible when you connect to member#1 in federation#1. So no globally visible single schema with federations or a single namespace to address all schema today. All of this is fairly similar to what you would have, if you were building your own sharding.
It is important to note that within a federation, it is possible to setup member#2 and member#1 with different schemas (different tables, indexes, triggers sprocs, permissions etc). However typically most apps eventually deploy the same schema to all members in a federation. That is many apps do no have a permanent drift of schemas but a transient drift during upgrades etc. I have worked on sharded models where I index member differently for examples based on their size but very few instances.
The ability to independently manipulate schema in each part of federations is critical because of a few reasons;
1- It promotes a flexible upgrade pattern for 24x7 apps: you can upgrade a piece at a time in your federated database (root+all members) and can rollback with minimized impact. A single monolithic database does not give you options to upgrade half of a table or try a fix to a stored proc for some of your users. I that this is the experience of many DBAs; it is hard to figure out what schema change operations and updates can be done online in databases and with the separation of schemas to many mini private parts, you can upgrade your schema partially for some of your data and test. During the upgrade even it the DDL exclusively locks the data, it is isolated to only 1 member. If the upgrade works out, roll the new schema to all other members. If it does not work out, you can roll back faster because you only rollback parts you updated. All of this is similar to how we do our rollout in SQL Azure as well.
2- It allows for parallel high performance upgrades: given the ability to scale out all your schema updates on all independent nodes with their independent transaction logs and temp dbs, memory, cpu and IO capacities, you can deploy your schema much faster than you can on a single monolithic database. Because schema update is massively parallelized to all members.
Annotating and Deploying Schema to Federations:
So you get it: All objects are local to where they are created. However if you start looking at the collection of all parts together across the root database, the federations and their members, you can see a set of tables used for 3 different purposes: central tables, federated tables and reference tables.
Types of Tables
Tables in the root are called central tables , tables scaled out in federations are called federated tables. Within members you can also create a second type of table called reference tables.
Central tables are the tables in your data model that you choose not to scale out. They are low traffic any happy with the resource constraints of a single node. For these tables life is easy. There are no changes to the shape of these tables or how you deploy them. Just connect to the root and deploy.
We talked about reference tables in part 1 as part of the logical data model but lets remember:
Reference tables are the tables we choose to distribute to all members because we want to optimize query-ability at the members. You can choose to leave many lookup tables as central tables in the root database but if the tables are regularly used for lookups by queries hitting your federated tables, it may make sense to move them to members as reference tables.
With reference tables given they are going to be part of the members, there are a few restrictions to ensure correctness;
- Reference tables does not have support for IDENTITY property or the Timestamps/Rowversion data type. We hope to remove the restriction in future.
- Reference tables cannot have a foreign key relationship back to a federated table. Other type of foreign key relationships work fine.
We touched on federated tables in part 1 as well: Federated tables have federation keys and are constrained to store values that comply with the range the member serves, whereas reference tables does not contain a federation key and are not constrained by the range of the member.
With federated tables, there are a few restrictions to ensure correctness as well;
- Federated tables need to contain the federation distribution column as part of the table and today that can only be a single column and computed columns are not supported.
- Federated tables does not have support for IDENTITY property or the Timestamps/Rowversion data type.
- All unique indexes and clustered indexes must contain the federation distribution column.
- Foreign key relationships between federated tables must include the federation distribution column.
Figure#1 : Gray – Central Tables, Blue & Green & Orange – Federated Tables
Objects Other Than Tables
All other types of objects besides tables, such as views, triggers, stored procedures and functions simply get deployed without requiring any changes to their definition as well as long as they can maintain local references. You may choose to deploy these objects to root or to members or to both depending on their function. For objects with a clear single table dependency you can follow the table placement (root or one of the members) and place the objects with table dependency in the same location as the table. However If you have objects that reference distributed pieces of your schema, like a stored procedure that reference tables in root and in member, this logic has to move to client side for now since SQL Azure does not support any cross database communication.
The only restriction within federations for non-table objects is on indexed views. Indexed views cannot be created on federation members. We hope to remove that restriction in future.
Deploying Central Tables
Lets start with tables you will leave in the root. These are central tables. Schema definition for central tables have no new consideration in federations. That is no change required to how you would design and deploy these tables.
-- connect to the adventureworks. this is the root db
CREATE TABLE HumanResources.Employee(EmployeeID int primary key, NationalIDNumber nvarchar(15)…)
Deploying Reference Tables
Pieces of the schema you scale-out in federation out of the root database like federated tables and reference tables need to be deployed to the federation members. Reference tables require no changes to their single-database schemas as well. However they are subject to the limitation on federation members listed above.
The deployment of reference tables require you to deploy the schema to every member. You can do this in a script to loop through them. You can use the following tool or code sample to achieve this;
Americas Deployment: http://federationsutility-scus.cloudapp.net/
European Deployment: http://federationsutility-weu.cloudapp.net/
Asian Deployment: http://federationsutility-seasia.cloudapp.net/To deploy a central table you connect to root and iterate over each member using USE FEDERATION and repeat the CREATE TABLE statement such as the one below.
USE FEDERATION CustomerFederation(customerID=0x0) WITH RESET, FILTERING=OFF
GO
CREATE TABLE Zipcodes(id uniqueidentifier primary key, code nvarchar(16) not null, …)
GO
Deploying Federated Tables
Just like reference tables, federated tables need to be deployed to the federation members. Federated tables do go through a transformation for their original form in a single database model. Federated tables are required to have the federation key as a column in the database. Some tables naturally contain the federation key but for others like orderdetails table, you denormalize the table to include the federation key (customerID). Federated tables are also anotated with a FEDERATED ON clause that point to the distribution column used in the table. Here is the deployment of the orderdetails table;
USE FEDERATION CustomerFederation(customerID=0x0) WITH RESET, FILTERING=OFF
GO
CREATE TABLE Ordersdetails(orderdetail_id uniqueidentifier primary key,
order_id uniqueidentifier not null,
customer_id uniqueidentifier not null,
…)
FEDERATED ON (customerID=customer_id)
GO
One useful piece of information to note here is that even though a denormalization is required, maintenance of the new federation in each table like customer_id columns the oderdetails table above, can be simplified with the following default.
USE FEDERATION CustomerFederation(customerID=0x0) WITH RESET, FILTERING=OFF
GO
CREATE TABLE Ordersdetails(orderdetail_id uniqueidentifier primary key,
order_id uniqueidentifier not null,
customer_id uniqueidentifier not null DEFAULT federation_filtering_value('customerId'),
…)
FEDERATED ON (customerID=customer_id)
GO
Deploying Objects Other Than Tables
For objects other than tables there is no refactoring to do but you need to ensure connection is switched over to the right part of the federation for the deployment. For objects you need to deploy to members the fanout utility above can help or the code sample can help you code your own scripts. Here is a sample script that deploys a stored procedure to a member.
USE FEDERATION CustomerFederation(customerID=0x0) WITH RESET, FILTERING=OFF
GO
CREATE PROCEDURE proc1(p1 int) AS
BEGIN
….
END
To recap, once the scale-first data model is defined, there are a few incremental changes to the tsql script that expresses the data model. There are the annotations with FEDERATED ON for tables, also changes to do to your foreign key relationships like including the federation distribution key and there are changes to how you deploy some parts of your schema to members like using USE FEDERATION to switch the connection to the members and fanning out the statements to all members. with those changes you get a scale-first data model deployed to SQL Azure. The last step along the way is to make some changes to the app. We’ll talk about that next.
The SQL Azure Team posted DAC SQL Azure Import Export Service Client v 1.5 to CodePlex on 4/12/2012:
- Refactored the sources to make the client implemenation as simple and streamlined as possible
- Fixed "type initializer" configuration issues in the previous release
- Updated SQL Azure datacenter mappings
From the Documentation:
The DAC framework provides a set of services for database developers and administrators and is currently available in two forms:
- Hosted services such as the new SQL Azure Import/Export Service
- The service tools do not require any of the DAC components to be installed on your machine (only .Net 4), and it submits jobs against a Microsoft service that is running in Windows Azure. The actual import or export is performed within the service.
- Redistributable client side tools such as the DAC Framework
- The client side tools require the DAC Framework and other components to be installed, and run on your local machine.
This project will contain reference implementations for both hosted services and client side tools. Check back often for updates to the downloadable samples and feel free to jump over to the forum if you need help.
Please select one of the links above to get started or continue reading if you are not sure which you should use.
Hosted Services
- Pros
- You do not need to install components locally and your machine is does not need to be connected to SQL Azure during import/export operations. The service tool is also xcopy deployable and has no dependencies on the DAC framework or any other components.
- Cons
- You have to put your bacpac in an Azure Blobstore separately (the tool does not do it for you). Additionally, the SQL Azure Import/Export unsurprisingly only works with Sql Azure. If you need to import or export to an on premise database you must use the client side tools.
Client Side Tools
- Pros
- Works against on-premise SQL Servers as well as SQL Azure. Additionally, also supports the file formats generated by the SQL Azure Import/Export Service so you can pass BACPACs back and forth between the client and the service.
- Cons
- You need to install several redistributable components on your local machine which will actually do all the work.
Zafar Kapadia (@zafarx) posted a detailed description of how to Synchronize SQL Server and SQL Azure using Sync Framework on 4/12/2012:
In this Blog, I will discuss Synchronizing data between On-Premise SQL Server database and SQL Azure database in the Cloud. Before we begin you will need to download and install Microsoft Sync Framework from the Microsoft Download Center. You will also need to add references to the following DLL files after you have installed the Microsoft Sync Framework.
Microsoft.Synchronization.dll
Microsoft.Synchronization.Data.dll
Microsoft.Synchronization.Data.SqlServer.dll
In this example I am using the SyncDB database and the Products table. You can use this Walkthrough to create the SyncDB database.
Now lets discuss the Synchronization. There are two ways to structure your application to synchronize data between SQL Server Database and SQL Azure Database. You could either use 2-tier architecture or N-tier architecture. The difference between the two is as follows:
- 2-Tier Architecture - With this option the Sync Framework runs on the local computer and uses a SqlSyncProvider object to connect the SQL Azure database with a SQL Server database.
- N–Tier Architecture – With this option the Sync Framework database provider runs in a Windows Azure hosted service and communicates with a proxy provider that runs on the local computer.
In this blog [post, we] will implement a 2 – Tier Architecture.
To synchronize On-Premise SQL Server database with a SQL Azure database in the cloud we will complete the tasks below.
- Define the scope based on the tables from the SQL Server database, then provision the SQL Server and SQL Azure databases.
This will prepare the SQL Server and SQL Azure databases for Synchronization.- Synchronize the SQL Server and SQL Azure databases after they have been configured for synchronization as per step 1.
- Optionally if you wish you can use the SqlSyncDeprovisioning class to deprovision the specified scope and remove all associated synchronization elements from the database.
Zafar continues with long C# code listings to accomplish the three tasks. Using the Windows Azure Portal to declaratively sync on-premises SQL Server and cloud-based SQL Azure databases is much simpler. See my PASS Summit: SQL Azure Sync Services Preview and Management Portal Demo article of 11/4/2011 for a walkthrough of setting up SQL Azure Data Sync.
<Return to section navigation list>
MarketPlace DataMarket, Social Analytics, Big Data and OData
Chris Webb described Importing UK Weather Data from Azure Marketplace into PowerPivot in a 4/12/2012 post:
I don’t always agree with everything Rob Collie says, much as I respect him, but his recent post on the Windows Azure Marketplace (part of which used to be known as the Azure Datamarket) had me nodding my head. The WAM has been around for a while now and up until recently I didn’t find anything much there that I could use in my day job; I had the distinct feeling it was going to be yet another Microsoft white elephant. The appearance of the DateStream date dimension table (see here for more details) was for me a turning point, and a month ago I saw something really interesting: detailed weather data for the UK from the Met Office (the UK’s national weather service) is now available there too. OK, it’s not going to be very useful for anyone outside the UK, but the UK is my home market and for some of my customers the ability to do things like use weather forecasts to predict footfall in shops will be very useful. It’s exactly the kind of data that analysts want to find in a data market, and if the WAM guys can add other equally useful data sets they should soon reach the point where WAM is a regular destination for all PowerPivot users.
Importing this weather data into PowerPivot isn’t completely straightforward though – the data itself is quite complex. The Datamarket guys are working on some documentation for it but in the meantime I thought I’d blog about my experiences; I need to thank Max Uritsky and Ziv Kaspersky for helping me out on this.
The first step in the process of importing this data is to go to the Azure Marketplace and construct a query to get the slice of data that you want – this is a big dataset and you won’t want to get all of it. Once you’ve signed in, go to https://datamarket.azure.com/dataset/0f2cba12-e5cf-4c6d-83c9-83114d44387a, subscribe to the dataset and then click on the “Explore this Dataset” link:
This takes you to the query builder page, where you get to explore the data in the different tables that make up this dataset:
You choose the table you want to explore in the confusingly-named ‘Query’ dropdown box on the right-hand side of the screen. The available tables are:
- ThreeHourlyForecast, a fact tables containing three hourly weather forecasts
- ThreeHourlyForecastArchive, a fact table containing aggregated, averaged values for the various forecasts for a given date and time
- SignificantWeather, a dimension table containing the different types of weather that can be forecast
- Visibility, a dimension table containing the different levels of visibility
- DailyForecast, a fact table containing daily weather forecasts
- Observations, a fact table containing observed weather
- Site, a dimension table containing all the UK’s weather stations
As far as I can tell, this data is more or less the same as what’s available through the Met Office’s own DataPoint service, and the documentation for this is here: http://www.metoffice.gov.uk/public/ddc/datasets-documentation.html
Once you’ve selected a table you can construct a filter by entering values in the Optional Parameters boxes below the query dropdown. These changes are then reflected in the URL shown at the top of the screen:
This URL represents an OData query. One thing I didn’t notice initially is that the query that is generated here includes a top 100 filter in it which you’ll need to remove (by deleting &$top=100 from the end of the URL) if you want to do anything useful with the data; you might also want to build a more complex query than is supported by the query builder, and you can learn how to do this by reading this article.
In my case I decided to look at the full three hourly forecast data. As I said, this is a big dataset – initially I thought I’d download the whole thing, but 18 million rows and several hours later I cancelled the import into PowerPivot. Instead I opted to look at data for the whole of the UK for just one forecast made on one day, which worked out at a more manageable 250000 rows. What’s not clear from any of the current documentation is what all of the columns in the three hourly forecast fact table represent:
- Date is the date the forecast is issued
- StartTime is the time the forecast is issued and is either 0, 6, 12 or 18, representing midnight, 06:00, 12:00 and 18:00 – new forecasts are issued every 6 hours
- PredictionTime is the time that an incremental update to a forecast is issued; these incremental updates appear every hour. PredictionTime is an actual time value going from 0 to 23 representing the hour the incremental update was issued.
- TimeStep is an offset in hours from the StartTime, and represents the time that the forecast is predicting the weather for. It ranges in value from 0 to 120, going up in 3s (so the values go 0, 3, 6, 9… 120), meaning we have weather predictions for 5 days into the future for each forecast.
Therefore, for any given row in the ThreeHourlyForecast table, if the Date is April 10th 2012, StartTime is 6, PredictionTime is 8 and TimeStep is 9, then this is data from a forecast that was issued on April 10th 2012 at 8am (the second incremental update to the 6am forecast) and this row contains the prediction for the weather for the time StartTime+TimeStep = 6 + 9 = 15:00 on April 10th 2012.
Here’s the OData url I used to grab data for the three hourly forecast issued on April 10th at midnight (StartTime=0 and PredictionTime=0) for all weather stations and all time steps:
To use this URL in PowerPivot, you need to create a new PowerPivot workbook, open the PowerPivot window and then click the From Azure DataMarket button:
Then enter your query URL and Account Key (which you can find on the Query Explorer page by clicking on the Show link, as indicated in the screenshot above):
Having imported this data I also imported the whole of Site (renamed here to Weather Stations) and SignificantWeather tables to give the following PowerPivot model:
Here are the joins I used:
I also created a few calculated columns, including one called ActualPredictionForStart which added the TimeStep to the Start Time and the Date to get the actual date and time that the prediction is for:
=[Date] + (([StartTime] + [TimeStep])/24)
With this all done, I was able to find out what the predicted weather for the current time and my home town was in this (as of the time of writing) two-day old forecast:
…and do all the usual PivotTable-y and chart-y things you can do with data once it’s in Excel:
Incidentally, the forecast is wrong – it’s not raining outside right now!
PivotTables and Excel charts are all very well, but there’s a better way of visualising this data when it’s in Excel – and in my next post I’ll show you how…
UPDATE: First of all, I owe an apology to the Met Office – as soon as I hit publish on this post it started pouring with rain, so they were right after all. Secondly, in a weird co-incidence, Rob Collie posted about using the other weather dataset in the DataMarket on his blog: http://www.powerpivotpro.com/2012/04/download-10000-days-of-free-weather-data-for-almost-any-location-worldwide/ [See below]
Rob Collie (@powerpivot) suggested that you Download 10,000 Days of Free Weather Data for Almost Any Location Worldwide to on 4/12/2012:
Example: 800 Days of Weather in New York City
820 Days of Weather Data from New York City, Pulled From DataMarket
(Temps in F, Precipitation in Inches)
Come on admit it. It’s very likely that you would have a use for data like this, whether it was from a single location or for a range of locations, as long as the locations(s) were relevant to your work and the data was easy (and cheap) to get.
Good news: I’m gonna show you how to get this same data for the location(s) you care about, for free, and make it easy for you. Read on for the weather workbook download link and instructions.
First: A Practical Application to Whet the Appetite
As I said in the last post, I think there’s a lot of important things to be learned if we only cross-referenced our data with other data that’s “out there.”
I happen to have access to two years of retail sales data for NYC, the same location that the weather data is from. To disguise the sales data, I’m going to filter it down to sales of a single product, and not reveal what that product is. Just know that it’s real, and I’m going to explore the following question:
If the weather for a particular week this year was significantly better or worse than the same week last year, does that impact sales?
Let’s take a look at what I found:
RESULTS: Weather This Year Versus Last Year (Yellow = “Better”, Blue = “Worse”),
Compared to Sales This Year Versus Last (Green = Higher, Red = Lower)I don’t have a fancy measure yet that directly ties weather and sales together into a single correlative metric. I’m not sure that’s even all that feasible, so we’re gonna have to eyeball it for now.
And here is what I see: I see a band of weeks where sales were WORSE this year than last, and the weather those weeks was much BETTER this year than last.
And the strongest impact seems to be “number of snow days” – even more than temperature, a reduction in snow this year seems to correlate strongly with worse sales of this product.
Does that make sense? I mean, when the weather is good, I would expect a typical retail location to do MORE business, especially in a pedestrian-oriented place like NYC. And we are seeing the reverse.
Aha, but this is a product that I would expect people to need MORE of when the weather is bad, so we may in fact be onto something. In fact this is a long-held theory of ours (and of the retailer’s), but we’ve just never been able to test it until now.
All right, let’s move on to how you can get your hands on data for your location(s).
Download the Workbook, Point it at Your Location(s)
Step 1: Download my workbook from here.
Step 2: Open it and find a location that interests you from this table on the first worksheet:
Nearly Four Thousand Cities Are Available on the First Sheet
(Pick One and Write Down the Location ID)Step 3: Open the PowerPivot Window, Open the connection for editing:
Step 4: Replace the Location ID and Fill in your Account Key:
ALSO IMPORTANT: Make sure the “Save My Account Key” Checkbox is Checked!
Don’t Have A DataMarket Account Key?
No problem, it’s easy to get and you only have to do it once, ever.
Step 1: Go to https://datamarket.azure.com/
Step 2: Click the Sign In button in the upper right to create your account:
Step 3: Follow the Wizard, finish signing up. (Yes it asks for payment info but you won’t be charged anything to grab the data I grabbed.)
Step 4: Go to “My Account” and copy the account key:
Next: Subscribe to the Free Version of the Weather Feed
Go to the data feed page for “WT360” and sign up for the free version:
I’ve Gone a Bit Crazy With This Service and Already Exhausted my Free Transactions,
But That Was NOT Easy to DoBack in the Workbook…
Now that you’ve entered your account key, set the LocationID, subscribed to the feed, and saved the connection, you can just hit the Refresh button:
Send Me Your Mashups!
Or at least screenshots of them. I’m Rob. At a place called Pivotstream. DotCom.
And let me know if you are having problems, too.
I’ll have some more details on Tuesday of things you can modify and extend, like how I added a “Snow Days” calculated column.

One tool that you can use to browse your LightSwitch in Visual Studio 2011 Beta OData feeds is LinqPad. Another one is the Silverlight OData Explorer.
You can run the OData Explorer from this link:
http://www.silverlight.net/content/samples/odataexplorer/default.html
(Note: The LightSwitch OData feed is the address of your LightSwitch application with /ApplicationData.svc/ at the end)
You will want to click the Install Out Of Browser link to install it locally if you need to access an OData feed that requires you to log in.
Click install.
Enter the connection information.
Enter the credentials of a user of the application.
The Service will be added but the box to add a service will still be in the way.
Close the application…
Click in the icon that was added to your desktop to re-open.
Log in.
You can click on collections to browse them.
The Raw button allows you to inspect the raw feed.
Mark Stafford (@markdstafford) posted Hello, OData! on 4/9/2012 to his BitWhys blog (missed when published):
In celebration of our release of WCF Data Services 5.0 today, I’m starting this new blog. I have blogged previously but the content was primarily IT oriented and it seemed best to make a clean break.
Hello, OData
I recently joined the OData (WCF Data Services) team at Microsoft. Our team has nearly 20 people spread across PM, dev and test. We take on a variety of responsibilities including:
- Writing the OData specification
- Building the WCF Data Services server
- Building implementations and tooling for .NET, Silverlight, Windows 8 Metro, Windows Phone, JavaScript and Visual Studio
- Helping out with OData implementations for Ruby, Java, PHP, Objective-C and Drupal
- Organizing events like the OData meetup
There is also an incredible amount of work we do to ensure that the community is thriving. Some of that is internal to Microsoft – working with partners like Office, SharePoint and Dynamics. Overall the majority of the community work is external to Microsoft. Hopefully many of the posts on this blog will fall into that category.
What can you expect?
As I said, I recently joined the OData team so I have a very rudimentary understanding of the OData protocol and WCF Data Services, a Microsoft implementation of the protocol. I think it’s time for an up-to-date beginner’s tutorial series. Or, to directly steal an idea from my manager, OData 101.
Since it’s my blog I’ll probably be investigating things that are interesting to me, but if there’s a topic you’d like to see covered please leave a comment below.
Finally, you should probably take a quick second to read through my disclaimers.
Subscribed.
Kevin Rattan posted Exposing IQueryable/oData Endpoints With Web API on 4/3/2012 to KnowledgeTree’s Perspectives on .NET Programming blog (missed when published):
This is a follow on from my post on Web API and the Entity Framework. In that post, I showed a couple of approaches to dealing with JSON serialization problems in the Visual Studio 11 beta. Now I want to look at returning IQueryable from Web API methods.
IQueryable allows you to do what it says on the box: return an object that can be queried from the client. In other words, you can pass through arguments that tell the server what data to retrieve. This is a hot topic on the Web, with some people strongly against the idea and some strongly for it. The argument is between convenience (look how easy it is to get any data I want!) and security/architecture (look how easy it is for someone else to get any data they want).
I don’t have strong views either way. I share the concerns of those who worry about leaving client layers free to bombard the data layer with inappropriate (and potentially dangerous) queries, but I also like the convenience of being able to shape my queries from the client—especially given the Web API’s (partial) support of the oData specification. (For those unfamiliar with oData, it allows you to use querystring arguments to modify the query at the server, e.g., $top=10 will become .Take(10) in the EF query).
If I don’t use IQuerable, I will need to write lots of different methods to allow for different queries (e.g., in cocktails-r-us, I need to search for cocktails by beverage, non-liquid ingredient, name, id, etc.). Here is a simple example from my demo project, with two methods: one returning an IEnumerable of BeverageTypes, the other a single BeverageType by id:
If I want to get an individual BeverageType, I make a get request along these lines: http://[mysite]/api/beveragetype/2. Here is the Firebug output from such a request:
If I switch to IQueryable as the return type, however, I can supply both queries from a single method (note the addition of ‘AsQuerable()’ at the end of the method return):
Now I can write my oData query as “http://[MySite]/api/beveragetype?$filter=id eq 2“, so I no longer need my separate specialized method.
Let’s try and simplify the method. The oData specification allows us to expand associations using $expand, so let’s remove the .Include(“Beverages”) call from our method and pass that through on the querystring as follows: http://[MySite]/api/beveragetype?$filter=id eq 2&$expand=Beverages.
Here is the new code:
And here is the result… not quite what we were hoping for:
It turns out that the Web API does not support $expand…. And I rather hope it never does. If Web API supported $expand, then my users would be able to create huge queries with far too many joins. In cocktails-r-us, I only want to return all the details of a cocktail (ingredients, comments, ratings, related cocktails, etc.) for one cocktail at a time. I don’t want users to be able to join all those tables in one massive query. So, that’s the upside. The downside is that I have to go back to using multiple methods, but even then I should only need two: one to get a specific cocktail (or, in this case, BeverageType) by ID, the other to return lists of them by whatever criteria the client prefers.
Since I can deal with security concerns by forcing my clients to authenticate (and only giving access to trusted developers in the first place), and that leaves me with only one concern: will my client developers write ill-advised queries? They might, for example return too many rows at once instead of paginating through the data as I would prefer. Fortunately, there is a solution: the [ResultLimit(n)] attribute. This restricts the number of items returned. So now our remote users will have to page through the data rather than return it all at once.
If we examine the output in Firefox/Firebug, you can see that only 5 rows are returned even though the query requested all the rows:
ResultLimit is not a perfect solution. It only restricts the number of items returned from the method, not the number retrieved from the database. Here is what’s happening on the server:
However, since the remote user won’t be able to get the data they want the easy way, they will be forced to write oData pagination queries like “http://[site]/api/beveragetype?$skip=5&$top=5&$orderby=Type desc” which would give them the following output on the client:
I understand why people are nervous about exposing IQueryable, and I wouldn’t do it in a completely open way where anyone’s code can access my data without authentication, but I love its openness and flexibility and the way it works so easily with Web API.
<Return to section navigation list>
Windows Azure Service Bus, Access Control, Identity and Workflow
Leandro Boffi (@leandroboffi) described Requesting a Token from ADFS 2.0 using WS-Trust with Username and Password in a 4/13/2012 post:
In a previous post I showed how to request tokens to ADFS using WS-Trust based on the identity of the user that requests the token.
Due to I’ve received a lot of requests on the subject, here’s the code to do the same but using username and password, I mean request tokens from ADFS 2.0 using username and password based identity.
var stsEndpoint = "https://[server]/adfs/services/trust/13/UsernameMixed";
var relayPartyUri = "https://localhost:8080/WebApp";

var factory = new WSTrustChannelFactory(
    new UserNameWSTrustBinding(SecurityMode.TransportWithMessageCredential),
    new EndpointAddress(stsEndpoint));

factory.TrustVersion = TrustVersion.WSTrust13;

// Username and Password here...
factory.Credentials.UserName.UserName = user;
factory.Credentials.UserName.Password = password;

var rst = new RequestSecurityToken
{
    RequestType = RequestTypes.Issue,
    AppliesTo = new EndpointAddress(relayPartyUri),
    KeyType = KeyTypes.Bearer,
};

var channel = factory.CreateChannel();

SecurityToken token = channel.Issue(rst);
<Return to section navigation list>
Windows Azure VM Role, Virtual Network, Connect, RDP and CDN
No significant articles today.
<Return to section navigation list>
Live Windows Azure Apps, APIs, Tools and Test Harnesses
Himanshu Singh (@himanshuks) published the weekly Windows Azure Community News Roundup (Edition #14) on 4/13/2012:
Welcome to the latest edition of our weekly roundup of the latest community-driven news, content and conversations about cloud computing and Windows Azure. Let me know what you think about these posts via comments below, or on Twitter @WindowsAzure. Here are the highlights from last week.
- DocShare: Illustrating the CQRS Pattern with Windows Azure and MVC4 Web API by @davidpallmann (posted April 9)
- (Windows) Azure Service Bus Tester by Roman Kiss (posted April 9)
- Using the Windows Azure Content Delivery Network by @maartenballiauw
- Synchronous, Async and Parallel Programming Performance in Windows Azure by @udooz (posted April 6)
- Building (Windows) Azure Applications using Agile Technologies and Continuous Integration by Rebecca Martin (posted April 4)
Upcoming Events, and User Group Meetings
- April 14: Twin Cities Code Camp – Minneapolis, MN
- April 18: Brisbane (Windows) Azure User Group Meeting – Brisbane, Australia
- April 24: Windows Azure Rapid Design Workshop – Mountain View, CA
- April 26: Sales@night: (Windows) Azure - Brussels, Belgium
- April 26: Dutch Windows Azure User Group Meeting – Nieuwegein, Netherlands
- April 28: Vancouver TechFest 2012 – Burnaby, BC, Canada
- May 9: Windows Azure User Group Meeting – Manchester, UK
- May 11: Windows Azure Bootcamp – London, UK
- May 18: Windows Azure Bootcamp – Liverpool, UK
- June 11-14: Microsoft TechEd North America 2012 – Orlando, FL
- June 22: Microsoft UK Cloud Day – London, UK
- June 26-29: Microsoft TechEd Europe – Amsterdam, Netherlands
- Ongoing: Cloud Computing Soup to Nuts - Online
Recent Windows Azure Forums Discussion Threads
- Website on Local IIS – 206 views, 5 replies
- HttpListener in Worker Role – 303 views, 13 replies
- Not Able to Connect to (Windows) Azure Web Role External Endpoint – 736 views, 5 replies
- Best Way to Increase ‘Cores’ Quota – 542 views, 4 replies
Send us articles that you’d like us to highlight, or content of your own that you’d like to share. And let us know about any local events, groups or activities that you think we should tell the rest of the Windows Azure community about. You can use the comments section below, or talk to us on Twitter @WindowsAzure
Guess I’ll start sending @himanshuks links to my Hadoop on Azure posts.
Hanu Kommalapati (@hanuk) posted a list of 3rd Party ISV Tools for Windows Azure Application Monitoring and Load Testing on 4/13/2012:
Here are a list of products, in no particular order, which will help improve the quality of end user experience for Azure hosted applications. This list is an organic aggregation of tribal knowledge and is not a definitive one.
If you have any suggestions, please feel free to send it to me through comments.
Application Availability Management
- Azure Watch by Paraleap Technologies
- Azure Check from from Apica Systems
- Azureops from Opstera
- Spotlight from Quest Software
Application Performance Management (APM)
- Gomez from Compuware
- Dynatrace APM for Windows Azure from Dynatrace
Application Load testing
- Gomez Web Load Testing from Compuware
- Loadstorm from Loadstorm.com
- CloudTest from Soasta
- Visual Studio Ultimate Stress Testing from Microsoft
- HP LoadRunner from Hewlett Packard.
A CBRStaffWriter reported Microsoft Hitachi parthership to offer cloud computing services to Japanese firms in a 4/13/2012 post to the Computer Business Review’s App Dev and SOA blog:
The collaboration will enable the reuse of existing IT assets, secure collaboration among clouds, and IT system change
Hitachi and Microsoft Japan have partnered to jointly provide global cloud applications by combining Hitachi Cloud Computing Solutions and Microsoft Windows Azure Platform.
Through this collaboration, both the companies will provide Hybrid Cloud Solutions which will help companies reuse of existing IT assets, safe and secure collaboration among clouds, and quick IT system change corresponding to shift in business environment.
The collaboration will help Japanese enterprises in expanding their businesses and globalisation efforts.
As part of this collaboration, Hitachi will provide WAN acceleration technology, integrated operation and management technology in addition to consulting and system integration services based on Hitachi's cloud services.
Microsoft will offer new cloud applications by providing Windows Azure Platform, technology for integrated management, and technology for collaboration with Microsoft's global data centre.
In addition, both companies together provide global on-site support which remove concerns of global Japanese customers on support.
This sounds a bit different from the Microsoft-Accenture/Avenade agreement reported yesterday. So far there’s no corresponding Microsoft press release that I could find for either agreement.
Nick Harris (@cloudnick) announced the Updated Windows Azure Toolkit for Windows 8 Consumer Preview on 4/12/2012:
On Friday we released the an update to the Windows Azure Toolkit for Windows 8 Consumer Preview. This version of the toolkit adds a Service Bus sample, Raw Notification sample and Diagnostics to the WnsRecipe NuGet. You can download the self-extracting package on Codeplex from here.
If you are building Windows 8 Metro Style applications with Windows Azure and have not yet downloaded the toolkit I would encourage you to do so. Why?, as a quick demonstration the following video shows how you can use the toolkit to build a Windows 8 Metro Style application that uses Windows Azure and the Windows Push Notification Service (WNS) to send Toast, Tile and Badge notifications to your Windows 8 Consumer Preview apps in under 4 minutes.
You can view/download the hi-def version of the video on channel 9 here
What’s in it?
- Automated Install – Scripted install of all dependencies including Visual Studio 2010 Express and the Windows Azure SDK on Windows 8 Consumer Preview.
- Project Templates – Client project templates for Windows 8 Metro Style apps in Dev 11 for both XAML/C# and HTML5/JS with a supporting server-side Windows Azure Project for Visual Studio 2010.
- NuGet Packages – Throughout the development of the project templates we have extracted the functionality into NuGet Packages for example the WNSRecipe NuGet provides a simple managed API for authenticating against WNS, constructing notification payloads and posting the notification to WNS. This reduces the effort to send a Toast, Tile, Badge or Raw notification to about three lines of code. You can find a full list of the other packages created support Push Notifications and the sample ACS scenarios here and full source in the toolkit under /Libraries.
- Samples – Five sample applications demonstrating different ways Windows 8 Metro Style apps can use Push Notifications, ACS and Service Bus
- Documentation – Extensive documentation including install, file new project walkthrough, samples and deployment to Windows Azure.
Want More?
If you would like to learn more about the Windows Push Notification Service and the Windows Azure Toolkit for Windows 8 check out the following videos.
Building Metro Style apps that use Windows Azure Service Bus
You can view/download the hi-def version of the video on channel 9 here
Sending Push Notifications to Windows 8 and Windows Phone 7 Devices using Windows Azure
You can view/download the hi-def version of the video on channel 9 here
Building Metro Style apps that use Push Notifications
You can view/download the hi-def version of the video on channel 9 here
Building Metro Style apps that use the Access Control Service
You can view/download the hi-def version of the video on channel 9 here
For more details, please refer to the following posts:
- Documentation and Download at Codeplex
- Vittorio Bertocci’s Blog: Using ACS in Metro Style Applications
- Wade Wegner’s Blog: Metro Style Apps with Windows Azure
- Nick Harris’s Blog: How to Send Push Notifications with the Windows Push Notification Service and Windows Azure
Please ping me on twitter to let me know if you have any feedback or questions @cloudnick
Adam Hoffman announced a New Cloud Learning Path - 100 to 400 Level Classes for Free on 4/12/2012:
You know you've been meaning to do it - get developing on the cloud - but you haven't found the resources or time to get started. Or maybe you've taken the first steps, and done a little reading on the subject, but haven't yet sat down to write any code. Or maybe you really tried to figure it out, and got a little lost along the way.
No matter: Starting today, we're pleased to announce the new Windows Azure Learning Path at http://walearningpath.cloudapp.net, which will get you up and developing in no time flat.
Organized by levels, and featuring the teachings of some of the leading cloud evangelists, you'll get clear guidance on every step of your journey, from getting the tools and the basics, to cloud rockstar, bursting to scale, and poised for world domination.
Start with level 100 courses, which will take you from installation of the tools through hosting a basic web site on Azure. Once you're comfortable with that, move on to the 200, 300 and 400 level courses, which will take you further on your journey, introducing concepts like table, blob and queue storage, SQL Server in the cloud, security, caching and more.
So come on, and get ready for your freshman courses in Azure. To get started, you'll want to get access to your free Azure resources, so it's worth looking at aka.ms/azure90daytrial before you show up for class. You'll also want to make sure that you remember your pencil box and other development tools, so head to aka.ms/azuredotnetsdkso that you can "get the bits".
What are you waiting for? The time is right to get back to class and get the training you need to be a cloud superstar. Get started now at walearningpath.cloudapp.net.
Adam is a Microsoft cloud evangelist in the Chicago area.
<Return to section navigation list>
Visual Studio LightSwitch and Entity Framework 4.1+
Paul van Bladel (@paulbladel) described A Generic Audit trail solution – revisited in a 4/13/2012 post to his LightSwitch for the Enterprise blog:
Introduction
My post on audit trails has gotten some amount of attention. So, it seems that auditing is perceived as something important in LightSwitch.
A drawback of my initial approach is that it could only work with an intrinsic database and entities with a single-Id KeySegment (i.e. the entity is identified solely by an integer Id field).
In the mean time, I was able, based on some initial input of Matt Evans, to improve the existing solution.
What are our requirements/goals?
- We want that all changes (every insert, update and delete) to data in our application is monitored (audited) on field level.
- we want that extending the application with additional tables requires a minimum effort. Maintenance should be simple.
- Therefor, we want that all auditing information is collected in one audit table with a corresponding Search audit screen.
- Having audit information at your disposal is fine, but it should be consultable in an easy way. Therefor, we want to be able to navigate from the search audit screen to the corresponding entity.
- We want to be able to make it possible that we can navigate from an entity to the corresponding audit history, again, with a minimum coding effort when we extend the application with an additional table.
This boils down following UI.
The Audit Search Screen
Contains all audit information. The user can jump to the audit detail or to the corresponding entity. If the existing entity doesn’t exist any longer the user receives a message box.
The Audit Detail Screen
Navigating to the audit history for an enity “under audit”
How to hook up auditing?
Let’s see how we hook up auditing and let’s make a distinction between client and server side. We’ll start server side.
Server Side
I have in my example 2 distinct data sources. The intrinsic database (containing a customer table) and an external data source (a sql server database) with one table called “ExternalTable”.
The ApplicationDataService goes as follows:
public partial class ApplicationDataService
    {
        partial void SaveChanges_Executing()
        {
            EntityChangeSet changes = this.DataWorkspace.ApplicationData.Details.GetChanges();

            foreach (var modifiedItem in changes.ModifiedEntities)
            {
                AuditHelper.CreateAuditTrailForUpdate(modifiedItem, this.AuditTrails);
            }

            foreach (var deletedItem in changes.DeletedEntities)
            {
                AuditHelper.CreateAuditTrailForDelete(deletedItem, this.AuditTrails);
            }
        }

        //the _Inserted method needs to be repeated for all entities where auditing is desired
        partial void Customers_Inserted(Customer entity)
        {
            AuditHelper.CreateAuditTrailForInsert(entity, this.AuditTrails);
        }
    }
As you can see the Delete and Modified audits are handled during the SaveChanges_Executing method. We still need for every insert a dedicated call. The reason why we can’t do the insert audit during the SaveChanges_Executing will be come clear later.
The DataService of my external datasource goes as follows:
 public partial class SecurityDbDataService
    {
        partial void SaveChanges_Executing()
        {
            EntityChangeSet changes = this.DataWorkspace.SecurityDbData.Details.GetChanges();

            foreach (var modifiedItem in changes.ModifiedEntities)
            {
                AuditHelper.CreateAuditTrailForUpdate(modifiedItem, this.DataWorkspace.ApplicationData.AuditTrails);
            }

            foreach (var deletedItem in changes.DeletedEntities)
            {
                AuditHelper.CreateAuditTrailForDelete(deletedItem, this.DataWorkspace.ApplicationData.AuditTrails);
            }

            this.DataWorkspace.ApplicationData.SaveChanges();
        }

        partial void ExternalTables_Inserted(ExternalTable entity)
        {
            AuditHelper.CreateAuditTrailForInsert(entity, this.DataWorkspace.ApplicationData.AuditTrails);
        }
    }
This looks of course very similar, except that we do an explicit SaveChanges() on the ApplicationDataService. This is because my audit table is in the Intrinsic database. So, this my differ if you want to store the auditing in a completely different database.
So, the “low-level” handling is present in the AuditHelper class:
public static class AuditHelper
    {
        public static void CreateAuditTrailForUpdate<E>(E entity, EntitySet<AuditTrail> auditTrailEntitySet) where E : IEntityObject
        {
            StringBuilder newValues = new StringBuilder();
            StringBuilder oldValues = new StringBuilder();

            foreach (var prop in entity.Details.Properties.All().OfType<IEntityStorageProperty>())
            {
                if (!(Object.Equals(prop.Value, prop.OriginalValue)))
                {
                    oldValues.AppendLine(string.Format("{0}: {1}", prop.Name, prop.OriginalValue));
                    newValues.AppendLine(string.Format("{0}: {1}", prop.Name, prop.Value));
                }
            }

            foreach (var prop in entity.Details.Properties.All().OfType<IEntityReferenceProperty>())
            {
                if (!(Object.Equals(prop.Value, prop.OriginalValue)))
                {
                    oldValues.AppendLine(string.Format("{0}: {1}", prop.Name, prop.OriginalValue));
                    newValues.AppendLine(string.Format("{0}: {1}", prop.Name, prop.Value));
                }
            }

            CreateAuditRecord<E>(entity, auditTrailEntitySet, newValues, oldValues, "Updated");
        }

        public static void CreateAuditTrailForInsert<E>(E entity, EntitySet<AuditTrail> auditTrailEntitySet) where E : IEntityObject
        {
            StringBuilder newValues = new StringBuilder();
            StringBuilder oldValues = new StringBuilder("The record has been newly created");

            foreach (var prop in entity.Details.Properties.All().OfType<IEntityStorageProperty>())
            {
                newValues.AppendLine(string.Format("{0}: {1}", prop.Name, prop.Value));
            }

            foreach (var prop in entity.Details.Properties.All().OfType<IEntityReferenceProperty>())
            {
                newValues.AppendLine(string.Format("{0}: {1}", prop.Name, prop.Value));
            }

            var auditRecord = CreateAuditRecord<E>(entity, auditTrailEntitySet, newValues, oldValues, "Inserted");

            //savechanges needs only be done if the datasource of the entity under audit is different from the datasource of the audittable itself
            string auditTableDataSource = auditRecord.Details.EntitySet.Details.DataService.Details.Name;
            if (auditRecord.DataSource != auditTableDataSource)
            {
                auditRecord.Details.EntitySet.Details.DataService.SaveChanges();
            }
        }

        public static void CreateAuditTrailForDelete<E>(E entity, EntitySet<AuditTrail> auditTrailEntitySet) where E : IEntityObject
        {
            StringBuilder oldValues = new StringBuilder();
            StringBuilder newValues = new StringBuilder("The record has been deleted");

            foreach (var prop in entity.Details.Properties.All().OfType<IEntityStorageProperty>())
            {
                oldValues.AppendLine(string.Format("{0}: {1}", prop.Name, prop.Value));
            }

            foreach (var prop in entity.Details.Properties.All().OfType<IEntityStorageProperty>())
            {
                oldValues.AppendLine(string.Format("{0}: {1}", prop.Name, prop.Value));
            }

            CreateAuditRecord<E>(entity, auditTrailEntitySet, newValues, oldValues, "Deleted");
        }
        private static AuditTrail CreateAuditRecord<E>(E entity, EntitySet<AuditTrail> auditTrailEntitySet, StringBuilder newValues, StringBuilder oldValues, string changeType) where E : IEntityObject
        {
            AuditTrail auditRecord = auditTrailEntitySet.AddNew();
            auditRecord.ChangeType = changeType;
            auditRecord.KeySegment = CommonAuditHelper.SerializeKeySegments(entity);
            auditRecord.ReferenceType = entity.Details.EntitySet.Details.Name;
            auditRecord.DataSource = entity.Details.EntitySet.Details.DataService.Details.Name;
            auditRecord.Updated = DateTime.Now;
            auditRecord.ChangedBy = Application.Current.User.FullName;
            if (oldValues != null)
            {
                auditRecord.OriginalValues = oldValues.ToString();
            }
            if (newValues != null)
            {
                auditRecord.NewValues = newValues.ToString();
            }

            return auditRecord;
        }
    }
The tricky part in this implementation is the way how we handle compound KeySegments. Remember, that one of our requirements is being able to jump from an audit record to the corresponding entity. That means that we have to store in our audit table the “KeySegment” of our initial record. When you use only the intrinsic database, a keysegment in always a simple primary key (an integer Id field). This is not the case when you use external datasources where a keysegment can be any combination of fields and types.
In order to test this as good as possible, I constructed a table (in my external datasource) which has only one field, but which a compound primary key consisting of 6 different fields and each key field has different type.
So, we need to be able to store inside our audit table a kind of serialized Key-Type-Value combination of the keysegment. This is handled by following class (in the common project):
public static class CommonAuditHelper
    {
        public static string SerializeKeySegments(IEntityObject entity)
        {
            string keyString = "";
            object propVal = null;

            foreach (Microsoft.LightSwitch.Model.IKeyPropertyDefinition keyPropertyDefinition in entity.Details.GetModel().KeyProperties)
            {
                if (!string.IsNullOrEmpty(keyString))
                    keyString += ", ";

                keyString += keyPropertyDefinition.Name;

                keyString += ";";
                propVal = entity.Details.Properties[keyPropertyDefinition.Name].Value;
                if (null != propVal)
                    keyString += Convert.ToString(propVal, CultureInfo.InvariantCulture);
                else
                    keyString += "(null)";

                keyString += ";";
                IPrimitiveType definitionType = keyPropertyDefinition.PropertyType as IPrimitiveType;

                string definitionTypeName;
                if (definitionType != null)
                {
                    definitionTypeName = definitionType.ClrType.Name;
                }
                else
                {
                    ISemanticType semanticDefType = keyPropertyDefinition.PropertyType as ISemanticType;
                    if (semanticDefType != null)
                    {
                        definitionTypeName = semanticDefType.UnderlyingType.Name;
                    }
                    else
                    {
                        definitionTypeName = "unknowType"; //Houston-->problem
                    }
                }
                keyString += definitionTypeName;
            }
            return keyString;
        }
        public static object[] DeserializeKeySegments(string keySegmentString)
        {
            string[] rawSegments = keySegmentString.Split(',');
            object[] segments = new Object[rawSegments.Count()];

            for (int i = 0; i < rawSegments.Count(); i++)
            {
                var currentSegment = rawSegments[i].Split(';');
                string segmentValue = currentSegment[1];
                string segmentType = currentSegment[2];

                switch (segmentType)
                {
                    case "Int16":
                        segments[i] = Convert.ToInt16(segmentValue, CultureInfo.InvariantCulture);
                        break;
                    case "Int32":
                        segments[i] = Convert.ToInt32(segmentValue, CultureInfo.InvariantCulture);
                        break;
                    case "Int64":
                        segments[i] = Convert.ToInt64(segmentValue, CultureInfo.InvariantCulture);
                        break;
                    case "String":
                        segments[i] = segmentValue;
                        break;
                    case "Decimal":
                        segments[i] = Convert.ToDecimal(segmentValue, CultureInfo.InvariantCulture);
                        break;
                    case "DateTime":
                        segments[i] = Convert.ToDateTime(segmentValue, CultureInfo.InvariantCulture);
                        break;
                    case "Guid":
                        segments[i] = new Guid(segmentValue);
                        break;
                    default:
                        segments[i] = segmentValue;
                        break;
                }
            }
            return segments;
        }
    }
So, there is both a Serialize and Deserialize method. We’ll need the Deserialize method client side when we want to jump to the original record. That’s why this class is in the common project.
Note that another option would be here, instead of storing the keysegment in a serialized string, to store the key segment in a related table to the audit table. I have chosen for the serialization approach because I believe it might be better from a performance perspective.
Client Side
We want to call the related record from the audit record. The code of the Show_Execute() method is very simple:
 partial void Show_Execute()
        {
            AuditTrail auditTrail = this.AuditTrails.SelectedItem;
            bool result = false;
            ClientAuditHelper.TryShowRecordFromAuditRecord(auditTrail, this.DataWorkspace, out  result);
            if (result == false)
            {
                this.ShowMessageBox("Sorry, the record is no longer available...");
            }
        }
It makes use of following ClientAuditHelper class:
public static class ClientAuditHelper
    {
        public static void TryShowRecordFromAuditRecord(AuditTrail auditTrail, IDataWorkspace dataWorkSpace, out bool result)
        {

            string entitySetName = auditTrail.ReferenceType;
            string dataSourceName = auditTrail.DataSource;
            string serializedKeySegment = auditTrail.KeySegment;

            object[] keySegments = CommonAuditHelper.DeserializeKeySegments(serializedKeySegment);

            IDataService dataService = dataWorkSpace.Details.Properties[dataSourceName].Value as IDataService;

            IEntityObject entityObject = null;
            entityObject = GetEntityByKey(dataService, entitySetName, keySegments);

            if (entityObject != null)
            {

                Application.Current.ShowDefaultScreen((IEntityObject)entityObject);
                result = true;
            }
            else
            {

                result = false;
            }
        }

        private static IEntityObject GetEntityByKey(IDataService dataService, string entitySetName, params object[] keySegments)
        {
            ICreateQueryMethod singleOrDefaultQuery = dataService.Details.Methods[entitySetName + "_SingleOrDefault"] as ICreateQueryMethod;

            if (singleOrDefaultQuery == null)
            {
                throw new ArgumentException("An EntitySet SingleOfDefault query does not exist for the specified EntitySet.", entitySetName);
            }

            ICreateQueryMethodInvocation singleOrDefaultQueryInvocation = singleOrDefaultQuery.CreateInvocation(keySegments);
            return singleOrDefaultQueryInvocation.Execute() as IEntityObject;
        }

        public static void ShowRelatedAuditRecords(IEntityObject entity)
        {
            string serializedKeySegment = CommonAuditHelper.SerializeKeySegments(entity);

            Application.Current.ShowSearchAuditTrails(serializedKeySegment, entity.Details.EntitySet.Details.Name);
        }
    }
And finally, we want to navigate from a detail record to the list of related audit records.
This is again calling our ClientAuditHelper:
 partial void ShowAuditRecords_Execute()
        {
            ClientAuditHelper.ShowRelatedAuditRecords(this.Customers.SelectedItem);
        }
Sample
You can find a sample over here : AuditTrail. You first need to create a database called ExternalDb and then run the .sql script present in the solution folder.
Conclusion
This post presents a improved approach for audit trails, but basically it’s a good illustration of the power of using the “weakly-typed” API style in LightSwitch
Hopefully, the presented extensions to the audit solution are useful for you. Please drop me a line in the LightSwitch forum in case you find bugs or ideas for improvement :
Paul Ferrill has written SharePoint Apps with LightSwitch [Paperback], which was to be published by O’Reilly Media on 4/13/2012 but isn’t available from Amazon yet:
Building SharePoint Apps with Visual Studio LightSwitch presents all the information you'll need to get started building real-world business intelligence applications. We'll start by getting a virtual environment setup to make it easy to build and test your applications without a lot of expensive server hardware. Next we'll build a few utility function apps to get a feel for working with the different SharePoint data sources. Then we'll move on to more functional applications and finish up with a section on integrating with other sources of business data.

Update: 4/13/2012 11:00 AM PDT Amazon accepted my order with two-day shipment, so the book was available on 4/13.
Andrew Lader described How to Format Values in LightSwitch (Andrew Lader) in a 4/11/2012 post:
Note: This article applies to LightSwitch in Visual Studio 11 (LightSwitch V2)
One of the more popular topics about LightSwitch has been around formatting numeric data. This is a very common requirement in business applications, which is why there have been so many requests to add this feature to LightSwitch. For those playing with LightSwitch in Visual Studio 11 Beta, you may have seen that indeed, there is a new feature that allows you to do just this: you will be able to specify a formatting pattern for certain fields using the entity designer. Specifying this in one place will make every screen that displays that field use the same formatting pattern. This post will show what this feature can do, and how you can use it in your own applications.
Please note that this formatting feature works for all of the numeric data types, including Decimals, Doubles, Integers and Long Integers, and also Date/Time values and Guids. Formatting is not available for data types of String and Boolean. Of course, you can always format any type, including strings, using custom business logic in the Validate methods. For more information on how to do this, refer to the “Simple String Validation & Formatting” section of the Common Validation Rules in LightSwitch Business Applications article.
Formatting Numeric Values
Let's say that I want to have a field that tracks the change in how something was ranked week-to-week. This could be how a stock is ranked, or a song on the Billboard charts, or in my case, the ranking of a football player. In other words, what I want to show is that something moved up 4 slots in the rankings. But instead of displaying “4”, I want all of my screens to show “+4”. Likewise, if it moves down in the rankings by 6 slots, then I want it to show “-6”. And finally, if it stayed the same for that week, then I want it to display “No change”. With this new feature, this is pretty easy.
Specifying a Field’s Formatting
For simplicity sake, we’ll create an entity called Player that represents an athlete who plays football professionally. It will have the typical fields, plus one called RankingDelta, which is an Integer. It should look something like this:
One that is done, select the RankingDelta field, and examine the Properties window. You will see a new section there called Formatting. Under there, you will see a property called Format Pattern. By default it is empty:
Now, to make it do what we want, let’s enter the following value +#;-#;”No Change” into the Format Pattern property field like so:
The format pattern above actually consists of three patterns separated by semicolons, “;”. Breaking it apart, here’s what it means:
- If the value is positive, use the first formatting section, +#, to format the value
- If the value is negative, use the second formatting section, -#, to format the value
- And if the value is zero, use the third formatting section, “No change”, to format the value
Okay, so let’s see this in action. Add a screen, specifying the Editable Grid screen template, and choose the Players entity for the screen’s data. Press F5, and enter some data in the first row of the grid. I’ve used Tim Tebow for my example below (yes, there is a choice list for the Position field):
With the focus in the “Ranking Delta” column, enter a value of 4 and tab off; you will see “+4” displayed.
Place the focus back on this field and enter a value of -8 and tab off; you will see “-8” displayed:
And finally, returning the focus to this field, enter a 0 and tab off; you will see “No change” displayed:
So, what exactly is happening? Well, if the value is positive, the first formatting section, “+#”, says to begin formatting by outputting the plus sign “+”, followed by a number of digits depending on the value itself. If the value itself is a 4, then this will format that value as “+4”. Likewise, if the value is 22, then it will display “+22”. The pound sign, “#”, tells the formatting engine to place a digit value there. The same concept applies to the second section that handles negative values. The third section has no formatting characters; it says, output the text “No change” whenever the value is zero.
Note that the text “No change” works with or without quotes because there are no other special formatting characters for Integers in that section. To avoid any confusion, it’s a good idea to enclose static text with quotes. These quotes can either be with a single quote mark or the common double quotes. When displayed to the user, the quotes are not displayed.
Let’s return to the the formatting pattern we used above. Instead of using the “#” formatting character, I could have used a zero, “0”. In fact, if we had used a formatting pattern of “+000” –that’s a plus sign followed by three zeroes –and a value of 4 was entered, then “+004” would have been displayed. In other words, the “0” formatting character is used to define leading zeroes if the value contains less digits then what is supplied. There are a number of formatting options available, and the variations that can be employed are almost endless. If anyone has ever done some .NET development, you may find these formatting options to be quite familiar. The following table lists just a small sampling of them:
NOTE: There is a difference in behavior between formatting a Decimal field using the pre-defined percentage format pattern “P2”, and specifying a field as the Percent business type. The business type assumes that any number you are entering is actually a percentage value. For example, if you enter a value of 10 for a field that is defined as the Percent business type, you will see 10.00% displayed. The real value under the covers for this business type is 0.1, not 10. On the other hand, if you have a field specified as a Decimal with a formatting pattern of “P2”, when you enter a value of 10, you will see 1,000.00% displayed. This happens because it doesn’t interpret the underlying value as a percentage, but as the real value of 10, and then formats it as a percentage. For more information about the Percent business type, check out the blog post, New Business Types: Percent & Web Address, that covers this topic.
With respect to formatting a Decimal field using the “C2” pre-defined currency format, and the Money business type, there is no visual difference to the user. However, the Decimal data type does not provide all of the inherent benefits of a business type, including validation. If you want these features, then I recommend you use the Money business type.
And for more specific information on all of the formatting options available for this feature, check out the documentation How to: Format Numbers and Dates.
Date and Date Time Formatting
As the table above demonstrates, dates and time values can be formatted in addition to numeric data types. There are a number of pre-defined formatting patterns that can be accessed using a single character. Here are some of the more common options, but by no means is this an exhaustive list (refer to the link documentation above for the full list):
The Properties window for a date/time field will look just like the ones for numeric data types, but the formatting options expected are different. For example:
IMPORTANT: In order to have fields of Date or Date Time properly render their values using their assigned formatting patterns, the controls must be set to either a Label or a Text Box in the screen designer. Otherwise, the date-specific controls will ignore the formatting pattern, and user their own formats to display the date/time values.
Formatting Guids
In addition to numeric and date/time values, fields of data type Guid can be formatted as well. If you aren't familiar with a Guid (usually pronounced one of two ways: “Goo-id” or the one that rhymes with squid), it stands for Globally Unique Identifier. They are used because they consist of 32 alpha-numeric values, providing over 3x1038 possible Guids values, making them extremely difficult to duplicate. Here is the list of pre-defined formatting characters for Guids:
Error Handling
When assigning a format pattern for a field in the entity designer, an error message will be displayed if the pattern is invalid for that type of data type. In other words, specifying a Guid formatting pattern or a Date/Time formatting pattern for a decimal will result in an error message. For example, if you specify the pre-defined date pattern of “M” (without the quotes of course) for a field whose data type is Integer, you will see the error message:
Wrapping up
I’ve introduced you to the new Formatting feature that is part of the next LightSwitch release. This feature is highly flexible, leveraging a wide array of formatting options which let you craft any number of formatting patterns. When you specify this in the entity designer, all the screens that display this field pick up the formatting. This is a really powerful feature, and I hope everyone enjoys discovering what they can do with it.
Return to section navigation list>
Windows Azure Infrastructure and DevOps
Jean Paoli posted Announcing one more way Microsoft will engage with the open source and standards communities on 4/12/2012:
I am really excited to be able to share with you today that Microsoft has announced a new wholly owned subsidiary known as Microsoft Open Technologies, Inc., to advance the company’s investment in openness – including interoperability, open standards and open source.
My existing Interoperability Strategy team will form the nucleus of this new subsidiary, and I will serve as President of Microsoft Open Technologies, Inc.
The team has worked closely with many business groups on numerous standards initiatives across Microsoft, including the W3C’s HTML5, IETF’s HTTP 2.0, cloud standards in DMTF and OASIS, and in many open source environments such as Node.js, MongoDB and Phonegap/Cordova.
We help provide open source building blocks for interoperable cloud services and collaborate on cloud standards in DMTF and OASIS; support developer choice of programming languages to enable Node.js, PHP and Java in addition to .NET in Windows Azure; and work with the PhoneGap/Cordova and jQuery Mobile and other open source communities to support Windows Phone.
It is important to note that Microsoft and our business groups will continue to engage with the open source and standards communities in a variety of ways, including working with many open source foundations such as Outercurve Foundation, the Apache Software Foundation and many standards organizations. Microsoft Open Technologies is further demonstration of Microsoft’s long-term commitment to interoperability, greater openness, and to working with open source communities.
Today, thousands of open standards are supported by Microsoft and many open source environments including Linux, Hadoop, MongoDB, Drupal, Joomla and others, run on our platform.
The subsidiary provides a new way of engaging in a more clearly defined manner. This new structure will help facilitate the interaction between Microsoft’s proprietary development processes and the company’s open innovation efforts and relationships with open source and open standards communities.
This structure will make it easier and faster to iterate and release open source software, participate in existing open source efforts, and accept contributions from the community. Over time the community will see greater interaction with the open standards and open source worlds.
As a result of these efforts, customers will have even greater choice and opportunity to bridge Microsoft and non-Microsoft technologies together in heterogeneous environments.
I look forward to sharing more on all this in the months ahead, as well as to working not only with the existing open source developers and standards bodies we work with now, but with a range of new ones.
It’s interesting that Microsoft formed a subsidiary, rather than a division, to manage open-source issues.
Hovannes Avoyan continued his Windows Azure series on the Sys-Con Media blog with Windows Azure Overview Part 3: All About Azure Pricing on 4/12/2012:
Knowing all the different features of Windows Azure and what the corresponding fees are, can help you estimate your expenses for running an application in the cloud. It can also help you develop new applications in a way that they consume lower numbers of billable resources — drastically reducing your monthly bill.
Each instance of your Azure application runs on a separate virtual machine. You have to choose the type of these virtual machines depending on the needs of your application. Microsoft has provided the following details for comparison:
Some Basic Facts About Pricing
With Windows Azure, every started hour is a billed hour. Keep in mind that all these resources get reserved for your application once you deploy your application and you’re paying for them — whether your application is using them completely or not. Even if your applications are not running at all, you will still be charged for the allocated resources. That’s why you need to be careful when designing your application and when you set the configuration settings for it in Windows Azure. You are responsible for removing the instances of unused applications and for allocating more or less resources for your running applications when they need them.
Other features you will be charged for are as follows:
- Storage that your application is using
- Storage transactions
- Outbound data transfers (Inbound transfers are not charged)
- Using Content Delivery Network
- Caching
- Access Control
You can find more information on actual prices on the Windows Azure official website.
There you can also find an Azure pricing calculator, which can help you in estimating your costs. It is an easy-to-use application. You simply specify the amount of resources your application will be using and the calculator gives you the price for running it in Windows Azure.
You now know all the important information about Windows Azure design, its pros and cons, and its pricing. If you haven’t yet decided whether to use it for running your applications or not, then our next article on Windows Azure Security may help you to make your choice.
Keep a lookout for that article coming up in this blog!
<Return to section navigation list>
Windows Azure Platform Appliance (WAPA), Hyper-V and Private/Hybrid Clouds
No significant articles today.
<Return to section navigation list>
Cloud Security and Governance
Ed Moyle (@securitycurve) described Five steps for achieving PaaS security in the cloud in a 12/11/2012 post to TechTarget’s SearchCloudComputing.com blog:
When it comes to security and cloud computing models, Platform as a Service (PaaS) has its own particular challenges. More than other cloud models, PaaS security requires application security expertise -- a skillset that most shops haven’t invested heavily in. The issue is compounded because many organizations employ the strategy of “bolting on”infrastructure-level security controls as a mitigation of application-layer security risks (for example, the use of a WAF to help mitigate cross-site scripting or other front-end issues discovered once application code is released to production.) This strategy becomes non-viable in a PaaS deployment scenario due to lack of control over the underlying infrastructure in a PaaS.
Consider the flexibility of PaaS relative to the control you have over the underlying computing environment. PaaS, like IaaS, provides nearly infinite design flexibility: you can build anything from social networking sites to corporate intranet sites or CRM applications. However, unlike IaaS, the “stack” below the application is opaque, meaning the components and infrastructure supporting the application are (by design) a “black box.” This means that, similar to SaaS, security controls must be built into the application itself; but unlike SaaS -- where the service provider usually implements application-level security controls that apply to all customers -- in PaaS, controls are specific to your app. This means the burden is on you to ensure those controls are appropriate and well implemented.
Here is a simplified illustration of the differences between the models and customer control:
For organizations that have invested heavily in application security, have solid developer training in place, and separate development, test and production processes, PaaS security should be familiar territory. Organizations that haven’t made these kind of investments, can follow these steps to help address the challenges of PaaS security.
PaaS security step one: Build security in
The fundamental challenges of application security were around long before the arrival of PaaS. Consequently, there’s already been quite a bit of research into how to refine development efforts to produce secure, robust applications. One technique that directly supports this is application threat modeling. Some good starting points are the OWASP Threat Modeling Page and theMicrosoft Security Development Lifecycle Resource Page. From a tool standpoint, the free Microsoft SDL Threat Modeling Tool provides an automated way to streamline much of the work associated with establishing an application threat modeling process. PaaS security step two: Scan Web apps Many shops have already embraced application scanning, a technique whereby tools scan Web applications for common security issues such as cross-site scripting (XSS) and SQL injection. Organizations that have a tool in-house can leverage it for PaaS security, or many of the PaaS providers provide those tools either free of charge or at reduced price to customers. Organizations also can use a free tool like Google’s skipfishwhile they iron out a broader scanning strategy.Step three: Train developers
It’s critical that application developers are thoroughly versed in application security principles. This can include language-level training (i.e. principles of secure coding in the language they’re currently using to build apps) as well as broader topics such as secure design principles. Developer application security training can be expensive since developer attrition (not to mention the fallibility of human memory) means training must be periodically repeated to stay relevant. Fortunately, there are some free resources such as the joint Texas A&M / FEMA Domestic Preparedness Campus, which offers free e-learning on secure software development. Microsoft also offers free training through its Clinic 2806: Microsoft Security Guidance Training for Developers, which can be a useful starting point while you bootstrap your own custom program.Step four: Sanitize test data
It happens all the time: developers test with production data. This is an issue because confidential data items, such as customer personally identifiable data, can get exposed in the process, particularly when development or staging areas don’t have the same controls as production. PaaS environments feel this acutely, as many PaaS services make it easy to share databases between development, staging and production to streamline deployment. Tools like the open source Databene Benerator can generate high-volume data conformant to the particular structure of your database while data “scrubbers” exist to help sanitize production data. These scrubbers are usually framework-specific though, so you may need to look a bit to find one that works in your particular situation.Step five: Reprioritize
This last one is the most important step you can take. Since PaaS probably means a culture and priority shift, embracing that shift and representing security accordingly should be front of mind. With PaaS, it’s all about the app; that means security organizations are highly reliant on what comes out of the development side of the house. If that’s problematic without PaaS, it’s going to be a nightmare afterwards since there’s not much you can bolt on at the infrastructure level to mitigate identified risk. If you’ve historically relied on infrastructure-level controls to meet security challenges at the application level, now’s the time to rethink that strategy for PaaS security. Familiarize yourself with the application security space now and don’t wait until you’re behind the eight ball to take action.
Ed is a senior security strategist with Savvis as well as a founding partner of Security Curve.
<Return to section navigation list>
Cloud Computing Events
Yahoo! and Hortonworks (@hortonworks) announce Hadoop Summit 2012 (@hadoopsummit) to be held on 6/13 and 6/14/2012 at the San Jose Convention Center:
Hortonworks and Yahoo! are proud to host the 5th annual Hadoop Summit. The two-day event will feature many of the leading thought leaders from the Apache Hadoop community who will showcase successful Hadoop use cases, share development and administration tips and tricks and educate organizations about how to leverage Apache Hadoop as a key component of their enterprise data platform. Hadoop Summit will also be an excellent network environment for developers, architects, administrators, data analysts, data scientists and vendors interested in advancing, extending or implementing Apache Hadoop.
Hadoop Summit Sessions Now Posted!
Thank you all who submitted an abstract for presenting at Hadoop Summit. The Content Selection Committee had a difficult time narrowing down the choices from almost 300 abstracts. Thank you also to those who participated in the Community Choice voting process. The top vote getters are now part of the final agenda. Check back for a full agenda posted later this month. See the selected sessions »
Want a crash course in Apache Hadoop?
Attend one of the companion training courses taking place before Hadoop Summit. Your choices include a two-day technical course for Java programmers: “Developing Solutions Using Apache Hadoop – HDFS and MapReduce” or a one-day course for non-Java programmers: “How Apache Hadoop Works”. Learn More About Training »
Microsoft’s Alexander Stojanovic (@stoyanovic) will present Unleash Insights On All Data With Microsoft Big Data from the abstract:
Do you plan to extract insights from mountains of data, including unstructured data that is growing faster than ever? Attend this session to learn about Microsoft’s Big Data solution that unlocks insights on all your data, including structured and unstructured data of any size.
Accelerate your analytics with a Hadoop service that offers deep integration with Microsoft BI and the ability to enrich your models with publicly available data from outside your firewall. Come and see how Microsoft is broadening access to Hadoop through dramatically simplified deployment, management and programming, including full support for JavaScript.
Alexander is the General Manager at Microsoft who leads the Hadoop for Azure and Windows Server engineering team.
The Server and Cloud Platform Team requested that you Save the Date for MMS 2012! on 4/11/2012:
The Microsoft Management Summit is the place to be to learn about the evolving role of IT as cloud innovator. But you don’t need a plane ticket to experience MMS! This year we’re streaming the keynotes live to make it super-easy to catch all the excitement. Use this friendly calendar reminder to save the date for both MMS keynotes!
For those who can’t attend live, we will also make over 175 breakout sessions available on-demand via the MMS website shortly after they are presented.
KeynotesJoin Brad Anderson, Corporate Vice President of the Management and Security Division at Microsoft, returning this year to keynote both days. Brad will demonstrate how Microsoft management solutions can empower you on your cloud computing journey and help your organization manage a wide range of different devices.
Here are more detailed descriptions of the keynotes:
Day 1 Keynote: Microsoft Private Cloud. Built for the Future. Ready Now.
Cloud computing and the delivery of true IT as a Service is one of the most profound industry shifts in decades. Brad Anderson will present Microsoft’s vision for cloud computing and show how System Center 2012, as part of the Microsoft private cloud, will enable you to deliver the promise of cloud computing in your organization today.
Day 2 Keynote: A World of Connected Devices
Clouds and cloud-connected devices are changing the world of work and our daily interactions. Tech-savvy and always-connected, people want faster, more intuitive technology, uninterrupted services, and the freedom to work anywhere, anytime, on a variety of devices. Brad will show how System Center 2012 and Windows Intune can help IT embrace this new reality today, and in the future, by making the right intelligent infrastructure investments.
Looking for a deeper dive into MMS content? We will follow up with details on all the other “can’t-miss” MMS sessions. So stay tuned!
In-person or online, we look forward to seeing you next week!
The problem is, they didn’t say what date: 4/17 and 4/18/2012.
<Return to section navigation list>
Other Cloud Computing Platforms and Services
No significant articles today.
<Return to section navigation list>
Technorati Tags: Windows Azure, Windows Azure Platform, Azure Services Platform, Azure Storage Services, Azure Table Services, Azure Blob Services, Azure Drive Services, Azure Queue Services, Azure Service Broker, Azure Access Services, SQL Azure Database, SQL Azure Federations, Open Data Protocol, OData, Cloud Computing, Visual Studio LightSwitch, LightSwitch, Amazon Web Services, AWS, SharePoint 2010, SharePoint, Apache Pig,


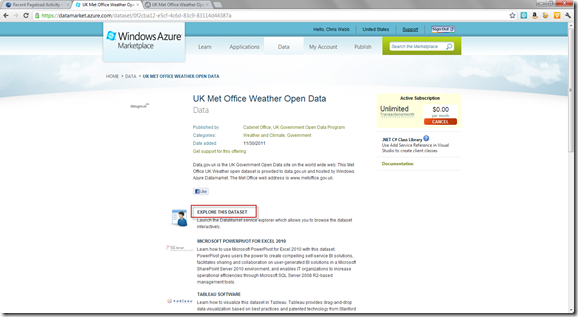
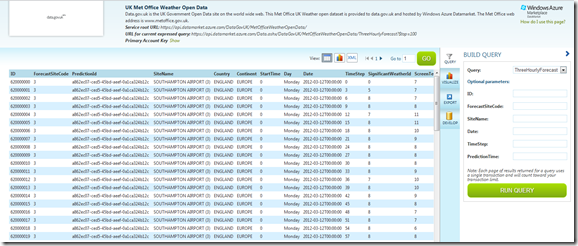


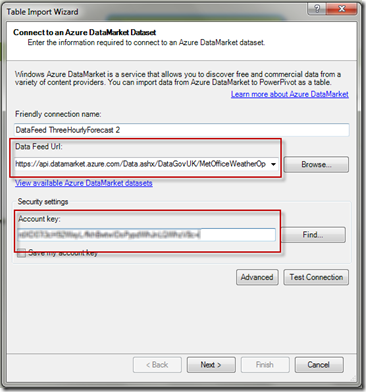
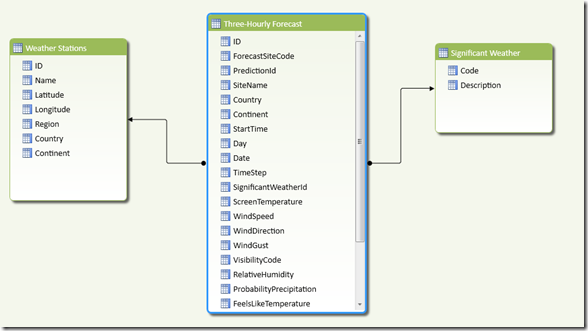
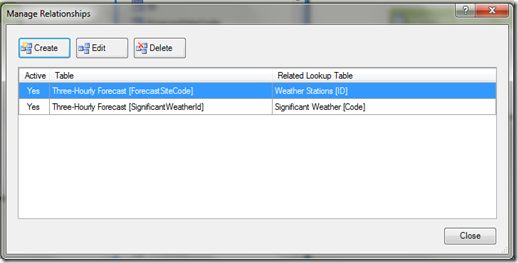

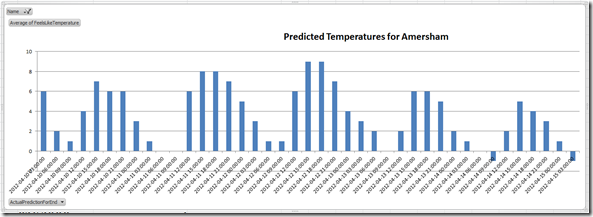


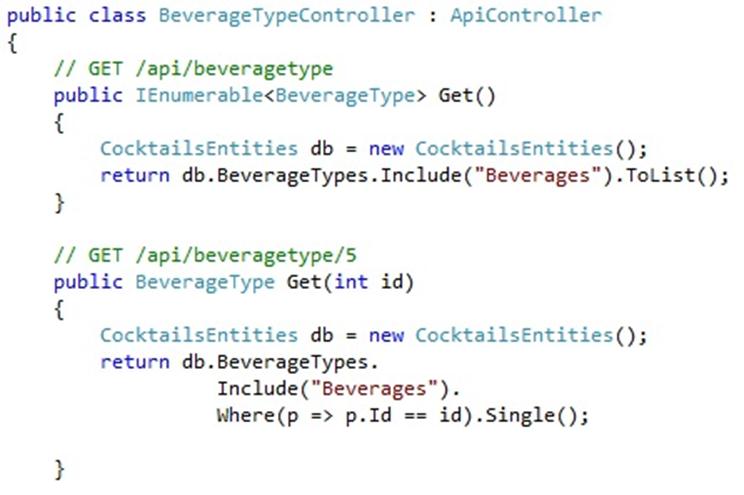
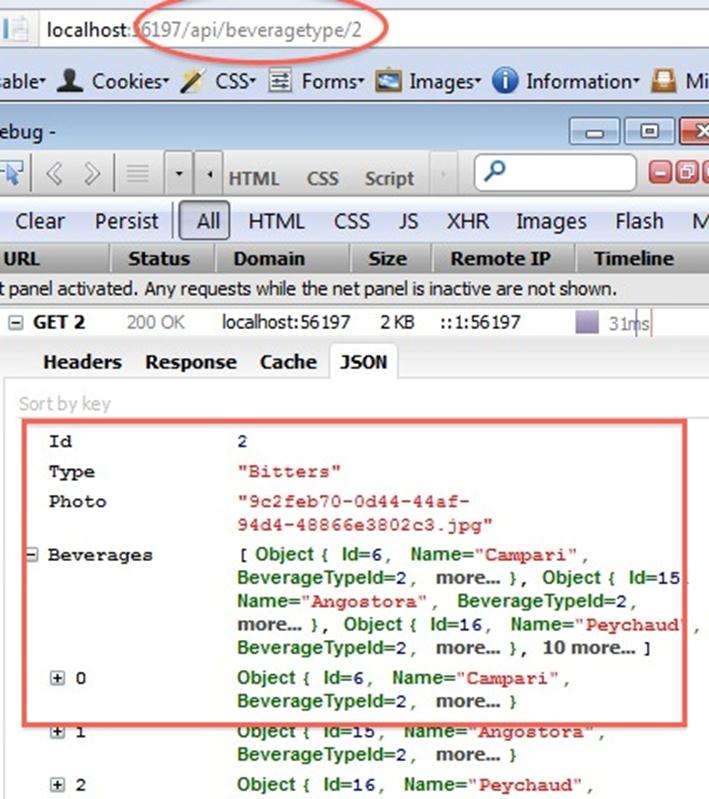
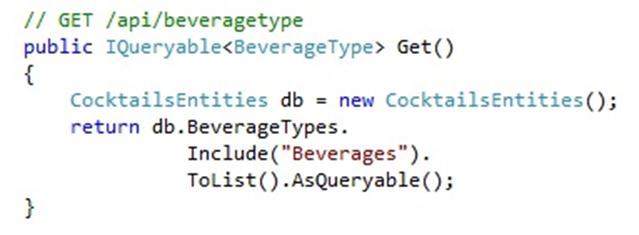
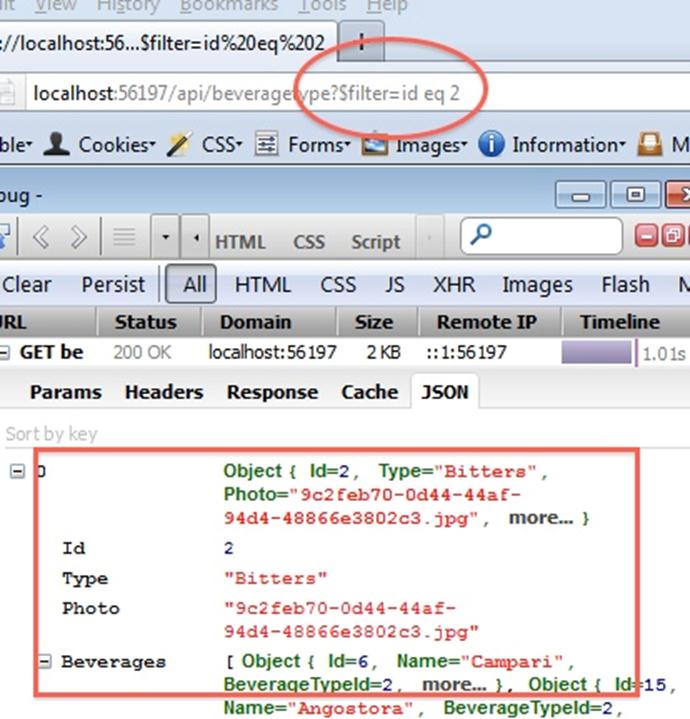

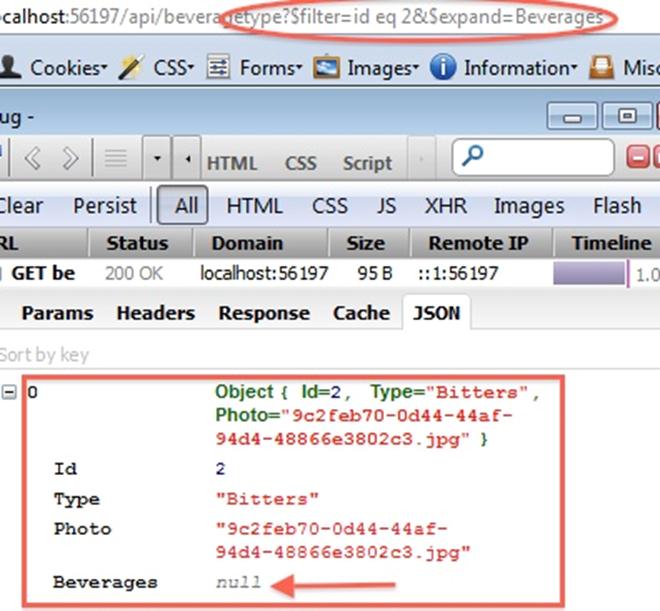
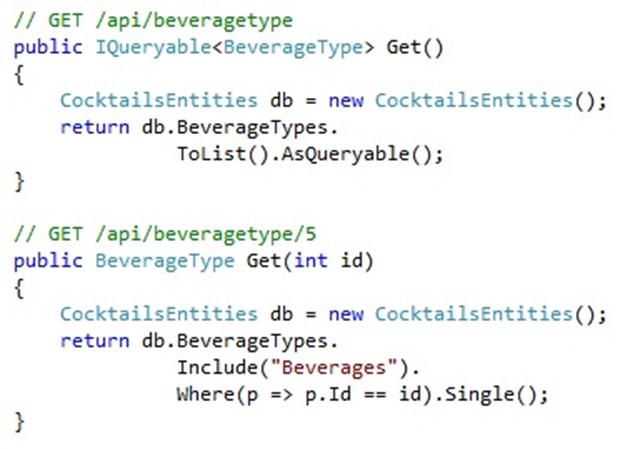

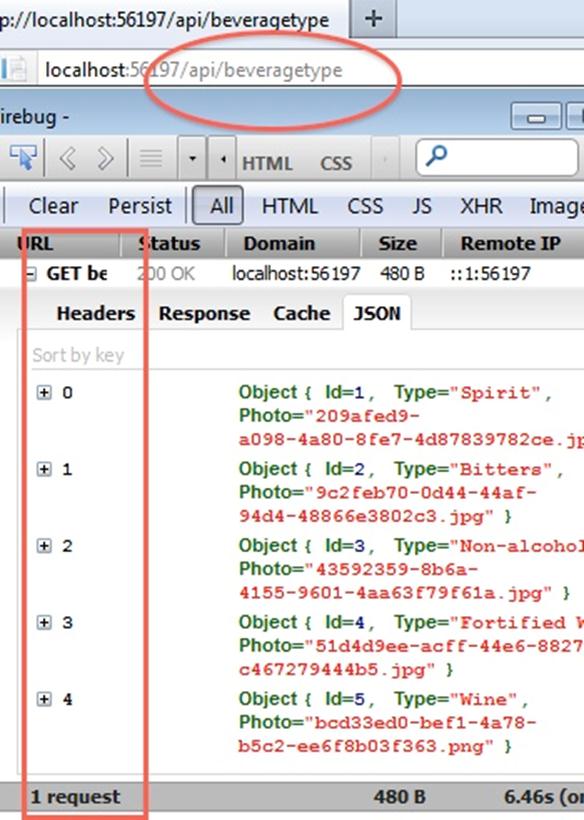
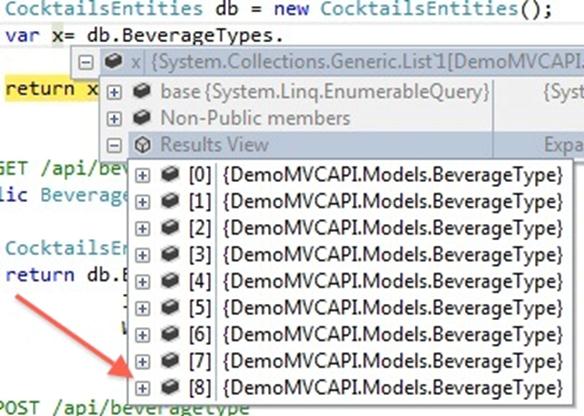
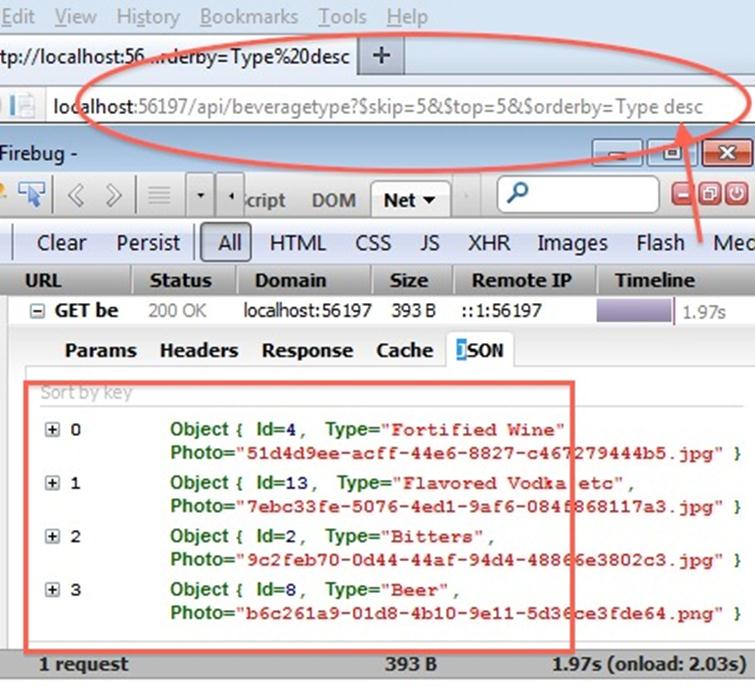




0 comments:
Post a Comment