Windows Azure and Cloud Computing Posts for 6/10/2013+
Top news this week:
‡ Scott Guthrie reported on 6/14/2013: This week we released some great updates to Windows Azure that make it significantly easier to develop mobile applications that use the cloud. These new capabilities include:
- Mobile Services: Custom API support
- Mobile Services: Git Source Control support
- Mobile Services: Node.js NPM Module support
- Mobile Services: A .NET API via NuGet
- Mobile Services and Web Sites: Free 20MB SQL Database Option for Mobile Services and Web Sites
- Mobile Notification Hubs: Android Broadcast Push Notification Support
All of these improvements are now available to use immediately (note: some are still in preview). See the Windows Azure SQL Database, Federations and Reporting, Mobile Services section for more details about them.
• CloudSpectator.com’s five-day UnixBench test of a ~4GB Ubuntu 12.04 VM from five IaaS providers (see the Windows Azure Infrastructure, DevOps, and System Center section):
Over the course of 5 days, Windows Azure scored highest in performance and price-performance. For price-performance, it averaged 12023 points. [Emphasis added.]
Respectively, HP cloud averaged 9559; SoftLayer averaged 4378; Amazon EC2 averaged 3182; and Rackspace averaged 2313. Normalizing each provider in relation to the highest one (Windows Azure) at 100, we get HP cloud at 80; SoftLayer at 36; Amazon EC2 at 26; and Rackspace at 19.
• Windows Azure Active Authentication (WAAA?) Preview “adds a critical second layer of security to authenticate access to Windows Azure, Microsoft Online Services like Microsoft Office 365 and Microsoft Dynamics CRM Online, and third-party cloud services.” See the Windows Azure Access Control, Active Directory, and Identity section.
| A compendium of Windows Azure, Service Bus, BizTalk Services, Access Control, Connect, SQL Azure Database, and other cloud-computing articles. |
• Updated 6/12/2013 with new articles marked •.
Note: This post is updated weekly or more frequently, depending on the availability of new articles in the following sections:
- Windows Azure Blob, Drive, Table, Queue, HDInsight and Media Services
- Windows Azure SQL Database, Federations and Reporting, Mobile Services
- Windows Azure Marketplace DataMarket, Cloud Numerics, Big Data and OData
- Windows Azure Service Bus, BizTalk Services and Workflow
- Windows Azure Access Control, Active Directory, and Identity
- Windows Azure Virtual Machines, Virtual Networks, Web Sites, Connect, RDP and CDN
- Windows Azure Cloud Services, Caching, APIs, Tools and Test Harnesses
- Visual Studio LightSwitch and Entity Framework v4+
- Windows Azure Infrastructure, DevOps, and System Center
- Windows Azure Pack, Hyper-V and Private/Hybrid Clouds
- Cloud Security, Compliance and Governance
- Cloud Computing Events
- Other Cloud Computing Platforms and Services
Azure Blob, Drive, Table, Queue, HDInsight and Media Services
Denny Lee (@dennylee) posted on 6/10/2013 a link to Rui Barbosa Martins’ (@ruibm) Hadoop/Hive – Writing a Custom SerDe (Part 1) post of 6/2/2013:
(Special thanks to Denny Lee for reviewing this)
Apache Hadoop is an open source project composed of several software solutions for distributed computing. One interesting component is Apache Hive that lets one leverage the MapReducing powers of Hadoop through the simple interface of HiveQL language. This language is basically a SQL lookalike that triggers MapReduces for operations that are highly distributable over huge datasets.
A common hurdle once a company decides to use Hadoop and Hive is: “How do we make Hadoop understand our data formats.”. This is where the Hadoop SerDe terminology kicks in. SerDe is nothing but a short form for Serialization/Deserialization. Hadoop makes available quite a few Java interfaces in its API to allow users to write their very own data format readers and writers.
Step by step, one can make Hadoop and Hive understand new data formats by:
1) Writing format readers and writers in Java that call Hadoop APIs.
2) Packaging all code in a java library – eg., MySerDe.jar.
3) Adding the jar to the Hadoop installation and configuration files.
4) Creating Hive tables and explicitly set the input format, the output format and the row format.Before diving into the Hadoop API and Java code it’s important to explain what really needs to be implemented. For concisiveness of terms I shall refer to row as the individual unit of information that will be processed. In the case of good old days SQL databases this indeed maps to a table row. However our datasource can be something as simple as Apache logs. In that case, a row would be a single log line. Other storage types might take complex message formats like Protobuf Messages, Thrift Structs, etc… For any of these, think of the top-level struct as our row. What’s common between them all is that inside each row there will be sub-fields (columns), and those will have specific types like integer, string, double, map, …
So going back to our SerDe implemention, the first thing that will be required is the row deserializer/serializer (RowSerDe). This java class will be in charge of mapping our row structure into Hive’s row structure. Let’s say each of our rows corresponds to a java class (ExampleCustomRow) with the three fields:
- int id;
- string description;
- byte[] payload;
The RowSerDe should be able to mirror this row class and their properties into Hive’s ObjectInspector interface. For each of our types it’ll find and return the equivalent type in the Hive API. Here’s the output of our RowSerDe for this example:
- int id -> JavaIntObjectInspector
- string description -> JavaStringObjectInspector
- byte[] payload -> JavaBinaryObjectInspector
- class ExampleCustomRow -> StructObjectInspector
In the example above, the row structure is very flat but for examples where our class contains others classes and so forth, the RowSerDe needs to be able to recursively reflect the whole structure into Hive API objects.
Once we have a way of mapping our rows into hadoop rows, we need to provide a way for hadoop to read our files or databases that contain multiple rows and extract them one by one. This is done via de Input and Output format APIs. A simple format for storing multiple rows in a file would be separating them by newline characters (like comma separated files do). An Input reader in this case would need to know how to read a byte stream and single out byte arrays of individual lines that would later be fed into to our custom SerDe class.
As you can probably imagine by now, the Output writer needs to do exactly the opposite: it receives the bytes that corresponds to each line and it knows how to append them and separate them (by newline characters) in the output byte stream.
How an Hadoop MapReduce interacts with a custom SerDe for Hive.
Summarizing, in order to implement a complete SerDe one needs to implement:
1) The Hive Serde interface (contains both the Serializer and Deserializer interfaces).
2) Implement the InputFormat interface and the OutputFormat interface.In the next post I’ll take a deep dive into the actual Hadoop/Hive APIs and Java code.


Mariano Converti (@mconverti) posted Windows Azure Media Services (WAMS) Asset Replicator published on CodePlex! to his SouthWorks blog on 6/4/2013:
Last Friday, the Windows Azure Media Services (WAMS) Asset Replicator Tool was published on CodePlex. This tool allows you to replicate WAMS assets across two Media Services accounts. In the most common scenarios this capability is used to mirror a library of streaming assets across accounts in two different Azure data centers to enable geo-diverse redundancy. During London 2012 Olympics, this tool was used by multiple broadcasters to guarantee on-demand video streaming redundancy.
The WAMS Replicator Tool takes care of identifying asset mismatches (down to the asset file level) across the two accounts, copying assets bi-directionally between accounts, and applying the same on-demand origin locator to them. By replicating the locators, both assets share the same relative streaming URL in both data centers (only base URLs are different). It also provides a web UI an operator can use to monitor lists of assets that are mismatched, assets that have been verified, and provides commands for taking manual corrective action.
This tool can be used in conjunction with a Traffic Manager (TM) which routes traffic between the streaming origin attached to each account. For high volume streaming scenarios the TM would be used in conjunction with a Content Delivery Network (CDN) and would route CDN origin requests in an active-active or active-passive configuration.
You can access the following resources from the WAMS Asset Replicator CodePlex project:
- Source Code: https://replicator.codeplex.com/SourceControl/latest
- Git repository: https://git01.codeplex.com/replicator (use your CodePlex username and password)
- Documentation: https://replicator.codeplex.com/releases/view/107172 (explains how to configure the tool for deploying it to Windows Azure, and provides a brief description of its high-level architecture)


<Return to section navigation list>
Windows Azure SQL Database, Federations and Reporting, Mobile Services
‡ Scott Guthrie (@scottgu) described Windows Azure: Major Updates for Mobile Backend Development in a 6/14/2013 to his blog:
All of these improvements are now available to use immediately (note: some are still in preview). Below are more details about them.

Mobile Services: Custom APIs, Git Source Control, and NuGet
Windows Azure Mobile Services provides the ability to easily stand up a mobile backend that can be used to support your Windows 8, Windows Phone, iOS, Android and HTML5 client applications. Starting with the first preview we supported the ability to easily extend your data backend logic with server side scripting that executes as part of client-side CRUD operations against your cloud back data tables.
With today’s update we are extending this support even further and introducing the ability for you to also create and expose Custom APIs from your Mobile Service backend, and easily publish them to your Mobile clients without having to associate them with a data table. This capability enables a whole set of new scenarios – including the ability to work with data sources other than SQL Databases (for example: Table Services or MongoDB), broker calls to 3rd party APIs, integrate with Windows Azure Queues or Service Bus, work with custom non-JSON payloads (e.g. Windows Periodic Notifications), route client requests to services back on-premises (e.g. with the new Windows Azure BizTalk Services), or simply implement functionality that doesn’t correspond to a database operation. The custom APIs can be written in server-side JavaScript (using Node.js) and can use Node’s NPM packages. We will also be adding support for custom APIs written using .NET in the future as well.
Creating a Custom API
Adding a custom API to an existing Mobile Service is super easy. Using the Windows Azure Management Portal you can now simply click the new “API” tab with your Mobile Service, and then click the “Create a Custom API” button to create a new Custom API within it:
Give the API whatever name you want to expose, and then choose the security permissions you’d like to apply to the HTTP methods you expose within it. You can easily lock down the HTTP verbs to your Custom API to be available to anyone, only those who have a valid application key, only authenticated users, or administrators. Mobile Services will then enforce these permissions without you having to write any code:
When you click the ok button you’ll see the new API show up in the API list. Selecting it will enable you to edit the default script that contains some placeholder functionality:
Today’s release enables Custom APIs to be written using Node.js (we will support writing Custom APIs in .NET as well in a future release), and the Custom API programming model follows the Node.js convention for modules, which is to export functions to handle HTTP requests.
The default script above exposes functionality for an HTTP POST request. To support a GET, simply change the export statement accordingly. Below is an example of some code for reading and returning data from Windows Azure Table Storage using the Azure Node API:
After saving the changes, you can now call this API from any Mobile Service client application (including Windows 8, Windows Phone, iOS, Android or HTML5 with CORS).
Below is the code for how you could invoke the API asynchronously from a Windows Store application using .NET and the new InvokeApiAsync method, and data-bind the results to control within your XAML:
private async void RefreshTodoItems() {
var results = await App.MobileService.InvokeApiAsync<List<TodoItem>>("todos", HttpMethod.Get, parameters: null);
ListItems.ItemsSource = new ObservableCollection<TodoItem>(results);
}
Integrating authentication and authorization with Custom APIs is really easy with Mobile Services. Just like with data requests, custom API requests enjoy the same built-in authentication and authorization support of Mobile Services (including integration with Microsoft ID, Google, Facebook and Twitter authentication providers), and it also enables you to easily integrate your Custom API code with other Mobile Service capabilities like push notifications, logging, SQL, etc.
Check out our new tutorials to learn more about to use new Custom API support, and starting adding them to your app today.
Mobile Services: Git Source Control Support
Today’s Mobile Services update also enables source control integration with Git. The new source control support provides a Git repository as part your Mobile Service, and it includes all of your existing Mobile Service scripts and permissions. You can clone that git repository on your local machine, make changes to any of your scripts, and then easily deploy the mobile service to production using Git. This enables a really great developer workflow that works on any developer machine (Windows, Mac and Linux).
To use the new support, navigate to the dashboard for your mobile service and select the Set up source control link:
If this is your first time enabling Git within Windows Azure, you will be prompted to enter the credentials you want to use to access the repository:
Once you configure this, you can switch to the configure tab of your Mobile Service and you will see a Git URL you can use to use your repository:
You can use this URL to clone the repository locally from your favorite command line:
> git clone https://scottgutodo.scm.azure-mobile.net/ScottGuToDo.git
Below is the directory structure of the repository:
As you can see, the repository contains a service folder with several subfolders. Custom API scripts and associated permissions appear under the api folder as .js and .json files respectively (the .json files persist a JSON representation of the security settings for your endpoints). Similarly, table scripts and table permissions appear as .js and .json files, but since table scripts are separate per CRUD operation, they follow the naming convention of <tablename>.<operationname>.js. Finally, scheduled job scripts appear in the scheduler folder, and the shared folder is provided as a convenient location for you to store code shared by multiple scripts and a few miscellaneous things such as the APNS feedback script.
Lets modify the table script todos.js file so that we have slightly better error handling when an exception occurs when we query our Table service:
todos.js
tableService.queryEntities(query, function(error, todoItems){
if (error) {
console.error("Error querying table: " + error);
response.send(500);
} else {
response.send(200, todoItems);
}
});Save these changes, and now back in the command line prompt commit the changes and push them to the Mobile Services:
> git add .
> git commit –m "better error handling in todos.js"
> git push
Once deployment of the changes is complete, they will take effect immediately, and you will also see the changes be reflected in the portal:
With the new Source Control feature, we’re making it really easy for you to edit your mobile service locally and push changes in an atomic fashion without sacrificing ease of use in the Windows Azure Portal.
Mobile Services: NPM Module Support
The new Mobile Services source control support also allows you to add any Node.js module you need in the scripts beyond the fixed set provided by Mobile Services. For example, you can easily switch to use Mongo instead of Windows Azure table in our example above. Set up Mongo DB by either purchasing a MongoLab subscription (which provides MongoDB as a Service) via the Windows Azure Store or set it up yourself on a Virtual Machine (either Windows or Linux). Then go the service folder of your local git repository and run the following command:
> npm install mongoose
This will add the Mongoose module to your Mobile Service scripts. After that you can use and reference the Mongoose module in your custom API scripts to access your Mongo database:
var mongoose = require('mongoose');
var schema = mongoose.Schema({ text: String, completed: Boolean });
exports.get = function (request, response) {
mongoose.connect('<your Mongo connection string> ');
TodoItemModel = mongoose.model('todoitem', schema);
TodoItemModel.find(function (err, items) {
if (err) {
console.log('error:' + err);
return response.send(500);
}
response.send(200, items);
});
};
Don’t forget to push your changes to your mobile service once you are done
> git add .
> git commit –m "Switched to use Mongo Labs"
> git push
Now our Mobile Service app is using Mongo DB!
Note, with today’s update usage of custom Node.js modules is limited to Custom API scripts only. We will enable it in all scripts (including data and custom CRON tasks) shortly.
New Mobile Services NuGet package, including .NET 4.5 support
A few months ago we announced a new pre-release version of the Mobile Services client SDK based on portable class libraries (PCL).
Today, we are excited to announce that this new library is now a stable .NET client SDK for mobile services and is no longer a pre-release package. Today’s update includes full support for Windows Store, Windows Phone 7.x, and .NET 4.5, which allows developers to use Mobile Services from ASP.NET or WPF applications.
You can install and use this package today via NuGet.
Mobile Services and Web Sites: Free 20MB Database for Mobile Services and Web Sites
Starting today, every customer of Windows Azure gets one Free 20MB database to use for 12 months free (for both dev/test and production) with Web Sites and Mobile Services.
When creating a Mobile Service or a Web Site, simply chose the new “Create a new Free 20MB database” option to take advantage of it:
You can use this free SQL Database together with the 10 free Web Sites and 10 free Mobile Services you get with your Windows Azure subscription, or from any other Windows Azure VM or Cloud Service.
Notification Hubs: Android Broadcast Push Notification Support
Earlier this year, we introduced a new capability in Windows Azure for sending broadcast push notifications at high scale: Notification Hubs.
In the initial preview of Notification Hubs you could use this support with both iOS and Windows devices. Today we’re excited to announce new Notification Hubs support for sending push notifications to Android devices as well.
Push notifications are a vital component of mobile applications. They are critical not only in consumer apps, where they are used to increase app engagement and usage, but also in enterprise apps where up-to-date information increases employee responsiveness to business events. You can use Notification Hubs to send push notifications to devices from any type of app (a Mobile Service, Web Site, Cloud Service or Virtual Machine).
Notification Hubs provide you with the following capabilities:
- Cross-platform Push Notifications Support. Notification Hubs provide a common API to send push notifications to iOS, Android, or Windows Store at once. Your app can send notifications in platform specific formats or in a platform-independent way.
- Efficient Multicast. Notification Hubs are optimized to enable push notification broadcast to thousands or millions of devices with low latency. Your server back-end can fire one message into a Notification Hub, and millions of push notifications can automatically be delivered to your users. Devices and apps can specify a number of per-user tags when registering with a Notification Hub. These tags do not need to be pre-provisioned or disposed, and provide a very easy way to send filtered notifications to an infinite number of users/devices with a single API call.
- Extreme Scale. Notification Hubs enable you to reach millions of devices without you having to re-architect or shard your application. The pub/sub routing mechanism allows you to broadcast notifications in a super-efficient way. This makes it incredibly easy to route and deliver notification messages to millions of users without having to build your own routing infrastructure.
- Usable from any Backend App. Notification Hubs can be easily integrated into any back-end server app, whether it is a Mobile Service, a Web Site, a Cloud Service or an IAAS VM.
It is easy to configure Notification Hubs to send push notifications to Android. Create a new Notification Hub within the Windows Azure Management Portal (New->App Services->Service Bus->Notification Hub):
Then register for Google Cloud Messaging using https://code.google.com/apis/console and obtain your API key, then simply paste that key on the Configure tab of your Notification Hub management page under the Google Cloud Messaging Settings:
Then just add code to the OnCreate method of your Android app’s MainActivity class to register the device with Notification Hubs:
gcm = GoogleCloudMessaging.getInstance(this);
String connectionString = "<your listen access connection string>";
hub = new NotificationHub("<your notification hub name>", connectionString, this);
String regid = gcm.register(SENDER_ID);
hub.register(regid, "myTag");
Now you can broadcast notification from your .NET backend (or Node, Java, or PHP) to any Windows Store, Android, or iOS device registered for “myTag” tag via a single API call (you can literally broadcast messages to millions of clients you have registered with just one API call):
var hubClient = NotificationHubClient.CreateClientFromConnectionString(
“<your connection string with full access>”,
"<your notification hub name>");hubClient.SendGcmNativeNotification("{ 'data' : {'msg' : 'Hello from Windows Azure!' } }", "myTag”);
Notification Hubs provide an extremely scalable, cross-platform, push notification infrastructure that enables you to efficiently route push notification messages to millions of mobile users and devices. It will make enabling your push notification logic significantly simpler and more scalable, and allow you to build even better apps with it.
Learn more about Notification Hubs here on MSDN .
Summary
The above features are now live and available to start using immediately (note: some of the services are still in preview). If you don’t already have a Windows Azure account, you can sign-up for a free trial and start using them today. Visit the Windows Azure Developer Center to learn more about how to build apps with it.
Hope this helps,


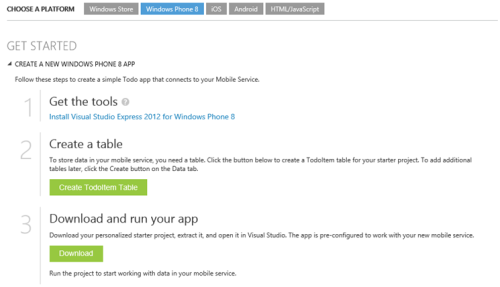
Kevin Kell shows you how to get started with Windows Azure Mobile Services in a 6/3/2013 post to his Learning Tree blog:
For some time now I have wanted to get started building mobile apps but I just haven’t been able to find the time. This week I decided to explore the Mobile Services in Windows Azure to see if that might offer a path of low resistance. I was pretty happy with what I found there.
Azure Mobile Services, which is currently in preview, is a collection of backend cloud services that support applications written for mobile devices. Included are services for storage/database, server side scripting, scheduled jobs, authentication, push notifications and others. Supported mobile platforms are Windows Phone/Windows Store, Android, iOS and HTML5.
Getting started with Mobile Services is very easy. From the Azure portal all you do is provision a new mobile service. You pick a name for the url endpoint, a geographic region to deploy into and specify to use an existing or a new SQL database for storage. Then, from the dashboard, you can either create a new mobile app or connect the service to an existing mobile app.
Figure 1. Creating a new Mobile App
Since I am creating a Windows Phone 8 app I needed to install the SDK. I did this right from within Visual Studio since I already had it installed. It was fairly painless with only a couple of warnings where I had to grant permissions, enable the Windows Hyper-V feature so I could run the emulator and turn on the Package Manager option in Visual Studio that allows NuGet to download missing packages during the build.
Create a Table provisions a SQL database that your mobile app can use for storage. Then, all you need to do is download and unzip a file which contains a Windows Phone 8 project which comes pre-configured to connect to the specific service you just created. Just open it in Visual Studio and it will run in the emulator.
Figure 2. Personalized Phone 8 project running in Emulator
This project is the starting point for the custom app you are creating. Back on the portal you will see that a database table has been automatically created dynamically from the code. Pretty cool.
Obviously there is still quite a bit of work ahead as you now build out your custom app. There are also other features and capabilities of the service and the API that need to be explored. Still, it is pretty easy to get started and get a working mobile app that uses the Azure Mobile Services as a back end put together with just a few mouse clicks.


<Return to section navigation list>
Windows Azure Marketplace DataMarket, Cloud Numerics, Big Data and OData
The Data Explorer for Excel (@DataExplorer) team posted Announcing the Data Explorer June Update on 6/10/2013:
It’s a warm and sunny Monday afternoon in Redmond and that means a couple of things: mid-June Summer weather is here and it is about time to announce the Data Explorer June update.
This update contains several quality improvements and bug fixes, including the fix for the interaction issues between Data Explorer and the VBA Editor. If you have hit this issue in the past, install our latest bits and enjoy. If you haven’t, you don’t really want to know about it… but please install our bits anyways!
As always, we hope that you enjoy the latest and greatest Data Explorer bits and please send us a smile or frown if you have any feedback. We’ll be more than happy to hear from you!

No significant OData articles today
<Return to section navigation list>
Windows Azure Service Bus, BizTalk Services and Workflow
‡ Paolo Salvatori (@babosbird) explained How to send a large message to a Service Bus Relay Service using Streamed transfer mode on 6/10/2013:
Introduction
This solution shows how to use the TransferMode = Streamed to send a large message to a Service Bus Relay Service using a streaming approach.
Requirements
The following list contains the software required for building and running the sample:
Windows Server 2008 R2 SP1, Windows Server 2012, Windows 7 SP1, Windows 8 or higher.
- Windows Azure Service Bus 2.1 or higher.
- NET Framework 4.5
- Visual Studio 2012
- Any Microsoft SDK which provides a gacutil version for .NET 4.0/4.5.
- A valid subscription to Windows Azure.
Building the Sample
Inside the zip file you can find a solution that contains 3 projects:
- Client: this is a Windows Forms application that you can use to select multiple files (typically very large files, images, videos, etc.) from the local file system and send them in parallel to the WCF service, running on-premises or in the cloud, which exposes an endpoint in Windows Azure via a Service Bus Relay Service.
- Service: this is a Console Application hosting the WCF service. The UploadService receives messages from the client application and stores them in a local folder whose path is defined in the appSettings section of the configuration file. Note: in a production environment the service should run in a scalable, reliable and robust environment such as Internet Information Services (IIS).
- Contracts: this project contains the data and service contracts used by both the client an service.
Open the solution in Visual Studio 2012 and make sure to replace the following placeholders in the App.config file under the Client and Service projects:
- YOUR-NAMESPACE: specify the name of your Windows Azure Service Bus namespace.
- YOUR-NAMESPACE-ISSUER-SECRET: specify the issuer secret of your Service Bus namespace. You can retrieve the issuer secret of your namespace from the Windows Azure Management Portal as illustrated in the picture below.
Solution
The following picture shows the architecture of the solution:
Message Flow:
- The user selects multiple files from the local file system, then clicks the Send button. The client application sends the selected files to the Service Bus Relay Service using creates a separate Task and WCF channel for each message. The Windows Forms application can use two different client endpoints to send messages to the underlying WCF service . These endpoints are respectively configured to use the BasicHttpRelayBinding and NetTcpRelayBinding.
- The Service Bus Relay Service re-transmits the message to the WCF service.
- The WCF service, running on-premises or in the cloud, receives files from the client via the Service Bus Relay Service. The WCF service exposes two endpoints in Windows Azure. These endpoints are respectively configured to use the BasicHttpRelayBinding and NetTcpRelayBinding.
- The WCF service stores the incoming files to a local folder configured in the configuration file.
WCF Message Encoders and Transfer Modes
WCF includes three types of encoding for SOAP messages:
- Text Message Encoding: The text encoding represented by the TextMessageEncodingBindingElement is the most interoperable, but the least efficient encoder for XML messages. Web service or Web service client can generally understand textual XML. However, transmitting large blocks of binary data as text is not efficient.
- Binary Message Encoding: The BinaryMessageEncodingBindingElement is the binding element that specified the .NET Binary Format for XML should be used for encoding messages, and has options to specify the character encoding and the SOAP and WS-Addressing version to be used. Binary encoding is most efficient but least interoperable of the encoding options.
- MTOM Message Encoding: The MTOMMessageEncodingBindingElement represents the binding element that specifies the character encoding and message versioning and other settings used for messages using a Message Transmission Optimization Mechanism (MTOM) encoding. (MTOM) is an efficient technology for transmitting binary data in WCF messages. The MTOM encoder attempts to create a balance between efficiency and interoperability. The MTOM encoding transmits most XML in textual form, but optimizes large blocks of binary data by transmitting them as-is, without conversion to their base64 encoded format.
WCF transport channels support two modes for transferring messages in each direction:
- Buffered: transmissions hold the entire message in a memory buffer until the transfer is complete. On the service side message processing cannot start until the entire message has been received. This is the default mode for all the WCF bindings.
- Streamed: transmissions only buffer the message headers and expose the message body as a stream, from which smaller portions can be read at a time.
The TransferMode property exposed by transport protocol channel (e.g.HttpTransportBindingElement, TcpTransportBindingElement, etc.) and bindings (BasicHttpBinding, NetTcpBinding, BasicHttpRelayBinding, NetTcpRelayBinding, etc.) allows to indicate whether messages are sent buffered or streamed. Streamed transfers can improve the scalability of a service by eliminating the need for large memory buffers. Whether changing the transfer mode actually improves scalability in practice depends on the size of the messages being transferred. Improvements in scalability should be more evident when sending large messages using the streamed instead of buffered transfer mode. For more information on the WCF Transfer Modes, you can read the following topic:
“TransferMode Enumeration” on MSDN.
Client
The Windows Forms is able to upload multiple documents at the same time. The UI of the client application allows to select a list of files to be sent in parallel to the underlyng WCF service and which client endpoint to use to this purpose. The configuration file of the client application contains two client endpoints configured, respectively, to use the BasicHttpRelayBinding and NetTcpRelayBinding. Each endpoint (see below) is configured to use the Streamed transfer mode. Besides, the value of the maxBufferPoolSize, maxReceivedMessageSize, maxBufferSize properties of the two bindings have been increased to support the transmission of large files. The same approach has been used for the WCF service. When the user clicks the Send button on the main form, the event handler method sends the selected files in an asynchronous way using a separate Task and WCF channel for each message. The following table contains the code of the MainForm class. …


[200 or so lines of source code excised for brevity.]
Run the sample
To run the solution you can proceed as follows:
- Start the console application hosting the WCF service. Access your Service Bus namespace in the Windows Azure Management Portal and make sure that the both the the BasicHttpRelayBinding and NetTcpRelayBinding Relrelay services were started correctly, as shown in the following picture.
- Start the client application.
- Click the Select Files button and select 1 or multiple files to send.
- Select the basicHttpRelayBinding or netTcpRelayBinding endpoint from the Endpoint drop-down-list.
- Specify a value for the BufferSize.
- Click the Send button to send the selected files to the WCF service using the chosen client endpoint, as shown in the following picture.
- The WCF service receives the files via Service Bus Relay Service and stores them in the folder whose path is defined in the configuration file.
Conclusions
This article shows a powerful technique to transfer large files using the Service Bus Relay Service and WCF Streamed transfer mode. You can download the code on MSDN Code Gallery.


Philip Fu described the Use Task Based programming technology in Service Bus All-In-One Code Frameworks sample of 6/3/2013:
Sample Download : http://code.msdn.microsoft.com/Use-Task-Based-programming-2bf1f4b6
This sample shows the new feature in Windows Azure Service Bus Client SDK 2.0.
You can find more code samples that demonstrate the most typical programming scenarios by using Microsoft All-In-One Code Framework Sample Browser or Sample Browser Visual Studio extension. They give you the flexibility to search samples, download samples on demand, manage the downloaded samples in a centralized place, and automatically be notified about sample updates.
If it is the first time that you hear about Microsoft All-In-One Code Framework, please watch the introduction video on Microsoft Showcase, or read the introduction on our homepage http://1code.codeplex.com/.
Brian Loesgen (BrianLoesgen) described deploying 3 BizTalk Servers, 2 Datacenters, 1 On-prem in a 5/21/2013 post (missed when published):
As you’re probably aware, Windows Azure IaaS went general availability recently. There are three BizTalk images in the gallery that you use to create a new BizTalk virtual machine.
This was too much for me to resist, I wanted to do something cool and distributed as a proof-of-concept. The result is this blog post, and the accompanying video that shows the demo running.
To get to the bottom line, I used 2 BizTalk VMs on Azure, and 1 runnin
g “on prem” (in a Hyper-V VM). The roles of the servers are as follows:
Server 1 (“Spoke”, Western Europe):
- receives a batch of orders
- disassembles the batch into individual orders
- uses the WCF-WebHttp adapter to send each order to the hub via a REST POST
Server 2 (“Hub”, Southeast Asia)
- receives each order via the WCF-WebHttp adapter
- sends each order on the the Azure Service Bus using the WCF-NetTcpRelay adapter
Server 3 (“On-prem”, San Diego USA)
- establishes an endpoint on the Windows Azure Service Bus using the WCF-NetTcpRelay adapter
- receives order messages sent to that endpoint
- persists them to file
As this is the ultimate “watch a file disappear here and another show up there” canonical BizTalk demo, I put a video together showing it working. All BizTalk people have done one of these demos before, but this is as far as I know the first one to circle the planet, leveraging Windows Azure.
I created this demo by first getting everything running locally in a single Hyper-V VM. Then, after deploying, all I needed to do was re-configure thee Spoke machine send port to that it would send to the Hub machine. For the BizTalk Servers running in Windows Azure, I used the Evaluation image, which has SQL Server installed (the Standard and Enterprise images do not).
The Spoke machine uses the default settings (it seems the default behavior of a WCF-WebHttp adapter in a send port is to do a POST, which makes sense).
The Hub machine receive location also uses the default settings:
The Hub machine send port (sending to the Windows Azure Service Bus) looks like this:
The credentials used above are the credentials for the Service Bus namespace.
Remember to watch the video!


<Return to section navigation list>
Windows Azure Access Control, Active Directory, Identity and Workflow
• Alex Simons (@Alex_A_Simons) published Windows Azure Active Authentication: Multi-Factor for Security and Compliance to the Active Directory Team Blog on 6/12/2013:
Today we've got some pretty cool news! We've just released the preview of our new Windows Azure Active Authenticaton service. A few months ago we showed you how to enable multi-factor authentication for your Aure AD Global Admins. With this preview we're giving you the ability to give all your employees, customers and partners a rich set of smartphone based two factor authentication options.
Starting now, companies can use this preview to enable multi-factor authentication for all their Windows Azure Active Directory identities securing access to Office 365, Windows Azure, Windows Intune, Dynamics CRM Online and many of the other applications that are integrated with Windows Azure AD. Additionally Developers can also use the Active Authentication SDK to build multi-factor authentication into their custom applications and directories.
Getting Started
To start using multi-factor authentication with your Windows Azure Active Directory tenant, you’ll first need to add the Active Authentication service. To do that:
Sign in to the Windows Azure Portal as an Administrator.
On the Active Directory page, at the top, select Active Auth Providers.
In the tray at the bottom of the page, click New.
Fig 1: Active Auth Provider Tab
Under App Services, select Active Auth Providers, and select Quick Create.
Fig 2: Adding a new provider
Fill in the following fields and when completed, select Create.
a. Name – The name of the Active Auth Provider, so you can associate for billing purposes for example, “Messaging DEMO”
b. Usage Model – Select the usage model you prefer - “Per Enabled User” or “Per Authentication”. This sets the billing model for this authentication provider as either per user or per authentication.
Note: You can learn more about these usage models and pricing here
c. Directory – Enter the Windows Azure Active Directory tenant that the Active Authentication Provider is going to be used with e.g. Contoso Demo
Fig 3: Completing the Authentication Provider Quick Create form
Once you click create, the Active Authentication Provider will be created and you should see a message stating: Successfully created Active Authentication Provider.
Click Ok
Now you've got Active Authentication provisioned and ready to use. Time to configure which users will have it enabled.
Turning on multi-factor authentication for specific users
Click on the Active Directory tab on the left
- Click the Directory tab underneath the Active Directory header
- Click on your Windows Azure AD tenant.
On the Users page, click the user you want to enable.
Select the Require Multi-factor Authentication check box
Fig 4: Activating 2 Factor Authentication for a user
Your admin tasks are all done. Pretty easy eh?
Signing in with Windows Azure Active Authentication Service
Once Active Authentication has been enabled for a user the next time that user signs into a service that uses Windows Azure AD, they will be asked to select and configure one of these multi-factor authentication methods:
- App Notification – Use the Active Authentication smart phone app.
- App One-time password (OTP) – Use a One-time Password with their Active Authentication smart phone app.
- Phone Call – A phone call to their mobile or landline phone.
- Text Message –A text message sent to their mobile phone.
This auto-enrollment feature, makes deploying multi-factor authentication easy and hassle free for ITPros while providing the end user the flexibility to configure the primary method that suits their needs. Users can add or change methods later.
While all four of these authentication methods work great, my favorite is our Active Authentication app (available for Windows Phone, iOS and Android smartphones and tablets). You can download the free app from the device store and activate it. If you are a gadget geek like me, this is the one you’ll want to use!
Configuring your account to use the Windows Azure Active Authentication smart phone app:
First, if you are logged into Windows Azure, Office 365, or another service integrated with Windows Azure AD, log-out.
Using your browser, sign in to Windows Azure or Office 365.
You will be prompted to configure your multi-factor options. Click the "Set it up now" button.
Fig 5: Prompt to configure Multi-Factor Auth when signing in the first time.
This will bring up the Additional Security Verification settings page. Once that page loads, under mobile app, select the check box and click Configure.
Fig 6: Additional Verification Page
That will bring up the App Configuration screen:
Fig 7: Configure App Screen
On the phone that has the Active Authentication app installed, launch the app.
Now click the + sign in the app to add a new account.
Then click the barcode scanner button on the far right in the app. This will launch the camera.

Fig 8: Active Authentication App Configuration Screen
Scan the barcode picture that came up with the configure phone app screen.
After a few seconds you should see a 6 digit code on the app screen. Once you see this click the check mark button on the configure phone app screen.
Click Save.
You are all set!
The next time you sign-in to a cloud application or service protected by Windows Azure AD, the app will activate on your phone and ask you to authenticate or deny the login. You also have the option to report the attempt as being fraudulent.
Of course, the app is my personal favorite but you might like receiving a phone call better and most of the folks on our team prefer the SMS messaging option. The great thing about the service is that your users can choose the method they like best and switch between methods without any additional configuration on your part.
We’ll have a lot more coming in this space in the very near future, so stay tuned. And as always, we would love to hear your feedback. Head over to the Windows Azure Active Authentication forum to let us know what you think.


• The Active Directory Team posted What is Windows Azure Active Authentication (Preview) and three related tutorials to the TechNet Library on 6/12/2013:
This topic provides a general overview of Windows Azure Active Authentication and multi-factor authentication concepts and describes how a global administrator can use multi-factor authentication in Windows Azure to further protect their organization’s identity data in the cloud. Active Authentication can be enabled for Windows Azure Active Directory users or for custom applications using the SDK.
What is multi-factor authentication and how does it work?
Multi-factor or two-factor authentication (2FA) is a method of authentication that requires the use of more than one verification method and adds a critical second layer of security to user sign-ins and transactions. It works by requiring any two or more of the following verification methods:
- Something you know (typically a password)
- Something you have (a trusted device that is not easily duplicated, like a phone)
- Something you are (biometrics)
The security of multi-factor authentication lies in its layered approach. Compromising multiple authentication factors presents a significant challenge for attackers. Even if an attacker manages to learn the user’s password, it is useless without also having possession of the trusted device. Conversely, if the user happens to lose the device, the finder of that device won’t be able to use it unless he or she also knows the user’s password.
By default, Windows Azure AD supports the use of passwords as its only authentication method for user sign-ins.
What is Windows Azure Active Authentication?
Windows Azure Active Authentication is the multi-factor authentication service that requires users to also verify sign-ins using a mobile app, phone call or text message. It is available to use with Windows Azure Active Directory or with custom applications and directories using the SDK. When using the service with Windows Azure AD, administrators can enable the service for a directory user. The next time that user signs in, that user will be prompted to setup the specifics of their multi-factor authentication experience. This is done by specifying up to 3 phone numbers, which can either be used for authentication using phone calls or text messages. These numbers are marked as mobile, office, and alternate. Also, the user must specify whether or not they will be using the Active Authentication phone app which can offers out-of-band push and one-time passcode authentication options. For more information on configuring your multi-factor experience see: Windows Azure Active Authentication for Users (Preview)
What Authentication Options are Available?
With multiple out-of-band methods and a one-time passcode option, Windows Azure Active Authentication provides flexibility for users and backup options in the event the user is not able to authenticate using their preferred method.
- Active Authentication apps are available for is available for Windows Phone, Android, and IOS devices. Users can download the free app from the device store and activate it using a code provided during set up. When the user signs-in, a notification is pushed to the app on their mobile device. The user taps to approve or deny the authentication request. Cellular or Wi-Fi access is required for installing and setting up the app. Once the app is installed it can operate in 2 different modes to provide the additional security that a multi-factor authentication service can provide. These are the following:
- Notification - In this mode, the Windows Azure Active Authentication app prevents unauthorized access to accounts and stops fraudulent transactions. This is done using a push notification to your phone or registered device. Simply view the notification and if it is legitimate select Authenticate. Otherwise you may choose Deny or choose to deny and report the fraudulent notification. For information on reporting fraudulent notifications see How to use the Deny and Report Fraud Feature for Active Authentication.
- One-Time Password - In this mode, the Windows Azure Active Authentication app can be used as software token to generate an OAuth passcode. This passcode can then be entered along with the username and password to provide the second form of authentication. This option is great in instances of spotty phone coverage.
- Automated phone calls can be placed by the Active Authentication service to any phone, landline or mobile. The user simply answers the call and presses # on the phone keypad to complete their sign in.
- Text messages can be sent by the Active Authentication service to any mobile phone. The text message contains a one-time passcode. The user is prompted to either reply to the text message with the passcode or enter the passcode into the sign in screen.Only phone call and text message options are currently available for the Active Authentication SDK.
Things to consider before enabling multi-factor authentication
It’s important that you read the following information before you enable this feature because it will have a broad impact on the accounts you enable.
- No rich client application support - When you enable multifactor authentication for a user account, you will not be able to use rich client applications, such as Microsoft Outlook, Lync, Windows PowerShell or other installed applications on your computer, to send/receive data provided by the cloud services you have subscribed to in your tenant.
For example, if your organization has subscribed to Office 365, the user will not be able to access their e-mail through Outlook that is installed locally but will be able to access their e-mail through a browser using Outlook Web Access.- No Lync-based IP phone support – Once enabled, users will not be able to use a Lync-based IP phones with multi-factor authentication.
Purchasing Windows Azure Active Authentication
Multi-factor authentication is available by default for global administrators who have a Windows Azure Active Directory tenant. However, if you wish to extend multi-factor authentication to all of your users and/or want to your global administrators to be able to take advantage features such as the management portal, custom greetings, and reports, then you must purchase and configure the service. For information on purchasing Windows Azure Active Authentication see Windows Azure pricing details. For information on configuring the Windows Azure Active Authentication service see Windows Azure Active Authentication for Administrators (Preview)
See Also: Other Resources
Add or change your security verification settings
• The Windows Azure Team announced a preview of Windows Azure Active Authentication on 6/12/2013:
Windows Azure Active Authentication (Preview)
With escalating IT security threats and strengthening regulatory requirements, multi-factor authentication is no longer optional for many organizations. Windows Azure Active Authentication provides a critical second layer of security, in addition to a user’s existing credentials, to authenticate employee, customer, and partner access. Enable Active Authentication for Windows Azure AD identities or build the service into your cloud applications.
Get security AND convenience
Active Authentication safeguards access to your data and applications while addressing user demand for easy, anywhere access. Active Authentication offers a range of authentication options, including phone calls, text messages, mobile apps, and one-time passcodes, allowing users to choose the method that works best for them. Support for alternate methods ensures that users can be reached for authentication every time.
Turn it on for Windows Azure AD
Enable Active Authentication for Windows Azure AD identities, and users will be prompted to set up additional verification the next time they sign in. Use Active Authentication to secure access to Windows Azure, Microsoft Online Services like Office 365 and Dynamics CRM Online, as well as 3rd party cloud services that integrate Windows Azure AD with no additional set up. Multi-factor authentication can be rapidly enabled for large numbers of global users and applications.
Build it into your applications
An SDK enables direct integration with your cloud services. Build Active Authentication phone call and text message verification into your application’s sign-in or transaction processes and leverage your application’s existing user database.
Pricing Details
Prices below include a 50% preview discount:
Per User Per Authentication Price (Preview) $1/month for unlimited authentications $1 per 10 authentications Methods supported Mobile App, Phone Call, Text Mobile App, Phone Call, Text Advanced Configuration Included Included Reporting Included Included
Manu Cohen-Yashar (@ManuKahn) explained How to Analyze SAML Traffic in a 6/2/2013 post:
To learn and debug ADFS 2.0 and the SAML protocol it is important to look at the traffic running between the client, STS and the RP (web application). When using AD FS 2.0 the traffic must be sent on a secure channel (SSL), Fortunately Fiddler can decrypt the content and present the actual traffic on the wire yet when activating fiddler and with SSL decryption (as shown here) you will be continuously prompted for credentials by the AD FS 2.0 Federation Server. This prompt comes in the form of a HTTP 401 challenge dialog box.
Cause
By default, AD FS 2.0 utilizes Extended Protection for Authentication (EPA) in IIS. When this is turned on, the client browser cannot successfully authenticate while Fiddler is proxying all requests.
Resolution
For troubleshooting purposes, you should disable Extended Protection for Authentication in IIS by following one of these two options:
Open IIS Manger on each ADFS server in the farm
- Start > Administrative Tools > IIS Manager
- Expand: <server-name>, Sites, Default Web Site, and adfs
- Select the ls application and double-click Authentication
- Select Windows Authentication and select Advanced Settings....
- Set Extended Protection to Off and click OK
Now you can monitor the traffic and debug the session


Maarten Balliauw (@maartenballiauw) described Using Amazon Login (and LinkedIn and …) with Windows Azure Access Control in a 5/31/2013 post:
One of the services provided by the Windows Azure cloud computing platform is the Windows Azure Access Control Service (ACS). It is a service that provides federated authentication and rules-driven, claims-based authorization. It has some social providers like Microsoft Account, Google Account, Yahoo! and Facebook. But what about the other social identity providers out there? For example the newly introduced Login with Amazon, or LinkedIn? As they are OAuth2 implementations they don’t really fit into ACS.
Meet SocialSTS.com. It’s a service I created which does a protocol conversion and allows integrating ACS with other social identities. Currently it has support for integrating ACS with Twitter, GitHub, LinkedIn, BitBucket, StackExchange and Amazon. Let’s see how this works. There are 2 steps we have to take:
- Link SocialSTS with the social identity provider
- Link our ACS namespace with SocialSTS
Link SocialSTS with the social identity provider
Once an account has been created through www.socialsts.com, we are presented with a dashboard in which we can configure the social identities. Most of them require that you register your application with them and in turn, you will receive some identifiers which will allow integration.
As you can see, instructions for registering with the social identity provider are listed on the configuration page. For Amazon, we have to register an application with Amazon and configure the following:
- Name: your application name
- Application return URL: https://socialsts.azurewebsites.net/foo/amazon/authenticate
If we do this, Amazon will give us a client ID and client secret in return, which we can enter in the SocialSTS dashboard.
That’s basically all configuration there is to it. We can now add our Amazon, LinkedIn, Twitter or GitHub login page to Windows Azure Access Control Service!
Link our ACS namespace with SocialSTS
In the Windows Azure Access Control Service management dashboard, we can register SocialSTS as an identity provider. SocialSTS will provide us with a FederationMetadata.xml URL which we can copy into ACS:
We can now save this new identity provider, add some claims transformation rules through the rule groups (important!) and then start using it in our application:
Enjoy! And let me know your thoughts on this service.


Windows Azure Virtual Machines, Virtual Networks, Web Sites, Connect, RDP and CDN
• My (@rogerjenn) Uptime Report for My Windows Azure Web Services (Preview) Demo Site: May 2013 = 99.58% begins:
My Android MiniPCs and TVBoxes blog provides technical details of low-cost MiniPCs with HDMI outputs running Android JellyBean 4.1+. The site emphasizes high-definition 1080p video recording and rendition techniques.
The blog runs WebMatrix 3 with WordPress 3.5.1 and a 1-GB ClearDB MySQL database on a single shared instance of the Windows Azure Web Sites (WAWS) Preview in Microsoft’s West U.S. (San Francisco Bay Area) data center. Word Press Super Cache is implemented to improve response time of the typical lengthy, fully illustrated articles. I use Windows Live Write to author the posts.
Following is Pingdom’s uptime report for the month of May, 2013:
Note: Downtimes probably are less that reported because Pingdom interrogates the site at five-minute intervals.


Note: Downtime has been reduced substantially starting 6/3/2013. See the full report for details.

<Return to section navigation list>
Windows Azure Cloud Services, Caching, APIs, Tools and Test Harnesses
No significant articles today

<Return to section navigation list>
Visual Studio LightSwitch and Entity Framework 4.1+
Beth Massi (@bethmassi) published TechEd Presentations Now Online: Building Modern, HTML5-Based Business Apps with LightSwitch on 6/6/2013:
Just a quick post while I’m here at TechEd in New Orleans this week. My sessions are now online along with the slides. They went really well and I couldn’t have been more pleased with the turnout. My first session was so popular they’ve asked me to repeat it later today. Yes!
The first presentation focuses on mobile development and deployment to Azure and the second on SharePoint development with LightSwitch:

Building Modern, HTML5-Based Business Apps on Windows Azure with Microsoft Visual Studio LightSwitch
Building Modern, HTML5-based Business Apps for SharePoint 2013 with Visual Studio LightSwitch
Look for a full trip report (and the May Community & Content Rollup) when I get back!

FMS, Inc. published a detailed Comparison of Microsoft Access, LightSwitch and Visual Studio Platforms for Database Developers:
Microsoft Access started at the beginning of the Windows revolution 20+ years ago and became the most popular database of all time. More recently, additional technologies have become significant, so it behooves the Microsoft Access community to be aware of the trends and options.
Ultimately, it's about being able to create solutions that help you and/or your users accomplish their mission. Sometimes the user's platform is critical, sometimes, it's the data source, and other times it's the permissions you have to deploy a solution. A variety of platforms and options are available with benefits and limitations with each. Meanwhile, Microsoft Access is also evolving with their latest Access 2013 version offering new web based solutions.

Here’s the beginning of FMS’s graphic:

…

Return to section navigation list>
Windows Azure Infrastructure, DevOps and System Center
• John Vlacich (@johnvlacich) published a Cloud Server Performance: A Comparative Analysis of 5 Large Cloud IaaS Providers report to the CloudSpectator.com site on 6/6/2013 (missed when posted):
With a lack of standardization in the IaaS industry, providers freely use unique terminology to describe their VM resource allocations. How do you compare an ECU to an HPCCU to a vCPU? This report examines the performance and pricing of 5 of the world’s largest IaaS providers over a 5-day period, and provides a process to clearly determine the price-performance value of a cloud provider, addressing the issue of standardization in the marketplace.
(For a PDF version, please click here.)
The Confusing Marketplace
As the market quickly saturates with IaaS providers, the decision-making complexity of choosing the right provider evolves as well. Cloud Spectator monitors IaaS performance of over 20 of the world’s most well-known cloud providers to guide businesses in the selection process to maximize performance efficiency and minimize cost.
This report highlights and analyzes the performance of 5 of the largest cloud providers in the market today: Amazon EC2, Rackspace OpenStack Cloud, HP Cloud, SoftLayer CloudLayer Compute, and Windows Azure. Results from the 5-day experiment prominently display the performance differences in providers, with Windows Azure, the highest-performing provider, scoring 3 times better than Amazon EC2, the lowest-performing provider, on average. [Emphasis added.] …


The Methodology
The tests were run from the beginning of May 25, 2013 until the end of May 29, 2013. Tests were run 3 times a day, and the highest and lowest scores from each day were recorded and graphed in chronological order.
From speaking with a variety of large and small cloud providers, we have learned that one of the most common sizes for cloud servers is a 4GB configuration; therefore, for the purpose of relevance for the largest readership, we have as closely matched each provider’s offering to the 4GB configuration as possible.
We are using the most updated version of Unixbench (5.1.3, released January 2011), which can handle multi-CPU systems. The purpose of the test is to gauge the performance of a Unix-like system by giving a score at the end of the test; hence, we have used it to measure the performance of Linux operating systems running on top of the virtualized infrastructure. Unixbench calculates its score by running a series of individual tests aimed at stressing a server to test how much load it can handle, and how efficiently it can handle it. …
The Results: Performance Only
Below are the results of the Unixbench test over a period of 5 days. A noticeable difference separates the providers between a score range of 300-600 (Amazon EC2 and Rackspace) and 1100-1500 (SoftLayer, HP Cloud, and Windows Azure). …


The Results: Weighing in Cost
To understand the performance value, we factor in the pay-per-hour cost from each provider. Please note that many providers offer long-term discounts, which may increase their price-performance value. Also, qualitative factors, such as services, additional features, etc. are not included in this calculation; i.e., this is a pure price-to-performance calculation.
We begin by averaging the score of each provider over the test period:
By taking each score and dividing by the price, we can get a relative price-to-performance score for each provider. Below is a list of adjusted Unixbench scores by cost, giving perspective into the value (the higher the score, the better):


The CloudSpecs Score
The CloudSpecs Score is a further normalization of the price-performance values established on the previous page, used to easily understand how much value the best provider gives its user in relation to other providers. The highest-value provider receives a score of 100, and other providers are pegged in relation to it.
Over the course of 5 days, Windows Azure scored highest in performance and price-performance. For price-performance, it averaged 12023 points. Respectively, HP cloud averaged 9559; SoftLayer averaged 4378; Amazon EC2 averaged 3182; and Rackspace averaged 2313. Normalizing each provider in relation to the highest one (Windows Azure) at 100, we get HP cloud at 80; SoftLayer at 36; Amazon EC2 at 26; and Rackspace at 19.

…
Conclusion
Though Amazon EC2 has the lowest price advantage over the other 4 providers at $0.12 per hour (tied with Windows Azure), the lowest cost does not always mean the best value for a customer looking for maximized performance. Also, while Amazon EC2 had the lowest performance, due to its cost, it did not score lowest on the price-performance value measurement, the CloudSpecs score; in fact, while Rackspace performed 1.5 times better than Amazon EC2 on the Unixbench tests, its higher price dropped it lower than Amazon EC2 in the CloudSpecs score.
Unixbench is just one test, and has been used as an example in this document to highlight performance variability across providers. A wider variety of tests, measuring CPU, disk, RAM, internal network, external network, and application performance, can be used to further fine-tune specific experiments to guide informed IT-purchases for public and private clouds.
We published this document because we recognize the concern in the industry over the performance of public clouds. We automate over 20 benchmark tests that gauge CPU, RAM, disk, and network performance 3 times a day, 365 days a year across 20 of the largest IaaS providers in the world, and witness the performance variability first-hand. We chose these tests on their reliability, usefulness, and practicality.
When the performance of a server becomes an issue out of your control, not only do you lose money and customers, but waste time and energy trying to fix the problem. By proactively addressing these concerns, we work to create a standard for performance in the cloud. This results in clearly defined expectations businesses using cloud environments so that their customers stay happy and their employees stay productive after a move to cloud.
For more information about our company and how we can help you find the right cloud provider(s) for your application, please visit our website at www.cloudspectator.com or email us at contact@cloudspectator.com.
The preceding is abridged. Read the entire report here.
Rod Trent (@rodtrent) posted Truth in IT: Accelerated Release Cycles will Nudge Companies to the Microsoft Cloud to the Windows IT Pro Web site on 6/4/2013. Here’s the takeaway:
…
Licensing continues to be a sore spot for Microsoft. No matter how many times they revamp their licensing agreements they remain the most confusing documents ever created. A subscription-based Cloud solution would eliminate the headaches of software licensing for both Microsoft and its customers.
Upgrading systems in the company is so time intensive and costly that it either never gets done, only gets accomplished a few weeks before end of life, or stalls out in the middle. Utilizing the Cloud means someone else performs the upgrades and users are always running the most current, cutting edge technologies.
Upgrades and Licensing make the Cloud a very palatable solution. And, Microsoft realizes it. As new releases are announced a couple times a year – significant releases, btw - IT will fall farther and farther behind in implementations. Eventually, business owners will start asking for functionality that can only be obtained through upgrades. At that point, it will make much more sense to utilize the Cloud to fulfill user requests than to build and implement a project plan for on-premise upgrades. …

Read the entire post here.
<Return to section navigation list>
Windows Azure Platform Appliance (WAPA), Hyper-V and Private/Hybrid Clouds
No significant articles today
<Return to section navigation list>
 Cloud Security, Compliance and Governance

No significant articles today
<Return to section navigation list>
Cloud Computing Events
‡ San Francisco Bay Area Azure Developers invite you to listen to ‡ Vittorio Bertocci (@vibronet), “the Identity superstar on the Windows Azure product team, speak about Identity, ACS, and/or AD in Windows Azure. More details available soon.”
Vittorio Bertocci is Principal Program Manager in the Windows Azure Active Directory team at Microsoft, where he looks after Developer Experience: WIF, the development aspects of ACS, and a lot of other things he can’t tell you about.
You can find out more about Vittorio here.
Thursday, June 27, 2013, 6:30 PM
Microsoft San Francisco (in Westfield Mall where Powell meets Market Street)
835 Market Street
Golden Gate Rooms - 7th Floor
San Francisco, CA (map)We are in the same building as Westfield Mall and San Francisco State University, on the 7th floor

Ping Identity (@PingIdentity) announced that they will hold their Cloud Identity Summit 2013 on 4/8 through 4/12/2013 at the Meritage Resort & Spa in Napa, California:
Identity—The Great Enabler of Next
Every decade, a new computing paradigm comes along that is so big, so powerful and potentially so disruptive that it challenges everything we thought we knew. Today, we have several disruptions occurring simultaneously: cloud, social, mobile, and big data. It’s time to re-think everything we thought we knew about security, control, governance and privacy—enter Identity.
With a reported $1 trillion shift in IT investment over the next five years due to these new computing innovations, a new Identity Management model is now required to enable widespread adoption. The need for identity and access management professionals to understand how the shift will impact them has never mattered more. Learn more about the future of security, identity and access management at Cloud Identity Summit 2013.
Explore the leading edge of identity management through a series of in-depth workshops, enlightening lectures and engaging sessions in a world-renowned location. Register today.


Vittorio Bertocci (@vibronet) is one of the speakers, of course. The venue is a pleasant respite from urban (Silicon Valley and San Francisco) locations.
<Return to section navigation list>
Other Cloud Computing Platforms and Services
Lydia Leong (@cloudpundit) reported IBM buys SoftLayer on 6/4/2013:
It’s been a hot couple of weeks in the cloud infrastructure as a service space. Microsoft’s Azure IaaS (persistent VMs) came out of beta, Google Compute Engine went into public beta, VMware formally launched its public cloud (vCloud Hybrid Service), and Dell withdrew from the mark. Now, IBM is acquiring SoftLayer, with a deal size in the $2B range, around a 4x-5x multiple — roughly the multiple that Rackspace trades at, with RAX no doubt used as a comp despite the vast differences in the two companies’ business models.
SoftLayer is the largest provider of dedicated hosting on the planet, although they do also have cloud IaaS offerings; they sell direct, but also have a huge reseller channel, and they’re often the underlying provider to many mass-market shared hosting providers. Like other dedicated hosters, they are very SMB-centric — tons of dedicated hosting customers are folks with just a server or two. But they also have a sizable number of customers with scale-out businesses to whom “bare metal” (non-virtualized dedicated servers), provisioned flexibly on demand (figure it typically takes 1 to 4 hours to provision bare metal), is very attractive.
Why bare metal? Because virtualization is great for server consolidation (“I used to have 10 workloads on 10 servers that were barely utilized, and now I have one heavily utilized server running all 10 workloads!”), but it’s often viewed as unnecessary overhead when you’re dealing with an environment where all the servers are running nearly fully utilized, as is common in scale-out, Web-scale environments.
SoftLayer’s secret sauce is its automation platform, which handles virtualized and non-virtualized servers with largely equal ease. One of their value propositions has been to bring the kinds of things you expect from cloud VMs, to bare metal — paid by the hour, fully-automated provisioning, API as well as GUI, provisioning from image, and so forth. So the value proposition is often “get the performance of bare metal, in exactly the configuration you want, with the advantages and security of single-tenancy, without giving up the advantages of the cloud”. And, of course, if you want virtualization, you can do that — or SoftLayer will be happy to sell you VMs in their cloud.
SoftLayer also has a nice array of other value-adds that you can self-provision, including being able to click to provision cloud management platforms (CMPs) like CloudStack / Citrix CloudPlatform, and hosting automation platforms like Parallels. Notably, though, they are focused on self-service. Although SoftLayer acquired a small managed hosting business when it merged with ThePlanet, its customer base is nearly exclusively self-managed. (That makes them very different than Rackspace.)
In terms of the competition, SoftLayer’s closest philosophical alignment is Amazon Web Services — don’t offer managed services, but instead build successive layers of automation going up the stack, that eliminate the need for traditional managed services as much as possible. They have a considerably narrower portfolio than AWS, of course, but AWS does not offer bare metal, which is the key attractor for SoftLayer’s customers.
So why does IBM want these guys? Well, they do fill a gap in the IBM portfolio — IBM has historically not served an SMB market directly in gneral, and its developer-centric SmartCloud Enterprise (SCE) has gotten relatively weak traction (seeming to do best where the IBM brand is important, notably Europe), although that can be blamed on SCE’s weak feature set and significant downtime associated with maintenance windows, more so than the go-to-market (although that’s also been problematic). I’ll be interested to see what happens to the SCE roadmap in light of the acquisition. (Also, IBM’s SCE+ offering — essentially a lightweight data center outsourcing / managed hosting offering, delivered on cloud-enabled infrastructure — uses a totally different platform, which they’ll need to converge at some point in time.)
Beyond the “public cloud”, though, SoftLayer’s technology and service philosophy are useful to IBM as a platform strategy, and potentially as bits of software and best practices to embed in other IBM products and services. SoftLayer’s anti-managed-services philosophy isn’t dissonant with IBM’s broader outsourcing strategy as it relates to the cloud. Every IT outsourcer at any kind of reasonable scale actually wants to eliminate managed services where they can, because at this point, it’s hard to get any cheaper labor — the Indian outsourcers have already wrung that dry, and every IT outsourcer today offshores as much of their labor as possible. So your only way to continue to get costs down is to eliminate the people. If you can, through superior technology, eliminate people, then you are in a better competitive position — not just for cost, but also for consistency and quality of service delivery.
I don’t think this was a “must buy” for IBM, but it should be a reasonable acceleration of their cloud plans, assuming that they manage to retain the brains at SoftLayer, and can manage what has been an agility-focused, technology-driven business with a very different customer base and go-to-market approach than the traditional IBM base — and culture. SoftLayer can certainly use more money to for engineering resources (although IBM’s level of engineering commitment to cloud IaaS has been relatively lackluster given its strategic importance), marketing, and sales, and larger customers that might have been otherwise hesitant to use them may be swayed by the IBM brand.
(And it’s a nice exit for GI Partners, at the end of a long road in which they wrapped up EV1 Servers, ThePlanet, and SoftLayer… then pursued an IPO route during a terrible time for IPOs… and finally get to sell the resulting entity for a decent valuation.)

Perhaps this is IBM’s answer to the Windows Azure Pack.

<Return to section navigation list>


0 comments:
Post a Comment