Windows Azure and Cloud Computing Posts for 12/22/2011+
| A compendium of Windows Azure, Service Bus, EAI & EDI, Access Control, Connect, SQL Azure Database, and other cloud-computing articles. |

•••• Updated 12/25/2011 9:45 AM with new article marked •••• by Scott Smith and Eric Johnson, IBM
••• Updated 12/24/2011 9:00 AM with new articles marked ••• by Stéphanie Hertrich, Steve Peschka, and Jaganathan B
•• Updated 12/23/2011 3:30 PM with new articles marked •• by Kristian Nese, Alan Le Marquand, Eric Nelson, Turker Keskinpala and Avkash Chauhan
• Updated 12/22/2011 4:20 PM with a new article marked • by Liam Cavanagh
Note: This post is updated daily or more frequently, depending on the availability of new articles in the following sections:
Windows Azure Blob, Drive, Table, Queue and Hadoop Services
- SQL Azure Database and Reporting
- Marketplace DataMarket, Social Analytics and OData
- Windows Azure Access Control, Service Bus, and Workflow
- Windows Azure VM Role, Virtual Network, Connect, RDP and CDN
- Live Windows Azure Apps, APIs, Tools and Test Harnesses
- Visual Studio LightSwitch and Entity Framework v4+
- Windows Azure Infrastructure and DevOps
- Windows Azure Platform Appliance (WAPA), Hyper-V and Private/Hybrid Clouds
- Cloud Security and Governance
- Cloud Computing Events
- Other Cloud Computing Platforms and Services

Azure Blob, Drive, Table, Queue and Hadoop Services
••• Steve Peschka (@speschka) solved a One of the request inputs is out of range Error with Azure Table Storage problem from a DateTime object in this 12/23/2011 post:
I wanted to document this error here because I recently went nearly blind trying to solve it, and I never did find the exact cause when Bing'ing for it. Unfortunately it's a pretty generic error so it may very well have been out there, but it seems there are several reasons for it. In my case I created a new instance of a class that I was adding to my Azure table but it kept failing with this "One of the request inputs is out of range" error that was driving me absolutely nuts. Fortunately some bright individual pointed out to me that my class contained a DateTime property, and I wasn't initializing it. Apparently the default DateTime.MinValue in .NET is outside the bounds of what Azure table storage supports. So I just put in a dummy date in my property and - voila! - everything started working again.
So just a heads up in case you see this error yourself - it seems like a pretty easy one to miss.
Hope everyone has a happy holiday season!
<Return to section navigation list>
SQL Azure Database and Reporting
No significant articles today.
<Return to section navigation list>
MarketPlace DataMarket, Social Analytics and OData
••• Adrian Bridgewater asserted “Mentor program champions collaboration/community development over specific tools/development processes” in an introduction to his Outercurve Decrees More Agnostic Blessings post of 12/23/2011 to his Open Source column for Dr. Dobbs:
The Outercurve Foundation has announced the acceptance of the OData Library for Objective C into its endorsed rank of open-source-centric technology. The OData Library for Objective C supports cross-platform interoperability of tools essential for mobile developers and is similar to libraries available for .NET, Java, and other languages.
The platform-, technology-, and license-agnostic spokespeople at Outercurve confirm that developers can use the library to connect to OData feeds by leveraging code that makes it easier to build queries and parse AtomPub and JSON responses from the server. Accepting the project into Outercurve will, says the foundation, support interoperability and make it simpler for iOS developers to adopt and contribute to the OData Library.
In line with its latest agnostically filtered judgments, the foundation is also expected to announce details of its new Mentor Program, which appears to have been designed to deliver more project-specific relevance. While Outercurve has already had active mentorship activities in motion for project and gallery managers, the new program is still only described in generic terms as providing more support to create successful projects, develop and transmit an Outercurve culture, and develop an environment of leadership development.
According to the organization's publicity arm, "The mentor program will introduce gallery and project managers to the 'Outercurve Way', which emphasizes collaboration/community development over specific tools/development process; training and mentoring over incubation, and development guidance/best practices over fixed development methodologies."
Outercurve recently completed a developer survey; top-line results include:
- Ninety percent of respondents use open source in their work. Eighty percent indicated they use OSS to save time and money by using existing code instead of creating code from scratch.
- Open source is a path to productivity for many respondents (62 percent) who choose it for its greater choice of tools, platforms, communities, and projects.
- Forty-four percent of developers contribute to open source to improve their careers and credibility. The theme of developing software to improve credibility is a common one.
- Seventy percent of Outercurve survey respondents use forums to stay in touch with project communities.
••• See Stéphanie Hertrich’s Using ACS to provide authentication for a WP7 application and a WCF Data Service post of 12/24/2011 in the Windows Azure Access Control, Service Bus, and Workflow section.
•• Turker Keskinpala (@tkes) described a new OData Service Validation Tool Update: 10 new rules in a 12/23/2011 post:
OData Service Validation Tool is updated with 10 more new rules to mark the end of a very productive year. Below is the breakdown of newly added rules:
- 2 new common rules
- 1 new metadata rule
- 2 new rules for Link
- 5 new rules for Property
This rule update brings the total number of rules in the validation tool to 136. You can see the list of the active rules here and the list of rules that are under development here.
OData Service Validation Codeplex project was also updated with all recent changes.
Updated my (@rogerjenn) More Features and the Download Link for My Codename “Social Analytics” WinForms Client Sample App on 12/21/2011:
Update 12/21/2011: Added an embedded Excel Web Services worksheet from my SkyDrive account (see end of post). The worksheet was created from ContentItems.csv with a graph having a linear (rather than logarithmic) abcissa by the process described in Microsoft’s Excel Mashups site.
…
Update: Embedded Excel Web Services Worksheet
The Excel Mashups site describes uploading Excel workbooks to your SkyDrive account, sharing it, and adding a generated <embed> element to your own Website. Here’s the default embedded ContentItems worksheet for 11/1/2011 to 12/14/2011:
Clicking a button at the bottom right of the worksheet performs one of the following actions:
- Download the worksheet
- Tell Microsoft about your experience with the embedded Excel Web App
- Get information (URL and embed code) for this workbook
- View full-sized workbook (see below)
Here’s the full-sized workbook:
Notice the automatic reversal of Published On dates to ascending from the desk top client’s descending order.
Here’s the worksheet configuration page for the embedded ExcelWebApp above:
Note: The help files for publicly sharing a folder containing the source *.xlsx file for the embedded ExcelWebApp hasn’t caught up with recent SkyDrive updates. To share a folder publicly:
1. Right click the folder line in the list and choose share to open the Share “Folder Name” dialog.
2. Click the Get a Link item in the dialog’s navigation list and click the lower Get A Link button to generate a public link:
3. Close the dialog. (You don’t need to paste the link, unless you want to add it to your Web site.)


Dhananjay Kumar (@debug_mode) described How to consume WCF REST Service with JSON in Windows Phone 7 in a 12/22/2011 post:
In this post I will show you the way to consume JSON WCF REST Service in Windows Phone 7. This post is divided into four parts.
- Creating simple WCF REST Service for ADD
- Consuming JSON REST Service in Windows Phone 7 application.
- Creating complex WCF REST Service with custom classes and types.
- Consuming complex JSON REST Service in Windows Phone 7 application.
Creating simple Add Service
[ServiceContract]
public interface IService2
{

[OperationContract]
[WebGet(UriTemplate="/Add/{Number1}/{Number2}",RequestFormat=WebMessageFormat.Json,
ResponseFormat = WebMessageFormat.Json
)]
int Add(string  Number1, string Number2);

}
Service is implemented as below,
using System;

namespace MultipleBindingWCF
{

public class Service1 : IService2
{

public int Add(string Number1, string Number2)
{
int num1 = Convert.ToInt32(Number1);
int num2 = Convert.ToInt32(Number2);
return num1 + num2;
}

}
}
Next in this section we need to configure service. We need to configure service webHttpBinding to eanble it as REST Service. So in Web.Config we need to do the below changes.
<?xml version="1.0"?>
<configuration>
<system.web>
<compilation debug="true" targetFramework="4.0" />
</system.web>
<system.serviceModel>
<behaviors>
<serviceBehaviors>
<behavior name ="servicebehavior">
<serviceMetadata httpGetEnabled="true"/>
<serviceDebug includeExceptionDetailInFaults="false"/>
</behavior>
</serviceBehaviors>
<endpointBehaviors>
<behavior name="restbehavior">
<webHttp/>
</behavior>
</endpointBehaviors>
</behaviors>
<services>
<endpoint name ="RESTEndPoint"
contract ="MultipleBindingWCF.IService2"
binding ="webHttpBinding"
address ="rest"
behaviorConfiguration ="restbehavior"/>
</service>
</services>
</system.serviceModel>
<system.webServer>
<modules runAllManagedModulesForAllRequests="true"/>
</system.webServer>
</configuration>
After configuring, Service ready for hosting. You are free to host it either on Azure, IIS, or Cassini. For local ASP.Net Server hosting press F5. Do a testing of service in browser and if you are getting expected output, you are good to consume it in the Windows Phone 7 application.
Consuming Service in Windows Phone 7
To consume REST Service in Windows Phone 7 and then parse JSON, you need to add below references in Windows Phone 7 project.
As the design of the page I have put two textbox and one button. User will input numbers to be added in the textbox and on click event of button result would get displayed in message box. Essentially on click event of the button we will make a call to the service. Design of the page is as below,
<Grid x:Name="LayoutRoot" Background="Transparent">
<Grid.RowDefinitions>
<RowDefinition Height="Auto"/>
<RowDefinition Height="*"/>
</Grid.RowDefinitions>

<!--TitlePanel contains the name of the application and page title-->
<StackPanel x:Name="TitlePanel" Grid.Row="0" Margin="12,17,0,28">
<TextBlock x:Name="ApplicationTitle" Text="calling JSON REST" Style="{StaticResource PhoneTextNormalStyle}"/>
<TextBlock x:Name="PageTitle" Text="JSON REST" Margin="9,-7,0,0" Style="{StaticResource PhoneTextTitle1Style}"/>
</StackPanel>

<!--ContentPanel - place additional content here-->
<Grid x:Name="ContentPanel" Grid.Row="1" Margin="12,0,12,0">
<TextBox x:Name="txtNumber1" Height="100" Margin="-6,158,6,349" />
<TextBox x:Name="txtNumber2" Height="100" Margin="-6,28,6,479" />
<Button x:Name="btnAdd" Height="100" Content="Add" Click="btnAdd_Click"/>
</Grid>
</Grid>
On click event of the button we need to make a call to the service as below,
And ServiceURi is constructed as below,
There is nothing much fancy about above service call. We are just downloading JSON as string using WebClient. However parsing of JSON is main focus of this post. To parse we need to write below code in completed event.
In above code
- Converting downloaded string as Stream
- Creating instance of DataContractJsonSerializer. In that we are passing type as string since returned type of service is string.
- Reading stream into instance of DataContractJsonSerializer
- Displaying the result.
Putting all code together you should have below code to make a call and parse JSON in windows phone 7
using System;
using System.Net;
using System.Windows;
using Microsoft.Phone.Controls;
using System.Runtime.Serialization.Json;
using System.IO;
using System.Text;

namespace ConsumingJSON
{
public partial class MainPage : PhoneApplicationPage
{
// Constructor
public MainPage()
{
InitializeComponent();
}

private void btnAdd_Click(object sender, RoutedEventArgs e)
{

string Number1 = txtNumber1.Text;
string Number2 = txtNumber2.Text;
string ServiceUri = "http://localhost:30576/Service1.svc/Rest/add/"
+ Number1 + "/"
+ Number2;
WebClient proxy = new WebClient();
proxy.DownloadStringCompleted +=
new DownloadStringCompletedEventHandler(proxy_DownloadStringCompleted);
proxy.DownloadStringAsync(new Uri(ServiceUri));

}

void proxy_DownloadStringCompleted(object sender, DownloadStringCompletedEventArgs e)
{
Stream stream = new MemoryStream(Encoding.Unicode.GetBytes(e.Result));
DataContractJsonSerializer obj = new DataContractJsonSerializer(typeof(string));
string result = obj.ReadObject(stream).ToString();
MessageBox.Show(result);
}
}
}
Creating complex Service with custom classes and types
Go back to service and add a custom class as below,
[DataContract]
public class Student
{
[DataMember]
public string Name { get; set; }
[DataMember]
public string RollNumber { get; set; }
[DataMember]
public string Grade { get; set; }
}
And add one more function to service. This operation contract will return List of Students.
[OperationContract]
[WebGet(UriTemplate = "/GetStudents", RequestFormat = WebMessageFormat.Json,
ResponseFormat = WebMessageFormat.Json
)]
List<Student> GetStudents();
Next you need to implement service as below,
public List<Student> GetStudents()
{
List<Student> lstStudent = new List<Student>
{
new Student { Name = "John " ,RollNumber = "1" , Grade = "A"},
new Student { Name = "Dan " ,RollNumber = "2" , Grade = "Q"},
new Student { Name = "Pinal " ,RollNumber = "3" , Grade = "M"},
new Student { Name = "Mahesh " ,RollNumber = "4" , Grade = "Z"},
new Student { Name = "Julie" ,RollNumber = "5" , Grade = "L"},
};
return lstStudent;
}
Configuration will be the same as of simple REST Service returning JSON. Press F5 to host and test the service.
Consuming complex JSON REST Service in Windows Phone 7 application
At the Windows Phone 7 application, you need to create entity class. This class will be representing Student class of service. Add Student class to project as below,
public class Student
{
public string Name { get; set; }
public string RollNumber { get; set; }
public string Grade { get; set; }

}
Design page as below. I have put a button and on click event of the button service will get called and returned data would be bind to the listbox.
<Grid x:Name="ContentPanel" Grid.Row="1" Margin="12,0,12,0">
<Grid.RowDefinitions>
<RowDefinition Height="*" />
<RowDefinition Height="110" />
</Grid.RowDefinitions>
<ListBox x:Name="lstStudents" Height="auto" Width="auto" >
<ListBox.ItemTemplate>
<DataTemplate>
<StackPanel Orientation="Vertical">
<TextBlock Text="{Binding Name}" Style="{StaticResource PhoneTextTitle2Style}"  />
<TextBlock Text="{Binding RollNumber}" Style="{StaticResource PhoneTextTitle3Style}" />
<TextBlock Text="{Binding Grade}" Style="{StaticResource PhoneTextAccentStyle}" />
</StackPanel>
</DataTemplate>
</ListBox.ItemTemplate>
</ListBox>

<Button Grid.Row="1" x:Name="btnAdd" Height="100" Content="Add" Click="btnAdd_Click"/>
</Grid>
In the code behind on click event of the button we need to make call using WebClient again
private void btnAdd_Click(object sender, RoutedEventArgs e)
{
WebClient proxy = new WebClient();
proxy.DownloadStringCompleted += new DownloadStringCompletedEventHandler(proxy_DownloadStringCompleted);
proxy.DownloadStringAsync(new Uri("http://localhost:30576/Service1.svc/rest/getstudents"));

}
And need to parse the returned JSON as below. In parameter to create instance of DataContractJsonSrrializer we are passing List of Student.
void proxy_DownloadStringCompleted(object sender, DownloadStringCompletedEventArgs e)
{
Stream stream = new MemoryStream(Encoding.Unicode.GetBytes(e.Result));
DataContractJsonSerializer obj = new DataContractJsonSerializer(typeof(List<Student>));
List<Student> result = obj.ReadObject(stream) as List<Student>;
lstStudents.ItemsSource = result;
}
On running you should be getting output as below.
In this way you can work with WCF REST with JSON Data and Windows Phone 7.


<Return to section navigation list>
Windows Azure Access Control, Service Bus and Workflow
••• Stéphanie Hertrich (@stepheMicrosoft) described Using ACS to provide authentication for a WP7 application and a WCF Data Service in a 12/24/2011 post to her MSDN blog:
The Windows Azure Toolkit for Windows Phone is helping a lot to integrate all kind of Azure features in the device. Recently, Azure Toolkit for Windows Phone has been split in separate parts (storage, ACS, Push notification, …), so that each can be used separately in a project (via NuGet), which is a VERY good thing.
Though, it makes it easy to deal with ACS authentication and external identity providers which is what we need in our WP7 application. We want to get an authenticated user to use our app since the OData service will associate data to this user. The service will also ensure that each user will have access to his own data only.
The How To is very explicit, though, it is very easy to handle an OAuth 2 authentication in a windows phone app.
But the procedure doesn’t explain how to set up your remote service so that it can handle the token you just received, and also doesn’t detail how to send it to the server. Actually the answer is a mix of the tutorial dedicated to the inital toolkit, and the new “How To” procedure.
Here is how to do it in a few steps…
Where we will go
Our WP7 application needs to access data from the OData service, but only an authenticated user will be allowed to. We also want to filter resulting information according to the user identity.
In your Windows Phone application
Add the NuGet package to your WP7 project
This package will install all your project needs to use ACS and store the token that will be later reinjected in the OData Http request.
The “HowTo” ([Your WP7 Project]/App_Readme/Phone.Identity.Controls.BasePage.Readme.htm) is very explicit and you just need to follow the steps to make it work. by the way, you need to have set up an ACS like explained here in Task 2.
Add the Web Browser Capability in the application manifest
The log in page will be provided from a web browser control, so you should make it available in the manifest file WMAppManifest.xml
<Capability Name="ID_CAP_WEBBROWSERCOMPONENT"/>Handling Navigation
Add the log in page as the welcome page in your application, as explained in the How To.
If your token is valid when you start the app, you will skip the log in page and navigate directly to your application home page. So you will have to handle the Back button from there so that you exit the application. You can do it by clearing the navigation history when you navigate to your home page:
protected override void OnNavigatedTo(System.Windows.Navigation.NavigationEventArgs e)
{
    base.OnNavigatedTo(e);

    while (this.NavigationService.BackStack.Any())
    {
        NavigationService.RemoveBackEntry();
    }
}
Try it !
At this point, you should be able to log into your app with any of your identity provider credentials, for example with a Live ID:


Where is my token ?
Once the log in procedure succeeds, your token is stored as a SimpleWebTokenStore in
Application.Current.Resources["swtStore"]How do I use the token in my OData request ?
The token will be placed in the header of the http request.You should register to the SendingRequest event of your WCF Data Service context and update the header with the authorization.
_dc = new YourDataServiceContext(new Uri("http://YourDataService.svc/"));

_dc.SendingRequest += new EventHandler<SendingRequestEventArgs>(SendingRequest);


void SendingRequest(object sender, SendingRequestEventArgs e)
{
   var simpleWebTokenStore = Application.Current.Resources["swtStore"] as SimpleWebTokenStore;
   if (simpleWebTokenStore != null)
   {
      e.RequestHeaders["Authorization"] = "OAuth " + simpleWebTokenStore.SimpleWebToken.RawToken;
   }
}
The access to the Resources is not allowed from a thread different from the IU thread, so if that may happen in your case, you should save the token in some place from a BeginInvoke so that you can reuse it safely in the SendingRequest event.
In your WCF Data Service
How do I get it back in my WCF Data Service ?
If your WCF Data Service has not been setup to handle OAuth 2, you should follow the step Task 3 – Securing an OData Service with OAuth2 and Windows Identity Foundation of the great tutorial mentioned earlier.
You will use an assembly developped by Microsoft DPE guys, that extends the WIF mechanism to handle OAuth.
At this point you should have:
- Added a reference to DPE.OAuth2.dll (you should download the lab to get this one)
- Added a reference to Microsoft.Identity.Model.dll
- Added entries to the web.config
Checking the identity
You would probably check the identity on some actions made on your data.
[System.ServiceModel.ServiceBehavior(IncludeExceptionDetailInFaults = true)]
public class YourDataService : DataService<[YourContext]>
{
    // This method is called only once to initialize service-wide policies.
    public static void InitializeService(DataServiceConfiguration config)
    {
        config.SetEntitySetAccessRule("[YourEntity]", EntitySetRights.All);
        config.DataServiceBehavior.MaxProtocolVersion = DataServiceProtocolVersion.V3;
    }

    string GetUserIdentity()
    {
        string userIdName = null;
        var claim = HttpContext.Current.User.Identity as IClaimsIdentity;
        if (HttpContext.Current.Request.IsAuthenticated)
        {
            userIdName = HttpContext.Current.User.Identity.Name;
        }
        return userIdName;
    }
You can use interceptors (QueryInterceptor or ChangeInterceptor) to do some identity validation and relative tasks, according to your business rules. In my case, I store the user identity name in each new record.
[ChangeInterceptor("[YourEntity]")]
public void OnChange([YourEntityType] updatedRecord, UpdateOperations operations)
{
    if (operations == UpdateOperations.Add)
    {
        var userIdName = GetUserIdentity();
        if (userIdName == null)
        {
            throw new DataServiceException(401, "Permission Denied you must be an authenticated user");
        }
        updatedRecord.UserId = userIdName;
    }
}
On queries, I return only records that are associated to the identity of the request initiator.
[QueryInterceptor("[YourEntity]")]
public Expression<Func<[YourEntityType], bool>> OnQuery()
{
    var userIdName = GetUserIdentity();
    if (userIdName == null)
    {
        throw new DataServiceException(401, "Permission Denied you must be an authenticated user");
    }
    return (b => b.UserId == userIdName);
}
Let’s give it a try
You can put a breakpoint on the ChangeInterceptor and QueryInterceptor to check if everything is going fine and if your identity is retrieved properly on the service side. If not, try to use IIS instead of Visual Studio Development Server (thanks to Benjamin Guinebertière for that tip !)
What do I finally have ?
Each OData request made from your WP application is now including an identity token, allowed by the identity provider through ACS. You can use this identity for business rules purpose in your service, and this will be efficient wherever the request comes from. Though, you can protect your data from being accessed and updated from a simple web browser which will return a security exception.
You can still use these data from any application running on any platform that is able to send an OAuth http authorization header.


Stéphanie’s blog also includes a version in the original French.
Amit K. Agrawal described Configuring The ACS Management Portal in a 12/18/2011 post:
Prerequisites
To run this sample, you will need:
- To create an account at http://windows.azure.com and create an Access Control Service namespace.
- Visual Studio 2010
- Windows Server 2008
- AD FS 2.0 and its requirements
System Requirements For Development
- Visual Studio 2010
- .NET Framework 4.0 or .NET Framework 3.5 SP1 with KBs 976126 or 976127 applied
- Windows Identity Foundation SDK
Windows Azure Account Requirements
To use ACS, you must first obtain a Windows Azure subscription by browsing to the Windows Azure AppFabric Management Portal and signing up. Once you have a subscription, on the Windows Azure AppFabric Management Portal, browse to the Service Bus, Access Control, and Caching section and create an Access Control Service namespace.
Platform Compatibility
ACS is compatible with virtually any modern web platform, including .NET, PHP, Python, Java, and Ruby. ACS can be accessed from applications that run on almost any operating system or platform that can perform HTTPS operations.
Configuring the Sample
The ACS configuration required for this sample can be performing using either the ACS management portal, or the ACS management service. Select one of the two options below to go to the relevant section.
- Option 1: Configuring via the ACS Management Portal
- Option 2: Configuring via the ACS Management Service
Note that since I am using AD FS 2.0 as the federation server, AD FS 2.0 must be installed and running.
For more information about installing AD FS 2.0, see http://technet.microsoft.com/en-us/library/dd807086(WS.10).aspx
Configuring via the ACS Management Portal
Step 1 : Open a browser and navigate to http://windows.azure.com and sign in. From there, navigate to the Service Bus, Access Control, and Caching section to configure your ACS service namespace. Once you have created a namespace, select it and click Manage > Access Control Service at the top of the page. This should launch the following page in a new window
Step 2: Next, add your AD FS 2.0 identity provider. To do this, you will need to have your WS-Federation metadata document, which is hosted in your AD FS 2.0 server at /FederationMetadata/2007-06/FederationMetadata.xml. For example, if your AD FS 2.0 server is installed on a computer with the name abc.com, then the metadata URL will be:
https://abc.com/FederationMetadata/2007-06/FederationMetadata.xm
if the computer running AD FS 2.0 is accessible from internet and not placed behind a firewall, then you can use this URL directly. Otherwise, you will need to save this document to your computer and upload it to ACS when adding your identity provider.
Step 3: Click Identity Provider in the left panel and then click Add.
Step 4 : Select WS-Federation identity provider and click Next. Depending on the Metadata document’s location, complete the form either entering the URL or using the saved file.
Step 5 : Next, register your application with ACS by creating a relying party application. Click the Relying Party Applications link on the main page, then click Add and enter the following information in the subsequent form.
- In the Name field, enter some name which you want for example “Federation Sample “
- In the Realm field, enter your app url ex: http://localhost:7200/Service/Default.aspx
- In the Token format field, select SAML 2.0
- In the Token encryption policy field, select “Require Encryption”
- In the Identity Providers field, check only the AD FS 2.0 identity provider added in the previous step
- For Token signing, select “Use a dedicated certificate”. For the certificate file, browse for the ACS2SigningCertificate.pfx file in the Certificates folder of this sample. Enter a password of “password”.
- For the Token encryption certificate, browse for the WcfServiceCertificate.cer file in the Certificates folder of this sample and save the settings.
Step 6 When complete, click the Save button and then navigate back to the main page.
Step 7 : With your relying party registered, it is now time to create the rules that determine the claims that ACS will issue to your application. To do this, navigate to the main portal page and select Rule Groups. From there, select the Default Rule Group for Federation Sample RP. Click Generate and then select AD FS 2.0 in the subsequent form. Complete the form by clicking on the Generate button. This will create passthrough rules fo AD FS 2.0 based on the claim types present in the WS-Federation metadata.
Step 8: Now it is time to add the decryption certificate. This certificate is needed for ACS to decrypt incoming tokens from the AD FS 2.0 identity provider. To do this, click Certificates and keys in the left panel, and click the Add link for Token Decryption.
Step 9: In the Certificate field of the subsequent form, browse to Certificates folder of this sample and pick ACS2DecryptionCert.pfx. The password for this certificate is “password”.
Step 10: Complete the form by clicking Save.


<Return to section navigation list>
Windows Azure VM Role, Virtual Network, Connect, RDP and CDN
No significant articles today.
<Return to section navigation list>
Live Windows Azure Apps, APIs, Tools and Test Harnesses
•• Avkash Chauhan (@avkashchauhan) described How to Modify Registry keys in Windows Azure Virtual Machine from a web or worker role? in a 12/23/2011 post:
If you have a requirement and decided to modify VM registry keys, you have two options:
- Do it from a Standalone Startup task
- This modification will be completed even before your role start
- Be sure to run the startup task as in elevated mode.
- You just need to use standard Windows API to access the VM Registry and make modification
- You can update the registry the same way you do in any Windows command line application
- You can also write a small code to update the Azure Storage with registry update status to be sure your update went well.
- Sometime, you may needs to modify the registry and then reboot the machine to make it accessible to role, which can be done here
- This will be done the same way
- Most of the registry changes will be available after the role start
- One advantage I see here is that you can generate a role environment change event, and perform specific task if needed
- Restart role can be done here or if you would need to reboot the VM , you can do it
- Code will be same as any standard Windows API to change the registry

• Liam Cavanagh (@liamca) described How to combine a Worker Role with a MVC4 Web Role into a single instance in a 12/22/2011 post:
I wanted to expand on a great blog post that Wayne Berry did on the subject of combining web and worker roles into a single machine instance. As Wayne mentioned, this is a great way to help save money when you do not need a high end machine for your web application and worker processes and it is more efficient to combine these into a single machine instance. By default, you get allocated one instance for the worker role and another machine for your web site. If you want an SLA, you would need 2 of each. Certainly for a new business looking to keep the costs low it would be far better if you could combine these roles into a single machine.
I called mine WebWorker.cs
After that you simple add code that would look similar to the following and you are done.
using System;
using System.Collections.Generic;
using System.Linq;
using System.Web;
using Microsoft.WindowsAzure.StorageClient;
using System.Diagnostics;
using System.Threading;

namespace MyMVC4ProjectUI
{
public class WebWorker : Microsoft.WindowsAzure.ServiceRuntime.RoleEntryPoint
{
public override bool OnStart()
{

return base.OnStart();
}

public override void Run()
{
// This is a sample worker implementation. Replace with your logic.
Trace.WriteLine("WorkerRole1 entry point called", "Information");

while (true)
{
Thread.Sleep(10000);
Trace.WriteLine("Working", "Information");
}
}
}
}


David Makogon (@dmakogon) reported Windows Azure ISV Blog Series: BrainCredits in a 12/22/2011 post:
The purpose of the Windows Azure ISV blog series is to highlight some of the accomplishments from the ISVs we’ve worked with during their Windows Azure application development and deployment. Today’s post is about Windows Azure ISV BrainCredits and how they’re using Windows Azure to deliver their online service.
BrainCredits provides a system to help people track all their informal learning on a virtual transcript, including instructor-led or self-study learning, such as webinars, classes, tutorials, books, conferences, blogs or videos. The system is designed as a highly available, high-volume web-based Model-View-Controller (MVC) application and was built following an agile process, of pushing small, incremental releases into production. To do this, the team needed an architecture that would support fast read operations and allow for very targeted updates without having to recompile or retest the entire application. They decided on a CQRS (Command Query Responsibility Segregation) style architecture. They also decided to host the application on Windows Azure to take advantage of fine-grain scaling of individual subsystems (web roles or worker roles) independently depending on traffic and background workload.
CQRS architectures essentially separate write actions from read actions. With BrainCredits, you’d have write actions, such as registering for an instructor-led class, and read actions, such as seeing your online resume. BrainCredits handles write actions by having the web role collect requests (aka commands) and routes them to the worker role asynchronously via queues. This allows the UI response time to be very fast and also reduces the load on the web role. In this case, BrainCredits was able to deploy Small instances for their Web Roles, with each instance consuming a single core.
The basic architecture is below:
- Windows Azure queues. The web role instance drop messages in a queue, alerting the worker role instances that a command needs to be handled.
- Windows Azure blobs. Blobs store serialized commands, and each command queue message points to a specific blob. Note: a blob is used to store the command because a BrainCredits user can add free-form text to some of the commands being issued, resulting in unpredictable message sizes that occasionally exceed 8k, the then-current queue message size limit. With the new 64K message-size limit announced in August 2011, this indirection is likely unneeded.
- Windows Azure table storage. Event sourcing data is captured in Windows Azure Tables. As events are raised by the domain, the events are stored in table storage and used by the CQRS framework to re-initialize a domain object during subsequent requests. Windows Azure Table Storage is also used for storing command data such as user UI clicks (which are unrelated to domain events). The Domain Event table allows BrainCredits system administrators to recreate all of the UI steps that a user took during their visits to the site (e.g. search performed, page loaded, etc.)
- Windows Azure Cache. The cache is used for storing data between requests, to provide the user some feedback on commands being executed but have not completed yet. This allows BrainCredits to handle eventual consistency in the application so as to provide the user the appearance of a synchronous experience in an asynchronous application.
One point about VM size: A Small VM instance provides approx. 100Mbps bandwidth. If BrainCredits found a performance bottleneck due to reading and writing command and event content that impacted total round-trip processing time for a large command or event, a larger VM size would have been a viable solution. However, based on testing, a Small instance provided very acceptable customer-facing performance. By keeping the VM size at Small (e.g. 1 core), the “idle-time” cost is kept to a minimum (e.g. 2 Small Web Role instances + 1 Small Worker Role instance equates to approx. $270 as a baseline monthly compute cost). Medium VMs would increase this minimum cost to about $540. It’s much more economical to scale out to multiple VM instances as needed, then scale back during less-busy time periods.
There are a few key points illustrated by the BrainCredits architecture:
- Focus on End-user experience. By following a CQRS approach and handling updates asynchronously, Web response time is unaffected by long-running background processes.
- Scalability. BrainCredits separated all background processing into a Worker Role. While it’s entirely possible to process queues asynchronously in a Web Role thread, this would impact scale-out options. With a separate Worker Role, the system may be fine-tuned to handle user-traffic and background-processing load independently.
- Cost footprint. VM size selection is important when considering minimum run-rate. While it’s tempting to go for larger VMs, it’s often more cost-effective to choose the smallest VM size, based on memory, CPU, and network bandwidth needs. For specific details about VM sizes, see this MSDN article.
Remember that there are often several ways to solve a particular problem. Feel free to incorporate these solution patterns into your own application, improve upon it, or take a completely different approach. Feel free to share your comments and suggestions here as well!
Stay tuned for the next post in the Windows Azure ISV Blog Series; next time we’ll share Digital Folio’s experience with Windows Azure.

Bruce Kyle posted an ISV Case Study: Cloud Storage Gateway Provides Backup into Windows Azure to the US ISV Evangelism blog on 12/22/2011:
Whitewater automates enterprise backup to the cloud. The product from Riverbed is a gateway that combines data de-duplication, network optimization, data encryption, and integration with Windows Azure storage services through a single, virtual, or physical appliance.

No longer do enterprises need to use tape and move the files from disk to disk. Nor does an enterprise need to pay for a traditional disaster recovery site.
Whitewater cloud storage gateways and public cloud storage provides secure, off-site storage with restore anywhere capability for disaster recovery (DR). Data can be recovered by Whitewater from any location. Public cloud storage offers excellent DR capabilities without the high costs associated with remote DR sites or colocation service providers. With the public cloud and Whitewater cloud storage gateways – any size organization can significantly reduce its business risk from unplanned outages without the large capital investments and running costs required by competing solutions.
The Problem
How do you eliminate dependence on unreliable, error-prone tape systems for backup and DR Eliminate tape?
Smaller offices who may have few IT Pros are often focused on other priorities. Backups can be lower on the priority list for smaller businesses.
How can offsite vaulting expenses be reduced while insuring high speed for recovery?
The Solution
Whitewater replicates data automatically to the public cloud, eliminating costly off-site tape vaulting and improving disaster recovery (DR) capabilities.
Whitewater is either a gateway appliance (with dedicated hardware and software) or software on an existing server.
Then Whitewater does de-duplication, compression, encryption before data is moved [to] Azure blob storage. Duplicate copies of your data are made and copied Windows Azure. Windows Azure also copies the date to a data center in the same international region.
Whitewater cloud storage gateways are available in four models, as either virtual or physical appliances, to meet a wide range of needs.
Architecture
The customer back up software pulls data from file servers, application servers, and email servers, just as you would expect. The backup software points to Whitewater software or appliance which optimizes, deduplicates the data.
It then sends the data to Windows Azure for storage.
Whitewater requires the security keys that are supplied to the Whitewater device. The customer holds the keys to the data maintained by Whitewater and the keys to the data stored in Azure. For Whitewater to not e ba single point of failure, you can configure another Whitewater device with the same key to execute the restore.
Whitewater uses Server Message Block (SMB), also known as Common Internet File System (CIFS) protocol to Network Attached Storage (NAS) target. Windows-powered NAS includes advanced availability features such as point-in-time data copies, replication, and server clustering.
Backups are made to the Whitewater appliance, which optimizes, deduplicates
The customer’s Azure account sets aside one specific type of account or directory each Whitewater.
Supported Microsoft Applications
- SharePoint
- Exchange
- SQL Server
- Windows Server
Whitewater Features
Byte-level deduplication. Whitewater gateways reduce cloud storage requirements by 10-30 times on average. Byte-level deduplication uses smaller segments, finds more duplication, and thus reduces data sets sizes.
WAN optimization technologies. Whitewater gateways uses byte-level deduplication, compression, and an advanced TCP stack to optimize data and transmit in multiple, parallel streams to maximize the available bandwidth for outstanding throughput.
Real-time replication. Teal-time replication transmits data quickly so that all backup data is safely stored in the cloud as quickly as possible and ensures synchronization between the cloud and locally cached data set.
Strong 256-bit encryption and secure transmission. Whitewater secures data in-flight using SSL v3, and at rest using 256-bit AES encryption. Whitewater leverages an innovative key management system that allows organizations to carefully manage data security and offers the flexibility to restore data to any location. Encryption keys are kept safe by the IT administrator.
Local optimized disk cache. Whitewater keeps the most recent, and most-often-accessed data in deduplicated and compressed format within the cache to greatly increase the amount of data stored locally to speed recoveries. If data needing restoration is no longer completely in its local cache, the Whitewater gateway will supplement in-cache data with data from cloud storage.
Drop-in installation. Whitewater gateways install quickly and easily, requiring only a simple change of the backup target in the backup application. As Whitewater gateways appear to the backup application as a CIFS share or NFS export, the change required is minimal.
About Riverbed
Riverbed delivers performance for the globally connected enterprise. With Riverbed, enterprises can successfully and intelligently implement strategic initiatives such as virtualization, consolidation, cloud computing, and disaster recovery without fear of compromising performance. By giving enterprises the platform they need to understand, optimize and consolidate their IT, Riverbed helps enterprises to build a fast, fluid and dynamic IT architecture that aligns with the business needs of the organization. Additional information about Riverbed (NASDAQ: RVBD) is available at www.riverbed.com.
Additional Resources

Amit K. Agrawal posted Azure Zone Web Role Service Configuration(HTTPs) on 12/18/2011:
Targeted Audience
This specification is intended for Architects, Project Managers, Software Design Engineers and Developer.
SSL Certificate
SSL uses an encryption mechanism to transport the data from Client-Server. The encryption using a private key/public key pair ensures that the data can be encrypted by one key but can only be decrypted by the other key pair
The trick in a key pair is to keep one key secret (the private key) and to distribute the other key (the public key) to everybody (client). A client side public key is stored in certificate.
A certificate contains information about the owner, like e-mail address, owner’s name, certificate usage, duration of validity and the certificate ID of the person who certifies (signs) this information.
Certificate contains also the public key and finally a hash to ensure that the certificate has not been tampered with. Usually your browser or application has already loaded the root certificate of well known Certification Authorities (CA) or root CA Certificates. The CA maintains a list of all signed certificates as well as a list of revoked certificates.
Note: Developer can also generate Self Signed certificate for development and testing purpose.
Certificate Generation
Below steps is not required if developer has valid certificate.
Step-1 Generate Self Signed Certificate (Makecert.exe)
Developer can generate certificate for development and testing purpose. Follow below steps to generate Self Signed Certificate
Goto – > “Visual Studio Tool” ->“Visual Studio Command Prompt”
Right click “Visual Studio Command Prompt” and select “Run as Administrator” as highlighted below.
Step 2: Use the following command from command prompt. Before running the command don’t forget to replace www.yourserver.com with service URL. It is mandatory to have CN value same as service URL to expose the service on HTTPs
makecert -r -pe -n “CN=www.yourserver.com” -b 01/01/2000 -e 01/01/2036 -eku 1.3.6.1.5.5.7.3.1 -ss my -sr localMachine -sky exchange -sp “Microsoft RSA SChannel Cryptographic Provider” -sy 12
Step 3 After execution of above command execute MMC command from “RUN”. This will open below highlighted window
Step 4 : Click on File -> “Add/Remove Snap-in”
Step 5: Select Certificate -> Click on “Add” button
Step 6: Select Computer Account -> Click on “Next” button on next screen
Step 7: Click on “Finish” -> “Ok” button on next screen. You should be able to view the certificate.
Note: It is recommended to NOT to use Self Signed certificate in production environment.
Export Private Key
Once certificate is generated, we need to export the Private key. Private Key required to upload on Windows Azure along with service package and configuration file.
1.Right click on your certificate and navigate to “All Task”->”Export”.
2.Click on Button “Next”
3.Select “Yes, Export the private Key“ option and click on “Next” Button as sown below
4.Click on “Next” Button as shown below.
5.Type the Password and Confirm Password (example: sonata) and click on Next Button
6. Brows the location to save the private key on next screen
Configure Web service on Secure Channel (HTTPs)
1. Web Role Configuration
Assuming that user has Private key configured in certificate store at development m/c Open the Service solution in Visual Studio and right click on Web Role and select property
Previous steps will open property windows having following highlighted Tab.
Click on “Certificates” Tab, -> Click on “Add Certificates”. This step will display the below screen
Click on button at “Thumbprint” column to brows the certificate from certificate store, select your certificate and click on Ok button.
Now switch to “Endpoints” tab and make the below highlighted configuration and select SSL Certificate from dropdown. It is the same certificate created in previous step.
Now switch to “Configuration” tab and make the below highlighted configuration
Build the project and launch the service, It should be launched on HTTPs protocol.
Web.Config Configuration
Apart from above changes, few more changes to be made on service Web.config file to complete the configuration.
i. Add the following property to ServiceMetaData Tag as highlighted <serviceMetadata httpsGetEnabled=”true” httpGetEnabled=”true”/>
Make the web config changes as highlighted below
<?xml version=”1.0″?>
<configuration><system.diagnostics>
<trace>
<listeners>
<add type=”Microsoft.WindowsAzure.Diagnostics.DiagnosticMonitorTraceListener, Microsoft.WindowsAzure.Diagnostics, Version=1.0.0.0, Culture=neutral, PublicKeyToken=31bf3856ad364e35″ name=”AzureDiagnostics”>
<filter type=”" />
</add>
</listeners>
</trace>
</system.diagnostics>
<system.web>
<compilation debug=”true” targetFramework=”4.0″>
<assemblies>
<add assembly=”Microsoft.IdentityModel, Version=3.5.0.0, Culture=neutral, PublicKeyToken=31BF3856AD364E35″ />
</assemblies>
</compilation>
<customErrors mode=”Off” />
</system.web>
<system.serviceModel>
<bindings>
<basicHttpBinding>
<!–secure wcf by TransportWithMessageCredential security–>
<binding name=”binding1″>
<security mode=”TransportWithMessageCredential”>
<message clientCredentialType=”UserName” />
</security>
</binding>
</basicHttpBinding>
</bindings>
<services>
<service name=”AzureZoneWebRole.TimeSheetService” behaviorConfiguration=”sb1″>
<endpoint address=”" binding=”basicHttpBinding” contract=”AzureZone.TimeSheetContract.ISeemlessOfflineContract” bindingConfiguration=”binding1″ />
<endpoint address=”mex” binding=”mexHttpBinding” contract=”IMetadataExchange” />
</service>
<service name=”AzureZoneWebRole.AuthenticationService” behaviorConfiguration=”sb1″>
<endpoint address=”" binding=”basicHttpBinding” contract=”AzureZone.AuthContract.IAuthenticationService” bindingConfiguration=”binding1″ />
<endpoint address=”mex” binding=”mexHttpBinding” contract=”IMetadataExchange” />
</service>
</services>
<behaviors>
<serviceBehaviors>
<behavior name=”sb1″>
<serviceCredentials>
<userNameAuthentication userNamePasswordValidationMode=”Custom” customUserNamePasswordValidatorType=”AzureZoneWebRole.MyCustomUsernamePasswordValidator,AzureZoneWebRole” />
</serviceCredentials>
<!– To avoid disclosing metadata information, set the value below to false and remove the metadata endpoint above before deployment –>
<serviceMetadata httpsGetEnabled=”true” httpGetEnabled=”true”/>
<!– To receive exception details in faults for debugging purposes, set the value below to true. Set to false before deployment to avoid disclosing exception information –>
<serviceDebug includeExceptionDetailInFaults=”false”/>
</behavior>
<behavior name=”">
<serviceCredentials>
<serviceCertificate storeLocation=”LocalMachine” storeName=”My” x509FindType=”FindByThumbprint” findValue=”482C7073ECFD9B90385318C7566A441C4CFB2F8C” />
</serviceCredentials>
</behavior>
<behavior name=”ServiceBehavior”>
<!– To avoid disclosing metadata information, set the value below to false and remove the metadata endpoint above before deployment –>
<serviceMetadata httpsGetEnabled=”true” httpGetEnabled=”true”/>
<!– To receive exception details in faults for debugging purposes, set the value below to true. Set to false before deployment to avoid disclosing exception information –>
<serviceDebug includeExceptionDetailInFaults=”true”/>
</behavior>
</serviceBehaviors>
</behaviors>
<serviceHostingEnvironment multipleSiteBindingsEnabled=”true” />
</system.serviceModel>
<system.webServer>
<modules runAllManagedModulesForAllRequests=”true” />
</system.webServer>
<system.net>
<defaultProxy useDefaultCredentials=”true”>
</defaultProxy>
</system.net>
</configuration>Build the project and launch the service, It should be launched on HTTPs protocol. Package the Service and Upload to Windows Azure with following
- Service Package
- Service Configuration
- Certificate Private Key
Configure Client on Secure Channel (HTTPs)
Once the Service reference is added of above service following code change is required at client-
Client Credential need to be passed on Proxy.
Sample code: AzureZoneContractClient proxy = new AzureZoneContractClient();
if (proxy.ClientCredentials.UserName.UserName == null)
{
proxy.ClientCredentials.UserName.UserName = CommonFunction.UserID;
}Windows and Web Client:
During the development and testing self sign certificate are used, which is not recognized by standard CA and application throws error. To suppress the error following modification to made to client side code.
Note: This steps is not required, If Service is configured with valid SSL certificate.
a) Add following class to client solution
using System;
using System.Collections.Generic;
using System.Linq;
using System.Web;
using System.Net;
using System.Net.Security;
using System.Security.Cryptography.X509Certificates;
public static class CertificateUtils
{
/// <summary>
/// Sets the cert policy.
/// </summary>
public static void SetCertificatePolicy()
{
ServicePointManager.ServerCertificateValidationCallback
+= RemoteCertificateValidate;
}
/// <summary>
/// Remotes the certificate validate.
/// </summary>
private static bool RemoteCertificateValidate(
object sender, X509Certificate cert,
X509Chain chain, SslPolicyErrors error)
{
// trust any certificate!!!
// System.Console.WriteLine(“Warning, trust any certificate”);
return true;
}
}a) Add the following code only once before making service call. This would suppress the certificate error.
CertificateUtils.SetCertificatePolicy();


<Return to section navigation list>
Visual Studio LightSwitch and Entity Framework 4.1+
••• Jaganathan B described How to create theme extension for LightSwitch Application in a 12/24/2011 post:
Prologue:
In this article we shall discuss about that theme extension for LightSwitch application. As the continuation of my previous article titled “How to create shell extension for lightswitch application, today we will create a demo theme extension.What is Theme?
A theme is a collection of property settings that allow you to define the look of screens and controls, and then apply the look consistently across screen in a LightSwitch application, across an entire LightSwitch application, or across all LightSwitch applications on a server.
For lightswitch application, we can create a theme as extension. In this post we will create a sample theme extension.Preparing the Solution:
Let us start VS 2010 or VS LightSwitch 2011 [if you have installed]. Create a sample theme extension as shown in the figure.
Follow the numberings as showing in the above figure. Name the extension as “HowToCreateCustomThemeLightSwitch”. Once you created the extension application, we need to add the theme file.
As shown in the figure,
- Select the “Custom Theme.Lspkg
- Then select Add –> New Item to add the new theme file.

If you click on the “New Item” option, you will be seeing a window which lists all the extensions available. Select the Theme extension type as shown in the above figure. After adding the Theme file, two theme files will be generated in the “CustomTheme.Client” as show in the below figure.
- NewTheme.cs – This file contains the property for the newly created theme file.
- NewTheme.xaml – The XAML file a Resource Dictionary which has the theme definitions like font color,size and screen background colors etc.
The below example xaml code shows the theme definition.
- <!-- Control: Screen -->
- <!-- States: NormalBrush -->
- <!-- ScreenBackground - The background of the screen. -->
- <SolidColorBrush x:Key="ScreenBackgroundBrush" Color="Pink"/>
- <!-- ScreenLoadingBackground - The background of a control that is loading -->
- <SolidColorBrush x:Key="ScreenLoadingBackgroundBrush" Color="#FFF7F7F7"/>
- <!-- ScreenControlBorder - The border of a control that is not based on another control already defined -->
- <SolidColorBrush x:Key="ScreenControlBorderBrush" Color="Black"/>
In this sample code, we have define the Screen’s background color as “Pink”
Theme Meta data:
Meta data about the newly created theme will be in the NewTheme.lsml file. Open the .lsml file as shown in the figure.
This meta data file contains the information about the theme created.
- <?xml version="1.0" encoding="utf-8" ?>
- <ModelFragment
- xmlns="http://schemas.microsoft.com/LightSwitch/2010/xaml/model"
- xmlns:x="http://schemas.microsoft.com/winfx/2006/xaml">
- <Theme Name="NewTheme">
- <Theme.Attributes>
- <DisplayName Value="Custom Theme"/>
- <Description Value="This is new custom theme"/>
- </Theme.Attributes>
- </Theme>
- </ModelFragment>
Building and Install the theme extension:
So we are created a theme in which the screen background we defined is Pink. Build the demo extension application. it will create the a .VSIX file in the BIN folder as shown in the figure.
Press Ctrl and click on the link as highlighted in yellow i.e. the .VSIX file path. It will ask you to Open or Save the file. Just click on Open.
If you click on Open, then it will open a install wizard as shown in the above figure. Click on Install to install our sample theme extension.Configuring theme for LightSwitch Application:
After installing the sample theme we need to use the theme. Just open a lightswitch application and go to the Project Properties page.
From the Project Properties page go to Extensions tab and select the theme extension which we have created as show in the above figure..
After selecting the sample theme then we need to set the theme for our application as show in the figure.Application in Action:

••• Jaganathan B explained Accessing Controls of one Screen from another Screen in LightSwitch in an 12/24/2011 post:
Prologue:
In this article, we shall discuss about how to access controls of one screen from another screen. There should be some situation where we need to add or remove some controls depending on the option user has selected.
Let us discuss with an example to add or remove controls of one screen from another screen.
Preparing the Solution:
Fire up the Visual Studio LightSwitch 2011; create a project as shown in the below figure.
Follow the # number sequence as shown in the figure to create the project.
Designing the Entities:
To create this demo application, we don't want to create any entity.
Designing the Screens:
For this demo application, we need to create two screens. The first screen is used to have a button on the command bar. when you click on the button, a new button will be created on the another screen.
As shown in the figure, create a New Data Screen without entity.
Create another screen as shown in the below figure with name “AnotherScreen”.
In this screen we are going to add button control dynamically. So to hold the dynamic button control, we need to have a holder. Add a canvas into this screen.
Add a custom control as shown in the above figure.
Select the canvas control as new custom control into the screen.
Adding Command Bar Buttons:
We need to add two command bar buttons namely “Add Control” in the first screen and “Remove Control” in another screen.
Create “Add Control” command bar button as show in the figure.
Open the first screen “CreateNew” and create the command bar button with the name “Add Control”.
Follow the above shown steps to create “Remove Control” command bar button in another screen.
The Code-Behind:
As we need to add or remove controls of one screen from another screen dynamically, we need to write some line of code.
Edit the Command Bar Button “AddControl” method of CreateNew screen. Add little bit code as shown in the below figure.
- partial void AddControl_Execute()
- {
- // Write your code here.
- IList<IActiveScreen> screens = Application.ActiveScreens;
- IActiveScreen anotherScrn = screens.Single(scr => scr.GetName() == "AnotherScreen");
- anotherScrn.Screen.FindControl("ScreenContent").ControlAvailable += (s, e) =>
- {
- Canvas stkPanel = e.Control as Canvas;
- Button btn = new Button();
- btn.Name = "NewButton";
- btn.Content = "Click Me";
- if (stkPanel.FindName("NewButton") == null)
- {
- stkPanel.Children.Add(btn);
- }
- anotherScrn.Activate();
- };
- }
Above code is used to add a custom button control into the “AnotherScreen” screen from CreateNew screen. Here, the ActiveScreens property will give you screens which are currently opened.
IActiveScreen interface is used to activate the specified screen.
In the AnotherScreen’s Command Bar, edit the method for “RemoveControl” button as shown in the below figure.
After editing the “RemoveControl” buttons partial method, add bit of code into that method as shown in the below figure.
- partial void RemoveControl_Execute()
- {
- this.FindControl("ScreenContent").ControlAvailable += (s, e) =>
- {
- Canvas stkPanel = e.Control as Canvas;
- if (stkPanel.FindName("NewButton") != null)
- {
- // stkPanel.Children.Add(new Button() { Name = "NewButton", Content = "Click Me" });
- stkPanel.Children.Remove(stkPanel.FindName("NewButton") as UIElement);
- }
- };
- }
While clicking the “RemoveControl” command bar button, the above code will remove the button control from “AnotherScreen” screen.
Now we are ready with our demo application. Press F5 to see our application in Action.
Summary:
In this article, we have seen about how to access a control of one screen from another screen in Visual Studio LightSwitch 2011.
Thanks for spending your precious time here. Please provide your valuable feedbacks and comments, which make me to give a better article next time.


Jaganathan B’s blog contains many other LightSwitch-related posts.
Jan van der Haegen (@janvanderhaegen) described Extensions Made Easy: dispatcher fixed & IsEnabled feature in a 12/21/2011 post:
In case you haven’t tried it, Extensions Made Easy includes a really easy way to add commands to the button ribbon. By default, the code you want executed will run on the dispatcher of the currently active screen, if there is one, or on the main dispatcher if there is no currently active screen.
However, the former sometimes poses a problem. For certain pieces of code, you want to be on the main thread because you are going to access global resources for example. For this reason, you might sometimes want to force your command’s code to run on the main thread, and this can now be done since Extensions Made Easy v1.6, thanks to an overloaded constructor in the ExtensionsMadeEasy.ClientAPI.Commands.EasyCommandExporter…
This piece of code will execute on the dispatcher of the currently active screen:
public DynamicThemeCommand()
 : base(
   "Edit theme", //Display name
   "Edit the current theme", //Description
   "Customize", //Ribbon button group name
   null //URI to image (was too lazy today to actually include one)
 ) { }
And this is the second constructor, where you can force the main dispatcher…
public DynamicThemeCommand()
 : base(
   "Edit theme", //Display name
   "Edit the current theme", //Description
   "Customize", //Ribbon button group name
   null, //URI to image (was too lazy today)
   ExtensionsMadeEasy.ClientAPI.Commands.Dispatcher.ForceMainDispatcher
 ) { }
And yes, that command IS a command from the EME 2.0 series which I’m currently working on…
New IsEnabled feature
About a month ago, a comment from Bala, volunteer to be my partner in crime from now on, slipped under my radar:
I was playing with this again and got stuck on how to ‘disable a global button’, something like “CanExecute” validation.
Is it possible to implement?
I found the comment by accident – yes I’ve been terrible with following up my comments… will do better next year! – when trying to find another comment for my previous post…
Now, it was already fairly easy to indicate whether or not your command should be active (visible) for a particular screen.
        public override bool IsCommandActiveForScreen(Microsoft.LightSwitch.Client.IScreenObject currentScreen)
        {
            return currentScreen != null; //3.
        }
But as Bala indicated, sometimes a command should be visible, but disabled based on the situation. Extensions Made Easy v1.8 just got pushed to the gallery, including a new property on the ExtensionsMadeEasy.ClientAPI.Commands.EasyCommandExporter called IsEnabled.
public override void Execute(Microsoft.LightSwitch.Client.IScreenObject currentScreen)
 {
   new ExtensionsMadeEasy.Presentation.Themes.DynamicControl.Views.DynamicThemeManagementView().Show(currentScreen, null);
   this.IsEnabled = false;
 }
Set it to true of false whenever you feel like it, the property properly raises the INotifyChanged event and the LightSwitch framework immediately disables or enables the command.
Aight, out of ammunition for this blog post (V, 2 ,2! Extra credit for anyone to know where V, 2, 2 comes from…), moving on to write the EME change log, another long overdue item on my TODO pile…

Michael Washington (@ADefWebserver) claimed Oh, And It's Also All About Productivity in a 12/21/2011 post:
If you stop and think about it, an automobile is an amazing thing. The automobile brings together several key elements such as cost, fuel, rubber tires. The result is a massive increase in productivity for the world.
The key is productivity. This is what fuels growth.
Let’s take a look at the advancements HTML 5 provides. Yes, there are new tags and new functionality, but where is any increased productivity? Don’t get me wrong, HTML 5 is a great technology, but, I have seen too many great technologies fail to reach critical mass because they did not increase productivity. Did you ever turn all your HTML 4 document types to Strict, or did you leave them as Transitional? Are you using .css for all your styling? Is ‘lack of time’ your reason?
I love the Model-View-View Model pattern (MVVM), and LightSwitch uses it under the covers, but it never caught on with most of the developers I know, because for them, it actually goes in the opposite direction. It takes more code and time for them to use the MVVM pattern, than it would to not use it.
People act based on ‘motivations’ and increased productivity translates into ‘more for less work’, this translates into ‘more money’… and don’t forget, it is always about the money
.
90% + Productivity With Visual Studio LightSwitch
Visual Studio LightSwitch is the result of a convergence of a number if technologies (Linq, Silverlight, MVVM, WCF, Entity Framework) wrapped into a model centric tool that is built inside Visual Studio. Like a combustion engine sitting on rubber tires, it is a complete package that works. It achieves the number one thing required for success, increased productivity.
Look at the entries in the Code Project LightSwitch Star Contest. You will see example after example of projects that achieved a 90%+ savings in productivity.

Jan van der Haegen (@janvanderhaegen) posted LightSwitch and the MEF story on 12/21/2011:
A couple of months ago, a guy named Kostas Christodoulou opened a Q&A ticket on the Extensions Made Easy extension…
Written September 16, 2011
I start a new discussion because for some strange reason I cannot reply to a discussion I started.
My question has to do with composition. When I was looking forward to read your code (which I did)
I was hoping to see how one can use lightswitch and composition with his own contracts/interfaces (like IThemeExporter).
I have tried using my own contracts with Import/Export attributes but somehow composition seems to ignore my contracts.
I have ended up believing that somehow you have to "register" your contracts with MEF to achieve this, and I was expecting to see this in your solution, but I don't see anything like that. If you have any light to shed...
O yea…
Extensions Made Easy v1.7 is out!
Will blog the changes (they are really minor) after this post…
Wait…
This is about to become the most confusing blog post ever, but…
Extensions Made Easy v1.8 is out!
Had a really good idea after writing “v1.7 is out”, so went ahead and implemented it, published the new version, and now continuing my blogging streak of tonight…
Now where was I… Oh yea… This fellow named Kostas asked me something about LightSwitch and MEF, which didn’t make any sense to me until about 3 hours and 7 minutes ago. I pushed a new version of ExtensionsMadeEasy to the gallery, which contains a bugfix that was long overdue regarding some MEF imports not being found…

Much ado about not a lot.
Return to section navigation list>
Windows Azure Infrastructure and DevOps
Ibon Landa (@ibonilm) announced Azure Monitor for Windows Phone 7 is out! in a 12/22/2011 post:
Azure Monitor for Windows Phone 7 lets you manage your Windows Azure subscriptions from your mobile device.
- List azure hosted services and view service information.
- Manage and move your deployments from production to staging.
- View key performace metrics of your instances.
- Delete hosted services.
- Stop and start a deployment.
- Restart and reimage a role instance.
- Change the numbers of instances in a role.
- Change the numbers of instances in a role.
- List your storage services.
- List SQL Azure Servers and get información about server, firewall rules etc…
Azure Monitor WP7 Application: http://www.windowsphone.com/es-ES/apps/e0e4066b-55f8-4c04-9d3b-8b28f3224881
Here you have some screenshots taken from the emulator:


Ibon is a Windows Azure MVP in Spain.
David Linthicum (@DavidLinthicum) asserted “Businesses that don't anticipate these shifts will find themselves at a disadvantage, perhaps fatally so” in a deck for his 3 game-changers in the cloud: Get ready -- or else post of 12/22/2011 to InfoWorld’s Cloud Computing blog:
I'm often taken aback by businesses that are unaware of the influence of cloud computing when it's about to hit them upside the head.
We saw this before, back in the early days of the Web. Some businesses got it and thrived. Others did not, and they had to play catch-up or shut their doors. Indeed, a great business skill is to understand when technology will require you to move in different directions, and cloud computing is another instance of that shift.
What are they missing? I have a few items for the list.
Reduction in IT overhead creates a price advantage. How can your competition sell its product at the price it does and still make money? Well, instead of putting $50 million a year into IT, the company has cut its costs in half through the use of cloud-based services. Or perhaps it avoided an investment in that new data center. Instead, thanks to the use of the cloud, your competitor passed that savings on as lower prices, which increased sales and led to higher profits.
Better use of business data. The cloud provides the ability to deal with massive amounts of data, a traditionally cost-prohibitive endeavor. Many businesses are taking advantage of the access to information to better determine trends and opportunities they were once blind to. They get better and make smarter allocation of resources by using those newfangled, cloud-based big data systems -- and the ability they provide to turn this new access to business intelligence into profit. If that's your competition, watch out.
Expansion through new IT agility. Businesses looking to expand through acquisition are often blocked by the years it can take to convert existing IT systems. The cloud provides much better agility, including the ability to quickly bring on board infrastructure, applications, and business data. By leveraging this newfound agility, many businesses will find that they can expand much faster -- at less cost and with less risk.
The use of cloud computing becomes a competitive advantage. You need to make sure you see this technology coming, or it could quickly run you over if your competition gets it first.

<Return to section navigation list>
Windows Azure Platform Appliance (WAPA), Hyper-V and Private/Hybrid Clouds
•••• Scott Smith and Eric Johnson wrote IBM Reference Configuration for Microsoft Private Cloud: Implementation Guide and IBM posted it on 12/25/2011:
Abstract
The IBM® Reference Configuration for Microsoft Private Cloud provides businesses an affordable, interoperable, reliable, and industry-leading virtualization solution. Validated by the Microsoft Private Cloud Fast Track program, the IBM Reference Configuration for Microsoft Private Cloud combines Microsoft software, consolidated guidance, and validated configurations for compute, network, storage, and value-added software components.
The Microsoft program requires a minimum level of redundancy and fault tolerance across the servers, storage, and networking for both the management and production virtual machine (VM) clusters. These requirements help to ensure a certain level of fault tolerance while managing private cloud pooled resources.
This IBM Redpaper™ publication explains how to set up and configure the IBM 8-Node Microsoft Private Cloud Fast Track solution used in the actual Microsoft program validation. The solution design consists of Microsoft Windows 2008 R2 Hyper-V clusters powered by IBM System x3650 M3 servers with IBM XIV® Storage System connected to IBM converged and Ethernet networks. This paper includes a short summary of the Reference Configuration software and hardware components, followed by best practice implementation guidelines.
This paper targets mid-to-large sized organizations that consist of IT engineers who are familiar with the hardware and software that make up the IBM Cloud Reference Architecture. It also benefits the technical sales teams for IBM System x® and XIV and their customers who are evaluating or pursuing Hyper-V virtualization solutions.
Table of contents
Chapter 1. Components, Microsoft Hyper-V, and failover clustering
Chapter 2. Components of the IBM Reference Configuration
Chapter 3. Best practices and implementation guidelines
Appendix A. Brocade 2-port 10 GbE CNA for IBM System x
Appendix B. Brocade Switch Management
Appendix C. Networking worksheets
•• Kristian Nese (@KristianNese) described how to Deploy Services to Azure from App Controller (Part Three) in a 12/23/2011 post:
After you have created the required connections to both your private and public clouds, and set up the libraries to serve your clouds with resources, you should easily be able to deploy new services in both clouds using App Controller.
1. First, copy the packages over to your public cloud library
2. Right click your package and click ‘Deploy’
3. Give your service a name and a public url, and specify the preferred region (you can also specify an affinity group if you have set up this)
4. Select this hosted service for deployment
5. Name this deployment and eventually specify the operating system version (Azure OS), and select stage or production. If this service is ready to you and you want it to be available immediate, select production
6. You can eventually specify the roles and instances as well. In this example, 1 instance is enough
After the job is done, you`ll find your service up and running in the Services tab in App Controller.


•• Alan Le Marquand posted Announcing the release of the Private Cloud Infrastructure course on 12/23/2011:
The Microsoft Virtual Academy team would like to announce the release of the Private Cloud Infrastructure course.
This course focuses on how using technologies and tools from Microsoft can help your business build, deploy, and maintain a private cloud.
Lastly, you will learn how using tools and technologies from Microsoft as part of your private cloud will benefit both your organization and you as the IT professional.
After completing this course, try out what you’ve learnt by downloading Windows Server 2008 R2 and System Center from the TechNet Evaluation Center.

<Return to section navigation list>
Cloud Security and Governance
No significant articles today.
<Return to section navigation list>
Cloud Computing Events
Eric Nelson (@ericnel) recommended that you Check out the London Windows Azure User Group in a 12/23/2011 post:
The London Windows Azure Users Group is a new user group founded by Andy Cross, Richard Conway and Hancock and Parsons. The group is dedicated to building a sustainable community of Azure users that want to share experiences and code! Amongst other things the group puts on meetings the first Tuesday evening of every month with one or two speakers on Windows Azure and related topics. Feel free to come and rub shoulders with other Azure users and put your questions and programming problems to seasoned programmers. Meetings, beer and pizza are provided. Register via the website @ http://www.lwaug.net.
Related Links:


<Return to section navigation list>
Other Cloud Computing Platforms and Services
Jordan Sissel (@jordansissel, pictured below) continued his SysAdvent series with Day 22 - Load Balancing Solutions on EC2 on 12/22/2011:
This was written by Grig Gheorghiu.
Before Amazon introduced the Elastic Load Balancing (ELB) service, the only way to do load balancing in EC2 was to use one of the software-based solutions such as HAProxy or Pound.
Having just one EC2 instance running a software-based load balancer would obviously be a single point of failure, so a popular technique was to do DNS Round-Robin and have the domain name corresponding to your Web site point to several IP addresses via separate A records. Each IP address would be an Elastic IP associated to an EC2 instance running the load balancer software. This was still not perfect, because if one of these instances would go down, users pointed to that instance via DNS Round-Robin would still get an error until another instance would be launched.
Another issue that comes up all the time in the context of load balancing is SSL termination. Ideally you would like the load balancer to act as an SSL end-point, in order to offload the SSL computations from your Web servers, and also for easier management of the SSL certificates. HAProxy does not support SSL termination, but Pound does (note: that you can still pass SSL traffic through HAProxy by using its TCP mode, you just cannot terminate SSL traffic there.)
In short, if Elastic Load Balancing weren’t available, you could still cobble together a load balancing solution in EC2. There is no reason to ‘roll your own’ anymore however now that you can use the ELB service. Note that HAProxy is still the king of load balancers when it comes to the different algorithms you can use (and to a myriad of other features), so if you want the best of both worlds, you can have an ELB upfront, pointing to one or more EC2 instances running HAProxy, which in turn delegate traffic to your Web server farm.
Elastic Load Balancing and the DNS Root Domain
One other issue that comes up all the time is that an ELB is only available as a CNAME (this is due to the fact that Amazon needs to scale the ELB service in the background depending on the traffic that hits it, so they cannot simply provide an IP address). A CNAME is fine if you want to load balance traffic to www.yourdomain.com, since that name can be mapped to a CNAME. However, the root or apex of your DNS zone, yourdomain.com, can only be mapped to an A record, so for yourdomain.com you could not use an ELB in theory. In practice, however, there are DNS providers that allow you to specify an alias for your root domain (I know Dynect does this, and Amazon’s own Route 53 DNS service).
Elastic Load Balancing and SSL
The AWS console makes it easy to associate an SSL certificate with an ELB instance, at ELB creation time. You do need to add an SSL line to the HTTP protocol table when you create the ELB. Note that even though you terminate the SSL traffic at the ELB, you have a choice of using either unencrypted HTTP traffic or encrypted SSL traffic between the ELB and the Web servers behind it. If you want to offload the SSL processing from your Web servers, you can choose HTTP between the ELB and the Web server instances.
If however you want to associate an existing ELB instance with a different SSL certificate (say for instance you initially associated it with a self-signed SSL cert, and now you want to use a real SSL cert), you can’t do that with the AWS console anymore. You need to use command-line tools. Here’s how.
Before you install the command-line tools, a caveat: you need Java 1.6. If you use Java 1.5 you will most likely get errors such as java.lang.NoClassDefFoundError when trying to run the tools.
Install and configure the AWS Elastic Load Balancing command-line tools
- download ElasticLoadBalancing.zip
- unzip
ElasticLoadBalancing.zip; this will create a directory named ElasticLoadBalancing-version (latest version at the time of this writing is 1.0.15.1)- set environment variable
AWS_ELB_HOME=/path/to/ElasticLoadBalancing-1.0.15.1(in .bashrc)- add
$AWS_ELB_HOME/binto your$PATH(in.bashrc)Install and configure the AWS Identity and Access Management (IAMCli) tools
- download
IAMCli.zip- unzip
IAMCli.zip; this will create a directory named IAMCli-version (latest version at the time of this writing is 1.3.0)- set environment variable
AWS_IAM_HOME=/path/to/IAMCli-1.3.0(in.bashrc)- add
$AWS_IAM_HOME/binto your$PATH(in.bashrc)Create AWS credentials file
- create file with following content AWSAccessKeyId=your_aws_access_key AWSSecretKey=your_aws_secret_key
- if you named this file
aws_credentials, set environment variableAWS_CREDENTIAL_FILE=/path/to/aws_credentials(in .bashrc)Get DNS name for ELB instance you want to modify
We will use the ElasticLoadBalancing tool called elb-describe-lbs:
# elb-describe-lbs
LOAD_BALANCER  mysite-prod  mysite-prod-2639879155.us-east-1.elb.amazonaws.com  2011-05-24T22:38:31.690Z
LOAD_BALANCER  mysite-stage   mysite-stage-714225413.us-east-1.elb.amazonaws.com    2011-09-16T18:01:16.180Z
In our case, we will modify the ELB instance named mysite-stage.
Upload SSL certificate to AWS
I assume you have 3 files:
- the SSL private key in a file called
stage.mysite.com.key- the SSL certificate in a file called
stage.mysite.com.crt- an intermediate certificate from the SSL vendor, in a file called
stage.mysite.com.intermediate.crtWe will use the IAMCli tool called
iam-servercertupload:# iam-servercertupload -b stage.mysite.com.crt -c stage.mysite.com.intermediate.crt -k stage.mysite.com.key -s stage.mysite.comList the SSL certificates you have uploaded to AWS
We will use the IAMCli tool called
iam-servercertlistbypath:# iam-servercertlistbypath arn:aws:iam::YOUR_IAM_ID:server-certificate/stage.mysite.com arn:aws:iam::YOUR_IAM_ID:server-certificate/www.mysite.comAssociate the ELB instance with the desired SSL certificate
We will use the ElasticLoadBalancing tool called
elb-set-lb-listener-ssl-cert:# elb-set-lb-listener-ssl-cert mysite-stage --lb-port 443 --cert-id arn:aws:iam::YOUR_IAM_ID:server-certificate/stage.mysite.com OK-Setting SSL CertificateThat's it! At this point, the SSL certificate for stage.mysite.com will be associated with the ELB instance handling HTTP and SSL traffic for stage.mysite.com. Not rocket science, but not trivial to put together all these bits of information either.
Further Reading
- Elastic Load Balancing Developer Guide
- AWS Identity and Access Management User Guide
- Blog post by Werner Vogels on New Route 53 and ELB features


I prefer the simplicity of Windows Azure’s built-in, default load balancing.
Jeff Barr (@jeffbarr) described New - Elastic Network Interfaces in the Virtual Private Cloud in a 12/21/2011 post:
If you look closely at the services and facilities provided by AWS, you'll see that we've chosen to factor architectural components that were once considered elemental (e.g. a server) into multiple discrete parts that you can instantiate and control individually.
For example, you can create an EC2 instance and then attach EBS volumes to it on an as-needed basis. This is more dynamic and more flexible than procuring a server with a fixed amount of storage.
Today we are adding additional flexibility to EC2 instances running in the Virtual Private Cloud. First, we are teasing apart the IP addresses (and important attributes associated with them) from the EC2 instances and calling the resulting entity an ENI, or Elastic Network Interface. Second, we are giving you the ability to create additional ENIs, and to attach a second ENI to an instance (again, this is within the VPC).
Each ENI lives within a particular subnet of the VPC (and hence within a particular Availability Zone) and has the following attributes:
- Description
- Private IP Address
- Elastic IP Address
- MAC Address
- Security Group(s)
- Source/Destination Check Flag
- Delete on Termination Flag
A very important consequence of this new model (and one took me a little while to fully understand) is that the idea of launching an EC2 instance on a particular VPC subnet is effectively obsolete. A single EC2 instance can now be attached to two ENIs, each one on a distinct subnet. The ENI (not the instance) is now associated with a subnet.
Similar to an EBS volume, ENIs have a lifetime that is independent of any particular EC2 instance. They are also truly elastic. You can create them ahead of time, and then associate one or two of them with an instance at launch time. You can also attach an ENI to an instance while it is running (we sometimes call this a "hot attach"). Unless the Delete on Termination flag is set, the ENI will remain alive and well after the instance is terminated. We'll create a ENI for you at launch time if you don't specify one, and we'll set the Delete on Terminate flag so you won't have to manage it. Net-net: You don't have to worry about this new level of flexibility until you actually need it.
You can put this new level of addressing and security flexibility to use in a number of different ways. Here are some that we've already heard about:
Management Network / Backnet - You can create a dual-homed environment for your web, application, and database servers. The instance's first ENI would be attached to a public subnet, routing 0.0.0.0/0 (all traffic) to the VPC's Internet Gateway. The instance's second ENI would be attached to a private subnet, with 0.0.0.0 routed to the VPN Gateway connected to your corporate network. You would use the private network for SSH access, management, logging, and so forth. You can apply different security groups to each ENI so that traffic port 80 is allowed through the first ENI, and traffic from the private subnet on port 22 is allowed through the second ENI.
Multi-Interface Applications - You can host load balancers, proxy servers, and NAT servers on an EC2 instance, carefully passing traffic from one subnet to the other. In this case you would clear the Source/Destination Check Flag to allow the instances to handle traffic that wasn't addressed to them. We expect vendors of networking and security products to start building AMIs that make use of two ENIs.
MAC-Based Licensing - If you are running commercial software that is tied to a particular MAC address, you can license it against the MAC address of the ENI. Later, if you need to change instances or instance types, you can launch a replacement instance with the same ENI and MAC address.
Low-Budget High Availability - Attach a ENI to an instance; if the instance dies launch another one and attach the ENI to it. Traffic flow will resume within a few seconds.
Here is a picture to show you how all of the parts -- VPC, subnets, routing tables, and ENIs fit together:
I should note that attaching two public ENIs to the same instance is not the right way to create an EC2 instance with two public IP addresses. There's no way to ensure that packets arriving via a particular ENI will leave through it without setting up some specialized routing. We are aware that a lot of people would like to have multiple IP addresses for a single EC2 instance and we plan to address this use case in 2012.
The AWS Management Console includes Elastic Network Interface support:
The Create Network Interface button prompts for the information needed to create a new ENI:
You can specify an additional ENI when you launch an EC2 instance inside of a VPC:
You can attach an ENI to an existing instance:


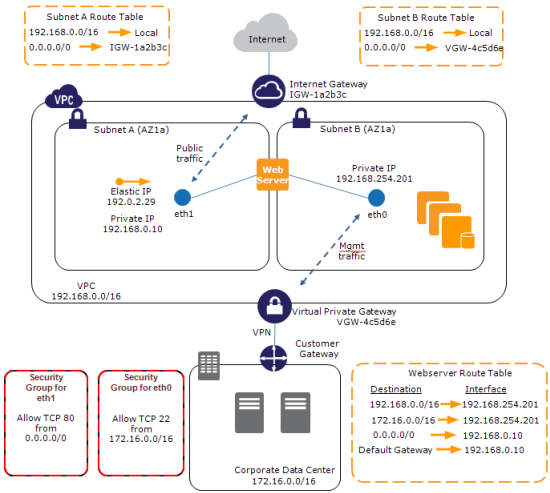
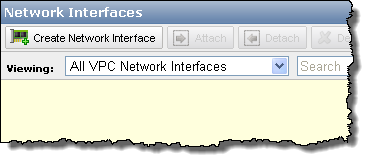
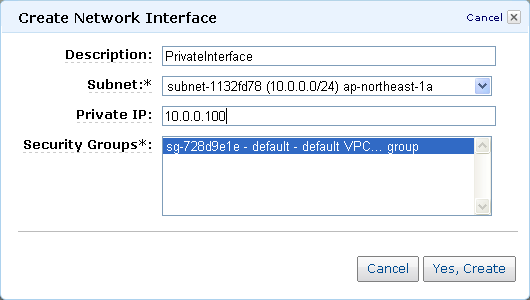
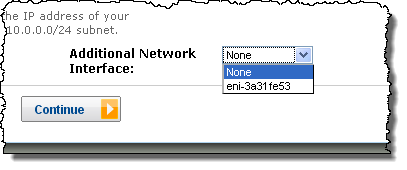
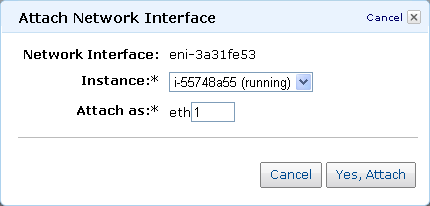
<Return to section navigation list>


0 comments:
Post a Comment