Windows Azure and Cloud Computing Posts for 8/5/2013+
Top Stories This Week:
- Adam Grocholski (@codel8r) reported availability of The Windows Azure Training Kit 2013 Refresh in an 8/6/2013 Sys-Con Media Blog Feed Post. See the Windows Azure Cloud Services, Caching, APIs, Tools and Test Harnesses section below.
- Brad Anderson (@InTheCloudMSFT) described What’s New in 2012 R2: Service Provider & Tenant IaaS Experience and other new Windows Server 2012 R2 features in the Windows Azure Pack, Hosting, Hyper-V and Private/Hybrid Clouds section below.
- Brian Hitney described Migrating a Blog to Windows Azure Web Sites in the Windows Azure Virtual Machines, Virtual Networks, Web Sites, Connect, RDP and CDN section below.
| A compendium of Windows Azure, Service Bus, BizTalk Services, Access Control, Caching, SQL Azure Database, and other cloud-computing articles. |
‡ Updated 8/11/2013 with new articles marked ‡.
• Updated 8/8/2013 with new articles marked •.
Note: This post is updated weekly or more frequently, depending on the availability of new articles in the following sections:
- Windows Azure Blob, Drive, Table, Queue, HDInsight and Media Services
- Windows Azure SQL Database, Federations and Reporting, Mobile Services
- Windows Azure Marketplace DataMarket, Power BI, Big Data and OData
- Windows Azure Service Bus, BizTalk Services and Workflow
- Windows Azure Access Control, Active Directory, and Identity
- Windows Azure Virtual Machines, Virtual Networks, Web Sites, Connect, RDP and CDN
- Windows Azure Cloud Services, Caching, APIs, Tools and Test Harnesses
- Windows Azure Infrastructure and DevOps
- Windows Azure Pack, Hosting, Hyper-V and Private/Hybrid Clouds
- Visual Studio LightSwitch and Entity Framework v4+
- Cloud Security, Compliance and Governance
- Cloud Computing Events
- Other Cloud Computing Platforms and Services
Windows Azure Blob, Drive, Table, Queue, HDInsight and Media Services
‡ Andrew Tegethoff continued his series with a Microsoft Cloud BI: Azure Data Services for BI? post to the Perficient blog on 8/9/2013:
In my first post in this series, I talked a little about the basics of cloud BI and Microsoft’s Windows Azure public cloud platform. I gave a brief glimpse of what services Azure offers for BI. So to begin with, let’s recap the Azure data services offerings in terms of the cloud computing models available. Azure’s Platform as a Service (PaaS) offerings include Azure SQL Database, Azure SQL Reporting Services, HDInsight, and Azure Tables. Azure’s Infrastructure as a Service (IaaS) offering is Azure Virtual Machines.
So what does each of these services provide, and is it something you can leverage for BI?
Azure SQL Database
The Service Formerly Known As “SQL Azure” is essentially “SQL Server in the cloud”. With your subscription, you can establish up to 150 databases of either 5GB each for the Web Edition subscription (up to 150GB each for the Business Edition). Aside from some administration differences and some datatypes in the on-premise software not supported in the cloud service, Azure SQL Database functions very much like SQL Server. You access data with T-SQL and write queries the same way. It’s a great option for building an application data source — especially if that application is also being built in Azure. But what about for BI use? The capacity and capabilities of SQL Database are sufficient for almost any small company’s data warehouse needs — even that of many mid-size organizations. But this is not the place to store a multi-TB data warehouse. One could theoretically Federate databases to achieve that, but complexity and storage costs would be prohibitive. Connectivity and bandwidth concerns may also render typical ETL patterns impractical. And, as if that weren’t enough, Azure SQL Database does not include the BI stack tools: Analysis Services, Integration Services, or Reporting Services.
Azure SQL Reporting Services
This service is, as you might guess, basically a port of SQL Server Reporting Services into the Azure world as a PaaS offering. As such, the development experience and functionality are very much like that of the document-oriented interface of traditional RS. So this makes up for not having SSRS in SQL Database right? Well, no. Azure RS is really built for use only against a SQL Database data source. And as far as security, SQL Authentication is the only scheme supported. So, no, this isn’t a cloud-based reporting service at-large, and isn’t a general purpose BI tool.
Azure Tables
Azure Table storage provides storage primarily aimed at non-relational data. This “No SQL” option is ideal for storing big (up to 100TB with an Azure Storage account) datasets that don’t require complex joins or referential integrity. Data is accessible in tables using oData connections and LINQ in .NET applications. The term “Tables” is a little deceiving, because an Azure Table is actually a collection of Entities, each of which has Properties. You can think of this as analogous to a Row of Columns — even though it’s quite different under the covers. So, this type of storage is of great use in app development for storing, say User or Profile information. It’s less expensive than Azure, scales easily and transparently for both performance and data size. BUT it does not make for a great BI platform , as things like RI and joins tend to be fairly critical parts of a Data Warehouse.
HDInsight
A cloud-based offering for storing Big Data in the cloud, HDInsight is built on Hadoop, but offers the capability of end users to tap into big data using SQL Server and/or Excel. HDInsight uses Azure Storage , which provides the ability to contain TB-level stores of unstructured data. But the real magic happens in supplementary tools like Hive, Pig, and Sqoop, which allow users to submit queries and return results from Hadoop using SQL. One could connect to an HDInsight store using on-premise SQL Server, Azure SQL Database, or even Excel. So here, we have something extremely compelling from the perspective of analytics.
BTW – This is one way in the Microsoft stack to integrate Big Data into existing solutions. The other way, staying native to Microsoft tech, would be using Parallel Data Warehouse (PDW) 2012, which features cool new Polybase technology as a way to bridge the gap between Hadoop and SQL. But that’s an entirely different topic…
Azure Virtual Machines
So, we’ve evaluated the PaaS side and found it a questionable fit for BI. So what about the IaaS side and Azure Virtual Machines? NOW we’re talking! Azure VM’s provide the only path to running full-featured SQL Server BI in the cloud, since you can install and run a complete version of SQL server.
But since this post is already too long, so I’ll save that for next time…. See you then!
• My (@rogerjenn) Uptime Report for my Live OakLeaf Systems Azure Table Services Sample Project: July 2013 = 100.00% of 8/6/2013 is the fifth in a series of months with no downtime:
My (@rogerjenn) live OakLeaf Systems Azure Table Services Sample Project demo project runs two small Windows Azure Web role compute instances from Microsoft’s South Central US (San Antonio, TX) data center. This report now contains more than two full years of uptime data.
Here’s the summary report from Pingdom for July 2013:


• Joe Giardino, Serdar Ozler, Jean Ghanem and Marcus Swenson of the Windows Azure Storage Team described a fix for .NET Clients encountering Port Exhaustion after installing KB2750149 or KB2805227 on 8/7/2013:
A recent update for .NET 4.5 introduced a regression to HttpWebRequest that may affect high scale applications. This blog post will cover the details of this change, how it impacts clients, and mitigations clients may take to avoid this issue altogether.
What is the effect?
Client would observe long latencies for their Blob, Queue, and Table Storage requests and may find either that that their requests to storage are dispatched after a delay or it is not dispatching requests to storage and instead see System.Net.WebException being thrown from their application when trying to access storage. The details about the exception is explained below. Running a netstat as described in the next section would show that the process has consumed many ports causing port exhaustion.
Who is affected?
Any client that is accessing Windows Azure Storage from a .NET platform with KB2750149 or KB2805227 installed that does not consume the entire response stream will be affected. This includes clients that are accessing the REST API directly via HttpWebRequest and HttpClient, the Storage Client for Windows RT, as well as the .NET Storage Client Library (2.0.6.0 and below provided via NuGet, GitHub, and the SDK). You can read more about the specifics of this update here.
In many cases the Storage Client Libraries do not expect a body to be returned from the server based on the REST API and subsequently do not attempt to read the response stream. Under previous behavior this “empty” response consisting of a single 0 length chunk would have been automatically consumed by the .NET networking layer allowing the socket to be reused. To address this change proactively we have added a fix to the .NET Client library in version 2.0.6.1 to explicitly drain the response stream.
A client can use the netstat utility to check for processes that are holding many ports open in the TIME_WAIT or ESTABLISHED states by issuing a nestat –a –o ( The –a will show all connections, and the -o option will display the owner process ID).
Running this command on an affected machine shows the following:
You can see above that a single process with ID 3024 is holding numerous connections open to the server.
Description
Users installing the recent update (KB2750149 or KB2805227) will observe slightly different behavior when leveraging the HttpWebRequest to communicate with a server that returns a chunked encoded response. (For more on Chunked encoded data see here).
When a server responds to an HTTP request with a chunked encoded response the client may be unaware of the entire length of the body, and therefore will read the body in a series of chunks from the response stream. The response stream is terminated when the server sends a zero length “chunk” followed by a CRLF sequence (see the article above for more details). When the server responds with an empty body this entire payload will consists of a single zero-length chunk to terminate the stream.
Prior to this update the default behavior of the HttpWebRequest was to attempt to “drain” the response stream whenever the users closes the HttpWebResponse. If the request can successfully read the rest of the response then the socket may be reused by another request in the application and is subsequently returned back to the shared pool. However, if a request still contains unread data then the underlying socket will remain open for some period of time before being explicitly disposed. This behavior will not allow the socket to be reused by the shared pool causing additional performance degradation as each request will be required to establish a new socket connection with the service.
Client Observed Behavior
In some cases older versions of the Storage Client Library will not retrieve the response stream from the HttpWebRequest (i.e. PUT operations), and therefore will not drain it, even though data is not sent by the server. Clients with KB2750149 or KB2805227 installed that leverage these libraries may begin to encounter TCP/IP port exhaustion. When TCP/IP port exhaustion does occur a client will encounter the following Web and Socket Exceptions:
- or -
System.Net.WebException: Unable to connect to the remote server
System.Net.Sockets.SocketException: Only one usage of each socket address (protocol/network address/port) is normally permitted.Note, if you are accessing storage via the Storage Client library these exceptions will be wrapped in a StorageException:
Microsoft.WindowsAzure.Storage.StorageException: Unable to connect to the remote server
System.Net.WebException: Unable to connect to the remote server
System.Net.Sockets.SocketException: Only one usage of each socket address (protocol/network address/port) is normally permittedMitigation
We have been working with the .NET team to address this issue. A permanent fix is now available which reinstates this read ahead semantic in a time bounded manner.
Install KB2846046 or .NET 4.5.1 Preview
Please consider installing the hotfix (KB2846046) from the .NET team to resolve this issue. However, please note that you need to contact Microsoft Customer Support Services to obtain the hotfix. For more information, please visit the corresponding KB article.
You can also install .NET 4.5.1 Preview that already contains this fix.
Upgrade to latest version of the Storage Client (2.0.6.1)
An update was made for the 2.0.6.1 (NuGet, GitHub) version of the Storage Client library to address this issue. If possible please upgrade your application to use the latest assembly.
Uninstall KB2750149 and KB2805227
We also recognize that some clients may be running applications that still utilize the 1.7 version of the storage client and may not be able to easily upgrade to the latest version without additional effort or install the hotfix. For such users, consider uninstalling the updates until the .NET team releases a publicly available fix for this issue. We will update this blog, once such fix is available.
Another alternative is to pin Guest OS for your Windows Azure cloud services as this prevents getting updates. This involves explicitly setting your OS to a version released before 2013.
More information on managing Guest OS updates can be found at Update the Windows Azure Guest OS from the Management Portal.
Update applications that leverage the REST API directly to explicitly drain the response stream
Any client application that directly references the Windows Azure REST API can be updated to explicitly retrieve the response stream from the HttpWebRequest via [Begin/End]GetResponseStream() and drain it manually i.e. by calling the Read or BeginRead methods until end of stream
Summary
We apologize for any inconvenience this may have caused. Please feel free to leave questions or comments below,
Joe Giardino, Serdar Ozler, Jean Ghanem, and Marcus Swenson
Resources
- Windows Azure Storage Client library 2.0.6.1 (NuGet, GitHub)
- Original KB article #1: http://support.microsoft.com/kb/2750149
- Original KB article #2: http://support.microsoft.com/kb/2805227
- Hotfix KB article: http://support.microsoft.com/kb/2846046
- .NET 4.5.1 Preview: http://go.microsoft.com/fwlink/?LinkId=309499


<Return to section navigation list>
Windows Azure SQL Database, Federations and Reporting, Mobile Services
‡ Rich Edmonds reported Microsoft's Windows Phone App Studio beta saw 30,000 projects created in just 48 hours in an 8/11/2013 post to the Windows Phone Central blog:
Microsoft launched its new online tool for new Windows Phone developers earlier this week, enabling those with app ideas to easily create and deploy working concepts. If you're a novice at app development, or simply reside in emerging markets and don't have an endless supply of funding, the Windows Phone App Studio beta is a simple solution that helps you get cracking without any obstacles. It's time to turn that app idea into reality.

‡ Matteo Pagani (@qmatteoq) posted App Studio: let’s create our first application! on 8/9/2013:
In the previous post I’ve introduced App Studio, a new tool from Microsoft to easily create Windows Phone applications. You’ll be able to define the application’s content with a series of wizards and, in the end, to deploy your application on the phone or to download the full Visual Studio project, so that you can keep working with it and add features that are not supported by the web tool. Right now access to the tool, due to the big success that caused some troubles in the past days, can be accessed only with an invite code. If you’re really interested in trying it, send me a mail using the contact form and I’ll send you an invite code. First come, first served!
Let’s see in details how to use it and how to create our first app. We’re going to create a sample comic tracker app, that we can use to keep track of our comics collection (I’m a comics fan, so I think it’s a good starting point). In these first posts we’ll see how to create the application just using the web tool: then, we’ll extend it using Visual Studio, to provide content editing features (like adding, deleting or editing a comic), since actually the web tool doesn’t support this scenario.
Let’s start!
Empty project or template?
The first thing to do is to connect to http://apps.windowsstore.com and sign in with your Microsoft Account: then you’ll have the chance to create an application from scratch or to use one of the available templates. Templates are simply a collection of already pre populated items, like pages, menus and sections. We’re going to create an empty app, so that we can better familiarize with the available options. So, choose Create an empty app and let’s start!
Step 1: App Information
The first step is about the basic apps information, which are the title, the description and the logo (which is a 160×160 PNG image). While you fill the required information, the phone image on the right will be updated live to reflect the changes.
There isn’t too much to see in the preview, since we’ve just defined the basic information. Let’s move on the second step, when we’ll start to see some interesting stuff.
Configure App Content
In this section we’re going to define the content of our application and it’s, without any doubt, the most important one. Here is how the wizard looks like for an empty app:
The app content is based on two key concepts, which are strongly connected: data sources and sections. Data sources are, as the name says, the “containers” of the data that we’re going to display in the application. There are 4 different data sources’ types:
- Collection is a static or dynamic collection of items (we’ll see later how to define it).
- RSS is a dynamic collection of items, populated by a RSS feed.
- YouTube is a collection of YouTube videos.
- Html isn’t a real collection, but just a space that you can fill with HTML content, like formatted text.
Each data source is connected to a section, which is the page (or the pages) that will display the data taken from the source: it can be made by a single page (for example, if it’s a Html data source) or more pages (for example, if it’s a collection or RSS data source that has a main page, with the list of items, and a detail page).
As suggested by the Windows Phone guidelines, the main page of the application is a Panorama that can have up to 6 sections: each section added in this view will be treated like a separated PanoramaItem in the XAML. This means that you’ll be able to jump from one section to another simply by swiping on the left or on the right.
If you want to add more than 6 sections, you can choose to add a Menu, which is a special section that simply displays a list of link: every link can be a web link (to redirect the user to a web page) or a section link, which redirects the user to a new section. The setup process that I’m going to describe it’s exactly the same in both case: the only difference is that, if the section is placed at the main level, it will be displayed directly in the panorama; if it’s inserted using a menu, it will be placed in another page of the application.
Let’s see how to define a section: you can add it by clicking on the “+” button near the Application Sections header. Here is the view that is displayed when you create a new section.:
You can give a name to the section and choose which is the data source’s type that will be connected: once you’ve made your choice, you simply have to give to the source a name and press the Save changes button. In this sample, we’re going to create a data source to store our comics, which is a Collection data source.
Here is how a typical data source looks like: the tool has already added for us two pages; a master one, which will be included in the Panorama and will display the list of items; a detail one, which is a different page that will be displayed when the user taps on an item to see the details.
To see how you can customize a data source, click on the ComicsCollection we’ve just created: you’ll see a visual editor that that can be used to define your data source. A collection data source is just a table: data will be automatically pulled and displayed in the application. By default, a collection data source already contains some fields, like Title, Subtitle, Image and Description. You can customize them by clicking the Edit columns button (it’s important to define the fields as first step, since you can’t change them after you’ve inserted some items).
The editor is simple to use:
- You can add new columns, by clicking the Add new column button.
- You can delete a column, by clicking the Bin icon near avery field.
- You can reorder columns, by dragging them using the first icon in the table.
You’ll be able to create fields to store images, texts or numbers. After you’ve set your collection’s fields, you can use the available editor to start adding data; a nice feature is that you can choose if your collection is static or dynamic. Static means that the application will contain just the data that you’ve inserted in the editor: the only way to add new data will be to create an application update and submit it to the store. Dynamic, instead, means that the data inserted in your collection will be available through an Internet service: you’ll be able to add new data by simply inserting new items in the collection’s editor. The application will automatically download (like if it’s a RSS feed) and display them.
Once you’ve defined your data source, it’s time to customize the user interface and define how to display the data. As we’ve seen, the tool has automatically created two pages for us: the list and the detail page. However, we can customize them by clicking on the desired page in the editor:
In this editor you can customize the title, the layout (there are many available layouts for different purposes, for example you can choose to create an image gallery) and the content. The content editor will change, according to the layout you’ve selected: in the previous sample, we have chosen to use a list layout, so we can set which data to display as title, subtitle and image. If we would have chose an image gallery layout, we would have been able just to set the image field.
The data to display can be picked from the data source we’ve defined: by clicking on the icon near the textbox, we can choose which of the collection’s fields we want to connect to the layout. In the sample, we connect the Title to the comic’s title, the Subtitle to the comic’s author and the Image to the comic’s cover. We can update the preview in the simulator by clicking the Preview icon: items will be automatically pulled from the data source.
The detail page editor is similar: the only difference is that the available layouts will be different, since they are specific for detail pages. Plus, you’ll have access to a section called Extras, which you can use to enable Text To Speech features (the application will read the content of the specified field) and Pin To Start (so that the user can create a shorcut in the home screen to directly access to the detail’s page).
Configure App Style
This section is used to configure all the visual features of the applications: colors, images, tiles, etc. The section is split into three tabs: style, tiles and splash & lock.
Style
The Style section can be used to customize the application’s colors: you can choose between a predefined list or by picking a customized one, by specifying the hexadecimal value.
You can customize:
- The accent brush, which is the color used for the main texts, like the application’s title.
- The background brush, which is the background color of all the pages. You can choose also to use an image, which can be uploaded from your computer.
- The foreground brush, which is the color used for all the texts in the application.
- The Application bar brush, which is the color of the application bar.
Tiles
In this section you’ll be able to customize the tile and to choose one of the standard tile templates: flip, cycle and iconic. Cycle will be available only if you use a static collection data source, since the generated application is not able to pull images from remote and to use them to update the tile.
According to the template, you’ll be able to edit the proper information: by default, the tile will use, as background image, the application’s icon you’ve uploaded in the first step, but you’re free to change it with a new image stored on your computer. On the right the tool will display a live preview of how the tile looks like.
Splash & lock
This last section can be used to customize the splash screen and the lock screen. The generated application, in fact, is able to set an image as lock screen, using the new APIs added in Windows Phone 8. In both cases you can choose between a list of available images or upload your custom one from your hard disk.
Summary
We’re at the end of the process! The summary page will show you a recap of the application: the name, the icon and the number of sections, pages and data sources we’ve added.
To complete the wizard you need to click the Generate button: the code generation process will start and will complete within minutes. You’ll get a mail when the process is finished: one of the cool App Studio features is that you’ll be able to install the created application on your phone even if it’s not unlocked and without having to copy the XAP file using the Application Deployment tool that is included in the SDK. This is made possible by using an enterprise certificate, that will allow you to simply download the XAP using the browser and to install it. This is why the e-mail you’ve received is important: it contains both the links to the certificate (that you’ll have to install first) and to the application. Installing the certificate it’s easy: just tap on the link on your phone; Windows Phone will open Internet Explorer and download the certificate, then it will prompt you if you want to add a Company account for Microsoft Corporation . Just choose “Yes” and you’re done: now you can go back to the portal, where you’ll find a QR Code that points to the application’s XAP. Just decode it using the native Bing Vision feature (press the Search hardware button, tap on the Eye icon and point the phone’s camera towards the QR code): again, Windows Phone will open Internet Explorer, download the XAP file and it will prompt you if you want to install the company app. Just tap Yes and, after a few seconds, you’ll find your app in the applications list.
The tool will provide you also two other options:
- Download source code will generate the Visual Studio project, so that you can manually add new features to the application that are not supported by the tool.
- Download publish package will generate the XAP file required if you want to publish the application on the Store.
Have fun!
Now it’s your turn to start doing experiments with the tool: try to add new sections, new pages or to use one of the already existing templates. Anytime, you’ll be able to resume your work from the Dashboard section of the website: it will list all the applications you’ve created and you’ll be able to edit or download them.
In the next posts, we’ll take a look at the code generated by the tool and how we can leverage it to add new features.


See Matteo’s initial App Studio review below.
‡ Robert Green (@rogreen_ms) produced a 00:15:00 Azure Mobile Services Tools in Visual Studio 2013 video clip for Channel9 on 7/24/2013 (missed when published):
In this show, Robert is joined by Merwan Hade, who demonstrates how easy it is to add Azure Mobile Services that use push notifications to a Windows Store app built using Visual Studio 2013. Rather than having to switch back and forth from Visual Studio to the Azure portal Web site, you can do everything from inside Visual Studio. This saves time and should make anyone using Mobile Services very happy.

• Matteo Pagani (@qmatteoq) provided a third-party review of App Studio: a new tool by Microsoft for Windows Phone developers on 8/7/2013:
Yesterday Microsoft revealed a new tool for all Windows Phone developers, called App Studio. It’s a [beta version of a] web application, that can be used to create a new Windows Phone application starting from scratch: by using a visual editor, you’ll be able to define all the visual aspects of your applications, live tiles, images, logos, etc.
Plus, you’ll be easily able to create pages and menus and to display collections, which are a series of items that can be static, or taken from an Internet resource (an RSS feed, a YouTube video, etc.). You can add also some special features, like Pin To Start (to pin a detail page to the start screen) or Text To Speech (to read a page’s content to the user). It’s the perfect starting point if you easily want to create a company app, or a website companion app and you don’t have too much time to spend on it.
After the editing process, you’ll be able to test your application directly on the phone: by using an enterprise certificate (that you’ll need to install), you’ll be able to install the generate XAP directly from the website, even if your phone is not developer unlocked.
I know what you’re thinking: “I’m an experienced Windows Phone developer, I don’t care about a tool for newbies”. Well, App Studio may reserve many surprises: other than simply generating the app, it creates also the Visual Studio project with the full source code, which is based on the MVVM pattern. It’s the perfect starting point if you want to develop a simple app and then leverage it by adding new features; or if you need fast prototyping, to show an idea to a potential customer.
The website where to start is http://apps.windowsstore.com. [Click the Start Building button.] After you’ve logged in with your Microsoft Account, you’ll be able to create an empty application or to use one of the available templates (which already contain a series of pages and menus for some common scenarios, like a company app, a hobby app or a sporting app). Anyway, you’ll be able to edit every existing item and to fully customize the template. …

")
Note: You’ll need an invitation code, which you can obtain from studio@microsoft.com, to create an app. I requested one and the responder said I can expect a response within the next 24 hours.
In the next posts we’ll cover the App Studio basics: how to create an application, how to customize it, how to deploy it. We’ll also see, in another series of posts, how to customize the generated Visual Studio project, to add new features to the application.
With the App Studio release Microsoft has also introduced a great news for developers: now you’ll be able to unlock a Windows Phone device even without a paid developer account. The difference is that you’ll be limited to unlock just 1 phone and to side load up to 2 apps, while regular developers will continue to be able to unlock up to 3 phones and to side load up to 10 apps.
I’m anxious to find a connection between App Studio and Windows Azure Mobile Services (WAMS.) You’ll be the first to know if one exists.
• Nick Harris (@cloudnick) posted TechEd North America 2013 sessions about Windows Azure Mobile Services on 8/6/2013:
Yep its been a couple really busy months of events. TechEd, /BUILD and ImagineCup. Thanks for coming to my TechEd North America 2013 sessions back in June. If you missed the sessions below you can find the respective Channel 9 videos and slide decks if you feel like presenting to your local user group.
Developing Connected Windows Store Apps with Windows Azure Mobile Service: Overview (200)
Join us for a demo-packed introduction to how Windows Azure Mobile Services can bring your Windows Store and Windows Phone 8 apps to life. We look at Mobile Services end-to-end and how easy it is to add authentication, secure structured storage, and send push notifications to update live tiles. We also cover adding some business logic to CRUD operations through scripts as well as running scripts on a schedule. Learn how to point your Windows Phone 8 and Windows Store apps to the same Mobile Service in order to deliver a consistent experience across devices.
Watch directly on Channel9 here and get the Slides here
Build Real-World Modern Apps with Windows Azure Mobile Services on Windows Store, Windows Phone or Android (300)
Join me for and in-depth walkthrough of everything you need to know to build an engaging and dynamic app with Mobile Services. See how to work with geospatial data, multiple auth providers (including third party providers using Auth0), periodic push notifications and your favorite APIs through scripts. We’ll begin with a Windows Store app then point Windows Phone and Android apps to the same Mobile Service in order to ensure a consistent experience across devices. We’ll finish up with versioning APIs.
Watch directly on Channel9 here and get the Slides here
Ping me on twitter @cloudnick if you have questions


I’ve pinged Nick with a request for post on integrating WAMS with App Studio.
• Nick Harris (@cloudnick) explained How to handle WNS Response codes and Expired Channels in your Windows Azure Mobile Service on 8/6/2013:
When implementing push notification solutions for your Windows Store apps many people will implement the basic flow you typically see in a demo then consider their implementation as job done. While this works well in demos and apps that are running at a small scale with few users those that are successful will likely want to optimize their solution to be more efficient to reduce compute and storage costs. While this post is not a complete guide I am providing it to at least give you enough information to get you thinking about the right things.
A few quick up front questions you should ask yourself are:
Is push appropriate? Should I be using Local, Scheduled or Periodic notifications instead?
- Do I need updates at a more granular frequency then every 30 minutes?
- Am I sending notifications that are personalized for each recipient or am I sending a broadcast style notification with the same content to a group of users?
A typical implementation
If you figured out push is the right choice and implemented the basic flow it will normally look something like this:
- Requesting a channel
using Windows.Networking.PushNotifications; … var channel = await PushNotificationChannelManager.CreatePushNotificationChannelForApplicationAsync();- Registering that channel with your cloud service
var token = Windows.System.Profile.HardwareIdentification.GetPackageSpecificToken(null); string installationId = Windows.Security.Cryptography.CryptographicBuffer.EncodeToBase64String(token.Id); var ch = new JObject(); ch.Add("channelUri", channel.Uri); ch.Add("installationId", installationId); try { await App.pushdemoClient.GetTable("channels").InsertAsync(ch); } catch (Exception exception) { HandleInsertChannelException(exception); }- Authenticate against WNS and sending a push notification
//Note: Mobile Services handles your Auth against WNS for your, all you have to do is configure your Store app and the portal WNS credentials.

function SendPush() {
    var channelTable = tables.getTable('channels');
    channelTable.read({
        success: function (channels) {
            channels.forEach(function (channel) {
                push.wns.sendTileWideText03(channel.uri, {
                    text1: 'hello W8 world: ' + new Date().toString()
                });
            });
        }
    });
}
And for most people this is about as far as the push implementation goes. What many are not aware of is that WNS actually provides two useful pieces of information that you can use to make your push implementation more efficient – a Channel Expiry time and a WNS response that includes both notification status codes and device status codes using this information you can make your solution more efficient. Let’s take a look at the first one
Handling Expired Channels
When you request a channel from WNS it will return to you both a channel and an expiry time, typically 30 days from your request. Consider that your app over time is popular but you do have users that over time end up deciding either to not use your app for extended periods or delete it all together. Over time these channels will hit their expiry date and will no longer be of any use and there is no need to a) send notifications to these channels and b) keep these channels in your datastore. Let’s have a look at a simple implementation that will cleanup your expired channels.
Using a Scheduled Job in Mobile Services we can perform a simple clean of your channels but first we must send the Expiry to your Mobile Service. To do this you must update step 2 of the above implementation to pass up the channel expiry as a property in your JObject – you will find the channel expiration in the channel.ExpirationTime property. For my channel table I have called this Expiry.
Following that once you have created your scheduled push job at say an interval of X (I am using 15 minutes) you can then add a function that deletes the expired channels similar to the following
function cleanChannels() {
    var sql = "DELETE FROM channels WHERE Expiry < GetDate()";
    mssql.query(sql, {
        success: function (results) {
            console.log('deleting expired channels:', results)
        },
        error: function (error) {
            console.log(error);
        }
    });
}
As you can see there is no real magic here and you probably want to handle UTC dates – but in short it demonstrates the concept that the expired channels are not useful for sending notifications so delete them, flag them as deleted or anything else that keeps them out of the valid set that you will push to… moving on
Handling the WNS response codes
When you send a notification to a channel via WNS, WNS will send a response. Within this response are many useful response headers. Today i’ll just focus on X-WNS-NotificationStatus but it’s worth noting that you should also consider X-WNS-DeviceConnectionStatus – more details here
Let’s look at a typical response:
{
headers:
{ ‘x-wns-notificationstatus’: ‘received’,
‘x-wns-msg-id’: ’707E20A6167E338B’,
‘x-wns-debug-trace’: ‘BN1WNS1011532′ },
statusCode: 200,
channel: ‘https://bn1.notify.windows.com/?token=AgYAAACghhaYbZa4sqjJ23pWp3kGDcEOEb3JxxdeBahCINn15fc11TiG0mlTpR5heYQmEaQrgZc3TSSwoUllW9s4Lsn3eyvSn19DcrX%2bOvSOY4Bq%2bPKGWbdy3mjTmaRi2Yb1dIM%3d’
}Of interest in this response is X-WNS-NotificationStatus which can be one of three different states:
- received
- dropped
- channelthrottled
As you can probably guess if you are sending notifications when you are either throttled or dropped it is probably not a good use of your compute power and as such you should really handle channels that are not returning received status in a fitting way. Consider the following when the scheduled job runs delete any expired channels and send notifications to channels in (the status of received) OR (that are not in the status of received AND that last had a push sent over an hour ago). This can be easily achieved by tracking the X-WNS-NotificationStatus every time a notification is sent. Code follows:
function SendPush() {
    cleanChannels();
    doPush();
}

function cleanChannels() {
    var sql = "DELETE FROM channel WHERE Expiry < GetDate()";

    mssql.query(sql, {
        success: function (results) {
            console.log('deleting expired channels:', results)
        },
        error: function (error) {
            console.log(error);
        }
    });
}

function doPush() {
    //send only to received channels OR channels that are not in the state of received that last had a push sent over an hour ago
    var sql = "SELECT * FROM channel WHERE notificationStatus IS NULL OR notificationStatus = 'received'
                    OR ( notificationStatus <> 'received'
                           AND CAST(GetDate() - lastSend AS float) * 24 >= 1) ";

    mssql.query(sql, {
        success: function (channels) {
            channels.forEach(function (channel) {

                push.wns.sendTileWideText03(channel.uri, {
                    text1: 'hello W8 world: ' + new Date().toString()
                }, {
                    success: function (response) {
                        handleWnsResponse(response, channel);
                    },
                    error: function (error) {
                        console.log(error);
                    }
                });
            });
        }
    });
}

// keep track of the last know X-WNS-NotificationStatus status for a channel
function handleWnsResponse(response, channel) {
    console.log(response);

    var channelTable = tables.getTable('channel');

    // http://msdn.microsoft.com/en-us/library/windows/apps/hh465435.aspx
    channel.notificationStatus = response.headers['x-wns-notificationstatus'];
    channel.lastSend = new Date();

    channelTable.update(channel);
}
That’s about it I hope this post has helped you to start thinking about how to handle your Push Notification implementation beyond the basic 101 demo push implementation


Emilio Salvador Prieto posted Everyone can build an app – introducing Windows Phone App Studio beta to the Windows Phone Developer Blog on 8/6/2013:
Today Todd Brix outlined several new programs to make it easier for more developers to get started with the Windows Phone platform. In this post, I’d like to tell you a bit more about one of them, Windows Phone App Studio beta. I’ll cover what it does today and how you can help determine the future direction of this new tool.
Windows Phone App Studio is about giving everyone the ability to create an app, regardless of experience. It also can radically accelerate workflow for all developers.
I continue to be impressed with the rate at which the developer community has adopted the app paradigm, but I also recognize that the app economy is still in its infancy. From a few hundred apps just a few years ago to millions of apps today, developers have imagined and built amazing app experiences that elevate the concept of a smartphone to new heights. In a way, apps are the new web. Websites began as portals for large companies, then became vital to small and local business, until ultimately we all had a piece of the web via blogs and social networks. The same is now true of apps. With the industry’s best developer tools and technologies, and a growing set of innovative features and capabilities across the Windows family, we are investing in new ways to make it even easier for everyone to quickly create innovative and relevant apps.
Windows Phone App Studio beta is a web-based app creation tool designed to help people easily bring an app idea to life by applying text, web content, images, and design concepts to a rich set of customizable templates. Windows Phone App Studio can help facilitate and accelerate the app development process for developers of all levels.
For hobbyists and first-time app designers, Windows Phone App Studio can help you generate an app in 4 simple steps. When you are satisfied with your app, Windows Phone App Studio will export a file in a form that can be submitted for publication to the Windows Phone Store so the new app can be made available to friends, family, and Windows Phone users across the globe. The app’s data feed is maintained in the cloud, so there’s no hosting or maintenance for the developer to orchestrate.
More skilled developers, on the other hand, can use the tool for rapid prototyping, and then export the code and continue working with the project in Visual Studio. Unlike other app creation tools, with Windows Phone App Studio a developer can download the source code for the app to enhance it using Visual Studio. (Emphasis added.)
The Windows Phone App Studio beta is launching with a limited number of templates, plug-ins, and capabilities, and is optimized for Windows Internet Explorer 10. We have implemented full support for Live Tiles in this first release to give developers and users the opportunity to personalize their app experiences.
What features we add next are largely up to you: Windows Phone App Studio is what you make of it. We’re exploring new content, data access modules, and capabilities, and we’re eager to learn just how you use the tool and what sort of additional training, resources, or guidance you may value.
I invite you to sign up and explore Windows Phone App Studio and more importantly, I’m looking forward to hearing your suggestions on how we could expand the service.


Haddy El-Haggan (@Hhaggan) described Windows Azure Mobile Services – CORS in a 7/30/2013 post (missed when published):
For those who have worked with the Windows Azure Mobile Services, after building a new Windows Azure Mobile Services you can download the application or connect it to the application you have already built. For each application you build using this mobile service or for any change of the application domain you will have to add its domain to the Windows Azure Cross-Origin resource sharing known as CORS. The reason you will have to do so is to allow the communication between the different applications, from different platforms with different URLs to communicate with your Windows Azure Mobile Services.
I have faced this error especially when I was developing an application on the local machine. If you have downloaded the application from the portal directly and have run it without any modification it will run smoothly without any errors, the reason it worked smoothly is that if you went to the CORS under the configuration you will find the local host added to the CORS.
If you have added a new project to your solution that you have downloaded from the portal, and just run it. You will find that it will run smoothly but won’t execute any functions that require actions from the Windows Azure Mobile Services. The reason is that your application that runs on your local machine is not using local host but an IP with 127.0.0.1 that you will have to add it manually on your Windows Azure Mobile Services only for the testing after that I think that you will have to remove it before publishing the application.


<Return to section navigation list>
Windows Azure Marketplace DataMarket, Cloud Numerics, Big Data and OData
Chris Robinson described Using the new client hooks in WCF Data Services Client in a 7/26/2013 post to the WCF Data Services Blog (missed when posted):
What are the Request and Response Pipeline configurations in WCF Data Services Client?
In WCF Data Services 5.4 we added a new pattern to allow developers to hook into the client request and response pipelines. In the server, we have long had the concept of a processing pipeline. Developers can use the processing pipeline event to tweak how the server processes requests and responses. This concept has now been added to the client (though not as an event). The feature is exposed through the
Configurationsproperty on theDataServiceContext. OnConfigurationsthere are two properties, calledResponsePipelineandRequestPipeline. TheResponsePipelinecontains configuration callbacks that influence reading to OData and materializing the results to CLR objects. TheRequestPipelinecontains configuration callbacks that influence the writing of CLR objects to the wire. Developers can then build on top of the new public API and compose higher level functionality.The explanation might be a bit abstract so let’s move look at a real world example. The code below will document how to remove a property that is unnecessary on the client or that causes materialization issues. Previously this was difficult to do, and impossible if the payload was returning the newer JSON format, but this scenario is now trivially possible with the new hooks. Below is a code snippet to remove a specific property:
This code is using the
OnEntryReadresponse configuration method to remove the property. Behind the scenes what is happening is theMicrosoft.Data.ODataReadercallsreader.Read(). As it reads though the items, depending on theODataItemtype a call will be made to the all configuration callbacks of that type that are registered. A couple notes about this code:
- Since
ODataEntry.Propertiesis anIEnumerable<ODataProperty>and not anICollection<ODataProperty>, we need to replace the entireIEnumerableinstead of just callingODataEntries.Properties.Remove().ResolveTypeis used here to use theTypeNameand get theEntityType, typically for a code generatedDataServiceContextthis method is automatically hooked up but if you are using aDataServiceContextdirectly then delegate code will need to be written.What if this scenario has to occur for other properties on the same type or properties on a different type? Let’s make some changes to make this code a bit more reusable.
Extension method for removing a property from an
ODataEntry:Extension method for removing a property from the
ODataEntryon the selected type:And now finally the code that the developer would write to invoke the method above and set the configuration up:
The original code is now broken down and is more reusable. Developers can use the
RemovePropertiesextension above to remove any property from a type that is in theODataEntrypayload. These extension methods can also be chained together.The example above shows how to use
OnEntryEnded, but there are a number of other callbacks that can be used. Here is a complete list of configuration callbacks on the response pipeline:All of the configuration callbacks above with the exception of
OnEntityMaterializedandOnMessageReaderSettingsCreateare called when theODataReaderis reading through the feed or entry. TheOnMessageReaderSettingsCreatecallback is called just prior to when theODataMessageWriteris created and before any of the other callbacks are called. TheOnEntityMaterializedis called after a new entity has been converted from the givenODataEntry. The callback allows developers to apply any fix-ups to an entity after it was converted.Now let’s move on to a sample where we use a configuration on the
RequestPipelineto skip writing a property to the wire. Below is an example of an extension method that can remove the specified properties before it is written out:As you can see we are following the same pattern as the extension method we wrote to
RemovePropertiesfor theResponsePipeline. In comparison to this extension method this function doesn’t require the type resolving func, so it’s a bit simpler. The type information is specified on theOnEntryEndingargs in theEntityproperty. Again this example only touches onODataEntryEnding. Below is the complete list of configuration callbacks that can be used:With the exception of
OnMessageWriterSettingsCreated, the other configuration callbacks are called when theODataWriteris writing information to the wire.In conclusion, the request and response pipelines offer ways to configure the how payloads are read and written to the wire. Let us know any other questions you might have to leverage this feature.
<Return to section navigation list>
Windows Azure Service Bus, BizTalk Services and Workflow
No significant articles today

<Return to section navigation list>
Windows Azure Access Control, Active Directory, Identity and Workflow
‡ Brad Anderson (@InTheCloudMSFT) posted What’s New in 2012 R2: Identity Management for Hybrid IT to the In the Cloud blog on 8/9/2013:
Part 6 of a 9-part series.
Leaders in any industry have one primary responsibility in common: Sifting through the noise to identify the right areas to focus on and invest their organization’s time, money, and people. This was especially true during our planning for the 2012 R2 wave of products; and this planning identified four key areas of investment where we focused all our resources.
These areas of focus were the consumerization of IT, the move to the cloud, the explosion of data, and new modern business applications. To enable our partners and customers to capitalize on these four areas, we developed our Cloud OS strategy, and it immediately became obvious to us that each of those focus areas relied on consistent identity management in order to operate at an enterprise level.
For example, the consumerization of IT would be impossible without the ability to verify and manage the user’s identity and devices; an organization’s move to the cloud wouldn’t be nearly as secure and dynamic without the ability to manage access and connect people to cloud-based resources based on their unique needs; the explosion of data would be useless without the ability to make sure the right data is accessible to the right people; and new cloud-based apps need to govern and manage access just like applications always have.
In the 13+ years since the original Active Directory product launched with Windows 2000, it has grown to become the default identity management and access-control solution for over 95% of organizations around the world. But, as organizations move to the cloud, their identity and access control also need to move to the cloud. As companies rely more and more on SaaS-based applications, as the range of cloud-connected devices being used to access corporate assets continue to grow, and as more hosted and public cloud capacity is used companies must expand their identity solutions to the cloud.
Simply put, hybrid identity management is foundational for enterprise computing going forward.
With this in mind, we set out to build a solution in advance of these requirements to put our customers and partners at a competitive advantage.
To build this solution, we started with our “Cloud first” design principle. To meet the needs of enterprises working in the cloud, we built a solution that took the power and proven capabilities of Active Director and combined it with the flexibility and scalability of Windows Azure. The outcome is the predictably named Windows Azure Active Directory.
By cloud optimizing Active Directory, enterprises can stretch their identity and access management to the cloud and better manage, govern, and ensure compliance throughout every corner of their organization, as well as across all their utilized resources.
This can take the form of seemingly simple processes (albeit very complex behind the scenes) like single sign-on which is a massive time and energy saver for a workforce that uses multiple devices and multiple applications per person. It can also enable the scenario where a user’s customized and personalized experience can follow them from device to device regardless of when and where they’re working. Activities like these are simply impossible without a scalable, cloud-based identity management system.
If anyone doubts how serious and enterprise-ready Windows Azure AD already is, consider these facts:
- Since we released Windows Azure AD, we've had over 265 billion authentications.
- Every two minutes Windows Azure AD services over 1,000,000 authentication requests for users and devices around the world (that’s about 9,000 requests per second).
- There are currently more than 420,000 unique domains uploaded and now represented inside of Azure Active Directory.
Windows Azure AD is battle tested, battle hardened, and many other verbs preceded by the word “battle.”
But, perhaps even more importantly, Windows Azure AD is something Microsoft has bet its own business on: Both Office 365 (the fastest growing product in Microsoft history) and Windows Intune authenticate every user and device with Windows Azure AD.
In this post, Vijay Tewari (Principle Program Manager for Windows Server & System Center), Alex Simons (Director of Program Management for Active Directory), Sam Devasahayam (Principle Program Management Lead for Windows Azure AD), and Mark Wahl (Principle Program Manager for Active Directory) take a look at one of R2’s most innovative features, Hybrid Identity Management.
As always in this series, check out the “Next Steps” at the bottom of this post for links to wide range of engineering content with deep, technical overviews of the concepts examined in this post.
Today’s hybrid IT environment dictates that customers have the ability to consume resources from on-premises infrastructure, as well as those offered by service providers and Windows Azure. Identity is a critical element that is needed to provide seamless experiences when users access these resources. The key to this is using an identity management system that enables the use of the same identities across providers.
Previously on the Active Directory blog, the Active Directory team has discussed “What’s New in Active Directory in Windows Server 2012 R2,” as well as the features which support “People-centric IT Scenarios.” These PCIT scenarios enable organizations to provide users with secure access to files on personal devices, and further control access to corporate resources on premises.
In this post, we’ll cover the investments we have made in the Active Directory family of products and services. These products dramatically simplify Hybrid IT and enable organizations to have a consistent management of services using the same identities for both on-premises and the cloud.
Windows Server Active Directory
First, let’s start with some background.
Today, Active Directory in Windows Server (Windows Server AD) is widely adopted across organizations worldwide, and it provides the common identity fabric across users, devices and their applications. This enables seamless access for end users – whether they are accessing a file server from their domain joined computer, or accessing email or documents on a SharePoint server. It also allows IT to set access policies on resources, and is the foundation for Exchange and many other enterprise critical capabilities.
Windows Server Active Directory on Windows Azure Virtual Machines
Today’s Hybrid IT world is focused on driving efficiencies in infrastructure services. As a result we see organizations move more application workloads to a virtualized environment. Windows Azure provides infrastructure services to spin up new Windows Server machines within minutes and make adjustments as usage needs change. Windows Azure also enables you to extend your enterprise network with Windows Azure Virtual Network. With this, when applications that rely on Windows Server AD need to be brought into the cloud, it is possible to locate additional domain controllers on Windows Azure Virtual Network to reduce network lag, improve redundancy, and provide domain services to virtualized workloads.
One scenario that has already been delivered (starting with Windows Server 2012) is enabling Windows Server 2012’s Active Directory Domain Services role to be run within a virtual machine on Windows Azure.
You can evaluate this scenario via this tutorial and create a new Active Directory forest in servers hosted on Windows Azure Virtual Machines. You can also review these guidelines for deploying Windows Server AD on Windows Azure Virtual Machines.
Windows Azure Active Directory
We have also been building a new set of features into Windows Azure itself – Windows Azure Active Directory. Windows Azure Active Directory (Windows Azure AD) is your organization’s cloud directory. This means that you can decide who your users are, what information to keep in the cloud, who can use or manage that information, and what applications or services are allowed to access it.
Windows Azure AD is implemented as a cloud-scale service in Microsoft data centers around the world, and it has been exhaustively architected to meet the needs of modern cloud-based applications. It provides directory, identity management, and access control capabilities for cloud applications.
Managing access to applications is a key scenario, so both single tenant and multi-tenant SaaS apps are first class citizens in the directory. Applications can be easily registered in your Windows Azure AD directory and granted access rights to use your organization’s identities. If you are a developer for a cloud ISV, you can register a multi-tenant SaaS app you've created in your Windows Azure AD directory and easily make it available for use by any other organization with a Windows Azure AD directory. We provide REST services and SDKs in many languages to make Windows Azure AD integration easy for you to enable your applications to use organizational identities.
This model powers the common identity of users across Windows Azure, Microsoft Office 365, Dynamics CRM Online, Windows Intune, and third party cloud services (see diagram below).
Relationship between Windows Server AD and Windows Azure AD
For those of you who already have a Windows Server AD deployment, you are probably wondering “What does Windows Azure AD provide?” and “How do I integrate with my own AD environment?” The answer is simple: Windows Azure AD complements and integrates with your existing Windows Server AD.
Windows Azure AD complements Windows Server AD for authentication and access control in cloud-hosted applications. Organizations which have Windows Server Active Directory in their data centers can connect their domains with their Windows Azure AD. Once the identities are in Windows Azure AD, it is easy to develop ASP.NET applications integrated with Windows Azure AD. It is also simple to provide single sign on and control access to other SaaS apps such as Box.com, Salesforce.com, Concur, Dropbox, Google Apps/Gmail. Users can also easily enable multi-factor authentication to improve security and compliance without needing to deploy or manage additional servers on-premises.
The benefit of connecting Windows Server AD to Windows Azure AD is consistency – specifically, consistent authentication for users so that they can continue with their existing credentials and will not need to perform additional authentications or remember supplementary credentials. Windows Azure AD also provides consistent identity. This means that as users are added and removed in Windows Server AD, they will automatically gain and lose access to applications backed by Windows Azure AD.
Because Windows Azure AD provides the underlying identity layer for Windows Azure, this ensures an organization can control who among their in-house developers, IT staff, and operators can access their Windows Azure Management Portal. In this scenario, these users do not need to remember a different set of credentials for Windows Azure because the same set of credentials are used across their PC, work network, and Windows Azure.
Connecting with Windows Azure Active Directory
Connecting your organization’s Windows Server AD to Windows Azure AD is a three-step process.
Step 1: Establish a Windows Azure AD tenant (if your organization doesn’t already have one).
First, your organization may already have Windows Azure AD. If you have subscribed to Office365 or Windows Intune, your users are automatically stored in Windows Azure AD and you can manage them from the Windows Azure Management Portal by signing in as your organization’s administrator and adding a Windows Azure subscription.
This video explains how to use an existing Windows Azure AD tenant with Windows Azure:
If you do not have a subscription to one of these services, you can create a new Windows Azure AD tenant by following this link to sign up for Windows Azure as an organization.
Once you sign up for Windows Azure, sign in as the new user for your tenant (e.g., “user@example.onmicrosoft.com”), and pick a Windows Azure subscription. You will then have a tenant in Windows Azure AD which you can manage.
When logged into the Windows Azure Management Portal, go to the “Active Directory” item and you will see your directory.
Step 2: Synchronize your users from Windows Server Active Directory
Next, you can bring in your users from your existing AD domains. This process is outlined in detail in the directory integration roadmap.
After clicking the “Active Directory” tab, select the directory tenant which you are managing. Then, select the “Directory Integration” option.
Once you enable integration, you can download the Windows Azure Active Directory Sync tool from the Windows Azure Management portal, which will then copy the users into Windows Azure AD and continue to keep them updated.
Step 3: Choose your authentication approach for those users
Finally, for authentication we’ve made it simple to provide consistent password-based authentication across both domains and Windows Azure AD. We do this with a new password hash sync feature.
Password hash sync is great because users can sign on to Windows Azure with the password that they already use to login to their desktop or other applications that are integrated with Windows Server AD. Also, as the Windows Azure Management portal is integrated with Windows Azure AD, it supports single sign-on with an organization’s on-premises Windows Server AD.
If you wish to enable users to automatically obtain access to Windows Azure without needing to sign in again, you can use Active Directory Federation Services (AD FS) to federate the sign-on process between Windows Server Active Directory and Windows Azure AD.
In Windows Server 2012 R2, we’ve made series of improvements to AD FS to support Hybrid IT.
We blogged about it recently in the context of People Centric IT in this post, but the same concepts of risk management apply to any resource that is protected by Windows Azure AD. AD FS in Windows Server 2012 R2 includes deployment enhancements that enable customers to reduce their infrastructure footprint by deploying AD FS on domain controllers, and it supports more geo load-balanced configurations.
AD FS includes additional pre-requisite checking, it permits group-managed service accounts to reduce downtime, and it offers enhanced sign-in experiences that provide a seamless experience for users accessing Windows Azure AD based services.
AD FS also implements new protocols (such as OAuth) that deliver consistent development interfaces for building applications that integrate with Windows Server AD and with Windows Azure AD. This makes it easy to deploy an application on-premises or on Windows Azure.
For organizations that have deployed third-party federation already, Shibboleth and other third-party identity providers are also supported by Windows Azure AD for federation to enable single sign-on for Windows Azure users.
Once your organization has a Windows Azure AD tenant, by following those steps your organization’s users will be able to seamlessly interact in the Windows Azure management, as well as in other Microsoft and third-party cloud services. And all of this can be done with the same credentials and authentication experiences which they have with their existing Windows Server Active Directory.
Summary
As IT organizations evolve to support resources that are beyond their data centers, Windows Azure AD, the Windows Server AD enhancements in Windows Server 2012, and Windows Server 2012 R2 provide seamless access to these resources.
In the coming weeks you will see more details of the Active Directory enhancements in Windows Azure and in Windows Server 2012 R2 on the Active Directory blog.
This post is just the first of three Hybrid IT posts that this “What’s New in 2012 R2” series will cover. Next week, watch for two more that cover hybrid networking and disaster recovery. If you have any questions about this topic, don’t hesitate to leave a question in the comment section below, or get in touch with me via Twitter @InTheCloudMSFT.NEXT STEPS
To learn more about the topics covered in this post, check out the following articles. You can also obtain a Windows Azure AD directory by signing up for Windows Azure as an organization.
- Using an existing Windows Azure AD Tenant with Windows Azure
The video in this blog post covers how to sign up for a Windows Azure subscription as well as how to use an organizational account to sign in to and manage Windows Azure.- Making it Simple to Connect Windows Server AD to Windows Azure AD with password Hash Sync
This blog post introduces the enhancements for you to easily synchronize users from Windows Server AD to Windows Azure AD so that users can keep their same passwords.- Easy Web App Integration with Windows Azure Active Directory, ASP.NET & Visual Studio
The ASP.NET and Web Tools for Visual Studio 2013 Preview extends the new ASP.NET project templates and tooling experience to integrate Windows Azure AD authentication and management features right at project creation time.- Application Access Enhancements for Windows Azure Active Directory
The application access enhancements preview enables you to control access to many of the Software-as-a-Service (SaaS) applications, such as Box.com, Salesforce.com, Concur, DropBox & Google Apps Gmail that your organization uses, through one simple management experience.- Windows Azure Active Authentication: Multi-Factor for Security and Compliance
The Windows Azure Active Authentication preview which enables multi-factor authentication for Windows Azure AD identities, securing access to Office 365, Windows Azure, Windows Intune, Dynamics CRM Online and many of the other applications that are integrated with Windows Azure AD. Developers can also use the Active Authentication SDK to build multi-factor authentication into their applications.


Windows Azure Virtual Machines, Virtual Networks, Web Sites, Connect, RDP and CDN
‡ My (@rogerjenn) Uptime Report for My Live Windows Azure Web Site: July 2013 = 99.37% of 8/10/2013 begins:
My Android MiniPCs and TVBoxes blog runs WordPress on WebMatrix with Super Cache on Windows Azure Web Site (WAWS) Shared Preview and ClearDB’s MySQL database (Venus plan) in Microsoft’s West U.S. (Bay Area) data center. Service Level Agreements aren’t applicable to the Web Services Preview; only sites with two or more Reserved Web Site instances qualify for the usual 99.95% uptime SLA.
Running a Shared Preview WAWS costs ~US$10/month plus MySQL charges
- Running two Reserved WAWS instances would cost ~US$150/month plus MySQL charges
I use Windows Live Writer to author posts that provide technical details of low-cost MiniPCs with HDMI outputs running Android JellyBean 4.1+, as well as Google’s new Chromecast device. The site emphases high-definition 1080p video recording and rendition.
The site commenced operation on 4/25/2013. To improve response time, I implemented WordPress Super Cache on May 15, 2013.
Here’s Pingdom’s summary report for July 2013:
The post continues with Pingdom’s graphical Uptime and Response Time reports for the same period, and concludes with this brief history table:
Month Year Uptime Downtime Outages Response Time July 2013 99.37% 04:40:00 45 2,002 ms June 2013 99.34% 04:45:00 30 2,431 ms May 2013 99.58% 03:05:00 32 2,706 ms


‡ Piyush Ranjan continued his series with SWAP space in Linux VM’s on Windows Azure – Part 2 on 8/9/2013:
This article was written by Piyush Ranjan (MSFT) from the Azure CAT team.
In a previous post, SWAP space in Linux VM’s on Windows Azure Part 1, I discussed how by default the Linux VM’s provisioned in Azure IaaS from the gallery images do not have swap space configured. The post then provided a simple set of steps with which one could configure a file based swap space on the resource disk (/mnt/resource). The key point to note, however, is that the steps described there are for a VM that has already been provisioned and is running. Ideally, one would want to have the swap space configured automatically right at the time of the VM provisioning itself, rather than having to wait for a later time and then running a bunch of commands manually.
The trick to automating the swap space configuration at the time of VM provisioning is to use the Windows Azure Linux Agent (waagent). Most people are somewhat vaguely aware that there is an agent running in the Linux VM, but most people also find it a bit too obscure and ignore it, even though the Azure portal actually has a nice documentation on waagent. See Windows Azure Linux Agent user Guide. There is one other point that needs to be mentioned before drilling down into the details of waagent and how it may be used for the task at hand. That point is that this approach works well if you have a customized Linux VM of your own and are exporting it as a reusable image for provisioning of Linux VM’s in future. There is no way of tapping into the capabilities of the waagent when using a raw base image of Linux from the Azure gallery. This is not really a limitation since the use case scenario that I find most useful is one where I start out with a VM that is provisioned using a gallery image, and is then customized for things I like to have; for example, I like to have Standard Java instead of the open-jdk Java; or I may want to install Hadoop binaries on the VM so that the image can then be used later on toward a multi-node cluster. In such a scenario, it is just as easy to configure the waagent to do a few of the additional things that I want done automatically through the provisioning process.
As discussed in the Windows Azure Linux Agent user’s guide, the agent can be configured to do many things, among which are:
- Resource disk management
- Formatting and mounting the resource disk
- Configuring swap space
The waagent is already installed in the VM provisioned from a gallery image and one needs to simply edit its configuration file located at “/etc/waagent.conf” where the configuration looks like the following:
Change the two lines shown above in the configuration file to enable swap, by setting as follows:
Set ResourceDisk.EnableSwap=y
Set ResourceDisk.SwapSizeMB=5120
The overall process, therefore, is the following:
- Provision a Linux VM in IaaS as usual using one of the images in the gallery.
- Customize the VM to your liking by installing or removing software components that you need.
- Edit the “/etc/waagent.conf” file to set the swap related lines, as shown above. Adjust the size of the swap file (the above is setting it to 5 GB).
- Capture a reusable image of the VM using instructions described here.
- Provision new Linux VM’s using the image just exported. These VM’s will have the swap space automatically enabled.
While we are on the subject of Windows Azure Linux Agent, it turns out that it provides yet another interesting capability – that of executing an arbitrary, user-specified script through the Role.StateConsumer property in the same configuration file “/etc/waagent.conf”. For example, one can create a shell script “do-cfg.sh” as follows:
Then, in the configuration file set Role.StateConsumer=/home/scripts/do-cfg.sh or whatever is the path to your script. The waagent execute the script just before sending a “Ready” signal to Azure fabric when provisioning a VM. It passes a command-line argument “Ready” to the custom script which can be tested within the script, as shown above to do some custom initialization. Likewise, the waagent executes the same script at the time of VM shutdown and passes a command-line argument “Shutdown” to the script which can be tested for and some custom cleanup task can be run in the VM.


‡ Brian Hitney described Migrating a Blog to Windows Azure Web Sites in an 8/7/2013 post:
For many years, I’ve hosted my blog on Orcsweb. I moved there about 5 years ago or so, after outgrowing webhost4life. Orcsweb is a huge supporter of the community and has offered free hosting to MVPs and MSFTies, so it seemed like a no brainer to go to a first class host at no charge. Orcs is also local (Charlotte, NC) and I know many of the great folks there. But, the time has come to move my blog to Windows Azure Web Sites (WAWS). (This switch, of course, should be transparent.)
This isn’t meant as disappointment with Orcs, but lately I’ve noticed my site throwing a lot of 503 Service Unavailable messages. Orcs was always incredibly prompt at fixing the issue (I was told the app pool was stopping for some reason), but I always felt guilty pinging support. Frankly, my blog is too important to me, so it seemed time to take responsibility for it.
WAWS allows you to host 10 sites for free, but if you want custom domain names, you need to upgrade to the shared plan at $10/mo. This is a great deal for what you get, and offers great scalability options when needed. My colleague, Andrew, recently had a great post on WebGL in IE11, and he got quite a bit of traction from that post as you can see from the green spike in his site traffic:
This is where the cloud shines: if you need multiple instances for redundancy/uptime, or simply to scale when needed, you can do it with a click of a button, or even automatically.
Migrating the blog was a piece of cake. You’ve got a couple of options with WAWS: you can either create a site from a gallery of images (like BlogEngine.net, Wordpress, et al.), as shown in red below, or simply create an empty website to which you can deploy your own code (shown in green).
Although I use BlogEngine, I already have all the code locally so instead of creating a site from the gallery, I created an empty website using Quick Create and then published the code. If you’re starting a new blog, it’s certainly faster to select a blog of your choice from the gallery and you’re up and running in a minute.
After clicking Quick Create, you just need to enter a name (your site will be *.azurewebsites.net) and a region for your app to live:
Once your site is created (this should only take a few seconds) we’ll see something like this:
Since the site I’m going to be pushing up has already been created, all I need right now is the publish profile. You can certainly publish from source control, but for the time being let’s assume we have a website in a directory we want to publish. I saved that file in a convenient place.
There are two quick ways to bring up the Publish dialog in VS, either through Build – Publish Web Site, or right click on project and select Publish Web Site.
The next step is to locate the publish profile:
Once imported, the connection details should be filled and the connection validated:
The first deploy can obviously take a little while depending on the size of the solution, and you can see what’s going on in the output window:
The website should launch automatically when done:
Easy, huh? On the configure page, we can add our custom DNS names:
For example, on my blog, I’ve got a few domains that I’ve added:
When first trying to add a domain name, you may see something like this:
What the message is saying is that before the website will respond to that domain, we need to prove that we, in fact, own the domain name. We can go about this two ways, either by creating an A record or CNAME. A CNAME is technically the most appropriate, however, it’s often insufficient because many people try browse to a root domain, such as “http://structuretoobig.com” instead of “http://www.structuretoobig.com” or “http://blog.structuretoobig.com”. In these cases, you need an A record, but that’s another topic entirely.
Here’s an example of the somedomain CNAME for my blog on my DNS registrar (this is not something you do on Windows Azure – this is to be done by your domain registrar):
Once done, you might have to wait a short while for those changes to propagate the DNS cache. (1 hour TTL is pretty low – typically you’d bump that a bit higher but when doing migrations, it’s best to keep this low so any changes you make are more immediate.)
Once done and after waiting about 2 minutes, the domain is verified in the Windows Azure DNS page:
In this case I created a CNAME over to this blog, so if we try it, here we are! How cool is that … I’m writing about what’s on the screen. Hmmm … this is kind of strange…
So what if we wanted to create something from the gallery, instead? For example, setting up a new BlogEngine site instead of downloading the code and publishing it. If we clicked on “From Gallery” when first creating our web site, we’ll see something like this:
The advantage of this approach is that it copies all of the files for you into your site. You still have total access to those files, but this is perfect for new blogs and you know you’ll have a working configuration right away. On the dashboard of the page, you’ll notice you have all the links you need to connect to your site, download a publish profile, set up source control, etc. You can also configure an FTP password.
If we open this in FileZilla, we can see it has the same directory structure as our code, as the gallery image happens to be using the same version. If we wanted to, we could pull down this code and redeploy it as necessary with any changes:
The bottom line: this post took a lot longer to write that it did for me to migrate my entire blog. It’s easy to get going, and scalable to exactly what you need. If you’re pulling in advertising or have critical uptime needs, you can have 2 or more instances for extra reliability and load capacity, or simply when needed. If you don’t need a custom DNS name, the free tier gives you some great benefits and liberal usage.
Want to get started with Azure? Here’s a link to a free trial, and of course, the free stuff remains free after the trial.


• Corey Fowler (@SyntaxC4) described Enabling Zend®Guard Extension in Windows Azure Web Sites in a 7/25/2013 post (missed when published):
Zend®Guard enables you to encode and obfuscate your code to help protect against reverse engineering. It’s understandable that someone would want to help protect their hard work by encoding it, but in order to execute this encoded source on a server it is necessary to enable an extension to decode the source prior to execution.
Getting Started with ZendGuard
Using ZendGuard is out of the scope of this article, as there is plenty of documentation around the process on the Zend Guard User Guide. If you’d like to get the quick overview, watch this video below:
Zend Guard Basics by Zend Documentation
ZendGuard Setup in Web Sites (default runtime)
In order to enable ZendGuard in Windows Azure Web Sites you will need to acquire
ZendLoader.dllfrom the ZendGuard Download page. The remaining steps we will configure php which is built into the Windows Azure Web Sites environment.Installing a Zend Extension in Windows Azure Web Sites
Now that we have the ZendLoader assembly let’s make sure that it’s loaded into the extensions list in the default php.ini file. We can do this by selecting the configure tab in your Web Site and adding an App Setting.
There are a number of reserved App Settings in Windows Azure Web Sites to configure a number of different parts of the default runtime experience, in this particular case we’re going to use
PHP_ZendExtensionsto loadZendLoader.dllinto the default PHP Runtime Zend Extension list.Ensure you download the proper ZendLoader.dll for your PHP Version.
As you can see in the image below, the an app setting is created with the key
PHP_ZendExtensionsand the valuebin\ZendLoader.dll, which is a semi-colon delimited list of relative paths in this case theZendLoader.dllwill need to be placed in abindirectory off the root of the Web Site.You can upload the DLL file via FTP, or download it directly to the bin directory in your Windows Azure Web Site by using KuduExec, which I’ll use to download the
.user.inifile later in this article.
With the assembly in the PHP pipeline, we still need to do some custom configuration to the
php.inivia the.user.inifile. I have created a.user.iniwhich captures all of the configuration settings available to ZendGuard as well as a command to turn off WinCache file caching which is required in order for ZendGuard to operate.To demonstrate another feature of Windows Azure Web Sites, let’s use KuduExec to download the
.user.inifile into our Windows Azure Web Site usingcurl.KuduExec – The Windows Azure Web Sites Command Line
First things first, in order to use KuduExec you need to have it available on your local machine. KuduExec is written in Node.js which you will need installed and configured on your machine. To download KuduExec, use the following command to install it globally on your system.
npm install kuduexec -gNow let’s look at how to connect to our command line in Windows Azure Web Sites:
kuduexec https://<deployment-user>@<dns-namespace>.scm.azurewebsites.netEnter your Deployment Password to login to the Windows Azure Web Sites command line. You can download the
.user.inifile from a Gist the followingcurlcommand:
curl -O https://gist.github.com/SyntaxC4/6084034/raw/cd8e1e27cbaa45db25f94be51968960bf71276bf/.user.iniNote
Depending on your ZendGuard configuration, you may need to change some of the
zend_loadersettings.Exit KuduExec by typing
exit.Refresh the PHP Configuration
By default, PHP is configured to refresh it’s settings from the
php.inifile every 300 seconds (5 minutes), you can force this to refresh immediately by doing a Web Site reset.You can confirm ZendGuard is configured by looking at the following sections of the phpinfo output:
Deploying your ZendGuard Encoded Application
There are many ways to upload content in Windows Azure Web Sites as described in this list of PHP Tutorials. After ZendGuard encodes the application code, the index.php file in my example looks like this:
The actual file is a simple echo of
phpinfo()
Conclusion
In this example, I demonstrated how to configure ZendGuard with the built in PHP runtime in Windows Azure Web Sites. This will allow you to run your ZendGuard Encoded and Obfuscated code in a highly scalable hosting environment. It is also possible to set up ZendGuard using the Bring Your Own Runtime functionality, which I will explain in a future blog post upon request in the comments below.


<Return to section navigation list>
Windows Azure Cloud Services, Caching, APIs, Tools and Test Harnesses
Adam Grocholski (@codel8r) posted Hot off the Cloud: Windows Azure Training Kit for August 2013 to Sys-Con Media’s Blog Feed on 8/6/2013:
Yesterday Microsoft released the Windows Azure Training Kit 2013 Refresh (I know, the name really rolls of the tongue).

In all seriousness though, this is a great resource for both developers and IT professionals who want to learn about the Windows Azure platform. The training kit includes the following:
- 50+ hands-on labs
- 25+ demos
- 30+ presentation
The August 2013 refresh includes the following new and updated content:
New Lab: Going Live with Windows Azure Web Sites
- New Lab: Automatically Scaling Web Applications on Windows Azure Web Sites
- New Lab: Creating a Windows Azure Mobile Service with a Custom API
New Lab: Introduction to Windows Azure Active Directory
- Updated: Introduction to Windows Azure Access Control
- New Exercises: Getting Started with Windows Azure Storage
- Updated: Windows Azure Service Bus Messaging
This is a great free resource for helping you get started with Azure.
Wait, what’s that you say? You think there should be something else in the kit? You’re in luck! The Windows Azure Training Kit is on GitHub. After you read the Contribution License Agreement (CLA) feel free to contribute. Happy forking!


Guarav Mantri (@gmantri) described Making Windows Azure Caching Work in Compute Emulator in an 8/7/2013 post:
Recently I was working on a project where we wanted to use In-Role Windows Azure Caching. We ran into a number of issues while making it work. In this blog post, I will share that experience.
Shorter Version (Tl;dr)
Two things you would need to keep in mind:
If the caching is not working at all, see if you’re using Windows Azure Caching package 2.1.0.0. If that’s the case, make sure you’re using Windows Azure SDK Version 2.1.
- If the caching is working intermittently, its time to update your Visual Studio to the latest version. At the time of writing of this blog, “Update 3” of Visual Studio 2012 was the most latest version.
Longer Version
Now for my (in)famous longer version of the blog post
.
Problem 1: Caching Just Won’t Work
So for our project we started implementing Windows Azure Caching. We went through the guides available on Windows Azure website and based on that built a small prototype. The code to initialize the cache was really simple:
cache = new DataCache(nameOfCache);When we ran the application, it just didn’t work. All we got was “No such host is known” error. Interestingly one of my team member had an other application which used cache and that worked flawlessly. We were completely baffled. Same piece of code worked in one cloud project but didn’t work in other. Him and an other colleague of mine looked deeply and found that the project where it worked was using Windows Azure Caching library 2.0.0.0 while the version of the library that didn’t work was using Windows Azure Caching library 2.1.0.0. We were using Windows Azure SDK version 2.0. They then looked at the package description on Nuget and found that version 2.1.0.0 will only work with SDK version 2.1.

More information about this can be found on these threads on StackOverflow:
- http://stackoverflow.com/questions/17991166/exception-while-using-windows-azure-caching-no-such-host-is-known
- http://stackoverflow.com/questions/18045279/configure-azure-shared-cache-locally-and-on-the-cloud
So we downgraded the Windows Azure Caching library to version 2.0.0.0 and our caching started working properly. So far so good!
Problem 2: Caching Worked Intermittently
This was a really ridiculous problem
iisexpress.exe Information: 0 : INFORMATION: <DistributedCache.ClientChannel.1.127.0.0.1:54346; 127.255.0.1:20004> SocketException
errorcode:10060 message System.Net.Sockets.SocketException (0x80004005): A connection attempt failed because the connected party did not properly
respond after a period of time, or established connection failed because connected host has failed to respond at System.Net.Sockets.Socket.EndReceive
(IAsyncResult asyncResult) at Microsoft.ApplicationServer.Caching.TcpSocketChannel.AsyncReceiveCallback(IAsyncResult result)
iisexpress.exe Information: 0 : INFORMATION: <DistributedCache.ClientChannel.1.127.0.0.1:54346; 127.255.0.1:20004> Aborting channel 127.0.0.1:54346; 127.255.0.1:20004. iisexpress.exe Warning: 0 : WARNING: <SimpleSendReceiveModule> DeadServerCallback Called, Server URI: [net.tcp://127.255.0.1:20004], Underlying exception -I searched all over the Internet and found that there were number of folks who were facing similar kind of problem. However none of them found a solution to the problem.
I then approached Windows Azure Caching team and they have been extremely helpful. They worked diligently with me on getting this issue resolved. We went back and forth however nothing was coming out of it. All the while the code continued to work on my colleague’s machine. This made me realize that there is something wrong with my machine. We compared both machines and found that both of us were running different versions of Visual Studio 2012 and Windows 8 operating system. Since we were not getting anywhere, I decided to repave my machine.
So I had Windows 8 Enterprise Edition and Visual Studio 2012 Premium Edition and my colleague had Windows 8 Pro and Visual Studio 2012 Ultimate. I decided to repave my machine to the same in the hope that things might work. Spent about a couple of hours and got everything installed. Ran the application, still same result. Then I realized my colleague had “Update 3” of Visual Studio 2012 applied as well which I didn’t. So I thought – what the hell, let’s try that as well.
Guess what – once I updated Visual Studio to the latest update, magically things started working. I know, I know … it’s a lame solution but hey, it worked for me. You may want to try that.
Summary
To summarize, if caching doesn’t work at all look at caching library/SDK version mismatch and if caching works intermittently, consider upgrading your Visual Studio to the latest version. Last few days have been quite frustrating and unproductive and if you’re facing similar problems, I hope that one of these solutions work for you and you don’t have to go through the same ordeal as I did.


Brian Benz (@bbenz) announced an Updated Windows Azure Plugin for Eclipse with Java – Kepler, new Windows Azure SDK, and less is more for deployment options in an 8/5/2013 post to the Interoperability @ Microsoft blob:
Microsoft Open Technologies, Inc., has released The August preview of the Windows Azure Plugin for Eclipse with Java. This release includes support for the new Windows Azure SDK v2.1 (a prerequisite), and some changes to eclipse version support and how JDKs and servers are deployed. Eclipse users may already be seeing plugin update notifications in Eclipse, so please note the Windows Azure SDK prerequisite. For full details, have a look at the documentation update.
Highlights:
Windows Azure SDK Update - This update is in sync with the new Windows Azure SDK v2.1, which is required for the update.
- Kepler support – For eclipse users working with Kepler, we now support you! Note that going forward we’re testing new plugin releases with Indigo, Juno and Kepler, so our minimum required version is now Indigo. Helios may also work, but we’re no longer testing our plugins on Helios as of this version.
- Include-in-package option JDKs and Application Server configuration is removed. Back in May we introduced the much more efficient and team-friendly option of auto-uploading the JDK and server to a blob then deploying from there. To pave the way for future enhancements, we’re replacing the option to include your JDK and app server in the deployment package to this as of this plugin release. Projects that still use the include option will automatically be converted to the deploy-from-blob option. Here’s a sample of what you’ll see in the deployment project UI now for the JDK:
And here’s what you’ll see when selecting a Web server for deployment:
Getting the Plugin
Here are the complete instructions to download and install the Windows Azure Plugin for Eclipse with Java, as well as updated documentation.
Ongoing Feedback
This update is another in our company’s ongoing work to make it easier to deploy Java applications on Windows Azure. As you might have read, last month we partnered with Azul Systems on an OpenJDK build for Windows Azure. This plugin is an important element for our customers working in heterogeneous development environments.
As always, let us know how the latest release works for you and how you like the new features! To send feedback or questions, just use MSDN Forums or Stack Overflow.


Return to section navigation list>
Windows Azure Infrastructure and DevOps
‡ David Linthicum (@DavidLinthicum) asserted “Perennial management, security, and data issues will remain key, but they will look different than they do today” in a deck for his What the cloud will look like in 3 years article for InfoWorld’s Cloud Computing blog:
Although many people are calling for a cloud revolution in which everyone simultaneously migrates their systems to the cloud, that's not going to happen. Instead, the adoption of cloud computing will be largely around the opportunistic use of this technology.
While there will be no mass migration, there will be many one-off cloud migration projects that improve the functionality of systems, as well as cloud-based depoyments of new systems. This means that cloud computing's growth will follow the same patterns of adoption we saw for the PC and the Web. We won't notice many of the changes as they occur, but the changes will indeed come.
[ From Amazon Web Services to Windows Azure, see how the elite 8 public clouds compare in the InfoWorld Test Center's review. | Stay up on the cloud with InfoWorld's Cloud Computing Report newsletter. ]
If you could jump forward three years, I believe the changes would be more obvious. Here are the key issues a time traveler from today would notice that those who live through it might not see as clearly.
1. Governance and management will be major focuses
The use of the cloud creates the need to manage hundreds, perhaps thousands of services and APIs. Enterprises will have reached the tipping point long before in terms of trying to manually manage these services. In three years, they will have cloud service/resource systems to manage the complexity.2. Security will be better and more baked in
Security will continue to be a concern three years from now, even though there will be significant strides made to improve cloud security. Large cloud providers will provide security features right in their cloud, although in many cases third-party providers will offer the best solution, including those dealing with distributed and federated identity management. "Centralized trust" will be the new buzz phrase, and hopefully the standards will be in place to allow for interoperability.3. Tiered data will be a major focus
In the tiered-data approach, some data will be on premise, such as those where performance or legal concerns require it be local. As time goes on, the data will move from the local tiers to the remote tiers due to cost issues. Most data will be in the cloud, though we'll see the emergence of private and community clouds that will house data that is semi-private and needs some control. As part of that cloud-centered storage reality, back-end public cloud-based databases will handle massive data stores with an eye to analytics use -- in the petabyte scale.I plan to be writing this blog three years from now, so let me know then if I'm right or wrong.

• Larry Dignan (@ldignan) asserted “Based on Forrester's data, Amazon Web Services (AWS) has a lead, but Windows Azure and Google's cloud isn't far behind” in a deck for his Amazon Web Services, Windows Azure top cloud dev choices, says survey article of 8/7/2013 for ZDNet’s Cloud blog:
Amazon Web Services and Microsoft's Windows Azure are the most commonly used platforms for enterprise cloud developers, according to a Forrester Research survey.
The survey covers a lot of ground. For instance, cloud developers are typically using platforms for infrastructure as a service, gravitate to operating systems like Windows 8 much faster than the public and favor open source technologies.
Here's a shot of the cloud pecking order as it stands today for enterprise software developers.
Based on Forrester's data, Amazon Web Services (AWS) has a lead, but Windows Azure and Google's cloud isn't far behind. Meanwhile, established enterprise vendors such as IBM, Oracle and HP are also players. Salesforce also has momentum, but has a majority of developers who have no plans to do anything with Force.com and Heroku. Rackspace, Red Hat and HP have similar challenges.
…
The Forrester survey also turned up a few interesting data points about cloud developers. Cloud developers were defined as those using cloud/elastic applications. The sample size for cloud developers was 125 and 572 for those not using cloud applications with 1,815 respondents overall. Among the key items:
- Application integration, mobile and internal Web applications are the three top uses for cloud environments over the last 12 months.
- HTML, JavaScript, PHP, Ruby and Python are the top languages. Custom applications that use SQL databases and application servers are also dev technologies that have been used in last 24 months.
- Enterprise cloud developers are targeting desktop PCs, laptops and browsers for their software. Smartphones and tablets are also key, but middle of the priority list.
- Open source technologies dominate for cloud developers.
- Cloud platforms are largely used for infrastructure such as compute and storage as well as relational database.
- 19 percent of cloud developers use Windows 8. 3 percent of non-cloud developers use Windows 8.
- Cloud developers generally are more aligned with the business compared to their non-cloud counterparts.
- Cloud developers spend more time coding on their own time. For instance, 7 percent of cloud developers say they average 20 hours a week programming for personal reasons compared to 3 percent non-cloud. Another 14 percent of cloud providers said they average between 11 and 20 hours a week programming on their own time compared to 3 percent non-cloud. And 33 percent of cloud developers average 5 hours to 10 hours a week programming on their own time compared to 15 percent non-cloud.
- Forty one percent of non-cloud developers say they don't program or develop on their own time (19 percent of cloud developers had that response).
- The top three developer frameworks for cloud were Microsoft Team Foundation Server, Apache Ant and IBM Build Forge.


Tyler Doerksen (@tyler_gd) posted an Azure MSDN Subscription Intro on 8/6/2013:
Over the summer the Windows Azure team has released a number of features that support Dev/Test scenarios on Azure. Features like up to the minute billing, stopping VMs without charge, MSDN licensing in Azure, and MSDN based subscriptions.
Where to start
If you have an MSDN account the best way to take advantage of the included Azure benefits is to go to your MSDN benefits page and click the “Activate Windows Azure” link.
What does an MSDN account give you? -> Azure MSDN Member Offer
Features
Billing Screen
An MSDN based Azure account has a new billing screen which will tell you how fast you are consuming your quota.
Spending Cap
Much like the 90 day free trial subscriptions MSDN accounts have a spending cap. If you ever reach the end of your monthly usage, Azure will kindly shut off all of your services.
Which means you can even create an MSDN subscription without a Credit Card!
Discounted Rates
MSDN subscribers will receive a 33% discount on VMs and 25% discount on Cloud Services, HDInsight, and Reserved Websites.
So for a Small VM which would retail $0.09/hour (~$67/month), would be discounted to $0.06/h (~ $45/month).
The Catch
As the saying goes, there is no such thing as a free lunch. The catch with an MSDN Azure subscription is that you cannot use it for production services (much like your MSDN licensing benefits). Also, hidden away in the FAQ of the benefits page, the MSDN subscription does not carry a financially backed SLA.
Even with those limitations, the Azure MSDN subscription is a great place for dev-test scenarios on Azure.
In the days following my blog will have some resources for setting up complex testing environments with Active Directory, SharePoint, or TFS. Plus some tips and tricks to get the most out of your Azure subscription.


Be sure to catch Tyler’s earlier Get the most from your Azure MSDN subscription post.
HPC in the Cloud reported Accenture Expands Ecosystem of Accenture Cloud Platform Providers on 8/1/2013:
Accenture has launched a new version of its Accenture Cloud Platform, offering new and enhanced cloud management services for public and private cloud infrastructure offerings. By expanding its ecosystem of cloud providers, Accenture can now offer an expanded service catalog allowing clients to procure the solutions they require, when and where they are required, and in a pre-packaged, standardized format, which can result in faster and lower cost deployments.
“With this next version, we’ve enhanced its capabilities as a management platform for clients to confidently source and procure capacity from an ecosystem of providers that meet the highest quality standards, as well as providing the critical connections required to seamlessly transition work to the cloud.”
The platform now supports an expanded portfolio of infrastructure service providers including, Amazon Web Services, Microsoft Windows Azure, Verizon Terremark and NTT Communications.
“With this next version, we’ve enhanced its capabilities as a management platform for clients to confidently source and procure capacity from an ecosystem of providers that meet the highest quality standards, as well as providing the critical connections required to seamlessly transition work to the cloud,” said Michael Liebow, Managing Director and global lead for Accenture Cloud Platform. “An expanded provider portfolio increases our geographic footprint helping us to better serve our clients around the world as they migrate to the cloud and fits with our blueprint for enterprise-grade cloud services.”
Providing services and solutions designed to help organizations integrate and manage hybrid cloud environments across multiple vendor platforms, the new version of the Accenture Cloud Platform offers a more flexible, service-enabled architecture based on open source components, which helps reduce deployment costs for clients while the expanding catalog of services helps to speed deployments.
The growing portfolio of top tier providers extends the geographic footprint of the Accenture Cloud Platform with new data center locations in Latin America and Asia, helping to better serve clients around the world. The platform delivers infrastructure services with the following providers:
- Amazon Web Services – Providing account enablement and expert assisted provisioning services, the Accenture Cloud Platform supports clients deploying Amazon Web Services environments in their nine regions around the world.
- Microsoft Windows Azure – Providing account enablement, the Accenture Cloud Platform supports the deployment of application development solutions on the Windows Azure platform.
- Verizon Terremark – Offering provisioning, as well as administrative and support services for Terremark’s Enterprise Cloud, a virtual private cloud solution, the platform adds datacenters around the world, extending reach into Latin America through the Verizon Terremark datacenter in Sao Paulo, Brazil.
- NTT Communications – Supporting NTT’s private and public enterprise clouds, Accenture offers provisioning, administrative and support services, as well as professional architecture guidance to help clients design and deploy their applications in the cloud. The platform gains public datacenters in Hong Kong and Tokyo, expanding locations in the Asia-Pacific region.
“The addition of Windows Azure platform and infrastructure services to the Accenture Cloud Platform simplifies adoption of cloud services and hybrid computing scenarios for our clients,” said Steven Martin, Microsoft, General Manager, Windows Azure. “It offers all the benefits of Azure – rapid provisioning and market leading price-performance – wrapped in robust solutions from Accenture.”
“We are focused on providing global customers with a secure, enterprise-ready cloud solution,” said Chris Drumgoole, senior vice president, Global Operations at Verizon Terremark. “By participating in the Accenture Cloud Platform ecosystem, our mutual clients have another avenue for acquiring cloud services worldwide.”
“The Accenture Cloud Platform offers enterprise clients total flexibility to design an ecosystem that meets their own unique technology and geography requirements,” said Kazuhiro Gomi, NTT Communications board member and CEO of NTT America. “NTT is proud to be a key infrastructure and services partner to Accenture for the global delivery of robust cloud computing business solutions.”
“We have a robust blueprint for enterprise services on the Accenture Cloud Platform that goes far beyond the typical service provider and leverages our deep capabilities,” said Liebow. ”For instance, we’ve done more than 30 conference room pilots for ERP on the platform to help our clients smoothly and quickly provision the cloud for their ERP systems.”
The Accenture Cloud Platform is a major part of Accenture’s investment of more than $400 million in cloud technologies, capabilities and training by 2015 to focus on delivering the right cloud services from its network of providers, as well as blending its own industry solutions and innovations with third party offerings.
Accenture has worked on more than 6,000 cloud computing projects for clients, including more than 60 percent of the Fortune Global 100, and has more than 7,900 professionals trained in cloud computing. Accenture is consistently recognized for its industry leadership by leading independent analyst firms and software alliance partners.
Learn more about the Accenture Cloud Platform.
About Accenture
Accenture is a global management consulting, technology services and outsourcing company, with approximately 266,000 people serving clients in more than 120 countries. Combining unparalleled experience, comprehensive capabilities across all industries and business functions, and extensive research on the world’s most successful companies, Accenture collaborates with clients to help them become high-performance businesses and governments. The company generated net revenues of US$27.9 billion for the fiscal year ended Aug. 31, 2012. Its home page is www.accenture.com.

Haishi Bai (@haishibai2010) described Hosting a Single-Tenant Application as a Multi-Tenant Application on Windows Azure (idea) on 7/30/2013:
Disclaimer: This article is just an idea. It doesn’t provide any implementation details.
To make an application effectively scalable on cloud, an application has to be multi-tenant. However, multi-tenant applications are much harder to make comparing to single-tenant applications, and adapting an existing single-tenant application for multi-tenancy is also a daunting task. In this article, I’ll introduce a possible strategy to host an existing single-tenant application as a multi-tenant application on Windows Azure. With this strategy you’ll be able to host an existing single-tenant application on Windows Azure as if it was a multi-tenant application with minimum code changes and be able to:
- Share server resources across multiple customers when possible.
- Provision/de-provision a customer quickly without affecting existing deployments.
- Improve availability by redundancy and failovers.
- Prepare for migration to multi-tenancy.
The strategy consists of three steps: abstraction, classification, and deployment. Abstraction separates application from underlying infrastructure; classification categorizes each application component into different types; and finally deployment uses different methods to deploy different types of components and organizes them as a whole manageable unit.
Abstraction
Traditional single-tenant applications rely on replicating underlying infrastructures to scale out for different customers. In such cases server resources are dedicated to respective customers, so they can’t be shared, and they have to be separately maintained for all deployed customers. To be able to fully enjoy the benefits of cloud, an application’s logical definition has to be separated from underlying infrastructure. Only when such kind of isolation is achieved, a cloud platform can provide high-availability and scalability in a generic way.
The abstraction process focuses on a single-customer deployment with granularity of servers. For instance, “a customer needs a web server, an application server and a database server” is a reasonable high-level abstraction. Then, for each identified servers, we need to decide if the component can be hosted as a standard Windows Cloud Service role , as a Windows Azure Web Site, or as a custom virtual machine. Please note that here we are not considering multi-tenancy at all. We are simply working out the deployment topology of a single customer.
Classification
After we’ve identified different server components, we put them into four different categories:
- Stateless. Stateless components follows principals of stateless design. Because each request can be handled independently from other requests, we can easily scale out such components on Windows Azure by using multiple instances.
- Local state. Local-state components have the concept of a user session. In this case, user sessions either need to be shared among instances, or certain sticky session/server affinity mechanisms need to be put in place so that requests within a session are handled by the same server.
- Global state. Global state components assume they have the global knowledge of the entire system. These kind of components are most problematic when we scale out the application. For instance, let’s assume on application server we have a centralized job dispatcher that dispatches jobs to all connected clients. When we scale out the application server two 2 instances, some clients are attached to one dispatcher and some other clients are attached to another dispatcher. Many problems may occur because of the wrong assumption made by the job dispatcher. For instance, a job might be dispatched twice; a client’s states may be scattered to two servers, causing inconsistencies and conflicts; clients might be lost when attached server crashes, etc.
- Tenant isolation. In many cases customers require their data or even running systems to be isolated. In this case the server component has to be deployed and managed individually. This classification supersedes other classification criteria.
Deployment
After classification, we can plan for server deployment. The key of this part is to use different routing mechanisms for different types:
- Request-level routing. This applies to stateless components, as well as local state components when local state can be externalized to a external storage, such as a database or a cache cluster.
- Session-level routing. This applies to local state components that requires sticky sessions or server affinity.
- Tenant-level routing. This applies to global state components as well as components that require tenant isolation.
Request-level routing is supported by Windows Azure out-of-box. You simply create multiple instances of your services to be load-balanced. In addition, you can use different session state providers to externalize session states, such as the one use Windows Azure Caching. You can also use services such as Application Request Routing to achieve sticky sessions. The real challenge resides in tenant-level routing. There’s no out-of-box services on Windows Azure yet, but we can easily list out two of the high-level requirements:
- The service shall add minimum overheads.
- The redirection decision shall be based solely on untampered, authoritative information, such as a claim in user’s security context.
Possible directions include a light-weight cloud service, a URL rewrite module, a DDNS service, etc.
As for high-availability, we can use multiple instances as backups of each other for first two routing methods. For tenant-level routing, we’ll need to set up a master-slave deployment to provide high-availability using failovers. Hence, our routing service shall provide:
- The service shall support failover based on a priority list of server instances.
What we achieve (once this is done)?
Being able to manage all related resources as a complete unit is the first important step towards multi-tenancy, which requires complete separation of services and underlying infrastructures. With this strategy we can host existing single-tenant applications on Windows Azure with minimum code changes. We’ll be able to share resources among tenants when possible, and we’ll be able to provision new customers quickly without affecting existing ones. This is a low-risk approach to migrate existing applications to Windows Azure and pave the ways for them to become real multi-tenancy, SaaS solutions.
What’s Next?
Once we abstract a single-tenant application as a “cloud solution“, we can potentially work on various of tools and utilities to support such scenarios. For instance, tenant-level routing can be a generic, independent service; Windows Azure PowerShell can be used to automate different processes such as configuration, deployment, provisioning, etc.; graphic UIs can be provided to manage and monitor cloud solutions as a logical unit… there are many possibilities here. I *INTEND* to work on these aspects to provide some PoC implementations, but I don’t have a firm schedule yet. If you’d like to help out, please let me know! @HaishiBai2010.

<Return to section navigation list>
Windows Azure Pack, Hosting, Hyper-V and Private/Hybrid Clouds
‡ Scott Densmore, Alex Homer, Masashi Narumoto, John Sharp and Hanz Zhang wrote a 367-page Building Hybrid Applications in the Cloud on Windows Azure eBook with source code for Microsoft’s patterns & practices team. From Clemens Vaster’s (@clemensv) Foreward:
The first platform-as-a-service cloud capabilities to be released by Microsoft as a technical preview were announced on May 31, 2006 in form of the “Live Labs” Relay and Security Token services (see http://blogs.msdn.com/b/labsrelay/archive/2006/05/31/612288.aspx), well ahead of the compute, storage, and networking capabilities that are the foundation of the Windows Azure platform. In the intervening years, these two services have changed names a few times and have grown significantly, both in terms of capabilities and most certainly in robustness, but the mission and course set almost six years ago for the Windows Azure Service Bus and the Windows Azure Access Control Service has remained steady: Enable Hybrid Solutions.
We strongly believe that our cloud platform – and also those that our competitors run – provides businesses with a very attractive alternative to building and operating their own datacenter capacity. We believe that the overall costs for customers are lower, and that the model binds less capital. We also believe that Microsoft can secure, run, and manage Microsoft’s server operating systems, runtime, and storage platforms better than anyone else. And we do believe that the platform we run is more than ready for key business workloads. But that’s not enough.
From the start, the Microsoft cloud platform, and especially the Service Bus and Access Control services, was built recognizing that “moving to the cloud” is a gradual process and that many workloads will, in fact, never move into the cloud. Some services are bound to a certain location or a person. If you want to print a document, the end result will have to be a physical piece of paper in someone’s hand. If you want to ring an alarm to notify a person, you had better do so on a device where that person will hear it. And other services won’t “move to the cloud” because they are subjectively or objectively “perfectly fine” in the datacenter facilities and on their owner’s existing hardware – or they won’t move because regulatory or policy constraints make that difficult, or even impossible.
However, we did, and still do, anticipate that the cloud value proposition is interesting for corporations that have both feet solidly on the ground in their own datacenters. Take the insurance business as an example. Insurance companies were some of the earliest adopters of Information Technology. It wouldn’t be entirely inaccurate to call insurance companies (and banks) “datacenters with a consumer service counter.” Because IT is at the very heart of their business operations (and has been there for decades) and because business operations fall flat on the floor when that heart stops beating, many of them run core workloads that are very mature; and these workloads run on systems that are just as
mature and have earned their trust.Walking into that environment with a cloud value proposition is going to be a fairly sobering experience for a young, enthusiastic, and energetic salesperson. Or will it be? It turns out that there are great opportunities for leveraging the undeniable flexibility of cloud environments, even if none of the core workloads are agile and need to stay put. Insurance companies spend quite a bit of energy (and money) on client acquisition, and some of them are continuously present and surround us with advertising. With the availability of cloud computing, it’s difficult to justify building up dedicated on-premises hardware capacity to run the website for a marketing campaign – if it weren’t for the nagging problem that the website also needs to deliver a rate-quote that needs to be calculated by the core backend system and, ideally, can close the deal right away.
But that nagging problem would not be a problem if the marketing solution was “hybrid” and could span cloud and the on-premises assets. Which is exactly why we’ve built what we started building six years ago.
A hybrid application is one where the marketing website scales up and runs in the cloud environment, and where the high-value, high-touch customer interactions can still securely connect and send messages to the core backend systems and run a transaction. We built Windows Azure Service Bus and the “Service Bus Connect” capabilities of BizTalk Server for just this scenario. And for scenarios involving existing workloads, we offer the capabilities of the Windows Azure Connect VPN technology.
Hybrid applications are also those where data is spread across multiple sites (for the same reasons as cited above) and is replicated and updated into and through the cloud. This is the domain of SQL Azure Data Sync. And as workloads get distributed across on-premises sites and cloud applications beyond the realms of common security boundaries, a complementary complexity becomes the management and federation of identities across these different realms. Windows Azure Access Control Service provides the solution to this complexity by enabling access to the distributed parts of the system based on a harmonized notion of identity.
This guide provides in-depth guidance on how to architect and build hybrid solutions on and with the Windows Azure technology platform. It represents the hard work of a dedicated team who collected good practice advice from the Windows Azure product teams and, even more importantly, from real-world customer projects. We all hope that you will find this guide helpful as you build your own hybrid solutions.
Thank you for using Windows Azure!
Clemens Vasters
Principal Technical Lead and Architect
Windows Azure Service Bus

• Brad Anderson (@InTheCloudMSFT) posted What’s New in 2012 R2: Service Provider & Tenant IaaS Experience to the the Microsoft Server and Cloud Platform Team (@MSCloud) blog on 8/1/2013:
Part 5 of a 9-part series. Today’s post is the 2nd of two sections; to read the first half, click here.
I recently had an opportunity to speak with a number of leaders from the former VMWare User Group (VMUG), and it was an incredibly educational experience. I say “former” because many of the VMUG user group chapters are updating their focus/charter and are renaming themselves the Virtual Technology User Group (VTUG). This change is a direct result of how they see market share and industry momentum moving to solutions like the consistent clouds developed by Microsoft.
In a recent follow up conversation with these leaders, I asked them to describe some common topics they hear discussed in their meetings. One of the leaders commented that the community is saying something really specific: “If you want to have job security and a high paying job for the next 10 years, you better be on your way to becoming an expert in the Microsoft clouds. That is where this industry is going.”
When I look at what is delivered in these R2 releases, the innovation is just staggering. This industry-leading innovation – the types of technical advances that VTUG groups are confidently betting on – is really exciting.
With this innovation in mind, in today’s post I want to discuss some of the work we are doing around the user experience for the teams creating the services that are offered, and I want to examine the experience that can be offered to the consumer of the cloud (i.e. the tenants). While we were developing R2, we spent a lot of time ensuring that we truly understood exactly who would be using our solutions. We exhaustively researched their needs, their motivations, and how various IT users and IT teams relate to each other. This process was incredibly important because these individuals and teams all have very different needs – and we were committed to supporting all of them.
The R2 wave of products have been built with this understanding. The IT teams actually building and operating a cloud(s) have very different needs than individuals who are consuming the cloud (tenants). The experience for the infrastructure teams will focus on just that – the infrastructure; the experience for the tenants will focus on the applications/ services and their seamless operation and maintenance.
In yesterday’s post we focused heavily on the innovations in these R2 releases in the infrastructure – storage, network, and compute – and, in this post, Erin Chapple, a Partner Group Program Manager in the Windows Server & System Center team, will provide an in-depth look at Service Provider and Tenant experience and innovations with Windows Server 2012 R2, System Center 2012 R2, and the new features in Windows Azure Pack.
As always in this series, check out the “Next Steps” at the bottom of this post for links to a variety of engineering content with hyper-technical overviews of the concepts examined in this post. Also, if you haven’t started your own evaluation of the 2012 R2 previews, visit the TechNet Evaluation Center and take a test drive today!
Delightful Experiences
We focus on delivering the best infrastructure possible in order to provide delightful experiences to our customers. The two work hand-in-hand: The right infrastructure enables key customer-facing scenarios, and the focus on the experience ensures that customers can get the most out of their infrastructure investments.
In this release, we focused on two core personas: the Service Provider who is responsible for deploying and operating the IaaS, and the tenant (or consumer) who consumes those services provided by the Service Provider.
Service Provider Experience
With Windows Server 2012, System Center 2012 SP1, and Windows Azure Pack v1, we established the foundation for IaaS: A self-service portal on top of resource pools. To determine which enhancements were necessary for the R2 wave, we spent time with customers (ranging from enterprises to Service Providers, to groups within Microsoft responsible for IaaS-type services) to better understand what they needed in order to deliver an end-to-end IaaS experience. Three main pieces of feedback emerged:
- A self-service experience is critical to deliver rich end-to-end IaaS.
A rich self-service experience is not only for tenant customers – it is equally important for Service administrators. With the previous release, our self-service experience allowed Service administrators to create and manage Plans, and tenant administrators could manage their subscriptions to those Plans. In the 2012 R2 release, we include new capabilities to provide a much richer experience. One new feature, is called Plan add-ons, allows the administrator to upsell value-added services to subscribers’ existing plans. Another feature is the Virtual Machine Role, which allows the administrators to create Virtual Machine templates (a tier of VMs that behave as a singleton). These templates can be deployed in a consistent manner across private, hosted, and Windows Azure public clouds. Another feature enables providers to offer their enterprise tenants the ability to extend and stretch their network to the provider-hosted clouds. These features and others combine to deliver rich IaaS capabilities in the R2 release.- Metering tenant resource usage is essential in a cloud business model.
The cloud business model requires providers to track tenant resource utilization and be able to bill or charge only for what was used by the tenant. Furthermore, the primary attraction of the cloud is its elasticity – tracking usage consumption in an elastic environment requires the providers to process large volumes of data and pivot on the correct values, to be able to successfully monetize their services. In our conversations with customers and providers, they clearly expressed the need for rich metering capability along with analytics covering that metered usage. In the 2012 R2 release, we provide two distinct capabilities in response to this feedback. To begin with, there is a REST Usage API, which provides resource utilization data at 15 minute granularity fidelity for each subscription. Providers use this API to extract utilization data and integrate the data feed with their own billing system in order to create the billing reports that are relevant for their business needs. In addition to the Usage API, we also provide Usage Reports in Excel that provide analytics and trending information. This is very useful for capacity planning based on resource consumption trends, and it allows the Service Provider to perform capacity forecasting – which is yet another core customer-driven innovation.- Reduce COGS by using automation and by leveraging existing investments.
COGS cannot be minimized by reducing CapEx costs alone. It is just as important to enable Service Administrators to maximize utilization of their existing processes and systems along with other resources (in other words, make what they have work even better), and reduce the need to have fragmented provisioning and operating process across their data centers. As we looked into how our Service Administrator customers can continue to reduce COGS and streamline their operations, the need to continue our investments in automation and integration scenarios became abundantly clear. In today’s data centers, Windows PowerShell is the framework for IT coordination of infrastructure task management. To address this directly, in 2012 R2 we have extended automation capabilities by enabling the construction of complex automation workflows, and we have ensured that all the activities inside the data center can be expressed using PowerShell constructs.These learnings helped crystallize our core customer vision for the Service Provider in the 2012 R2 release:
Enable Service Providers with a rich IaaS platform that seamlessly integrates with existing systems and processes within the datacenter and has rich self-service experiences while having the lowest COGS.
This vision defined the key scenario areas we targeted:
- Managing provider offers and tenant subscriptions
- Customizing self-service experience for tenants
- Automation for creating efficient, policy driven and consistent process for Service Providers
- Tenant resource usage, billing and analytics
Scenario 1: Managing Provider Offers and Tenant Subscriptions
Success for a Service Provider business largely hinges on the ability to attract and retain tenants. It therefore falls to the Service Provider to think about how to use service offerings to attract tenants; to consider different tactics for differentiation, as well as ongoing efforts like upselling and retention to maintain healthy tenant accounts. To help Service Providers meet these challenges, we have invested in key enhancements to the service management experience targeting these specific areas:
- Use value-based offers to attract tenants and drive new subscriptions.
- Offer differentiation and upsell to drive more consumption.
- Manage tenant accounts and subscriptions.
Use value-based offers to attract and retain tenants
Service Providers can build bundles of many different service offers, which are often called “Plans.” Plans include various services that can be assembled together in order to create subscriber-specific value offerings. Tenants then consume an offer by subscribing to a plan. In a very general sense, a cloud is nothing more to the consumer (in this case, the tenant) than a set of capabilities (services) at some capacity (quotas). When a service provider creates offers, they need to know what types of workloads customers want (which services to include) and how they will be consumed – as well as some basic intuition about the consumption habits of their tenants (how much will they need, and how fast will that change, etc.).
We designed an easy-to-use experience for creating offers, selecting the kinds of services or capabilities to include, and setting the quotas to control how much can be consumed by any single subscription. But, obviously, it goes beyond a simple set of compute, storage, and networking capabilities at some quota amount. One of the most important aspects of offer construction is the process of including library content to facilitate simplified application development. For that reason, the offer construction experience also features a way to include templates for foundational VM configurations and workloads.
Use differentiation to induce more (high-value) usage
Armed with the ability to attract tenants to the service through precise service offerings, the Service Provider now needs a way to focus on the quality of the tenant experience. This can be either for the purpose of driving margin growth (in the case of pubic hosting), or customer satisfaction initiatives (public or private), or both. To achieve this, we introduced the concept of an add-on that gives the service provider a more precise mechanism for exposing offers. Plan add-ons are usually targeted at specific plans or tenants, and they are used to drive up-sell opportunities. For example, Service Providers can create a plan add-on called “Peak Threshold Quota Expansion” that can be targeted towards subscribers who show seasonality in their consumption patterns.
Manage accounts & subscriptions
Lastly, Service Providers need a way to manage the accounts and subscriptions of their tenants. The motivations for direct management of accounts and subscriptions can vary from white-glove service, to loyalty programs, and rewards to account health/delinquency, and the need to maintain health of the shared environment for all tenants.
The features for Service Providers are high-level, but provide comprehensive capabilities to cover a variety of scenarios, including:
- Accounts: Create, suspend, delete, reset password.
- Subscriptions: Create, add/remove co-administrators, suspend, migrate, delete.
- Add-ons: Create, associate/remove, delete.
Scenario 2: Customizing Self-Service Experience for Tenants
One of the design goals of the R2 release is to provide a consistent experience for tenants across private, hosted and Windows Azure public clouds. As part of the new Web Sites and Virtual Machines service offerings in Windows Azure, we launched a modern, web standards-based, device-friendly web portal for our Windows Azure customers. The Windows Azure portal has received rave reviews and has dramatically eased the manageability of the cloud services. We heard from our customers that they would like the similar capabilities in the Windows Azure Pack portal, which allows them to change the various visual elements such as colors, fonts, images, and logos. They also wanted the portal to enable them to add new services that would help them differentiate, while staying consistent with the overall experience.
In the R2 release, the same great experience in Windows Azure is now available on Windows Server for our customers through Windows Azure Pack. This Self-Service Tenant Portal has been designed with the following capabilities.
- Customizable Service Provider portal experience
- Customer-approved branding and theming experiences
- Ability to add new services
- Ability to differentiate
While these capabilities offer a great in-the-box experience that is consistent with Windows Azure, all these capabilities are also available through an API for customers who want to build their own self-service portal. To facilitate your efforts to build and develop your own self-service portal, in September we will share the Windows Azure Pack Tenant self-service portal source code that can be leveraged as a sample. Upcoming blog posts will go into greater detail on this experience.
Customize the experience to fit the branding and theming needs of the portal
Customers would like the tenant-facing portal to reflect the brand that their business represents. Therefore, it is very essential that the portal offers the customers the ability to customize the look and feel of the portal to reflect their choice of colors, fonts, logos, and various other artifacts that represent the brand. To enable this scenario, the Windows Azure Pack Self-Service Tenant Portal has been designed from the ground up with cloud services in mind, and has been updated to allow our partners and customers to adapt it to their business needs.
Customizable Web Experience
The Self-Service Tenant Portal enables easy customization with your theme and brand, a custom login experience, and banners. The sample kit contains CSS files to easily override the default images, logos, colors, and the like.
Add-on services
As new services are introduced, the portal can light up these services easily. This capability is possible because the framework uses REST APIs and scales to a large number of services easily.
For example, the ability to provide custom domains is a very common need for service providers. The self-service framework allows the service provider to include these value-added services to the framework easily and in a format that makes them ready for their tenants to consume.
In the example seen in Figure 5 (see below), “Web Site Domains” is a new Resource Provider, providing custom domains. When configured, the portal lights up with this capability, allowing the tenants to subscribe to the offer.

Figure 5: Add-on services.Differentiation
The ability to differentiate the tenant experience is a key strategy for many service providers, and to support such scenarios the Tenant Portal source code is provided as mentioned earlier. This enables the service provider to use the Tenant Portal as a sample and to use the Service Management API’s to integrate the experience with their own portal.
Scenario 3: Automation for Creating Efficient, Policy Driven and Consistent Process for Service Providers
Running a data center is a complex operation in which many different systems and processes need to be aligned to achieve efficiencies at cloud scale. Automating key workflows, therefore, becomes an essential part of the data center operations. Automation capabilities have been part of our cloud solutions for a long time – System Center Orchestrator has enabled data center administrators to encapsulate complex tasks using runbooks for years, and it helps data center admins reap the benefits of automation with ease. With the 2012 release of System Center, there is now tighter integration between Service Manager and Orchestrator which enables the self-service scenarios powered by automation.
Our goals with automation have always been to enable our customers to drive value within their organization by:
- Integrating, extending, and optimizing existing investments
- Lowering costs and improving predictability
- Delivering flexible and reliable services
Another key area of investment within 2012 R2 is Service Management Automation, which integrates into the Windows Azure Portal and enables operations exposed through the self-service portal (and via the Service Management API) to be automated using PowerShell modules.
Integrate, extend, and optimize investments
Service Management Automation (SMA) taps into the power and popularity of Windows PowerShell. Specifically, Windows PowerShell encapsulates automation tasks while SMA builds workflows on top of it and provides a user interface for managing the workflows in the portal. This allows the co-ordination of IT-based activities (represented as PowerShell cmdlets), and it allows you to create IT processes (called runbooks) through the assembly of various PowerShell cmdlets.
In Figure 6 (see below), you can see that the Automation Service is represented in the WAP as a core resource termed “Automation.” This diagram also depicts a variety of potential integration end-points that can participate in IT-coordinated workflows as shown in the figure below.

Figure 6: Overview of Service Management Automation.Lower costs and improve predictability
Automating tasks that are manual, error prone, and often repeated lowers costs and enables providers to focus on work that adds business value. Windows PowerShell encapsulates automation tasks and SMA builds workflows on top of it, thus providing a user interface for managing the workflows in the portal. By building on top of the Windows PowerShell framework, we are enabling Service Providers to leverage their existing investments in Windows PowerShell cmdlets, and we are also making it easy for them to continue to reap the benefits of automation.
Deliver flexible and reliable services
Service reliability can be vastly improved by ensuring that most error prone, manual, and complex processes are encapsulated in a workflow that is easy to author, operate and administer. Orchestrating these workflows across multiple tools and systems improves service reliability.
When we talked to service providers and enterprises, it was clear that providers have complex processes and multiple systems within their IT infrastructure. Service providers have often invested a lot in user onboarding, provisioning, de-provisioning, and subscriber management processes – and they have many different systems that need to be aligned during each of these processes.
In R2, we targeted investments to enable these scenarios. For example, Windows Azure Pack’s event generation framework generates events of various types, including VM start/stop, plan subscription, and new user creation. These events can be integrated with workflows using the SMA user interface in the Windows Azure Pack portal. Now you get the benefit of automation with process integration – and with it come repeatability and predictability. These events can then be integrated with workflows using the SMA user interface in the Windows Azure Pack portal.
In summary, SMA is about reducing costs by encapsulating complex, error prone, manual and repetitive tasks into runbooks which can be used in automation and, where/when appropriate, use the same patterns to integrate with other systems that need to participate in complex processes within the data center.
Scenario 4: Tenant Resource Usage, Billing, and Analytics
The cloud operating model requires providers to track tenant resource utilization and be able to bill or charge only for what was used by the tenant.
In the 2012 R2 release, we made targeted investments in this area. To begin with, there is a REST Usage API, which provides resource utilization data (at hourly fidelity) for each subscription. Providers use this API to extract utilization data and integrate the data feed with their own billing system to create the billing reports. In addition to the Usage API, we also provide Usage Reports in Excel that provide analytics and trending information. This is very useful for capacity planning based on resource consumption trends.
Using the REST Usage API to Enable Billing and Chargeback Scenarios
The intention and design of the Usage Metering system in R2 is to collect and aggregate all the usage data across all the resource providers and expose the usage data via the REST Usage API. The Usage API is the only way to extract the data from the Usage Metering System. Most Service Providers have a billing system that they use today and this is used to generate monthly bills to subscribers. Using this API, Service Providers can easily integrate the Tenant Resource Utilization with their existing billing system. The blog post “How to integrate your Billing System with the Usage Metering System” goes into detail regarding how to leverage the API and the samples to create a billing adaptor. Doing this helps integrate the billing system with the Usage Metering system.
Usage reports and out-of-the box analytics for IaaS usage
It is very important for Service Providers to understand how their tenants consume the offers they provide. In R2, we provide out-of-the box data warehousing capabilities that correlate subscriptions with usage across VMs as well as analytical reports. Excel is the most widely used tool when it comes to reporting, thus, with this popularity in mind, we designed the Usage reports to be Excel friendly.
In Figure 7 (see below), the usage report shows VM Usage data in hourly granularity for all subscribers. The filter allows you to scope the data to selected subscribers for the selected date ranges.

Figure 7: Usage Report.Dashboards
Though Excel reports are very powerful, Service Providers also asked for a dashboard showing all the key usage metrics in order to give a “glance-able” indication of overall heath. The dashboard capabilities of SharePoint are very useful when a lot of people within an organization need to view the key performance indicators for a business. For a Service Provider, the top-line revenue can be measured by of how many of these services are used by their tenants, and then understanding which of the subscribers drive their business. For such scenarios, Usage dashboards are very critical and provide a convenient way to both consume and perform drill through analytics if desired.
In Figure 8 (see below), VM runtime statistics are displayed in four key dimensions:
- The first chart (on the left) shows VM Runtime statistics for each quarter. Very quickly, one can understand how the current quarter is shaping up when compared to the previous one.
- Similarly the second chart shows the VM Runtime on a monthly basis.
- The third chart displays which Cloud/Plan is the most popular among the customers.
- The forth chart shows which subscriber is generating the most usage in the system.

Figure 8: Usage dashboard experience.As you can see, the key metrics for the business are available at a glance. If further details are needed, a simple drill-through experience allows the user to select a particular chart and hone in on the details that compose the chart. This all leads to a powerful self-service analytics experience.
Server Inventory Report
Service Providers need to stay compliant within the Service Provider Licensing Agreement (SPLA), and, in a quickly changing data center, keeping track of server and host inventory for licensing needs can be very difficult. This feedback was commonly shared by Service Providers, and we have made a series of key investments to make this entire process easier for them to execute.
In R2 we introduce the Server Inventory report as a feature of Service Reporting component, which tracks all the servers and the VMs. The SPLA requires the service providers to compute the license costs for Microsoft software at the end of the month. The formula for calculating these licensing costs includes the edition of Windows Server OS, the processor count, and the maximum number of Windows Virtual Machines that were hosted on the severs for that month.
To assist in this scenario, we provide an out-of-the-box Server Inventory report that processes all the calculations and displays the information for easy consumption. Figure 9 below shows a report where the processor count and the VM Instance count are displayed for the selected months.

Figure 9: Sample Server Inventory Report.One of the most common concerns of Service Providers is the need to be able to look back at this history and accurately compare key performance indicators (KPI) across various time dimensions to better understand growth patterns. To support such a scenario, we have developed the licensing report on top of a data warehousing module. Based on the report below, for example, it is very clear to see that the computing and resource capacity used by the consumer grew over that last monthly cycle. The reporting system keeps a cumulative count of resources, and uses this information in determining compliance with licensing.
Requirements like these also exist in licensing scenarios. To support such a scenario, we have developed the licensing report on top of the data warehousing module. As noted in Figure 9, it is possible to observe the growth of processors and VM instances.
The ability to surface data aggregated over time becomes a very powerful auditing tool as well. In R2, the default storage is for three years; this allows the provider to go back in history and understand the SPLA compliance status for the Windows Servers managed by the R2 stack.
Tenant Administrator Experience
As mentioned above, a key design goal of the 2012 R2 wave was to provide a consistent experience for tenants across private, hosted and Windows Azure public clouds. We achieved this by delivering a consistent framework and tool set for running modern cloud services. tenants can now run and operate a rich set of cloud services in partner-provided data centers just as easily as they can by using Windows Azure. In short, the core vision for the tenant administrator experience in the R2 release is to:
Provide a rich self-service experience that enables tenants to self-provision and scale applications in an Azure-consistent manner
This vision defined our target scenarios:
- Self-Service Tenant Portal
- Modern Website Services
- Self-Provisioning Scalable Tenant Capacity
- Troubleshooting Virtual Machines
Scenario 1: Self-Service Tenant Portal
Windows Azure Pack includes a Self-Service Tenant Portal and a set of REST management APIs. The portal is deployed and operated by the Service Provider. Tenants use it to manage the services and infrastructure that are operated by the Service Provider. The Self-Service Tenant Portal is a companion portal to the Provider portal and can only be deployed and used if the operator has configured their environment with the Provider portal or used the Provider REST APIs.
Figure 10(see below) illustrates the high-level technologies of Windows Azure Pack, and it compares the layering of these technologies in Windows Azure with Windows Azure Pack running on Windows Server 2012 R2.

Figure 10: Comparison of Windows Azure Pack technologies running in Windows Azure and Windows Server.Because the Self-Service Tenant Portal is based on the same framework used by Windows Azure, the same rich dev-op experience originally developed for Windows Azure Websites (described in the next scenario) is available in partner data centers using Windows Server and System Center 2012 R2.
Scenario 2: Modern Website Services
One of the new Platform-as-a-Service (PaaS) services available in Windows Azure is Windows Azure Websites. Rather than a traditional IIS web hosting, this is instead a true elastic cloud service for provisioning and scaling website applications. It offers a rich dev-ops management experience for running and scaling the website, as well as deep integration with popular open source code-control solutions such as GIT.
As part of our effort to create a consistent experience across clouds, we invested to bring this modern website PaaS service from Windows Azure and run it natively on Windows Server. The end result is a set of REST APIs for consumers along with a management experience which is consistent with Windows Azure.

Figure 11: Self-Service Portal experience on Windows Azure and Windows Server.As you can see in Figure 11, the Self-Service Portal experience is very similar. You’ll notice right away that the color scheme is different between Windows Azure and Windows Server. As mentioned earlier in the Service Provider Experience section, the Self-Service Portal is a customizable solution that can be themed and re-branded to suit the needs of the enterprise. In this example, we’ve applied a different theme to emphasize that the Self-Service Portal running on Windows Server is a different instance from the one running in Windows Azure.
Another difference is that the Self Service Portal exposes only the services the Service Provider has included in the plan the tenant is using. For example, if a tenant has only subscribed to IaaS (including only Virtual Machines and Networking), only those two services would be presented in the tenant portal as shown in Figure 12 (see below).

Figure 12: Self-Service Portal IaaS experience.However, if the tenant subscription included all the services included in Windows Azure Pack and provided by System Center 2012 R2, the portal would look like Figure 13 (see below).

Figure 13: Self-Service Portal full experience.Each tenant has a unique subscription, and the experience is tailored to the services provided on a per subscription basis.
Scenario 3: Self-Provisioning Scalable Tenant Capacity
Service Providers often ask about VM provisioning within the data center. The way this works is simple: Service Providers define hosting plans with resource quotas. These quotes then define where in the data center a resource is provisioned. This location then determines the amount of capacity that a customer can self-provision.
In order to enable self-provisioning of scalable tenant capacity, we introduced a new service model in System Center 2012 R2: Virtual Machine Roles. These are a tier of VMs that operate as a singleton. VMs in the tier exhibit a set of cloud attributes that can be scaled, operated upon, and treated as a single entity within the portal environment.
Service Providers publish Virtual Machine Roles via the gallery to enable tenants to easily provision capacity. The Service Provider is then able to scope or limit access to these gallery items on a plan-by-plan basis. This enables the Service Provider to tailor the set of applications they make available to different groups or even individual tenants. Figure 14 (see below) shows how the tenant can select a Virtual Machine Role from the gallery. In this example, the service provider has provided six gallery items in the plan to which this tenant is subscribed.

Figure 14: Creating a Virtual Machine Role from the gallery.Virtual Machine Roles have also been modeled and designed with Windows Azure consistency in mind. One of the new capabilities in Virtual Machine Roles is the ability to scale a virtualized application. Just as with the modern website service, tenants can now easily scale their virtualized applications.
In order to enable this scenario, a Virtual Machine Role separates the application from the image – this allows the same base image to be used for multiple applications. Next, settings unique to the Virtual Machine Role define the scaling constraints for the application along with the initial number of instances to be deployed. The default values for these settings can then be defined when the gallery item is authored. Figure 15 (see below) shows how the tenant can configure the scaling settings.

Figure 15: Specifying scaling settings for the virtual machine.In Figure 15 you’ll also notice a drop-down list for VM Size. This contains a set of Service Provider defined values for Extra-Small, Small, Medium, Large and Extra-Large. This theme of offering simplified options to the tenant consumer is in line with the same type of experience in Azure.
In addition to the scalability settings, there is a set of application-specific settings. These are uniquely defined for each gallery item. In Figure 16’s example (see below), the gallery item was authored to collect a few IIS-specific settings. The key concept to highlight here is that Virtual Machine settings are separated from the application settings. This is not merely a UX separation, it is a fundamental distinction in the Virtual Machine Role service model and package definition.

Figure 16: Specifying application settings.After the application is deployed, the tenant will be able to manage the logical Virtual Machine Role, scale the application to handle additional load, and manage the individual instances running as part of this application. This provide a high degree of flexibility in managing the VM role independent of the application settings.
An essential feature of the Virtual Machine Role is versioning. Versioning enables the Service Provider to publish updated versions of their gallery items over time. Subscribed customers are notified when a new version is available in the portal. This allows users the option to upgrade to the new version during the appropriate servicing window. In Figure 17 (see below), the dashboard for the Virtual Machine Role indicates that there is an update available. This reminder is present in the portal because the tenant initially deployed version 1.0.0.0, and version 1.1.0.0 has been published by the provider. Tenants can choose to deploy this update during the appropriate servicing windows for the application.

Figure 17: Update notification.As we said earlier, a unique feature of Virtual Machine Roles is the ability to scale the application. Figure 18 (see below) shows how easily tenants can scale out new Virtual Machine instances for their applications: They simply move a slider in the portal. This is a consistent experience for scalable services running on the platform throughout the Self-Service Portal.

Figure 18: Scaling applications.Scenario 4: Troubleshooting Virtual Machines (VMs)
Another new scenario we have enabled as a part of Windows Azure Pack is a way to console connect to an inaccessible VM instance running on the fabric. This inaccessibility can have a variety of causes (the VM may have a misconfigured network, or remote desktop disabled, or perhaps the machine is having trouble during the installation or boot up sequence, etc.), and in each case the end result is critically important to address: The VM is inaccessible to the remote desktop connection client. This means that if the machine is running in a Service Provider’s data center, the customer has no way to access the machine to troubleshoot the problem.
Console Connect is a new feature delivered in Windows Azure Pack made possible by new capabilities in Windows Server 2012 R2 and System Center 2012 R2. Console Connect is plumbed through the entire stack including the Remote Desktop Connection client. When the tenant opens the dashboard screen for a VM, there is a "Connect” command in the command bar. By default, the Connect command will simply launch the Remote Desktop Connection client to RDP to the virtual machine. If the Service Provider has enabled Console Connect, the customer will have an additional “Console” option on the “Connect” command. When the customer selects this, it launches a new RDP session on a secure connection to the new Console Connect service provided by the operator. Figure 19 (see below) illustrates this experience.

Figure 19: Console Connect.In Figure 20 (see below) you can see that we have established a remote connection to a virtual machine that is waiting at the Windows Server 2012 installation screen. We are actually able to remote connect to a machine that does not even have the operating system installed!

Figure 20: Console Connect to a Windows Server VM.As discussed in last week’s blog post discussing how we’ve enabled Open Source software, a key tenant of the R2 wave is ensuring open source software runs equally well on Windows Server. This is demonstrated in Figure 21 with the ability to create a remote desktop connection to a Linux machine.

Figure 21: Console Connect to a Linux VM.The integration of Windows Azure Pack, System Center 2012 R2, and Windows Server 2012 R2 delivers both a Self-Service Portal experience and new services that enable Service Providers to deliver a tenant administrative experience that will delight customers.
The R2 wave has built on the innovation in the 2012 releases to provide Service Providers a rich IaaS solution. We have brought to market innovation into the infrastructure itself to ensure that the network, compute and storage, and infrastructure are not only low-cost but easy to operate through rich integration with System Center. On top of this, there is the delightful user experience for not only the IaaS administrators, but also the tenant administrators consuming IaaS.
Next week, we start a two week look at what 2012 R2 can do for Hybrid IT.
Next Steps
To learn more about the topics covered in this post, check out the following articles. Also, don’t forget to start your evaluation of the 2012 R2 previews today!
Service Provider Experience
- How to create basic IaaS Offers in the Service Administration Portal
In this blog post, we will go into the details of how a Service Administrator can easily create IaaS offers and make them available for the tenants to subscribe.- How to integrate your Billing System with the Usage Metering System
In this blog post, we will detail how to create a billing adaptor, to integrate the billing system of the Service Provider with the Usage Metering System.- Creating Usage Analytics Reports using Excel
In this blog post, we will go into the details of how a Service Provider can analyze the tenant Resource Utilization, identify patterns and get insights to run their business.- Using Server inventory reports to help stay complaint with Service Provider Licensing Agreement (SPLA)
In this blog post, we will go into the details of how Service Providers can leverage the Server Inventory report and be able use the information to plan and account for the licenses according to the Service Provider Licensing Agreement (SPLA).- Message Analyzer
Analyze network, system events and log files all together, all in one place, with powerful correlation, diagnostic and visualizations tools.Tenant Administrator Experience
- Learn more about Windows Azure Pack here, where you’ll find and excellent whitepaper detailing the services included in Windows Azure Pack.

• The Microsoft Server and Cloud Platform Team (@MSCloud) described What's New in 2012 R2: Going Deep on the Microsoft IaaS Service Provider and Tenant Admin Experience on 8/1/2013:
Yesterday Microsoft VP Brad Anderson and Erin Chapple detailed some key Infrastructure as a Service (IaaS) scenarios for a High Performance Storage Fabric, Scalable Storage on Commodity Hardware, and End-to-end Storage Management in the post, “What’s New in 2012 R2: IaaS Innovations.” It’s an excellent read and sets the stage nicely for today’s post.
Today we do another deep dive, but the context will be different. Brad and Erin are going to take you deep from the eyes of a Service Provider, and from the eyes of a tenant administrator.
We focus on delivering the best infrastructure possible in order to provide delightful experiences to our customers. The two work hand-in-hand: The right infrastructure enables key customer-facing scenarios, and the focus on the experience ensures that customers can get the most out of their infrastructure investments.
So without further delay, read up on the experience in the post, “What’s New in 2012 R2: Service Provider & Tenant IaaS Experience.” [See above post.] Like yesterday, this is a lengthy blog post but we think you’ll find a lot of valuable information on the investments we have made, and where we are headed.
And for those of you interested in downloading some of the products and trying them, here are some resources to help you:
- Windows Server 2012 R2 Preview download
- System Center 2012 R2 Preview download
- SQL Server 2014 Community Technology Preview 1 (CTP1) download
- Windows 8.1 Enterprise Preview download
As always, follow us on Twitter via @MSCloud, and you can check out Brad @InTheCloudMSFT!


• The Microsoft Server and Cloud Platform Team (@MSCloud) explained What's New in 2012 R2: Microsoft IaaS Investments and Innovations on 7/31/2013 (missed when published):
The move to a service provider model is one of the most significant shifts we are seeing in data centers around the world. This is occurring as two key developments are afoot: First, many organizations are making moves to use Service Provider and public cloud capacity, and Second, there is an internal shift within organizations towards a model wherein they are provide Infrastructure-as-a-Service for their internal business units. This is all headed towards a model where enterprises have detailed reporting on the usage of that infrastructure, if not bill-back for the actual usage.
This week’s post from Microsoft VP Brad Anderson is lengthy. In fact, we broke the topic into two parts and are posting part one today, followed by another post tomorrow. Infrastructure as a Service (IaaS) allows service providers to build out highly available and highly scalable compute capability for customers (tenants). To get a more detailed understanding of Microsoft’s investments and the vision of where we are headed, see “What’s New in 2012 R2: IaaS Innovations”. Like last week, Brad starts off the discussion to provide some context, then turns the technical details over Erin Chapple for the deep dive on the following scenarios:
High Performance Storage Fabric for Compute - Building on the strategic shifts introduced in Windows Server 2012, our vision for IaaS cloud storage focusses on disaggregated compute and storage. In this model, scale-out of the Hyper-V compute hosts is achieved with a low-cost storage fabric using SMB3 file-based storage, where virtual machines access VHD files over low-cost, Ethernet-based networks.
- Scalable Resilient Storage with Commodity Hardware - In Windows Server 2012 R2, we continue the journey with Spaces delivering high-performance, resilient storage on inexpensive hardware through the power of software. Windows Server 2012 R2 delivers many of the high-end features you expect from expensive storage arrays.
- End-to-end Storage Management - Another focus area was to reduce the operational costs associated with deploying and managing a Windows Server 2012 R2 cloud storage infrastructure. SCVMM now provides end-to-end management of the entire IaaS storage infrastructure with a single pane of glass management experience.
When you have a few minutes, take some time to read through the article. There is a lot of great information to digest and consider.
And for those of you interested in downloading some of the products and trying them, here are some resources to help you:
- Windows Server 2012 R2 Preview download
- System Center 2012 R2 Preview download
- SQL Server 2014 Community Technology Preview 1 (CTP1) download
- Windows 8.1 Enterprise Preview download
As always, follow us on Twitter via @MSCloud!


• Scott Schnoll (@schnoll) described Database Availability Groups and Windows Azure in an 8/7/2013 post to the Exchange Team Blog (!):
At TechEd North America 2013, we announced that we had begun testing and validation of a new configuration for a database availability group (DAG) that would enable automatic site resilience when two datacenters were used in concert with a witness server that was deployed in a Windows Azure IaaS environment.
During the validation phase of our testing, it became clear that the Windows Azure infrastructure did not support the necessary underlying network components to allow us to configure a supported solution. As a result, we are not yet able to support the use of Azure for a DAG’s witness server.
Background Information
The goal was to derive a supported configuration for Azure subscribers that already had at least two datacenters of their own. Two of the on-premises datacenters would house the Exchange DAG members, and the witness server would be deployed as an Azure file server VM, which would be located in a third datacenter (the Azure cloud).
In order to configure a DAG and its witness across three datacenters, you must meet the following requirements:
- You need two well-connected datacenters, in which Exchange is deployed
- You need a third location that is connected via the network to the other two datacenters
- The third location needs to be isolated from network failures that affect the other two datacenters
Unfortunately, Azure does not provide the necessary infrastructure to provide us with a third location with the appropriate network connectivity.
Azure Networks
Today, Azure provides support for two types of networks:
- A single site-to-site VPN – a network that connects two locations
- One or more point-to-site VPNs – a network that connects a single VPN client to a location
To have a server deployed in Azure act as a witness server for the DAG, you would require two site-to-site VPN connections (one connecting each Exchange datacenter to the Azure infrastructure). This is not possible today, as Azure supports only a single site-to-site VPN connection per Azure network. Without a second site-to-site VPN connection for the other datacenter, only one datacenter can have persistent network connectivity with the Azure servers.
A point-to-site VPN cannot be used in the second datacenter for a variety of reasons:
- A point-to-site connection is designed to be a client VPN connection that connects a single host to the Azure cloud service
- Point-to-site VPN connections have timeouts and will automatically disconnect after a certain period of time
- Point-to-site VPN connections do not automatically reconnect and require administrative intervention
Witness Server Placement Considerations
The placement of a DAG’s witness server will depend on your business requirements and the options available to your organization. Exchange 2013 includes support for new DAG configuration options that are not recommended or not possible in previous versions of Exchange. These options include using a third location, such as a third datacenter or a branch office.
The following table lists general witness server placement recommendations for different deployment scenarios.


When a DAG has been deployed across two datacenters, a new configuration option in Exchange 2013 is to use a third location for hosting the witness server. If your organization has a third location with a network infrastructure that is isolated from network failures that affect the two datacenters in which your DAG is deployed, then you can deploy the DAG’s witness server in that third location, thereby configuring your DAG with the ability automatically failover databases to the other datacenter in response to a datacenter-level failure event.
For more information on the witness server and witness server placement, see Managing Database Availability Groups.
Moving Forward From Here
Unfortunately, without the required networking infrastructure in the Azure service, a DAG cannot be deployed on-premises using a witness server in the Azure cloud. The Exchange Product Group has made a formal feature request from the Azure team for multiple site-to-site VPN support. If that feature is introduced by the Azure team, then testing and validation of the Azure witness will reconvene with the hope of producing a supportable solution. In the meantime, Azure is not supported for use as a DAG witness. [Emphasis added.]
• Michael S. Collier (@MichaelCollier) posted The Case of the Latest Windows Azure VM Image on 7/30/2013 (missed when posted):
When creating new Windows Azure VMs, an Operating System (OS) image needs to be specified. Microsoft maintains a repository of images that are available to be used when creating a new VM. These images could be regular Windows Server 2012 or Windows Server 2008 images, server images with software like SQL Server or BizTalk server installed, or even various Linux distributions.
To get a list of all available images, execute the Get-AzureVMImage cmdlet. This will return a list of all possible images and details for each.
Sometimes there may be multiple versions of a particular type of image. For example, Microsoft will maintain a few versions of Window Server images – these very by patch level.
Notice the properties available (Location, Label, OS, ImageFamily, etc.) for each image. These can be very helpful in narrowing the list of images.
Find the Image Type
In order to find a particular type of image, the ImageFamily property can be used.
Get-AzureVMImage `
| where { $_.ImageFamily -eq “Windows Server 2012 Datacenter” }
This returns details of only the Windows Server 2012 Datacenter images.
Find the Latest Image
In order to find the most recent version of a particular type of image, the PublishDate property can be used to enhance the query.
$images = Get-AzureVMImage `
| where { $_.ImageFamily -eq “Windows Server 2012 Datacenter” } `
| Sort-Object -Descending -Property PublishedDate

$latestImage = $images[0]
$latestImage
Using the above snippet, only the most recent version of the “Windows Server 2012 Datacenter” image will be returned.
Images Aren’t Always Available
Take another look at the properties returned by Get-AzureVMImage. Notice there is a Location property. This specifies in which Windows Azure data centers the particular image is available. All images may not be available in all data centers. I’ve only seen this happen a few times, and it seemed to be related to a new OS image rolling out to the various data centers. If trying to create a new VM with an image that is not supported in the target data center, the Windows Azure service management interface will return a 400 error related to a location constraint:
New-AzureVM : “An exception occurred when calling the ServiceManagement API. HTTP Status Code: 400. Service
Management Error Code: BadRequest. Message: The location constraint is not valid. Operation Tracking ID:
0ba6c633f3xxxxxxxxxxxxxxxxxxxxxx.”To remedy this, slightly modify the script to include logic to select images that are only available in the desired data center location.
$images = Get-AzureVMImage `
| where { $_.ImageFamily -eq "Windows Server 2012 Datacenter" } `
	| where { $_.Location.Split(";") -contains "West US"} `
	| Sort-Object -Descending -Property PublishedDate
Using the above snippet, only the most recent version of the “Windows Server 2012 Datacenter” image that is supported in the “West US” datacenter will be returned.
Create the Virtual Machine
Now that the desired VM OS image has been found, the New-AzureVMConfig and New-AzureVM cmdlets can be used to create the new Virtual Machine.
# Get the latest version of the Windows Server 2012 Datacenter image.
$images = Get-AzureVMImage `
| where { $_.ImageFamily -eq $imageFamily } `
	| where { $_.Location.Split(";") -contains $location} `
	| Sort-Object -Descending -Property PublishedDate
$myVM = New-AzureVMConfig -Name “myvm01” -InstanceSize “Small” -ImageName $images[0].ImageName -DiskLabel "OS" `
| Add-AzureProvisioningConfig -Windows -Password $password -AdminUsername $username -DisableAutomaticUpdates

New-AzureVM -ServiceName “myvmservice” -VMs $myVM -Location


<Return to section navigation list>
Visual Studio LightSwitch and Entity Framework 4.1+
• Paul S. Patterson (@paulspatterson) described Building SharePoint 2013 Apps Using LightSwitch Rollup in a 7/24/2013 post (missed when published):
Hey, I may be all about cloud computing these days, but my heart is still anchored in all that is LightSwitch. With the new Visual Studio 2013 Preview out, I’ve been a busy little beaver (okay, a busy big ol’ bear) with all that interesting LightSwitch stuff.
(a service management billing application being built with VS2013 LightSwitch)
For what it’s worth, here is a bit of a web content rollup about creating LightSwitch applications in SharePoint (yes, most are from Microsoft):
- Building Modern, HTML5-based Business Apps for SharePoint 2013 with Visual Studio LightSwitch
- Building Modern, HTML5-based Business Apps for SharePoint 2013 with Visual Studio LightSwitch (same presentation, different presenter at TechEd 2013 Europe)
- Walkthrough: Creating an App for SharePoint by Using LightSwitch
- Walkthrough: Accessing a SharePoint Workflow from a LightSwitch Mobile App
- Get Started Building SharePoint Apps in Minutes with LightSwitch
- Sending Email from a LightSwitch SharePoint App using Exchange Online
- Theming a LightSwitch SharePoint App with ThemeRoller (way cool!)
- Publishing LightSwitch apps for SharePoint to the Catalog
- Survey App Tutorial: Developing a SharePoint Application Using LightSwitch
More to come I’m sure.
Hey, if you’re curious to learn more about LightSwitch, I’m your guy. Contact me and I’d more than happy to chat with you about how using LightSwitch can shave weeks, if not months, of your next line of business software project.


Amr Altahlawi (@atahlawi) described LightSwitch Choice List improvements in an 8/7/2013 post to the Visual Studio LightSwitch blog:
One of the new LightSwitch features in the Visual Studio 2013 Preview is the ability to import a list of name/value pairs to the Choice List dialog from either a file or from another Choice List. This is useful when you have a long list of values that you need to add (for example: List of US states), in which you can simply copy and paste them to the Choice List.
This feature will allow you to:
- Copy a list of name/value pairs from an Excel file or a text file to the Clipboard and then paste them to the Choice List.
- It only supports copying of single and double columns. If you copy more than 2 columns, only the first two will be copied and pasted.
- The name/value pair should be tab delimited and the line should ends up with the new line character.
- You can paste the values into the Choice List by either using the keyboard “Ctrl+V” or by using the Paste command from the context menu.
Now let’s start with some examples. Let’s say you are creating a simple application that stores sales orders. For every sales order, you need to track its status:
You keep the list of options for this status property in an Excel file since it’s easier to enter, edit and sort in Excel:
To use those values, select the status property and click on “Choice List” from the Property window to open the Choice List Dialog.
Go back to the Excel file you have, select the values and copy them to Clipboard
Now go back to the Choice List dialog and right-click on the edge of the grid and select the Paste command to paste the values. Make sure not to right-click on the cell, otherwise you’ll get the context menu of the cell which is different than the context menu of the Choice List grid.
As you can see LightSwitch treated the first column that was copied from Excel as the value for the Value column, and the second column from Excel as the value for the Display Name column.
Tip: Your copied list doesn’t have to provide all the values for the Display Name. If the 2nd column is blank, the Choice List will use the Value for the Display Name.
Press Ok and Hit F5 and there you have it.
Now after you test the application you realized that you still missing some values and you need to add them to the list, what should you do? You could simply copy the values from the Excel file and paste them to the Choice List in the position you want. Here is the list from Excel file with the new items
You select the new items and copy them
You go to the Choice List diagram and highlight the row you want to insert the new items after. Paste the values from Clipboard by either choosing the Paste command from the context menu or by pressing Ctrl+V.
If you want to insert the new items in another position (Before the “Paid” item), you simply right-click on the edge of the grid next to the Paid item and select Paste command from the context menu
Now let’s say that you have a new requirement that is to add a status for the Sales Order Items too, and the status values are same as the status values for the Sales Order Header entity except for few items. What should you do? You could simply select the items from the existing Choice List that you have and copy them to the Choice List of the order details.
Here is how you can do it:
Open the Choice List dialog that you created before and select the items you want.
Right-click and select the Copy command from the context menu or press Ctrl+C.
Go to the other Choice List and you want to copy the items too and right-click the mouse and select the Paste command from the context menu:
So that was one of the helpful features you could do in Visual Studio 2013 Preview. Let us know on the forums how you’re using this feature or if you run into any problems.

![clip_image001[4]](http://blogs.msdn.com/cfs-file.ashx/__key/communityserver-blogs-components-weblogfiles/00-00-01-39-73-metablogapi/7485.clip_5F00_image0014_5F00_394B33E4.png "clip_image001[4]")
![clip_image002[4]](http://blogs.msdn.com/cfs-file.ashx/__key/communityserver-blogs-components-weblogfiles/00-00-01-39-73-metablogapi/2630.clip_5F00_image0024_5F00_1689FC27.png "clip_image002[4]")
![clip_image003[4]](http://blogs.msdn.com/cfs-file.ashx/__key/communityserver-blogs-components-weblogfiles/00-00-01-39-73-metablogapi/5226.clip_5F00_image0034_5F00_5ED741F6.png "clip_image003[4]")
![clip_image004[4]](http://blogs.msdn.com/cfs-file.ashx/__key/communityserver-blogs-components-weblogfiles/00-00-01-39-73-metablogapi/0878.clip_5F00_image0044_5F00_356300B6.png "clip_image004[4]")
![clip_image005[4]](http://blogs.msdn.com/cfs-file.ashx/__key/communityserver-blogs-components-weblogfiles/00-00-01-39-73-metablogapi/5102.clip_5F00_image0054_5F00_32BCD5B6.png "clip_image005[4]")
![clip_image006[4]](http://blogs.msdn.com/cfs-file.ashx/__key/communityserver-blogs-components-weblogfiles/00-00-01-39-73-metablogapi/6116.clip_5F00_image0064_5F00_4D88FBC2.png "clip_image006[4]")
![clip_image007[4]](http://blogs.msdn.com/cfs-file.ashx/__key/communityserver-blogs-components-weblogfiles/00-00-01-39-73-metablogapi/0602.clip_5F00_image0074_5F00_0B18EA3D.png "clip_image007[4]")
![clip_image009[4]](http://blogs.msdn.com/cfs-file.ashx/__key/communityserver-blogs-components-weblogfiles/00-00-01-39-73-metablogapi/8540.clip_5F00_image0094_5F00_7AA07941.jpg "clip_image009[4]")
![clip_image010[4]](http://blogs.msdn.com/cfs-file.ashx/__key/communityserver-blogs-components-weblogfiles/00-00-01-39-73-metablogapi/2804.clip_5F00_image0104_5F00_7C70CF08.png "clip_image010[4]")
![clip_image011[4]](http://blogs.msdn.com/cfs-file.ashx/__key/communityserver-blogs-components-weblogfiles/00-00-01-39-73-metablogapi/5481.clip_5F00_image0114_5F00_2C2E7788.png "clip_image011[4]")
![clip_image012[4]](http://blogs.msdn.com/cfs-file.ashx/__key/communityserver-blogs-components-weblogfiles/00-00-01-39-73-metablogapi/1106.clip_5F00_image0124_5F00_5BEC2007.png "clip_image012[4]")
![clip_image013[4]](http://blogs.msdn.com/cfs-file.ashx/__key/communityserver-blogs-components-weblogfiles/00-00-01-39-73-metablogapi/8081.clip_5F00_image0134_5F00_3277DEC7.png "clip_image013[4]")
![clip_image014[4]](http://blogs.msdn.com/cfs-file.ashx/__key/communityserver-blogs-components-weblogfiles/00-00-01-39-73-metablogapi/4606.clip_5F00_image0144_5F00_7007CD41.png "clip_image014[4]")
![clip_image015[4]](http://blogs.msdn.com/cfs-file.ashx/__key/communityserver-blogs-components-weblogfiles/00-00-01-39-73-metablogapi/6215.clip_5F00_image0154_5F00_46938C01.png "clip_image015[4]")
![clip_image016[4]](http://blogs.msdn.com/cfs-file.ashx/__key/communityserver-blogs-components-weblogfiles/00-00-01-39-73-metablogapi/4111.clip_5F00_image0164_5F00_4AA06A84.png "clip_image016[4]")
![clip_image017[4]](http://blogs.msdn.com/cfs-file.ashx/__key/communityserver-blogs-components-weblogfiles/00-00-01-39-73-metablogapi/8738.clip_5F00_image0174_5F00_6C1F9A13.png "clip_image017[4]")
![clip_image019[4]](http://blogs.msdn.com/cfs-file.ashx/__key/communityserver-blogs-components-weblogfiles/00-00-01-39-73-metablogapi/1854.clip_5F00_image0194_5F00_774BB50E.jpg "clip_image019[4]")
![clip_image020[4]](http://blogs.msdn.com/cfs-file.ashx/__key/communityserver-blogs-components-weblogfiles/00-00-01-39-73-metablogapi/1374.clip_5F00_image0204_5F00_71FCCE5D.png "clip_image020[4]")

<Return to section navigation list>
Cloud Security, Compliance and Governance
‡ Christopher Hoff (@Beaker) posted The Curious Case Of Continuous and Consistently Contiguous Crypto… on 8/8/2013:
Here’s an interesting resurgence of a security architecture and an operational deployment model that is making a comeback:
Requiring VPN tunneled and MITM’d access to any resource, internal or external, from any source internal or external.
While mobile devices (laptops, phones and tablets) are often deployed with client or client-less VPN endpoint solutions that enable them to move outside the corporate boundary to access internal resources, there’s a marked uptake in the requirement to require that all traffic from all sources utilizing VPNs (SSL/TLS, IPsec or both) to terminate ALL sessions regardless of ownership or location of either the endpoint or the resource being accessed.
Put more simply: require VPN for (id)entity authentication, access control, and confidentiality and then MITM all the things to transparently or forcibly fork to security infrastructure.
Why?
The reasons are pretty easy to understand. Here are just a few of them:
- The user experience shouldn’t change regardless of the access modality or location of the endpoint consumer; the notion of who, what, where, when, how, and why matter, but the user shouldn’t have to care
- Whether inside or outside, the notion of split tunneling on a per-service/per-application basis means that we need visibility to understand and correlate traffic patterns and usage
- Because the majority of traffic is encrypted (usually via SSL,) security infrastructure needs the capability to inspect traffic (selectively) using a coverage model that is practical and can give a first-step view of activity
- Information exfiltration (legitimate and otherwise) is a problem.
…so how are folks approaching this?
Easy. They simply require that all sessions terminate on a set of [read: clustered & scaleable] VPN gateways, selectively decrypt based on policy, forward (in serial or parallel) to any number of security apparatus, and in some/many cases, re-encrypt sessions and send them on their way.
We’ve been doing this “forever” with the “outside-in” model (remote access to internal resources,) but the notion that folks are starting to do this ubiquitously on internal networks is the nuance. AVC (application visibility and control) is the inside-out component (usually using transparent forward proxies with trusted PAC files on endpoints) with remote access and/or reverse proxies like WAFs and/or ADCs as the outside-in use case.
These two ops models were generally viewed and managed as separate problems. Now thanks to Cloud, Mobility, virtualization and BYOE (bring your own everything) as well as the more skilled and determined set of adversaries, we’re seeing a convergence of the two. To make the “inside-out” and “outside-in” more interesting, what we’re really talking about here is extending the use case to include “inside-inside” if you catch my drift.
Merging the use case approach at a fundamental architecture level can be useful; this methodology works regardless of source or destination. It does require all sorts of incidental changes to things like IdM, AAA, certificate management, etc. but it’s one way that folks are trying to centralize the distributed — if you get what I mean.
I may draw a picture to illustrate what I mean, but do let me know if either you’re doing this (many of the largest customers I know are) if it makes sense.
/Hoff
P.S. Remember back in the 80′s/90′s when 3Com bundled NIC cards with integrated IPSec VPN capability? Yeah, that.


Be sure to read the comments.
David Linthicum (@DavidLinthicum) asserted “FBI wants real-time monitoring of data streams from telecom providers, thus creating another barrier to cloud adoption” in a deck for his The cloud's next big federal spying threat article of 8/6/2013 for InfoWorld’s Cloud Computing blog:
According to Cnet security reporter Declan McCullogh, the FBI is pressuring telecom carriers (such as AT&T and Verizon) to install "port reader" software that would allow the agency to intercept and analyze entire communication streams in real time. Carriers seem to be resisting, but the FBI claims it has the right to do this under the Patriot Act.
Although the recent NSA scandal has not been put to bed yet, most of us who deploy cloud computing technology have dialed that situation into our thinking. However, this latest attempt to monitor electronic communications goes a bit further and creates more concern that moving data into the cloud means the government can leaf through your data willy-nilly.
As I pointed out last week, U.S. cloud providers are already suffering from fears due to the NSA scandal. Many European companies are hesitant to use U.S.-based cloud services when they consider the risk that the U.S. government's spying may come along from the ride.
I think we need a bit of sanity here. If cloud computing is to succeed, we must have the fundamental assumption and understanding that information residing in the cloud can be both private and secure. If that can't be assured, either by law or technology, many companies won't see the benefit of cloud computing. Risk equals cost, and this sort of risk can make cloud adoption cost-prohibitive, despite the fact it's less expensive to operate.
What can be done? Not much, unless the government acts to police itself and look into these types of activities. Perhaps it has good reasons. But if those reasons exist, let us know what they are. Otherwise, as the Rolling Stones say, get off of my cloud.


<Return to section navigation list>
Cloud Computing Events
‡ Neudesic will conduct a Webinar: Unleashing the Power of Windows Azure BizTalk Services on 8/22/2013:
Webinar Registration
Windows Azure BizTalk Services is a simple, flexible cloud-based integration service that provides powerful capabilities for delivering scalable and secure cloud and hybrid integration solutions. Windows Azure BizTalk Services provides a robust set of PaaS capabilities that enable a reduced footprint in platform and infrastructure requirements for enterprises and unlocks new potential for start ups and ISVs.
Register for this webinar and learn how Azure BizTalk Services will help you:
• Extend your on-premises applications to the cloud
• Build EAI solutions for integrating on-premises, SaaS, and cloud services
• Process and transform messages with rich messaging endpoints
• Connect with any HTTP, FTP, SFTP, or REST data sources
• Reduce cost of business partner collaboration for EDI service providers
• The University of California - Irvine will offer a Cloud Computing with Google App Engine and Microsoft Windows Azure ( Section 1 ) extension course from 11/4/2013 to 12/8/2013:
I&C SCI X460.53 ( 1.50 )
Acquire techniques and practices of cloud computing. Cloud computing is a set of services that provide companies and application developers with an on-demand solution that addresses usage issues by using the Internet . Build applications on Google App Engine and Microsoft Windows Azure. Design and implement cloud-based software systems and explore current challenges.
Prerequisites: Experience building web based applications. See enrollment confirmation for login information.
Mustafa Seifi, M.S., Senior Director of Development at Oracle. Mustafa has been involved in software development and architecture since 1986. He has expertise is building high transaction and distributed applications using J2EE and Microsoft .NET technologies. Mustafa has helped develop the curriculum and has taught classes in the J2SE and J2EE certificates, and software design since 1996.
- When: November 04, 2013 to December 08, 2013
- Where: Online
- Fee: $650.00
See Louis Columbus’ Coursera, edX Offer Free Online Courses As Cloud Computing Learning Options Proliferate post for details of other online offerings by colleges and universities.
Neil MacKenzie (@mknz) will present an Apache Cassandra on Windows Azure session to the San Francisco Bay Azure Developers group on 8/27/2013 at 6:30 PM at Microsoft San Francisco (in Westfield Mall where Powell meets Market Street):
835 Market Street
Golden Gate Rooms - 7th Floor
San Francisco, CA (map)
Apache Cassandra is a NoSQL database in which a distributed architecture supports high scale and availability on commodity hardware. It provides a model for understanding how to create scalable systems in the cloud. Cassandra is particularly useful for workloads requiring high write throughput, such as time-series data and logs. In this presentation, Neil Mackenzie will provide an introduction to Cassandra and describe how to use it in Windows Azure.
Neil Mackenzie is Windows Azure Lead for Satory Global, where he helps companies migrate onto the Windows Azure Platform. He has been using Windows Azure since its public preview at Microsoft’s Professional Developers Conference (PDC) 2008. Neil wrote the Microsoft Windows Azure Development Cookbook. He speaks frequently at user groups and in Windows Azure training sessions.

<Return to section navigation list>
Other Cloud Computing Platforms and Services
‡ Jeff Barr (@jeffbarr) described The AWS Web Identity Federation Playground in an 8/8/2013 post:
We added support for Amazon, Facebook, and Google identity federation to AWS IAM earlier this year. This poweful and important feature gives you the ability to grant temporary security credentials to users managed outside of AWS.
In order to help you to learn more about how this feature works and to make it easier for you to test and debug your applications and websites that make use of it, we have launched the Web Identify Federation Playground:
You can use the playground to authenticate yourself to any of the identity providers listed above, see the requests and responses, obtain a set of temporary security credentials, and make calls to the Amazon S3 API using the credentials:
The AWS Security Blog just published a step-by-step walkthrough to show you how the playground can help you to learn more about IAM and identity federation.


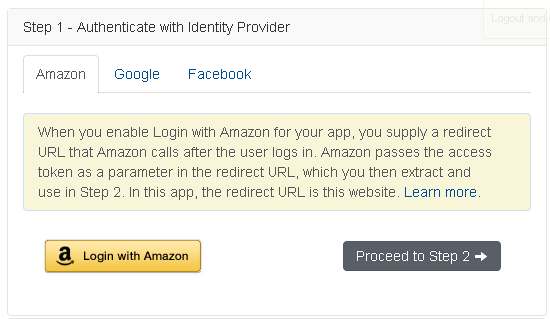
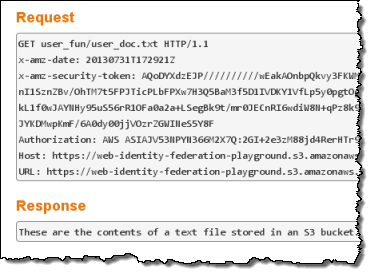
Jorden Novet reported Google adds load balancing, SQL-like queries in hot pursuit of more cloud business in an 8/7/2013 post to GigaOm’s Structure blog:
Google added a few features to its cloud services Wednesday, including load balancing for Google Compute Engine and SQL-like search inside the NoSQL Cloud Datastore.
The SQL-like language GQL, which stands for Google Query Language, has been in place for five years now for the Google App Engine’s datastore. So developers familiar with it will find it easier to use the Cloud Datastore, which was revealed three months ago.
Prior to this point, the Google Cloud Datastore could only be queried manually with more complex commands through its application programming interface (API), a spokeswoman wrote in an email.
Implementing SQL-like capability on NoSQL databases is a road many others in the database world have gone down. Facebook kicked off SQL-like querying on Hadoop with Hive. Cassandra has a SQL-like query language, and Couchbase came out with one of its own, too.
Aside from introducing GQL querying, Google said the Cloud Datastore can supports applications written in Ruby, not just Java, Node and Python.
Google is also adding to its Platform as a Service (PaaS), the Google App Engine, with new functionality for PHP applications and a bunch of solutions to problems users had encountered when running applications written in Python.
Load balancing in particular is a valuable feature, letting applications easily scale out in response to traffic spikes. it’s available for free for the rest of the year.
These are important moves for Google to make as it takes on Amazon Web Services and others in the busy and growing Infrastructure-as-a-Service (IaaS) market. But it was already clear Google was working on such a feature. The company announced as much at Google I/O during a talk about advanced routing features for Google Compute Engine.
A report from two TBR analysts last month suggested significant revenue growth from Google’s cloud services, including the Google Cloud Platform. They estimated the growth will only continue this year. These sorts of announcements — and probably also more price cuts — will help propel the young Google IaaS to contribute its fair share to top-line cloud growth and expand its user base.
Related research and analysis from GigaOM Pro:
Subscriber content. Sign up for a free trial.


Full disclosure: I’m a registered GigaOm analyst.
Jeff Barr (@jeffbarr) described AWS Flow Framework for Ruby for the Simple Workflow Service in an 8/5/2013 post:
The Amazon Simple Workflow Service (SWF) lets you build scalable, event-driven systems that coordinate work across many machines that can be either cloud-based or on-premises. The service handles coordination, logging, and auditing so that you don't need to write a bunch of glue code or to maintain your own state machines. Instead, you can focus on the business logic that adds value and makes your business unique.
Today we are announcing a Ruby version of the AWS Flow Framework to make it even easier for you to write and manage your workflow logic in pure Ruby. Using the framework, you can write code in a straightforward way. Flow's pre-built objects and classes will communicate with the Simple Workflow API on your behalf, making it easy for you to run tasks in sequence or in parallel on one or more machines. The framework tracks the progress of each step and retries failed tasks based on rules you define. Under the covers, it uses Amazon SWF for state management and for distributing tasks across worker machines.
The Ruby version of the AWS Flow Framework is open source and available on GitHub. Get the gems from Rubygems and install them by typing gem install aws-flow. This will also install the AWS SDK for Ruby.
You construct your application by extending base classes provided by the framework. For example, to write a workflow that controls a flow of steps – known in Amazon SWF as Activities – you would write:
class HelloWorldWorkflow
extend AWS::Flow::Workflows
workflow :hello_workflow do
{
:version => "1",:execution_start_to_close_timeout => 3600, :task_list => $TASK_LIST
}
end
activity_client(:activity) { {:from_class => "HelloWorldActivity"} }
def hello_workflow(name)
activity.hello_activity(name)
end
endYou can then write or reuse your existing Ruby code for the individual steps:
def hello_activity(name)
puts "Hello, #{name}!"
endWe have created a video tutorial to help you get started:
You can also download the Amazon SWF code samples, or read the Flow Framework Developer Guide to learn more.


<Return to section navigation list>


0 comments:
Post a Comment