Windows Azure and Cloud Computing Posts for 9/24/2012+
| A compendium of Windows Azure, Service Bus, EAI & EDI,Access Control, Connect, SQL Azure Database, and other cloud-computing articles. |

• Updated 9/25/2012 5:00 PM PDT with new articles marked •.
Tip: Copy bullet, press Ctrl+f, paste it to the Find textbox and click Next to locate updated articles:
Note: This post is updated daily or more frequently, depending on the availability of new articles in the following sections:
- Windows Azure Blob, Drive, Table, Queue, Hadoop and Media Services
- Windows Azure SQL Database, Federations and Reporting, Mobile Services
- Marketplace DataMarket, Cloud Numerics, Big Data and OData
- Windows Azure Service Bus, Access Control, Caching, Active Directory, and Workflow
- Windows Azure Virtual Machines, Virtual Networks, Web Sites, Connect, RDP and CDN
- Live Windows Azure Apps, APIs, Tools and Test Harnesses
- Visual Studio LightSwitch and Entity Framework v4+
- Windows Azure Infrastructure and DevOps
- Windows Azure Platform Appliance (WAPA), Hyper-V and Private/Hybrid Clouds
- Cloud Security and Governance
- Cloud Computing Events
- Other Cloud Computing Platforms and Services
Azure Blob, Drive, Table, Queue, Hadoop and Media Services
The Apache Hadoop on Windows Azure team (@bradoop) posted a HadoopOnAzure REST API Wrapper Sample to the MSDN Code repository on 9/24/2012:
Introduction
Download: C# (188.8 KB)
This sample provides a more easy-to-use wrapper over the HadoopOnAzure REST API. Originally developed by Brad Sarsfield and available on GitHub, the original HadoopOnAzure REST API allows you to programmatically submit a MapReduce or Hive job through a Web service.
This library was initially developed for automation in SQL Server Integration Services (SSIS) purposes. Interestingly enough, it is not limited to SSIS and is compatible with a large amount of project types. Beyond
somehowsimplifying the usage, the new library also adds new features such as the possibility to run PIG and SQOOP scripts on Hadoop.Building the Sample
- Open the solution HadoopOnAzureJobClient.sln in Visual Studio 2010
- Set HadoopOnAzureJobClientSimplified as Startup Project
- Press F6 to build the library from Visual Studio 2010
Description
In order to simplify interactions with the user, the sample allows running commands with a minimum amount of code as illustrated hereafter.
The following provides some examples of use:
Getting the Hadoop version
JobClientSimplified client = new JobClientSimplified("https://yourcluster.cloudapp.net", username, password);
var version = client.GetVersion();Substitute in the above code your actual Hadoop Cluster name for yourcluster.
Running a Job on the Head node cluster
JobClientSimplified client = new JobClientSimplified("https://yourcluster.cloudapp.net", username, password);
var jobId = client.Start("HelloWords", "C:\\Temp\\hellowords.jar", "wordcount asv://ssis/books/fr-fr/ booksTopWords");Substitute in the above code your actual Hadoop Cluster name for yourcluster.
Waiting for and monitoring a job
JobClientSimplified client = new JobClientSimplified("https://yourcluster.cloudapp.net", username, password);
client.Wait(
progress =>
{
Console.WriteLine(progress);
},
finishResult =>
{
if (finishResult != 0)
Console.WriteLine("Job Complete with errors");
else
Console.WriteLine("Job Complete with success");
},
jobId, waitingTime);Substitute in the above code your actual Hadoop Cluster name for yourcluster.
Running a Pig script
JobClientSimplified client = new JobClientSimplified("https://yourcluster.cloudapp.net", username, password);
string jobId = client.PigQueryFromFile("C:\\Temp\\query.pig", "C:\\Temp\tutorial.jar");


Substitute in the above code your actual Hadoop Cluster name for yourcluster.
Denny Lee (@dennylee) posted a link to the slides for his Introduction to Microsoft’s Big Data Platform and Hadoop Primer on 9/24/2012:
Last week I had the honor of presenting to the SQL Community during the 24 Hours of PASS – Fall 2012 event. If you would like to get a copy of the slides included embedded images of the demos, check out the SlideShare below.
Introduction to Microsoft’s Big Data Platform and Hadoop Primer from Denny Lee

• The Datanami Staff (@datanami) posted A Cutting Preview of Hadoop in 2013 on 9/24/2012:
Hadoop, with its impressive scalability and predictive analytics capabilities, has made somewhat of a name for itself in the big data world and one of the leading vendor forces behind that move—Cloudera—is hoping to extend the open source framework’s reach.
Doug Cutting, Hadoop’s founder, will give the keynote address at the Hadoop World convention in New York City in October, where we will be on hand to report live. This week he gave a little preview on the state of Hadoop in a recent interview.
Though Cutting works for Cloudera, named because its founder believed it was the era of the cloud, he noted that Hadoop is facilitating a move away from the cloud for those serious about their big data. According to Cutting, it is expensive to host a lot of data in the cloud and inefficient to host some data in the cloud and some locally. As a result, many companies, especially those who constantly require access to their data, simply purchase their own Hadoop cluster.
“At Cloudera,” Cutting said “the vast majority of our customers are self-hosting. I think a lot of folks start out doing things hosted in the cloud, but as their clusters get very big and they’re starting to use them a lot, will bring them in-house. If you’re using your cluster 24/7, then it’s really expensive to keep it in the cloud compared to hosting it yourself.”
Companies’ integrative attitude toward Hadoop has helped make it a standard. Instead of trying to build their own Hadoop-like systems and compete with it, companies like Microsoft and Oracle incorporated Hadoop into their existing infrastructures and built on it themselves. In Cutting’s mind, this has created an open source Hadoop community which has been integral to Hadoop’s continued improvement.
“I didn’t expect Oracle and Microsoft to so quickly and readily adopt Hadoop as a component for their platform. I thought maybe they would develop their own proprietary technology and compete. They instead elected to join in and work with the open source community in building out Hadoop.”
As a result of this open source community, Hadoop is becoming more and more compatible. This stands to reason. As more people work on Hadoop, it is transposed to more systems and translated to more languages. “Compatibility, compatibility of data, compatibility of network protocols are all areas that we’re improving in and we need to keep improving.” This compatibility will hopefully see the amount of Hadoop-based projects rise going forward, a goal Cutting is focused on for the near future.
Eventually, Cutting would also like to see Hadoop be the one to bridge the gap between big data and fast data. It is already renowned for its batch-processing system, allowing it to scale to petabytes of data and even perform a measure of predictive analytics. “Hadoop started as a batch-processing system able to economically store petabytes and process them in ways you that couldn’t before – really get through datasets that large.”
However, Hadoop is not exactly the standard when it comes to processing those petabytes quickly. With that being said, there are a significant amount of people who work on and run Hadoop. Since they store and analyze a great deal of their data on Hadoop anyway, it would make sense to somehow leverage flash technology or something similar into the system.
“I think the challenge is to see if we can meet that promise and really provide the sort of holy grail of computing, something which is scalable to arbitrary large numbers of computers, arbitrary size of data sets, and arbitrary latencies. We can make it as fast and faster by adding more resources and giving the transactional consistency along with the scalability.”
While Cutting is optimistic about Hadoop improving its speed in the future, in order for Hadoop to become a force in quick data, users will need Hadoop’s speed to match its scalability. However, Hadoop has come a long way since its beginnings as a Yahoo side project under Cutting and should not be counted out.
Related Articles
![image_thumb[13]](https://blogger.googleusercontent.com/img/b/R29vZ2xl/AVvXsEiq2cjOpt_O4yFxsSDyTMnLD88RBoLXuLA4DvT7E4Xbn2RS4axkrEvDMUDYVxQcV3iuXvWDwSyqrcy4lW8z1f5jn9DT2Wq4eKJtbam-rK-l3tWnuSUy8UnYq_gT-yCyRS3iIP0u3QBO/s1600-h/image_thumb136.png "image_thumb[13]")
<Return to section navigation list>
Windows Azure SQL Database, Federations and Reporting, Mobile Services
• Visual Studio Magazine published Nick Randolph’s (@BTRoam) Getting Started with Windows Azure Mobile Services [and Windows Phone] article on 9/24/2012:
Set up and use create a simple Windows Phone program that connects to Azure Mobile Services.
Recently, Microsoft announced the Windows Azure Mobile Services (WAMS), a set of cloud services designed to jump start mobile application development. Currently, all that's shipped is an SDK for Windows 8 application development. However, as the service is exposed via an OData-like feed, it's possible to get started using these services in your Windows Phone applications today. This article will show how to set up and get started with your first WAMS, before jumping into accessing it from an application.
A Windows Azure Mobile Service accelerates a normal mobile application development cycle by providing some of the backend services that most applications require. Currently, these are focused around data storage and push notifications.
Data storage is provided via a SQL Azure database, which is exposed to the mobile applications via a REST API. The push notifications are currently limited to Windows 8, and as such won't be covered in this article.
The first thing you'll need is a Windows Azure account with the Mobile Services preview feature enabled. Microsoft's provided a quick tutorial that will step you through the process of creating a Windows Azure account and enabling preview features (in step 3, three make sure you select the Mobile Services feature to try it out).
The next step is to set up a mobile service to work with. Open and sign into the Windows Azure management portal, then select the Mobile Services tab from the left menu to view the list of Mobile Services (shown in Figure 1).
Figure 1. The Windows Azure Management portal.
From the action bar at the bottom of the screen click the New button, followed by the Create button, to begin creating a new Mobile Service. The New Mobile Service wizard will step you through specifying a URL (think of this as the name of your service) and the details of the SQL Azure database you're going to use. In this case we're going to specify a new database sitting on a new database server. If you have existing SQL Azure databases you may decide to use one of those, or reuse an existing database server.
After you've entered all the information and hit the Complete (tick) button, the management portal will take a couple of minutes to finish setting up your service. Once your service is ready to go, it will appear in the Mobile Services area with a status of Ready. Click on your new mobile service to start interacting with it.
Figure 2. Creating a new mobile service on the portal.
On the welcome page for your new mobile service, you'll see a number of steps to help you start building a Windows 8 application against this service. These steps include a couple of important pieces of information needed to access your mobile service from a Windows Phone application. Click the "Connect an existing Windows Store app" link to expand out the instructions. From Step 2, record both the URL and application key from the example code displayed (as illustrated by the comments):
public static MobileServiceClient MobileService = new MobileServiceClient(
    "https://mobilecorner.azure-mobile.net/",  // This is the URL for your mobile service
    "QEoycHPhsULrrqnrHBVKydvlPugspY77"	  // This is the application Key
);
In this example, we're going to have a single table which records a list of articles written for the this column. Each article will have two properties: a title and the URL of the article itself.
From the top of the management portal for your new mobile service, select the Data tab, and then click the Add a Table button in the middle of the screen (or hit the Create button from the action bar). Give the table a name, Article, and hit the Complete button. There are other options you can tweak to adjust permissions for the table, but for the purposes of this example we'll go with the default values.
You'll notice that the newly-created table appears in the Data tab, and that if you click through to the table, then select the Columns tab, it consists of a single column, id. There is currently no way to add columns via the management portal.
Initially, all mobile services are setup with the Dynamic Schema option enabled. This means that the schema will update to automatically accommodate additional properties dynamically. Of course, you'll probably want to disable this option before you make your application widely available to prevent abuse.
Let's flip over to Visual Studio and create a new Windows Phone application, which we'll use to add and view the list of articles. The interface will be relatively straight forward, consisting of two TextBlocks, two TextBoxes and a Button.
<StackPanel x:Name="ContentPanel" Grid.Row="1" Margin="12,0,12,0">
    <TextBlock Text="Title" />
    <TextBox x:Name="TB_Title" />
    <TextBlock Text="Url" />
    <TextBox x:Name="TB_Url" />
    <Button Content="Submit"
            Click="SubmitClick" />
</StackPanel>
We'll start with the code for the SubmitClick method and the Article class, which we'll use to send and receive data with the mobile service (note we're accessing the XAML elements directly to keep the example simple; in production, you'd want to use model-view/view-model (MVVM) and data binding to separate the view from the logic of your application). In this code, we're using asynchronous programming to make the code more readable.
public class Article
{
    public int? Id { get; set; }
    public string Title { get; set; }
    public string Url { get; set; }
}

private async void SubmitClick(object sender, RoutedEventArgs e)
{
    var article = new Article {Title = TB_Title.Text, Url = TB_Url.Text};
    article = await Insert(article);
    MessageBox.Show("Article inserted: " + article.Id);
}
The code in the Insert method (Listing 1) is where all the heavy lifting happens, via communication with the mobile service. Essentialy, the Article object is serialized to JSON to be sent to the mobile service via a POST operation. Note that because we don't want the id property to be sent when inserting a new object, we've used Json.net rather than the built-in DataContractJsonSerializer (it's also significantly quicker).
If you now check back in the management portal, you'll see that a record has been added to the Article table, and both Title and URL columns have been added. The code in Listing 2 illustrates how you can read the articles from the mobile service. It uses a GET operation to retrieve articles. To do an update, use the PATCH verb, and the DELETE verb to delete an item (both these require you to add "/<id>" to the end of the URL, where <id> is the id of the item you wish to update or delete).
In this article you've seen an example of how you can setup and start calling a Windows Azure Mobile Service from within your Windows Phone application. This information was put together based on an analysis of the Windows 8 client library, and by monitoring the calls to the mobile service using Fiddler.


Full disclosure: I’m a contributing editor for 1105 Media’s Visual Studio Magazine.
Chris Risner (@chrisrisner) posted Storing Images from iOS in Windows Azure Mobile Services on 6/24/2012:
Windows Azure Mobile Services have been blowing up in popularity since the release a few weeks ago. One of the questions I’ve received most frequently is if there is anyway to store images in Mobile Services. The answer to this is a little bit yes and a little bit no. Before proceeding, if you haven’t already taken a walk through of Mobile Services, I’d highly recommend reading through my earlier post on connecting iOS to Windows Azure Mobile Services. The code I’ll show later in this article will build off the sample built in that post. If you want to skip all of the explanation, you can download the code for this sample from the savingImages branch in GitHub. If you decide to go right to the code, I would HIGHLY recommend reading the Disclaimer first.
JSON and Binary Data
JSON, the data format that Mobile Services uses to send data across the wire, does not natively support binary data types so you can’t post JSON as a column in the JSON you send to the server. If you try, you’ll get back this from your post to the server:
"code":400,"error":"The value of property 'columnName' is of an unsupported type."
What is interesting is that if you manually connect to the SQL database that stores the data for your mobile service (using either SQL Server Management Studio or the Manage button in the Windows Azure portal) there isn’t anything to stop you from adding columns of unsupported types to the database. When I first wanted to look at storing an image in the database for Mobile Services, the first thing I tried was adding a Varbinary column to my table and pulling that down into my client. This actually works, kind of. When you query the table from your iOS app the Varbinary column comes back looking like this in the JSON:
{"0":1,"1":35,"2":0,"3":0,"4":0,"5":0,"6":0,"7":0,"8":0,"9":0,"10":0}
So you’re literally getting an array back of the bytes. As you can imagine, this wouldn’t really be ideal for taking and then reconstructing into an image. The bigger problem, though, is that you can’t post image data back to the server in the same format (you’ll get the error mentioned above). However, in trying this, I struck on another idea which does work.
Disclaimer
While the method I’m about to describe will work, I wouldn’t recommend it unless you know what you’re doing. You’re better off with hosting a service in Windows Azure Websites which will get you a Shared Access Signature (SAS) for secure uploading to Windows Azure Blob Storage and then saving the blob’s URL to your Mobile Services database. If you’d like to take a look at doing this, you can read this series about mobile geolocation apps which talks about getting a SAS URL from a PHP service (running in Windows Azure Websites) and then uploading the image. The debate about whether or not you should even store image data in a database is much too large to even be touched upon here but hopefully with this disclaimer in mind, you’ll know how to proceed.
The Solution
The solution I’m going to explain today is to use a varchar (string) column to store the base 64 encoded string representation of an image in the Mobile Services database. Since Mobile Services is more than capable of handling string type data, it will treat this as such and not even realize it’s storing image data. We’re going to be basing our code off of the sample mentioned above. You can grab the code without any of the changes we’re about to do from the master branch of this GitHub repository.
Changing the UI
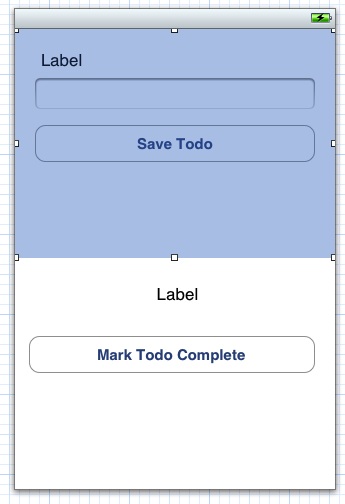
The first thing we need to do is alter our user interface to facilitate the images. Open up MainStoryboard.storyboard and take a look at the view for the TodoDetailsViewController (it should be at the far right). Before we make any changes the view will look like this:
We’re going to compact things a bit so we can keep our simple view and add the new controls. Everything in the top half view should be moved up and a button should be added to the left side and an ImageView to the right side. In the bottom half view, you can move things up and just add an ImageView beneath the “Mark Todo Complete” button. When you’re done, the UI should look like this:
Open the assistant editor and control + click and drag the new UI elements over to create an IBOutlet for each of the image views and an IBAction for the button. We’re also going to need to change TodoDetailsViewController.h so that the class implements the UIImagePickerControllerDelegate and UINavigationControllerDelegate. When you’re done, your header file will look something like this:
@class TodoDetailsViewController;
@protocol TodoDetailsViewControllerDelegate <NSObject>
- (void)todoDetailsViewController:(TodoDetailsViewController *)controller didFinishWithTodo:(NSString *)todoId andTodoText:(NSString *)todoText;
@end
@interface TodoDetailsViewController : UIViewController<NSURLConnectionDelegate, UIImagePickerControllerDelegate, UINavigationControllerDelegate> {
@private
NSNumber* todoId;
NSMutableData* receivedData;
NSHTTPURLResponse* httpResponse;
}
@property (weak, nonatomic) IBOutlet UIView *viewCreateTodo;
@property (weak, nonatomic) IBOutlet UIView *viewDetailsTodo;
@property (weak, nonatomic) IBOutlet UITextField *txtTodoText;
@property (weak, nonatomic) IBOutlet UILabel *lblTodoText;
@property (nonatomic, weak) id <TodoDetailsViewControllerDelegate> delegate;
@property (weak, nonatomic) IBOutlet UIImageView *imageViewNewTodo;
@property (weak, nonatomic) IBOutlet UIImageView *imageViewExistingTodo;
@property (nonatomic, weak) NSString *todoText;
@property BOOL addingNewTodo;
- (IBAction)tapSaveTodo:(id)sender;
- (IBAction)tapMarkTodoComplete:(id)sender;
- (IBAction)tapSelectImage:(id)sender;
@end
view rawTodoDetailsViewController.hThis Gist brought to you by GitHub.
Now before we code the implementation, let’s solve a problem with encoding our string.
Handling Base 64 encoding and decoding
Simply put, there isn’t anything built into Objective-C or the iOS Framework to facilitate base 64 encoding and decoding. Thankfully, a quick search on the internet turns up this. You’ll need to download the NSData+Base64 class and header and drop them into your project. After doing so, make sure you open your project file and go to the Build Phases tab. You’ll need to expand Compile Sources and add NSData+Base64.m. When you’re done it will look like this:
Now that we can encode and decode in base 64 to our heart’s content, let’s move on to TodoDetailsViewController.m.
Implementing the Methods
First things first, add the base 64 class to your import statements:
#import "NSData+Base64.h"
Now let’s implement the tapSelectImage method:
- (IBAction)tapSelectImage:(id)sender {
UIImagePickerController *picker = [[UIImagePickerController alloc] init];
picker.sourceType = UIImagePickerControllerSourceTypePhotoLibrary;
picker.delegate = self;
[self presentModalViewController:picker animated:YES];
}
view rawtapSelectImage.mThis Gist brought to you by GitHub.
Here we’re creating a UIImagePickerController, telling it to use the gallery, telling it to use the view controller as it’s delegate, and presenting it to the user. The imagePickerController delegate method will use the image returned to set the image property on our ImageView:
- (void)imagePickerController:(UIImagePickerController *)picker
didFinishPickingImage:(UIImage *)image
editingInfo:(NSDictionary *)editingInfo {
imageViewNewTodo.image = image;
[picker dismissModalViewControllerAnimated:YES];
}
view rawimagepickercontroller.mThis Gist brought to you by GitHub.
Now if you run your app and tap select image and pick one from the gallery, it should show up next to the “Select Image” button.
Let’s handle saving the image next.
Saving the image
Go to the tapSaveTodo method. After we’ve set headers on theRequest we will pull the image property from the ImageView and base 64 encode it (provided there is an image selected).
- (IBAction)tapSaveTodo:(id)sender {
NSMutableURLRequest *theRequest=[NSMutableURLRequest
requestWithURL:
[NSURL URLWithString:kAddUrl]
cachePolicy:NSURLRequestUseProtocolCachePolicy
timeoutInterval:60.0];
[theRequest setHTTPMethod:@"POST"];
[theRequest addValue:@"application/json" forHTTPHeaderField:@"ACCEPT"];
[theRequest addValue:@"application/json" forHTTPHeaderField:@"Content-Type"];
[theRequest addValue:kMobileServiceAppId forHTTPHeaderField:@"X-ZUMO-APPLICATION"];
NSData *data = nil;
NSString *imageData = nil;
if (imageViewNewTodo.image != nil) {
UIImage *image = imageViewNewTodo.image;
data = UIImagePNGRepresentation(image);
imageData = [data base64EncodedString];
}
//build an info object and convert to json
NSDictionary* jsonDictionary = [NSDictionary dictionaryWithObjectsAndKeys:
@"false", @"complete",
txtTodoText.text, @"text",
imageData, @"coltest",
nil];
//convert JSON object to data
NSError *error;
NSData* jsonData = [NSJSONSerialization dataWithJSONObject:jsonDictionary
options:NSJSONWritingPrettyPrinted error:&error];
[theRequest setHTTPBody:jsonData];
// create the connection with the request and start loading the data
NSURLConnection *theConnection=[[NSURLConnection alloc] initWithRequest:theRequest delegate:self];
if (theConnection) {
// Create the NSMutableData to hold the received data.
// receivedData is an instance variable declared elsewhere.
receivedData = [NSMutableData data];
} else {
// We should inform the user that the connection failed.
}
}
view rawtapSaveTodo.mThis Gist brought to you by GitHub.
Then we add the image field into the NSDictionary we create and serialize to JSON. The column name I’m using here is “coltest” but since we’re using Mobile Service’s dynamic schema, you could name it anything you want. In this situation, if there is image data we’ll pass over the encoded string for it and if there isn’t, we’ll send over nil. Now, you could run your app and try out saving, but why don’t we make loading work as well so we can test it all at once.
Loading the image
Due to the fact that we’re storing the data that comes back from the server as an NSDictionary with all fields returned left inside it, and since we’re storing that NSDictionary on the app delegate, the change we need to make to load the image for an existing todo item is extremely small:
- (void)viewDidLoad {
[super viewDidLoad];
// Do any additional setup after loading the view.
if (addingNewTodo == NO) {
//Viewing an existing todo
viewCreateTodo.hidden = YES;
lblTodoText.text = todoText;
AppDelegate *appDelegate = (AppDelegate *)[[UIApplication sharedApplication] delegate];
for (NSDictionary *item in appDelegate.todos) {
if ([todoText isEqualToString:[item objectForKey:@"text"]]){
todoId = (NSNumber*) [item objectForKey:@"id"];
NSString *stringData = (NSString *)[item objectForKey:@"coltest"];
if (stringData != (id)[NSNull null]) {
NSData *data = [NSData dataFromBase64String:stringData];
UIImage *image = [UIImage imageWithData:data];
imageViewExistingTodo.image = image;
}
break;
}
}
} else {
//Adding a new todo
viewDetailsTodo.hidden = YES;
}
}
view rawviewDidLoad.mThis Gist brought to you by GitHub.
Here in the viewDidLoad method we are pulling the NSString value out for “coltest”. If that isn’t null, we then base 64 decode it into NSData. We then create an UIImage from the NSData and use that to set the image property of the ImageView. Let’s run it.
Running the app
When you run your app, you should be able to select an image and then save your todo item. When you tap back into that todo item, you should see the image along with the title:
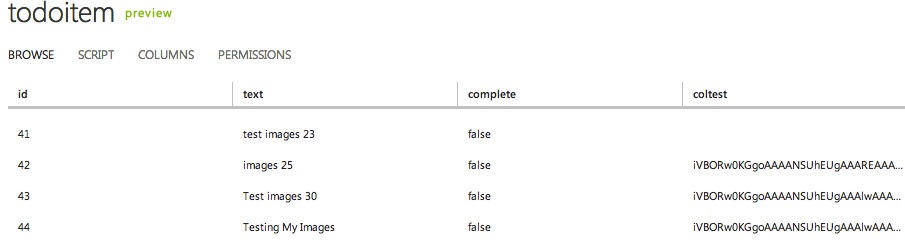
Additionally, if we log into the Windows Azure portal and go to our mobile service’s data page and view our table data, we can see that the string representation of our data is showing up in “coltest”:
Conclusion
Today we walked through one way to store images with Windows Azure Mobile Services. As noted in the disclaimer, this technique shouldn’t be used without some consideration. If you do decide to use it, one way you could mitigate long load times (you may have noticed this sample running slower due to the data being returned when it selects all of the todos) is to only select the non-image columns when you are pulling data for the TableView and select the full todo item (including the image) when the user taps into a todo. This still doesn’t solve some of the problems like increased database bandwidth and size, but it is a way of solving the problem. You can access the completed source code for this demo under the savingImages branch of this GitHub repository (just remember that you’ll need to follow the above instructions for downloading the NSData+Base64 files and including them in your compile sources as well as configure your app in the Constants.m file).


![image_thumb[18]](https://blogger.googleusercontent.com/img/b/R29vZ2xl/AVvXsEhjsk_NF384PZyLO6pOrTR2s3pnwoxxo6LecxfQy3avxrKqClqYZQiRZao9JduuaNu1UIcQORNga59mNyWKRlGNVtsGH6j4FrEYoxzt1dMWq00T051T99_3JmJkKioWuZyDHusxSVjy/s1600-h/image_thumb182.png "image_thumb[18]")
Amit Apple (@amitapl) described Azure Mobile Services - Admin Table Viewer Sample in a 9/24/2012 post:
In this post I’m going to write about building a simple Windows 8 app for administration of a Windows Azure mobile service.
This app will allow us to view all of our mobile service tables with added options to delete and edit rows.
Disclaimer: The code in my post will focus more on how to use the Windows Azure mobile services SDK to create administration apps and less on Windows 8 client code.
The first thing we want to do in an admin app is have full access to your tables, the way to do that is by using your mobile service master key as mentioned in a previous post.
using Microsoft.WindowsAzure.MobileServices;
using System;
using Windows.Foundation;
namespace MobileServices
{
public class AdminServiceFilter : IServiceFilter
{
private bool disableScripts;
private string masterKey;
public AdminServiceFilter(bool disableScripts, string masterKey)
{
this.disableScripts = disableScripts;
this.masterKey = masterKey;
}
public IAsyncOperation<IServiceFilterResponse> Handle(IServiceFilterRequest request, IServiceFilterContinuation continuation)
{
// Add master key to the request's header to have admin level control
request.Headers["X-ZUMO-MASTER"] = this.masterKey;
if (this.disableScripts)
{
// Get the request's query and append noScript=true as the first query parameter
var uriBuilder = new UriBuilder(request.Uri);
var oldQuery = (uriBuilder.Query ?? string.Empty).Trim('?');
uriBuilder.Query = ("noScript=true&" + oldQuery).Trim('&');
request.Uri = uriBuilder.Uri;
}
return continuation.Handle(request);
}
}
}
…


Amit continues with source code excerpts from GitHub.
You can find the entire project in this link.
Chris Risner (@chrisrisner) completed his Android app series with Mobile Geolocation Apps with Windows Azure Websites Part 5: Adding New Points of Interest in Android on 6/24/2012:
In the previous article in this series, we walked through creating an Android app, adding a MapView to it, and displaying points of interest on it. When the user’s location changes and when the app first loads, we communicate with the PHP service, which we set up in the first article, to get all of the points of interest within a number of meters from a certain latitude and longitude. Today we’re going to look at adding new points of interest. This actually involves an interesting dance between the client application and the cloud. We’ll discuss that first.
If you haven’t already done so, you’ll need to go through part 1 in this series to set up a Windows Azure Website running the PHP service. To do this you will need to have a Windows Azure account. If you don’t already have a Windows Azure account, you can sign up for a free trial here. Once you’ve deployed that site, you can come back and proceed with this walkthrough.
If you would like to jump ahead and just pull down the source code, you can access it in this GitHub repository. Note that you’ll still need to follow the instructions in the readme and configure your app.
How do we add a point of interest
In order to upload an image or video and tie it to a point of interest in our backend, we have to communicate with two different server components: our Windows Azure Websites PHP service and Windows Azure Blob Storage. Let’s look at a diagram of the steps to do this and then discuss them:
The first thing we need to do is have our client app communicate with our service running in Windows Azure Website and request a Shared Access Signature (SAS).
A SAS is a way around needing to have the account name and key of our storage account on the local device. If you were to put the account name and key in your client app and someone was able to pull those details out, they could then upload and access whatever they wanted in your storage account. The way around this is by using the SAS. A SAS is created to give an application the ability to upload a file to a storage account without having the name or key. Instead, a server side component has the name and key and requests the SAS from the storage account. This SAS is a URL which expires after a certain period of time (chosen by the server side component) and gives a client application the ability to upload a single file.
So, our client app requests the SAS from our website. The website talks to our storage account and gets the SAS. The SAS is then returned to the client application. The client app can then use the SAS URL to upload a file. After that is done, we save the point of interest (with a reference to the URL of the item uploaded to storage) inside that point of interest. Let’s get to our code and see how we can accomplish this.
Let’s code
Let’s start by adding some new variables to Constants.java. Specifically, we need URLs for getting a SAS and uploading a point of interest. We also need to keep track of a container name for blob storage.
public class Constants {
public static final String kFindPOIUrl = "http://yoursubdomain.azurewebsites.net/api/Location/FindPointsOfInterestWithinRadius";
public static final String kBlobSASUrl = "http://yoursubdomain.azurewebsites.net/api/blobsas/get?container=%s&blobname=%s";
public static final String kAddPOIUrl = "http://yoursubdomain.azurewebsites.net/api/location/postpointofinterest/";
public static final String kContainerName = "test";
}
view rawconstants2.javaThis Gist brought to you by GitHub.
Remember you need to change “yoursubdomain” to whatever URL you set up in the first article in the series. Next we need to do is start storing the current location whenever it changes in the activity. Open up MainActivity.java and add a private variable that is a Location object:
private Location mCurrentLocation;
Then in the onLocationChanged method in the LocationListener, start storing the location into that variable:
LocationListener locationListener = new LocationListener() {
public void onLocationChanged(Location location) {
// Called when a new location is found by the network location
// provider.
makeUseOfNewLocation(location);
mCurrentLocation = location;
}
view rawmainActivity onLocationCHangedThis Gist brought to you by GitHub.
Next, let’s add a new Android Activity to your project named AddPointOfInterestActivity. You can lead all of the defaults for this activity. When your’e done you should have a new activity and a layout file tied to it (I’m using the latest version of ADT which gives you a new activity wizard, as opposed to older versions which required you to manually create the class and layout file as well as modify the manifest). We’re not going to do any work in this activity yet, but we’ll come back to it. Instead, open up the res/menu/activity_main.xml. This class contains the menu options that appear when you tap the menu button inside our app. We’re going to add a new item here:
<menu xmlns:android="http://schemas.android.com/apk/res/android">
<item android:id="@+id/menu_settings"
android:title="@string/menu_settings"
android:orderInCategory="100"/>
<item android:id="@+id/menu_addpoi"
android:title="Add Point"
android:orderInCategory="100"/>
</menu>
view rawmenu.xmlThis Gist brought to you by GitHub.
Now if you run the app and tap the menu button, you should see a new option appear:
Now let’s return to MainActivity and override the onOptionsItemSelected:
@Override
public boolean onOptionsItemSelected(MenuItem item) {
switch (item.getItemId()) {
case (R.id.menu_addpoi):
Intent addPOIIntent = new Intent(getApplicationContext(),
AddPointOfInterestActivity.class);
addPOIIntent.addFlags(Intent.FLAG_ACTIVITY_REORDER_TO_FRONT);
addPOIIntent.putExtra("currentLocation", mCurrentLocation);
startActivityForResult(addPOIIntent, 1234);
return true;
default:
return super.onOptionsItemSelected(item);
}
}
view rawmainactivity_optionsmenu.javaThis Gist brought to you by GitHub.
Here, you’re checking to see if the menu item tapped was the “Add Point” one, and if so, starting the AddPointOfInterestActivity. Notice that we’re passing the current location in as an extra. We’re also starting that activity with the startActivityForResult method. We’re doing that so that when we finish the AddPointsOfInterestActivity it will do a callback into MainActivity so that we can refresh the map. Before we move on to creating a new point of interest, let’s handle the callback that is fired when the new point of interest activity finishes by adding the onActivityResult method:
@Override
protected void onActivityResult(int requestCode, int resultCode, Intent data) {
if (requestCode == 1234) {
// Check to see if a POI was created
if (resultCode == 4321) {
Toast.makeText(getApplicationContext(), "New POI Created!",
Toast.LENGTH_SHORT).show();
loadPointsFromServer(mCurrentLocation);
} else {
Toast.makeText(getApplicationContext(), "Nothing was done",
Toast.LENGTH_SHORT).show();
}
} else
super.onActivityResult(requestCode, resultCode, data);
}
view rawmainactivity_onactivityresult.javaThis Gist brought to you by GitHub.
We first check the requestCode to see if it matches the value sent into startActivityForResult. We then check to see if the resultCode matches another value. This value will be returned from our new point of interest activity if we successfully added a new point. Normally we would have used a constant for these values but for ease of explanation, I’m just using numbers right in the code. Finally, if we did create a new point, we reload the points from the server.
The UI for Adding a new Point of Interest
Let’s open up the layout file that was generated for our activity. It should be something like res/layout/activity_add_point_of_interest.xml. This layout just has the default “hello world” message in it right now. Let’s change this UI to allow a user to add a new point of interest. We’ll need to give the user the ability to do three things: select an image, get a SAS, and save a point of interest. To do this, we will want a button for the user to select the image, an image view to show that image in, a button to trigger getting the SAS, a text view to show the SAS, and a button to trigger the save. We’re going to wrap this all in a ScrollView since we’re not sure how much room the user will have on their screen. When you’re done, the xml will look like this:
<ScrollView xmlns:android="http://schemas.android.com/apk/res/android"
android:id="@+id/scrollview"
android:layout_width="match_parent"
android:layout_height="match_parent" >
<LinearLayout
android:layout_width="match_parent"
android:layout_height="match_parent"
android:orientation="vertical" >
<TextView
android:id="@+id/lblAddPoiHeader"
android:layout_width="wrap_content"
android:layout_height="wrap_content"
android:text="Add New Point of Interest"
android:textAppearance="?android:attr/textAppearanceLarge" />
<Button
android:id="@+id/btnSelectImage"
android:layout_width="match_parent"
android:layout_height="wrap_content"
android:text="Select Image" />
<ImageView
android:id="@+id/imgSelectedImage"
android:layout_width="wrap_content"
android:layout_height="wrap_content"
android:src="@drawable/androidmarker" />
<LinearLayout
android:layout_width="match_parent"
android:layout_height="wrap_content"
android:layout_marginTop="30dp" >
<Button
android:id="@+id/btnGetSAS"
android:layout_width="match_parent"
android:layout_height="wrap_content"
android:text="Get SAS" />
</LinearLayout>
<TextView
android:id="@+id/lblSASDetails"
android:layout_width="wrap_content"
android:layout_height="wrap_content"
android:layout_marginTop="30dp"
android:text="SAS Details" />
<LinearLayout
android:layout_width="match_parent"
android:layout_height="wrap_content"
android:layout_marginTop="30dp" >
<Button
android:id="@+id/btnSavePOI"
android:layout_width="match_parent"
android:layout_height="wrap_content"
android:text="Save Point of Interest" />
</LinearLayout>
</LinearLayout>
</ScrollView>
view rawadd_poi.xmlThis Gist brought to you by GitHub.
If you run your app now and tap the menu button and go to “Add Point” your new screen should look like this:
Now that the UI is done, we’ll do the code behind.
Coding adding the point of interest
Open back up AddPointOfInterestActivity.java. Let’s first add some private variables we’ll need:
private Activity mActivity;
private Button mBtnGetSAS, mBtnSavePOI, mBtnSelectImage;
private TextView mLblSASDetails;
private ImageView mImgSelectedImage;
private ProgressDialog mProgressDialog;
private String _blobImagePostString = null;
private Uri mImageUrl;
private Location mCurrentLocation;
view rawaddpoi_vars.javaThis Gist brought to you by GitHub.
You’ll see where these come in as we proceed. Next, we have the onCreate method:
@Override
public void onCreate(Bundle savedInstanceState) {
super.onCreate(savedInstanceState);
setContentView(R.layout.activity_add_point_of_interest);
mActivity = this;
// Get UI Controls
mBtnGetSAS = (Button) findViewById(R.id.btnGetSAS);
mBtnSavePOI = (Button) findViewById(R.id.btnSavePOI);
mBtnSelectImage = (Button) findViewById(R.id.btnSelectImage);
mImgSelectedImage = (ImageView) findViewById(R.id.imgSelectedImage);
mLblSASDetails = (TextView) findViewById(R.id.lblSASDetails);
mBtnGetSAS.setEnabled(false);
mBtnSavePOI.setEnabled(false);
Intent myIntent = getIntent();
mCurrentLocation = (Location) myIntent.getParcelableExtra("currentLocation");
// Image select handler
mBtnSelectImage.setOnClickListener(new OnClickListener() {
@Override
public void onClick(View v) {
selectImage();
}
});
// Get SAS Handler
mBtnGetSAS.setOnClickListener(new OnClickListener() {
@Override
public void onClick(View v) {
// Start progress dialog and start async task
mProgressDialog = new ProgressDialog(mActivity);
mProgressDialog.setMessage("Requesting SAS URL");
mProgressDialog.show();
new GetSASTask().execute();
}
});
// Save POI handler
mBtnSavePOI.setOnClickListener(new OnClickListener() {
@Override
public void onClick(View v) {
// Start progress dialog and start async task
mProgressDialog = new ProgressDialog(mActivity);
mProgressDialog.setMessage("Uploading Point of Interest");
mProgressDialog.show();
new PostPointOfInterestTask().execute();
}
});
}
view rawadd_poi_onCreate.javaThis Gist brought to you by GitHub.
The first thing we do is get references to all of our UI controls and keep track of the Activity we’re in. We then disable the “Get SAS” and “Save Point of Interest” buttons so the user can’t tap them until we’re ready. Finally we set some onClickListeners. When the user taps the “Select Image” button we are firing a local method named selectImage. The other two buttons show a progress dialog and then execute new tasks. Let’s look at the image selection first:
// Fire off intent to select image from gallary
protected void selectImage() {
Intent intent = new Intent(Intent.ACTION_GET_CONTENT);
intent.setType("image/*");
startActivityForResult(intent, 1111);
}
// Result handler for any intents started with startActivityForResult
@Override
protected void onActivityResult(int requestCode, int resultCode, Intent data) {
super.onActivityResult(requestCode, resultCode, data);
try {
//handle result from gallary select
if (requestCode == 1111) {
Uri currImageURI = data.getData();
this.mImageUrl = currImageURI;
//Set the image view's image by using imageUri
mImgSelectedImage.setImageURI(currImageURI);
mBtnGetSAS.setEnabled(true);
mBtnSavePOI.setEnabled(false);
}
} catch (Exception ex) {
Log.e("Add point of interest activity", "Error in onActivityResult: " + ex.getMessage());
}
}
view rawadd_poi_selectImage.javaThis Gist brought to you by GitHub.
In selectImage we are creating a new ACTION_GET_CONTENT intent and telling it to select from images (this will fire the gallery). Again we’re starting the intent with startActivityForResult which let’s us catch it which is what we’re doing in onActivityResult. In the result method, we store the image URI as well as set the URI of the image view. Finally, we switch the buttons so the user can get the SAS. Now let’s look at the GetSASTask we saw above:
This task starts by calling the getSas method which is actually a method in the AddPointOfInterestActivity class. When getSas returns, we pass the blobImagePostString which goes to the postExecute method. postExecute will set the returned SAS URL to be the text of the text view in our UI as well as deactivating the “Get SAS” button (so the user can’t get a second one) and enables the “Save Point of Interest” button. In the getSas method, we create a URL using the kBlobSASUrl constant formatted with the container name (a container stores blobs (or files)), and the current time in milliseconds (which we’re using as the file name). We then use HttpURLConnection to post to the PHP service and get our SAS URL back. This is set to the blobImagePostString variable and the method completes (which goes back to the postExecute method above). The last thing we have to look at is the PostPointOfInterestTask:
Here we’re calling a method (part of the AddPointOfInterestActivity) named postPointOfInterestToServer. We return the result of that method which is sent to postExecute. If the result was “created” we return the result code that is expected back in MainActivity if an point is successfully created. If not, we figure out what the reason was and show a toast to alert the user. Let’s finish things off with the postPointOfInterestToServer method:
private String postPointOfInterestToServer() {
try {
// Make sure we have an image selected
if (this.mImageUrl == null) {
return "FAIL-IMAGE";
}
// Make sure we have a location
if (mCurrentLocation == null) {
return "FAIL-LOCATION";
}
Cursor cursor = getContentResolver().query(this.mImageUrl, null,null, null, null);
cursor.moveToFirst();
int index = cursor.getColumnIndex(MediaStore.Images.ImageColumns.DATA);
String absoluteFilePath = cursor.getString(index);
FileInputStream fis = new FileInputStream(absoluteFilePath);
int bytesRead = 0;
ByteArrayOutputStream bos = new ByteArrayOutputStream();
byte[] b = new byte[1024];
while ((bytesRead = fis.read(b)) != -1) {
bos.write(b, 0, bytesRead);
}
byte[] bytes = bos.toByteArray();
// Post our byte array to the server
URL url = new URL(_blobImagePostString.replace("\"", ""));
HttpURLConnection urlConnection = (HttpURLConnection) url.openConnection();
urlConnection.setDoOutput(true);
urlConnection.setRequestMethod("PUT");
urlConnection.addRequestProperty("Content-Type", "image/jpeg");
urlConnection.setRequestProperty("Content-Length", ""+ bytes.length);
// Write image data to server
DataOutputStream wr = new DataOutputStream(urlConnection.getOutputStream());
wr.write(bytes);
wr.flush();
wr.close();
int response = urlConnection.getResponseCode();
if (response == 201
&& urlConnection.getResponseMessage().equals("Created")) {
// We've posted succesfully, let's build the JSON data
JSONObject jsonUrl = new JSONObject();
try {
jsonUrl.put("Description", absoluteFilePath.substring(absoluteFilePath.lastIndexOf("/") + 1));
UUID uuid = UUID.randomUUID();
jsonUrl.put("Id", uuid.toString());
jsonUrl.put("Latitude", mCurrentLocation.getLatitude());
jsonUrl.put("Longitude", mCurrentLocation.getLongitude());
jsonUrl.put("Type", 1);
jsonUrl.put("Url",this._blobImagePostString.split("\\?")[0]);
} catch (JSONException e) {
Log.e("AddPOI", "Exception building JSON: " + e.getMessage());
e.printStackTrace();
}
HttpURLConnection newPOIUrlConnection = null;
URL newPOIUrl = new URL(Constants.kAddPOIUrl);
newPOIUrlConnection = (HttpURLConnection) newPOIUrl.openConnection();
newPOIUrlConnection.setDoOutput(true);
newPOIUrlConnection.setRequestMethod("POST");
newPOIUrlConnection.addRequestProperty("Content-Type","application/json");
newPOIUrlConnection.setRequestProperty("Content-Length",""+ Integer.toString(jsonUrl.toString().getBytes().length));
// Write json data to server
DataOutputStream newPoiWR = new DataOutputStream(newPOIUrlConnection.getOutputStream());
newPoiWR.writeBytes(jsonUrl.toString());
newPoiWR.flush();
newPoiWR.close();
int newPoiResponse = urlConnection.getResponseCode();
return newPOIUrlConnection.getResponseMessage();
}
// End of post of byte array to server
} catch (Exception ex) {
Log.e("AddPOI", "Error in image upload: " + ex.getMessage());
}
return "BIGFAIL";
}
view rawpost_point_of_interest.javaThis Gist brought to you by GitHub.
We’ve got a lot going on here so we’ll go step by step. We first check to make sure the image and location are valid. We then open up the image file and get the bytes for it. We then create a HttpURLConnection and write the image bytes to the SAS URL. Provided we get back a 201 response code, we then generate a JSONObject with all of our point of interest information in it including the coordinates, ID, type (image or video), URL, and description. We then use another HttpURLConnection to post to our PHP server to let it know we generated a new point of interest. We return the response message from that to the calling method (which passes it to the postExecute method seen above).
Running the App
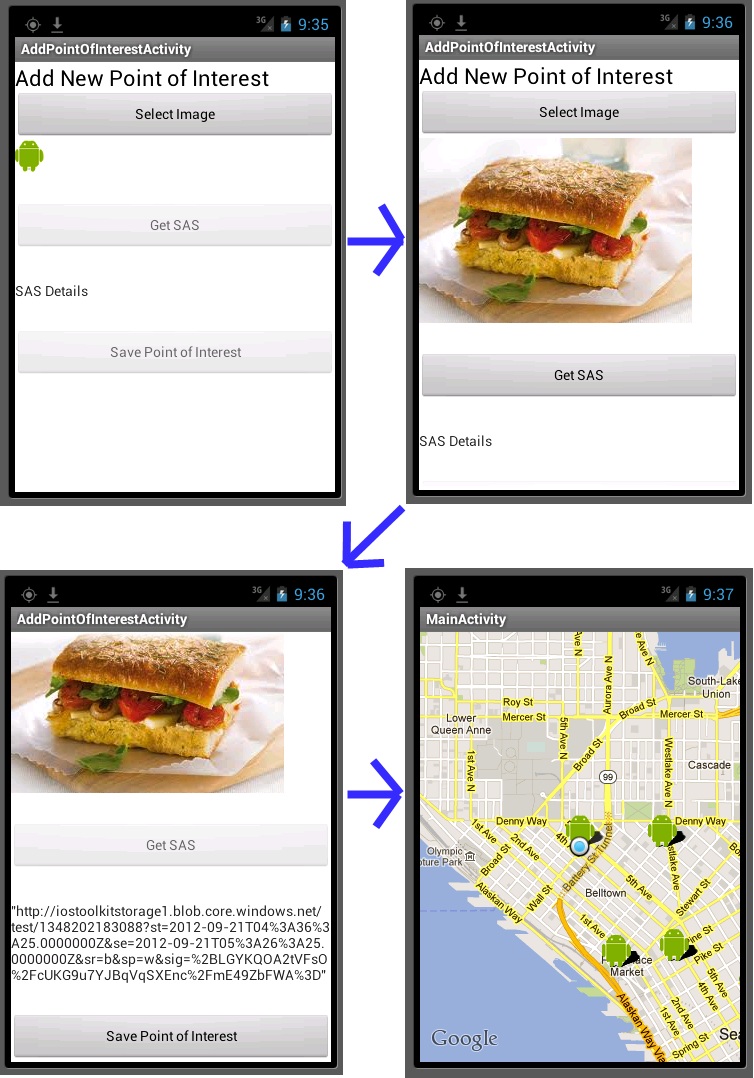
When we run the app, we’ll set our location to be in downtown Seattle, near where we were yesterday. Currently there are three points of interest. We’re going to add a fourth. Let’s follow the flow of adding a new point of interest.
We select an image first. Then we get the SAS URL. Finally we post it (which handles both uploading the image to blob storage and the point of interest data to our service). With that done we return the user to the map and refresh the points of interest near our current location. Now we see that the original point from yesterday and our new point are showing up.
Conclusion
Today we finished our Android Geolocation app. In doing so, we made more connections to our PHP service running in Windows Azure Websites in addition to using Windows Azure Blob Storage for storing images. I hope this has proved informative and has given you some solid understanding of how to create Android applications with geolocation components powered by Windows Azure. As mentioned at the top, you can access the source code for the full version of this app on GitHub. Remember to configure the subdomains in the Constants.java file before trying to run it


Chris Risner (@chrisrisner) continued his Android app series with Mobile Geolocation Apps with Windows Azure Websites Part 4: Displaying Points of Interest in Android on 9/21/2012:
In the first article in this series, we walked through creating a site in Windows Azure Websites and deploying a PHP web service to it. This PHP service exposed three important endpoints: getting a collection of points of interest, getting a shared access signature (for uploading files), and adding new points of interest. Today we’re going to build an Android client that is capable of displaying a map with these points of interest on it. We’ll also poll the user’s current location in the application so they will see all the points of interest around their current position. in the next few articles, we’ll continue to talk about how to add new points of interest.
If you haven’t already done so, you’ll need to go through part 1 in this series to set up a Windows Azure Website running the PHP service. To do this you will need to have a Windows Azure account. If you don’t already have a Windows Azure account, you can sign up for a free trial here. Once you’ve deployed that site, you can come back and proceed with this walkthrough.
If you would like to jump ahead and just pull down the source code, you can access it in this GitHub repository. Note that you’ll still need to follow the instructions in the readme and configure your app.
We’ll be using Eclipse for this tutorial though if you use a different IDE to work with Android, you should be able to follow along without too much trouble.
Creating the Android App
Let’s start by creating our new application in Eclipse. Go to File –> New –> Android Application Project. We’ll name our new application GeoAndroid:
You can leave the options for the Launcher Icon as the default or customize them if you want. In the Create Activity page, you can leave it as a Blank Activity (the default). Finally, you can use the defaults for the New Blank Activity as well. When you click finish, your app should be generated. If you run your app as is now, you should see something like this:
Now that we have our app, let’s work on the UI.
The User Interface
Open up the res/layout/activity_main.xml file. Currently there is only a TextView in the layout. Let’s get rid of that and replace it with two LinearLayouts each with two TextViews inside of them. The first two TextViews will show a latitude header and will show the actual latitude value. The second two TextViews will show a longitude header and the actual longitude value. You’ll also need to put a MapView beneath those LinearLayouts. When you’re done, the XML for your layout will look like this:
<RelativeLayout xmlns:android="http://schemas.android.com/apk/res/android"
xmlns:tools="http://schemas.android.com/tools"
android:layout_width="match_parent"
android:layout_height="match_parent" >
<LinearLayout
android:id="@+id/linearLayoutLongitude"
android:layout_width="match_parent"
android:layout_height="wrap_content" >
<TextView
android:id="@+id/lblLongitudeHeader"
android:layout_width="wrap_content"
android:layout_height="wrap_content"
android:text="Longitude" />
<TextView
android:id="@+id/lblLongitudeValue"
android:layout_width="wrap_content"
android:layout_height="wrap_content" />
</LinearLayout>
<LinearLayout
android:id="@+id/linearLayoutLatitude"
android:layout_width="match_parent"
android:layout_height="wrap_content" >
<TextView
android:id="@+id/lblLatitudeHeader"
android:layout_width="wrap_content"
android:layout_height="wrap_content"
android:text="Latitude" />
<TextView
android:id="@+id/lblLatitudeValue"
android:layout_width="wrap_content"
android:layout_height="wrap_content" />
</LinearLayout>
<com.google.android.maps.MapView
android:id="@+id/mapMain"
android:layout_width="fill_parent"
android:layout_height="fill_parent"
android:apiKey="ENTER YOUR API KEY"
android:clickable="true" />
</RelativeLayout>
view rawMainActivity.xmlThis Gist brought to you by GitHub.
One important thing to point is that in the MapView xml, we see “ENTER YOUR API KEY” for the API key. This won’t work. Before it will, you’ll need to get a Google Maps API key. You can get a Maps API Key by signing up here. Once you have that key, make sure you enter it in your XML. If you run your app now, it will error out with the following:
E/AndroidRuntime(1410): Caused by: java.lang.ClassNotFoundException: com.google.android.maps.MapView
The reason for this is that your application doesn’t know that it needs to use the maps library. To tell the compiler that, you need to open the AndroidManifest.xml file. Add the following XML element INSIDE the application node:
<uses-library android:name="com.google.android.maps" />
Now you can run your app again, but it will fail again, though with a different error:
E/AndroidRuntime(1559): Caused by: java.lang.IllegalArgumentException: MapViews can only be created inside instances of MapActivity.
This is saying that your activity needs to be of type MapActivity to use a MapView. Open the src/com.msdpe.geoandroid/MainActivity.java file and change the class your activity extends from Activity to MapActivity (you’ll also need to add an import statement). Now if you run, your app will work, but the map won’t actually show up, just the map grid. In order for it to show the actual map, you need to add the android.permission.Internet to your manifest file. Go back to your manifest and put this between the uses-sdk node and application:
<uses-permission android:name="android.permission.INTERNET" />
Now when you run your app, you should see the map show up:
Before we continue on to the code, you should also add the android.permission.ACCESS_FINE_INTERNET.
<uses-permission android:name="android.permission.ACCESS_FINE_LOCATION" />
Plumbing Code
Before we work on the code to show our location and points of interest, we need to add some plumbing code. First, add a new class named Constants and leave the default subclass of java.lang.object. In this class we’re going to put a few constants we’ll use for URLs:
public class Constants {
public static final String kFindPOIUrl = "http://yoursubdomain.azurewebsites.net/api/Location/FindPointsOfInterestWithinRadius";
}
view rawConstants.hThis Gist brought to you by GitHub.
Make sure you replace the “yoursubdomain” with the URL of the site you created in the first article in the series. We’re going to add one more class named GeoItemizedOverlay and leave it with the same subclass. After it’s created, we’re going to change it to extend ItemizedOverlay<OverlayItem>. This class will be used to handle the items we display on the map:
import java.util.ArrayList;
import android.app.AlertDialog;
import android.content.Context;
import android.content.DialogInterface;
import android.content.Intent;
import android.graphics.drawable.Drawable;
import android.net.Uri;
import android.util.Log;
import com.google.android.maps.GeoPoint;
import com.google.android.maps.ItemizedOverlay;
import com.google.android.maps.MapView;
import com.google.android.maps.OverlayItem;
public class GeoItemizedOverlay extends ItemizedOverlay<OverlayItem> {
private final String TAG = "GeoItemizedOverlay";
private Context mContext;
public GeoItemizedOverlay(Drawable defaultMarker, Context context) {
super(boundCenterBottom(defaultMarker));
this.mContext = context;
this.populate();
}
private ArrayList<OverlayItem> mOverlays = new ArrayList<OverlayItem>();
public void addOverlay(OverlayItem overlay) {
mOverlays.add(overlay);
populate();
}
@Override
protected OverlayItem createItem(int i) {
return mOverlays.get(i);
}
@Override
public int size() {
return mOverlays.size();
}
@Override
public boolean onTap(GeoPoint p, MapView mapView) {
Log.i(TAG, "item tapped: " + p.toString());
return super.onTap(p, mapView);
}
/***
* When an overlay item is tapped, pop up an alert with it's Title and
* snippet
*/
@Override
protected boolean onTap(int index) {
Log.i(TAG, "Index of tapped item: " + index);
OverlayItem tappedItem = mOverlays.get(index);
Log.i(TAG, "Title of tapped item: " + tappedItem.getTitle());
Log.i(TAG, "shippet of tapped item: " + tappedItem.getSnippet());
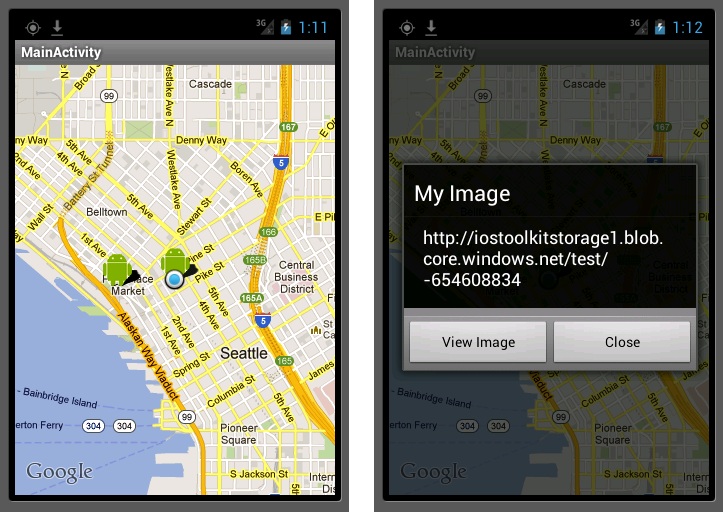
// Bulid the alert dialog and show it
AlertDialog dialog = new AlertDialog.Builder(this.mContext).create();
dialog.setTitle(tappedItem.getTitle());
dialog.setMessage(tappedItem.getSnippet());
final String url = tappedItem.getSnippet();
//When the user clicks view image, open a browser with the image URL
dialog.setButton("View Image", new DialogInterface.OnClickListener() {
public void onClick(DialogInterface dialog, int which) {
Intent webIntent = new Intent(Intent.ACTION_VIEW);
webIntent.setData(Uri.parse(url));
mContext.startActivity(webIntent);
}
});
dialog.setButton2("Close", new DialogInterface.OnClickListener() {
public void onClick(DialogInterface dialog, int which) {
}
});
dialog.show();
return super.onTap(index);
}
}
view rawGeoItemizedOverlay.javaThis Gist brought to you by GitHub.
Here we’re handling creating the overlay, adding items, and tapping those items. The only really interesting thing to point out is the onTap(int index) method. When the user taps an item on the overlay, we create a dialog with a title and description and two buttons. The first button when tapped, will launch the web browser with whatever URL has been set into the description. Later when we display our points of interest, we’ll use the URL tied to each one for that description. This gives us the ability to show whatever image is tied to a point of interest. The second button just closes the dialog.
Pulling points of interest and showing them
Now that we’re showing the map and have done our plumbing, let’s show the users current location and pull the near by points of interest. Open up MainActivity.java. The first thing we’re going to do is add some private variables:
private MapView mMapMain;
private TextView mLblLatitudeValue;
private TextView mLblLongitudeValue;
private List<Overlay> mMapOverlays;
private Drawable mDrawable;
private GeoItemizedOverlay mItemizedOverlay;
view rawMainActivity private varsThis Gist brought to you by GitHub.
Here we have an object for referencing the MapView and TextViews, an object to track our itemized overlay, a list of overlay objects (used to display each point), and a drawable we’ll use to store the image we want to draw at each point. Now let’s look at the onCreate method:
@Override
public void onCreate(Bundle savedInstanceState) {
super.onCreate(savedInstanceState);
setContentView(R.layout.activity_main);
// Get UI controls
mLblLatitudeValue = (TextView) findViewById(R.id.lblLatitudeValue);
mLblLongitudeValue = (TextView) findViewById(R.id.lblLongitudeValue);
mMapMain = (MapView) findViewById(R.id.mapMain);
mMapMain.setBuiltInZoomControls(true);
mMapOverlays = mMapMain.getOverlays();
mDrawable = this.getResources().getDrawable(R.drawable.androidmarker);
mItemizedOverlay = new GeoItemizedOverlay(mDrawable, this);
mMapOverlays.add(mItemizedOverlay);
MyLocationOverlay myLocationOverlay = new MyLocationOverlay(this,
mMapMain);
mMapMain.getOverlays().add(myLocationOverlay);
myLocationOverlay.enableMyLocation();
// Acquire a reference to the system Location Manager
LocationManager locationManager = (LocationManager) this
.getSystemService(Context.LOCATION_SERVICE);
view rawmain_activity onCreate 1This Gist brought to you by GitHub.
First we are getting references to our UI objects. We turn on the zoom controls on the map using setBuiltInZoomControls so the user can manually zoom in and out. We initialize the drawable to an image in our resources folder (I’m just using a little Android guy which you can download here). We fetch the collection of the MapView’s overlays and then add a new GeoItemizedOverlay. That overlay is used to display the points of interest. We’re also adding a MyLocationOverlay which we use to display only the user’s current location. For that overlay, we also call enableMyLocation so it knows that it should draw the user’s location on it. Lastly, we get a reference to the LocationManager which we’ll use a bit later.
// Define a listener that responds to location updates
LocationListener locationListener = new LocationListener() {
public void onLocationChanged(Location location) {
// Called when a new location is found by the network location
// provider.
makeUseOfNewLocation(location);
}
public void onStatusChanged(String provider, int status,
Bundle extras) {
}
public void onProviderEnabled(String provider) {
}
public void onProviderDisabled(String provider) {
}
};
view rawmain_activity onCreate 2This Gist brought to you by GitHub.
Continuing in the onCreate method, we create a LocationListener which just calls the onLocationChanged method whenever it receives an updated location. That listener then calls the makeUseOfNewLocation method in our activity.
// Register the listener with the Location Manager to receive location
// updates
boolean couldPollNetworkProvider = true;
boolean couldPollGPSProvider = true;
try {
locationManager.requestLocationUpdates(
LocationManager.NETWORK_PROVIDER, 0, 0, locationListener);
} catch (Exception ex) {
couldPollNetworkProvider = false;
}
try {
locationManager.requestLocationUpdates(
LocationManager.GPS_PROVIDER, 0, 0, locationListener);
} catch (Exception ex) {
couldPollGPSProvider = false;
}
if (!couldPollGPSProvider && !couldPollNetworkProvider)
Toast.makeText(this, "Couldn't get any location provider",Toast.LENGTH_LONG).show();
else if (!couldPollGPSProvider)
Toast.makeText(this, "Couldn't get GPS provider",Toast.LENGTH_LONG).show();
else if (!couldPollNetworkProvider)
Toast.makeText(this, "Couldn't get network provider",Toast.LENGTH_LONG).show();
view rawmain_activity onCreate 3This Gist brought to you by GitHub.
Finally, we ask the LocationManager to send updates from both the NETWORK_PROVIDER and GPS_PROVIDER to our LocationListener. If either of those don’t work, we let the user know via toast. We already added the permission required to get the user’s location to the Manifest file above, but if we hadn’t this code would not work. Next let’s look at the makeUseOfNewLocation method:
protected void makeUseOfNewLocation(Location location) {
// Set our text views to the new long and lat
mLblLatitudeValue.setText(String.valueOf(location.getLatitude()));
mLblLongitudeValue.setText(String.valueOf(location.getLongitude()));
GeoPoint point = coordinatesToGeoPoint(new double[] {
location.getLatitude(), location.getLongitude() });
CenterLocation(point);
// Get Data from server
loadPointsFromServer(location);
mMapMain.invalidate();
}
public static GeoPoint coordinatesToGeoPoint(double[] coords) {
if (coords.length > 2) {
return null;
}
if (coords[0] == Double.NaN || coords[1] == Double.NaN) {
return null;
}
final int latitude = (int) (coords[0] * 1E6);
final int longitude = (int) (coords[1] * 1E6);
return new GeoPoint(latitude, longitude);
}
private void CenterLocation(GeoPoint centerGeoPoint) {
mMapMain.getController().animateTo(centerGeoPoint);
};
view rawmain_activity twoThis Gist brought to you by GitHub.
This method first sets the two TextView’s to show the latitude and longitude. It then creates a GeoPoint using the coordinates and centers the map on it (using the animateTo method on the map’s controller). We then call loadPointsFromServer to fetch the latest points of interest given our new location and call invalidate on the map which will cause it to redraw. Let’s finish things up and look at loadPointsFromServer:
private void loadPointsFromServer(Location location) {
try {
String fetchUrl = Constants.kFindPOIUrl + "?latitude="
+ location.getLatitude() + "&longitude="
+ location.getLongitude() + "&radiusInMeters=1000";
URL url = new URL(fetchUrl);
HttpURLConnection urlConnection = (HttpURLConnection) url
.openConnection();
try {
InputStream in = new BufferedInputStream(
urlConnection.getInputStream());
BufferedReader r = new BufferedReader(new InputStreamReader(in));
StringBuilder stringBuilderResult = new StringBuilder();
String line;
while ((line = r.readLine()) != null) {
stringBuilderResult.append(line);
}
JSONArray jsonArray = new JSONArray(
stringBuilderResult.toString());
for (int i = 0; i < jsonArray.length(); i++) {
JSONObject jsonObject = jsonArray.getJSONObject(i);
Double latitude = jsonObject.getDouble("Latitude");
Double longitude = jsonObject.getDouble("Longitude");
String description = jsonObject.getString("Description");
String itemUrl = jsonObject.getString("Url");
// The item URL comes back with quotes at the beginning,
// so we strip them out
itemUrl = itemUrl.replace("\"", "");
// Create a new geo point with this information and add it
// to the overlay
GeoPoint point = coordinatesToGeoPoint(new double[] {
latitude, longitude });
OverlayItem overlayitem = new OverlayItem(point,
description, itemUrl);
mItemizedOverlay.addOverlay(overlayitem);
}
} catch (Exception ex) {
Log.e("MainActivity", "Error getting data from server: " + ex.getMessage());
} finally {
urlConnection.disconnect();
}
} catch (Exception ex) {
Log.e("MainActivity", "Error creating connection: " + ex.getMessage());
}
}
view rawmain_activity loadPointsFromServerThis Gist brought to you by GitHub.
The first thing I’m going to point out is that the network communication here is done on the MAIN THREAD! This is bad. So bad in fact that in later versions of ADT and Android, it won’t run. They really don’t want you doing network traffic on the main thread. For simplification purposes, I’m doing the code on the main thread but you should look at using either an IntentService or an Async Task to accomplish pulling the points of interest from the server, and then call invalidate on the map in the callback. The first thing we’re doing in the method is building our URL using the constant we added earlier and then tacking on parameters for the latitude, longitude, and the radius in meters that we want points from. We then hit the server using HttpUrlConnection and read the results back into a StringBuilder. This is turned into a JSONArray which we then loop through to grab the latitude, longitude, description, and url for each point of interest. We generate a GeoPoint from the position and create a new OverlayItem which is then added to the itemized overlay. That’s all there is to adding these points to our map.
Running the Application
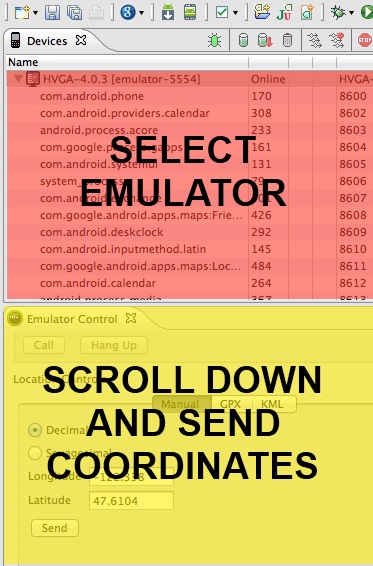
Now if you run your application (on the emulator), you will just see the normal map initially. The reason for this is that the Android emulator can’t grab our position like the way a device can. Luckily, there are a couple ways to send the GPS coordinates to the emulator. The first way is to return to Eclipse and go to the Window menu and choose Open Perspective and DDMS (you may have to go to Other and find DDMS if it isn’t listed). With that don you’ll be taken to the DDMS tool. There is a lot that you can do with DDMS but we’re going to focus on setting the GPS coordinates of our device.
In the top left of the DDMS tool, you’ll be able to select the emulator (or device) image that you want to interact with. You don’t need to choose the specific process of your running application though, you can just select the emulator name. After that, scroll down in the Emulator Control panel until you get to Location Controls. Here you can set a latitude and longitude and then send it to your emulator. After doing so, the map will animate over to the spot we’ve entered and will attempt to refresh the points of interest:
Now when I run and set my location to Seattle, the emulator shows the blue dot where I’m at and then pulls the near by points, which are shown with the little Android figure. If I tap on one of those points, an AlertDialog pops up giving us the ability to view the file attached to the point (the code for this was in the GeoItemizedOverlay class). In the next article we’ll discuss how to add these points of interest.
Conclusion
Today we walked through creating a simple Android application that will connect to a PHP service running in Windows Azure Websites and poll for geographical points of interest. We then display those points of interest as points on a map with more information provided when tapped. As I mentioned at the top, you can access the full version of this app on GitHub. Remember that you’ll need to configure the subdomains in the Constants class before trying to run it.


Ryan CrawCour (@ryancrawcour) and Emil Velinov (@emilvel) presented AZR302: Streaming Data Processing in the Cloud with Windows Azure Stream Insight (a.k.a., “Project Austin”) on 9/6/2012 at TechEd New Zealand 2012 (missed when presented):
Many streaming data scenarios require to collect, process, and aggregate events from widely distributed data sources, with high throughput and low latency. Examples are connected car diagnostics, web browser telemetry data, or mobile device GPS information. To enable such use cases in the Cloud, we are releasing Windows Azure SQL StreamInsight. This service enables event-driven applications where the streaming computations are performed in the Cloud. Beyond the core StreamInsight functionality the service will provide built-in connectivity to common data sources and sinks and a consistent developer, deployment, manageability, and monitoring experience. In this session we will walk you through an end-to-end demo and provide an overview of the user model, current status, and roadmap of Windows Azure SQL StreamInsight.
<Return to section navigation list>
Marketplace DataMarket, Cloud Numerics, Big Data and OData
• Rene Gayer (@dynamicsblog) described NAV2013: using OData with SSRS (Reporting Services) on 9/19/2012 (missed when posted):
Hi all, probably you are familiar with NAV 2013 and that it is supporting OData services to provide data from NAV to other applications for example for business intelligence.
Reporting Services does not support Odata directly, but with a small workaround it is possible to create server based reporting services reports for NAV by using odata and get all the server based features which are not available by using RDLC (end user access who are not NAV user, subscriptions, additional controls, running in browser, etc.)
(This post will not describe how you are using visual studio to create great reports. If you need assistance for this and Microsoft Dynamics NAV take a look on this book or training video 257-ebook-nav-2009-inside.aspx - Videotraining Microsoft Dynamics NAV 2009- Berichte mit Reporting Services)
This post will describe how you can use a OData feed from NAV with reporting services.
First of all you have to be familiar with the requirements when using Odata in Microsoft Dynamics NAV 2013
Our goal is: Create a report based on Value Entries from NAV using Odata and (“server based”) reporting services
Step 1 create a Odata service in NAV 2013
- Open the NAV 2013 windows client
- Navigate to right-corner and use the global search to find the web service page

- 3. Create a new web service entry with page 5802 value entries

Step2 Check that odata service is running
- Open the NAV 2013 Administration console
- Check Odata services is enabled and service is running

- Open a web browser and navigate to http://localhost:portnumber/ServerInstance/OData (sample: http://localhost:7048/DynamicsNAV70/OData)
- Check the listed Odata services and look for your created entry “ValuesEntries”

- Check that you are able to access it by enter the url into a new browser tab
- http://localhost:7048/DynamicsNAV70/OData/ValueEntries
If you are able to access it, all prerequisites exists. Lets move forward by using it for reporting.
Step 3 create a report using SSRS (Reporting Services)
- Open Visual Studio and create a new report project
- Add a new data source by using the solution explorer

- Because SSRS does not support OData directly use the XML connection type and the url for the connection string (Note: Do not forget to set windows authentication)

- Skip the “shared Dataset” directory and go directly to the folder “reports” (Of course you can work with shared datasets)

- Select the Datasource and click Next
- Before moving on designing the query, lets remember that Odata is not supported by SSRS. Because of this we have to use a short xml query to structure the odata feed into typically “fields”
- Enter this query into the query string textbox
- <Query>
- <ElementPath IgnoreNamespaces="true">
- feed{}/entry{}/content{}/properties
- </ElementPath>
- </Query>
- 11. Check the query before moving on by clicking on Query Builder and then run the result button


- You should now see structured “NAV” fields in you query and can move forward to create your report like any other reports in SSRS

- …
- ..
- .
- Finalized NAV report based on NAV OData

NAV 2013 Rocks …!
PS If you want to show someone the capability of Odata and NAV, and you have no SSRS or Excel Power Pivot use Microsoft Outlook RSS Feed feature instead. What is more easier than a notification using Odata directly in Outlook


<Return to section navigation list>
Windows Azure Service Bus, Access Control Services, Caching, Active Directory and Workflow
No significant articles today
![image_thumb[9]](https://blogger.googleusercontent.com/img/b/R29vZ2xl/AVvXsEg1y4Q9vq5Bo_JtsvhZlRAT_m8l7LfoADZHAWdlTcsF55-QhixNiBIDM-a85OJaJ9gG75RMUvHVFZZ9EXsWt41Vs2AmzMHsReyTnDra_z7xkkTtfb-HOf8jTjyeTeqZ8IGQmM6VR71Y/s1600-h/image_thumb92.png "image_thumb[9]")
<Return to section navigation list>
Windows Azure Virtual Machines, Virtual Networks, Web Sites, Connect, RDP and CDN
• David Ebbo (@davidebbo) described Managing settings and secrets for Windows Azure Web Sites in a 9/25/2012 post to github’s Project Kudu wiki:
When you deploy a site to Azure using git, all the files come from a git repository. If your site needs any secrets at runtime (e.g. credentials to access some external resource), it's generally a bad idea to commit those secrets to your repository. Even if it's a private repo, you may not want every developer working on the project to have access to those secrets.
In other cases, it's not really about the values being secrets, but simply about needing different values at runtime in Azure from the ones you use at development time on your own box.
The way to solve this is Azure Web Sites is to use runtime app settings. These are just a bunch of Key/Value pairs that you can find in the Configure section of the portal. They work in slightly different ways for .NET sites and for other sites.
Using App Settings with .NET sites
Suppose you have a .NET site that has something like this in its web.config:
  <appSettings>
    <add key="MyKey" value="Some default value" />
  </appSettings>
And somewhere in your code, you use
ConfigurationManager.AppSettings["MyKey"]to access the value. The value you hard code into your web.config will typically be some default that is safe for the world to see. Or you may simply not have anything in there, and have the code fall back to some default behavior.But when you deploy your site to Azure, you'd like this setting to take on a specific value, which may very well be a secret.
All you have to do here is add en entry in the portal's 'app settings' section (in the Confugure tab for an site). You make the Key be "MyKey", and the value is whatever you want it to be.
Then when the site runs in Azure, the call to
ConfigurationManager.AppSettings["MyKey"]will return this value instead of the one that's hard coded in your web.config.Note that in order to do this, it never actually modifies your physical web.config file. Instead, it directly affects the runtime behavior of the .NET configuration system to make it use those alternative values. You can verify this by downloading your webconfig file (see Accessing files via ftp), and seeing that it is unchanged.
Using App Settings with arbitrary sites
Outside of the .NET world, sites tend to simply rely on environement variables for settings, instead of having them in a web.config-like file.
e.g. in a Node app, you might have:
var mySetting = process.env.MyKey || "Some default value";To modify this value in an Azure Web Site, you so the exact same thing as in the .NET case below: you add the new key/value pair in the portal's 'app settings' section. This causes Azure to inject this environement variable into the process running your app.
Note that even in .NET app, you end up getting this environment variable. But in most cases, .NET apps ignore it and rely on web.config instead.


![image_thumb[20]](https://blogger.googleusercontent.com/img/b/R29vZ2xl/AVvXsEhgOV0Q2O0sKPPF56pT3yVIv4gMXY9wQZ-9DIkwcrCyiegJa4j0lK_oBSnuIGW1F2cLN2Je7ekY4FFQIs5RbCln5qOEHWlQeeF0fivyss-J5Vx2nWpizEGD_L4oEvFzULFbue3KkWz_/s1600-h/image_thumb202.png "image_thumb[20]")
<Return to section navigation list>
Live Windows Azure Apps, APIs, Tools and Test Harnesses
No significant articles today
![image_thumb[22]](https://blogger.googleusercontent.com/img/b/R29vZ2xl/AVvXsEif_TsdaLHqV28F9D4GjIGx_BkNLa_CBrDlYNRzU5qZBriChDEE3n8CPPO8agNqnLNh5Pj1IKBxsJ1A0lP6GUgg2vCj8zsqnqtkam_VK1IVJYXRnDgstupcojZf-95nWkjSuHq0EwH1/s1600-h/image_thumb222.png "image_thumb[22]")
<Return to section navigation list>
Visual Studio LightSwitch and Entity Framework 4.1+
• Paul Van Bladel (@paulbladel) continued his Pivot Viewer series with Adding in the LightSwitch pivot viewer an adorner for communicating with the regular lightswitch screens on 9/25/2012:
Introduction
This post is part of a series on the usage of the Pivot Viewer in LightSwitch.
In this post, we will add two adorners to the pivot viewer card in such a way the user can open a modal window for editing the current movie and for viewing the cast of the current movie.
Show me such an adorner
What will clicking the adorner trigger?
When we click “edit”:
and when we click “cast”:
How do we setup an adorner?
We first need to add a style to our custom control’s resources:
<Style x:Key="basicAdorner" TargetType="pivot:PivotViewerItemAdorner">
            <Setter Property="Template">
                <Setter.Value>
                    <ControlTemplate>
                        <pivot:PivotViewerDefaultItemAdorner
                    IsItemSelected="{Binding IsItemSelected, RelativeSource={RelativeSource TemplatedParent}}"
                    CommandsRequested="basicAdorner_CommandsRequested" />
                    </ControlTemplate>
                </Setter.Value>
            </Setter>
        </Style>
This style will make sure an event triggered where we setup the Commands that we want to fire when the adorner is clicked.
In the custom control’s code behind we setup this event:
 private void basicAdorner_CommandsRequested(object sender, System.Windows.Controls.Pivot.PivotViewerCommandsRequestedEventArgs e)
        {
            if (e.IsItemSelected)
            {
                IContentItem currentDataContext = (IContentItem)this.DataContext;
                e.Commands.Add(new EditMovieDetailsCommand(currentDataContext));
                e.Commands.Add(new showCastCommand(currentDataContext));
            }
        }
As you can see I forward the screen’s datacontext via the constructor to the command.
Such a command is simply a pivot viewer specific implementation of ICommand.
For the “edit movie” command we need:
    public class EditMovieDetailsCommand : IPivotViewerUICommand
    {
        IScreenObject _screen;
        public EditMovieDetailsCommand(IContentItem screenDataContext)
        {
            _screen = (IScreenObject)screenDataContext.Screen;
        }

        public string DisplayName
        {
            get { return "Edit"; }
        }

        public Uri Icon
        {
            get { return null; }
        }

        public object ToolTip
        {
            get { return "Edit the movie details"; }
        }

        public bool CanExecute(object parameter)
        {
            return true;
        }

        public event EventHandler CanExecuteChanged;

        public void Execute(object parameter)
        {

            IEntityObject entity = parameter as IEntityObject;
            int movieId = (int)(entity.Details.Properties["Id"].Value);
            _screen.Details.Dispatcher.BeginInvoke(() =>
            {
                _screen.Details.Properties["CurrentMovieId"].Value = movieId;
                _screen.Details.Methods["ShowDetails"].CreateInvocation(null).Execute();
            });
        }
    }
And for the “Show Cast” command we need:
 public class showCastCommand : IPivotViewerUICommand
    {
        IScreenObject _screen;
        public showCastCommand(IContentItem screenDataContext)
        {
            _screen = (IScreenObject)screenDataContext.Screen;
        }

        public string DisplayName
        {
            get { return "Cast"; }
        }

        public Uri Icon
        {
            get { return null; }
        }

        public object ToolTip
        {
            get { return "Show the list of actors"; }
        }

        public bool CanExecute(object parameter)
        {
            return true;
        }

        public event EventHandler CanExecuteChanged;

        public void Execute(object parameter)
        {

            IEntityObject entity = parameter as IEntityObject;
            int movieId = (int)(entity.Details.Properties["Id"].Value);
            _screen.Details.Dispatcher.BeginInvoke(() =>
            {
                _screen.Details.Properties["CurrentMovieId"].Value = movieId;
                _screen.Details.Methods["ShowCast"].CreateInvocation(null).Execute();
            });
        }
    }
As you can see, the Execute method is the most involved. In the execute method we will communicate with the hosting LightSwitch screen where we created two modal forms:
Obviously, we need to call the OpenModalWindow method:
namespace LightSwitchApplication
{
    public partial class MoviePivot
    {
        partial void ShowDetails_Execute()
        {
            this.OpenModalWindow("ModalMovie");
        }

        partial void ShowCast_Execute()
        {
            this.OpenModalWindow("ModalCast");
        }
    }
}
Conclusion
Setting up an adorner is a bit more work, but the result is great with minimal effort, since we re-use the standard LightSwitch screens for enriching the semantic zoom experience.


Return to section navigation list>
Windows Azure Infrastructure and DevOps
• David Linthicum (@DavidLinthicum) asserted “With $10 million in funding and 5,600 members, OpenStack is now the counterweight to the gargantuan Amazon Web Services” in a deck for his Why OpenStack owes its success to Amazon post of 9/25/2012 to InfoWorld’s Cloud Computing blog:
Who would have thunk it. The OpenStack Foundation now has a 24-person board, $10 million in funding, and, oh, yeah, 5,600 members. This is becoming more than momentum in the cloud computing market, and it certainly exceeds my expectations from when the standard was first launched.
OpenStack provides a platform to run a private cloud infrastructure, and it now boasts about 550,000 lines of code. Some cloud hosting providers, such as Rackspace and Hewlett-Packard, use the software to host their own services. More are working on OpenStack integration into public cloud services.
What's interesting about OpenStack is not the fact that's it's cloud code free for the download, but that so much progress has been made in just two years. We can thank Amazon.com for that, coupled with huge and continued interest in open standards.
The meteoric rise of Amazon Web Services proved the viability of the public cloud marketplace. But domination by a single cloud provider scares the hell out of many organizations looking to use cloud services. Perhaps haunted by visions of Microsoft in the 1990s or IBM in the 1980s, many people actively sought cloud computing technology alternatives that were open and where the control of the technology was widely distributed. Enter OpenStack, an alternative that many now embrace.
OpenStack's success is not so much about what it is and does, but more about what it is not. It's not Amazon.com.
Still, Amazon.com has little to worry about, given the projected rapid expansion of the market in the next few years and the fact that its technology is both well tested and well liked. At the same time, more and more enterprises will find OpenStack, and the many distributions of OpenStack, to be a more comfortable approach to cloud computing than dealing with a single, powerful provider.
The new and now well-funded OpenStack organization should send a thank-you card to Amazon.com as the first order of business.


Lori MacVittie (@lmacvittie) asserted “Elasticity is a design pattern for scalability, not necessarily failability” in an introduction to her Load Balancing 101: Scale versus Fail post of 6/24/2012 for F5’s DevCentral blog:
One of the phrases you hear associated with cloud computing is "architecting for failure." Rather than build in a lot of hardware-level redundancy – power, disk, network, etc… – idea is that you expect it to fail and can simply replace the application (which is what you care about anyway, right?) with a clone running on the same cheap hardware somewhere else in the data center.
Awesome idea, right?
But when it comes down to it, cloud computing environments are architected for scale, not fail.
SCALE versus FAIL
Most enterprise-class data centers have been architected with failure in mind; we call these high-availability (HA) architectures. The goal is to ensure that if any element in the data path fails that another can almost immediately take its place. Within a hardware platform, this implies dual power supplies, a high RAID level, and lights-out management. At the network and higher level, this requires redundant network elements – from load balancers to switches to routers to firewalls to servers, all elements must be duplicated to ensure a (near) immediate failover in the event of a failure. This generally requires configurations and support for floating (shared) IP addresses across redundant elements, allowing for immediate redirection upon detection of a failure upstream.
At the application/server tier, the shared address concept is still applied but it is done so at the load balancing layer, where VIP (virtual IP addresses) act as a virtual instance of the application. A primary node (server) is designated that is active with a secondary being designated as the "backup" instance which remains idle in "standby" mode*.
If the primary instance fails – whether due to hardware or software or network failure – the secondary immediately becomes active, and continuity of service is assured by virtue of the fact that existing sessions are managed by the load balancing service, not the server. In the event a network element fails, continuity (high-availability) is achieved due to the mirroring (replication) of those same sessions between the active (primary) and standby (secondary) elements.
Is it perfect? No, but it does provide sub-second response to failure, which means very high levels of availability (or as I like to call it, failability).
That's architected for "FAIL".
Now, most cloud computing environments are architected not with failure in mind but with scale in mind – that is, they are designed to enable elasticity (scale out, scale in) that is, in part, based on the ability to rapidly provision the resources required.
A load balancing instance is required and it works in much the same way as a high-availability architecture (minus the redundancy). The load balancing service acts as the virtual application, with at least one instance behind it. As demand increases, new instances are provisioned and added to the service to ensure that performance and availability are not adversely impacted. When this process is also capable of scaling back in by automatically eliminating instances when demand contracts it's called "elasticity".
If the only instance available fails, this architecture is not going to provide high availability of the application because it takes time to launch an instance to replace it. Even if there are ten active instances and one fails, performance and/or availability for some clients may be impacted because, as noted already, it takes time to launch an instance to replace it.
Similarly, if an upstream element fails, such as the load balancing service, availability may be adversely impacted – because it takes time to replace it.
But when considering how well the system responds to changes in demand for resources, it works well. That's scalability.
That's architected for "SCALE".
SCALE and FAIL are NOT INTERCHANGEABLE
These two are not interchangeable, they cannot be conflated with the expectation that either architecture is able to meet both goals equally well. They are designed to resolve two different problems.
The two can be combined to achieve a scalable, high-availability architecture where redundancy is used to assure availability while elasticity is leveraged to realize scale while reducing the time to provision and investment costs by implementing a virtual, flexible resource model.
It's important to understand the difference in these architectures especially when looking to public cloud as an option because they are primarily designed to enable scalability, not failability. If you absolutely need failability, you'll need to do some legwork of your own (scripts or manual intervention – perhaps both) to ensure a more seamless failover in the event of failure or specifically seek out cloud providers that recognize the inherent differences between the two architectures and support either the one you need, or both.
Relying on an elastic architecture to provide high-availability – or vice-versa – is likely to end poorly.


Richard Seroter (@rseroter, pictured below) posted a Book Review: Cloudonomics–The Business Value of Cloud Computing on 6/24/2012:
Last week I read Cloudonomics by Joe Weinman and found it to be the most complete, well-told explanation of cloud computing’s value proposition that I’ve ever read. Besides the content itself, I was blown away by the depth of research and deft use of analogies that Weinman used to state his case.
The majority of the book is focused on how cloud computing should be approached by organizations from an economic and strategic perspective. Weinman points out that while cloud is on the radar for most, only 7% consider it a critical area. He spends the whole second chapter just talking about whether the cloud matters and can be a competitive advantage. In a later chapter (#7), Weinman addresses a when you should – and shouldn’t – use the cloud. This chapter, like all of them, tackle the cloud from a business perspective. This is not a technical “how to” guide, but rather, it’s a detailed walkthrough of the considerations, costs, benefits and pitfalls of the cloud. Weinman spends significant time analyzing usage variability and how to approach capacity planning with cost in mind. He goes into great depth demonstrating (mathematically) the cost of insufficient capacity, excess capacity, and how to maximize utilization. This is some heady stuff that is still very relatable and understandable.
Throughout the book, Weinman relies on a wide variety of case studies and analogies to help bolster his point. For instance, in Chapter 21 he says:
One key benefit of PaaS is inherent in the value of components and platforms. We might call this the peanut butter sandwich principle: It’s easier to make a peanut butter sandwich if you don’t have to grow and grind your own peanuts, grow your own wheat, and bake your own bread. Leveraging proven, tested, components that others have created can be faster than building them from scratch.
Just a few pages later, Weinman explains how Starbucks made its fortune as a service provider but saw that others wanted a different delivery model. So, they started packaging their product and selling it in stores. Similarly, you see many cloud computing vendors chasing “private” or “on-premises” options that offer an alternate delivery mechanism than the traditional hosted cloud service. To be sure, this is not a “cloud is awesome; use it for everything or you’re a dolt” sort of book. It’s a very practical analysis of the cloud domain that tries to prove where and how cloud computing should fit in your IT portfolio. Whether you are a cloud skeptic or convert, there will be something here that makes you think.
Overall, I was really impressed with the quality, content and delivery of the book’s message. If you’re a CEO, CFO, CIO, architect or anyone involved in re-thinking how your business delivers IT services, this is an exceptionally good book to read.


The SearchCloudComputing.com staff (@TTintheCloud) posted Experts weigh in on Platform as a Service adoption on 6/24/2012:
Platform as a Service has been on the tip of cloud experts' tongues everywhere -- whether it's been reviled or touted. SearchCloudComputing.com asked a few of experts to weigh in on the anticipated growth ofPaaS in the cloud market.
Gartner claims Platform as a Service adoption will explode this year. How is your company preparing for PaaS? What risks do you see with PaaS?
Tom Nolle: I think "exploding" is a bit excessive at this point. I do think that in the long run, the cloud will be driven by applications written for it, applications written to a platform. The challenge for the market is that we're looking at the cloud as a replacement for IT in current apps, which means we're not looking at it as a platform for apps yet to be written. That puts us at risk to picking platforms that are suitable to do what's now done, but not suitable to be the framework of the future cloud.
Greg Shields: I agree that "exploding" is probably a bit sensational. That said, it fits certain use cases; it solves certain problems. Those use cases and problems will only increase in relevance as the concept sticks around. For the long-term future, at least as I see it, PaaS does provide a pathway to the post-VM era. Watch this space.
Nolle: I agree completely that PaaS is the long-term answer. I just wish that we were thinking about the long-term question more, which is, "What does a cloud-specific app really look like? There's no reason to think that the cloud of the future would be constrained by today's programming models, and yet the PaaS platforms of today are largely those very models.
What will it take to push PaaS to the next level? If portability and interoperability are the answers, which vendors are getting close?
Dan Sullivan: For developers there are a lot of advantages of PaaS, especially if you don't have in depth skills for parts of the application stack. (Anybody who has been Oracle DBA by default knows what I mean.) I suspect we'll see the largest growth in language- and stack-agnosticPaaS providers, such as Red Hat's OpenShift. More specialized providers, like PiCloud, will fill a niche (Python/science and analytic apps) and probably establish a dedicated user group but won't have the broad appeal of OpenShift.
Risk-averse developers may tend to stick with IaaS to keep their options open.
Roger Jennings: The primary risk of PaaS is vendor lock-in to a particular OS or cloud, e.g., Windows in the case of Azure. However, Microsoft is mitigating this issue with today's virtual machine (VM) roles and a full-blown Windows Azure IaaS implementation this year.
Nolle: I think that's going to be a tough call to make, personally. The problem is that we have barely scratched the surface of the cloud and nothing that's happened up to now has any proven relevance to the main push yet to come. I think Microsoft has a clear vision, and I think that any real distinctive cloud future is necessarily focused on PaaS and Software as a Service (SaaS), but I think we're still struggling to find the range of the real cloud story, even at the vendor space. Smaller players like Joyent have some interesting angles, but it may take some real market clout to make a difference, and only the big IT kingpins have that.
What does the success of Platform as a Service mean for the future of Infrastructure as a Service (IaaS) implementations in the enterprise?
Nolle: Frankly, I think a better question is, “What impact PaaS will have on the future of the cloud overall?” IaaS is just a way of doing server consolidation to a hosted virtual server; it's not a game-changer in a benefit sense. PaaS could be a game-changer if the "platform" that's offered as a "service" is really a new IT architecture created to combine hosting and service-oriented architecture (SOA) into a single grand picture. But the could qualifier is key because I don't think the market is in sync with reality. We need to understand what a cloud platform really is and what it really does, and to do that we need to ask what a cloud application would really look like.
Jennings: PaaS providers offering a la carte enhancements, such as Windows Azure's Media, Mobile, Connect, Service Bus, Workflow, Identity, Access Control, Hadoop/MapReduce and Cloud Numerics features, will relegate IaaS to a low-margin commodity market with Amazon Web Services (AWS) taking the cake and other vendors scrambling for the crumbs.
Sullivan: IaaS and PaaS will appeal to different groups. IaaS is the better option if you are looking for a hosted virtual machine that gives you full control over the application stack from the operating system (OS) level up. If you can find a PaaS with a combination of application stack services that fit your needs, then it can be a better option than IaaS.
A PaaS product like CloudBees might appeal to a Java developer who can take advantage of the development environment, messaging services and identity management functionality. It's really a question of how well the PaaS offering fits your existing requirements and your willingness to commit future development to the platform. Risk-averse developers may tend to stick with IaaS to keep their options open.


Full disclosure: I’m a paid contributor to TechTarget’s SearchCloudComputing.com blog.
<Return to section navigation list>
Windows Azure Platform Appliance (WAPA), Hyper-V and Private/Hybrid Clouds
• Tom Bittman (@tombitt) warned Mind the Gap: Here Comes Hybrid Cloud in a 9/24/2012 post to his Gartner blog:
Just when you thought you were starting to understand cloud computing, and private cloud computing, here comes hybrid cloud!
Vendors are already flocking to the term – it means everything from remotely managed appliances to a mix of virtual and non-virtual servers to traditional applications using cloud services, and everything in between. So what is it?
Gartner defines a hybrid cloud service as a cloud computing service that is composed of some combination of private, public and community cloud services, from different service providers. A hybrid cloud service crosses isolation and provider boundaries so that it can’t be simply put in one category of private, public, or community cloud service. This definition is intentionally loose, because there really are a lot of interesting edge exceptions, and rather than draw a tight boundary around what is, and what isn’t, this seems to get to the central point of the matter well enough.
So why is hybrid cloud computing useful? It allows you to extend either the capacity or the capability of a cloud service, by aggregation, integration or customization with another cloud service. For example, there might be a community cloud service that needs to include data from public cloud services in its analysis – while retaining a certain amount of analytics or data privately. Or a private cloud service that needs to expand its capacity by extending temporarily into a public cloud service (or perhaps a somewhat private cloud service offered by a third party provider). It allows you to balance your privacy needs with additional capacity and capability needs.
The terms “overdrafting” and “cloudbursting” have been used to describe how a hybrid cloud service could be used for capacity, but they paint an extreme example. Hybrid cloud compositions can be static (designed to require multiple services), composed at deployment/usage time (e.g., perhaps choosing one service provider or another, or combining based on policies), or composed dynamically (e.g., cloudbursting – or perhaps at disaster recovery time).
While these compositions can be designed into services and/or cloud-based applications, they will often be managed by cloud services brokerages – the intermediary that Gartner expects to become a major phenom in the next few years (something like the system integrator of the cloud world). Large enterprises will often take on this role themselves – in fact, this is central to Gartner’s vision for the future of IT.
So what does all this mean now? It means look out – the world is not going to be neatly divided into separate private and public cloud services. To maximize efficiency and take advantage of publicly available cloud services, we’re going to munge them together. Private clouds, in particular, will not stay simply “private” for long – Gartner expects most private cloud services to become hybrid. Minding the gap is key – planning for it, balancing isolation and value, leveraging it – hybrid will move from the realm of hype and vendor cloud-washing to reality in the next few years.


No significant articles today
<Return to section navigation list>
Cloud Security and Governance

<Return to section navigation list>
Cloud Computing Events
• Tyler Doerksen (@tyler_gd) reported on 9/25/2012 his participation in the Prairie Developer (IT Pro) Conference on 10/1/2012 in Regina, Saskatchewan:
The Regina, Saskatchewan Prairie Developer Conference (PrDC) is starting on Monday October 1st. With a pre-conference hackathon on Sunday September 29th. This year the conference has grown to 3 days of sessions with day 3 completely devoted to IT Pro tracks.
I am really excited to return to PrDC Regina as a speaker. These are the tracks I will be presenting and the currently scheduled times.
Windows Azure Has Grown Up
Day 1 – 2:30PM to 3:45PM: Azure, Data-BI-Cloud, Software Dev
Automating Virtual Machine Management with PowerShell
Day 3 – 8:30 AM to 9:30 AM: Azure, Cloud, PowerShell, IT Pro
PowerShell is a very powerful to for scripting and automation. The Windows Azure PowerShell Management module can help you automate everything from simple tasks to complex workflows that include Azure VMs and other services. In this session you will learn how to use the Cmdlets to manage and automate Azure Virtual Machines and Virtual Networks.
Deploying Active Directory in Windows Azure
Day 3 – 9:45 AM to 10:45 AM: Azure, Cloud, IT Pro
With Windows Azure Virtual Machines you can now host persisted VMs in the cloud on Azure. This session will talk about how and when to deploy Active Directory into Azure and the benefits of a cloud hosted AD machine in your enterprise.
I hope to see people there and I am always willing to sit and talk cloud.
See you next week!

<Return to section navigation list>
Other Cloud Computing Platforms and Services
Todd Hoff (@toddhoffious)reported Google Spanner's Most Surprising Revelation: NoSQL is Out and NewSQL is In in a 9/24/2012 post to the High Scalability blog:
Google recently released a paper on Spanner, their planet enveloping tool for organizing the world’s monetizable information. Reading the Spanner paper I felt it had that chiseled in stone feel that all of Google’s best papers have. An instant classic. Jeff Dean foreshadowed Spanner’s humungousness as early as 2009. Now Spanner seems fully online, just waiting to handle “millions of machines across hundreds of datacenters and trillions of database rows.” Wow.
The Wise have yet to weigh in on Spanner en masse. I look forward to more insightful commentary. There’s a lot to make sense of. What struck me most in the paper was a deeply buried section essentially describing Google’s motivation for shifting away from NoSQL and to NewSQL. The money quote:
We believe it is better to have application programmers deal with performance problems due to overuse of transactions as bottlenecks arise, rather than always coding around the lack of transactions.
This reads as ironic given Bigtable helped kickstart the NoSQL/eventual consistency/key-value revolution.
We see most of the criticisms leveled against NoSQL turned out to be problems for Google too. Only Google solved the problems in a typically Googlish way, through the fruitful melding of advanced theory and technology. The result: programmers get the real transactions, schemas, and query languages many crave along with the scalability and high availability they require.
The full quote:Spanner exposes the following set of data features to applications: a data model based on schematized semi-relational tables, a query language, and general purpose transactions. The move towards supporting these features was driven by many factors. The need to support schematized semi-relational tables and synchronous replication is supported by the popularity of Megastore [5].
At least 300 applications within Google use Megastore (despite its relatively low performance) because its data model is simpler to manage than Bigtable’s, and because of its support for synchronous replication across datacenters. (Bigtable only supports eventually-consistent replication across datacenters.) Examples of well-known Google applications that use Megastore are Gmail, Picasa, Calendar, Android Market, and AppEngine.
The need to support a SQLlike query language in Spanner was also clear, given the popularity of Dremel [28] as an interactive data analysis tool. Finally, the lack of cross-row transactions in Bigtable led to frequent complaints; Percolator [32] was in part built to address this failing.
Some authors have claimed that general two-phase commit is too expensive to support, because of the performance or availability problems that it brings [9, 10, 19]. We believe it is better to have application programmers deal with performance problems due to overuse of transactions as bottlenecks arise, rather than always coding around the lack of transactions. Running two-phase commit over Paxos mitigates the availability problems.
What was the cost? It appears to be latency, but apparently not of the crippling sort, though we don’t have benchmarks. In any case, Google thought dealing with latency was an easier task than programmers hacking around the lack of transactions. I find that just fascinating. It brings to mind so many years of RDBMS vs NoSQL arguments it’s not even funny.
I wonder if Amazon could build their highly available shopping cart application, said to a be a motivator for Dynamo, on top of Spanner?
Is Spanner the Future in the Same Way Bigtable was the Future?
Will this paper spark the same revolution that the original Bigtable paper caused? Maybe not. As it is Open Source energy that drives these projects, and since few organizations need to support transactions on a global scale (yet), whereas quite a few needed to do something roughly Bigtablish, it might be awhile before we see a parallel Open Source development tract.
A complicating factor for an Open Source effort is that Spanner includes the use of GPS and Atomic clock hardware. Software only projects tend to be the most successful. Hopefully we’ll see clouds step it up and start including higher value specialized services. A cloud wide timing plane should be a base feature. But we are still stuck a little bit in the cloud as Internet model instead of the cloud as a highly specialized and productive software container.
Another complicating factor is that as Masters of Disk it’s not surprising Google built Spanner on top of a new Distributed File System called Colossus. Can you compete with Google using disk? If you go down the Spanner path and commit yourself to disk, Google already has many years lead time on you and you’ll never be quite as good. It makes more sense to skip a technological generation and move to RAM/SSD as a competitive edge. Maybe this time Open Source efforts should focus elsewhere, innovating rather than following Google?
Related Articles
- Cloudant Labs: On Google Spanner by Mike Miller [see post below]
- Thread on G+ by Jeff Dean
- SPANNER : GOOGLE’S GLOBALLY DISTRIBUTED DATABASE by Srihari Srinivasan
- On Slashdot
- On Hacker News
- F1 - The Fault-Tolerant Distributed RDBMS Supporting Google's Ad Business
- Spanner: Google's Globally-Distributed Database by Rodrigo De Castro
- Google Spans Entire Planet With GPS-Powered Database by Cade Metz
- Facebook Tackles (Really) Big Data With ‘Project Prism’ by Cade Metz


Mike Miller (@mlmilleratmit) posted Cloudant Labs: On Google Spanner to the Cloudant Labs blog on 9/21/2012 (missed when published):
This past weekend Google released the latest in their seminal research publications -- Spanner. First introduced quietly nearly three years ago, Spanner is fully described, from motivation, to execution through operational performance data. The Spanner paper is technically revolutionary for a few reasons (described below), but most importantly it is continued proof that Google is a clear leader in distributed big data systems. In contrast to the original canon (GFS, MapReduce, Bigtable) and more recent replacements (Collosus, Percolator, Pregel, Dremel), I don't predict a Spanner clone will land as an Apache incubator anytime soon. The primary reason is that Spanner's largest design innovation leverages special hardware. Specifically one must install a coordinate network of GPS and atomic clocks in each participating datacenter.
At Cloudant we've built a globally distributed data layer that we've been operating at scale for years, so we're watching Spanner closely. Below I provide a non-Googler's perspective on the key elements of the Spanner publication and a personal opinion of its impact on distributed systems and databases going forward.
Spanner in a nutshell
Spanner is a globally distributed, temporally versioned database. It provides global distribution and replication of data to provide both high availability and to minimize latency of data reads and writes. Spanner accomplishes this using time-based serialization of events, partial locking, and synchronous replication. These ingredients enable Spanner's implementation for externally consistent transactions at global scale.
Spanner is a clear step in the RDBMS direction. While it emerged from work in BigTable, it meets many of the expectations of a typical RDBMS, but in a manner that can be globally distributed at massive scale. Indeed the original design goals presented by Jeff Dean in 2009 are ambitious -- millions of machines in thousands of data centers. To my knowledge, Spanner is the first system to support externally consistent transactions on a global scale and is therefore transformative work.
Spanner's Key Features
- Externally consistent global write-transactions with synchronous replication.
- Non-blocking reads in the past.
- Lock-free read-only transactions.
- Schematized, semi-relational (tabular) data model.
- SQL-like query interface.
- Efficient execution of atomic schema changes without requiring locking of the entire database.
- Auto-sharding, auto-rebalancing, automatic failure response.
- Exposes control of data replication and placement to user/application.
Guiding Design Principles
Spanner prioritizes consistency in the face of concurrency above all else. Google's philosophy is quite clear with the opening statement:
"We believe it is better to have application programmers deal with performance problems due to overuse of transactions as bottlenecks arise, rather than always coding around the lack of transactions."
That means that bottlenecks can and do occur, as witnessed by the fat tail on the read transactions in the F1 data in Table 6.
Availability for transactional writes and reads will suffer with node failures. Google adds, "Running two-phase commit over Paxos mitigates the availability problems." In practice, a single node failure naturally results in a 10 second window of partial unavailability (Figure 5, blue circles). I don't fully understand how to analyze Spanner in the face of Brewer's CAP theorem (consistency, availability, partition tolerance -- choose two at any moment in time). I believe Spanner is consistent and partition-able. In a globally distributed transactional system with synchronous replication a network partition may lead to write unavailability, depending on replica locations. Reads from local replicas certainly remain available. Interestingly, a new failure mode is introduced -- the clock. In the case that the time uncertainty grows (see below) Spanner slows down accordingly, which will ultimately lead to writes becoming unavailable.
Key Innovations
Spanner's key innovation is around time. It includes a novel system using GPS and Atomic Clocks to distribute a globally synchronized "proper time." The previous dogma in distributed systems was that synchronizing time within and between datacenters is insurmountably hard and uncertain. Ergo, serialization of requests is impossible at global scale. Google's key innovation is to accept uncertainty, keep it small (via atomic clocks and GPS), quantify the uncertainty and operate around it. In retrospect this is obvious, but it doesn't make it any less brilliant.
Once the notion of proper time is introduced, many previously challenging things become very efficient. There are existing algorithms for linearization of distributed systems, but Spanner's TrueTime API greatly reduces the complexity. For example, monotinicity across Paxos leaders follows naturally (trivially?) from the introduction of global proper time with quantified uncertainty.
Interestingly, the transaction rate of Spanner must be ultimately bounded by the uncertainty exposed by TrueTime (max-rate ~ 1 / t_{uncertainty}). Therefore, Spanner must provide fine-grained locking (row-based?) to prevent the system from grinding to a halt as transaction rates increase. Their operational data from F1 quotes 32.1E6 multi-site commits per day (at a mean latency of 103 ms). 32.1E6 writes/day implies 372 writes/sec, which is higher than the bound of 1/0.005 ms = 200 writes/sec set by the typical clock uncertainty. Therefore I conclude that the maximum transaction rate is likely a function of the both the time uncertainty and the granularity of the transactional locks required.
Use Cases
With its transactional nature, Spanner's sweet spot seems to be workloads that are relatively write-light and read-heavy. It appears to be targeted squarely at classic 3-tier applications at scale, specifically those that can accept mean latencies in the 1-100 ms range with large tails. E.g., The F1 ad backend requires thick clients, global distribution, scale and application-level buffering/caching. Last but not least, Spanner requires special hardware (atomic clocks and GPS) and likely won’t be immediately relevant for the Apache community.
Execution
- Schema leveraged to preserve data locality.
- Important changes w.r.t. BigTable to deal with data locality and access patterns.
- Range partitioning of rows in tablets.
- Paxos is everywhere.
Compromises
Spanner prioritizes consistency above all else. It is a fully connected system that requires "smart" clients capable of managing locality of requests, local buffering and transaction reasoning. Therefore availability and throughput compromise when time error increases. Notably, Spanner does not yet support automatic handling of secondary indices. Further, it does not support "offline" access with later reconciliation (ala CouchDB). This latter point is one that is very important to us at Cloudant. We've adopted the CouchDB API for our globally distributed data layer specifically because it enables offline access and deals with merging and conflict tracking and resolution efficiently and does all of that with JSON over a REST API (no client necessary). It's clear that offline storage and later reconciliation is on Google's map (see page 21 from Andrew Fikes' 2010 Faculty Summit talk). Spanner helps address locality, but doesn't naturally enable offline access.
Comparisons
Spanner's notion of global temporal serialization of events, thick clients and special hardware live in stark contrast to Cloudant and CouchDB (MVCC, master-master, JSON via HTTP, no clients). Spanner's largest feature overlap (distribution, synchronous replication, concurrency and externally consistent transactions) appears to be with Jim Starkey's NuoDB. However, there are notable differences in the implementation approaches of the two systems. Most importantly, Starkey claims to have solved concurrency without requiring serialization, but I have not analyzed his recent patent.Benchmarks and Operational Data
The description of benchmarks was the only opaque portion of the article. For example, it's not clear how many zones were inflated for the data in Table 3, nor how to map Paxos groups onto node counts. I therefore assume these benchmarks were meant to show scaling behavior, not absolute performance. The operational data from the F1 deployment however is a wonderful indicator of Spanner's performance in the wild. Typical reads are near 10 ms and single- and multi-site writes average ~100 ms. There are notable tails on these distributions. E.g., the standard deviations for all reads is 40x the mean, weighing in at 376 ms, although the authors note that an asymmetric mix of spinning media and solid state drives likely contributes significantly to the tails.
Summary
Spanner is an excellent piece of work and well presented. It represents a pragmatic acceptance of developer's reluctance to reason in the absence of immediately consistent transactions and therefore strikes a bittersweet chord. Philosophically this feels like a big step forwards for distributed systems. Time isn't easily synchronized? No big deal, measure the uncertainty, minimize the uncertainty and program around it! Philosophically this also feels like a step towards traditional database management systems. Instead of focusing on parallel execution and multi-master scenarios that enable rich, offline application state synchronization, Spanner represents a cleverly executed attack on serialization and more efficient cursors.


<Return to section navigation list>


0 comments:
Post a Comment