Windows Azure and Cloud Computing Posts for 11/11/2011+
| A compendium of Windows Azure, SQL Azure Database, AppFabric, Windows Azure Platform Appliance and other cloud-computing articles. |
•• Updated 11/13/2011 with new articles marked ••.
• Updated 11/12/2011 with new articles marked •.
Note: This post is updated daily or more frequently, depending on the availability of new articles in the following sections:
- Azure Blob, Drive, Table, Queue and Hadoop Services
- SQL Azure Database and Reporting
- Marketplace DataMarket, Social Analytics and OData
- Windows Azure AppFabric: Apps, Access Control, WIF and Service Bus
- Windows Azure VM Role, Virtual Network, Connect, RDP and CDN
- Live Windows Azure Apps, APIs, Tools and Test Harnesses
- Visual Studio LightSwitch and Entity Framework v4+
- Windows Azure Infrastructure and DevOps
- Windows Azure Platform Appliance (WAPA), Hyper-V and Private/Hybrid Clouds
- Cloud Security and Governance
- Cloud Computing Events
- Other Cloud Computing Platforms and Services
Azure Blob, Drive, Table, Queue and Hadoop Services
Barton George (@Barton808, pictured below, right) posted Hadoop World: Learning about NoSQL database Couchbase on 11/10/2011:
The next in my series of video interviews from Hadoop World is with Mark Azad who covers technical solutions for Couchbase. If you’re not familiar with Couchbase it’s a NoSQL database provider and the company was formed when, earlier this year, CouchOne and Membase merged.
Here’s what Mark had to say.
Some of the ground Mark covers
- What is Couchbase and what is NoSQL
- How Couchbase works with Hadoop (Emphasis added.)
- What its product line up looks like and his new combined offering coming next year
- Some of Couchbase’s customers and how Zynga uses them
- What excites Mark the most up the upcoming year in Big Data
Extra-credit reading
Avkash Chauhan (@avkashchauhan) described Using Windows Azure Cmdlets to Delete old Windows Azure Diagnostics log from Windows Azure Storage in an 11/10/2011 post:
Windows Azure Power Shell Cmdlets 2.0 was released last month. You can download the latest version from the link below:
Download Link:
Documentation and details:
Cmdlets 2.0 key features are included in the following area:
- Windows Azure Service Management API
- Windows Azure SDK
- Windows Azure Storage Analytics
- Windows Azure Diagnostics
- SQL Azure REST API
- Windows PowerShell
The one feature I like the most is to delete old diagnostics logs from Azure storage with a single command.
To delete old logs completely usethe command below:
- Clear-WindowsAzureLog
Also all of the Clear* diagnostics cmdlets support –From and –To (and –FromUTC and –ToUTC) parameters. So if you want to delete logs between certain dates you can use command as below:
- Clear-WindowsAzureLog -From "10/1/2011 12:00:00 AM" -To "10/31/2011 12:00:00 PM"
- (Above command delete all logs in the month of October 2011)
One caveat to above command is that after clearing the log, the container is not deleted.
Alex Popescu (@al3xandru) reported Enterprises Will Have Three Classes of Databases in an 11/9/2011 post to his myNoSQL blog:
Dwight Merriman (CEO and founder 10gen) interviewed by InternetNews.com:
Basically every large enterprise in the world has those two buckets for sure—a relational database used for OLTP and some form of data warehouse and a business reporting and intelligence database—and what we’re seeing are enterprises adding a third bucket, which is a NoSQL database. So on a forward basis, enterprises will have three classes of databases instead of two.
The challenge for NoSQL database producers is to convince people that maintaining 3 types of databases would deliver better value to the business. The challenge for system architects is to figure out where each of these databases fit and are providing increased value over alternatives.
Original title and link: Enterprises Will Have Three Classes of Databases (NoSQL database©myNoSQL)
The question remains: Will the third NoSQL database be a full-fledged platform (e.g., Apache Hadoop/MapReduce) or a cloud-based data source like Windows Azure tables or Amazon SimpleDB?
<Return to section navigation list>
SQL Azure Database and Reporting
• Brent Stineman (@BrentCodeMonkey) described SQL Azure Throttling & Error Codes (Year of Azure–Week 18) in an 11/12/2011 post:
OK, last week was weak. Hopefully my grammar is correct. So I want to make it up too you by giving you some meat this week. I’ve been involved lately in several discussions regarding SQL Azure capacity limits (performance, not storage) and throttling. Admittedly, this little topic, often glanced over, has bitten the butts of many an Windows Azure project.
So lets look at it a little more closely. Shall we?
Types of Throttling
Now if you go read that link I posted last week on SQL Azure Error Messages, you’ll see that there are two types of throttling that can occur:
- Soft Throttling – “kick in when machine resources such as, CPU, IO, storage, and worker threads exceed predefined thresholds”
- Hard Throttling – “happens when the machine is out of a given resource”
Now SQL Azure is a multi-tenant system. This means that we have multiple tenants (databases) that will sit on the same physical server. There cold be several hundred databases that share the same hardware. Now SQL Azure will use soft throttling to try and make sure that all these tenants get a minimum number of resources. When a tenant starts pushing those limits, soft throttling will kick in and the SQL Azure fabric will try to move tenants around to rebalance the load.
Hard throttling means no new connections. You’ve maxed things out (storage space, worker process, cpu) and drastic steps should be taken to free those resources up.
SQL Azure Resources
Also in that article, we find the various resource types that we could get throttled on:
- Physical Database Space
- Physical Log Space
- LogWriteIODelay
- DataReadIODelay
- CPU
- Database Size
- Internal
- SQL Worker Threads
- Internal Now when an error message is returned, you’ll have throttling types for one or more of these resources. The type could be “no throttling”, could be “soft”, or it could be “hard”.
Throttling Modes
Now if all this wasn’t confusing enough, we have three types of throttling. Well technically four if you count “no throttling”.
- Update/Insert – can’t insert/update, or create anything. But can still drop tables, delete rows, truncate tables, read rows.
- All Writes – all you can do is read. You can’t even drop/truncate tables.
- Reject All – you can’t do anything except contact Windows Azure Support for help.
Now unlike the throttling type, there is only one mode returned by the reason.
But what can we do to stop the errors?
Now honestly, I’d love to explain Andrew’s code to you for deciphering the codes. But I was never good with bitwise operations. So instead, I’ll just share the code and along with a sample usage. I’ll leave it to folks that are better equipped to explain exactly how it works.
The real question is can we help control throttling? Well if you spend enough time iterating through differing loads on your SQL Azure database, you’ll be able to really understand your limits and gain a certain degree of predictability. But the sad thing is that as long as SQL Azure remains a shared multi-tenant environment, there will always be situations where you get throttled. However, those instances should be a wee bit isolated and controllable via some re-try logic.
SQL Azure is a great solution, but you can’t assume the dedicated resources you have with on-premises SQL Server solution. You need to account for variations and make sure your application is robust enough to handle intermittent failures. But now we’re starting down a path of trying to design to exceed SLA’s. And that’s a topic for another day.
• Steve Fox (@redmondhockey) described Leveraging Windows Azure WCF Services to Connect BCS with SharePoint Online in an 11/12/2011 post:
Introduction
You might have read an earlier post of mine where I discussed the new Business Connectivity Services (BCS) functionality in SharePoint Online (SP-O) and walked through how you can leverage jQuery and JavaScript to interact with an external list in SharePoint Online. This blog post assumed that you had created an external list in the first place and provided you with some code snippets to create a view of an external list. Since that time, a great post from Christian Glessner popped up that shows you how you can walk through creating an external list using SQL Azure. Using these two posts, you should now be able to get up and running and create a working external list that not only leverages SQL Azure as your line-of-business (LOB) data, but also gives you a little jQuery veneer.
However, the question I’ve been wrangling with of late is how to leverage BCS in SP-O using a WCF service? Using a WCF service can be much more powerful than using the SQL Azure proxy because you can literally model many different types of data that are beyond SQL Azure—ranging from REST endpoints, in-memory data objects, entity-data model driven services, service bus-mediated connections to on-premises data, and so on.
I’m still working through a couple of more complex scenarios, but I wanted to get something out there as I’ve had a number of requests on this. Thus, in this post, I’ll show you a simple way to use WCF to create an external list with the two core operations: read list and read item. The reason you will want to use WCF is that you will at some point want to connect your own LOB back-end to the SP-O external list, and you’re more than likely going to want to mediate the loading of that data with a WCF service of some sort. Now, if you’ve used the BDC Metadata Model templates in Visual Studio 2010, then you’ll be familiar with how you model the LOB data you’re trying to load into the external list (else, you’d just stick with a direct connection to SQL Azure) by using the web methods that map to the CRUD operations. You will do it in this post, though, using a generic WCF service project template (or more precisely, a Windows Azure Cloud project with a WCF Service role). In a set of future posts, I’ll walk through more complex scenarios where you have full CRUD methods that are secured through certificates.
The high-level procedure to create an external list in SP-O that uses a cloud-based WCF service is as follows:
1. Create a back-end LOB data source that you’ll run your service against;
2. Create a WCF service and deploy to Windows Azure;
3. Assess the permissions in the Metadata Store; and
4. Create an external content type (ECT) in SharePoint Designer that digests your WCF service and creates the list for you.
LOB Data
In this example, the LOB data is going to be SQL Azure—yes, I know, but the back-end data source is less important than the connection to that data. That said, if you navigate to your Windows Azure portal (https://windows.azure.com/default.aspx) and sign in using your LiveID, you’ll see the options similar to the below in your developer portal. (You need to have a developer account to use Windows Azure, and if you don’t you can get a free trial here: http://www.microsoft.com/windowsazure/free-trial/.)
Here are the general steps to create a new SQL Azure db:
1. Click Database to display the database management capabilities in the Windows Azure portal.
2. Click Create to create a new database. Provide a name for the database and select Web edition and 1GB as the maximum size.
3. Click the Firewall Rules accordion control to manage your firewall rules . Note that you’ll need to ensure you have the firewall of your machine registered here so you can access the SQL Azure database.
4.After you create your SQL Azure database, you can now navigate away open SQL Server 2008 R2 Management Studio.
5.When prompted, provide the name of your server and enter the log-in information. Also, click the Options button to expose the Connections Properties tab and select Customers (or whatever you named your SQL Azure database). Click Connect. SQL Server will connect to your new SQL Azure database.
6. When SQL Server connects to your SQL Azure instance, click the New Query button as illustrated in the following image.
7. You now have a query window with an active connection to our account. Now you have the Customer database, you need to create a table called CustomerData. To do this, type something similar to the following SQL script and click the Execute Query button:
CREATE TABLE [CustomerData](
[CustomerID] [int] IDENTITY(1,1)NOT NULL PRIMARY KEY CLUSTERED,
[Title] [nvarchar](8)NULL,
[FirstName] [nvarchar](50)NOT NULL,
[LastName] [nvarchar](50)NOT NULL,
[EmailAddress] [nvarchar](50)NULL,
[Phone] [nvarchar](30)NULL,
[Timestamp] [timestamp] NOT NULL
)8. You’ll now want to create a set of records for your new database table. To do this, type something similar to the following SQL script (adding different data in new records as many times as you’d like).
INSERT INTO [CustomerData]
([Title],[FirstName],[LastName],[EmailAddress],[Phone])
VALUES
('Dr', 'Ties', 'Arts', 'ties@fabrikam.com','555-994-7711'),('Mr', 'Rob', 'Barker', 'robb@fabrikam.com','555-933-6514')
…
9. Eventually, you will have a number of records. To view all of the records you entered, type the following script and click the Execute Query button (where in this script Customers is the database name and CustomerData is the table name).
Select * from Customers.dbo.CustomerData
14. The picture below illustrates the type of results you would see upon entering this SQL script in the query window.
15. Close the SQL Server 2008 R2 Management Studio, as you are now done adding records.
This gives you a pretty high-level view of how to create and populate the SQL Azure DB. You can get a ton more information from the Windows Azure Developer Training Kit, which can be found here: http://www.microsoft.com/download/en/details.aspx?displaylang=en&id=8396.
Now that you’re done with the SQL Azure DB, let’s move onto the cloud-based WCF service.
Creating the WCF Service
As I mentioned earlier, the WCF service needs to ‘model’ the data you’re pulling back from your LOB and exposing in your external list. Modeling the data means at a minimum creating a Read List method and Read Item method. Optional methods, and ones you’d arguably want to include, would be Create Method, Update Method and Delete Method. The WCF service you create will be using the Cloud template and be deployed to your Windows Azure account.
To create the WCF service:
1. Open Visual Studio 2010 and click New Project. Select the Cloud option and provide a name for the project.
2. Select the WCF Service Web Role and click the small right-arrow to add the service to the cloud project. Click OK.
3. The cloud solution will create a new service project and the Windows Azure cloud project, which you use to deploy the service directly to your Windows Azure account.
4. You’ll want to add the SQL Azure db to your project, so select Data on the file menu and select Add New Data Source.
5. You can also right-click the main service project and select Add, New Item. Select Data and then select ADO.NET Entity Data Model.
6. You’re then prompted to walk through a wizard to add a new database as an entity data model. In the first step, select Generate from Database. In the second, select New Connection and then connect to your SQL Azure instance. (You’ll need to either obfuscate the connection string or include it in your web.config before moving on. Given this is a sample, select Yes to include in your web.config and click Next.) Now, select the tables you want to include in your entity data model, and click Finish.
7. Make sure you set the Build Action to EntityDeploy and Copy always, else you’ll spend countless hours with delightfully vague errors to work through. This ensures your entity data model gets deployed to Windows Azure. (You’ll also note that in the screenshot below, I renamed my services to be more intuitive than Service1. I also have a clientaccesspolicy.xml file, which is only necessary if you’re going to consume the service from, say, a Silverlight application.)
8. Right-click the service project and select Add and then select Class. Provide a name for the class, and then add the following variables to the class.
using System;
using System.Collections.Generic;
using System.Linq;
using System.Web;namespace SharePointCallingSvc
{
public class CustomerRecord
{
public int objCustomerID { get; set; }
public string objTitle { get; set; }
public string objFirstName { get; set; }
public string objLastName { get; set; }
public string objEmailAddress { get; set; }
public string objHomePhone { get; set; }
}
}9. In the service code, add a method that will read one item and a method that will retrieve all items from the SQL Azure (or our LOB) data store.
using System;
using System.Linq;
using System.Runtime.Serialization;
using System.ServiceModel;
using System.ServiceModel.Activation;
using System.Collections.Generic;
using Microsoft.ServiceBus;namespace SharePointCallingSvc
{
[AspNetCompatibilityRequirements(RequirementsMode = AspNetCompatibilityRequirementsMode.Allowed)]
public class SharePointCallingService : ISharePointCallingService
{
public CustomerRecord[] GetCustomers()
{
using (CustomersEntities db = new CustomersEntities())
{
var myItems = (from c in db.Customers select c);CustomerRecord[] myCustomerArray = new CustomerRecord[myItems.Count()];
int i = 0;
foreach (Customer item in myItems)
{
myCustomerArray[i] = new CustomerRecord();
myCustomerArray[i].objCustomerID = item.CustomerID;
myCustomerArray[i].objTitle = item.Title;
myCustomerArray[i].objFirstName = item.FirstName;
myCustomerArray[i].objLastName = item.LastName;
myCustomerArray[i].objEmailAddress = item.EmailAddress;
myCustomerArray[i].objHomePhone = item.Phone;
i++;
}return myCustomerArray;
}
}public CustomerRecord GetCustomer(int paramCustomerID)
{
using (CustomersEntities db = new CustomersEntities())
{
var myItem = (from c in db.Customers where c.CustomerID == paramCustomerID select c).FirstOrDefault();CustomerRecord returnCustomer = new CustomerRecord();
returnCustomer.objCustomerID = myItem.CustomerID;
returnCustomer.objTitle = myItem.Title;
returnCustomer.objFirstName = myItem.FirstName;
returnCustomer.objLastName = myItem.LastName;
returnCustomer.objEmailAddress = myItem.EmailAddress;
returnCustomer.objHomePhone = myItem.Phone;return returnCustomer;
}
}
}
}10. Add the interface contract.
using System;
using System.Collections.Generic;
using System.Runtime.Serialization;
using System.ServiceModel;namespace SharePointCallingSvc
{
[ServiceContract]
public interface ISharePointCallingService
{
[OperationContract]
CustomerRecord[] GetCustomers();[OperationContract]
CustomerRecord GetCustomer(int CustomerID);
}}
11. Right-click the Cloud project and select either Publish or Package. Publish is a more automated way of publishing your code to Windows Azure, but you need to configure it. Package is more manual. If you’ve never published an application to Windows Azure, select Package. Your solution will build and then Windows Explorer will open with the two built files—a configuration file and package.
12. Leave the Windows Explorer open for the time being and jump back to your Windows Azure portal.
13. Above, you can see that I’ve got a new hosted service set up, but if you don’t click New Hosted Service in the ribbon, fill out the properties of the new hosted service (e.g. Name, URI prefix, deployment name, etc.). Click Deploy to production environment and then click Browse Locally to load the package and configuration files—which should still be open in Windows Explorer.
14. Click OK, and then go have a coffee; it’ll take a few minutes to fully deploy.
15. When it is deployed, you will be able to click on the service definition to retrieve the WSDL, which should reflect the two web methods you included earlier.
16. At this point, I would create a simple test app to make sure your service works as expected. If it does, your one method (GetCustomer) will take an ID and pass back a single record, and your other method (GetCustomers) will return all of the records in the LOB back-end.
Assuming your service works fine, you’re now ready to move onto the next step, which is making sure you’ve set the permissions for your ECT.
Setting the Permissions for the External Content Type
To set the permissions on the Metadata Store, where the ECTs are stored, simply navigate to the Business Data Connectivity option in your SP-O portal, and select Set Metadata Store Permissions. Type in the person you want to have permissions for the ECT, and click Add, and then set the explicit permissions. Click OK when done.
You’re now ready for the final step: creating the external content type using the simple service.
Creating the External Content Type
Creating the external content type is similar to how you did it using SharePoint Foundation and SharePoint Designer; you create a new ECT and SharePoint Designer saves it directly to the site for you.
1. Navigate to your SP-O site and then click Site Actions and then select Edit in SharePoint Designer.
2. Click External Content Types in the left-hand navigation pane.
3. Click the External Content Type in the ribbon. Add a Name and a Display Name and leave the other options defaulted. Click the ‘Click here to discover…’ link.
4. In the External Data Source Type Selection, select WCF Service from the drop-down and then click OK.
5. You now add metadata about the WCF service in the WCF Connection dialog. For example, add the service metadata URL (e.g. http://myservice.cloudapp.net/myservice.svc?wsdl), select WSDL as the metadata connection mode, and then add the service URL to the Service Endpoint URL (http://myservice.cloudapp.net/myservice.svc). Add an optional name. Click OK, and your service should resolve, and you’ll now be able to add the Read Item and Read List operations.
6. Below, you can see that I now have the two web methods that I created exposed in my data connection—so I can now create the ECT and save it to the Metadata Store.
7. To do this, right-click on each of the methods in sequence. When right-clicking the GetCustomer method, make sure you select the Read Item operation and follow the wizard. When right-clicking the GetCustomers method, select Read List as the operation, as is shown below.
8. Both times you right-click and select an operation, a wizard will open to guide you through the process of creating that operation. For example, when you right-click and select New Read Item Operation, you’ll be prompted with a first step where you simply click Next. In the next step, you’ll then need to map the ID in your web method as the Identifier. You then click Next and then Finish.
At this point, you’ve created both the Read Item and Read List operations and can click the Create Lists & Form button to create a new list using that ECT.
The result is a new external list, which is reflective of the class name properties as the column headers.
And voila, you’re now done. You’ve created an external list using BCS for SP-O using a WCF service talking to a SQL Azure back-end.
To reiterate, we used the WCF service because we wanted to model our own return data using the web methods in the service. On the other side of that service could literally be many different types of LOB data. While you have the Metadata Store permissions that you assessed and set, the actual service is in some way unsecured. To get a service working to test out the modeling, this would be fine; though, for production code you may want to provide a more secure channel that comes with a username/password authentication and is protected using a certificate/key.
A Couple of Tips
When deploying services to Windows Azure, test often. I always test locally before I move to the cloud. You can build and test in the local emulator environment, or you can deploy the service to IIS to test it out there.
Also, I am not a bindings expert in WCF, so this is an area I’m looking into right now to try and understand the best binding method for the service. For example, the serviceModel elements from my web.config are below, and I’m in the process of trying out different bindings—to manage both secure and non-secure WCF-based web services.
…
<system.serviceModel>
<client />
<bindings>
<customBinding>
<binding name="WCFServiceWebRole1.CloudToOnPremForwarder.customBinding0">
<binaryMessageEncoding />
<httpTransport />
</binding>
</customBinding>
</bindings>
<services>
<service behaviorConfiguration="WCFServiceWebRole1.CloudWCFServiceBehavior" name="SharePointCallingSvc.SharePointCallingService">
<endpoint address=""
binding="customBinding"
bindingConfiguration="WCFServiceWebRole1.CloudToOnPremForwarder.customBinding0"
contract="SharePointCallingSvc.ISharePointCallingService" />
<endpoint address="mex" binding="mexHttpBinding" contract="IMetadataExchange" />
</service>
</services>
<behaviors>
<serviceBehaviors>
<behavior name="WCFServiceWebRole1.CloudWCFServiceBehavior">
<useRequestHeadersForMetadataAddress>
<defaultPorts>
<add scheme="http" port="81" />
<add scheme="https" port="444" />
</defaultPorts>
</useRequestHeadersForMetadataAddress>
<serviceMetadata httpGetEnabled="true" />
<serviceDebug includeExceptionDetailInFaults="true" />
</behavior>
</serviceBehaviors>
</behaviors>
<serviceHostingEnvironment aspNetCompatibilityEnabled="true" multipleSiteBindingsEnabled="true" />
</system.serviceModel>…
Lastly, if you get any ‘metadata resource’ errors, always make sure you’ve set the right properties on the entity data model. The resource files for my entity data model were not being generated and deployed, so I got this error a couple of times.
What’s Next?
As I mentioned earlier in the blog, I’ll next follow up with the other web methods/operations that you’d want to build into the cloud-based WCF service and will hopefully get a chance to discuss how to manage secure connections using certificates. It’d also be great to hear from other folks who are banging away at this. I know the MS writers are working hard to get some docs out on it, but it’s always good to test out different scenarios to take the BCS/SP-O functionality for a good test-run given the functionality is there now.
The above isn’t what I’d call a simple, straightforward implentation.
<Return to section navigation list>
MarketPlace DataMarket, Social Analytics and OData
•• My (@rogerjenn) Microsoft Codename “Social Analytics” ContentItems Missing CalculatedToneId and ToneReliability Values post of 11/12/2011 describes the following issue:
In the process of finishing a SocialAnalyticsWinFormsSample C# application, I discovered on 11/11/2011 that members of the VancouverWindows8 dataset’s ContentItems collection began displaying null values for CalculatedToneId and ToneReliability values on 11/10/2011 at about 7:12:25 PM UTC.
Here’s the form’s DataGridView control (with a descending sort on the Published On column) displaying the last of 5,000 items with a value:
CalculatedToneId and ToneReliability data are important when performing sentiment analysis or opinion mining on a particular topic, Windows 8 in this instance. Microsoft is one of the sponsors of an Opinion Mining, Sentiment Analysis, and Opinion Spam Detection project of Bing Liu and and Minqing Hu at the Department of Computer Science, University of Illinois at Chicago (UIC).
According to a Tweet from Richard Orr (@richorr), the Data Analytics Team is investigating the matter now:
My (@rogerjenn) application will be completed and available for download after Microsoft’s Social Analytics Team fixes the problem.
For more details about Codename “Social Analytics,” see:
- Querying Microsoft’s Codename “Social Analytics” OData Feeds with LINQPad of 11/5/2011
- Problems Browsing Codename “Social Analytics” Collections with Popular OData Browsers of 11/4/2011
- Using the Microsoft Codename “Social Analytics” API with Excel PowerPivot and Visual Studio 2010 of 11/2/2011
- SQL Azure Labs Unveils Codename “Social Analytics” Skunkworks Project of 11/1/2011
Tony Sneed (@tonysneed) reported in an OData, Where Art Thou? post of 11/11/2011 that he:
Gave a talk last night to the Dallas .NET Developer Group on OData and WCF Data Services.
I’ll update this post with some info on the topic, but in the meantime you can download the slides and code for the talk here: http://bit.ly/odata-talk. Enjoy.
Tony is an instructor for develop.com.
<Return to section navigation list>
Windows Azure AppFabric: Apps, Access Control, WIF and Service Bus
•• Dhananjay Kumar (@debug_mode) posted Step by Step guide on Federated Authentication in Windows Azure Web Role using Windows Azure App Fabric Access Control Service on 11/12/2011:
In this article I will show you step by step demonstration of enabling Federated Authentication on Windows Azure Web Role using Windows Azure App Fabric Access Control Service.
You are writing an application and want to make it open for users of all the identity providers. You want users of Facebook, Live, Google; Yahoo etc. should be able to use your application. Probably to achieve this task you will have to implement authentication logic for all types of providers separately. For instance there would be separate authentication logic for Facebook, separate authentication logic for Google and so on.
You outsource this authentication task for separate identity provider to Access Control Service. ACS does the task of authentication for your application.
Image taken from MSDN
In this post, I am focusing on demonstrating step by step process to work with Windows Azure ACS. In later post I will discuss more on theory of Claim Based Authentication
You need to work with Windows Azure Access Control Service.
Windows Identity Foundation SDK
Windows Identity Foundation Run Time
Essentially you need to perform two tasks
- Configure Windows Azure ACS with Identity Provider, Relying Party, Rules
- Create Windows Azure Web Role and configure for Federated authentication
Configure Windows Azure ACS with Identity Provider, Relying Party, Rules
First you need to login to Windows Azure Management portal. Navigate to below link and provide yours live username and password
After successful authentication, you need to select Service Bus, Access Control & Caching tab from left panel.
Then choose Access Control from top
You need to have a Namespace.If you are already having a namespace feel free to use that. I assume here you don’t have any namespace created then follow below screens to create namespace.
You need to click on New option at Top panel to create a new namespace.
On clicking of New, you will get Create a new Service Namespace window. For purpose of this article, I am choosing Access Control Service and providing other information in properties tab like Namespace, Country and Subscription
Once Namespace is created you can see that listed. Select newly created Namespace and from top panel choose Access Control Services
Access Control Services will get open in next tab. There from left panel select Identity Providers
On click of Identity providers you can see Windows Live ID is already added. Click on Add button to add another Identity Providers.
On click of Add Button you will get option to add different identity providers. For purpose of this post I am adding Google and Yahoo only.
I have chosen Yahoo. Next you will get prompted to choose Image URL at login screen. This is optional. I have not given any Image URL link here.
In same way you can add Google identity provider as well. After adding all the identity providers you will be getting them listed as below.
Next you need to add Relying Party Application. For that from the left panel click on Relying Part Application and then click on Add button to add new Relying Part Application. You will get screen to Add Relying Party Application. You need to provide all the information on this screen.
You need to provide a friendly name for relying party application. Feel free to give any name of your choice.
You need to select Mode. Choose Mode as Enter setting manually
After selecting Mode, you need to provide Realm, Return URL and Error URL.
We may have two scenarios here
- Running Azure Web Role in Locally in Azure Emulator
- Running Azure Web Role in Azure Portal
If you are running web role locally then set URL as http://127.0.0.1:81/
If you are running web role from Azure portal the set URL as you chosen there. That might look like http://abcurname.cloudapp.net
For both Realm and Return give the same URL and if you want you can leave optional error URL.
Leave Token Format, Token Encryption Policy and Token Lifetime as default.
Next you need to select identity providers for this relying party. Select all the identity providers we added previously.
Choose to create new rule group.
Select token signing as standard and click on save button to add a relying party application.
Next step you need to create Rule Groups for Relying party application. To create Rule Group click on Rule Groups from left panel and select Add
Next enter name of Rule Group and click on Save button
You will get an error message to generate rule. Click on Generate button to create rule.
Next you will get prompted to provide identity provider to generate rules. Select all listed identity provider and click on Generate button.
On next screen you need to click on save button. After saving in left panel click on Application integration from Development tab. You need WS-Federation MetaData to configure authentication mechanism for application.
Create Windows Azure Web Role and configure for Federated authentication
Now you need to create Windows Azure project. To create open visual studio as administrator and from cloud tab select Windows Azure Project.
Then choose ASP.Net Web Role as part of Windows Azure project.
Here you can write all required code and business logic of your application. Now to use ACS Federated authentication, right click on web application project and select add STS Reference
Now you need to provide
- Application Configuration location :Leave default value
- Application URI: It would be same as Replying Party Application URI. In our case it is URI of Azure web role running in azure emulator http://127.0.0.1:81/
On clicking of Next Button you will get a warning message that application is not using HTTPS. In real application best practice is to provide certificate and work with secure Http. Proceed with selecting yes.
In Security Token Service check the check box Use and existing STS and there you need to provide Meta Data document location. If you remember in previous step you copied an WS-Federation MetaData URL by clicking on Application integration from Development tab. You need to provide location of XML file from different End Point references.
On next screen choose Disable certificate chain validation.
On next screen select no encryption
On next screen leave the default values and click on next .
Finally click on Finish to complete add process. You should be getting Success message as below,
Last step you need to do is open Web.Config file and edit the entry as below. You need to add below line in rectangle in System.web
Now go ahead and run application. You will get prompted to Sign In. Choose any identity provider to log in to your application
I am choosing Google. I will be redirected to Google Login page
After successful Sign in you will get redirected to the application.
This is all you need to do to perform Federated authentication on Windows Azure web role using Windows Azure App Fabric Access Control Service. I hope this post is useful.
• Avkash Chauhan (@avkashchauhan) explained how to Test your App Fabric ACS v2 RPS Application to use actual REALM and Return URL in Cloud and localhost URL in Compute Emulator on 11/12/2011:
Today while I was testing my web role which includes Google Identity Provider with Windows Azure AppFabric ACSv2 locally in compute emulator I found after google IP authentication the return URL is my actual web role running in cloud.
My expectation was to use my http://localhost as REALM/return URL when I test same application in compute emulator and when I deploy it to Windows Azure, it should use actual http://my_service_name.cloudapp.net URL.
My App Fabric ACS v2 based Relying Party Application setting were as below:
- The REALM is set to use http://my_service_name.cloudapp.net
- The return URL is also set to use http://my_service_name.cloudapp.net
- Token Format – SAML1.1
Because of above settings, in compute emulator, after Google authentication was complete actual return URL was launched.
I wanted to use http://LocalHost when I was testing my application in compute emulator so changing Realm and Return URL in RPS was not a good option because I also want to keep my real *.cloudapp.net URL.
To solve this problem, I looked my ASP.NET web role application web.config and manually change the realm and return URL values to use http:\\Localhost:XXXX\ and after I just restarted the same instance again in Compute Emulator and after Google IP authentication the local return URL was used.
Paolo Salvatori reported a New Article: Managing and Testing Topics, Queues and Relay Services with the Service Bus Explorer Tool in an 11/11/2011 post:
The Windows Azure Service Bus Community Technology Preview (CTP), which was released in May 2011, first introduced queues and topics. At that time, the Windows Azure Management Portal didn’t provide a user interface to administer, create and delete messaging entities and the only way to accomplish this task was using the .NET or REST API. For this reason, I decided to build a tool called Service Bus Explorer that would allow developers and system administrators to connect to a Service Bus namespace and administer its messaging entities.
Over the last few months I continued to develop this tool and add new features with the intended goal to facilitate the development and administration of new Service Bus-enabled applications. In the meantime, the Windows Azure Management Portal introduced the ability for a user to create queues, topics, and subscriptions and define their properties, but not to define or display rules for an existing subscription. Besides, the Service Bus Explorer enables to accomplish functionalities, such as importing, exporting and testing entities, which are not currently provided by the Windows Azure Management Portal. For this reason, the Service Bus Explorer tool represents the perfect companion for the official Windows Azure portal, and it can also be used to explore the features (session-based correlation, configurable detection of duplicate messages, deferring messages, etc.) provided out-of-the-box by the Service Bus brokered messaging.
I’ve just published a post where I explain the functioning and implementation details of my tool, whose source code is available on MSDN Code Gallery. In this post I explain how to use my tool to manage and test Queues and Topics.
For more information on the Windows Azure Service Bus, please refer to the following resources:
- “Service Bus” topic on the MSDN Site.
- “Now Available: The Service Bus September 2011 Release” article on the Windows Azure Blog.
- “Queues, Topics, and Subscriptions” article on the MSDN site.
- "Service Bus” topic on the MSDN site.
- “Understanding Windows Azure Service Bus Queues (and Topics)” video.
- “Building loosely-coupled apps with Windows Azure Service Bus Topics and Queues” video on the channel9 site.
- “Service Bus Topics And Queues” video on the channel9 site.
- “Securing Service Bus with ACS” video on the channel9 site.
Read the full article on MSDN.
The companion code for the article is available on MSDN Code Gallery.
<Return to section navigation list>
Windows Azure VM Role, Virtual Network, Connect, RDP and CDN
• Anna Skobodzinski posted a Field Note: Using Windows Azure Connect to Integrate On-Premises Web Services to the Windows Azure Real-World Guidance site on 11/8/2011 (missed when posted):
Contributors: Nagendra Mishr (Microsoft FAST Services Team) and Tejaswi Redkar (Windows Azure Solution Architect)
Last updated: November 8, 2011
A previous Field Note describes a real-world scenario where we used the Service Bus to integrate on-premises FAST services with an ASP.NET application running in Windows Azure. One of the issues we encountered using the Port Bridge Service Bus proxy was that we were introducing multiple hops between the web application and the FAST query service. As a result, the difference in latency between the original on-premises architecture and the cloud architecture was in the order of 800-900ms. This latency difference is unacceptable from a usability perspective. Therefore, during the latter part of the POC, we were determined to bring this down at least another couple of hundred milliseconds without implementing any caching in the ASP.NET application running in Windows Azure. In this article, we described the steps we took to reduce latency using Windows Azure Connect.
First, let’s look at the application architecture for the initial Service Bus connectivity solution and see where the actual problem lies. The red dots in Figure 1 depict the cross-machine hops the application needs to make to make a search query. The size of the dot indicates the latency size.
Figure 1: Current Architecture
Additional hops in the Service Bus infrastructure, and polling by Port Bridge server for retrieving the message, add to the overall latency of the call.
In the Windows Azure platform, there is one more product available for integrating on-premises services with applications running in Windows Azure; it is called Windows Azure Connect. With Connect, you can establish IP-based, secured network connections between on-premises servers and designated Windows Azure instances. This means that Windows Azure application can talk directly to services running on-premises using this virtual network connectivity.
The new design using Connect looks like this:
Figure 2: Architecture with Connect
In Figure 2, the Connect agents establish VPN tunnels so that the application deployed on Windows Azure can make a direct call to a service running on premise through a proxy as an intermediary. The diagram presents this call as a continued arrow as opposed to two separate calls: application to a new endpoint and that new endpoint to a destination server (which was a case with Port Bridge). The role of a proxy will be explained below.
Implementation of Solution
Once the web application can run on Windows Azure, there are four steps to integrate it with on-premises FAST query service (or any on-premises web service) using Connect:
Enable Connect on the Windows Azure roles where relevant method calls exist. In this case it was the search service role. This service existed in the application even prior to migrating it to Windows Azure. For details on setting up Connect, see the following resources:
Setting up Windows Azure Connect from Scratch [Video]
Windows Azure Connect Overview
Windows Azure Connect SetupInstall the Connect agent on a server or virtual machine (VM) hosted on premise, near the FAST Enterprise Search Platform (ESP) engine (in the same network segment and in the same datacenter). You can use an existing proxy server for this installation or use a new VM where the proxy can be installed.
Run the proxy server on this VM. We used Fiddler during the proof of concept; when using Fiddler, just remember to select the Allow remote computers to connect option, as shown in the Figure below. (Of course, in production, use a real proxy.)
Write down the name of the server or VM where the proxy is hosted. (Yes it can be a VM host name, and yes, it is behind firewalls and not externally enabled.)
Enable proxy usage in the web.config file of the search service role that is hosted on Windows Azure:
<system.net>
<defaultProxy>
<proxy usesystemdefault="False"
proxyaddress="http://minint-tqqcjmv:8888"
bypassonlocal="False" />
</defaultProxy>
</system.net>
Where "minint-tqqcjmv" is the host name of the proxy VM.
That's all.
No new coding, no code modifications needed to facilitate this integration.
The communication works as follows:
The application will place a call to FAST ESP’s APIs using its original instance name (the name of the on-premise, internal server or VM) to find out an actual instance name that needs to be used by the Query APIs. Because of Windows Azure Connect (IPSec), this call will still work.
Why are we using a proxy? Two reasons:
- Connect provides an IPv6 connection. FAST ESP doesn't support IPv6 (though it is running on a server where IPv6 and IPv4 are enabled). In this case the proxy natively translates this communication and it just works.
- The Connect agent is a Windows-based agent; some instances of FAST ESP run on non-Windows operating systems. (In this case it was Linux.) A separate VM with a proxy also provided a solution to enable the virtual network between Windows Azure roles and a non-Windows operating system.
When the initial call is returned, FAST ESP also returns an actual instance name (the name of the actual on-premise server or VM) that will be used by the application to submit the search query.
Thanks to the virtual network connection (Azure Connect) and being able to call internal server names, this communication worked as-is with no code changes, even after the application was moved to Windows Azure. (This was not the case when new endpoints were introduced between the application running on Windows Azure and FAST ESP APIs.)
Latency Issue
The purpose of enabling Windows Azure Connect was to compare its latency with the original Service Bus solution. A comparison based on average query refresh times yielded the following results:
- Search web service (running in Windows Azure) communicating with FAST ESP through Port Bridge: ~900ms-1200ms
- Search web service (running in Windows Azure) communicating with FAST ESP through Windows Azure Connect: ~300-500ms
- Search web service (running on-premises) communicating with FAST ESP directly: ~60ms
As you can see, we saw a performance improvement when using Windows Azure Connect in comparison to the Service Bus in this specific scenario. The on-premises performance gain is expected because all the services are running in the same datacenter without much latency.
The primary difference between Service Bus and Windows Azure Connect is that Service Bus offers message-based communication through an endpoint registry hosted in Windows Azure, whereas Windows Azure Connect offers point-to-point VPN-like connection between specific Windows Azure instances and designated on-premises machines grouped together.
Further Improvements
The following improvements could be explored in the future to further increase the performance:
- Introduce Windows Azure Caching - this will increase performance of search results wherever reuse is possible. (Re-query by the same user; search results reused by multiple users; or ability to pre-cache data for query.)
- Further optimization on Indexing side - optimization for performance, for resource consumption. This may be a good topic for another article, out of scope of this one.
- You can also try IIS Application Request Routing as a proxy and let me know your results.
References
- Setting up Windows Azure Connect from Scratch [Video]
- Windows Azure Connect Overview
- Windows Azure Connect Setup
Presented by:
Worldwide Windows Azure Community
⇐ Read more Windows Azure Field Notes
No significant articles today.
<Return to section navigation list>
Live Windows Azure Apps, APIs, Tools and Test Harnesses
• Avkash Chauhan (@avkashchauhan) described Windows Azure Load Balancer Timeout Details in an 11/12/2011 post:
If you are already a Windows Azure user you [probably] know every application running in Windows Azure is running behind hardware based Load Balancer. Or if you are a new Windows Azure user, it is good to know about Windows Azure Load Balancer. It does not matter if you have 1 instance or more than 1 (hundreds or thousands), all of these instances are running behind [the] Load Balancer.
[The]
Windows Azure load balancer manages communication between the your Windows Azure application, which is running in specific Data Center and external internet i.e. the user using the Windows Azure application.
So if you have your application running in Windows Azure i.e. yourservice.cloudapp.net and you ping to it, the IP address you will get is actually the Windows Azure Load Balancer IP address. Your Windows Azure application (all of instances) does not get a dedicated IP address instead you will get a virtual IP address (which remain same unless instance is deleted) hiding behind the Load Balancer.
Windows Azure Load Balancer uses 1 minute (60 seconds) timeout value which cannot be altered by any means so when you write your Windows Azure application (a simple web app, WCF service or anything else) you must consider the fact that if your network communication between the source machine and Windows Azure Application is idle for more than 60 seconds the connection will be disconnected. This may impact your application depend on your application scenario. For a Windows Azure application which is just a web role if you leave the browser open for more than a minute you will see the web browser shows the error “Internet Explorer cannot display the page”. Now you just refresh the page and the web content is back on your browser page. If you have had an authentication done in your webpage and the connection if idle for 60+ seconds now your connection is disconnected and if you wish to keep working on the same page, you would need to re-authenticate the connection again as 60 seconds timeout was executed by Load Balancer for the active connection and the connection is no more there. So there could be several examples to consider how 60 second Load Balancer timeout will affect your application.
For example, If you have ASP.NET Web Role running in Windows Azure, you can verify that after 1 minute of inactivity w3wp.exe process which is running your ASP.NET Web application, is gone in the Azure VM. If you refresh your browser from client machine the new connection is established to Azure Web Application via Azure Load Balancer and w3wp.exe process is active again.
In another example if you create a WCF based REST service and deployed this application to Windows Azure and configured correctly to work perfectly. The application will work absolutely fine if the HTTP request could be processed within 1 min.
If service takes more than 1 min to process the request then Load Balancer will resend the same request again. Because of it, load balancer will shut down the connection soon after it.
The time-out set at the load balancer, restricting the request time-out to 1 min. Based on the request to the data-center, if this time is exceeded to process the request, then it time out. So now the question comes how you can workaround this scenario if your application is impacted with it.
Here are some suggestions:
[1] - You can make sure the TCP connection is not idle. To keep your TCP connection active you can keeping sending some data before 60 seconds passes. This could be done via chunked transfer encoding; send something or you can just send blank lines to keep the connection active.
[2] - If you are using WCF based application please have a look at below link:
Reference: http://code.msdn.microsoft.com/WCF-Azure-NetTCP-Keep-Alive-09f50fd9
[3] - If you are using TCP Sockets then you can also try ServicePointManager.SetTcpKeepAlive(true, 30000, 30000) might be used to do this. TCP Keep-Alive packets will keep the connection from your client to the load balancer open during a long-running HTTP request. For example if you’re using .NET WebRequest objects in your client you would set ServicePointManager.SetTcpKeepAlive(…) appropriately.
Reference - http://msdn.microsoft.com/en-us/library/system.net.servicepointmanager.settcpkeepalive.aspx
More details on MSDN:
A few great articles and forum discussion on this topic:
- http://stackoverflow.com/questions/2262307/how-does-windows-azure-perform-load-balancing
- http://social.msdn.microsoft.com/Forums/en-US/windowsazure/thread/2dc5bc8e-f9a9-4b82-9ca1-f6ddbe542db9/
Sincere thanks to Windows Azure Team to provide above information.
• Bruno Terkaly (@brunoterkaly) posted Source Code to Azure RESTful Service, Android Mobile Client, iOS/iPhone Mobile Client, and Windows Phone 7 Mobile Client on 11/11/2011:
Source Code: 8.5 mb download: http://brunoblogfiles.com/SourceCode/UploadedSourceCode.zip
You are going to need this to do the AzureRESTful service:
<Return to section navigation list>
Visual Studio LightSwitch and Entity Framework 4.1+
Beth Massi (@bethmassi) described Common Validation Rules in LightSwitch Business Applications in an 11/11/2011 post:
Checking the validity of data input is a common requirement for any application that interacts with humans (and other systems), particularly business applications. I’ve never seen or written a data-entry application without implementing common validation rules for inputting data. LightSwitch has many ways to implement validation declaratively through the data designer as well as supporting custom code you write. Field (or property) validation is just one aspect of writing business rules in LightSwitch, but it’s definitely an important one. It’s your “first line of defense” in keeping user entered data consistent.
Although LightSwitch has some built-in business types and declarative validation settings, many times we need to write small snippets of code to check the format of data entered on a screen. Common things in the USA are States, ZIP codes, Social Security Numbers, UPIN, ISBN, etc. But you may also want to prevent things like numeric and symbolic values in people’s or place’s names or a variety of other rules based on string manipulation.
In this post, I’ll show you how to define declarative rules as well as write custom validation code in LightSwitch. I’ll also show you some common patterns you can use to validate strings. Let’s get started!
Declarative Validation Rules
First let’s walk through the types of validation you can specify declaratively without having to write any code. Let’s take a customer entity that we’ve designed with the data designer. It has the following fields:
Required Fields & Business Types
The first step to validating these fields is to determine their types and which ones are required. LightSwitch will automatically handle required fields as well as validation that comes with business types so you can set these up declaratively using the data designer without having to write any code. The built-in business types are Email, Phone, Money and Image but this is an extensibility point so you can download more. On our customer entity notice I’m only requiring that LastName is filled out. Required fields prevent the user from saving data if the field is left blank and the labels show up bolded on the screen.
When any validation fails, a message is displayed when the user’s cursor is in the field or if they click the validation summary at the top of the screen.
Notice that I have also selected the “Phone Number” and “Email Address” business types for the Phone and Email fields on our customer entity. Business types come with built-in validation and have additional properties that you can set in the properties window to indicate how the validation should work. For Email Address, you can select whether you want to provide a default email domain and if the domain is required:
For Phone Number you can supply additional formats it should validate against and in what order:
Specifying Field Maximum Lengths
Another important declarative validation rule is specifying a maximum length. By default all string fields default to 255 characters. This works for most of our fields because they have variable lengths and 255 will be plenty of room for our data. However, the SSN, State, and ZIP fields are fixed lengths of 11, 2 and 10 characters respectively. Anything over that isn’t a valid piece of data. You specify maximum lengths in the properties window at the bottom in the Validation section:
Preventing Duplicates with a Unique Index
You can also prevent duplicates by including required fields in a unique index. For instance if I wanted to prevent duplicate Last Names in the system then I could include it in the unique index.
Note that this adds the field to a unique index for the table and is enforced by the database. So the validation message will appear after the data is saved and checked on the server side. In the case of my customer entity this is not a good idea to limit duplicates this way because it’s pretty common to have customers with the same last name. You might consider using SSN but then we’d have to make this a required field and only customers with an SSN would be allowed into the system. This is too restrictive in this case, but including fields in a unique index can work well for other types of data entities where you want to prevent duplicate records.
Custom Validation Rules
When you can’t express a validation rule declaratively then you need to write some code. To write custom validation code, select the property you want on the entity then drop down the “Write Code” button and select the property_Validate method:
This will open the code editor to a method stub that allows you to write the custom validation code. When a rule fails, you use the results object to add your error message.
Private Sub LastName_Validate(results As EntityValidationResultsBuilder)
    ' Check the rule, if it fails then display an error message on the field:
    results.AddPropertyError("<Error Message>")
End Sub
You can also specify warnings and informational messages as well. Only error messages prevent data from being saved. To specify a warning or informational message on a field use the AddPropertyResult method and pass it the level of severity:
You can also specify entity-level errors which aren’t specific to certain fields, instead they will only show up in the validation summary at the top of the screen. You use the AddEntityError and AddEntityResult methods for this. These property validation methods run on the client first and then again on the server, however you just write them once and LightSwitch will take care of calling them at the appropriate times. For a deeper understanding of the validation framework please read: Overview of Data Validation in LightSwitch Applications
Simple String Validation & Formatting
The first rule I want to enforce is that the State field should always be entered in uppercase. There are a lot of string methods you can use to manipulate and validate string data. For instance to format strings in a variety of ways you can use the String.Format() method. There are also methods to find characters at certain positions (IndexOf), to check if a string contains another string (Contains), to return parts of strings (Substring), to trim whitespace (Trim), and much much more. See the documentation for all the string methods available to you.
In order to format the State field we can simply use the ToUpper() method. Since State isn’t a required field, we first check to see if the State property has a value and if so we make it upper case.
Private Sub State_Validate(results As EntityValidationResultsBuilder)
    If Me.State <> "" Then
        Me.State = Me.State.ToUpper
    End If
End Sub
Notice that this doesn’t report a validation error to the user, it just formats the string they enter. You can also use the property_Validate methods to perform formatting as well because the _Validate method will fire when the user tabs out of the field when the method runs on the client. However we still need to validate whether they entered a valid State code – “AA” is currently allowed and this isn’t a valid U.S. State. In order to validate all the possible state code combinations we can use Regular Expressions.
Using Regular Expressions
Regular expressions are used by many text editors, utilities, and programming languages to search and manipulate text based on patterns. Regular expressions are used all over the web to validate user input. In fact, one of my favorite sites is www.RegExLib.com which has thousands of community submitted patterns you can use in your own validation rules. In order to use regular expressions in your _Validate methods you use the RegEx class located in the System.Text.RegularExpressions namespave. So in order to check that the State is a valid US State we can write the following in bold:
Imports System.Text.RegularExpressions Namespace LightSwitchApplication Public Class Customer Private Sub State_Validate(results As EntityValidationResultsBuilder) If Me.State <> "" Then Me.State = Me.State.ToUpperDim pattern = "^(?:(A[KLRZ]|C[AOT]|D[CE]|FL|GA|HI|I[ADLN]|K[SY]|" + "LA|M[ADEINOST]|N[CDEHJMVY]|O[HKR]|P[AR]|RI|S[CD]|" + "T[NX]|UT|V[AIT]|W[AIVY]))$"End If End Sub End Class End Namespace
If Not Regex.IsMatch(Me.State, pattern) Then results.AddPropertyError("Please enter a valid US State.") End IfSimilarly we can use regular expressions to check ZIP codes as well. However I want to allow both 5 digit and 9 digit ZIP codes. I also want to allow the user to not have to specify the dash so we’ll do a little formatting as well first.
Private Sub ZIP_Validate(results As EntityValidationResultsBuilder)
    If Me.ZIP <> "" Then
        'Add the dash if the user didn't enter it and the ZIP code is 9 characters
        If Not Me.ZIP.Contains("-") AndAlso Me.ZIP.Length = 9 Then
            Me.ZIP = Me.ZIP.Substring(0, 5) + "-" + Me.ZIP.Substring(5)
        End If
        'Now validate based on regular expression pattern
        If Not Regex.IsMatch(Me.ZIP, "^\d{5}$|^\d{5}-\d{4}$") Then
             results.AddPropertyError("Please enter a valid US ZIP code.")
        End If
    End If
End Sub
Another rule I want to enforce is the SSN format that has the pattern “3 digits (dash) 2 digits (dash) 4 digits”. I want to do the same type of thing we did above where we won’t require the user to enter the dashes. So we can write the following:
Private Sub SSN_Validate(results As EntityValidationResultsBuilder)
    If Me.SSN <> "" Then
        'Add the dashes if the user didn't enter it and the SSN is 9 characters
        If Not Me.SSN.Contains("-") AndAlso Me.SSN.Length = 9 Then
            Me.SSN = Me.SSN.Substring(0, 3) + "-" + Me.SSN.Substring(3, 2) + "-" + Me.SSN.Substring(5)
        End If

        'Now validate based on regular expression pattern
        If Not Regex.IsMatch(Me.SSN, "^\d{3}-\d{2}-\d{4}$") Then
            results.AddPropertyError("Please enter a valid SSN (i.e. 123-45-6789).")
        End If
    End If
End Sub
You can do a lot with regular expressions and string manipulation. The last rule I want to enforce is not allowing users to enter numbers or symbols in the LastName and FirstName fields. They should only contain alphabetical characters and spaces are allowed. We can do something like this to enforce that:
Private Sub LastName_Validate(results As EntityValidationResultsBuilder)
    If Me.LastName <> "" Then
        'This pattern only allows letters and spaces
        If Not Regex.IsMatch(Me.LastName, "^[a-zA-Z\s]+$") Then
            results.AddPropertyError("Last Name can only contain alphabetical characters.")
        End If
    End If
End Sub

Private Sub FirstName_Validate(results As EntityValidationResultsBuilder)
    If Me.FirstName <> "" Then
        'This pattern only allows letters and spaces
        If Not Regex.IsMatch(Me.LastName, "^[a-zA-Z\s]+$") Then
            results.AddPropertyError("First Name can only contain alphabetical characters.")
        End If
    End If
End Sub
Notice that in this last example I’m using the same pattern. You’ll most likely have fields across entities in your application where you’ll want to use the same validation checks. When you start copying and duplicating code you should stop and think about consolidating it into a single library or class that you can call. This way if you have a bug in your validation code you fix it in just one place. Remember, the less code you write the less bugs you’ll have. ;-)
Creating a Common Validation Module
Let’s create a validation module that we can call from our validation methods that encapsulates all the types of validation routines we’d want to support across all the entities in our application. In the Solution Explorer flip to “File View” and under the Common project expand the UserCode folder. Right-click and add a new Module. I’ll name it CommonValidation.
To make these validation rules easy to discover and c
all from our _Validate methods we’ll create them as Extension Methods. Basically extensions methods “extend” types, like a string or integer or any other object type with your own custom methods. What’s cool is they appear in IntelliSense with you type the dot “.” after the type. To place extension methods in our module we just need to import the System.Runtime.CompilerServices and then attribute our method with the <Extension()> attribute.
Let’s take a simple example before we move our complex validation code in here. For instance let’s create an extension method that extends a string type with a method called “MyMethod”. The first parameter to your extension method is the type you are extending. Here’s how we could write the module. (Notice I added the comment section by typing three single quotes (‘’’) above the <Extension>):
Imports System.Runtime.CompilerServices

Module CommonValidation
    ''' <summary>
    ''' This is my extension method that does nothing at the moment. ;-)
    ''' </summary>
    ''' <param name="value">extend the string type</param>
    ''' <remarks></remarks>
    <Extension()>
    Public Sub MyMethod(ByVal value As String)
        'Do something
    End Sub
End Module
If we flip back to one of the property_Validate methods then we will now see this extension method in IntelliSense on any string type. (You need to flip to the “All” tab).
Notice there are a lot of “built-in” extension methods in the .NET framework once you flip to the “All” tab in IntelliSense. So if you were wondering why the icons looked different now you know why :-). Extension methods are a great way to add additional functionality to a type without having to change the implementation of the actual class.
Now sometimes we’ll need to pass parameters and/or return a value from our extension method. Any parameters you specify after the first one in an extension method becomes a parameter the caller needs to pass. You can also return values from extension methods by declaring them as a Function instead.
Imports System.Runtime.CompilerServices

Module CommonValidation
    ''' <summary>
    ''' This is my extension method that still does nothing. :-)
    ''' </summary>
    ''' <param name="value">extend the string type</param>
    ''' <param name="param">demoing parameter</param>
    ''' <returns></returns>
    ''' <remarks></remarks>
    <Extension()>
    Public Function MyMethod(ByVal value As String, param As Boolean) As Boolean
        'Do something
        Return True
    End Function
End Module
If we use this extension method now, you’ll see that a boolean parameter is required.
Now let’s start moving our validation methods in here. Let’s start with the State validation method. Notice in this method that we first format the value by making it upper case. In order to change the value of the type we’re extending we just pass the parameter ByRef instead of ByVal. I also want to allow passing of a parameter that indicates whether the field can be empty. So now here is our CommonValidation module with an IsState extension method:
Imports System.Runtime.CompilerServices
Imports System.Text.RegularExpressions

Module CommonValidation
    ''' <summary>
    ''' Checks if the string is formatted as a 2 character US state code
    ''' </summary>
    ''' <param name="state">string type extension</param>
    ''' <param name="isEmptyOK">True if empty values are allowed, otherwise false</param>
    ''' <returns>True if the string is a valid US state, otherwise false</returns>
    ''' <remarks></remarks>
    <Extension()>
    Public Function IsState(ByRef state As String, ByVal isEmptyOK As Boolean) As Boolean
        If state <> "" Then
            'States should always be upper case
            state = state.ToUpper

            'Now validate based on regular expression pattern
            Dim pattern = "^(?:(A[KLRZ]|C[AOT]|D[CE]|FL|GA|HI|I[ADLN]|K[SY]|" +
                          "LA|M[ADEINOST]|N[CDEHJMVY]|O[HKR]|P[AR]|RI|S[CD]|" +
                          "T[NX]|UT|V[AIT]|W[AIVY]))$"

            Return Regex.IsMatch(state, pattern)
        Else
            Return isEmptyOK
        End If
    End Function
End Module
Notice the nice IntelliSense we now get back in the _Validate methods when we call our extension method:
To finish off the State_Validate method all we need to do is check the return value to determine if we should add the property error or not:
Private Sub State_Validate(results As EntityValidationResultsBuilder)
    If Not Me.State.IsState(True) Then
        results.AddPropertyError("Please enter a valid US State.")
    End If
End Sub
OK cool! So here are all of the extension validation methods in the module:
Imports System.Runtime.CompilerServices
Imports System.Text.RegularExpressions

Module CommonValidation
    ''' <summary>
    ''' Checks if the string is formatted as a 2 character US state code
    ''' </summary>
    ''' <param name="state">string type extension</param>
    ''' <param name="isEmptyOK">True if empty values are allowed, otherwise false</param>
    ''' <returns>True if the string is a valid US state, otherwise false</returns>
    ''' <remarks></remarks>
    <Extension()>
    Public Function IsState(ByRef state As String, ByVal isEmptyOK As Boolean) As Boolean
        If state <> "" Then
            'States should always be upper case
            state = state.ToUpper

            'Now validate based on regular expression pattern
            Dim pattern = "^(?:(A[KLRZ]|C[AOT]|D[CE]|FL|GA|HI|I[ADLN]|K[SY]|" +
                          "LA|M[ADEINOST]|N[CDEHJMVY]|O[HKR]|P[AR]|RI|S[CD]|" +
                          "T[NX]|UT|V[AIT]|W[AIVY]))$"

            Return Regex.IsMatch(state, pattern)
        Else
            Return isEmptyOK
        End If
    End Function
    ''' <summary>
    ''' Checks if the string is formatted as a valid US ZIP code
    ''' </summary>
    ''' <param name="zip">string type extension</param>
    ''' <param name="isEmptyOK">True if empty values are allowed, otherwise false</param>
    ''' <returns>True if the string is a valid ZIP code, otherwise false</returns>
    ''' <remarks></remarks>
    <Extension()>
    Public Function IsZIP(ByRef zip As String, ByVal isEmptyOK As Boolean) As Boolean
        If zip <> "" Then
            'Add the dash if the user didn't enter it and the ZIP code is 9 characters
            If Not zip.Contains("-") AndAlso zip.Length = 9 Then
                zip = zip.Substring(0, 5) + "-" + zip.Substring(5)
            End If
            'Now validate based on regular expression pattern
            Return Regex.IsMatch(zip, "^\d{5}$|^\d{5}-\d{4}$")
        Else
            Return isEmptyOK
        End If
    End Function
    ''' <summary>
    ''' Checks if the string is formatted as a Social Security Number
    ''' </summary>
    ''' <param name="ssn">string type extension</param>
    ''' <param name="isEmptyOK">True if empty values are allowed, otherwise false</param>
    ''' <returns>True if the string is a valid SSN, otherwise false</returns>
    ''' <remarks></remarks>
    <Extension()>
    Public Function IsSSN(ByRef ssn As String, ByVal isEmptyOK As Boolean) As Boolean
        If ssn <> "" Then
            'Add the dashes if the user didn't enter it and the SSN is 9 characters
            If Not ssn.Contains("-") AndAlso ssn.Length = 9 Then
                ssn = ssn.Substring(0, 3) + "-" + ssn.Substring(3, 2) + "-" + ssn.Substring(5)
            End If

            'Now validate based on regular expression pattern
            Return Regex.IsMatch(ssn, "^\d{3}-\d{2}-\d{4}$")
        Else
            Return isEmptyOK
        End If
    End Function

    ''' <summary>
    ''' Checks if the string contains only upper and lower case letters
    ''' </summary>
    ''' <param name="value">string type extension</param>
    ''' <param name="isEmptyOK">True if empty values are allowed, otherwise false</param>
    ''' <param name="isWhitespaceOK">True if spaces are allowed, otherwise false</param>
    ''' <returns></returns>
    ''' <remarks></remarks>
    <Extension()>
    Public Function IsAlpha(ByVal value As String,
                            ByVal isEmptyOK As Boolean,
                            ByVal isWhitespaceOK As Boolean) As Boolean
        If value <> "" Then
            'Validation for strings that must be Alphabetical characters only.
            Dim pattern As String
            If isWhitespaceOK Then
                'Allows spaces
                pattern = "^[a-zA-Z\s]+$"
            Else
                'No spaces
                pattern = "^[a-zA-Z]+$"
            End If

            Return Regex.IsMatch(value, pattern)
        Else
            Return isEmptyOK
        End If
    End Function

    ''' <summary>
    ''' Checks if the string contains only upper and lower case letters and/or numbers
    ''' </summary>
    ''' <param name="value">string type extension</param>
    ''' <param name="isEmptyOK">True if empty values are allowed, otherwise false</param>
    ''' <param name="isWhitespaceOK">True if spaces are allowed, otherwise false</param>
    ''' <returns></returns>
    ''' <remarks></remarks>
    <Extension()>
    Public Function IsAlphaNumeric(ByVal value As String,
                                   ByVal isEmptyOK As Boolean,
                                   ByVal isWhitespaceOK As Boolean) As Boolean
        If value <> "" Then
            'Validation for strings that must be AlphaNumeric characters only.
            Dim pattern As String
            If isWhitespaceOK Then
                'Allows spaces
                pattern = "^[a-zA-Z0-9\s]+$"
            Else
                'No spaces
                pattern = "^[a-zA-Z0-9]+$"
            End If

            Return Regex.IsMatch(value, pattern)
        Else
            Return isEmptyOK
        End If
    End Function
End Module
And finally, our customer entity that calls these methods. Notice how much cleaner the code is now and we can reuse these across any entity in the application.
Namespace LightSwitchApplication
    Public Class Customer

        Private Sub State_Validate(results As EntityValidationResultsBuilder)
            If Not Me.State.IsState(True) Then
                results.AddPropertyError("Please enter a valid US State.")
            End If
        End Sub

        Private Sub SSN_Validate(results As EntityValidationResultsBuilder)
            If Not Me.SSN.IsSSN(True) Then
                results.AddPropertyError("Please enter a valid SSN (i.e. 123-45-6789).")
            End If
        End Sub

        Private Sub ZIP_Validate(results As EntityValidationResultsBuilder)
            If Not Me.ZIP.IsZIP(True) Then
                results.AddPropertyError("Please enter a valid US ZIP code.")
            End If
        End Sub

        Private Sub LastName_Validate(results As EntityValidationResultsBuilder)
            If Not Me.LastName.IsAlpha(False, True) Then
                results.AddPropertyError("Last Name can only contain alphabetical characters.")
            End If
        End Sub

        Private Sub FirstName_Validate(results As EntityValidationResultsBuilder)
            If Not Me.FirstName.IsAlpha(True, True) Then
                results.AddPropertyError("First Name can only contain alphabetical characters.")
            End If
        End Sub
    End Class
End Namespace
To pull this all together into a concrete example I’ve included the sample code here:
http://code.msdn.microsoft.com/Common-Validation-Rules-in-397bf46bI hope this helps get you started writing your own more complex business rules and validation methods for your LightSwitch applications.
Microsoft posted a link to a glossy, 12-MB Visual Studio LightSwitch Reviewer’s Guide in PDF format during July 2011 (missed when published):
Microsoft Visual Studio LightSwitch is a simplified self-service development tool that enables you to build business applications quickly and easily for the desktop and cloud.
Return to section navigation list>
Windows Azure Infrastructure and DevOps
Adam Hall described Application Performance Monitoring with Operations Manager 2012 in an 11/11/2011 post:
As posted yesterday on the Server Cloud blog, we have released the Release Candidate of Operations Manager 2012. This is a significant milestone release, and in this article we will explore how Operations Manager 2012 Release Candidate delivers application performance monitoring.
For those of you who have downloaded and tested the Operations Manager Beta, there is new content and capabilities in the Release Candidate, so read on!
Operations Manager 2012 – the complete application monitoring solution
For many years Operations Manager has delivered infrastructure monitoring, providing a strong foundation on which we can build to deliver application performance monitoring. It is important to understand that in order to provide the application level performance monitoring, we must first have a solid infrastructure monitoring solution in place. After all, if an application is having a performance issue, we must first establish if the issue is due to an underlying platform problem, or within the application itself.
A key value that Operations Manager 2012 delivers is a solution that uses the same tools to monitor with visibility across infrastructure AND applications.
To deliver application performance monitoring, we provide 4 key capabilities in Operations Manager 2012:
- Infrastructure monitoring – network, hardware and operating system
- Server-side application monitoring – monitoring the actual code that is executed and delivered by the application
- Client-side application monitoring – end-user experiences related to page load times, server and network latency, and client-side scripting exceptions
- Synthetic transaction – pre-recorded testing paths through the application that highlight availability, response times, and unexpected responses
Configuring application performance monitoring
So it must be hard to configure all this right? Lots of things to know, application domain knowledge, settings, configurations? Rest assured, this is not the case! We make it incredibly easy to enable application performance monitoring!
It’s as easy as 1 – 2 – 3 …
1. Define the application to monitor.
2. Configure server-side monitoring to be enabled and set your performance thresholds
3. Configure client-side monitoring to be enabled and set your performance thresholds
And that’s it, you’re now set to go. Of course setting the threshold levels is the most important part of this, and that is the one thing we can’t do for you… you know your application and what the acceptable performance level is.
Configuring an application performance dashboard in 4 steps
It’s great that we make the configuration of application performance monitoring so easy, but making that information available in a concise, impactful manner is just as important.
We have worked hard to make the creation of dashboards incredibly easy, with a wizard driven experience. You can create an application level dashboard in just 4 steps:
1. Choose where to store the dashboard
2. Choose your layout structure. There are many different layouts available.
3. Specify which information you want to be part of your dashboard.
4. Choose who has access to the dashboard. As you will see a little later in this article, publishing information through web and SharePoint portals is very easy.
And just like that, you’ve created and published an application performance monitoring dashboard!
Open up the conversation
Anyone who has either worked in IT, or been the owner of an application knows the conversations and finger pointing that can go on when users complain about poor performance. Is it the hardware, the platform, a code issue or a network problem?
This is where the complete solution from Operations Manager 2012 really provides an incredible solution. It’s great that an application and associated resources are highly available, but availability does not equal performance. Indeed, an application can be highly available (the ‘5 nines’) but performing below required performance thresholds.
The diagram below shows an application dashboard that I created using the 4 steps above for a sample application. You can see that the application is available and ‘green’ across the board. But the end users are having performance issues. This is highlighted by the client side alerts about performance.
Deep Insight into application performance
Once you know that there is an issue, Operations Manager 2012 provides the ability to drill into the alert down to the code level to see exactly what is going on and where the issue is.
Reporting and trending analysis
An important aspect of application performance monitoring is to be able to see how your applications are performing over time, and to be able to quickly gain visibility into common issues and problematic components of the application.
In the report shown below, you can see that we can quickly see areas of the application we need to focus on, and also understand how these components are related to other parts of the application, and may be causing flow-on effects.
Easily make information available
With Operations Manager 2012, we have made it very easy to delegate and publish information across multiple content access solutions. Operations staff have access to the Operations Manager console, and we can now easily publish delegated information to the Silverlight based Operations web console and also to SharePoint webparts.
And best of all, the information looks exactly the same!
Calls to Action!
It looks great, you want to get started and see how Operations Manager application performance monitoring will work for you in your environment, so where do you start?
- Get involved in the Community Evaluation Program (CEP). We are running a private cloud evaluation program starting in November where we will step you through the entire System Center Private Cloud solution set, from Fabric and Infrastructure, through Service Delivery & Automation and Application Management. Sign up here.
- Read the online documentation
- Participate in the online TechNet Forums
- Download the Operations Manager 2012 Release Candidate here
Kenon Owens (@MS_Int_Virt) posted Infrastructure and Network Monitoring with System Center Operations Manager 2012 Release Candidate on 11/11/2011:
I am so glad that the System Center Operations Manager 2012 Release Candidate was recently released. This is an exciting release, and includes all of the new capabilities introduced in the Beta plus a few more.
One of the important changes we made with Operations Manager 2012 is that we have simplified the architecture by removing the RMS (Root Management Server) role. To do this, we have created resource pools that will distribute the workload that the RMS performed in the past. This will help decrease bottlenecks, help increase performance, and help provide higher availability of your Operations Manager environment.
I am really excited about our Network Monitoring in Operations Manager 2012 RC. Whether the devices are ones where we have extended monitoring capabilities (check out the link here), or other switches where we can just determine connectivity, you can determine if the problem is with the networking infrastructure, or the servers connected.
Now, if you want to, you can create your own custom dashboards displaying views of performance and alerts that are important to you. Once you have created these dashboards, you can present them in a read-only view to SharePoint via the Operations Manager Web Part support.
With Operations Manager 2012, we have connectors for other System Center products that allow for better management of your infrastructure and more connected communication within System Center.
With System Center Orchestrator 2012, the integration pack will have the capabilities to interact with Operations Manager 2012 through activities like:
- Create Alert
- Get Alert
- Update Alert
- Monitor Alert
- Get Monitor
- Monitor State
- Start Maintenance Mode
- Stop Maintenance Mode
With System Center Virtual Machine Manager 2012, the connector will allow you to push from Virtual Machine Manager
- Virtual machine information (properties, performance data)
- Service information (services rendered as distributed applications in OM)
- Private cloud information (capacity, usage metrics)
- Host and Host Cluster information
- Storage Pool information
- IP Address and MAC pool information
- VMM infrastructure information (VMM server health, library server health)
With System Center Service Manager 2012, you have the connector which allows you to sync your Operations Manager discovered objects from any Operations Manager management packs and create configuration items and business services within Service Manager. Also, the connector will create incidents from Operations Manager alerts automatically for you.
We’ve built Operations Manger 2012 with upgrading in mind, and you can perform a rolling upgrade from your Operations Manager 2007 environment. Here is a nice diagram on the upgrade process flow.
I would be remiss to mention that all the really cool things you used in Operations Manager before are still there. For example, your management packs will still work, your alerting, health, and performance monitoring is all still there. Existing MPs and Templates should just work, allowing you to preserve that existing investment you may have already made.
I am really excited about this Release Candidate. Please, download and give it a try.
Kristian Nese asked System Center App Controller - More spaghetti? (part 1) in an 11/10/2011 post:
System Center App Controller (changed from «Codename Concero») is available and you can grab it from here!
So what’s up with this tool? All the 2012 editions of the System Center portfolio are focusing on cloud computing. App Controller is no exception.
It is a small piece of software that open the doors to both Private Clouds (VMM 2012)and Public Clouds (Windows Azure).
It is a web-based management solution that lets you manage multiple public and private clouds in your organization, and you can therefore deploy services to both public and private cloud.
Some key benefits:
- Connect to and manage Windows Azure subscriptions and private clouds on VMM 2012
- Deploy and manage services and VMs across multiple public and private clouds
- Manage and share file resources, service templates and VM Templates
- Delegate role-based access to users for the management of services and resources on public and private clouds
Just another Self-Service Portal?
Obviously,the answer is yes. And no.
You will still have the option to deploy VMs though the biggest focus in this portal is the Service (service is equal to application).
So why should you consider the System Center App Controller if you already have the VMM2012 Self-Service Portal?
- You have developers and application owners that need to manage subscriptions an dapplications running in Windows Azure.
- You have multiple VMM servers within your organization (App Controller can connect to multiple VMM servers/private clouds).
- You love Silverlight.
Install
- A supported operating system (Windows Server 2008 R2 Full Installation –Standard, Enterprise or Datacenter. Service Pack 1 or earlier
- Microsoft.NET Framework 4 (The App Controller setup will install it for you).
- Web Server (IIS) with Static Content, Default Document, Directory Browsing, HTTP Errors, ASP.NET .NET Extensibility, ISAPI Extensions, ISAPI Filters, HTTP Logging, Request Monitor, Tracing, Basic Authentication, Windows Authentication,Request Filtering, Static Content Compression, IIS Management Console. And yes –The App Controller setup will install everything.
- VMM2012 Console.
- A supported SQL Server (SQL 2008 R2 Standard, Enterprise or Datacenter, SQL 2008 SP2 Standard or Enterprise. Both x86 and x64 are supported)
- Make sure the computer you install on is a member of an Active Directory Domain
- Best practice – do not install App Controller on your VMM server
Connect to public and private clouds
Once the App Controller service is up and running, you can access it through Internet Explorer 9 (remember to install Silverlight).
Connect to the public cloud
To connect App Controller to a Windows Azure subscription, you need the subscription ID and a Personal Information Exchange (.pfx) file that you have exported, and also the password to it.
- On the Clouds page click Connect and click Windows Azure Subscription.
- Enter a name for the subscription. This name is displayed in the Clouds column.
- Fill in the Subscription ID (get the ID from the Windows Azure Portal)
- Import the .pfx file and enter the password.
- You’re done!

Connect to the private cloud
- On the Clouds page click connect and then click VMM Server.
- Enter a name for this connection. This name is displayed in the Clouds column.
- In the VMM server name box, enter the FQDN of the VMM management server.
- Enter the port needed for communicating with the VMM server. This port should be the same within the entire VMM infrastructure (default port: 8100).
- Check Automatically Import SSL certificates. This is required when you intend to copy files and templates to and from VMM cloud libraries.
- Click OK.
- You might then be asked to select which VMM user role to use from the new VMM server connection for the current session.
There you go!
Next time, we’ll take a closer look at when the IT-pro meet the developer in the cloud (part 2).
Kristian is the author of the recently published Cloud Computing med Virtual Machine Manager 2012 book (in Norwegian.)
David Mills of the Microsoft Server and Cloud Platform Team announced the System Center Operations Manager 2012 Release Candidate: From the Datacenter to the Cloud in an 11/10/2011 post:
We’re happy to announce that the Release Candidate of Operations Manager 2012 is now available! If you read our post on 10/27 about App Controller, Service Manager and Orchestrator, then you know cloud computing is making things much easier for both the consumer of datacenter services, such as line of business application managers, as well as the datacenter IT provider of those resources. Cloud computing also makes it possible for IT to offer datacenter infrastructure on-demand, the same way you can order a new hard drive online. This is all goodness, making it easier for folks in IT to collaborate and deliver better overall IT services.
Now that you’ve established your standardized and automated process engine and a great self-service experience for the IT consumer, as the datacenter IT provider you still have to keep an eye on everything. You need to diagnose and fix IT problems before they lead to any downtime or loss of business productivity and revenue. You also know that providing this Infrastructure as a Service (IaaS) can be daunting when you depend on a mix of physical, virtual, and cloud resources to run a diverse mix of operating systems (Windows, Linux, and Unix) that support any number of critical business applications. Even if you have used Virtual Machine Manager to pool your underlying infrastructure into abstracted private cloud fabric, you still have to be able to monitor everything from the application running on top of this fabric all the way down to the underlying physical servers and network devices. This complexity can make it difficult to get an integrated, consistent and reliable view of what’s happening, hampering your ability to respond proactively. This is where Operations Manager really shines by providing deep application insights, integrated physical, virtual and cloud management – even down to network devices – and a single pane of glass to monitor resources across your datacenter and clouds.
To keep your applications healthy, you get deep application insights through market-leading .NET web application performance monitoring and diagnostics, as well as JEE web application health monitoring. Operations Manager uses built-in intelligence to monitor applications so you can discover dependencies automatically and get an end–to-end picture of all components running in the application. You can even monitor the application user’s experience and get alerts you if it degrades, so you can quickly diagnose and fix the problem. You can monitor the health of Windows Azure based applications running on Azure from the same console, too.
Operations Manager not only provides a view of your business applications, but a comprehensive view of the environment in which those applications run, whether it’s based on physical, virtual, or cloud resources. Even if you run a variety of operating systems—Windows, Linux, and UNIX servers and their workloads—you get a single console to monitor this heterogeneous environment.
Along with server, client, service, and application monitoring, Operations Manager now includes network monitoring. Instead of simply monitoring each server, it is now possible to look at the underlying network topology that connects the servers. You get a single end-to-end view to help you understand how your server and network infrastructure is working as a whole—from node to network to servers to applications and services. So, I think you’d agree – that’s quite a view!
Go ahead and download the Release Candidate today and give it a try. Also, be sure to look for more detailed deep-dive blogs coming from Adam and Kenon.
Lydia Leong (@cloudpundit) asserted In cloud IaaS, developers are face of business buyers in an 11/10/2011 post:
I originally started writing this blog post before Forrester’s James Staten made a post called “Public Clouds Prove I&O Pros Are From Venus And Developers Are From Mars“, and reading made me change this post into a response to his, as well as covering the original point I wanted to make.
In his post, James argues that cloud IaaS offerings are generally either developer-centric or I&O-centric, which leads to an emphasis on either self-service or managed services, with different feature-set priorities. Broadly speaking, I don’t disagree with him, but I think there’s a crucial point that he’s missing (or at least doesn’t mention), that is critical for cloud IaaS providers to understand.
Namely, it’s this: Developers are the face of business buyers.
We can all agree, I’m sure, that self-service cloud IaaS of the Amazon variety has truly empowered developers at start-ups and small businesses, who previously didn’t have immediate access to cheap infrastructure. Sometimes these developers are simply using IaaS as a substitute for having to get hardware and colocation. Sometimes they’re taking advantage of the unique capabilities exposed by programmatic access to infrastructure. Sometimes they’re just writing simple Web apps the same way they always have. Sometimes they’re writing truly cloud-native applications. Sometimes they really need to match their capacity to their highly-variable needs. Sometimes they have steady-state infrastructure. You can’t generalize about them too broadly. But their reasons for using the cloud are pretty clear.
But what’s driving developers in well-established businesses, with IT Operations organizations that have virtualized infrastructure and maybe even private cloud, to put stuff in the public cloud?
It’s simple. They’ve asked for something and IT Operations can’t give it to them in the timeframe that they need. Or IT Operations is such a pain to deal with that they don’t even want to ask. (Yes, sometimes, they want programmatic infrastructure, have highly variable capacity needs, etc. Then they think like start-ups. But this is a tiny, tiny percentage of projects in traditional businesses, and even a small percentage of those that use cloud IaaS.)
And why do they want something? Well, it’s because the business has asked the applications development group to develop a thingy that does X, and the developer is trotting off to try to write X, only he can’t actually do that until IT Operations can give him a server on which to do X, and possibly some other stuff as well, like a load balancer.
So what happens is you get a developer who goes back to a business manager and says, “Well, I could deliver you the code for X in six weeks, except IT Operations tells me that they can’t get around to giving me a server for it for another three weeks.” (In some organizations, especially ones without effective virtualization, that can be months.) The business manager says, “That’s unacceptable. We can’t wait that long.” And the developer sighs and says, “Don’t worry about it. I’ll just take care of it.” And then some cloud IaaS provider, probably one who’s able to offer infrastructure, right now, gets a brand-new customer. This is what businesses mean when they talk about “agility” from the cloud.
Maybe the business has had this happen enough that Enterprise Architecture has led the evaluation of cloud IaaS providers, chosen one or more, set down guideliens for their use, and led the signing of some sort of master services agreement with those providers. Or maybe this is the first sign-up. Either way, developers are key to the decision-making.
When it comes to go into production, maybe IT Operations has its act together, and it comes back into the business’s data center. Maybe it has to move to another external provider — IT Operations has sourced something, or Enterprise Architecture has set a policy for where particular production workloads must run. So maybe it goes to traditional managed hosting, hybrid hosting, or a different cloud provider. Maybe it stays with the cloud the developer chose, though. There’s a lot to be said for incumbency.
But the key thing is this: In SaaS, business buyers are bypassing IT to get their own business needs met. In IaaS, business buyers are doing the same thing — it’s just that it’s the developer that is fronting the sourcing, and is therefore making the decision of when to go cloud and who to use when they do, at least initially.
So if you’re a cloud provider and you say, “We don’t serve individual developers” (which, in my experience, you’ll generally say with a sneer), you are basically saying, “We don’t care about the business buyer.” Which is a perfect valid sales strategy, but you should keep in mind that the business controls two-thirds of cloud spending (so IT Operations holds the purse-strings only a third of the time), according to Gartner’s surveys. You like money, don’t you?
There are many, many more nuances to this, of course (nuances to be explored in a research note for Gartner clients, naturally, because there’s only so much you get for free). But it leads to the conclusion that you must be able to sell to both developers and IT Operations, regardless of the nature of your offering, unless you really want to limit your market opportunity. And that means that the roadmaps of leading providers will be convergent to deliver the features needed by both constituencies.
<Return to section navigation list>
Windows Azure Platform Appliance (WAPA), Hyper-V and Private/Hybrid Clouds
•• Linked In Jobs reported a Microsoft advert for an Eng Service Engineer 2 Job on 11/7/2011 (missed when posted):
Job Description
Job Category: Operations
Location: Redmond, WA, US
Job ID: 771202-65220
Division: Server & Tools BusinessAre you passionate about Cloud Services? Do you want to be a part of enabling enterprises, hosters and governments run cloud services via the Cloud Appliance? If you answered 'yes' to these questions above this job is for you!
The Windows Azure Platform Appliance (WAPA) integrates hardware, software and services together in a single package that will light up on-premises instances of the Windows Azure Platform technologies at tremendous scale. It provides unique ways for enterprises, hosters and governments to efficiently manage elastic virtualized environments with compute, networking, storage, database and application development capabilities. We will deliver WAPA with the help of hardware and operational partners to bring together the best in hardware innovation, IT services and software.
We are looking to significantly expand the program beyond the current four partners, Dell, eBay, Fujitsu and HP. The Cloud Appliance Production Services team is looking for a few passionate, driven and experienced Systems Engineers to drive this expansion. Come help us scale the appliance program and deliver a new technology to our customers and partners. [Emphasis added.]
Key Responsibilities:
In this role you will be building out and operating the appliance at various customer locations around the world and working with the product team to improve a v1 product. This job includes a combination of industry-typical System Engineering responsibilities and close partnership with key product teams on automation, manageability, security, optimization and deployment of large scale, geo-distributed datacenter solutions.Specific Responsibilities include:
- Optimize & Innovate: Develop monitoring, tuning, and implement optimization tactics. Build and integrate automation and tooling capabilities. Push such innovation and optimization back into the product development cycle.
- Evaluate systems and technology - Assess new systems designs and technical strategies and drive those into the produce.
- Technical engineering support - Support for the implementation, integration, and evolution of complex systems. Design and maintain monitoring and reporting for impact areas.
- Problem Solving: Provide technical expertise for resolving critical production systems issues. You will also work with other teams or members to troubleshoot complex support issues, identify root causes and develop mitigation options. …
Requirements follow. The “Cloud Appliance Production Services” team is new to me. The team also is advertising for Operations managers and staff.
Kevin Remde (@KevinRemde) posted a guide to The Cloud on Your Terms: 30 Part Series on 11/10/2011:
For those of you who missed any of these and want to catch up, here is a list that I will keep updated with links to the team’s (Me, Brian Lewis, John Weston, and Matt Hester) posts.
And don’t forget to go to http://aka.ms/evals if you want to evaluate any of the foundational software to create your own private cloud test environment.
The Cloud on Your Terms Part 1 of 30: What Cloud is Right for You?
- The Cloud on your terms part 2 of 30 What is a Hybrid Cloud?
- The Cloud on your Terms Part 3 of 30 Getting Ready for The Cloud
- The Cloud on Your Terms Part 4 of 30: What does System Center 2012 offer “The Cloud”
- The Cloud on Your Terms Part 5 of 30: Are your Servers Ready For the Cloud?
- The Cloud on Your Terms Part 6 of 30: What Cloud Goodies Can I Find in Windows Server 2008 R2 SP1
- Cloud on Your Terms Part 7 of 30: Hyper-V for the VMware Professional
- The Cloud on Your Terms Part 8 of 30: Installing Hyper-V Screencast
- The Cloud on Your Terms Part 9 of 30: What hardware is needed for a Datacenter? Lessons learned from a software company
- Cloud on Your Terms Part 10 of 30: Kevin’s Mad House of Cloud
- The Cloud on Your Terms Part 11 of 30: SCVMM and Virtualization a Love Story
<Return to section navigation list>
Cloud Security and Governance
Lydia Leong (@cloudpundit) asserted There’s no such thing as a “safe” public cloud IaaS in an 11/11/2011 post:
I’ve been trialing cloud IaaS providers lately, and the frustration of getting through many of the sign-up processes has reminded me of some recurring conversations that I’ve had with service providers over the past few years.
Many cloud IaaS providers regard the fact that they don’t take online sign-ups as a point of pride — they’re not looking to serve single developers, they say. This is a business decision, which is worth examining separately (a future blog post, and I’ve already started writing a research note on why that attitude is problematic).
However, many cloud IaaS providers state their real reason for not taking online sign-ups, or of having long waiting periods to actually get an account provisioned (and silently dropping some sign-ups into a black hole, whether or not they’re actually legitimate), is that they’re trying to avoid the bad eggs — credit card fraud, botnets, scammers, spammers, whatever. Some cloud providers go so far as to insist that they have a “private cloud” because it’s not “open to the general public”. (I consider this lying to your prospects, by the way, and I think it’s unethical. “Marketing spin” shouldn’t be aimed at making prospects so dizzy they can’t figure out your double-talk. The industry uses NIST definitions, and customers assume NIST definitions, and “private” therefore implies “single-tenant”.)
But the thing that worries me is that cloud IaaS providers claim that vetting who signs up for their cloud, and ensuring that they’re “real businesses”, makes their public, multi-tenant cloud “safe”. It doesn’t. In fact, it can lure cloud providers into a false sense of complacency, assuming that there will be no bad actors within their cloud, which means that they do not take adequate measures to defend against bad actors who work for a customer — or against customer mistakes, and most importantly, against breaches of a customer’s security that result in bad eggs having access to their infrastructure.
Cloud providers tell me that folks like Amazon spend a ton of money and effort trying to deal with bad actors, since they get tons of them from online sign-ups, and that they themselves can’t do this, either for financial or technical reasons. Well, if you can’t do this, you are highly likely to also not have the appropriate alerting to see when your vaunted legitimate customers have been compromised by the bad guys and have gone rogue; and therefore to respond to it immediately and automatically to stop the behavior and thereby protect your infrastructure and customers; and to hopefully automatically, accurately, and consistently do the forensics for law enforcement afterwards. Because you don’t expect it to be a frequent problem, you don’t have the paranoid level of automatic and constant sweep-and-enforce that a provider like Amazon has to have.
And that should scare every enterprise customer who gets smugly told by a cloud provider that they’re safe, and no bad guys can get access to their platform because they don’t take credit-card sign-ups.
So if you’re a security-conscious company, considering use of multi-tenant cloud services, you should ask prospective service providers, “What are you doing to protect me from your other customers’ security problems, and what measures do you have in place to quickly and automatically detect and eliminate bad behavior?” — and don’t accept “we only accept upstanding citizens like yourself on our cloud, sir” as a valid answer.
Fahmida Y. Rashid (@zdFYRashid) asserted “Microsoft Active Directory Federation Services now supports RSA SecurID token authentication to secure Office 365 applications, Microsoft Exchange, and Azure Cloud” in a deck for her RSA Adds SecurID Two-Factor Authentication to Microsoft Azure Cloud article of 11/11/2011 for eWeek’s IT Security and Network News blog:
Organizations can now use their SecurID two-factor authentication deployments to secure cloud applications running on Microsoft Windows Active Directory Federation Services (ADFS), RSA Security said.
Users will be able to add multi-factor authentication into Office 365 applications, including Microsoft Exchange and Microsoft Azure, and still use Active Directory roles to control authentication for both on-premise applications and cloud systems, EMC-subsidiary RSA Security said Nov. 7. [Emphasis added.]
ADFS allows customers to use their Active Directory roles in the cloud to achieve single sign capabilities for corporate networks and the cloud. The fact that ADFS now supports two-factor authentication out of the box adds another level of centralized authentication and authorization to the environment, according to RSA Security.
RSA's SecurID token generates a one-time-password every 30 seconds to two minutes. On systems that have SecurID enabled, users have to first enter their username and password, and then the generated one-time-password to gain access. This integration would allow Azure developers to build applications that use SecurID to handle authentication.
Organizations can use the hardware token that's already deployed in the enterprise, Karen Kiffney, a senior product marketing manager at RSA, told eWEEK.
This isn't the first time RSA partnered up with Microsoft. The two companies have teamed up in the past to protect data loss prevention tools and data classification service.RSA is trying to convince customers to stick with SecurID even after the data breach that damaged two-factor authentication technology's reputation earlier this year. Unknown attackers managed to breach RSA's corporate networks using a combination of malware, zero-day vulnerabilities and social engineering to steal information related to SecurID. There are over 40 million people in at least 30,000 organizations worldwise using the technology.
As a result of the attack on RSA, IT security professionals were considering moving away from hardware-based two-factor authentication tokens such as SecurID toward risk-based authentication and software-based tokens, Andras Cser, a principal analyst with Forrester Research wrote in a research note.
The fact that Microsoft chose RSA to protect its cloud environment with SecurID was validation that the company has moved beyond the incident, a RSA spokesperson said. The company has offered to replace tokens, made some changes to its manufacturing process, and the breach was a "one time event," Kiffney said.Customers are more curious about what RSA learned as a result of the breach, and what tactics they should be using, Phil Aldrich, RSA's senior product marketing manager, told eWEEK. "Customers see that we detected and stopped the attack as it was happening and want to know how to do that," Aldrich said.
The integration is available for no extra fee for all SecurID users and there's no additional work needed to get this to work. "It just will work out of the box," Kiffney said. If the customer is already a SecurID customer, then they know it's going to work with everything, regardless of whether it's in the cloud in Azure, or on-premise.RSA made a similar announcement for Citrix Receiver. Organizations were using Citrix Receiver in a virtual application delivery environment and protecting the session with usernames and passwords. Citrix Receiver can be used with Windows, Mac and Linux desktops and laptops, think clients, and mobile devices running Apple iOS, Google Android, or Research in Motion phones, according to RSA.
In the past, organizations who wanted to use SecurID on Citrix Receiver would have to switch to the software token app on the mobile device to obtain the one-time password. Now the software is part of a software developer kit (SDK) that allows the application that called the software token to obtain the passcode in the background automatically.
This capability is available in Citrix Receiver, Juniper JUNOS Pulse and VMware View, RSA said. In order to prevent Citrix session hijacking, the authentication technology is now built into the receiver.
"Hackers have to jump through much bigger hoops to abuse an identity and get to data since that data doesn’t exist by default on the device itself,” Sam Curry, CTO of RSA Security, wrote on the blog.
<Return to section navigation list>
Cloud Computing Events
Eric Nelson (@ericnel) posted Links and Slides on Windows Azure and Windows Phone 7 session Thursday 10th Nov on 11/11/2011:
Big thank you to everyone involved in the session yesterday – and well done on the cocktails! And a special thanks to David of red badger for doing a great job of sharing their experiences.
Download Slides: Windows Azure Workshop
Links:
- www.azure.com Getting started with Windows Azure
- www.buildwindows.com Latest Azure and Device sessions were recorded at this conference. Including
- www.sixweeksofazure.co.uk Sign up for six weeks of FREE technical and commerical help to take advantage of the Windows Azure Platform
- Red Badger Case Study
I was also asked about costing Windows Azure. Check out:
Peter Laudati (@jrzyshr) reported Windows Azure Camps Coming in December 2011 in an 11/10/2011 post:
It’s time for another round of Windows Azure events on the US east coast! Last spring, Jim, Brian, and I brought the Windows Azure Tech Jam to 5 locations in Pennsylvania, Florida, and North Carolina. Two weeks ago, the new Windows Azure DevCamp series launched with a two-day event in Silicon Valley. Now we are bringing it to five cities on the east coast this December!
We’re changing the formula up a bit this time too. In the past, we’ve done “9 to 5” events. Most of these events will begin at 2 p.m. and end at 9 p.m. – with dinner (instead of lunch) in middle. The first part will be a traditional presentation format and then we’re bringing back RockPaperAzure for some “hands-on” time during the second half of the event. We’re hoping you can join us the whole time, but if classes or your work schedule get in the way, definitely stop by for the evening hackathon (or vice versa).
If you haven’t heard about RockPaperAzure yet, check out http://www.rockpaperazure.com to get an idea of what we will be working on. It is a good old fashioned coding challenge that we will run live during the event. May the best algorithm win! (As per usual, there will be some cool swag headed to the authors of best algorithms!)
Below is the event schedule. Be sure to register quickly as some venues are very constrained on space! You’ll want to have your very own Windows Azure account to participate, so no time like the present to sign up for the Trial Offer, which will give you plenty of FREE usage of Windows Azure services for the event as well as beyond.
Event Schedule:
Location Date Time Registration Link Raleigh, NC 12-5-2011 2pm-9pm REGISTER HERE Farmington, CT 12-7-2011 2pm-9pm REGISTER HERE New York City, NY 12-8-2011 9am-5pm REGISTER HERE Malvern, Pa 12-12-2011 2pm-9pm REGISTER HERE Chevy Chase, MD 12-14-2011 2pm-9pm REGISTER HERE
Hope to see you at one of the Azure Dev Camps next month!
<Return to section navigation list>
Other Cloud Computing Platforms and Services
Cade Metz reported Exclusive: HP Runs VMware’s Open Source ‘Cloud OS’ in an 11/11/2011 post to the Wired Enterprise blog:
Nearly a year and a half ago, HP told the world it would offer a cloud service based on Microsoft’s Windows Azure, a means of building and deploying applications over the net. We’re still waiting for this service to arrive, but in the meantime, HP has embraced the open source alternative to Windows Azure: VMware’s Cloud Foundry.
HP is currently running the VMware platform atop the cloud service it privately introduced to a small number of testers earlier this fall. In all likelihood, the company will eventually make good on its Windows Azure promise, but at the same time, it’s fully committed to Cloud Foundry, and the platform will be part of HP’s cloud service when it’s unofficially unveiled in spring.
The move is a boost for VMware’s project, which seeks to provide a common way of building what are typically called “platform clouds.” VMware runs its own Cloud Foundry service — also in beta — and several outside outfits have deployed the platform in recent months, but HP is certainly the biggest name to do so. VMware aims to create a cloud “ecosystem” where applications can span disparate services — or even move from service to service.
But in adopting Cloud Foundry, HP is also moving its own cause forward. Now run by ex-IBM man Zorawar “Biri” Singh [pictured at right], the HP cloud services group is not only embracing open source projects that take a more egalitarian approach than cloud services such as Microsoft Azure, Google App Engine, or even Amazon Web Services. It’s moving with a speed you have to admire in such a large company. Cloud Foundry was opened sourced just seven months ago.
Hand of Singh
Biri Singh has a handshake that grabs your attention. You get the distinct impression that when he joined HP this past May, he took hold of the Cloud services group and promptly moved it where to he wanted it to be.
Before his arrival, the rumor was that HP was building a “public cloud” based on proprietary technology developed at HP Labs. But little more than four months later, Singh and his crew unveiled a “beta” cloud service to a small group of testers, and it was based on OpenStack, an open source platform founded by NASA and Rackspace.
This about-face showed not only that HP is determined to compete with the Amazons of the world, but that it may actually be nimble enough — and open minded enough — to do so. With its Elastic Compute Cloud (EC2), Simple Storage Service (S3), and other web services, Amazon pioneered the art of delivering infrastructure resources over the net, including virtual servers and storage. With OpenStack, HP aims to mimic Amazon Web Services, but in a way that plays nicely with other clouds. OpenStack can be run anywhere, by anyone.
Now, Singh and company have reaffirmed their approach with Cloud Foundry, a platform that lets developers build and host applications online without worrying about the underlying infrastructure. On HP’s beta service, Cloud Foundry runs atop OpenStack.
Public Meets Private
Biri Singh and the rest of the HP Cloud Services braintrust live in separate parts of the country. As befits a team that’s building a cloud service, they typically collaborate via the net. But on occasion, they come together for a few days of crash meetings at a central location. This week, they met at a hotel near the San Francisco airport, and in the afteroon, they stepped into a side room to show us their beta service, including its use of Cloud Foundry
Singh acknowledged that the original idea was to run HP’s cloud atop technology developed inside the company, but somewhere along the way, his team decided to fold at least some of this proprietary technology into OpenStack — and use that as the basis for the service. According to Singh and Patrick Scaglia, the chief technology officer of the cloud services group, HP will at some point contribute this work back to the open source community. But they didn’t discuss what this technology does.
OpenStack is a means of building what are commonly called “infrastructure clouds,” online services that provide access to virtual computing resources you can scale up and down as needed. These might be “public clouds” –- services such as Amazon’s AWS that can be used by anyone –- or they might be “private clouds” used within a particular company.
HP is building a public cloud, but in using OpenStack, it wants to create a service that dovetails with private clouds set up behind the firewall. Considering that HP is also a company that helps businesses forge infrastructure inside their own data centers, this only stands to reason.
“We want to provide hybrid clouds,” Singh said, referring to services that span the public and private. “As HP, we have to be able to connect the dots there.”
Like Amazon. And Beyond
In addition to offering raw computing resources over the web, HP’s public cloud will serve up online versions of common applications from atop its OpenStack base, including databases and other back-end tools as well as office tools such as the HR application offered by Silicon Valley outfit Workday. Amazon offers similar applications atop EC2 and S3.
Going beyond Amazon, HP will also use Cloud Foundry to provide a “platform cloud.” You’ll have a choice. You can use the raw infrastructure provided by OpenStack. Or you can build applications at a higher level with Cloud Foundry.
Like OpenStack, Cloud Foundry can be run anywhere. Once again, you’ll have the option of using the service in tandem with other services or private platform clouds. CEO Paul Maritz bills Cloud Foundry as an open source “cloud operating system.” The idea, he says, is to avoid getting “locked-in” to clouds from the likes of Google, Microsoft, and Amazon.
“We need to create the 21st century equivalent of Linux, which gives you a certain degree of isolation, abstraction, and portability across clouds,” he told us earlier in the week. “If you’re a developer, you need a set of services that can make your life easy, but that don’t bind you forever and a day to the stack of one vendor.”
Cloud Building Blocks
According to Singh and Scaglia, HP’s cloud will run in multiple HP data centers across the country and eventually across the world, and these facilities will be constructed using HP’s “EcoPods,” modular data centers that can be shipped across the globe and pieced together into larger data centers. “These are data centers optimized for a cloud,” said Scaglia.
“If you’re building a cloud service, your data center is going to be different. Your network is going to be different. Your ratio of servers to network will be very different. Your cost of operation needs to be very different. Your uptime needs to be different. They’re can’t really have downtime.”
This too follows technology pioneered by a big name web player. The modular data center originated at Google, after CEO Larry Page latched onto an idea originally floated by the Internet Archive. But HP is going further, seizing on ideas incubated by the big web names and taking them to a wider audience. At least, that’s the plan.
Yes, HP is a bit late to the public cloud party — even Dell has launched its own public service — and much of the HP pitch is still mere theory. After all, this is a beta service. But when you talk with Biri Singh, you get the feeling that HP’s cloud is in good hands.
<Return to section navigation list>


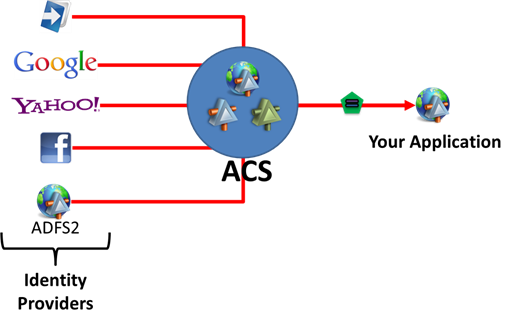
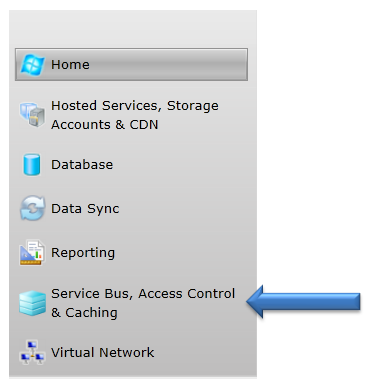
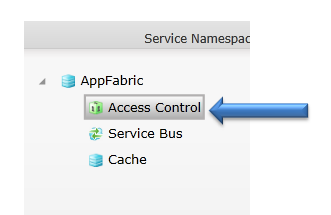
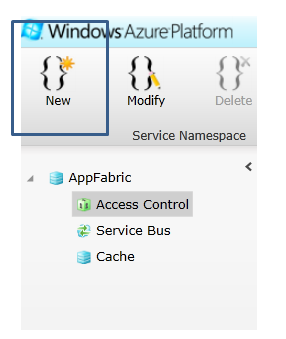
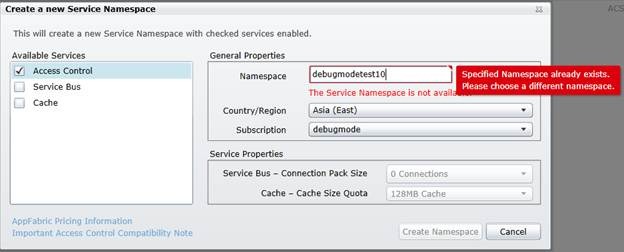
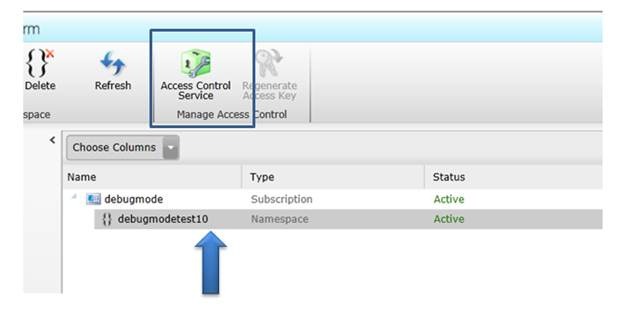
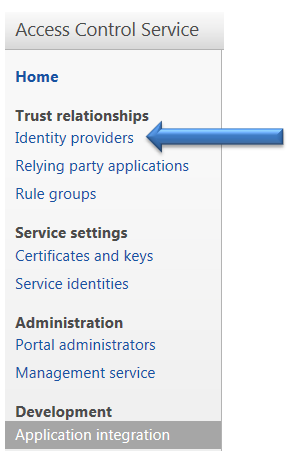
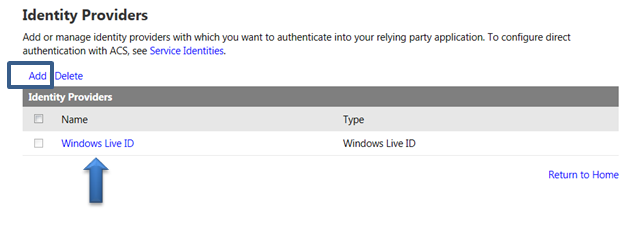
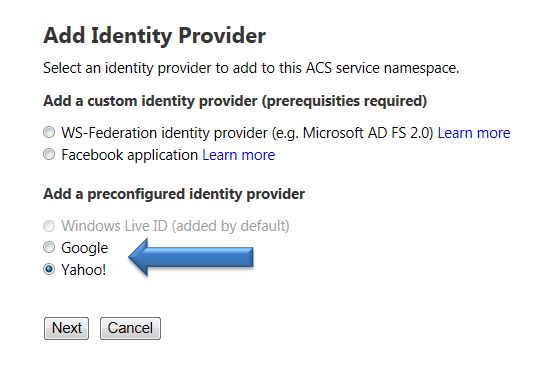
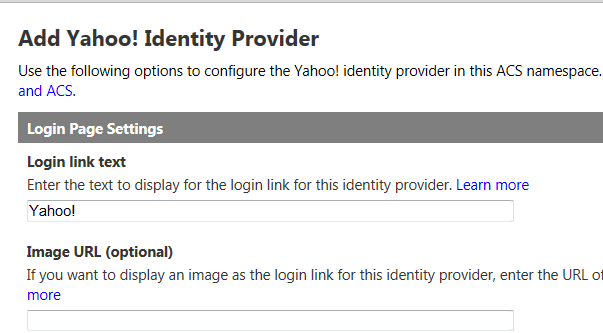
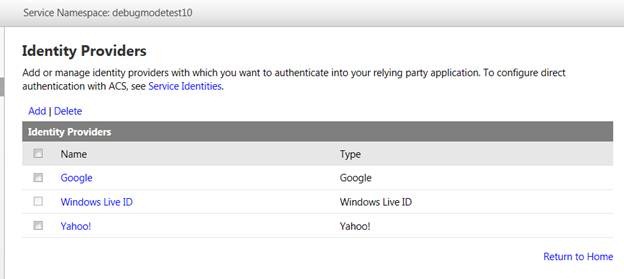
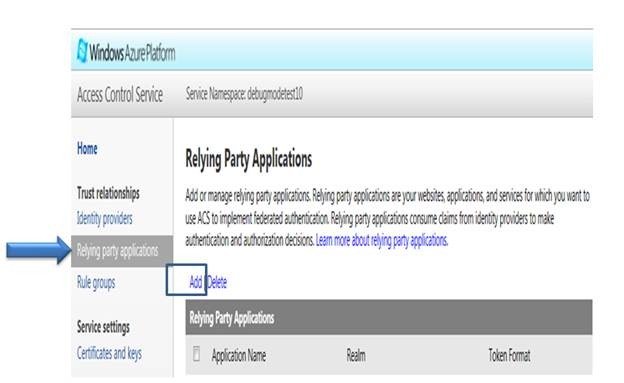

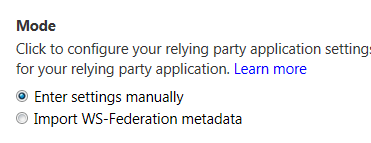
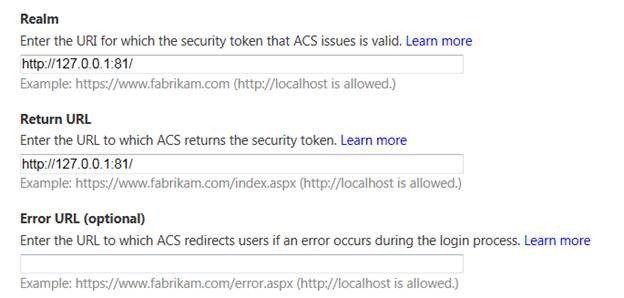
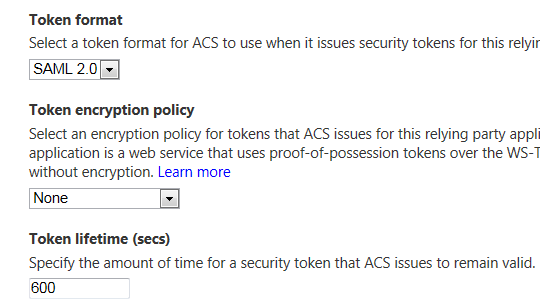
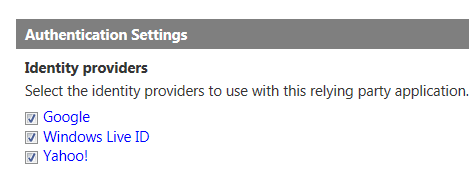

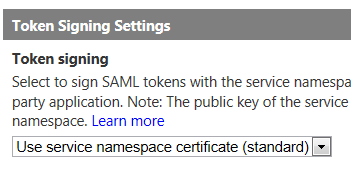
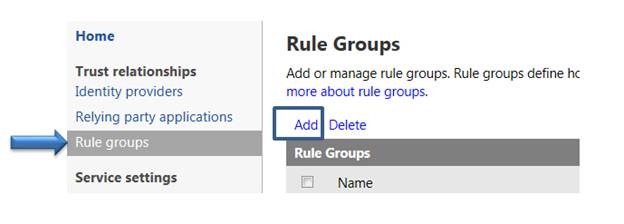
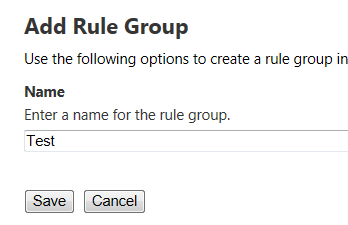
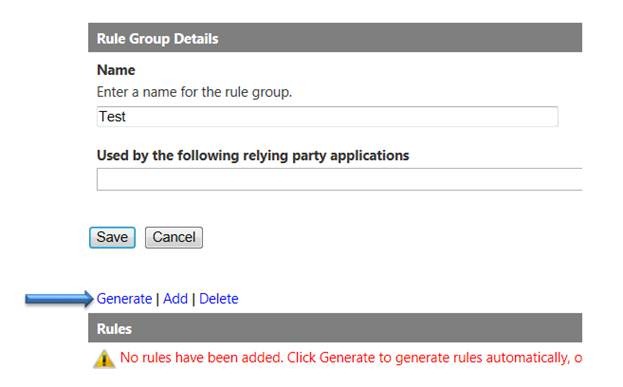
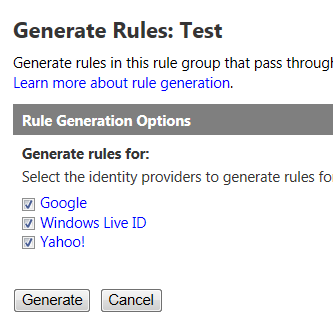
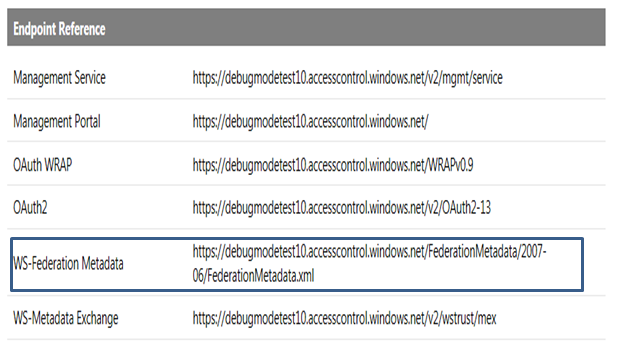
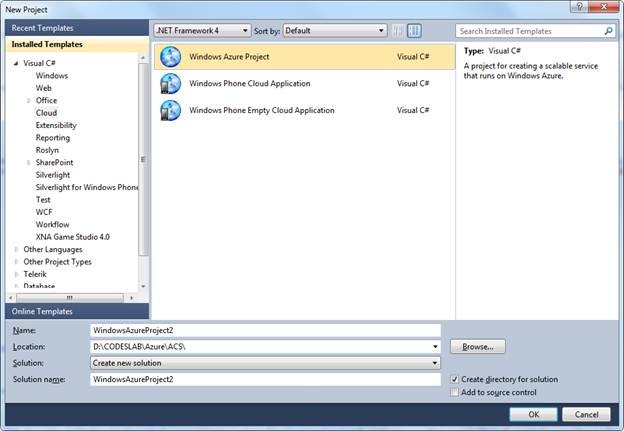
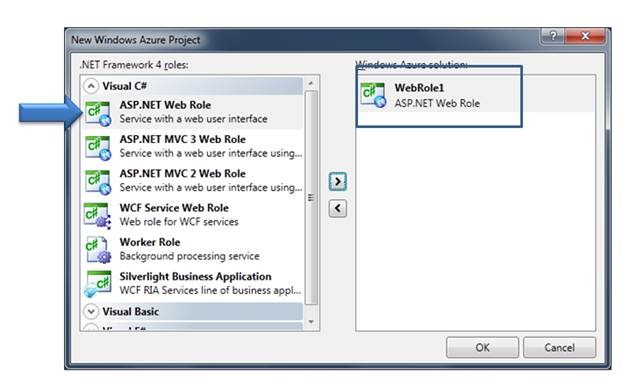
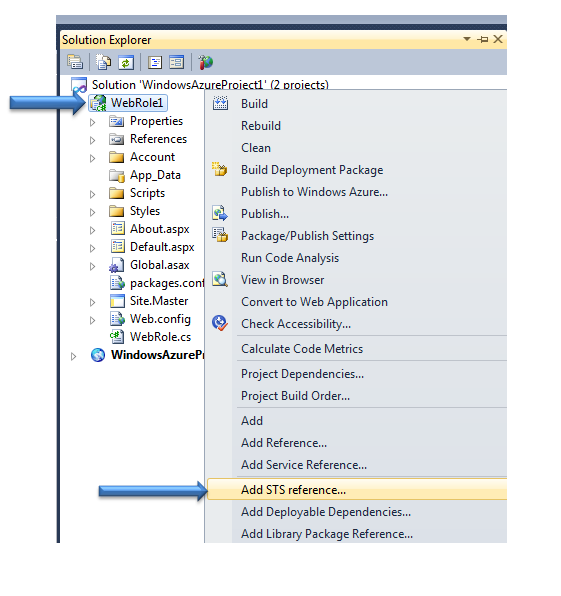
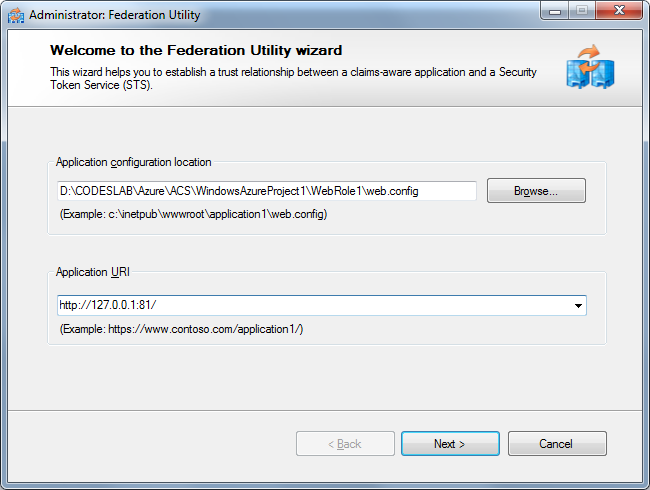

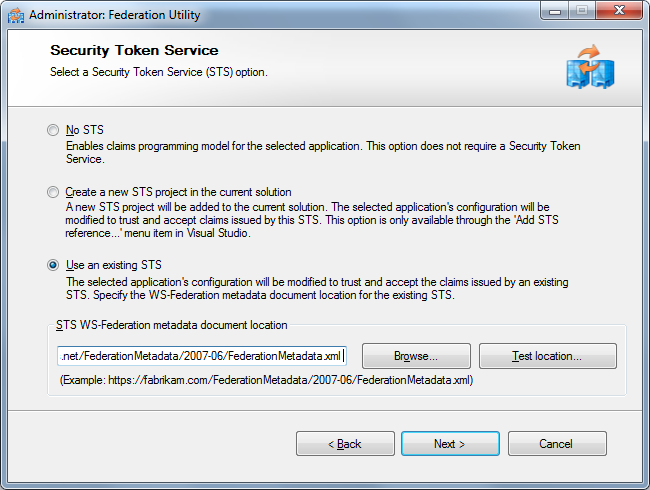
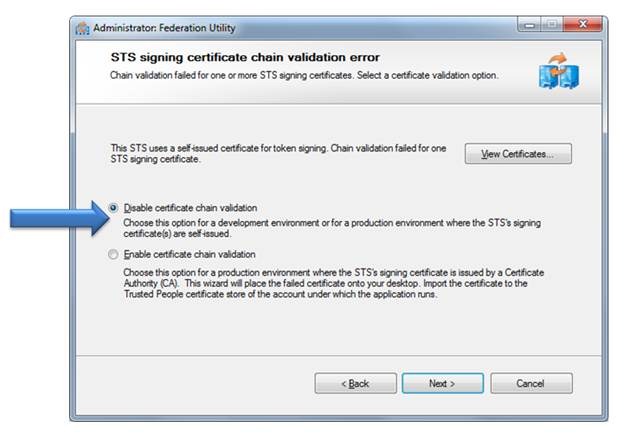
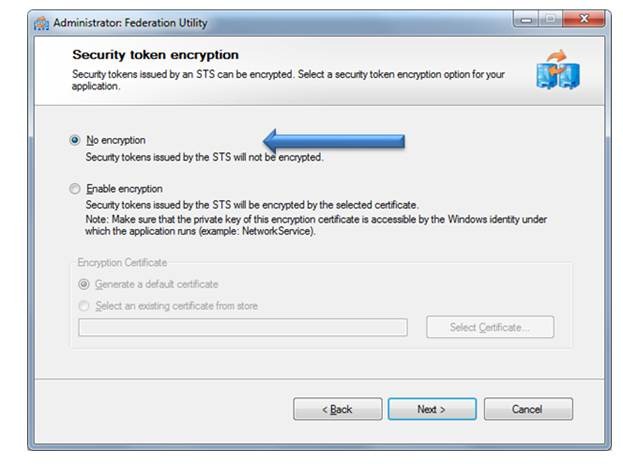
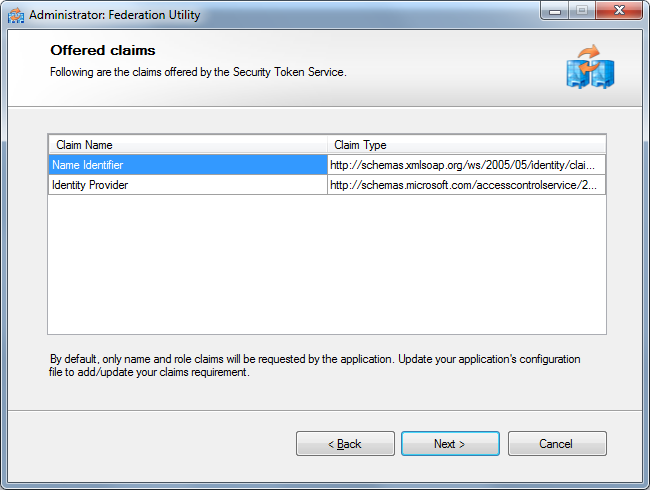

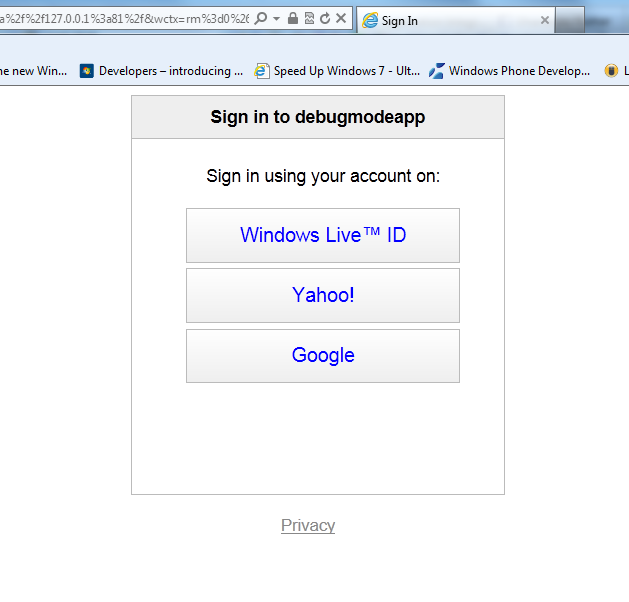
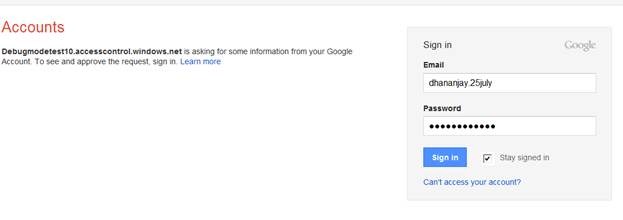
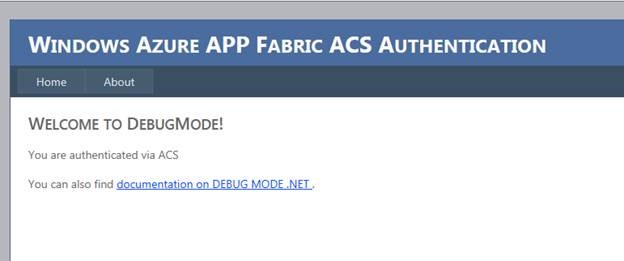


0 comments:
Post a Comment