Windows Azure and Cloud Computing Posts for 11/19/2011+
| A compendium of Windows Azure, SQL Azure Database, AppFabric, Windows Azure Platform Appliance and other cloud-computing articles. |
Note: This post is updated daily or more frequently, depending on the availability of new articles in the following sections:
- Azure Blob, Drive, Table, Queue and Hadoop Services
- SQL Azure Database and Reporting
- Marketplace DataMarket, Social Analytics and OData
- Windows Azure AppFabric: Apps, Access Control, WIF and Service Bus
- Windows Azure VM Role, Virtual Network, Connect, RDP and CDN
- Live Windows Azure Apps, APIs, Tools and Test Harnesses
- Visual Studio LightSwitch and Entity Framework v4+
- Windows Azure Infrastructure and DevOps
- Windows Azure Platform Appliance (WAPA), Hyper-V and Private/Hybrid Clouds
- Cloud Security and Governance
- Cloud Computing Events
- Other Cloud Computing Platforms and Services
Azure Blob, Drive, Table, Queue and Hadoop Services
No significant articles today.
<Return to section navigation list>
SQL Azure Database and Reporting
Mark Scurrell (@mscurrell) reported More SQL Azure Data Sync Webcasts on Channel 9 in an 11/19/2011 post:
A quick note to let you know that there are two more webcasts posted on Channel 9! We've also created a series on the Channel 9 web site so you can easily see all our available webcasts by using the following URL - http://channel9.msdn.com/Series/SQL-Azure-Data-Sync
The latest two webcasts are presented by Sudhesh. In one webcast Sudhesh digs into more detail about setting up sync between on-premises SQL Server and SQL Azure; in the other he focuses on sync'ing between SQL Azure databases. He goes into more detail than I did with my overview presentation.
Next up,I'm going to do a webcast covering database provisioning - how Data Sync creates the database tables on the member databases, that you have the option to create the database tables yourself, and why that may be preferable.
<Return to section navigation list>
MarketPlace DataMarket, Social Analytics and OData
Updated My Microsoft Codename “Social Analytics” Windows Form Client Detects Anomaly in VancouverWindows8 Dataset post with 11/20/2011 data:
Updated 11/19/2011 9:30 AM PST: Rate of new Tweets added appears to be returning to normal:
Notice the added display of Days, Average Tweets/Day and Average Tones/Day.
Sampling Tweets about Windows 8 in DataSift’s (@DataSift) Tweet-stream indicated a rate of about two/minute (2,880/day) on 11/19/2011 at 9:00 AM:
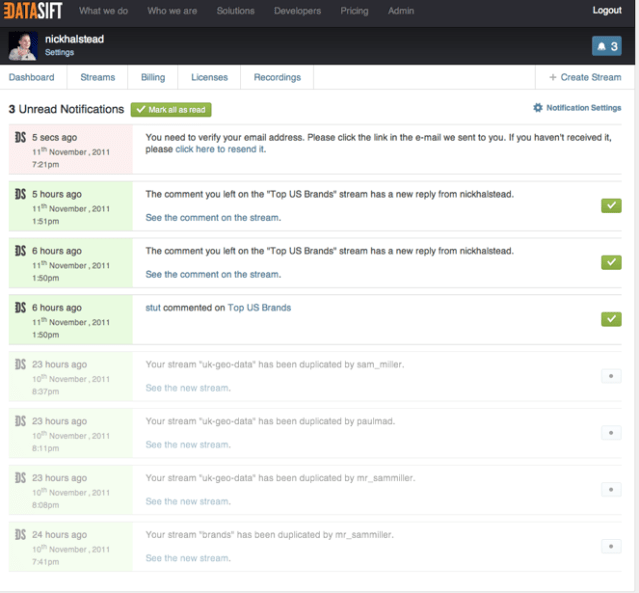
I’m not sure why the salience (similar to Codename “Social Analytics” Tone) is positive, as indicated by the smiley, based on the Tweet’s content. Nor can I determine why DataSift determined the language of rvackooij’s Tweet to be French. The “ij” at the end of his alias is corresponds to “y” in Dutch and his last name is Ackooij. The
symbol indicates the author’s Klout rating; the human figure represents demographic data.
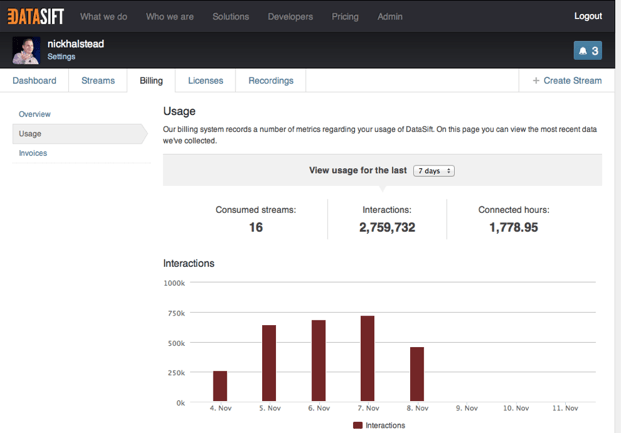
Using DataSift’s OnDemand pricing calculator with Codename “Social Analytics” 180 tweets per hour for the past 22 days as number of DataSift Interactions per Hour, the the cost per month to retrieve a similar amount of data would be about US$160:
For more information about DataSift’s data analytics offering, see Leena Rao’s article below.
Dhananjay Kumar delivered a 00:13:02 video of Consuming OData in Windows Phone 7 on 11/20/2011:
Leena Rao (@LeenaRao) reported DataSift Launches Powerful Twitter Data Analysis And Business Intelligence platform in an 11/16/2011 post to the TechCrunch blog (missed when posted):
DataSift, a big data business intelligence and analysis platform for Twitter, is finally opening its doors today to the U.S. public. DataSift was born out of Tweetmeme and was announced at TechCrunch Disrupt San Francisco a year ago. Founded by Nick Halstead, DatSift is one of two companies with rights to re-syndicate Twitter’s firehose of more than 250 million Tweets a day (the other one is Gnip).
Developers, businesses and organizations can essentially use DataSift to mine the Twitter firehose of social data. But what makes DataSift special (besides the premier access to Twitter data) is that it can then filter this social media data for demographic information, online influence and sentiment, either positive or negative.
Because DataSift can search for Twitter posts and information using metadata contained in Tweets, the possibilities of mining data at a very specific level are endless. DataSift does not limit searches based on keywords and allows companies of any size to define extremely complex filters, including location, gender, sentiment, language, and even influence based on Klout score, to provide quick and very specific insight and analysis. DataSift’s technology can also apply the data filtering process to any content that is represented as a link within the post itself.
For example, a users could see all the Tweets from Twitter profiles that include the words ‘dog lover’ in the description. Users could then segment that data by geography, sentiment, gender and more.
Because of the company’s vast insights into the Twitter stream, a number of businesses have already started expressing interest in testing out products that mine this data. Clients in the social media monitoring, financial services, healthcare, retail, politics, TV and news media are all using DataSift’s API.
In terms of pricing, DataSift features a cloud-based pricing model with pay-as-
you-go or subscription options. The company says a startup can start using DataSift for as little as $200 per month.Of course, the hope is that Twitter won’t enter this data syndication market itself. DataSift has a long-term contract with Twitter, but as we’ve written in the past, that doesn’t guarantee Twitter won’t replicate any services it sees to be especially profitable. On the other hand, if DataSift makes this work, it could become an acquisition target for Twitter.
For now, however, DataSift has the support of Twitter. Ryan Sarver, Director of Platform at Twitter, said of the company’s launch: “DataSift’s expansion shows the market for insights into Twitter’s real-time data is growing and producing
thriving businesses…Now, more developers than ever can meet increasing market demands by filtering 250 million tweets a day into instantly actionable information.”At launch, DataSift also parses social data from MySpace, and a number of forums. The company plans to add stream data from Google+ and Facebook in next 30 to 60 days.
Newly appointed CEO Rob Bailey (a fomer Yahoo bizdev exec who most recently served as VP of Business Development at SimpleGeo) tell us that the company is trying to “go deep before we go broad” and already provides massive insight to customers with the current amount of data available via the platform.
DataSift, which just opened its opened its headquarters in San Francisco, recently raised $6 million in funding from GRP and IA Ventures. The company also counts the Guardian and BBC as clients.
- Company:DataSift
- Website:datasift.com
- Funding:$7.5M
DataSift solves the problem for developers and companies where they want to easily be able to aggregate and filter the content from Twitter but don’t have the server resources to do this on a per project basis. DataSift gets the full firehose of information so you won’t miss anything either and you don’t need to go through the Twitter app authorization process. DataSift resolves this by taking the complexity away and providing API’s and notification services to get round this...
Barb Darrow (@gigabarb) reported DataSift launches in U.S., opens San Francisco headquarters in an 11/16/2011 post to the Giga Om blog:
DataSift, the British company that built its business filtering and sorting through reams of Twitter data in real time, has brought its act to the United States, moving its headquarters to San Francisco this week.
Twitter has become an important information source for marketers, branding experts and others wanting to track or try to correct or capitalize on public perceptions of their companies based on Twitter’s “firehose” of information. All of that data, which often includes customer complaints or reviews of products and services, contributes a significant amount to the big data boom.
Twitter has authorized only two companies to sort through and track that Twitter data: DataSift and Gnip.
In a statement, DataSift founder Nick Halstead, who also founded TweetMeme, said:
Social media has amplified the already fast-paced nature of business today. Companies don’t have the luxury to sift through hundreds of millions of data streams every day, only to second guess the appropriate action. What they need is definitive access to real-time intelligence that is impactful to their business — allowing them to easily and quickly detect and respond to major trending events, social behaviors, customer preferences — and ultimately, avert any impending crises. We have been amazed with the demand for our platform in the U.S. and are opening an office to cater to this demand.
DataSift’s users are not limited to keyword search: They can use complicated filters that take into account location, gender, sentiment, language and Klout influence. DataSift’s cloud-based services are available on a subscription basis and on demand.
The growth of companies like DataSift, which this summer got $6 million in venture funding, shows that Twitter can no longer be considered a toy: Twitter data means big business.
Photo courtesy of Flickr user Remko van Dokkum
<Return to section navigation list>
Windows Azure AppFabric: Apps, Access Control, WIF and Service Bus
Wade Wegner (@WadeWegner) described Adding Push Notification Support to Your Windows Phone Application in an 11/19/2011 post:
A couple days ago I wrote a post on outsourcing user authentication in a Windows Phone application, demonstrating how easy it is to leverage the Windows Azure Access Control service in your Windows Phone application. The solution is built using a set of NuGet packages that our team has built for Windows Phone + Windows Azure – they provide a simple development experience by allowing you to better manage dependencies and compose great application experiences on the Windows Phone.
Today I want to show a similar way to build support for sending push notifications to Windows Phone applications.
Push notifications provide you a way to deliver information to your applications that are installed on someone’s Windows Phone. It can help provide a key way to differentiate your application from other applications – especially when you tap into tile notifications and take advantage of background tiles, deep linking, and the like. There are a lot of great blog posts on this topic:
- Push Notifications Overview for Windows Phone
- Understanding Microsoft Push Notifications for Windows Phones (somewhat old)
- Understanding How Microsoft Push Notification Works (somewhat old)
- Live Tiles (part of the 31 Days of Mango series)
One problem I’ve observed with push notifications is most people aren’t sure what to do with the channel URI’s received from the Microsoft Push Notification Service (MPNS). Developers also don’t know where or how to send messages to the device—should it be a service, and if so, where does it run? This is where Windows Azure can provide a lot of help.
Through the Windows Azure Toolkit for Windows Phone, we’ve been providing push notification services for quite a long time. It’s a great solution, and one that has helped a lot of folks. However, it was also relatively difficult to take our samples and then update them such that they worked in your applications. This is where the NuGet packages come into play. We’ve completely refactored the underlying libraries and now deliver all the capabilities as individual NuGets – you can easily create a new Windows Phone application—or update an existing one—using these NuGets.
A few comments on how these NuGets collaborate with the Windows Phone and the MPNS:
- The Windows Phone Application registers in the MPNS: The Windows Phone application opens a notification channel to the MPNS and indicates that it wishes to receive push notification messages. The MPNS creates a subscription endpoint associated with that particular channel and forwards it to the Windows Phone device (and the specific application) using the channel it’s just opened. The MPNS sends the endpoint to the application so that the application can send it to the service from which it plans to receive notifications.
- The Windows Phone Client registers with the Web Role: The Windows Phone application invokes a service in the Web Role to register itself with the subscription endpoint received from the MPNS. This endpoint is the URI to which the cloud application will perform the HTTP POSTs to send push notification messages to the device.
- The Cloud Service sends a notification request to the MPNS: The cloud services sends a notification request by doing a HTTP POST in a specific XML format defined by the MPNS protocol to the subscription endpoint associated with the device it wants to notify.
- The MPNS sends the notification to the Windows Phone device: The MPNS transforms the notification request it received to a proper Push Notification to send to the Windows Phone device associated with the endpoint where it received the notification request. The notification request can ask for a toast, a tile, or a raw notification. Once the device receives the push notification via the Push Client it will route the notification to the Shell, which will take an action according to the status of the application. If the application is not running, the shell will either update the application tile, or show a toast. If the application is running, it will send the notification to the already running application.
This architectural picture should help explain the interactions:
As with the Windows Phone and ACS example, I want to walk you through the whole process. There’s certainly more that you can do, but I think you’ll agree that the following is quite compelling.
- Create a new Windows Phone OS 7.1 application.

- From the Package Manager Console type the following to install the ACS base login page NuGet package for Windows Phone: Install-Package Phone.Notifications.BasePage.

- Update the WMAppManifest.xml file so that the default page is the Push.xaml. This way the user will come to the login page before the MainPage.xaml.

- Let’s create a page that we can use to demonstration deep linking with MPNS. Create a new Windows Phone Portrait Page called DeepLinkPage.xaml in the Pages folder.
- In the ContentPanel grid, add a TextBlock control. We’ll push a message to this control when sending a notification.
<TextBlock x:Name="QueryString" Text="Query string" Margin="9,10,0,0" Style="{StaticResource PhoneTextTitle2Style}"/>- We need to write the handler that will write the code to the TextBlock.
protected override void OnNavigatedTo(NavigationEventArgs e) { if (this.NavigationContext.QueryString.ContainsKey("message")) { this.QueryString.Text = this.NavigationContext.QueryString["message"]; } else { this.QueryString.Text = "no message was received."; } }- That’s all there is to do in the Windows Phone client. Now we have to write the services that will store the Channel URI generated by MPNS and allow us to send notifications to the device. Add a new Windows Azure Project to the solution. Select the Internet Application template using the HTML 5 semantic markup.
- From the Package Manager Console, change the default project to Web (or whatever you called your MVC 3 web application), and then type the following to install the MPNS push notifications services and libraries into the web applications: Install-Package CloudServices.Notifications. The services installed will let clients register (and unregister) for receiving push notification messages.
- At this point we don’t have any means for sending a notification. To make this easier, we’ve built a sample management UI for Windows Phone that allows you to manually send push notifications to registered devices. This registers a sample MVC Area called “Notifications” containing the UI and the MPNS Recipe for sending all the supported types of push notifications.

- At this point you’re ready to roll! Hit Control-F5 to build and run. When your website starts browse to http://127.0.0.1:81/notifications and notice that you don’t have any clients currently registered.
- In the Windows Phone emulator, click to Enable push notifications. Wait until you receive confirmation that the channel has successfully registered.
- Reload the notifications page and you’ll see that you now have a registered channel.

- Click the Send Notification. Select the Raw notification type, type a message, and click send.
- In your application on the Windows Phone emulator you should receive the message. This is great – we’ve just received a push notification message in our application.

- On the device emulator, click the Windows button, pan to the right, and pin the PushNotifications application to start.
- Now, from the website, click Send Notification. This time select a Tile notification type. Change the Title, set the Count, and choose a Background Image. Click Send.
- Notice how the title, tile background, and count have now updated on the device!
- Lastly, from the website, click Send Notification. This time select a Toast notification type. Set a Title, Sub Title, and set the Target Page to: /Pages/DeepLinkPage.xaml?message=Hello. Click Send.
- You’ll receive a toast message (i.e “Title Sub Title”) on the device. Click it. This will open up the DeepLink.xaml page and pass along the message “Hello” that was sent in the toast.
And that’s it! You can now quickly enrich your Windows Phone applications by leveraging push notifications.
While the Sample UI works great for development, you’ll most likely want to go a few steps further and write your own services or processes to generate notifications. Worker roles with queues work great in this space – I’ll definitely write about this in the future.
Long story short, the following three NuGet packages make it really easy to take advantage of Push Notifications on the Windows Phone using Windows Azure:
- Install-Package Phone.Notifications.BasePage
- Install-Package CloudServices.Notifications
- Install-Package WindowsPhone.Notifications.ManagementUI.Sample
Give it a try and tell me if you agree.
<Return to section navigation list>
Windows Azure VM Role, Virtual Network, Connect, RDP and CDN
No significant articles today.
<Return to section navigation list>
Live Windows Azure Apps, APIs, Tools and Test Harnesses
Avkash Chauhan (@avkashchauhan) described What to do when your code could not find the certificate in Azure VM? in an 11/19/2011 post:
In an Windows Azure application when both client and service are running in two different Windows Azure virtual machines, I found some strange behavior.
I found that the following code which was using client certificate to authenticate with WCF service was keep failing:
certStore.Certificates.Find(X509FindType.FindByThumbprint, Certificate_ThumbPrint, true);
Above code fails to find the certificate even though certificate is available which I verify in the Azure VM under Certificate MMC.
I was not able to get a definitive answer why Find Certificate is not working in Azure VM, due to unsupported scenario or something else. To expedite the solution I used the following approach in my Code:
- Open Certificate Store
- Loop through all the certificate in specific Certificate storage and match each thumbprint to find the one you are looking for.
The code snippet look like as below:
 public static X509Certificate2 GetExpectedCertificate(CertStoreName certStoreName, StoreLocation certStoreLocation, string certThumbprint)
 {
 X509Store store = new X509Store(certStoreName.ToString(), certStoreLocation);
 try
 {
 store.Open(OpenFlags.ReadOnly);
 X509Certificate2Collection certCollection = new X509Certificate2Collection();
 foreach (X509Certificate2 cert in store.Certificates)
 {
 if(cert.Thumbprint.Equals(certThumbprint))
 certCollection.Add(cert);
 }
 if (certCollection.Count == 0)
 {
 throw new ArgumentException(string.Format("Unable to find the certificate – Certificate Store Location ={0} Certificate Store Name={1} Certificate Thumbprint={2}", certStoreLocation, certStoreName, certThumbprint));
 }
 }
 finally
 {
 store.Close();
 }
 }
Steve Fox (@redmondhockey) reported Professional SharePoint Cloud-Based Solutions Ships! on 11/19/2011:
As many of you know, I’ve been playing in the SharePoint and Cloud sandbox for quite some time now. In my latest book adventure, I managed to find 3 friends to come along for the ride: Paul Stubbs, Donovan Follette and Girish Raja. The book, Professional SharePoint Cloud-Based Solutions, which you can get here, provides you with a glimpse into how you can build a number of different types of cloud-based solutions that integrate in some way with Microsoft SharePoint.
This book explores a number of Microsoft and 3rd Party cloud technologies such as Windows Azure, Microsoft CRM, Twitter, Linked In, Yahoo Pipes, and Bing Services. The goal of the book is to show you how you can more tightly integrate cloud technologies into your core SharePoint applications. For example, integrate Bing Maps into web parts that expose customer list data graphically on a map, or extend your social profiles to integrate with Linked In. With many developers moving to the cloud to build integrated solutions, this book provides a three-step approach to showing you how you can build your own cloud-based solutions:
- Describes the cloud technology and answers the question of why you’d want to use it;
- Provides a high-level architecture to show how the cloud technology integrates with SharePoint; and
- Walks through the code and prescriptive guidance to show you how to create the cloud-based solution.
As with any book I’m a part of, I hope you get some practical use out of it. The Cloud is an extremely important topic for the entire IT industry, and it’ll continue to become more relevant for developers to understand what they can do in the cloud and how they can practically engage in building cloud-based solutions of all types.
Thanks to Paul, Donovan and Girish on what was great collaboration on the book.
Steve’s also the author of Developing SharePoint Applications Using Windows Azure.
Wade Wegner (@WadeWegner) performed in Episode 65 - New Windows Azure SDK and Tools with Scott Guthrie on 11/18/2011:
Join Wade and Steve each week as they cover the Windows Azure Platform. You can follow and interact with the show at @CloudCoverShow.
In this episode, Steve and Wade are joined by Scott Guthrie—Corporate Vice President at Microsoft—who walks them through some recent updates to the Windows Azure SDK & Tools. In particular, Scott highlights new ways to easily create and publish applications directly from Visual Studio.
In the news:
- Using Scala and the Play Framework in Windows Azure
- Outsourcing User Authentication in a Windows Phone Application
- Ten Basic Troubleshooting Tips for Windows Azure
- Now Available! Updated Windows Azure SDK & Windows Azure HPC Scheduler SDK
For the tip of the week, both Steve and Wade posted tips for managing the .publishsettings file for certificate management:
It’s nice to see the Gu working the Azure side of the street.
Nathan Totten (@ntotten) updated his Windows Azure Toolkit for Social Games Version 1.1.1 post on 11/18/2011:
I just released a minor update to the Windows Azure Toolkit for Social Games Version 1.1. You can download this release here. This release updates the toolkit to use Windows Azure Tools and SDK Version 1.6. Additionally, this release includes a few minor, but significant, performance enhancements.
Benjamin Guinebertière discovered the performance issues and was kind enough to share the results. Benjamin noticed that the response time between when the server gets a request to the time when the response begins was about 4 seconds. You can see this below by measuring the difference between “ServerGotRequest” and “ServerBeginResponse”.
Request Count:  1
Bytes Sent:     3 011	(headers:2938; body:73)
Bytes Received: 228	(headers:225; body:3)

ACTUAL PERFORMANCE
--------------
ClientConnected:    	16:33:24.848
ClientBeginRequest: 	16:33:45.247
ClientDoneRequest:   	16:33:45.247
Determine Gateway:  	0ms
DNS Lookup:           	0ms
TCP/IP Connect:      	1ms
HTTPS Handshake: 	0ms
ServerConnected:   	16:33:45.249
FiddlerBeginRequest:  	16:33:45.249
ServerGotRequest: 	16:33:45.249
ServerBeginResponse: 	16:33:49.973
ServerDoneResponse: 	16:33:49.973
ClientBeginResponse: 	16:33:49.973
ClientDoneResponse:   	16:33:49.973

Overall Elapsed:     	00:00:04.7260980

RESPONSE CODES
--------------
HTTP/200:		1

RESPONSE BYTES (by Content-Type)
--------------
       ~headers~:	225
application/json:	3
Benjamin setup and ran some tests to investigate the bottleneck. You can see how he added the traces below.
The results of this trace are show below. Notice that the action takes less than half a second to run. This meant that there was something outside of the action that was causing the problem.
After some investigation we discovered that we were calling the
EnsureExists()method on every request in the game service. This was a mistake on our part and definitely not a best practice. You can see how theEnsureExists()method is called every time the repository is instantiated.public GameRepository( IAzureBlobContainer gameContainer, IAzureBlobContainer gameQueueContainer, IAzureQueue skirmishGameMessageQueue, IAzureQueue leaveGameMessageQueue, IAzureBlobContainer userContainer, IAzureQueue inviteQueue) { this.skirmishGameQueue = skirmishGameMessageQueue; this.leaveGameQueue = leaveGameMessageQueue; this.gameContainer = gameContainer; this.gameContainer.EnsureExist(true); this.gameQueueContainer = gameQueueContainer; this.gameQueueContainer.EnsureExist(true); this.userContainer = userContainer; this.userContainer.EnsureExist(true); this.inviteQueue = inviteQueue; this.inviteQueue.EnsureExist(); }To fix this issue we created an
EnsureExists()method on the GameRepository and moved all the queue and storage initialization methods there.public void EnsureExist() { this.gameContainer.EnsureExist(true); this.gameQueueContainer.EnsureExist(true); this.userContainer.EnsureExist(true); this.inviteQueue.EnsureExist(); this.skirmishGameQueue.EnsureExist(); this.leaveGameQueue.EnsureExist(); }Next, we call this new method only once in our Global.asax Application_Startup. You can see that below.
protected void Application_Start()
{
    CloudStorageAccount.SetConfigurationSettingPublisher(
       (configName, configSetter) =>
    {
        string configuration = RoleEnvironment.IsAvailable ?
            RoleEnvironment
                 .GetConfigurationSettingValue(configName) :
            ConfigurationManager.AppSettings[configName];

        configSetter(configuration);
    });

    AreaRegistration.RegisterAllAreas();

    RegisterGlobalFilters(GlobalFilters.Filters);
    RegisterRoutes(RouteTable.Routes);

    FederatedAuthentication.ServiceConfigurationCreated +=
        this.OnServiceConfigurationCreated;

    // initialize blob and queue resources
    new GameRepository().EnsureExist();
    new UserRepository().EnsureExist();
}
After these changes the time for a request went down to less than 2 seconds. You can see the request and response times below.
This is a good improvement, but there are still several more changes like this we can do. I hope to release a new version in the next week or so that improves performance even more. Until then, give the updated version a try and let me know if you have any feedback.
<Return to section navigation list>
Visual Studio LightSwitch and Entity Framework 4.1+
Beth Massi (@bethmassi) described Using the Save and Query Pipeline to “Archive” Deleted Records in an 11/18/2011 post:
Before Microsoft, I used to work in the health care industry building software for hospitals and health insurance companies. In all of those systems we had detailed audit trails (change logging), authorization systems, and complex business rules to keep patient data safe. One particular requirement that came up often is that we never delete patient information out of the system, it was merely archived or “marked” as deleted. This way we could easily maintain historical data but limit the data sets people worked with to only current patients.
Fortunately LightSwitch makes this extremely simple because it allows us to tap into the save pipeline to perform data processing before data is saved. We can also tap into the query pipeline to filter data before it’s returned. In this post I’ll show you how you can mark records for deletion without actually deleting them from the database as well as how to filter those records out so the users don’t see them.
Tapping into the Save Pipeline
The save pipeline runs in the middle tier (a.k.a. logic tier) anytime an entity is being updated, inserted or deleted. This is where you can write business logic that runs as changes are processed on the middle tier and saved to data storage. (For more details on the save pipeline please see Getting the Most Out of the Save Pipeline in Visual Studio LightSwitch.)
Let’s say we have an application that works with customers. However we don’t ever want to physically delete our customers from the database. There’s a couple ways we can do this. One way is to “move” the record to another table. This is similar to the audit trail example I showed here. Another way you can do this is to “mark” the record as deleted by using another field. For instance, let’s take a simple data model of Customer and their Orders. Notice that I’ve created a required field called “IsDeleted” on Customer that is the type Boolean. I’ve unchecked “Display by Default” in the properties window so that the field isn’t visible on any screens.
In order to mark the IsDeleted field programmatically when a user attempts to delete a customer, just select the Customer entity in the data designer and drop down the “Write Code” button and select Customers_Deleting method.
Here are the 2 lines of code we need to write:
Private Sub Customers_Deleting(entity As Customer)
    'First discard the changes, in this case this reverts the deletion
    entity.Details.DiscardChanges()
    'Next, change the IsDeleted flag to "True"
    entity.IsDeleted = True
End Sub
Notice that first we must call DiscardChanges in order to revert the entity back to it’s unchanged state. Then we simply set the IsDeleted field to True. That’s it! Keep in mind when we change the state of an entity like this, the appropriate save pipeline methods will still run. For instance in this case, the Customers_Updating will fire now because we changed the state of the entity from Deleted to Unchanged to Modified. You can check the state of an entity by using the entity.Details.EntityState property.
Tapping into the Query Pipeline
Now that we’re successfully marking deleted customers, the next thing to do is filter them out of our queries so that they don’t display to the user on any of the screens they work with. In order to apply a global filter or sort on any and all customer entities in the system, there’s a trick you can do. Instead of creating a custom global query and having to remember to use that query on all your screens, you can simply modify the built-in queries that LightSwitch generates for you. LightSwitch will generate xxx_All, xxx_Single and xxx_SingleOrDefault queries on all entities for you and you can modify them in code. You access them the same way you do the save pipeline methods.
Drop down the “Write Code” button on the data designer for Customer and scroll down to Query methods and select Customers_All_PreprocessQuery.
This query is the basis of all the queries you create for Customer. I usually use this method to sort records in meaningful ways so that every default query for the entity is sorted on every screen in the system. In this case we need to also filter out any Customers that have the IsDeleted flag set to True, meaning only return records where IsDeleted = False:
Private Sub Customers_All_PreprocessQuery(ByRef query As System.Linq.IQueryable(Of Customer))
    query = From c In query
            Where c.IsDeleted = False
            Order By c.LastName, c.FirstName
End Sub
Notice we also have a related table called Order. I can do a similar filter on the Order entity as well. Depending on how you have users navigate to orders, this may not be necessary. For instance if you only show Orders on Customer detail screens then you don’t have to worry about the extra filter here.
Private Sub Orders_All_PreprocessQuery(ByRef query As System.Linq.IQueryable(Of Order))
    query = From o In query
            Where o.Customer.IsDeleted = False
            Order By o.OrderDate Descending
End Sub
See it in Action!
Okay time to test this and see if it works. I’ve created a List and Details screen on Customer. When we run this I can perform inserts, updates and deletes like normal. There’s nothing on the screen that needs to be changed and it acts the same as it normally would.
You mark the records for deletion….
.. and then click save to execute our Customers_Deleting logic. Once I delete a record and save, it disappears from the list on my screen, but it’s still present in the database. We can see that if we look in the actual database Customer table.
Leveraging the save and query pipelines can provide you with a lot of power over your data. This is just one of many ways you can use them to manipulate data and write business rules.
Return to section navigation list>
Windows Azure Infrastructure and DevOps
Lydia Leong (@cloudpundit) posted To become like a cloud provider, fire everyone here on 11/18/2011:
A recent client inquiry of mine involved a very large enterprise, who informed me that their executives had decided that IT should become more like a cloud provider — like Google or Facebook or Amazon. They wanted to understand how they should transform their organization and their IT infrastructure in order to do this.
There were countless IT people on this phone consultation, and I’d received a dizzying introducing to names and titles and job functions, but not one person in the room was someone who did real work, i.e., someone who wrote code or managed systems or gathered requirements from the business, or even did higher-level architecture. These weren’t even people who had direct management responsibility for people who did real work. They were part of the diffuse cloud of people who are in charge of the general principle of getting something done eventually, that you find everywhere in most large organizations (IT or not).
I said, “If you’re going to operate like a cloud provider, you will need to be willing to fire almost everyone in this room.”
That got their attention. By the time I’d spent half an hour explaining to them what a cloud provider’s organization looks like, they had decidedly lost their enthusiasm for the concept, as well as been poleaxed by the fundamental transformations they would have to make in their approach to IT.
Another large enterprise client recently asked me to explain Rackspace’s organization to them. They wanted to transform their internal IT to resemble a hosting company’s, and Rackspace, with its high degree of customer satisfaction and reputation for being a good place to work, seemed like an ideal model to them. So I spent some time explaining the way that hosting companies organize, and how Rackspace in particular does — in a very flat, matrix-managed way, with horizontally-integrated teams that service a customer group in a holistic manner, coupled with some shared-services groups.
A few days later, the client asked me for a follow-up call. They said, “We’ve been thinking about what you’ve said, and have drawn out the org… and we’re wondering, where’s all the management?”
I said, “There isn’t any more management. That’s all there is.” (The very flat organization means responsibility pushed down to team leads who also serve functional roles, a modest number of managers, and a very small number of directors who have very big organizations.)
The client said, “Well, without a lot of management, where’s the career path in our organization? We can’t do something like this!”
Large enteprise IT organizations are almost always full of inertia. Many mid-market IT organizations are as well. In fact, the ones that make me twitch the most are the mid-market IT directors who are actually doing a great job with managing their infrastructure — but constrained by their scale, they are usually just good for their size and not awesome on the general scale of things, but are doing well enough to resist change that would shake things up.
Business, though, is increasingly on a wartime footing — and the business is pressuring IT, usually in the form of the development organization, to get more things done and to get them done faster. And this is where the dissonance really gets highlighted.
A while back, one of my clients told me about an interesting approach they were trying. They had a legacy data center that was a general mess of stuff. And they had a brand-new, shiny data center with a stringent set of rules for applications and infrastructure. You could only deploy into the new shiny data center if you followed the rules, which gave people an incentive to toe the line, and generally ensured that anything new would be cleanly deployed and maintained in a standardized manner.
It makes me wonder about the viability of an experiment for large enterprise IT with serious inertia problems: Start a fresh new environment with a new philosophy, perhaps a devops philosophy, with all the joy of having a greenfield deployment, and simply begin deploying new applications into it. Leave legacy IT with the mess, rather than letting the morass kill every new initiative that’s tried.
Although this is hampered by one serious problem: IT superstars rarely go to work in enterprises (excepting certain places, like some corners of financial services), and they especially don’t go to work in organizations with inertia problems
<Return to section navigation list>
Windows Azure Platform Appliance (WAPA), Hyper-V and Private/Hybrid Clouds
The ReadWriteCloud blog offered a Comparing VMware vSphere and Microsoft Hyper-V Virtual Machine Migration report on 11/18/2011:
The ability to migrate virtual machines from one physical server to another is a key reason businesses are choosing virtualization. Whether the migrations are for routine maintenance, balancing performance needs, work distribution (consolidating VMs onto fewer servers during non-peak hours to conserve resources), or another reason, the best virtual infrastructure platform executes the move as quickly as possible and with minimal impact to end users.
Principled Technologies tested VMware vSphere 5 vMotion against Microsoft Windows Server 2008 R2 SP1 with Hyper-V Live Migration. According to Principled Technologies, VMware was faster, had greater stability and less impact on application performance.
<Return to section navigation list>
Cloud Security and Governance
No significant articles today.
<Return to section navigation list>
Cloud Computing Events
Herve Roggero (@hroggero) announced Azure Florida Association: New user group announcement in an 11/18/2011 post:
I am proud to announce the creation of a new virtual user group: the Azure Florida Association.
The mission of this group is to bring national and international speakers to the forefront of the Florida Azure community. Speakers include Microsoft employees, MVPs and senior developers that use the Azure platform extensively.
How to learn about meetings and the group
Go to http://www.linkedin.com/groups?gid=4177626
First Meeting Announcement
Date: January 25 2012 @4PM ET
Topic: Demystifying SQL Azure
Description: What is SQL Azure, Value Proposition, Usage scenarios, Concepts and Architecture, What is there and what is not, Tips and Tricks
Bio: Vikas is a versatile technical consultant whose knowledge and experience ranges from products to projects, from .net to IBM Mainframe Assembler. He has lead and mentored people on different technical platforms, and has focused on new technologies from Microsoft for the past few years. He is also takes keen interest in Methodologies, Quality and Processes.
<Return to section navigation list>
Other Cloud Computing Platforms and Services
Chris Czarnecki reported Google App Engine Out of Preview in an 11/18/2011 post to the Learning Tree blog:
Last week Google announced that the App engine is now out of preview and is a fully supported Google product. The success since its launch over 3 years ago is clear with Google claiming over 300K applications and 100K developers actively using the Platform. As part of this release, there is a new pricing strategy together with a Service Level Agreement. To take advantage of the benefits of App Engine Google have now provided a Premier account which provides the following:
- Unlimited number of applications on account domain
- Support from Google engineers
- No minimum monthly fee per app – just pay per use
The SLA Google have is 99.95%, but what this means is that if the service is available for 99% – < 99.95% in a month then 10% of that monthly bill will be credited to users accounts. This is incremental and < 95% availability in a month results in a 50% credit on that months usage.
For pricing, App Engine still provides free quotas for applications. An application can now be converted to a paid application for which a minimum spend of $2.10 per week is made. The free quotas still apply. Any usage of resources required above this payment will be charged accordingly. A Premier account application just pays for resource usage. One of the comforting aspects of the Google App engine is the ability to set daily spend limits on the application. This is not available on many other Cloud Services such as Amazon AWS.
For Java and Python developers Google App engine provides an excellent Platform as a Service for hosting the applications. If you are interested in more details and how it may benefit your organisation, why not consider attending Learning Tree's Hands-On Cloud Computing course where, amongst many other cloud products we detail the Google App Engine and have a hands-on exercise using the toolkit.
Jeff Barr (@jeffbarr) announced the availability of EC2 Instance Status Monitoring in an 11/17/2011 post:
We have been hard at work on a set of features to help you (and the AWS management tools that you use) have better visibility into the status of your AWS resources. We will be releasing this functionality in stages, starting today. Today's release gives you visibility into scheduled operational activities that might affect your EC2 Instances. A scheduled operational activity is an action that we must take on your instance.
Today, there are three types of activities that we might need to undertake on your instance: System Reboot, Instance Reboot, or Retirement. We do all of these things today, but have only been able to tell you about them via email notifications. Making the events available to you through our APIs and the AWS Management Console will allow you to review and respond to them either manually or programmatically.
System Reboot - We will schedule a System Reboot when we need to do maintenance on the hardware or software supporting your instance. While we are able to perform many upgrades and repairs to our fleet without scheduling reboots, certain operations can only be done by rebooting the hardware supporting an instance. We won’t schedule System Reboots very often, and only when absolutely necessary. When an instance is scheduled for a System Reboot, you will be given a time window during which the reboot will occur. During that time window, you should expect your instance to be cleanly rebooted. This generally takes about 2-10 minutes but depends on the configuration of your instance. If your instance is scheduled for a System Reboot, you can consider replacing it before the scheduled time to reduce impact to your software or you may wish to check on it after it has been rebooted.
Instance Reboot - An Instance Reboot is similar to a System Reboot except that a reboot of your instance is required rather than the underlying system. Because of this, you have the option of performing the reboot yourself. You may choose to perform the reboot yourself to have more control and better integrate the reboot into your operational practices. When an instance is scheduled for an Instance Reboot, you can choose to issue an EC2 reboot (via the AWS Management Console, the EC2 APIs or using other management tools) before the scheduled time and the Instance Reboot will be completed at that time. If you do not reboot the instance via an EC2 reboot, your instance will be automatically rebooted during the scheduled time.
Retirement - We will schedule an instance for retirement when it can no longer be maintained. This can happen when the underlying hardware has failed in a way that we cannot repair without damaging the instance. An instance that is scheduled for retirement will be terminated on or after the scheduled time. If you no longer need the instance, you can terminate it before its retirement date. If it is an EBS-backed instance, you can stop and restart the instance and it will be migrated to different hardware. You should stop/restart or replace any instance that is scheduled for retirement before the scheduled retirement date to avoid interruption to your application.
API Calls
The new DescribeInstanceStatus function returns information about the scheduled events for some or all of your instances in a particular Region or Availability Zone. The following information is returned for each instance:
- Instance State - The intended state of the instance (pending, running, stopped, or terminated).
- Rebooting Status – An indication of whether or not the instance has been scheduled for reboot, including the scheduled date and time (if applicable).
- Retiring Status - An indication of whether or not the instance has been scheduled for retirement, including the scheduled date and time (if applicable).
We'll continue to send "degraded instance" notices to our customers via email to notify you of retiring instances.
Console Support
You can view upcoming events that are scheduled for your instances in the EC2 tab of the AWS Management Console. The EC2 Console Dashboard contains summary information on scheduled events:
You can also click on the Scheduled Events link to view detailed information:
The instance list displays a new "event" icon next to any instance that has a scheduled event:
I expect existing monitoring and management tools to make use of these new APIs in the near future. If you've done this integration, drop me a note and I'll update this post.
Jeff Barr (@jeffbarr) reported AWS Management Console Now Supports Amazon Route 53 in an 11/16/2011:
AWS Management Console now includes complete support for Amazon Route 53. You can now create your hosted zones and set up the appropriate records (A, CNAME, MX, and so forth) in a convenient visual environment.
Let's walk through the entire process of registering a domain at a registrar and setting it up in Route 53. Here are the principal steps:
Buy a domain name from a registrar.
- Create a hosted zone.
- Update the NS (Name Server) records at the registrar.
- Set up hosting.
- Create an A record.
- Create an MX record for email.
As a bonus (no extra charge!) we'll see how to set up Weighted Round Robin (WRR) DNS.
Buy a Domain
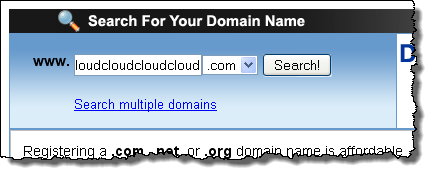
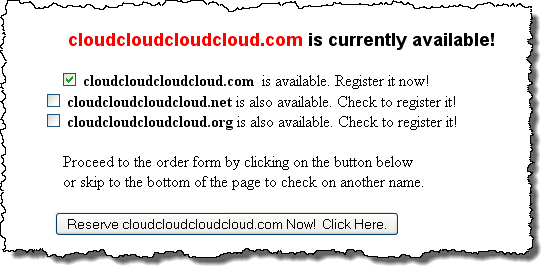
The first step in the process to acquire a domain name from a registrar. ICANN maintains a master list of accredited domain registrars. Choose a registrar based on the top-level domain (TLD) of the name that you want to register. Note that the next few screens will vary depending on the registrar that you choose. The basic search and data entry process will be more or less the same.Let's say that I want to register the domain cloudcloudcloudcloud.com. I search for the domain using the registrar's search function and I find that it is available:
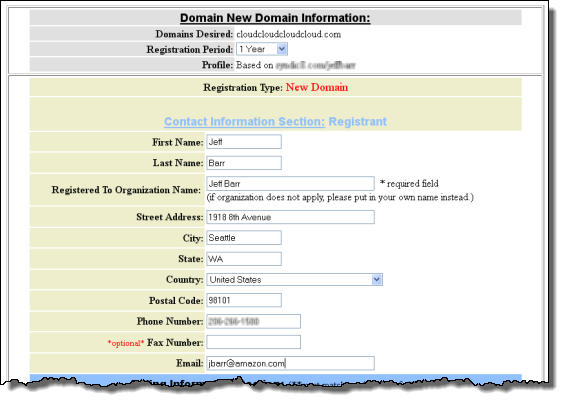
I fill out the contact and billing information, and proceed to pay for the domain name:
During the registration process I have the opportunity to change the name server (NS) records for my new domain. I will leave these as-is for now:
At this point the new domain exists. Now we need to establish two mappings:
- The first mapping is from the domain registrar to Route 53. This mapping tells the domain registrar (and any client application that performs a lookup on domain cloudcloudcloudcloud.com) that further information about the domain can be found in Route 53.
- The second mapping connects individual names within the domain (e.g. www.cloudcloudcloudcloud.com) to IP addresses or lists of IP addresses.
Before we can do this, we need to create a container, known in Route 53 terminology, as a Hosted Zone, for the domain.
Create a Hosted Zone
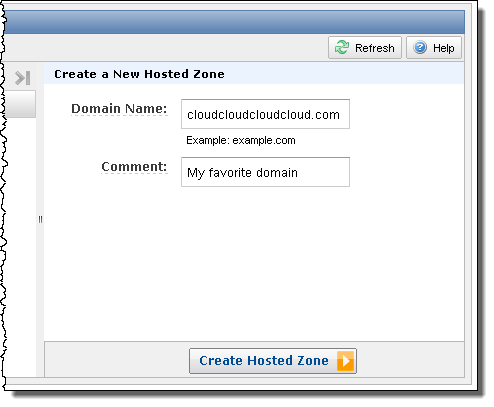
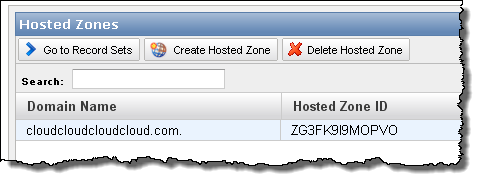
The next step is to visit the Route 53 tab of the console and click on the Create Hosted Zone button:
I fill out the form and create the zone:
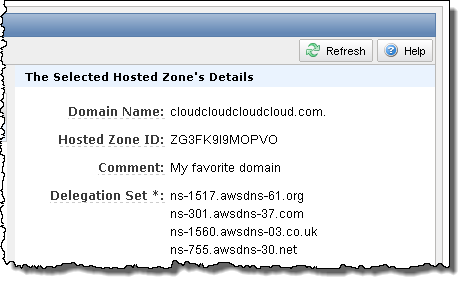
Route 53 creates the hosted zone. Click on the zone will display the list of name servers (also known as the Delegation Set) for the hosted zone:
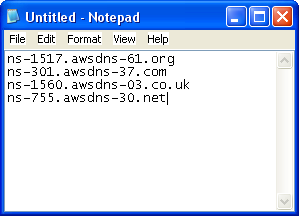
Copy the list and set it aside:
Update NS Records at the Registrar
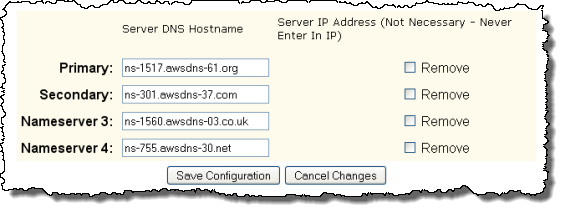
Now we can connect the domain's entry at the registrar to Route 53. The interface for this will vary from registrar to registrar. I will select the option Change DNS NameServers at my registrar:
I delete the existing records and then enter the four new ones as replacements (your registrar will undoubtedly do this in a completely different way than mine does):

Set Up Hosting
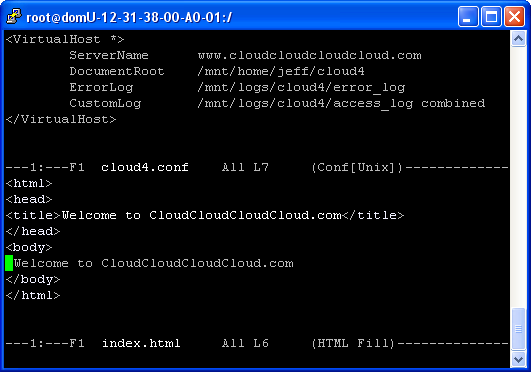
You will, of course, need a place to host your web site. This could be something as simple as an S3 bucket (see my post on S3 website hosting for more info), a single EC2 instance, or a load-balanced auto-scaled group of EC2 instances.I'll use one of my existing EC2 instances. I host a number of domains on the instance using name-based virtual hosting. I created a new configuration file and a simple index page:
Create an A Record
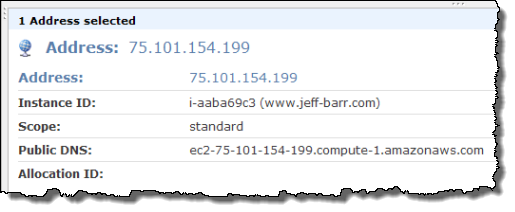
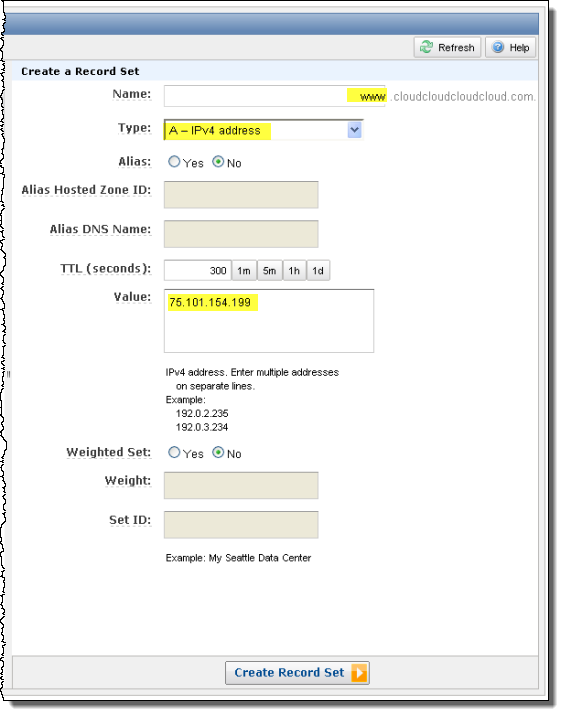
The next step is to create an A record (short for "Address"). In my case the A record will map the name "www" to the public IP address of my EC2 instance. I use an Elastic IP address for my instance (the actual address is 75.101.154.199):
It is easy to create the A record in the console. Start by clicking on the button labeled Go to RecordSets:
Then click on Create Record Set, fill in the resource name and IP address, and click Create Record Set. I've highlighted the relevant fields in yellow:
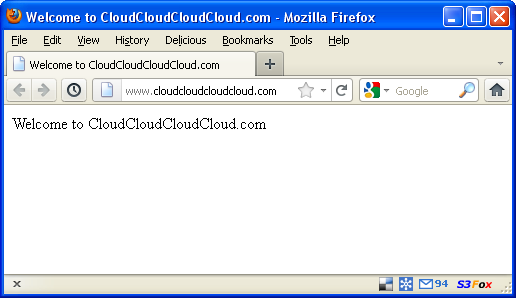
The information will be propagated to the Route 53 servers within seconds and the web site becomes accessible:
Create an MX Record
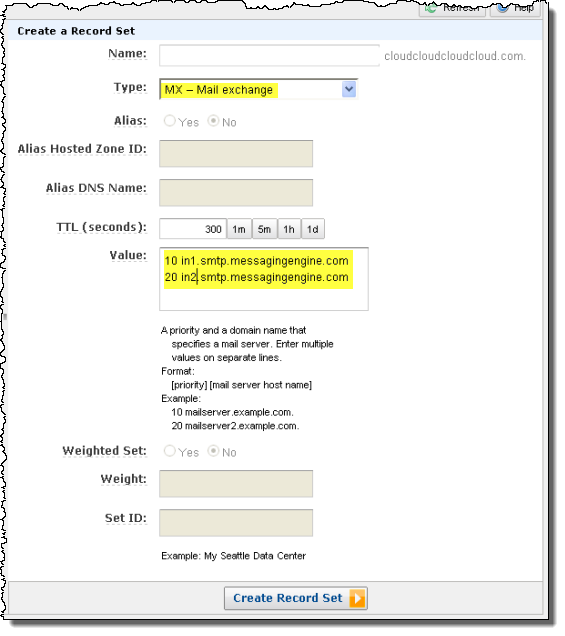
MX (Mail Exchange) records are used to route inbound email to the final destination. You can host and run an email server on an EC2 instance, or you can configure an external (third-party) email service provider so that it can receive email for your domain. I use an external provider for my own domains; here's how I set it up for cloudcloudcloudcloud.com:
The next step is to create a pair of MX records (primary and secondary) for the domain. The Value field of the MX record will be specific to, and provided by, your email service provider:
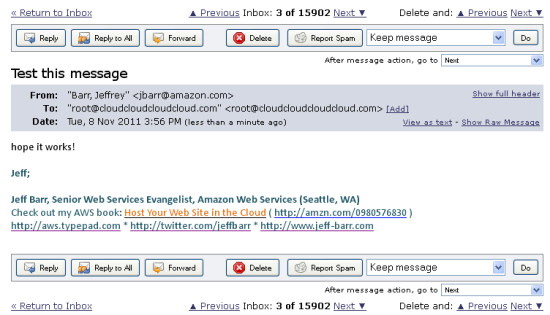
And (just to prove that it all works), here's a test message:
Weighted Round Robin
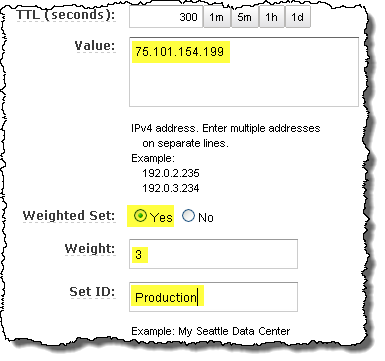
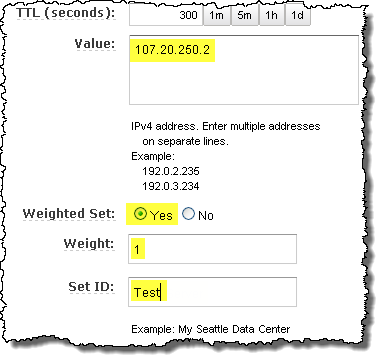
Ok, so that covers the basics. Route 53 also supports Weighted Round Robin (WRR) record sets. You can use a WRR set to send a certain proportion of your inbound traffic to a test server for A/B testing. It is important to note, however, that WRR is based on DNS lookups, not on actual traffic.To implement WRR with Route 53, you will need multiple servers (and the corresponding IP addresses). I'll use 75.101.154.199 (as seen above) and 107.20.250.2, a second Elastic IP that I allocated for demo purposes. Each record set has a weight. The proportion of a set's weight to sum of the weights in all record sets with the same name (e.g. "www") determines the approximate number of times that an IP address (there can be more than one) in the record set will be returned as the result of a DNS lookup.
Here's what I ended up with. The first record set ("Production") has a weight of 3:
And the second record set ("Test") has a weight of 1:
The sum of the weights of the record sets named "Web Server" is 4. Therefore, 3/4 of the DNS lookups for www.cloudcloudcloudcloud.com will return the first IP address and 1/4 will return the second IP address.
And there you have it! What do you think? Does this make it easier for you to manage your Amazon Route 53 DNS entries?
<Return to section navigation list>




![clip_image002[8] clip_image002[8]](http://az30020.vo.msecnd.net/wordpress/wp-content/uploads/2011/11/clip_image0028_thumb.jpg)








0 comments:
Post a Comment