Windows Azure and Cloud Computing Posts for 3/11/2012+
| A compendium of Windows Azure, Service Bus, EAI & EDI, Access Control, Connect, SQL Azure Database, and other cloud-computing articles. |

•• Updated 3/16/2013 with new articles marked ••, including Windows Azure Root Certificate Migration in the Windows Azure Infrastructure and DevOps section below.
• Updated 3/15/2013 with new articles marked •.
Note: This post is updated weekly or more frequently, depending on the availability of new articles in the following sections:
- Windows Azure Blob, Drive, Table, Queue, HDInsight and Media Services
- Windows Azure SQL Database, Federations and Reporting, Mobile Services
- Marketplace DataMarket, Cloud Numerics, Big Data and OData
- Windows Azure Service Bus, Caching, Access Control, Active Directory, Identity and Workflow
- Windows Azure Virtual Machines, Virtual Networks, Web Sites, Connect, RDP and CDN
- Live Windows Azure Apps, APIs, Tools and Test Harnesses
- Visual Studio LightSwitch and Entity Framework v4+
- Windows Azure Infrastructure and DevOps
- Windows Azure Platform Appliance (WAPA), Hyper-V and Private/Hybrid Clouds
- Cloud Security, Compliance and Governance
- Cloud Computing Events
- Other Cloud Computing Platforms and Services
Azure Blob, Drive, Table, Queue, HDInsight and Media Services
• Microsoft’s patterns & practices (@mspnp) group posted the 123-page first (alpha) drop of Developing Big Data Solutions on Windows Azure on 3/14/2013. From the Preface:
Do you know what visitors to your website really think about your carefully crafted content? Or, if you run a business, can you tell what your customers actually think about your products or services? Did you realize that your latest promotional campaign had the biggest effect on people aged between 40 and 50 living in Wisconsin (and, more importantly, why)?
Being able to get answers to these kinds of questions is increasingly vital in today's competitive environment, but the source data that can provide these answers is often hidden away; and when you can find it, it's very difficult to analyze successfully. It might be distributed across many different databases or files, be in a format that is hard to process, or may even have been discarded because it didn’t seem useful at the time.
To resolve these issues, data analysts and business managers are fast adopting techniques that were commonly at the core of data processing in the past, but have been sidelined in the rush to modern relational database systems and structured data storage. The new buzzword is “Big Data,” and it encompasses a range of technologies and techniques that allow you to extract real, useful, and previously hidden information from the often very large quantities of data that previously may have been left dormant and, ultimately, thrown away because storage was too costly.
In the days before Structured Query Language (SQL) and relational databases, data was typically stored in flat files, often is simple text format, with fixed width columns. Application code would open and read one or more files sequentially, or jump to specific locations based on the known line width of a row, to read the text and parse it into columns to extract the values. Results would be written back by creating a new copy of the file, or a separate results file.
Modern relational databases put an end to all this, giving us greater power and additional capabilities for extracting information simply by writing queries in a standard format such as SQL. The database system hides all the complexity of the underlying storage mechanism and the logic for assembling the query that extracts and formats the information. However, as the volume of data that we collect continues to increase, and the native structure of this information is less clearly defined, we are moving beyond the capabilities of even enterprise-level
relational database systems.Big Data encompasses techniques for storing vast quantities of structured, semi-structured, and unstructured data that is distributed across many data stores, and analyzing this data where it's stored instead of moving it all across the network to be processed in one location—as is typically the case with relational databases. The huge volumes of data, often multiple Terabytes or Petabytes, means that distributed processing is far more efficient than streaming all the source data across a network.
Big Data also deals with the issues of data formats by allowing you to store the data in its native form, and then apply a schema to it later, when you need to query it. This means that you don’t inadvertently lose any information by forcing the data into a format that may later prove to be too restrictive. It also means that you can simply store the data now—even though you don’t know how, when, or even whether it will be useful—safe in the knowledge that, should the need arise in the future, you can extract any useful information it contains.
Microsoft offers a Big Data solution called HDInsight, as both an online service in Windows Azure and as an onpremises mechanism running on Windows Server. This guide primarily focuses on HDInsight for Windows Azure, but explores more general Big Data techniques as well. For example, it provides guidance on configuring your
storage clusters, collecting and storing the data, and designing and implementing real-time and batch queries using both the interactive query languages and custom map/reduce components.
Big Data solutions can help you to discover information that you didn’t know existed, complement your existing knowledge about your business and your customers, and boost competitiveness. By using the cloud as the data store and Windows Azure HDInsight as the query mechanism you benefit from very affordable storage costs (at the time of writing 1TB of Windows Azure storage costs only $95 per month), and the flexibility and elasticity of the “pay and go” model where you only pay for the resources you use.
Who This Guide Is For
This guide is aimed at anyone who is already (or is thinking of) collecting large volumes of data, and needs to analyze it to gain a better business or commercial insight into the information hidden inside. This includes business managers, data analysts, system administrators, and developers that need to create queries against massive data repositories.
Why This Guide Is Pertinent Now
Businesses and organizations are increasingly collecting huge volumes of data that may be useful now or in the future, and they need to know how to store and query it to extract the hidden information it contains. This might be webserver log files, click-through data, financial information, medical data, user feedback, or a range of social sentiment data such as Twitter messages or comments to blog posts.
Big Data techniques and mechanisms such as HDInsight provide a mechanism to efficiently store this data, analyze it to extract useful information, and visualize the information in a range of display applications and tools.
It is, realistically, the only way to handle the volume and the inherent semi-structured nature of this data.
No matter what type of service you provide, what industry or market sector you are in, or even if you only run a blog or website forum, you are highly likely to benefit from collecting and analyzing data that is easily available, often collected automatically (such as server log files), or can be obtained from other sources and combined with your own data to help you better understand your customers, your users, and your business; and to help you plan for the future.
A Roadmap for This Guide
This guide contains a range of information to help you understand where and how you might apply Big Data solutions. This is the map of our guide:
- Chapter 1, “What is Big Data?” provides an overview of the principles and benefits of Big Data, and the differences between it and more traditional database systems, to help you decide where and when you might benefit from applying it. This chapter also discusses Windows Azure HDInsight, its place within Microsoft’s wider data platform, and provides a road map for the remainder of the guide.
- Chapter 2, “Implementing a Big Data Solution with HDInsight,” explains how you can implement a Big Data solution using Windows Azure HDInsight. It contains general guidance for applying Big Data techniques by exploring in more depth topics such as the technical capabilities, design patterns, query construction, data visualization, and more. You will find much of the information about the design, development, and testing lifecycle of a Big Data solution useful, even if you choose not to use HDInsight as the platform for your own solution.
- Chapter 3, “Using HDInsight for Business Analytics,” explores how, now that you understand how HDInsight works, you can use it within your own business processes, depending on your data analysis requirements and your existing business intelligence (BI) systems. For example, you might use HDInsight as a query tool and then visualize the results in a program such as Microsoft Excel. Alternatively, if you already have a data warehouse or an enterprise BI mechanism you may choose to use HDInsight as just another data source that integrates at different levels and feeds data into it.
The remaining chapters of the guide concentrate on specific scenarios for applying a Big Data solution, ranging from simple web server log file analysis to analyzing sentiment data such as users’ feedback and comments, and handling streaming data. Each chapter explores specific techniques and solutions relevant to the scenario, and shows an implementation based on Windows Azure HDInsight. The scenarios the guide covers are:
- Chapter 4, “Scenario 1 - Sentiment Analysis” covers obtaining information about the way that users and customers perceive your products and services by analyzing “sentiment” data. This is data such as emails, comments, feedback, and social media posts that refer to your products and services, or even to a specific topic or market sector that you are interested in investigating. In the example you will see how you can use Twitter data to analyze sentiment for a fictitious company.
- Chapter 5, “Scenario 2 - Analyzing Web Logs” covers one of the most common scenarios for Big Data solutions: analyzing log files to obtain information about visitors or users and visualizing this information in a range of different ways. This information can help you to better understand trends and traffic patterns, plan for the required capacity now and into the future, and discover which services, products, or areas of a website are underperforming. In this example you will see how you can extract useful data and then integrate it with existing BI systems at different levels and by using different tools.
- Chapter 6, Scenario 3 [in process]
- Chapter 7, Scenario 4 [in process]
- Chapter 8, Scenario 5 [in process]
- Finally, the appendices contain additional reference material that you may find useful as you explore the tools and utilities that are part of the Big Data framework.
…


I find it interesting that the p&p team made sentiment analysis the first scenario of their guide. The Microsoft “Social Analytics” Team put considerable effort into their preview, which I summarized in my Recent Articles about SQL Azure Labs and Other Added-Value Windows Azure SaaS Previews: A Bibliography. The team abandoned Project “Social Analytics” SQL Azure Lab on 6/21/2012 without explanation other than “The lab phase is complete.”
Amazon.com recently released hard-copy versions of the following p&p group publications:
- Building Hybrid Applications in the Cloud on Windows Azure
- Exploring CQRS and Event Sourcing: A journey into high scalability, availability, and maintainability with Windows Azure
- Moving Applications to the Cloud on Windows Azure
- Developing Multi-tenant Applications for the Cloud on Windows Azure
IMO, the books are a bit expensive at US$40 to $50 each.
Michael Wetzel, Tamir Melamed, Mark Vayman and Denny Lee (@dennylee) described Using Avro with HDInsight on Azure at 343 Industries in an 3/13/2013 post:
By Michael Wetzel, Tamir Melamed, Mark Vayman, Denny Lee
Reviewed by Pedro Urbina Escos, Brad Sarsfield, Rui Martins
Thanks to Krishnan Kaniappan, Che Chou, Jennifer Yi, and Rob Semsey
As noted in the Windows Azure Customer Solution Case Study, Halo 4 developer 343 Industries Gets New User Insights from Big Data in the Cloud, a critical component to achieve faster Hadoop query and processing performance AND keep file sizes small (thus Azure storage savings, faster query performance, and reduced network overhead) was to utilize Avro sequence files.
Avro was designed for Hadoop to help make Hadoop more interoperable with other languages; within our context, Avro has a C# API. Another popular format is protobuf (Google’s data interchange format) which was also under consideration. Altogether, we had compared the various formats (avro, protobuf, compressed JSON, compressed CSV, etc.) for our specific scenarios, we had found Avro to be smallest and fastest. In general, we found that in our case, Avro resulted in Hive queries with 1/3 the duration (i.e. 3x faster) while only 4% of the original data size. For more information about Avro, please refer to the latest Apache Avro documentation (as of this post, it is Apache Avro 1.7.3).
We will review some of the key components to get Avro up and running with HDInsight on Azure.
The Architecture
Many of the queries we executed against our HDInsight on Azure cluster were using the Hive Data Warehousing framework. Working within the context of HDInsight on Azure, all of the data is stored in the Azure Blob Storage using Block Blobs (the top set of boxes in the diagram below). Within HDInsight on Azure preview mode, the context of Azure Blob Storage is also known as the ASV protocol (Azure Storage Vault).
HDInsight itself is running on the Azure Compute nodes so that the Map Reduce computation is performed here while the source and target “tables” are in ASV.
To improve query performance, HDInsight on Azure utilizes Azure’s Flat Network storage – a grid network between compute and storage – to provide high bandwidth connectivity for compute and storage. For more information, please refer to Brad Calder’s informative post: Windows Azure’s Flat Network Storage and 2012 Scalability Targets.
Hive and Sequence Files
What’s great about Hive is that it is a data warehouse framework on top of Hadoop. What Hive really does is allow you to write HiveQL (a SQL-like language) that ultimately is translated to Map Reduce jobs. This means that Hive can take advantage of Hadoop’s ubiquity to read and store files of different formats and compressions.
In our particular case, we had our own binary format of data files that we had to process and store within Hadoop. Since we had to convert the files – we decided to test various formats including CSV, JSON, Avro, and Protobuf. We had the option to build a Serializer / Deserializer (SerDe) so Hive could read our binary format directly but in our case it was faster and easier to write our own mechanism vs. the custom SerDe.
Ultimately, whatever format chosen, the files would be stored in Azure Blob Storage. HDInsight on Azure would ultimately have a Hive table that would point to these files so we could query them as tables.
Jump into Avro with Haivvreo
A slight detour here in that because 343 Industries Foundation Services Team went into production on a preview instance of HDInsight on Azure, to get avro to work with HDInsight, we needed to utilize Jakob Homan GitHub project Haivvreo. It is a Hive SerDe that LinkedIn had developed to process Avro-encoded data in hive.
Note, Haivvreo is part of the standard Hive installation as of Hive 0.9.1 via HIVE-895. But if you are using a version of Hive prior to Hive 0.9.1, you will need to build Haivvreo yourself. Fortunately, the documentation for Haivvreo is straightforward and very complete. For more information on Haivvreo, please go to: https://github.com/jghoman/haivvreo
A quick configuration note, Haivvreo uses the two Jackson libraries:
- Jackson-core-asl-1.4.2.jar
- Jackson-mapper-asl-1.4.2.jar
As of this post, the Jackson libraries in HDInsight are version 1.8 and are fully backward compatible therefore you will not need to manually add these jars.
Jump into Protobuf with Elephant-Bird
While we ultimately had chosen Avro, Protobuf was a solid choice and if our data profile was different, we may have very well chosen Protobuf. This format is so popular that it is now native within Hadoop 2.0 / YARN (which as of this writing is still in beta). But for systems that are currently running on the Hadoop 1.0 tree (such as the current version of HDInsight), one of the most complete is Kevin Weil’s Elephant-Bird GitHub project – it is Twitter’s collection of LZO and Protocol Buffer code-base for Hadoop, Pig, Hive, and HBase.
Format Performance Review
As noted earlier, we had tested in their respective C# libraries the various file formats for compression and query performance. Below is a sample of the same set file in JSON (with Newtonsoft), Avro (with .NET 4.5 Deflate Fastest), and Protobuf (with LZO) format.


Based on these and other tests, it was observed that avro was faster and smaller in size. Faster is always good but smaller in size is more important than most may realize. The smaller size means there is less data to send across the network between storage and compute helping with query performance. But more importantly, it means you can save on Azure Blob Storage costs because you are using less storage space.
Additional tests were performed and the overall pro/con comparison can be seen below.

After prototyping and evaluating, we had decided to use Avro for the following reasons:
- Expressive
- Smaller and Faster
- Dynamic (schema store with data and APIs permit reading and creating)
- Include a file format and a textual encoding
- Leverage versioning support
- For Hadoop service provide cross language access.
Please note that these were the based on the test we had performed with our data profile. Yours may be different so it will be important for you to test before committing.
Getting Avro data into Azure Blob Storage
The Foundation Services Team at 343 Industries team is already using Windows Azure elastic infrastructure to provide them maximum flexibility – and much of that code is written in C# .NET. Therefore to make sense of the raw game data collected for Halo 4, the Halo Engineering team wrote Azure-based services that converted the raw game data into Avro.
The basic workflow is as follows:
- Take the raw data and use the patched C# Avro library to convert the raw data into an Avro object.
- As Avro data is always serialized with its schema (thus allowing you to have different versions of Avros but still being able to read them because the schema is embedded with it), we perform a data serialization step to create serialized data block.
- This block of data is then compressed using the deflate options within .NET 4.5 (in our case, using the Fastest option). Quick note, we started with .NET 4.0 but switching to .NET 4.5 Deflate Fastest gave us slightly better compression and approximately 3x speed improvement. Ultimately, multiple blocks (with the same schema) are placed into a single Avro data file.
- Finally, this Avro data file is sent to Azure Blob Storage.
A quick configuration note, you will need to take the AVRO-823: Support Avro data files in C# to get this up and running.
Configuration Quick Step by Step
As noted earlier, the documentation within Haivvreo is excellent and we definitely used it as our primary source. Therefore, before doing anything, please start with the Avro and Haivvreo documentation.
The configuration steps below are more specific to how to get the avro jars up and running within HDInsight per se.
1) Ensure that you’ve added the Hive bin to your PATH variables
;%HIVE_HOME%\bin
2) Ensure that you have already configured your ASV account within the core-site.xml if you have not already done so.
<property>
<name>fs.azure.account.key.$myStorageAccountName
<key>$myStorageAccountKey</key>
</name>
</property>
3) Copy your avro jars created within Haivvreo to your ASV storage account
4) Edit the hive-site.xml to include the path to your jars within ASV
<property>
<name>hive.aux.jars.path</name>
<value>asv://$container@account/$folder/avro-1.7.2.jar,asv://$container@account/$folder/avro-mapred-1.7.2.jar,asv://$container@account/$folder/haivvreo-1.0.7-cdh.jar</value>
</property>
5) Ensure that the avro schema (when you create an avro object, you also can create an avro schema that defines that object) is placed into HDFS so you can access it. Refer to the below Avros Tips and Tricks section concerning the use of schema.literal and schema.url.
Querying the Data
What’s great about this technique is that now that you have put your Avro data files into a folder within Azure Blob Storage, you need only to create a Hive EXTERNAL table to access and query this data. The Hive external table DDL is in the form of:
CREATE EXTERNAL TABLE GameDataAvro (
…
)
ROW FORMAT SERDE ‘com.linkedin.haivvreo.AvroSerDe’
STORED AS INPUTFORMAT ‘com.linkedin.haivvreo.AvroContainerInputFormat’
OUTPUTFORMAT
‘com.linkedin.haivvreo.AvroContainerOutputFormat’
LOCATION ‘asv://container/folder’
For a quick HDInsight on Azure tutorial with Hive, please check the post Hadoop on Azure: HiveQL query against Azure Blob Storage.
Avro Tips and Tricks
Some quick tips and tricks based on our experiences with Avros:
- Compression not only resulted in saving disk space, but less CPU resources were used to process the data
- Mixing compressed and uncompressed Avro in the same folder works!
- Corrupt file in ASV may cause jobs to fail. To workaround this problem, either manually delete the corrupt files and/or configure Hadoop/Hive to skip x number of errors.
- Passing long string literals into the Hive Metastore DB may result in truncation. To avoid this issue, you can use the schema.literal instead of schema.url if the literal is < 8K. If it is too big, then you can embed the schema within HDFS as per below.
CREATE EXTERNAL TABLE GameDataAvro (
…
)
ROW FORMAT SERDE ‘com.linkedin.haivvreo.AvroSerDe’
WITH SERDEPROPERTIES (
‘schema.url’=’hdfs://namenodehost:9000/schema/schema.avsc’)
STORED AS INPUTFORMAT ‘com.linkedin.haivvreo.AvroContainerInputFormat’
OUTPUTFORMAT
‘com.linkedin.haivvreo.AvroContainerOutputFormat’
LOCATION ‘asv://container/folder’


<Return to section navigation list>
Windows Azure SQL Database, Federations and Reporting, Mobile Services
• Luiz Santos of the ADO.NET Team explained SQL Database Connectivity and the Idempotency Issue in a 3/11/2013 post:
Applications connecting to SQL Server sometimes experience connections breaks due back-end failures. In general, they tend to be uncommon in LAN environment and more frequent in WAN topologies, when connectivity tends to be challenged by geographically dispersed links.
The introduction of Windows Azure SQL Database (WASD), which is a cloud-based SQL Server, added new availability and reliability challenges to the connectivity space. As a result, applications connecting to WASD witness frequent connection breaks due to backend reconfigurations and failures, forcing developers to include special logic for every database operation in order to handle these unexpected situations.
Basically, every time a connection drops, the application needs to decide to either reconnect (if it was a recoverable error (e.g. “server is busy)) or return an exception to the end user (if it was a non-recoverable one (e.g. “invalid password”)). In order to better handle these situations, developers can use a set of resources and best practices to avoid unwelcomed surprises after deploying applications to production. The Transient Fault Handling Framework for SQL Database, Windows Azure Storage, Service Bus & Cache is a free component that encapsulates all the logic required to handle most of the disconnections happening in SQL Database. For more information, please refer to its MSDN’s documentation here.
Also, for general resiliency guidance, please refer to Failsafe: Guidance for Resilient Cloud Architectures.
The Idempotency Issue
Now, special care must be considered when writing to a SQL Database table because a simple IUD (INSERT, UPDATE or DELETE) statement can potentially lead to data corruption. This is because there is no way to know if the statement was executed by the server immediately after a connection failure. Consider the code snippet below:
public class Data
{
public void Query(SqlConnection sqlConnection, string szQuery)
{
try
{
using (SqlConnection conn = new SqlConnection("…"))
{
conn.Open();
SqlCommand sqlCommand = new SqlCommand(szQuery, conn);
sqlCommand.ExecuteNonQuery("UPDATE productList SET Price=Price*1.01");
}
}
catch (SqlException)
{
//...
throw;
}
}
}
If the connection fails immediately after sqlCommand.ExecuteNonQuery, there is no way for the application to know if it needs to reissue the query (the UPDATE didn’t execute) or not (the UPDATE executed) upon reconnection.
In order to avoid this problem, the application must track if a command was uniquely executed (idempotent command) or not. If it were, then, there is nothing to do, but if it weren’t, then the application can safely re-execute it. Currently, SQL Database does not offer any idempotency capability, transferring this responsibility to the application.
One way to track idempotent activities is to track all writing database operations in a table, like the one below. This way, the application can query the table to know if a command was executed or not.
Once the tracking information is available, there are many ways to query it in order to reissue the command. Personally, I like to encapsulate the code in stored procedures and confine the idempotent logic to the database. This way, it becomes transparent to the application and simplifies the use of the Transient Fault Handling Framework for SQL Database, Windows Azure Storage, Service Bus & Cache component. The snippet below exemplifies this approach:
CREATE PROCEDURE UpdateBranch
-- Add the parameters for the stored procedure here
@Operation AS UNIQUEIDENTIFIER,
@ParentId AS INT,
@BranchDbId as INT
AS
BEGIN
DECLARE @COUNT_ID AS INT = 0
-- SET NOCOUNT ON added to prevent extra result sets from
-- interfering with SELECT statements.
SET NOCOUNT ON;
SET @COUNT_ID = (SELECT COUNT([ID]) FROM dbo.IdempotencyTracker WHERE ID = @Operation)
IF (@COUNT_ID = 0)
BEGIN
BEGIN TRANSACTION
UPDATE [dbo].[Branch] SET [BranchDbId] = @BranchDbId WHERE ParentId = @ParentId
INSERT INTO [dbo].[IdempotencyTracker] ([ID]) VALUES (@Operation)
COMMIT
END
END
In the scenario above, the application is responsible for generating and saving @Operation value in order to avoid losing track of the operation.
Concluding, although using the Transient Fault Handling Framework for SQL Database, Windows Azure Storage, Service Bus & Cache component is the right way to avoid connectivity issues in SQL Database, it’s not enough. You really need to implement an idempotency strategy in order to avoid data duplications or inconsistencies when writing to the database.

Carlos Figueira (@carlos_figueira) described Azure Mobile Services managed client – portable libraries and breaking changes in a 3/13/2013 post:
Among the requested features in the various forums for Azure Mobile Services, the usage of portable libraries has popped up quite often. We now have that support, which unifies the managed clients for the Windows Store and Windows Phone 8 platforms – and we’re also adding support for Windows Phone 7.5 as well. Johan Laanstra wrote a great post explaining the architecture of the new packages, so I won’t repeat what he wrote.
However, since there were some differences between the Windows Phone 8 and the Windows Store SDKs, unifying them meant some breaking changes. We felt that the grief we’ll take for them is worth, given the gains we can get by the platform unification, and we also used this opportunity to make some other changes to the client SDK to make it more polished before the general availability of the service. This post will try to list to the best of my knowledge the changes which will need to be addressed for apps using the new client. Notice that we’ll still support the “non-portable” clients for some more time, but it will be discontinued likely before the Azure Mobile Services goes out of preview mode and into a general availability,
Breaking changes / functionality changes
This is the grouped list of changes, along with the updates one needs to make to their projects to account for them.
Serialization changes
This is the place where the majority of the changes were made. For the Windows Store SDK, conversion between the typed objects and the JSON which was actually transferred over the wire was done via a custom serializer which converted between the two formats. The serializer was fairly simple, and could only deal with simple types (numbers, strings, dates and,Boolean values). To support more complex types (unsupported primitives, arrays, complex objects), we’d need to provide a custom implementation of the IDataMemberJsonCoverter interface, and decorate the appropriate member with the [DataMemberJsonConverter] attribute. Even simple things such as enumerations were not supported. With this new client, all the custom serialization code goes away, as we’ll be using the JSON.NET serializer, and by that move we gain all of the support of that great serializer. That means that complex types, arrays, enumerations will just work. The new client also exposes the serializer settings which allow the developer to fine-tune the output data, including adding custom converters and changing policies such as default value serialization.
Now for the list of changes:
- JSON.NET: that’s the serializer used for all platforms (not only for Windows Phone 8 as before). That causes the following behavioral changes from the current Windows Store SDK
- JSON bool values cannot be parsed as integers; false was interpreted as 0, and true as 1; now an exception will be thrown.
- Better / consistent exception messages for failed JSON parsing: there was a lot of code in the custom serializer for dealing with bad data; now this is all taken care of by JSON.NET, and its exception messages include more data such as the path in the JSON document, and position of the error
- All floating point members (even those with integer values) will be serialized with a decimal point: a JSON.NET behavior. Before a float / double with value 2 would be serialized as {“number”:2}; now it will be serialized as {“number”:2.0}.
- To maintain the previous behavior, one possibility is to use a custom JsonConverter class that first casts the values to integers if they are indeed integers.
- Float (System.Single) will be serialized with its “native” precision: before a member of type float (Single) would be serialized as if it had double precision. For example, the object new MyType { fltValue = float.MinValue } would be serialized as {“fltValue”:1.4012984643248171E-45}; now it will be serialized as {"fltValue":1.401298E-45}.
- To maintain the previous behavior, use a JsonConverter class that serializes float values as doubles (or change the property type to double)
- Float and double values less than their respective Epsilon now deserialize as 0.0: before it used to throw an exception. Now deserializing something like {“dblValue:1.23E-1000} will cause the dblValue member to be set to zero, instead of an exception being thrown.
- Fields are now serialized before properties: before properties were serialized before fields; now is the opposite. Since JSON objects are supposed to be unordered sets of members, this shouldn’t affect existing apps.
- Finer control of serialization via settings: the MobileServiceClient now exposes the JsonSerializerSettings object which is used by the JSON.NET serializer, so you can now have greater control of the serialization.
- Miscellaneous bugs fixed:
- Tab / newline characters can now be deserialized (before it would result in an exception)
- Integer values can now be deserialized to members of type char.
- Miscellaneous scenarios which are now supported:
- Uri / TimeSpan members don’t need a special converter anymore: they’re serialized as JSON strings
- Arrays / objects also now just work. They’re serialized as JSON array / object respectively. Notice that the server runtime still needs to process that value, since they cannot be inserted into the database directly.
- Non JSON.NET specific changes:
- Enumeration support: it was enabled by the move to JSON.NET, but our code now serializes the string value of the enumerations. Enums can also be used in ‘Where’ clauses while querying data from the service.
- Loss of precision handling: the runtime for Azure Mobile Services is based on JavaScript (node.js), which only stores numbers in a double-precision floating representation. That means that there are some integer and decimal values which cannot be represented accurately. Basically, any long number less than 2^53 can be represented, without loss of precision, in the server, so those are serialized correctly; any values larger than that (or smaller than -2^53) will cause an exception to be thrown. Notice that this is the current behavior, although it was a little buggy in which it would report some numbers within the valid range as invalid as well. Decimal values can also lose precision, and now this validation (exception thrown if precision would be lost) is applied to them as well. If you want to bypass the validation, either change the data type of the properties to double, or remove the converter (MobileServicePrecisionCheckConverter) from the serializer settings.
- One minor breaking change: before the exception thrown for long values outside the non-precision-loss range was ArgumentOutOfRangeException; now the exception type is InvalidOperationException.
- IDataMemberJsonConverter, [DataMemberJsonConverter] removed: now they either are not necessary anymore, or if you still want full control over the serialization of a property, you can use the [JsonConverterAttribute] applied to that property.
- ICustomMobileTableSerialization removed: if a type needs special serialization, decorate it with [JsonConverterAttribute].
- Only one member with name ‘id’ – regardless of casing – can exist in a type being serialized: before an object with members called “id”, “Id” and “ID” would be serialized to the server – where it would fail, since only one id is allowed. Now it will throw during serialization.
- [DataMember] attributes in members now require a [DataContract] attribute in the class: the contract of [DataMember] for serialization is tied with [DataContract], but we had a bug in which data members were being honored even if the containing class itself didn’t opt in to the data contract model (by using the [DataContract] attribute). Now if the SDK finds such a scenario it will throw an exception to signal that this is not a valid scenario. The typical scenario for using [DataMember] would be to change the serialized name of the member; now it can be accomplished via the [JsonPropertyAttribute] instead.
- The [DataTableAttribute] now takes the table name in the constructor: before: [DataTable(Name = “MyTable”)]; after:: [DataTable(“MyTable”)]
If I remember more or if you find one which is not listed here, please add a comment and I’ll update this post.
Operations with untyped (i.e., JSON) data
When performing CRUD operations in a managed client, usually we’d create a data type to store our information (e.g., Person, Order, etc.) and pass them to the Insert/Read/Update/Delete operations. We could also work directly with JSON data, and the table would support those as well. In the Windows Store client the SDK used the classes in the Windows.Data.Json namespace, native to the WinRT platform. However, those classes were not present in the Windows Phone 8, so that SDK was already using the JSON.NET classes from the Newtonsoft.Json.Linq namespace (JToken / JArray / JValue / JObject). To move to a common set of classes, now all managed libraries use the JSON.NET classes, including the Windows Store apps.
And the list of changes:
- [Windows Store only] Windows.Data.Json –> Newtonsoft.Json.Linq: there’s an added advantage that the JSON.NET classes have an API which is way more user-friendly than the “dry” WinRT one.
- Insert / update operations do not change the input object (untyped data only): This is a behavioral change which was the outcome of a lengthy discussion within the team. Before, the insert / operations would mutate the JsonObject (or JObject) value which was passed to it, by “patching” it with whatever the server returned. The most common case was the “id” in insert operations, but the server scripts are were free to mutate the object, even changing the shape of the value returned by the client (i.e., in an insert operation, the service could receive an object and return an array, or a primitive value). Before that would mean that the client had no way to retrieve that value. Now, the object passed to InsertAsync (and UpdateAsync) is not mutated, and the return of the server operation is returned as a new object instead. Notice that for typed operations (e.g., inserting / updating an Order object), the original object is still patched in place.
- This may require some code changes. For example, the code below:
- var table = MobileService.GetTable(“Clients”);
- var obj = JsonObject.Parse("{\"name\":\"John Doe\",\"age\":33}");
- await table.InsertAsync(obj);
- var id = (int)obj["id"].GetNumber();
- Would need to be rewritten as (notice changes in italics)
- var table = MobileService.GetTable(“Clients”);
- var obj = JObject.Parse("{\"name\":\"John Doe\",\"age\":33}");
- var inserted = await table.InsertAsync(obj);
- var id = inserted["id"].Value<int>();
Again, I’ll update the post if I can remember (or if you can add a comment) of any additional changes.
Service filters –> HttpClient primitives
Service filters are an advanced concept which implement a pipeline over the request / response. There is already such a pipeline in the HttpClient libraries – and since it has recently been made available for downlevel platforms (it originally only worked for .NET 4.5 and .NET 4.0) the Mobile Services SDK can now use this existing code instead of creating yet another pipeline.
And the changes:
- Goodbye IServiceFilter, hello DelegatingHandler: this is a sample implementation of a service filter, and the equivalent implementation with a delegating handler. Notice that there’s no IAsyncOperation<T> anymore, so the code is cleaner. Below you can see an example of the before / after the change.
- Message handlers are passed to the MobileServiceClient constructor, not to a method (WithFilter): that method created a clone of the client, and applied the filters to it. That name caused some confusion among users, with many people thinking that it would modify the client. By moving it to a constructor the API now makes it clear.
Here’s an example of a service filter converted to a message handler. The filter will add a custom header to the request, and change the response status code (useful for testing the behavior on unexpected responses from the server). First the service filter.
- public async Task CallFilteredClient()
- {
- var client = new MobileServiceClient(appUrl, appKey).WithFilter(new MyFilter());
- var table = client.GetTable<Person>();
- var p = new Person { Name = "John Doe" };
- await table.InsertAsync(p);
- }
- public class MyFilter : IServiceFilter
- {
- public IAsyncOperation<IServiceFilterResponse> Handle(IServiceFilterRequest request, IServiceFilterContinuation continuation)
- {
- request.Headers.Add("x-my-header", "my value");
- return continuation.Handle(request).AsTask().ContinueWith<IServiceFilterResponse>(t => {
- HttpStatusCode newStatusCode = HttpStatusCode.ServiceUnavailable;
- var response = t.Result;
- var newResponse = new MyResponse(response.Content, response.ContentType, response.Headers,
- response.ResponseStatus, (int)newStatusCode, newStatusCode.ToString());
- return newResponse;
- }).AsAsyncOperation();
- }
- class MyResponse : IServiceFilterResponse
- {
- string content;
- string contentType;
- IDictionary<string, string> headers;
- ServiceFilterResponseStatus responseStatus;
- int statusCode;
- string statusDescription;
- public MyResponse(string content, string contentType, IDictionary<string, string> headers,
- ServiceFilterResponseStatus responseStatus, int statusCode, string statusDescription)
- {
- this.content = content;
- this.contentType = contentType;
- this.headers = headers;
- this.responseStatus = responseStatus;
- this.statusCode = statusCode;
- this.statusDescription = statusDescription;
- }
- public string Content
- {
- get { return this.content; }
- }
- public string ContentType
- {
- get { return this.contentType; }
- }
- public IDictionary<string, string> Headers
- {
- get { return this.headers; }
- }
- public ServiceFilterResponseStatus ResponseStatus
- {
- get { return this.responseStatus; }
- }
- public int StatusCode
- {
- get { return this.statusCode; }
- }
- public string StatusDescription
- {
- get { return this.statusDescription; }
- }
- }
- }
And the same code implemented with a delegating handler:
- public async Task CallClientWithHandler()
- {
- var client = new MobileServiceClient(appUrl, appKey, new MyHandler());
- var table = client.GetTable<Person>();
- var p = new Person { Name = "John Doe" };
- await table.InsertAsync(p);
- }
- public class MyHandler : DelegatingHandler
- {
- protected override async Task<HttpResponseMessage> SendAsync(HttpRequestMessage request, CancellationToken cancellationToken)
- {
- request.Headers.Add("x-my-header", "my value");
- var response = await base.SendAsync(request, cancellationToken);
- response.StatusCode = HttpStatusCode.ServiceUnavailable;
- return response;
- }
- }
For more information on the HttpClient primitives, check the blog post from the BCL team.
Miscellaneous changes
Those are the other minor changes in the library:
- MobileServiceClient.LoginInProgress has been removed
- MobileServiceClient.LoginAsync(string) has been removed. This is now called LoginWithMicrosoftAccountAsync, which is added as an extension method to the class.
- MobileServiceTable, MobileServiceTable<T> and MobileServiceTableQuery<T> are now internal classes: all methods which used to return a table object now return the interface type IMobileServiceTable (untyped) or IMobileServiceTable<T> (typed). Typed queries are now exposed as the IMobileServiceTableQuery<T> interface.
- MobileServiceTable.<T>ToCollectionView() is now ToCollection(): the collection view implementation had some bugs, and it has been rewritten.
- Multiple Take operations now considers the minimum value: before it would use the last value. The call table.Take(5).Take(3).Take(7).ToListAsync() would issue a request with $top=7; now it sends a request with $top=3.
- Multiple Skip operations now add the values: before it would use the last value. The call table.Skip(3).Skip(5).Skip(4) would issue a request with $skip=4; now it sends a request with $skip=12.
That should be it. Please start using the new libraries and let us know what you think! We still have some (although not much) time to react to user feedback before we have to lock the API down as we move to the general release.


Kirill Gavryluk said “Nick [Harris] and Chris [Risner] have put together an awesome training kit on github. Here are few handy decks from it (including Android)” in a 3/12/2013 message:
Windows Store: https://github.com/WindowsAzure-TrainingKit/Presentation-Windows8AndWindowsAzureMobileServices
- Windows Phone: https://github.com/WindowsAzure-TrainingKit/Presentation-WindowsPhoneAndWindowsAzureMobileServices
iOS: https://github.com/WindowsAzure-TrainingKit/Presentation-BuildingiOSAppsWithWindowsAzureMobileServices
- Android: https://github.com/WindowsAzure-TrainingKit/Presentation-BuildingAndroidAppsWithWindowsAzureMobileServices


<Return to section navigation list>
Marketplace DataMarket, Cloud Numerics, Big Data and OData
•• Keith Craigo (@kcraigo) suggested that you Flex your ODATA in a 3/16/2013 post:
… ODATA stands for Open Data Protocol. ODATA is a web protocol used for querying and updating your data that may exist in what's called silos in your apps. With ODATA you can utilize and enhance other technologies such as HTTP, ATOM Publishing Protocol, XML and JSON. You can read more about ODATA at ODATA.org or view Scott Hanselman's talk
OData Basics - At the AZGroups "Day of .NET" with ScottGu
This post is about developing an Apache Flex mobile application that talks with a SQL Server Express database via ODATA. We're going to build a simple Project Manager application.
What! No LightSwitch!!! But But I thought you were a LightSwitch developer, hold your tater tots there partner. You can still use LightSwitch to create your ODATA service and manage your data.
But for this post I'm going to show you another way by using Visual Studio
Express 2012 for Web.
Why am I using Flex instead of LightSwitch, LightSwitch can now create an HTML client right? This is true but you have to have the latest edition of Visual Studio. The HTML client is not available in the express editions and it requires you upgrade your OS to Windows 8. Neither myself nor my employer is able to upgrade at the moment.
I've been developing Flex/Flash applications since Flash Builder, formerly known as Flex Builder version 1.1, so I have all the necessary components on my MacBook. And I just learned I could build an ODATA service using Visual Studio 2012 Express which I will pass on to you now.
There are other ways to connect your Flex application to SQL Server, such as WebORB for .NET from http://www.themidnightcoders.com/ but that is beyond the scope of this tutorial.
NOTE: If you have Visual Studio 2012 Pro you already have WCF Data Services installed.
My Setup on my wi-fi home network, I have a MacBook Pro OSX 10.7.5 and an ACER Aspire Ultrabook Windows 7:
Hosted on my ACER Ultrabook
Hosted on my MacBook Pro
- SQL Server Express -
http://www.microsoft.com/en-us/sqlserver/editions/2012-editions/express.aspx- Visual Studio Express 2012 for Web -
http://www.microsoft.com/visualstudio/eng/products/visual-studio-express-for-web- WCF Data Services 5.0 for ODATA-
http://www.microsoft.com/en-us/download/details.aspx?id=29306- Microsoft .NET Framework 5.0
- Adobe Flash Builder 4.7 Standard - http://www.adobe.com/products/flash-builder-family.html
- Latest version of Apache Flex SDK - http://flex.apache.org/
Useful but not required - if you are on Windows you can download the open source application LinqPad to help with your ODATA services.
What this tutorial is about:
A simple Project Management application that we can run on our iPhone or iPad. If you have an Android phone this should work also, I only have an iPhone though.
I'll try and keep this simple but make the project easy to expand upon. We will use straight out of the box components and technologies from Flex and Actionscript. We won't use any special frameworks like the excellent Inversion of Control Frameworks such as RobotLegs, Swiz, Mate, Parsley or the Event helper library AS3Signals. Maybe in another post but for now I'll keep this simple, I only provided the links for you to browse at your convenience if wish to learn more.Setup our development environment:
Download and install the items mentioned above if you don't already have them installed. I won't go over how to install all the above in this tutorial, each of the resources above have good documentation covering this.
Ok assuming you have everything installed and configured:
Let's make sure SQL Server can recieve requests from other machines on our home network, this should be the same setup for your company's internal network, consult your network admin about this.
WARNING! If you are following this tutorial from your Corporate Network, please check with your Network Administrator before making any of the following changes. You probably won't have the necessary privileges to complete this but make sure you know what you are doing first if you do. Your Network Administrator may have a better solution.
On your Windows machineSetup Our DATABASE
Click the Windows Start button then right click Computer, select Manage.
- Expand the SQL Server Configuration Manager located under Services and Applications.
- Click Protocols for SQLEXPRESS.
- Enable Shared Memory, Named Pipes, and TCP/IP
- Double click TCP/IP then click the IP Addresses tab
- Locate IPALL, if there is an entry for TCP Dynamic ports delete this, leave it blank. You need a hard coded port to be able to setup the Windows Firewall Inbound Rule.
- For TCP Port set it to 1433, SQL Server usually listens on port 1433. You will get an alert that no changes will take effect until SQL Server is restarted
- Click OK to close this dialog.
- Click SQL Server Services, click SQL Server then click the Restart button in the menu bar or right click and select Restart
- Make sure SQL Server Browser is running.
- You can now close Computer Management
Setup an Inbound Rule in Windows Firewall
Click the Windows Start button and select Control panel, then open Windows Firewall
- Click Advanced Settings
- Click Inbound Rules
- Under Actions select New Rule
- In the Name field I chose to give this rule the name SQL SERVER
- Make sure the Enabled box is checked
- Make sure the Allow the connection box is checked
- Click the Protocols and Ports tab
- For Protocol Type select TCP
- Local Port - select Specific Ports and type in 1433 or whatever you typed for IPALL
- Remote Ports - select Specific Ports, and type in 1433 or whatever you typed for IPALL
- Under the Advanced tab, for Profiles I deselected Domain and Public. I only have Private checked.
- Click OK to close this dialog
- Click New Rule again
- In the Name field I chose to give this rule the name SQL SERVER BROWSER
- Make sure the Enabled box is checked
- Make sure the Allow the connection box is checked
- Click the Protocols and Ports tab
- For Protocol Type select UDP
- Local Port - select Specific Ports and type in 1434
- Remote Ports - select Specific Ports, and type in 1434
- Under the Advanced tab, for Profiles I deselected Domain and Public. I only have Private checked.
- Click OK to close this dialog
- Close the Windows Firewall with Advanced Security screen
- Close Control Panel
Now let's setup our Database tables
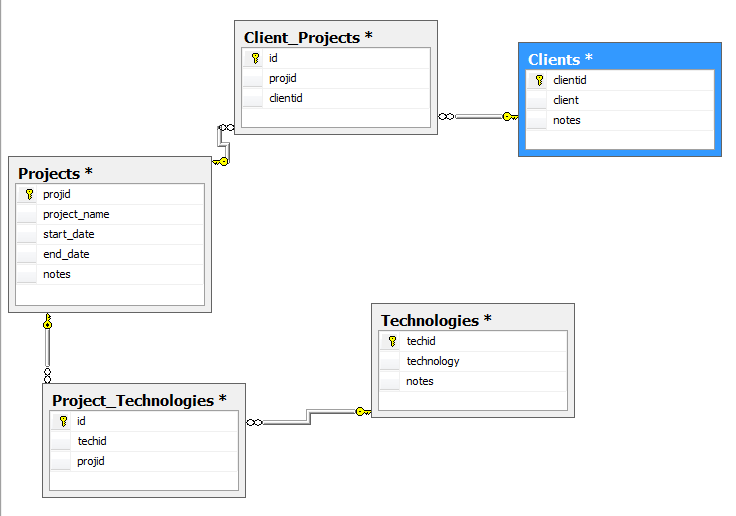
We will use three tables Projects, Clients, Technologies and two look up tables Project_Technologies and Client_Projects.
NOTE: You could setup your database from within Visual Studio using the Entity Data Model Designer but that creates the database in the app data and this is not covered by our Firewall Rule.
- Open SQL Server Management Studio and login to your server
- Right click the Databases folder icon and select New Database
- For Database name I gave mine the name of MyProjects
- Click OK to create the DB
- Expand the db and right click the Tables folder icon and select New Table
- Create the table with the following structure:
- projid (PK, int, not null) Identity set to YES
- project_name (varchar(50), not null)
- start_date (date, not null)
- end_date (date, null)
- notes (text, null)
- Save the table with the name Projects
- Create a second table with the following:
- clientid (PK, int, not null) Identity set to YES
- client (varchar(50), not null)
- notes (text, null)
- Save this table as Clients
- Create a third table with the following
- techid (PK, int, not null) Identity set to YES
- technology (varchar(50), not null)
- notes (text, null)
- Save this table as Technologies
- Create our two look up tables
- 1st table for our Clients and Projects relationships
- id (PK, int, not null) Identity set to YES
- projid (int, not null)
- clientid (int, not null)
- Save this table as Client_Projects
- 2nd table for our Projects and Technologies relationships
- id (PK, int, not null) Identity set to YES
- techid (int, not null)
- projid (int, not null)
- Next expand the Database Diagrams folder
Create a new diagram
Add all the tables and set the appropriate relationships.
Client (One) - Client_Projects (Many)
Project (One) - Client_Projects (Many)
Project (One) - Project_Technologies (Many)
Technology (One) - Project_Technologies (Many)
You should have something similar to the following: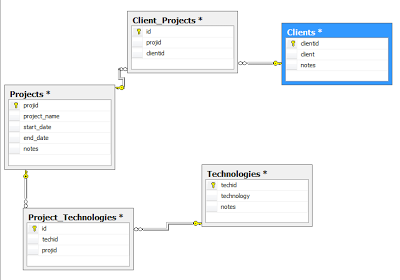
- We now need to give permission to the user who will be used to connect to our project database.
- Open the Server-Security folder, then select Logins.

If NT AUTHORITY\NETWORK SERVICE is NOT present follow Step 16. If NT AUTHORITY\NETWORK SERVICE IS present skip to step 17.- Right click Logins, select New Login

Click Search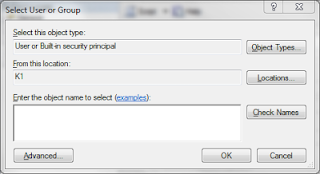
- The easiest way I've found is to click Advanced
- Then click Find Now
- Locate and select Network Service

- Click OK
- Click OK again
- Select User Mapping
- Check the box next to MyProjects, or whatever you named the db in this tutorial
- Then check the box next to db_datareader in the Database role membership for : MyProjects

- Click OK
- If NT AUTHORITY\NETWORK SERVICE IS present following Steps 6 - 9 above to map the user to our MyProjects database.
Setup Our ODATA Service
Open Visual Studio for Web or Visual Studio Professional and create a new
WCF Service Application.NOTE: I'm choosing the C# version, but the Visual Basic version will work as well.
I named this new service application ProjectManagerWCFService
Delete the default IService1.cs and Service1.svc, we will create our own.
Right click the ProjectManagerWCFService and select Add then WCF Data Service 5.3, I named this new Data Service ProjectManagerWCFDataService, click OK.NOTE: If WCF Data Service 5.3 is not present, select Add New Item and look for this library under your language, then Web. Or you may need to install it.
Next we need to add a data model.Right click ProjectManagerWCFService again, click Add and choose ADO.NET Entity Data Model.
NOTE: If ADO.NET Entity Data Model. is not present, select Add New Item and look for this library under your language, then Data.
I named this ProjectManagerDataModelYou should now see the following screen shot:
I chose the default, Generate from database.
- Click Next.
- Click New Connection.
You should see the following screen shot:
- Select your Server - HINT: If the server is on the same machine, just put a dot in the Server name field, this is a shortcut for localhost.
- I left the default Windows Authentication
- Select your database
- You can test the connection if you want at this point or just click OK
- I accepted the defaults of this screen.
- Click OK
The following screen will be shown
NOTE: Make a note of the name I've circled in the screen shot, we will need this later.
- Click Next
- Expand the Table, dbo disclosure buttons
- Check Clients_Projects, Clients, Project_Technologies, Projects and Technologies
- Accept the defaults and click Finish
- You may receive a warning message that "Running this template could possibly harm your computer, I chose to ignore". You have to make your own decision.

- OK, if the template above did not generate the connector lines? How do I correct this? Well the reason this will happen is if I forget to set the relationships in the database as I described in step 13. But not to worry, just go back to the database and follow step 13, then in Visual Studio update the model based on the database.
You could just create the relationships in the Entity Model Designer by Right clicking the Client Model, make sure your clicking in the title area of the Model box. Choose Add New then select Association. Create a One to Many relationship with the Client table table on the one side and Client_Projects on the many side. But be aware this is only for the data model not the database, so if there are any changes in the database you will need to update the model any ways so I suggest to just make the changes in the database.
- Open the ProjectManagerWCFDataService.svc file
- In the line
Public class ProjectManagerWCFDataService : DataService< /* TODO: put your data source class name here. */ > replace the /* TODO: put your data source class name here. */ comment with the name I mentioned above MyProjectsEntities
This line should now look like the following
Public class ProjectManagerWCFDataService : DataService<MyProjectsEntities>- We need to make one more change to this file. Uncomment the first config line
config.SetEntitySetAccessRule("MyEntitySet", EntitySetRights.AllRead);
replace "MyEntitySet" with an Asterisk, it should look the following
config.SetEntitySetAccessRule("*", EntitySetRights.AllRead);
This will give us unrestricted read access, you may need to change this before releasing to production.- OK now we can now test the service.
- Click the the green arrow button for Internet Explorer or the run button in Visual Studio.
- If all goes well you should see the following:

- I'll cover running queries against this service a little later.
- Under the wwwroot create a new folder named ProjectManager
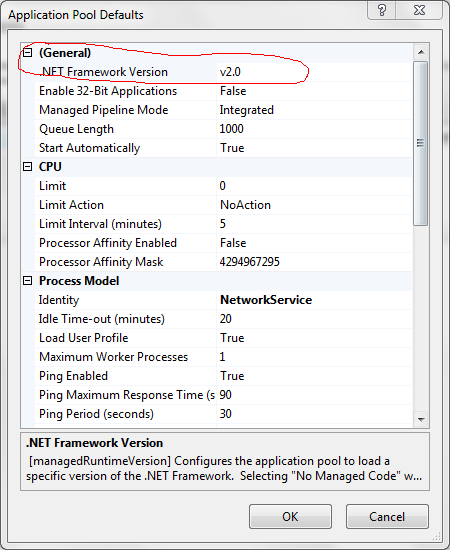
- We now need to create an application named ProjectManager in IIS Manager
- Open IIS Manager, click the Application Pool, I like to create a new Application Pool for each of my apps to isolate them from other processes. I'm not a NetworkAdmin so let me know if this is wrong and why.
- Click Add Application Pool, for the name I chose Project Manager
- Set .NET Framework version to .NET Framework v4.0.3019 or higher
- Managed pipeline mode: I selected Integrated
- Leave the check box for Start application pool immediately checked
- Click OK
- Now highlight the App Pool you just created
- Even though we set the .NET Framework to v4.0, the Managed .NET Framework version default is 2.0, we need to change this to 4.0 as well.

- Change the highlighted .NET Framework from v2.0 to v4.0
- Right click Default Web Site then select Add Application
- Click the Select button
- Select the Application Pool we just created
- Click OK
- For Alias I just type PM
- Click the button with the ... next to the Physical Path field
- Navigate to the ProjectManager folder we created in Step 22.
- Click OK
- You can now close IIS Manager.
PLEASE NOTE: If you are on a public server, check with your Network Admin. This tutorial is for localhost development. Be aware additional security settings may need to be set on a public server.- You have to complete this next part as the Administrator. Launch Visual Studio as Administrator.
- We need to set up publishing.
- Click Build in the menu bar, then select Publish Selection or Publish in Visuaal Studio.
- Select Profile, Select or Publish Profile. In the drop down, select new.
- For Profile Name type localhost|

- Connection
Service URL: localhost
Site / application: Default Web Site/ProjectManager- Click the Validate Connection Button you should see

- Click Next
- Settings: In the Databases section select the drop down under MyProjectEntities make sure the connection strings are correct.
- Select Next
- Click the Start Preview button or you can click the Publish button.
- If all goes well open a browser on the web server and type
http://localhost/ProjectManager/ProjectManagerWCFDataService.svc/- You should see the same screen as Step 20.
- OK now if your setup is like mine for your MAC, you need to know the ip address of your Windows machine, the web service host.
- Open a browser on your MAC and type your ip address, mine is
http://192.168.1.78/ProjectManager/ProjectManagerWCFDataService.svc/- You should see the same screen as Step 20.
- You can now close Visual Studio.
Setup Flash Builder
See video on Keith’s site.


AFAIK, the accepted abbreviation for Open Data Protocol is OData.
•• XRMLabs (@XrmLabs) described How to retrieve more than 50 records through OData in CRM 2011? in a 3/8/2013 post (missed when published):
If you are using OData end points to retrieve records in MS CRM 2011 then you might be surprised to know that the maximum number of records that can be retrieved in a single retrieve call is 50. This is because the page size is fixed to Max 50 records.
When working with large set of data we were faced with a similar problem. Thankfully MS CRM Odata has a next link which can be used to retrieve next 50 records. The following example shows how to retrieve more than 50 records using Odata end point. In this example we push the first 50 records in an array and retrieve next page results using the URL ("__next") provided in the JSON response object.
Note we are using Jquery and JSON2 in the following example. We presume you have already added JQuery and JSON to your Form. To know more about how to add jquery please follow this blog entry (How toadd JQuery support to CRM-2011)
The javascript code is
suchas follows.
varrelatedContact = [];
functiononloadFetchAllContactRecords(){
varserverUrl = Xrm.Page.context.getServerUrl();
varoDataUrl = serverUrl +"/xrmservices/2011/OrganizationData.svc/ContactSet?$select=EMailAddress1,FirstName,LastName&$filter=StateCode/Value eq 0";
GetContactRecords(oDataUrl);
vartotalRecords = relatedContact.length;
}
functionGetContactRecords(url){
jQuery.ajax({
type:"GET",
contentType:"application/json; charset=utf-8",
datatype:"json",
url: url,
async:false,
beforeSend:function(XMLHttpRequest){
XMLHttpRequest.setRequestHeader("Accept","application/json");
},
success:function(data, textStatus, XmlHttpRequest){
if(data && data.d !=null&& data.d.results !=null){
varobjrecord = data.d;
varrecords = objrecord.results;
insertRecordsToArray(records);
FetchRecordsCallBack(objrecord);
}
},
error:function(XmlHttpRequest, textStatus, errorThrown){
alert("An error has occurred");
}
});
}
functioninsertRecordsToArray(records){
for(vari = 0; i < records.length; i++){
relatedContact.push(records[i]);
}
}
functionFetchRecordsCallBack(objrecord){
if(objrecord.__next !=null){
varurl = objrecord.__next;
GetContactRecords(url);
}
}Hope this helps.

• Alejandro Jezierski (@alexjota) described Developing Big Data Solutions on Windows Azure, the blind and the elephant in a 3/15/2013 post to his SouthWorks blog:
What is a Big Data solution to you? Whatever you are thinking of, I cannot think of a better example than the story of the blind and the elephant. ”I’m a dev, It’s about writing some Map/Reduce awesomeness”, or “I’m a business analyst, I just want to query data in Excel!”, ”I’m a passer-by, but whatever this is, it’s yellow”… and so on.
I’m currently working with Microsoft’s Patterns and Practices team, developing a new guide in the Windows Azure Guidance Series called “Developing Big Data Solutions on Windows Azure”.
The guide will focus on discussing a wide range of scenarios, all of which have HDInsight on Windows Azure as a key player, the related technologies from the Hadoop ecosystem and Microsoft’s current BI solution stack.
We just made our first early preview drop on codeplex, so you can take a peek and see how the guide is shaping up so far.
So go get it, have a read and tell us what you think, we appreciate your feedback!


See the Microsoft’s patterns & practices (@mspnp) group posted the 123-page first (alpha) drop of Developing Big Data Solutions on Windows Azure on 3/14/2013 article at the beginning of the Windows Azure Blob, Drive, Table, Queue, HDInsight and Media Services section above.
Andrew Brust (@andrewbrust) asked “Microsoft wants to enable everyone to work with big data, using Excel, SQL Server, and current skill sets. With a solid stack, albeit one vulnerable in predictive analytics and mobility, can Microsoft become the McDonald's of big data "insights?" in a deck for his Microsoft's Big Data strategy: Democratize, in-memory and the cloud post of 3/8/2013 to ZDNet’s Big Data blog (missed when posted):
I've mentioned before that I've done a lot of work with Microsoft. Recently, I was visiting the company's corporate campus in Redmond, Washington, for the Global Summit of its Most Valuable Professionals program, in which I participate. As I was on campus, and it was the week before O'Reilly's big data-focused Strata conference, of which Microsoft is a big sponsor, I took the opportunity to sit down with Microsoft's Director of Program Management for BI in its Data Platform Group, Kamal Hathi.
It's not just about Strata, either. Hathi is gearing up to deliver the keynote address at the PASS Business Analytics Conference in Chicago next month and so his mind is pretty well immersed in strategic questions around big data that are relevant to the software giant that employs him.
Redmond's big data worldview
My goal was to find out how Redmond views the worlds of big data, analytics, and business intelligence, and what motivates those views, too. What I found out is that Microsoft sees big data mostly through two lenses: That of its business intelligence sensibility, formed over more than a decade of being in that market; and those of its other lines of business, including online services, gaming, and cloud platforms.
This combination makes Microsoft's analytics profile a combination of old-school mega vendor BI market contender and modern-day customer of analytics technologies. And because Microsoft has had to use its own BI tools in the service of big data analyses, it's been forced to find a way to make them work together, to ponder the mismatch between the two, and how best to productize a solution to that mismatch.
Strata reveals
I mentioned last week's Strata conference, and that really is germane to my conversation with Hathi, because Microsoft made three key announcements, all of which tie into the ideas Hathi and I discussed. Those announcements are as follows:
Version 2 of its SQL Server Parallel Data Warehouse product is complete, with Dell and HP standing by to take orders now for delivery of appliances this month. PDW v2 includes PolyBase, which integrates PDW's Massively Parallel Processing (MPP) SQL query engine with data stored in Hadoop.
Microsoft released a preview of its "Data Explorer" add-in for Excel. Data Explorer can be used to import data from a variety of sources, including Facebook and Hadoop's Distributed File System, and can import data from the web much more adeptly than can Excel on its own. Data Explorer can import from conventional relational data sources as well. All data imported by Data Explorer can be added to PowerPivot data models and then analyzed and visualized in Power View.
Hortonworks, Microsoft's partner in all things Hadoop, has released a beta of its own distribution of the Hortwonworks Data Platform (HDP) for Windows. This more "vanilla" HDP for Windows will coexist with Microsoft's HDInsight distribution of Hadoop, which is itself based on the HDP for Windows code base.
As I said, these announcements tie into the ideas Hathi discussed with me, but I haven't told you what they are yet. Hathi explained to me that Microsoft's strategy for "Insights" (the term it typically applies to BI and analytics) is woven around a few key pillars: "democratization", cloud, and in-memory. I'll try now to relay Hathi's elaboration of each pillar.
Democratization
"Democratization" is a concept Microsoft has always seen as key to its own value proposition. It's based on the idea that new areas of technology, in their early stages, typically are catered to by smaller pure play, specialist companies, whose products are sometimes quite expensive. In addition, the skills required to take advantage of these technologies are usually in short supply, driving costs up even further. Democratization disrupts this exclusivity with products that are often less expensive, integrate more easily in the corporate datacenter and, importantly, are accessible to mainstream information workers and developers using the skills they already have.
In the case of Hadoop, which is based on Apache Software Foundation open-source software projects, democratization is less about the cost savings aspect and much more about datacenter integration and skill set accessibility. The on-premises version of Microsoft's HDInsight distribution of Hadoop will integrate with Active Directory, System Center, and other back-end products; the Azure cloud-based version integrates with Azure cloud storage and with the Azure SQL Database offering as well.
In terms of skill set accessibility, Microsoft's integration of Excel/PowerPivot and Hadoop through Hive and ODBC means any Excel user that even aspires to power user status will be able to analyze big data on her own, using the familiar spreadsheet tool that has been established for decades.
The other thing to keep in mind is that HDInsight runs on Windows Server, rather than Linux. Given that a majority of Intel-based servers run Windows and that a majority of corporate IT personnel are trained on it, providing a Hadoop distribution that runs there, in and of itself, enlarges the Hadoop tent. …


Glenn Gailey (@ggailey777) described Extending the OData Async Extensions to DataServiceCollection<T> Methods in a 3/4/2013 post (missed when published):
As I announced in a previous post, there is an OData client library that supports Windows Store app development. This is a the good news, but folks who have tried to use it in their Windows Store apps are quick to note that the library’s asynchronous APIs don’t support the nice new await/async behaviors in .NET Framework 4.5. Our friend Phani Raju provided a bit of help here in his post Async extension methods for OData Windows 8 client library. In this post, Phani provides us with some nice awaitable wrappers around the Begin/End methods in the OData client APIs. This makes is easy to add these extension methods into your project and use the await pattern, like this:
        var results = await ODataAsyncExtensions
            .ExecuteAsync<AnswerLink>(_context.AnswerLinks);
I used var to define the variable…but when you code this, you will notice that this awaitable method (along with the other Execute and Load methods) actually returns an IEnumerable<T>, which is not the ideal collection for data binding, especially two-way binding. OData clients already have an ideal binding collection in DataServiceCollection<T>, but Phani didn’t provide for us the nice awaitable wrapper for the load methods on this collection.
Fortunately, I came across the article Convert Events to Async methods posted by Mandelbug, which showed how to convert the old style event/delegate based async operation into an awaitable Task-based one. As such, an awaitable version of the LoadAsync(DataServiceQuery) method looks like this:
        public static async Task<LoadCompletedEventArgs>
            LoadAsync<T>(DataServiceCollection<T> bindingCollection,
            DataServiceQuery<T> query)
        {
            var tcs = new TaskCompletionSource<LoadCompletedEventArgs>();

            EventHandler<LoadCompletedEventArgs> handler =
                delegate(object o, LoadCompletedEventArgs e)
            {
                if (e.Error != null)
                {
                    tcs.TrySetException(e.Error);
                }
                else if (e.Cancelled)
                {
                    tcs.TrySetCanceled();
                }
                else
                {
                    tcs.TrySetResult(e);
                }
            };

            bindingCollection.LoadCompleted += handler;
            bindingCollection.LoadAsync(query);

            LoadCompletedEventArgs eventArgs = await tcs.Task;
            bindingCollection.LoadCompleted -= handler;

            return eventArgs;
        }
I have attached the entire ODataAsyncExtensions class code page to this post, which includes Phani’s methods plus my new LoadAsync ones. As always, this code is provided to you “as is," I ‘m not going to support it, so use it at your own risk….but please let me know if you find any bugs.

<Return to section navigation list>
Windows Azure Service Bus, Caching Access Control, Active Directory, Identity and Workflow
• Haddy El-Haggan (@Hhaggan) posted Introducing Service Bus on 3/9/2013 (missed when published):
Service Bus is a software model, a middleware, that is mainly used with WCF or SOA to handle and loosens all the coupled messaging between all the applications required. There are 2 types of Service Bus, the one running on Windows Azure and the one that can run on the local servers which we call Enterprise Service Bus.
To clarify more what Service Bus can do, it can work with different applications, reach them and interact with them regardless of the different mechanism they work with.
Here is a video from Channel 9 that clarifies more the concept of EAI and What Service Bus can do: http://channel9.msdn.com/shows/Cloud+Cover/Cloud-Cover-Episode-23-AppFabric-Service-Bus/
For the Windows Azure Service Bus, it provides REST, relayed and brokered messaging capabilities for the Messaging, connecting the applications running on premises with the ones running on Windows Azure and finally works also for the mobile devices push notifications.
For more information about the Windows Azure Service Bus Relayed Messaging you can go to the following link [or see post below] and for more information about the Windows Azure Service Bus Brokered Messaging you can find it in the following link.
So why people use the Service Bus?
- It can be used for delivering messages to multiple connectors or endpoints.
- Simplify the integration between multiple applications as each one of them is using different connector with different way of integration.
- Ensure the delivery of the messaging to the applications.


• Haddy El-Haggan (@Hhaggan) continued his Service Bus series with Windows Azure Service Bus Relayed Messaging on 3/9/2013:
As for the Service Bus, the Windows Azure middleware solving the EAI (Enterprise application integration), here is the first way to do the messaging using the Relayed Messaging. Let me first explain what does Relayed Messaging means.
Here are the 3 ways of messaging using the Relay messaging:
- Direct one way messaging
- Request/response messaging
- Peer to Peer messaging
For the Binding there are several ways of bindings, certainly that matches all the different ways of Relay Messaging.
- TCP Relay Binding know as: NetTcpRelayBinding
- WS Relay Binding know as: WSHttpRelayBinding
- One Way Relay Binding known as: NetOneWayRelayBinding
- Event Relay Binding Known as: NetEventRelayBinding
Now starting for the first type of binding the TCP Relay Binding. Actually this type of binding has also three types of binding mode:
- Relay
- Direct
- Hybrid
Each one of them has a specific time to be used in, however there are some people who always go for the easiest one which is the hybrid but I have to clarify all of them. The TCP Relay binding mode “Relay” is used when you are connecting the service and the client through the service itself. First of all the Service has to authenticate itself in the service bus, the clients too has to authenticate itself to the service then it can sends the required message to the service. At the end, the service would be able to send the required message to the client.
The second TCP Relay Binding mode “Direct”, this mode is used for establishing direct connections between the client and the service without having any needs to use the service or passing by it. Like the Relay mode the Service has to authenticate itself, then the client too after that service bus will show them, the client and the service how they can establish connection between them and communicate directly. Working on the Message Security is a must.
The third TCP Relay Binding mode “Hybrid”, from its name you can get that it is a mix from the 2 other modes the Relay and the Direct. Well it is a Yes, like the two other services the authentication for the client and the service has to be done first after that the initialized mode is the relayed. The second step is to check if the direct mode could be achieved successfully, if yes than the switch will be done automatically otherwise the binding will remain the same. Also working on the security is a must.
PS: the TCP Relay Binding is not interoperable, in other words it always assume that the other side is using the same binding so it doesn’t work with other bindings.
Now with the Second type of binding the WSHttpRelayBinding, this one is easier than the NetTcpRelayBinding, it is interoperable, can work with different kind of binding running on the other side over HTTP and HTTPS protocols.
The third type is the NetOneWayRelayBinding, this type of binding doesn’t work like the others, it is a bit different, and although it has some drawbacks like you may face some problems delivering its messages but it is most commonly used when you cannot be sure of the current status of the Service.
The Fourth and last type of binding is the NetEventRelayBinding, this one is commonly used when you are targeting to distribute your message along multiple clients. In case like the above, the service must be connected using the NetEventRelayBinding but the client will have the option to connect using one of the two bindings, the NetEventRelayBinding or the NetOneRelayBinding.
In the following link you can learn step by step how to create Service Bus Relayed Messaging.
For better understanding how Service Bus Relay Messaging works, you can find more about it in this article, one of my resources.


• Haddy El-Haggan (@Hhaggan) concluded his Service Bus series with Windows Azure Service Bus Brokered Messaging on 3/9/2013:
As for the Service Bus, the Windows Azure middleware solving the EAI (Enterprise application integration), here is the second way to do the messaging using Brokered Messaging. Clarifying what Brokered Messaging means.
The Brokered Messaging is a durable, asynchronous messaging that has several ways to achieve this like the “Queues”, the “Topics and Subscriptions”, in a way that the senders and the receivers don’t have to be online when the message is send to receive it.
Starting first with the Queues, this way of communication can be used to make the connection between two points, it is totally like the Point-to-Point messaging. For the queues, it is like any normal queue data structure, or like the Windows Azure Queue storage (all the predefined .net functions) the first message sent is the first is to be received by the receiver (FIFO). This feature also works If you do have several receivers of the message through the Service bus.
Our Next Brokered Messaging way is the Topics and the Subscriptions, for the users, they can subscribe to a specific topic and after that can easily get all the messages sent through the service bus related to the subscribed topic.


• Haddy El-Haggan (@Hhaggan) posted an Introduction to Enterprise application Integration (EAI) on 3/7/2013 (missed when published):
Along with the increasing number of the business needs and the new software and applications they get to always meet their customers’ satisfaction and to increase their system’s reliability. An integration between all these applications and software is a must, so they can monitor their systems and the transactions made more easily and efficiently.
The main challenge always reside in how these multiple applications can communicate each other? The answer would be easy, it is SOA (service Oriented Architecture), well it is a yes and no. Yes because all these connections have to go through the SOA but no because SOA is not enough and need few more things to ensure its reliability. The way of the Messaging between the applications which is most probable the point to point integration. This will certainly oblige us to have a deeper look at the way the communication between the apps is done, the middleware. If we are talking about a small IT infrastructure where two or three applications needs to be connected then the point to point messaging would work more than great, but with the increasing number of connectors, you will face certainly a high degree of complexity and would not be able to manage all the connectors effectively.
Well the solution for EAI is quite simple, is building a middleware that manages all the connectors, loosens the coupled connections, which lead me to the Service Bus.
For more information about EAI or Enterprise application integration, you can check the following link on MSDN, it also has several lessons that can help you with it, it is a complete scenario using BizTalk Server.
• Haddy El-Haggan (@Hhaggan) explained What is Middleware? on 3/7/2013:
If you go to a dictionary to check on the “middleware” you will find this:” Software that manages the connection between a client and a database“. Actually a middleware does more than that, let’s first understand what any operating system must deliver to a developer. Actually they are two main things, the CPU and the Memory. The processor so the developer can execute the instructions for his applications and the memory so the developer can use it to store the required data. For nowadays, the applications require more than that especially for the applications that are designed to serve a special purpose for the enterprises.
The middleware here provides a way of connectivity between the applications like the messaging services. The Messaging service allows programs to share common messages handling code. In other words, the middleware is anything the developer can get to build applications using the networks.
You can find the middleware in your application connecting to the database, the way several applications can communicate with each other even if they are hosted on different hardware resources and on different operating system. You can always find it in the EAI (enterprise application integration) systems.
I’ve forgotten the name of the large software firm that tried to claim “Middleware” as their trademark.
Chris Klug (@ZeroKoll) described Encrypting messages for the Windows Azure Service Bus in a 3/12/2013 post:
A week ago I ran into Alan Smith at the Stockholm Cental Station on the way to the Scandinavian Developer Conference. We were both doing talks about Windows Azure, and we started talking about different Windows Azure features and thoughts. At some point, Alan mentioned that he had heard a few people say that they would like to have their BrokeredMessages encrypted. For some reason this stuck with me, and I decided to give it a try…
My first thought was to enherit the BrokeredMessage class, and introduce encryption like that. Basically pass in an encryption startegy in the constructor, and handle all encryption and decryption inside this subclass. However, about 2 seconds in to my attempt, I realized that the BrokeredMessage class was sealed. An annoying, but somewhat understandable decision made by Microsoft. Ok, so I couldn’t inherit the class, what can you do then? Well, there is no way to stop me from creating a couple of extension methods…
Ok, so extension methods would have to be my plan of attack, and as such, the goal would be to create 2 methods that look something like this
public static void Encrypt(this BrokeredMessage msg, IEncryptor encryptor)
public static void Decrypt(this BrokeredMessage msg, IDecryptor decryptor)
where IEncryptor and IDecryptor would be a couple of really simple interfaces like this
public interface IEncryptor
{
    byte[] Encrypt(byte[] data);
}

public interface IDecryptor
{
    byte[] Decrypt(byte[] data);
}
So the plan would be that the user created a new BrokeredMessage and set the body and the properties needed, and then he would call Encrypt() on it, and all the information would get encrypted. And when it was received, he would call Decrypt, and the body and the properties would be decrypted and ready for use. And with the interfaces abstracting the actual encryption and decryption, any type of algorithm would be possible to use.
I decided to start by encrypting the body, that is the object passed into the constructor, which is then serialized and passed as the body of the message. So I started looking at ways to access the serialized data…hmm…that seemed harder than expected. The only way to access the body is through the generic GetBody<T>() method. Unfortunately, that requires me to know the type of the body to get hold of it, and on top of that, I would get an object, not the serialized form…hmm…
I also figured out that once you have set the message’s body using the constructor, there is no real way of changing it…
I found 2 ways to get around this. Either I would have to modify the extension methods, or I would have to do some funky stuff. I will start by showing how to do it by changing my extension methods slightly, and then later on, I will show how to do it using reflection.
So to go forward, I had to change my extension methods a little… They ended up looking like this instead
public static BrokeredMessage Encrypt<T>(this BrokeredMessage msg, IEncryptor encryptor)
public static BrokeredMessage Decrypt<T>(this BrokeredMessage msg, IDecryptor decryptor)
As you can see, I am now forced to define the type of the body, as well as return a new BroekeredMessage instead of updating the original…but it will still work…
I will ignore the implementation of the IEncryptor and IDecryptor interfaces for now. The whole idea is that the implementation of this should not matter. They should take a byte array, and encrypt or decrypt it for me….that’s it…
The first order of business is to implement the Encrypt<T>() method. I need to have an encrypted message to be able to try my decryption, so I found that to be a good place to start…
First thing to do is to get hold of the body object, and serialize it. I decided to serialize it using JSON as it has nice and compact syntax…
var body = msg.GetBody<T>();
var json = JsonConvert.SerializeObject(body);
Now that I have the serialized object in string form, I can easily turn that into a byte array using the UTF8 encoding, and pass that to the encryptor. Once that is done, I can convert the byte array into a Base64 encoded string using the Convert class.
var bytes = encryptor.Encrypt(Encoding.UTF8.GetBytes(json));
var encryptedObject = Convert.ToBase64String(bytes, 0, bytes.Length);
Once the encryption of the serialized object is done, and converted to a Base64 encoded string, I can just creat a new BrokeredMessage, using that string as the actual body.
var encryptedMessage = new BrokeredMessage(encryptedObject);All that is left now is to encrypt the properties, set them on the new BrokeredMessage, and return it…
Unfortunately, the BrokeredMessage’s properties are of type object. Not that they can take actual objects, but because that they can take any simple type. So to handle this, I decided to wrap the property value in a class that would contain the property value as a string, as well as a definition of what type it was. The wrapper looks like this
public class BrokeredMessagePropertyWrapper
{
    public string Type { get; set; }
    public string Value { get; set; }

    public object GetValue()
    {
        switch (Type)
        {
            case "Int32":
                return int.Parse(Value);
            case "Double":
                return double.Parse(Value);
            case "Decimal":
                return decimal.Parse(Value);
            default:
                return Value;
        }
    }
}
As you can see, I also include a simple method for deserializing the value.
Now that I have a way of wrapping the property values, all I need to do is to go through the properties and create new wrappers. Then I need to serialize the wrapper into JSON, encrypt it, turn into a Base64 encoded string, and set the property on the encrypted message.
foreach (var property in sourceMessage.Properties.ToArray())
{
    var wrapper = new BrokeredMessagePropertyWrapper
    {
        Type = property.Value.GetType().Name,
        Value = property.Value.ToString()
    };
    var bytes = encryptor.Encrypt(Encoding.UTF8.GetBytes(JsonConvert.SerializeObject(wrapper)));
    targetMessage.Properties[property.Key] = Convert.ToBase64String(bytes, 0, bytes.Length);
}
In the above code, the sourceMessage points towards the original message, and the targetMessage points to the newly created, and encrypted message.
That is actually it… An encrypted message ready to be sent to the Service Bus…
The decryption is pretty much the same thing in reverse for obvious reasons…
Get the body as a string, which is really is. Get a byte array from the Base64 encoded string. Decrypt it. Convert it to a string. Deserialize the JSON and create a new BrokeredMessage with the deserialized object as the body. Like this
var encryptedObject = msg.GetBody<string>();

var json = Encoding.UTF8.GetString(decryptor.Decrypt(Convert.FromBase64String(encryptedObject)));
var body = JsonConvert.DeserializeObject<T>(json);

var decryptedMessage = new BrokeredMessage(body);
And the properties are the same thing. Pull the Base64 encoded string from the message’s properties, get the bytes, decrypt them, turn it into a string, deserialize to the wrapper type, and then set the decrypted message’s property using the GetValue() method of the wrapper.
foreach (var property in sourceMessage.Properties.ToArray())
{
    var decryptedBytes = decryptor.Decrypt(Convert.FromBase64String(property.Value.ToString()));
    var serializedWrapper = Encoding.UTF8.GetString(decryptedBytes);
    var wrapper = JsonConvert.DeserializeObject<BrokeredMessagePropertyWrapper>(serializedWrapper);
    targetMessage.Properties[property.Key] = wrapper.GetValue();
}
And voila! A very simple way to encrypt and decrypt BrokeredMessages. Using the extension methods when sending a message looks something like this
var client = GetQueueClient();

var obj = new MessageObject { Id = 1, Name = "Chris" };
var msg = new BrokeredMessage(obj);
msg.Properties.Add("MyProp", "MyValue");
msg.Properties.Add("MyProp2", 1);

msg = msg.Encrypt<MessageObject>(GetEncryption());
client.Send(msg);
And the receiving end like this
var client = GetQueueClient();
var message = client.Receive(TimeSpan.FromSeconds(5));
message = message.Decrypt<MessageObject>(GetEncryption());
var body = message.GetBody<MessageObject>();
That’s it! About a simple as can be. But I do say “about” as simple as can be. I still do not like the generic syntax being used. And I don’t like a new message being created. I want to change the existing message… And that can be done using reflection…
I know that there are a lot of people out there that doesn’t like reflection, and I am not convinced it is a great way to solve things. But I still want to show the difference, and how cool it can be…
Using reflection, I can go back and use the original extension method signatures
public static void Encrypt(this BrokeredMessage msg, IEncryptor encryptor)
public static void Decrypt(this BrokeredMessage msg, IDecryptor decryptor)
They will mofidy the object instead of actually creating a new one.
They way it works is by pulling out the private property called BodyStream on the BrokeredMessage instance. This contains a Stream that contains the serialized version of the body object.
The reflection part looks like this
var member = typeof(BrokeredMessage).GetProperty("BodyStream", BindingFlags.NonPublic | BindingFlags.Instance);
var data = (Stream)member.GetValue(msg);
where msg is the BrokeredMessage…
Encypting the data in the stream requires me to read the content of the stream as a byte array, send it to the IEncryptor instance, and then create a new Stream with the encrypted data. This newly created stream is then used to set the BodyStream property.
var bytes = new byte[data.Length];
data.Read(bytes, 0, (int)data.Length);
var handledBytes = encryptor.Encrypt(bytes);
var encryptedStream = new MemoryStream(handledBytes);

member.SetValue(msg, encryptedStream);
Once that is done, the encryption of the properties is exactly the same. It is only the body that is the issue…
Decrypting the body is once again pretty much the same… Get the Stream from the BodyStream. Decrypt the bytes. Turn them into a Stream, and set the BodyStream.
var member = typeof(BrokeredMessage).GetProperty("BodyStream", BindingFlags.NonPublic | BindingFlags.Instance);
var data = (Stream)member.GetValue(msg);

var bytes = new byte[data .Length];
data .Read(bytes, 0, (int)data .Length);
var handledBytes = decryptor.Decrypt(bytes);
var decryptedStream = new MemoryStream(handledBytes);
member.SetValue(msg, decryptedStream);
Ok, so the reflection part is not that great. It requires the BrokeredMessage’s implementation to not change, or at least not change by removing the BodyStream property. And some people say it might be slow, but hey, I am not running this a million times in a row… However, it does remove the Json.Net dependency, and relieves us of having to serialize and deserailize the object… So there is both good and bad parts involved in going down this route instead of the first one.
And jst for the sake of completeness, I want to show an implementation of the IEncryptor and IDecryptor. In this case using TripleDES (the download contains both TripleDes and Aes, as well as a base class that will make it VERY easy to implement new ones as long as you use a symmetric algorithm).
Actually, the code below is a previous implementation before the base class was introduced, but it will show the idea…
I have implemented both of the interfaces using the same class, called TripleDesEncryption. It takes 2 parameters in the constructor, the key and the initialization vector (2 strings).
It starts out by making sure that the key and IV is the correct length. The TripleDESCryptoServiceProvider requires the key to be 16 bytes (128 bits), and the IV to be 8 bytes (64 bits). It actually might support more key lengths, but the important thing is that they are fixed. So the constructor makes sure that they are the correct length before storing them.
public class TripleDesEncryption : EncryptionBase
{
    private readonly string _key;
    private readonly string _iv;

    public TripleDesEncryption(string key, string iv) : base(16, key, 8, iv)
    {
        if (key.Length > 16)
            key = key.Substring(0, 16);
        else if (key.Length < 16)
            key = key.PadRight(16, '*');
        _key = key;

        if (iv.Length > 8)
            iv = iv.Substring(0, 8);
        else if (iv.Length < 8)
            iv = iv.PadRight(8, '*');
        _iv = iv;
    }

    ...
}
As you can see, it either cuts the string if it is too long, or pads it if it is too short… Not the fanciest way of doing things, but it will work…
The Encrypt() method is implemented like this
public byte[] Encrypt(byte[] data)
{
    byte[] encryptedBytes;
    using (var algorithm = GetProvider())
    {
        algorithm.Key = Encoding.UTF8.GetBytes(_key);
        algorithm.IV = Encoding.UTF8.GetBytes(_iv);
        using (var encryptor = algorithm.CreateEncryptor())
        using (var ms = new MemoryStream())
        using (var cs = new CryptoStream(ms, encryptor, CryptoStreamMode.Write))
        {
            cs.Write(data, 0, data.Length);
            cs.FlushFinalBlock();
            encryptedBytes = ms.ToArray();
        }
    }
    return encryptedBytes;
}
and the Decrypt() method like this
public byte[] Decrypt(byte[] data)
{
    byte[] decryptedBytes;
    using (var algorithm = GetProvider())
    {
        algorithm.Key = Encoding.UTF8.GetBytes(_key);
        algorithm.IV = Encoding.UTF8.GetBytes(_iv);
        using (var decryptor = algorithm.CreateDecryptor())
        using (var ms = new MemoryStream())
        using (var cs = new CryptoStream(ms, decryptor, CryptoStreamMode.Write))
        {
            cs.Write(data, 0, data.Length);
            cs.FlushFinalBlock();
            decryptedBytes = ms.ToArray();
            algorithm.Clear();
        }
    }
    return decryptedBytes;
}
and for the curious person, the GetProvider method is actually just a one-liner
protected override SymmetricAlgorithm GetProvider()
{
    return new TripleDESCryptoServiceProvider();
}
That’s all there is to it! That will encrypt and decrypt the BrokeredMessages using TripleDES…making sending messages through the Service Bus even safer.
There is obviously downlaodable code for this. It is a little hefty at 2,7 Mb…sorry about that… NuGetting (new word?) Json.Net adds a bit to the download…
It will require you to have the Azure SDK installed to work, as well as a Service Bus service set up in Windows Azure. Other than that, you have to configure it by setting the appSetting values in the App.config file. They should be pretty self-explanatory though…
Code available here: DarksideCookie.Azure.Sb.Encryption.zip (2.72 mb)
I hope that this helps out! If there are any problems or comments, just add a comment, or even better, drop me an e-mail at chris(a)59north.com. I have a tendency to miss comments on the blog, even if I do try to monitor them.


No significant articles today

<Return to section navigation list>
Windows Azure Virtual Machines, Virtual Networks, Web Sites, Connect, RDP and CDN
Brent Stineman (@BrentCodeMonkey) described IaaS – The changing face of Windows Azure in a 3/6/2013 post (missed when published):
I need to preface this post by saying I should not be considered, by any stretch of imagination, a “network guy”. I know JUST enough to plug in an Ethernet cable, not to fall for the old “the token fell out of the network ring” gag, and know how to tracert connectivity issues. Thanks mainly to my past overindulgence in online role playing games.
In June of 2012, we announced that we would be adding Infrastructure as a Service (IaaS) features to the Windows Azure Platform. While many believe that Platform as a Service (PaaS) is still the ultimate “sweet spot” with regards to cost/benefit ratios, the reality is that PaaS adoption is… well… challenging. After 25+ years of buying, installing, configuring, and maintaining hardware, nearly everyone in the IT industry tends to think of terms of servers, both physical and virtual. So the idea of having applications and data float around within a datacenter and not tied to specific locations is just alien for many. This created a barrier to the adoption of PaaS, a barrier that we are hoping our IaaS services will help bridge (not sure about “bridging barriers” as a metaphor since I always visualize barriers as those concrete fence things on the side of highway construction sites for but we’ll just go with it).
Unfortunately, there’s still a lot of confusion about what our IaaS solution is and how to work with this. Over the last few months, I’ve run into this several times with partners so I wanted to pull together some of my learnings into a single blog post. As much for my own personal reference as for me to be able to easily share it with all of you.
Some terminology
So I’d like to start by explaining a few terms as they are used within the Windows Azure Platform…
Cloud Service – This is a collection of virtual machines (either PaaS role instances or IaaS virtual machines) representing an isolation boundary that contains computational workloads. A Cloud Service can contain either PaaS compute instances, or IaaS Virtual Machines, but not both.
Availability Set – For PaaS solutions, the Windows Azure Fabric already knows to distribute the same workload across different physical hardware within the datacenter. But for IaaS, I need to tell it to do this with the specific virtual machines I’m creating. We do this by placing the virtual machines into an availability set.
Virtual Network – Because addressability to the PaaS or IaaS instances within Cloud Services is limited to only those ports that you declare (by configuring endpoints), it’s sometimes helpful to have a way to create bridges between those boundaries or even between them and on-premises networks. This is where Windows Azure Virtual Networks come into play.
The reason these items are important is that in Windows Azure you’re going to use them to define your solution. Each piece represents a way to group, or arrange resources and how they can be addressed.
You control the infrastructure, mostly…
Platform as a Service, or PaaS, handles a lot for you (no surprise as that’s part of the value proposition). But in Infrastructure as a Service, IaaS, you take on some of that responsibility. The problem is that we are used to taking care of traditional datacenter deployments and either a) don’t understand what IaaS still does for us and b) just aren’t sure how this cloud stuff is supposed to be used. So we, through no fault of our own try to do things the way we always have. And who could really blame us?
So let’s start with what Windows Azure IaaS still does for you. It obviously handles the physical hardware and hypervisor management. This includes provisioning the locations for our Virtual Machines, getting them deployed, and of course moving them around the data center in the case of a hardware failure or host OS (the server that’s hosting our virtual machine) upgrades. The Azure Fabric, our secret sauce as it were, also controls basic datacenter firewall configuration (what ports are exposed to the internet), load balancing, and addressability/visibility isolation (that Cloud Service thing I was talking about). This covers everything right up to the virtual machine itself. But that’s not where it stops. To help secure Windows Azure, we control how all the virtual machines talk to our network. This means that the Azure Fabric also has control of the virtual NIC that is installed into your VM’s!
Now the reason this is important is that there are some things you’d normally try to do if you were creating a network in a traditional datacenter. Like possibly providing fixed IP’s to the servers so you can easily do name resolution. Fixed IPs in a cloud environment is generally a bad idea. Especially so if that cloud is built on the concept of having the flexibility to move stuff around the datacenter for you if it needs too. And if this happens in Windows Azure, it’s pretty much assured that the virtual NIC will get torn down and rebuilt and in the process lose any customizations you made to it. This is also a frequent cause for folks losing the ability to connect to their VMs (something that’s usually fixable by re-sizing/kicking the VM via the management portal). It also highlights one key, but not often thought of feature that Windows Azure provides for you, server name resolution.
Virtual Machine Name Resolution
The link I just dropped does a pretty good job of explaining what’s available to you with Windows Azure. You can either let Windows Azure do it for you and leverage the names you provided for the virtual machines when you created them, or you can use Virtual Networking to bring your own DNS. Both work well, so it’s really a matter of selecting the right option. The primary constraint is that the Windows Azure provided name resolution will only work for virtual machines (be they IaaS machines or PaaS role instances) hosted in Windows Azure. If you need to provide name resolution between cloud and on-premises, you’re going to want to likely use your own DNS server.
The key here again is to not hardcode IP address. Pick the appropriate solution and let it do the work for you.
Load Balanced Servers
The next big task is how to load balance virtual machines in IaaS. For the most part, this isn’t really any different than how you’d do it for PaaS Cloud Services, create the VM, and “attach” it to an existing Virtual Machine (this places both virtual machines within the same cloud service). Then, as long as both machines are watching the same ports, the traffic will be balanced between the two by the Windows Azure Fabric.
If you’re using the portal to create the VM, you’ll need to make sure you use the “create from gallery” option and not quick create. Then as you progress through the wizard, you’ll hit the step where it asks you if you want to join the new virtual machine to an existing virtual machine or leave it as standalone.
Now once they are both part of the same cloud service, we simply edit the available endpoints. In the management portal, you’ll select a Virtual Machine, and either add or edit the endpoint using the tools menu across the bottom. Then you set the endpoint attributes manually (if it’s a new endpoint that’s not already load balanced), or choose to load balance it with a previously defined endpoint. Easy-peasy. J
High Availability
Now that we have load balanced endpoints, the next step is to make sure that if one of our load balanced virtual machines goes offline (say a host OS upgrade or hardware failure), that the service doesn’t become entirely unavailable. In Windows Azure Cloud Services, the Fabric would automatically distribute the running instances across multiple fault domains. To put it simply, fault domains try to help ensure that workloads are spread across multiple pieces of hardware, this way if there is a hardware failure on a ‘rack’, it won’t take down both machines. When working with IaaS, we still have this as an option but we need to tell the Azure Fabric that we want to take advantage of this by placing our virtual machines into an Availability Set so the Azure Fabric knows it should distribute them.
You configure a virtual machine that’s already deployed to join it to an Availability Set, or we can assign a new one to a set when we create/deploy it (providing we’re not using Quick Create which you hopefully aren’t anyways because you can’t place a quick create VM into an existing cloud service). Both options work equally well and we can create multiple Availability Sets within a Cloud Service.
Virtual Networks
So you might ask, this is all find and dandy if the virtual machines are deployed as part of a single cloud service. But I can’t combine PaaS and IaaS into a single cloud service, and I also can’t do direct machine addressing if the machine I’m connecting to exists in another cloud service, or even on-premises. So how do I fix that? The answer is Windows Azure Virtual Networks.
In Windows Azure, the Cloud Service is an isolation boundary, fronted by a gatekeeper layer that serves as a combination load balancer and NAT. The items inside the cloud service can address each other directly and any communication that comes in from outside of the cloud service boundary has to come through the gatekeeper. Think of the cloud service as a private network branch. This is good because it provides a certain level of network security, but bad in that we now have challenges if we’re trying to communication across the boundary.
Virtual Network allows you to join resources across cloud service boundaries, or by leveraging an on-premises VPN gateway to join cloud services and on-premises services. Acting as a bridge across the isolation boundaries and enabling direct addressability (providing there’s appropriate domain resolution) without the need to publically expose the individual servers/instances to the internet.
Bringing it all together
So if we bring this all together, we now have a way to create complex solutions that mix and match different compute resources (we cannot currently join things like Service Bus, Azure Storage, etc… via Virtual Network). One such example might be the following diagram…
A single Windows Azure Virtual Network that combines an on-premises server, a PaaS Cloud Service, and both singular and load balanced virtual machines. Now I can’t really speculate on where this could go next, but I think we have a fairly solid starting point for some exciting scenarios. And if we do for IaaS what we’ve done for the PaaS offering over the last few years… continuing to improve the tooling, expanding the feature set, and generally just make things more awesome, I think there’s a very bright future here.
But enough chest thumping/flag waving. Like many topics here, I created this to help me better understand these capabilities and hopefully some of you may benefit from it as well. If not, I’ll at least share with you a few links I found handy:
- Mike Washam – Windows Azure Virtual Machines
- MSDN – Windows Azure Name Resolution
- WindowsAzure.com – Load Balancing Virtual Machines
- WindowsAzure.com – Manage the Availability of Virtual Machines


<Return to section navigation list>
Live Windows Azure Apps, APIs, Tools and Test Harnesses
Amy Frampton described Combat in the Cloud: Game Designer Launches Global Online Game on Windows Azure in a 3/14/2013 post to the Windows Azure blog:
Successful Korean game designer Webzen faced a formidable task in determining the required capacity and performance of the IT infrastructure in preparation for the global launch of Arctic Combat, a competitive game which users around the globe can fight together with a feeling of patriotism and fellowship. To ensure that it could respond to user demands in a world where every second matters, the company decided to support the game with hybrid cloud services based on Windows Azure Cloud Services and the Windows Server operating system.
Because the popularity of games has ups and downs, it is difficult for online game companies, who usually offer their services through a network, to predict the required scalability of their servers. For this reason, service stability is just as important as the overall game quality and the fun of the game experience.
“When users’ gameplay is not reflected in real time because of service delays, they quickly lose interest in the game,” says Jihun Lee, Head of Global Publishing at Webzen. “The improved speed from the users’ point of view was the direct reason that we chose Windows Azure for global gaming services.”
Because the cloud-based infrastructure reduces lag to a virtually unnoticeable level, Arctic Combat players experience the competitive play and intense first-person shooter (FPS) combat without connection errors. “By offering speeds more than 2.5 times faster than a private server, Windows Azure assures players that the tension of the battlefield is not interrupted by technical issues,” says Lee. “As the Arctic Combat army grows, the service continues to be seamless, smooth, and fast.”
Even though the company has provided stable game services to users in 190 countries since opening its global game portal, webzen.com, in 2009, it had to work nimbly to expand servers and network bandwidth quickly enough to meet market needs—especially if there was a spike in a game’s popularity. To address this issue, Webzen designed a hybrid cloud system that provides Windows Azure public cloud services in regions where Microsoft hosts data center facilities, plus private cloud services in regions where those facilities are not available.
“The hybrid cloud model we used enabled us to choose between the private cloud and the public cloud for game servers depending on the region so we that we could provide gamers in each region with the best services,” says Lee. “Windows Azure was the best choice for our criteria. Other cloud services often have difficulty transferring resources between public cloud and a private cloud.”
To operate a private and public cloud as a single platform, the company optimized its game servers and operating platform architecture to ensure efficient functionality in a hybrid environment. “Online gaming is a synthetic art that requires many external services including caching, billing, user authentication, item shops, and profile services,” says Lee. “Transferring those services to the cloud environment involved installing and deploying them on virtual machines as well as linking systems with communication handling methods.”
On December 6, 2012, Webzen staged an open beta test for Arctic Combat, and then launched the game for the global market seven days later on December 13. The game makes it possible for a large number of players to simultaneously role-play and interact in a persistent world, and features dynamic combat scenes such as aerial and artillery fire support. “The tension of the gameplay can be maintained only if the online service is reliable,” says Lee. “With this hybrid cloud model, Arctic Combat users are reporting no lags."
Amy Frampton reported Cloud-Based Platform Leverages New Technologies to Transform In-Store Shopper Marketing in a 3/13/2013 post:
Initially funded in January 2009 and headquartered in Kirkland, Washington, VisibleBrands has introduced technology built on Windows Azure Cloud Services that turns retail into a plannable media channel, enables brands to electronically deliver coupons to the supermarket shelf-edge, and offers shoppers savings at the “moment of decision” as they browse the aisles. If a shopper accepts a coupon by touching the screen, it is “clipped to cloud” and automatically applied to the purchase at checkout. As part of the Azure series, we talked to Tim Morton, CEO and Cofounder of VisibleBrands, and Tim Belvin, CTO and Cofounder of VisibleBrands, about the startup’s offering and the impact of cloud services on the $300 billion dollar consumer packaged goods (CPG) U.S. marketplace.
Azure: How does the VisibleBrands solution work?
Morton: We use collaborative filtering and location-aware wireless networks to deliver the most relevant coupons to shoppers based on real-time analytics. We can optimize against a store’s demand ratios; that is, people who like this might like that, too. We also know, for example, where shoppers are dwelling in the store and whether they are on a quick trip or a stock-up. With these CPG-focused, data-driven insights, we can optimize campaigns to deliver the right offer at the right time to the right shopper. Advertisers get the opportunity to deliver the last impression to shoppers who vote with their feet. We provide a network capability that engages shoppers when and where it matters most: the moment of decision. That’s the key. We are guaranteed enormous traffic and participation on day one because the one thing everyone does is shop for food.
Azure: How does Windows Azure Cloud Services make it possible to deliver the VisibleBrands solution?
Morton: When we started, cloud capabilities—and the ability to manage big data—along with a number of other technologies including wireless indoor location, network management tools, ad serving, and collaborative filtering were really coming online. If you combine these advancements with other market drivers such as in-store marketing, a CPG coupon industry that hadn’t changed much in decades, retailers being squeezed by big boxes, and the fragmentation of advertising media, you have a tipping point. It became apparent to us that the industry was ripe for a makeover that leverages all of these technologies and brings it into the 21st century. And that’s what we’ve done. By putting web connected displays on the shelf-edge, we’re turning retailers into publishers so that brands can now begin a conversation with consumers online and complete the conversation with shoppers in the store, in the category where purchases are actually made. It is because those displays are connected to the cloud that it is possible for us to totally close the loop in terms of accountability and control and to do it in real time. Windows Azure is an enabling lynchpin for our solution.
Azure: You probably couldn’t do this without the cloud because you’d need an onsite server at every grocery store, right?
Morton: Exactly. We started out with onsite servers, but Microsoft changed the game. Windows Azure transforms our offering because we can efficiently deliver a scalable solution across multiple chains and thousands of stores, and manage that network centrally without the requirement to put a server in each store and manage it locally. Grocers typically operate at a 1.5 percent net profit and simply don’t have the budget or bandwidth to do this on their own. This is all possible because the cloud and other Microsoft technologies that help us manage our network are available. And the quality of service available from Microsoft rivals anything available.
Azure: Talk about the scalability of Windows Azure with the VisibleBrands solution.
Belvin: Let’s say we’re working with a large chain that has 1,000 stores. By using Windows Azure, we could start in March and have everything deployed by June. You can’t do that with standalone servers. Operationally, it would be impossible. The other great game changer with the cloud is that our solution is scalable in terms of data. For example, Kraft has 56 brand categories. With Windows Azure, we can provide a subscription-based data pipeline that can be scaled and partitioned so that a brand can quickly get a real-time, 24/7 understanding of campaign performance in terms of traffic, category, brand connections, sales, lift, and ROI. Instead of having to wait weeks or months for campaign analytics or in-store metrics, supermarkets and brands can have them instantly. And then they can adjust their merchandizing or their campaigns on the fly according to what the market is telling them.
Azure: What makes Windows Azure a cost-effective way to deploy the VisibleBrands solution in a retail environment?
Belvin: Grocers are very operationally focused and nearly all of the available space is used to sell groceries. That’s the business they’re in. It’s almost impossible to deploy all the software elements into a physical store in a way that integrates with existing loyalty and identity programs. We provide an ad-funded, platform-as-a-service offering, which completely changes the game of in-store promotion. Cloud technology radically transforms how new media capabilities are delivered efficiently and effectively and without the encumbrance of heavy up-front infrastructure expenses. And, by using Windows Azure, retailers can avoid outages and prepare for down time in advance. We’re talking about 30 minutes worth of work versus an entire month of planning.
Azure: How is the VisibleBrands solution localized to each store?
Morton: Our solution features predictive analysis and location services that are precisely tuned to each store. The underlying technology uses location-based wireless networks, and every site is supported by Microsoft System Center for network health monitoring and control. With Windows Azure, we can turn knobs and manage the network from a central location on a per unit basis—instead of trying to manage servers at every physical location separately. It’s one of those situations where a platform-as-a-service play is absolutely the most efficient approach, and it offers the greatest return for our customers. With a powerful cloud-based service backbone like Azure, there’s no longer the need to worry about redundant systems or failovers. Every store is effectively a node in a centralized system. It’s infinitely scalable, literally a one-click deployment. We believe it will become the new paradigm for delivering web-enabled digital media right down to the shelf in retail.

<Return to section navigation list>
Visual Studio LightSwitch and Entity Framework 4.1+
•• Heinrich Wendel described Designing for Multiple Form Factors in a 3/12/2013 post to the LightSwitch Team blog:
Creating applications that run on a variety of form factors has become a necessity in an environment where applications live in the cloud and people bring their own devices to work, commonly referred as BYOD (Bring Your Own Device). The range of devices was extended from desktops to smartphones and tablets as well. They have screen sizes from 3.5" over 10" to 24" and utilize different input methods, touch, pen, the traditional mouse or a combination of all of them. People expect that applications run smoothly on their own devices, and are less willing to make any compromises when it comes to usability than ever before. This blog post describes the approach we took to support this variety of devices for the new LightSwitch HTML Client.
Let's start with the one daunting question that people ask first: Which devices and browsers does LightSwitch support?
On the desktop LightSwitch supports IE10, IE9, latest Chrome, Firefox and Opera.
Devices supported by LightSwitch are Windows RT, Windows Phone 8, iPhone and iPad (iOS 5/6) and Android 4 (Android 2 is functional with some limitations). [Emphasis added.]
The challenges of the web
We faced a lot of different challenges when trying to deal with this variety of devices, challenges very common to web developers, but new to people coming from a native or managed world. The most obvious one is different screen sizes on different devices. But this is only a small part of it, you also have to take into account different input methods and the performance of the individual device. Last but not least, even though the underlying platform is HTML(5) and JavaScript in all cases, it is still a fairly new standard and the supported set of features still differs hugely between devices and browsers.
Input: Is the mouse and the keyboard dead? No, but they have been supplemented by newer input methods. The devices and desktop world might have started off from two different places, but they are slowly merging together, under one umbrella of modern applications. Gestures like swipe or tap are primarily used on phones and tablets. Still, the on-screen keyboard exists and you have to take it into account, it covers a large part of the screen when opened. On the larger end, monitors in the range of 20 - 27" have support for touch now. This requires a different set of controls which are large enough for fingers but work well with the mouse as well, e.g. you might want to use toggle switches instead of checkboxes. We tried to combine the best of both worlds.
Performance: A common logic seems to be that smaller devices are slower. This holds some truth, since they necessarily have a limited computing power and memory in order to provide a longer battery lifetime. But, they have smaller screens too, so the amount of pixels they render is smaller as well. There is an ongoing contest between browser vendors on who has the fastest JavaScript engine. Still, in some cases even simple pages and scripts will surface limitations with specific CSS configurations or JavaScript calls. At the end of the day we had to do intensive performance testing on a lot of different devices in order to deliver on our promise.
Features: When it comes to feature parity with one of the HTML standards, and I am not even talking about HTML5, there is big gap between different platforms. Layout handling, for example, has always been a challenge, but newer CSS3 proposals are not supported by a wide range of browsers yet. If you want to use all of the new HTML5 features, you might want to natively wrap your application using frameworks like PhoneGap. Apart from that we tried to hide this complexity from you, build on top of as many modern features as possible, while still supporting the mentioned variety of platforms.
Screens: Dealing with different screen sizes is not enough, you have to deal with different orientations as well, portrait or landscape. On top of those physical differences there are technical fineness's as well. Vendors are competing for the highest screen resolution, which results in different pixel densities. They also came up with proprietary ways of making legacy web content scale on smaller devices, sometimes making it harder to create optimized sites. Device pixels, screen pixels, CSS pixels, if your head is already smoking, QuirksMode gives an overview about all the details in the article "A tale of two viewports". If you don't care, great, because we did so that you don't have to worry about it.
The table below lists common screen resolutions for phones and tablets. You might want to keep them in mind when testing. The graphic illustrates the different sizes by stacking all those different devices on top of each other using both, portrait and landscape orientations. The smallest blue rectangle would be an iPhone 4, the largest green one a surface.
Phone (blue) Small Tablet (almond / orange) Tablet (red / green) 320x480, 320x568, 360x640, 400x640 480x800, 533x853, 600x1024 617x1097, 640x960, 700x1024, 768x1024, 768x1366, 800x1280
Different approaches to the problem
Supporting a wide variety of devices can be approached in two different ways. You can either try to build a single application that works on all platforms, or build individual apps per device. While the former necessarily comes with some limitations, the later comes with high implementation costs as well as a long time to market. Usually you would build native applications when going down the second route. Those applications can still leverage LightSwitch's OData middle-tier as Elizabeth has effectively shown in her blog post "Using LightSwitch OData Services in a Windows 8 Metro Style Application".
Individual Apps: Even if you go down the individual app route using web technology instead of using native code, the nature of HTML still forces a certain level of adaptability from your app. HTML is built on flexible layouts, relative instead of absolute definitions. Even inside of one device category, i.e. one platform the range of devices is huge. Let's take Android as an example and only focus on tablets, they start at 7" and go up to 11". Since this is fundamentally different from our Silverlight model it also required a certain level of rethinking on our side.
Single App: We are aware that supporting a wide variety of devices using a single implementation comes with its price, still we think we maintained the right balance here. All of our out of the box features work on the mentioned spectrum of devices and browsers. Depending on the complexity of your app it might still make sense to build a version specifically targeted at the phone form factor and another one targeted at tablets. We do not prevent you from building applications that are targeted to specific devices and leverage their features. We even support multiple applications as part of one LightSwitch application, I'll give an example for that later.
How we adapt to different form factors
Let's take a closer look at the specific features we implemented to adapt to different devices. This set of features is built-in for you, you get them for free. They are either provided by our underlying platform, jQueryMobile, or we implemented them on top of that. For those features we focused on two different form factors, the phone and the tablet, but we also made sure that applications work reasonably well on a lot of resolutions and screens which do not fall exactly into those categories.
Defaults: HTML and CSS use a very simple layout system which has been created for text markup, not for complex grid systems. By default every container (div) takes up 100% of the available width, but only as much height as it needs. We changed the defaults of all our controls to match this, StretchToContainer for the width and FitToContent for the height. We also removed absolute pixel definitions and replaced them by min and max sizes instead. This guarantees the widest possible browser support and makes it easier to flow the layout into multiple rows if it doesn't fit on the screen. We still support setting the height of a container to StretchToContainer in order to create multiple vertical scrollbars on a page. You should be aware that Android 2.x doesn't support this setting at runtime and will not show scrollbars at all. The following screenshot illustrates the new set of defaults for a view detail screen.
Media queries: CSS media queries allow you to specify style sheets that are specific to a screen resolution. After doing a lot of research around common screen resolutions we decided to settle on two different form factors and style sheets. Our default style is optimized around tablet devices. On top of that we add a few more styles to adapt to the phone. The most notable changes are font sizes, margins and paddings and icon sizes. The logo and splash screen will also automatically adapt. The phone style is also applied when running your application in Windows 8 snapped view and you can write your own specific styles in the user-customizations.css. The following screenshot shows the same application running twice on Windows 8, once in snapped view and once in the normal mode.
Text flow: What to do with text that exceeds the width of the screen? Wrap into multiple lines, cut it and show ellipsis or allow for scrolling? It depends, as it does so often. The default behavior we settled on is that tabs scroll horizontally, headlines, labels and content will only take on line and show ellipsis and normal content wraps into multiple lines. You can change this behavior by using the CSS properties overflow, text-overflow, word-wrap and white-space for individual controls using our PostRender callback. The following screenshot shows the behavior for our default browse and view details screens.
Dialogs: Whether a screen is shown as dialog or really covering the full screen is now only a matter of a simple checkbox at design time, as described in the previous blog post "A new User Experience". Besides the ability to reuse dialogs by calling them from multiple screens, this allows for another feature. On the phone form factor it doesn't matter whether you created a dialog or screen at design time, they will always be shown as full screens in order to maximize the usage of the available space, shown in the following screenshot.
Dynamic tile list: A tile list is nice on a wide screen, but how many columns fit on a smaller screen? Windows 8 solved that problem by introducing horizontal scrolling. Web applications scroll vertically by default, still you want the tiles to fill the available horizontal space. We adapt to Microsoft's modern application guidelines in general, but LightSwitch apps are cross-platform web applications and not native applications. People do not expect them to scroll horizontally. We solved that problem by introducing a new property Adjust Tile Width dynamically. Selecting this option will basically set the width of the tile list between one and two times the width you actually specified. You can see the result in the following screenshot:
Multiple columns: A tablet might have enough space to fit a two column layout, on the phone you got only space for one column though. Dialogs are smaller on the phone as well, the same logic applies. You might want to show one column instead of the default two columns on larger screens. In order to get that behavior we configured the two columns layout in the screen templates with a specific layout. Each row's width sizing mode is set to StretchToContainer with a min and max width. The exact width values are some magic numbers that we calculated for you based on the set of common screen resolutions. The combination of the sizing mode and those magic numbers allows for the specific behavior you can see in the screenshot below. Feel free to change the numbers, remove or add another column if the defaults do not fit your needs.
Header and footer: One of the new features has caused some confusion around our testers. As soon as people discover how this feature really works they love it though. We didn't even have to implement it on our own, jQueryMobile gave it to us for free. The feature I am talking about is dynamically showing and hiding the header and footer. Since headers and footers can cover a large amount of the available space, especially on smaller devices, they can be hidden. Tapping on an empty area of your screen will just hide them. Tap again and they will fade in again. If you are still confused, jQueryMobile also allows you to disable the tap interaction for certain controls by specifying tapToggleBlacklist, or altogether by adding data-tap-toggle='false' to your header and footer.
Implementing custom form factor specific behavior
In addition to those built-in features, you can also implement your own form factor specific behavior. I will show you how to start with small CSS customizations before creating two completely different screens for different form factors. We will use the familiar Northwind database again (http://services.odata.org/Northwind/Northwind.svc). Make sure your project is set-up to have a basic Northwind CRUD application running, as described in our previous blog post.
Form factor specific styles
The home screen of the Northwind app shows a tile list with all customers, like the first screenshot in this blog post. Each tile has three rows, the customer name, the company name and the company address. This looks really great on a tablet screen. On a phone it takes up too much space though. Probably some information can be hidden from this screen since the details screen will show all of them by clicking on one of the tiles. Let's hide the address in the phone form factor. This can be done by two easy steps.
Adding the CSS class: Select the address field in the screen designer. In the properties sheet click "Edit PostRender Code" which opens a code window. Add the following code:
myapp.BrowseCustomers.Address_postRender = function (element, contentItem) {
// Write code here.
$(element).addClass("hidden-on-phone");
};This decorates our DOM element with an additional CSS class named "hidden-on-phone". We will use this class in the second step to hide the content on smaller screens.
Defining the CSS style: Select "File View" from the solution explorer's toolbar. This will show the underlying project structure of your solution. We will not go into the details of all files for now. The important file you should be looking for is "user-customizations.css", it lives in the "Content" folder of your client project. This file is the central place for all your CSS customizations. This file and "default.htm" are the only ones that we will not override on updates, e.g. from CTP4 to RTM. We already added an empty media-query on the bottom of the file for you. This is the same media query that we use internally to adapt to different form factors. Inside this media query add the following code:
.hidden-on-phone {
display: none;
}That's it, the screenshot illustrates the few changes we made:
Testing your changes
You can get a good overview about how things looks on different devices by just F5ing the app in your favorite browser and playing around with the window size. If you want to emulate a specific screen size, Internet Explorer provides a very handy feature for you. Open the Development Tools (F12) and select Tools -> Resize (1). This will open a dialog where you can define a specific screen size, e.g. 320x480 for the iPhone 4 (2). Clicking Resize will apply those settings to the currently opened Browse window (3). You can see that on the large screen the address is shown (background), on the small one it is hidden now (foreground).
Different home screens
Let's take it a step further and assume that your application is a bit more sophisticated and you need specific layouts for different form factors. We provide you with a hook in our default.htm to redirect to different home screens based on custom JavaScript logic.
Let's add a second home screen to browse our customer data and name it "BrowseCustomersSmall". For now we will just stick with the default values the screen template gives us. Open the "File View" in the solution explorer and look for "default.htm" in your client project. At the bottom of the file you'll find a script tag that calls msls._run(), without any parameter. You can specify the screen you actually want to run by adding a simple string parameter to it.
Replace the existing code snippet in default.htm with the following one. It uses the media query that you are already familiar with. Instead of using it from CSS we will execute it in JavaScript this time. Based on whether the media query applies or not the home screen will be set to either "BrowseCustomersSmall" or "BrowseCustomers":
<script type="text/javascript">
$(document).ready(function () {
if ($.mobile.media("screen and (max-width: 400px) and (orientation: portrait), \
screen and (max-width: 640px) and (max-height: 400px) and (orientation: landscape)")) {
var screen = "BrowseCustomersSmall";
} else {
var screen = "BrowseCustomers";
}
msls._run(screen)
.then(null, function failure(error) {
alert(error);
});
});
</script>F5 the application again and try different screen sizes. This time you have to make sure that you reload the application in order to really see the difference shown in the following screenshot:
Wrapping it up
I’ve got two final tips for you that helped us designing apps that run on different form factors.
First, start small. Start with the smallest set of features that you think you need. Then, if you increase the screen size, think about what additional features would make sense. Do not try to overload your app with features, the more features you have, the harder it will be to make it work across different devices. The Windows 8 user experience guidelines have a good introduction describing this method.
Finally: test, test, test. I recommend testing on different browsers. Internet Explorer is used by Surface and Windows Phones. iPad and iPhone and Android all share the same underlying rendering engine, WebKit. iOS devices are closer to Safari and Android closer to Chrome (*surprise*). But at the end of the day nothing replaces testing on the actual devices.
As always, use the forums and comments to ask questions and provide us with feedback, and stay tuned for more blog posts.


Beth Massi (@bethmassi) posted her Trip Report: TechDays Netherlands 2013 on 4/14/2013:
Last week I had the pleasure of speaking at TechDays in The Hague, Netherlands. It was my fourth time speaking there and as always the show does not disappoint! Held at the World Forum, the venue is big, bright and flashy. Check out the session recordings as they become available on Channel 9.
I had three talks this year, and it was GREAT timing as we just released the latest preview of LightSwitch version 3 which includes HTML client and SharePoint 2013 support. If you missed it, check out my post: Getting Started with LightSwitch in Visual Studio 2012 Update 2 CTP4
Building Modern Business Applications for SharePoint 2013 with Visual Studio LightSwitch
My first session was held in a large theater and I’d guess there were about 60-70 people in the audience. About 60% of them were SharePoint developers. Almost everyone had heard of LightSwitch but there were still about a quarter of the audience that had not seen it before. This was the first time I presented LightSwitch to SharePoint devs and all I can say is WOW what a warm reception LightSwitch received! All the SharePoint developers seemed to be very impressed with the ease of development.
We started the discussion with the SharePoint hosting models and the new apps architecture. Then I showed some demos around building a mobile app hosted in SharePoint -- similar to the lessons you learn in the LightSwitch SharePoint Tutorial like:
- Enabling SharePoint in your LightSwitch projects
- Attaching to SharePoint Lists in your data model
- Creating virtual relationships between SQL data and SharePoint data
- Manipulating SharePoint lists via the standard LightSwitch entity model
- Writing business rules that interact with SharePoint assets via CSOM
- Authentication & Authorization
- Working with Office 365 Exchange services
- Deployment to Office 365
I think this turned out to be my best session of the week. To learn more about building SharePoint apps with LightSwitch see:
- Get Started Building SharePoint Apps in Minutes with LightSwitch
- A quick & easy LightSwitch app for SharePoint
- Sending Email from a LightSwitch SharePoint App using Exchange Online
- LightSwitch Apps for SharePoint
- LightSwitch SharePoint Tutorial
And stay tuned to the LightSwitch Team Blog for a lot more content rolling out in the coming weeks!
Building Mobile Business Applications with Visual Studio LightSwitch
This session focused on the HTML Client where we build a mobile application that extends a desktop application and then deploy it to Azure. It was in a smaller room but it was pretty full, probably 50 or so people. Again most people had heard of LightSwitch but a lot had never tried it. (I always love a challenge! he heee)
I showed the design experience particularly around the screens and all the things you can do to provide a tailored user experience without writing code. Then I moved into how LightSwitch provides hooks in the client for you to write your own HTML/JavaScript just where you need it in order to use custom controls, special UI logic, etc – similar to the lessons you learn in LightSwitch HTML Client Tutorial like:
- Building a mobile companion to a desktop client against the same middle-tier (reusable data model, rules, permissions)
- Seeing how LightSwitch handles scaling screens for multiple form factors & async loading of data automatically
- Learning how you can reuse dialogs and screens for viewing/editing data
- Showing how to filter/find data and providing a good mobile experience
- Integration with NuGet & customizing HTML/JavaScript client code for
- Custom Databinding
- Custom controls
- Conditional theming
- Modifying the look-and-feel using standard CSS
- Deployment to Azure
This session also went well. There were some gasps of joy when I showed the scaling LightSwitch does for you (apparently that’s hard to do if you have to do it yourself ;-)). I also had a lot of great comments about how much customization you could do with LightSwitch -- but only if you needed it. I like to say, LightSwitch does the boring stuff for you so you can concentrate on the fun stuff/business value. To learn more see:
- A New User Experience
- Designing for Multiple Form Factors
- Custom Controls and Data Binding in the LightSwitch HTML Client
- New LightSwitch HTML Client APIs
- LightSwitch HTML Client Tutorial
Building REST-full Data Cloud Services using LightSwitch
This session is more advanced and really focuses on the LightSwitch services layer / middle-tier. Almost all of the talk is around what was released in LightSwitch version 2, which is part of Visual Studio 2012 RTM. This was in a HUGE room (looked more like a dance club) so it was hard to tell how many folks were in there, maybe 80.
Unfortunately not only was the internet being picky, my jet lag kicked in full force and I messed up a demo at the end. Luckily I always have a “done” backup I can walk through if needed, and boy I needed it. In the end I felt bad but people came up and told me I had a good recovery. Whew.
We went through a lot of stuff that we’ve talked about on the blogs before like:
- Creating and Consuming LightSwitch OData Services
- Enhance Your LightSwitch Applications with OData
- LightSwitch Architecture: OData
- Filtering Data using Entity Set Filters
- Publishing LightSwitch Apps to Azure with Visual Studio 2012
I also showed a bit of new stuff coming in the next version that lets you tap into the LightSwitch server context in order to create your own service endpoints. I showed how you can use WebAPI to provide aggregated data (using LINQ against the LightSwitch server context) to a custom chart control on the client. This allows you to create reporting dashboards over LightSwitch data. Joe introduced those concepts here:
Stay tuned to the LightSwitch Team Blog for a more information on how to create dashboards as well as a lot more information on how to get the most out of the next version of LightSwitch.
FUN STUFF
You don’t travel all the way to Europe without having a little bit of fun ;-). This year I had the pleasure of meeting up with TWO LightSwitch community rock stars, Jan van der Haegen and Paul van Bladel. They travelled three hours from Belgium to meet me and geek out about LightSwitch. Man I thought I had a lot of energy but these guys, especially Jan, are insanely hyper (in a good way!!) and super passionate about LightSwitch. We headed out to dinner with some other folks including Gil Cleeren to the same place we went to eat last year. I think we’ll be making a LightSwitch tradition out of this!
Thanks for all you do to help the community, it was great seeing you in person my friends!


Return to section navigation list>
Windows Azure Infrastructure and DevOps
•• Mike Neil reported Windows Azure Root Certificate Migration in a 3/15/2013 message to all Windows Azure subscribers and this post to the Windows Azure blog of the same date:
As part of our ongoing commitment to security we are making a change to our SSL certificate chain that will require a small number of customers to take action before April 15, 2013. Windows Azure currently uses the GTE CyberTrust Global Root and beginning on April 15th, 2013 will migrate to the Baltimore CyberTrust Root. The new root certificate uses a stronger key length and hashing algorithm which ensures we remain consistent with industry-wide security best practices. If your application does not accept certificates chained to both the GTE CyberTrust Global Root and the Baltimore CyberTrust Root, please take action prior to April 15, 2013 to avoid certificate validation errors. While we seek to minimize the need for customers to take specific action based on changes we make to the Windows Azure platform, we believe this is an important security improvement. The Baltimore CyberTrust Root can be downloaded from https://cacert.omniroot.com/bc2025.crt.
To learn more about our commitment to security in Windows Azure please visit our Trust Center. For more information on the April 15, 2013 root certificate migration please see the details below.
Background
The Windows Azure platform APIs and management portal are exposed to customers over the SSL and TLS protocols, which are secured by certificates. For example, when you visit the Windows Azure Management Portal (https://manage.windowsazure.com), the “lock” icon in your browser lets you know that you are visiting the legitimate website – not the website of an impostor. The same mechanism protects all of our SSL-based services such as Windows Azure Storage and Service Bus.
Applications that call these services implement their own certificate validation checks – the equivalent of the test that your browser uses to verify the certificate before showing the “lock” icon. The details of these checks vary per application. These checks often include validation of the root certificate in the certificate chain against a trusted root list. Currently, Windows Azure uses SSL/TLS certificates that chain to the GTE CyberTrust Global Root. For example, at the time of this writing, the following certificate chain secures the Windows Azure Management Portal:
What is Changing?
All of the SSL/TLS certificates exposed by the Windows Azure platform are being migrated to new chains rooted by the Baltimore CyberTrust Root. We are making this change to stay up to date with industry-wide security best practices for trusted root certificates. The new root certificate uses a stronger key length and hashing algorithm. The migration process will begin on April 15, 2013 and take several months for all services to complete the migration. We expect to continue to use the Baltimore CyberTrust Root for the foreseeable future, however, as part of our commitment to security we will continue to make changes as industry security standards and threat mitigations evolve.
Customer Impact
The Baltimore CyberTrust Root is widely trusted by a number of operating systems including Windows, Windows Phone, Android and iOS, and by browsers such as Internet Explorer, Safari, Chrome, Firefox, and Opera. We expect that the vast majority of customers will not experience any issues due to this change. However, some customers may experience certificate validation failures if their custom applications do not include the Baltimore CyberTrust Root in their trusted root lists. Customers with such applications must modify these applications to accept both the Baltimore CyberTrust Root and the GTE CyberTrust Global Root. We advise our customers to make this change no later than April 15, 2013, as the majority of Windows Azure platform services will begin the migration process on that date. Customers who do not have the Baltimore CyberTrust root in their trusted root lists and do not take the prescribed action will receive certificate validation errors, which may impact the availability of their services.
As a best practice, we recommend that our customers do not hard-code trusted root lists for certificate validation. Instead, we recommend using policy-based root certificate validation that can be updated as industry standards or certificate authorities change. For many customers, the default trusted root list provided as part of your operating system or browser distribution is a reasonable mechanism. In other cases, more restrictive organization-wide policies may be implemented to meet regulatory or compliance requirements.
Additional Information
If you have questions about this change, please post a comment on this forum and we’ll respond as quickly as possible.
For reference, the following is a full dump of the Baltimore CyberTrust Root certificate, generated using certutil.exe -dump:
X509 Certificate:
Version: 3
Serial Number: 020000b9
Signature Algorithm:
Algorithm ObjectId: 1.2.840.113549.1.1.5 sha1RSA
Algorithm Parameters:
05 00
Issuer:
CN=Baltimore CyberTrust Root
OU=CyberTrust
O=Baltimore
C=IE
Name Hash(sha1): c12f4576ed1559ecb05dba89bf9d8078e523d413
Name Hash(md5): 918ad43a9475f78bb5243de886d8103c
NotBefore: 5/12/2000 10:46 AM
NotAfter: 5/12/2025 3:59 PM
Subject:
CN=Baltimore CyberTrust Root
OU=CyberTrust
O=Baltimore
C=IE
Name Hash(sha1): c12f4576ed1559ecb05dba89bf9d8078e523d413
Name Hash(md5): 918ad43a9475f78bb5243de886d8103c
Public Key Algorithm:
Algorithm ObjectId: 1.2.840.113549.1.1.1 RSA
Algorithm Parameters:
05 00
Public Key Length: 2048 bits
Public Key: UnusedBits = 0
0000 30 82 01 0a 02 82 01 01 00 a3 04 bb 22 ab 98 3d
0010 57 e8 26 72 9a b5 79 d4 29 e2 e1 e8 95 80 b1 b0
0020 e3 5b 8e 2b 29 9a 64 df a1 5d ed b0 09 05 6d db
0030 28 2e ce 62 a2 62 fe b4 88 da 12 eb 38 eb 21 9d
0040 c0 41 2b 01 52 7b 88 77 d3 1c 8f c7 ba b9 88 b5
0050 6a 09 e7 73 e8 11 40 a7 d1 cc ca 62 8d 2d e5 8f
0060 0b a6 50 d2 a8 50 c3 28 ea f5 ab 25 87 8a 9a 96
0070 1c a9 67 b8 3f 0c d5 f7 f9 52 13 2f c2 1b d5 70
0080 70 f0 8f c0 12 ca 06 cb 9a e1 d9 ca 33 7a 77 d6
0090 f8 ec b9 f1 68 44 42 48 13 d2 c0 c2 a4 ae 5e 60
00a0 fe b6 a6 05 fc b4 dd 07 59 02 d4 59 18 98 63 f5
00b0 a5 63 e0 90 0c 7d 5d b2 06 7a f3 85 ea eb d4 03
00c0 ae 5e 84 3e 5f ff 15 ed 69 bc f9 39 36 72 75 cf
00d0 77 52 4d f3 c9 90 2c b9 3d e5 c9 23 53 3f 1f 24
00e0 98 21 5c 07 99 29 bd c6 3a ec e7 6e 86 3a 6b 97
00f0 74 63 33 bd 68 18 31 f0 78 8d 76 bf fc 9e 8e 5d
0100 2a 86 a7 4d 90 dc 27 1a 39 02 03 01 00 01
Certificate Extensions: 3
2.5.29.14: Flags = 0, Length = 16
Subject Key Identifier
e5 9d 59 30 82 47 58 cc ac fa 08 54 36 86 7b 3a b5 04 4d f0
2.5.29.19: Flags = 1(Critical), Length = 8
Basic Constraints
Subject Type=CA
Path Length Constraint=3
2.5.29.15: Flags = 1(Critical), Length = 4
Key Usage
Certificate Signing, Off-line CRL Signing, CRL Signing (06)
Signature Algorithm:
Algorithm ObjectId: 1.2.840.113549.1.1.5 sha1RSA
Algorithm Parameters:
05 00
Signature: UnusedBits=0
0000 a9 39 63 ea 42 24 c3 19 1d 81 e7 fc d5 3c ee b5
0010 1e 6a 32 dc 81 fe d0 2e 38 d2 47 d2 32 b5 1d bb
0020 5d 01 2c 44 47 cf 62 9e 8e fc f5 0f 65 a7 3d 33
0030 d0 7a 94 30 3e af 90 ab 35 7e ee 11 10 e9 dd 18
0040 8e ab 02 32 9a 8d 16 e3 e2 c2 92 73 88 50 f2 b7
0050 1b bb 2e 9f f2 f0 ce b7 1f e6 64 bd 63 1a 6b 6d
0060 70 fd 6d 4b 14 08 4e 9e a4 c8 2e 7c 9e c8 b5 9e
0070 9d f5 5e 3c e3 82 45 a3 f7 99 12 f4 2a a0 bf 18
0080 7a 31 a9 d5 04 39 37 52 f8 b4 02 c0 0f a3 11 65
0090 be 7f fd 05 b8 85 79 c0 84 5c 16 ff 70 7f 1a 48
00a0 07 5e 75 be ee 74 01 b3 d2 4c 8e 31 68 dd ed 4f
00b0 11 37 c6 38 7e a3 cc ec 4f 40 86 8d 25 0c e9 d6
00c0 7c 30 bc c5 bd 0a d5 17 8a 12 6a 61 04 bd 70 61
00d0 d4 a4 58 f9 0a 10 b8 23 13 19 f6 76 3f 79 b6 29
00e0 29 da eb 17 10 a4 e3 30 d7 2d fd 64 f7 bd 03 84
00f0 25 27 4f bb dd a0 05 42 68 51 6f e4 8e 5d 0c 85
Signature matches Public Key
Root Certificate: Subject matches Issuer
Key Id Hash(rfc-sha1): e5 9d 59 30 82 47 58 cc ac fa 08 54
36 86 7b 3a b5 04 4d f0
Key Id Hash(sha1): 30 a4 e6 4f de 76 8a fc ed 5a 90 84
28 30 46 79 2c 29 15 70
Key Id Hash(md5): 68 cb 42 b0 35 ea 77 3e 52 ef 50 ec
f5 0e c5 29
Key Id Hash(sha256): a6 7f e2 a9 af 96 7c b5 bf fd c9 eb
da 8f 1a b5 ea bc a2 54 f1 03 96 52
77 fd 4b a3 3e 27 a1 87
Cert Hash(md5): ac b6 94 a5 9c 17 e0 d7 91 52 9b b1
97 06 a6 e4
Cert Hash(sha1): d4 de 20 d0 5e 66 fc 53 fe 1a 50 88
2c 78 db 28 52 ca e4 74
Cert Hash(sha256): 16 af 57 a9 f6 76 b0 ab 12 60 95 aa
5e ba de f2 2a b3 11 19 d6 44 ac 95
cd 4b 93 db f3 f2 6a eb
Signature Hash: ce 0e 65 8a a3 e8 47 e4 67 a1 47 b3
04 91 91 09 3d 05 5e 6f

Barb Darrow (@gigabarb) summarized Who’s the biggest cloud of all? The numbers are in as “Synergy Research ranked the top Iaas, PaaS and CDN providers by revenue for the fourth quarter; some of the findings might surprise you” for GigaOm’s Cloud Computing blog on 3/11/2013:
And the winner is … Amazon, at least among Infrastructure as a Service (IaaS) providers, by a very wide margin in the fourth quarter of 2012, according to new numbers from Synergy Research Group. Synergy ranked IBM second and somewhat surprisingly — to me anyway — British Telecom ranked third worldwide.
Overall revenue from IaaS and Platform as a Service (PaaS) made up just 15 percent of the overall cloud infrastructure market, although they were the fastest growing categories. That’s hardly a surprise given the cash funneled into these arenas, not only by Amazon but by Rackspace, HP, IBM, Red Hat, and all the telcos.
According to a post by Telegeography, a Synergy partner and the company behind all the cool fiber pipeline maps:
“In the past year, IaaS and PaaS revenues increased 55% and 57%, respectively. Amazon dominates the IaaS segment, accounting for 36% of revenues, and is quickly approaching PaaS leader Salesforce’s 19% market share. Although well behind Akamai and Level 3 in theCDN/ADN segment, Amazon holds the number three spot with a 7% market share.”
Rackspace, because of its roots as opposed to its budding OpenStack cloud business, leads the managed hosting segment, followed by Verizon and NTT. Across all segments, Amazon is the market leader in North America and NTT leads in Asia. Europe, the Middle East and Africa or EMEA is a battle ground hotly contested by France Telecom-Orange, British Telecom, and Deutsche Telekom.
Content Delivery Network (CDN) leader Akamai remains at the front of the pack in that category, followed by Level3 and Amazon.
Numbers like these are fascinating snapshots of what will doubtless be a changing market. I was surprised to see Amazon so strong in PaaS — it was ranked second after Salesforce.com. Amazon’s Elastic Beanstalk PaaS just doesn’t seem to have that much traction — but definitions of PaaS vary and the array of higher-level services that Amazon offers atop its IaaS foundation (but aren’t considered Elastic Beanstalk) could be considered PaaS-like. Salesforce.com’s PaaS tally presumably includes both Force.com and Heroku.
Related research
Subscriber Content: Subscriber Content comes from GigaOM Pro, a revolutionary approach to market research without the high price tag. Visit any of our reports to subscribe.


Full disclosure: I’m a registered GigaOm analyst.
Mike McKeown (@nwoekcm) explained HOW TO: Manage Deployments and Upgrades on Windows Azure in a 3/7/2011 post to the Aditi Technologies blog (missed when posted):
Managing deployments and updates to Windows Azure applications is a very similar process as to how it is done for on-premise applications. You can upgrade your application on every server all at once.
Windows Azure offers the concept of a “VIP-swap” where you can deploy or update your Azure application in one shot. Or you can do it incrementally with custom-defined granularity across groups of Azure servers.
Azure provides the concept Update Domains to help you manage this process of updating your application in a sequential manner. The option you choose is based upon your business and application requirements for system availability to users as well as your tolerance for having more than one version of your application available to users during the upgrade process.
A common thread of discussion facing IT Ops personnel new to Windows Azure are:
- How to manage application changes with respect to deployment, updates, and down times?
- How does one update a service when only some parts of its configuration need to change?
- What about down time and do I need to take my whole application down to update just a part of it?
- Can I update it incrementally over the range of servers?
- Do I deploy an application directly into user circulation within an environment or can I verify base functionality before making it public?
Answers to this question are complex even if you are managing all your servers yourself on-premise. On the Azure Cloud, it can get even more confusing. The deployment issues revolve around a few key Azure concepts – VIP swaps, deletion/redeploy of a service, service updates, and update domains.
Download this whitepaper for an in-depth guide on how to manage application changes with respect to deployment, updates, and down times on Windows Azure.


No significant articles today
<Return to section navigation list>
Windows Azure Platform Appliance (WAPA), Hyper-V and Private/Hybrid Clouds
No significant articles today
<Return to section navigation list>
Cloud Security, Compliance and Governance
• David Linthicum (@DavidLinthicum) asserted “We must address the issue of when and how your cloud data can be seized by police and government agents” in a deck for this The ticking time bomb known as cloud forensics article of 3/15/2013 for InfoWorld’s Cloud Computing blog:
We've seen the news reports with carloads of FBI agents, windbreakers and all, rushing into a business to seize paper records and servers. The evidence is analyzed later to prove a crime using computer forensics. However, the more likely use of computer forensics will be requirements around lawsuits: accounting records, emails, transaction data, and so on, all used to tell a story that will benefit either the plaintiff or the defense.
The problem comes when we move data to the public clouds. How do we deal with legal issues, such as lawsuits and law enforcement? For the most part, organizations moving to the cloud have not even considered this issue.
Indeed, according to Network World, "Any business that anticipates using cloud-based services should be asking the question: What can my cloud provider do for me in terms of providing digital forensics data in the event of any legal dispute, civil or criminal case, cyber attack, or data breach?"
The reality is that each cloud provider takes a different approach to cloud forensics. Although some have polices and procedures around warrants showing up at the data center door, including data retention policies, other cloud providers have not yet begun to think through this issue.
The technology issues they need to consider include how to hand over just the data required, what to do if there is missing data, and how to deal with encryption. Moreover, what if the cloud provider is in a foreign country and not subject to U.S. laws? You've heard of offshore accounts to avoid legal issues; perhaps we'll hear of offshore clouds as well.
Some of these issues are being considered in the Cloud Forensics Working Group at the National Institute of Standards and Technology (NIST). It is looking at the requirements around cloud forensics, and it'll make suggestions regarding best practices.
I suspect we'll really begin to understand this issue after a few well-publicized court cases where data in the cloud turned out to be the smoking gun or, in some instances, where cloud providers either lost the data or were incapable of producing it on demand. No matter what, the issue will make for interesting legal discussions.

IAMAL, but it’s plaintiffs’ attorneys, prosecuting attorneys and judges who determine “the issue of when and how your cloud data can be seized by police and government agents.”

<Return to section navigation list>
Cloud Computing Events
• Rocky Lhotka is the conference chair for the Modern Apps Live! Conference taking place 3/26 through 3/28/2013 at the MGM Grand Hotel & Casino in Las Vegas, NV:
The Future of Software Development
From the same minds that brought you Visual Studio Live! comes a new kind of educational technology conference: Modern Apps Live!.
Co-located with Visual Studio Live! Las Vegas, Modern Apps Live! is a 3-day event, presented in partnership with Magenic, that brings Development Managers, Software Architects and Development Leads together to learn the latest and greatest techniques in low-cost, high-value application development.
What sets Modern Apps Live! apart is the singular topic focus; sessions build on each other as the conference progresses, leaving you with a holistic understanding of modern applications.
Session Topics Will Include:
- Building applications successfully and at a low cost
- Application Lifecycle Management (ALM)
- Application Best Practices
- Tools for Development and Testing
Key platform technologies (Azure, Windows 8, Visual Studio, SQL Server 2012, etc.)
Attendees of Modern Apps Live! will also have full access to sessions at Visual Studio Live! Las Vegas, an event for .NET developers, software architects and designers that focuses on Microsoft platform technologies.
The conference team is hard at work creating the best agenda and speaker lineup possible – make sure you check back here for programming updates!

Full disclosure: I’m a contributing editor for 1105 Media’s Visual Studio Magazine. 1105 Media is the producer of the Modern Apps Live! and Visual Studio Live! conferences.
<Return to section navigation list>
Other Cloud Computing Platforms and Services
‡ Jeremy Geelan (@jg21) asserted “848 days after registering @GoogleCloud, there's not yet been a single tweet: but that may all be about to change” in a deck for his "@GoogleCloud Hasn't Tweeted Yet" – But It Surely Will Very Soon! to Ulitzer.com:
On 19 November 2010, according to this useful research tool, the account @GoogleCloud was registered with Twitter. 848 days later it has yet to tweet. But that may be about to change...
With only 32 followers (including @jg21!) to date, the account is certainly very dormant. As the page currently says: "@GoogleCloud hasn't tweeted yet." But that won't, I suspect, be the case for much longer. because Google is now the proud owner of Talaria Technologies [@TalariaTech], a very recent (2011) infrastructure start-up that has now joined forces with Google's Cloud Platform team.
This is the state of the @GoogleCloud Twitter account as of this writing.
But stay tuned!On its website main page, Talaria now has just a simple announcement, titled: "Talaria is now a part of Google!"
It says:"We'd like to thank those people that helped us get here. Our investors and advisors that stood behind us, both in good times and bad. Our beta customers that pushed us, kicked the tires, and warmly invited us into their organizations. And finally, our friends and family that have gotten less attention and time than they deserve while we've been busy."
The Google Cloud Platform – on which Google claims that 1 million applications already run – allows users to build applications and websites, as well as to store and analyze data on Google’s infrastructure.
The Google Cloud Platform product manager is William Vambenepe [@vambenepe], who joined Google in 2012 from Oracle. "Welcome to my new Google Cloud colleagues!" he tweeted, on his personal Twitter page, to the Talaria team. Before very long however, I suspect that we may find Vambenepe and/or his team tweeting over on @GoogleCloud instead.
Vambenepe's own Cloud pedigree is impeccable. Before Oracle, where he was an architect for five years, he was at HP for nearly a decade, rising to Distinguished Technologist, just one step off the much sought-after rank of HP Fellow.
The Google Cloud Platform, before Talaria's web application server is layered in, comprises five main elements:Google Sr. Developer Advocate Arun Nagarajan will be giving a session in June at 12th Cloud Expo | Cloud Expo New York, entitled "How to Use Google Apps Script". Full details here.


• Sebastian Stadil (@sebastianstadil) explained By the numbers: How Google Compute Engine stacks up to Amazon EC2 in a 3/15/2013 post to GigaOm’s Cloud blog:
At Scalr, we’ve been happy customers of Amazon’s infrastructure service, EC2, since 2007. In fact, we’ve built our tools for EC2 because we saw an opportunity to leverage its flexibility to help AWS customers easily design and manage resilient services. But as competitors spring up, we always test them to see how they compare, especially in regards to io performance.
On a warm June day in San Francisco, the Scalr team attended Google I/O 2012. Google was rumored to be launching a EC2 competitor, which we were interested in for our multi-cloud management software. It launched. And boy did it sound good. You see, EC2 and GCE offer pretty much the same core service, but Amazon has been plagued by poor network and disk performance, so Google’s promise to offer both higher and more consistent performance struck a real chord.
Not ones to be fooled by marketing-driven, hyped-up software, we applied for early access and were let in so we could start testing it ourselves. Once we got in, we felt like kids in a candy store. Google Compute Engine is not just fast. It’s Google fast. In fact, it’s a class of fast that enables new service architectures entirely. Here are the results from our tests, along with explanations of how GCE and EC2 differ, as well as comments and use cases.
A note about our data: The benchmarks run to collect the data presented here were taken twice a day, over four days, then averaged. When a high variance was observed, we took note of it and present it here as intervals for which 80 percent of observed data points fall into.
API
First off, GCE’s API is beautifully simple, explicit and easy to work with. Just take a look at it. Their firewalls are called “firewalls,” vlans are “networks,” and kernels are “kernels” (AKIs, anyone?). Anyone familiar with Unix will feel right at home.
Fast boot
Second, VMs are deployed and started with impressive speed (and we’ve extensively used 10 clouds). It routinely takes less than 30 seconds to login as root after making the insert call to launch a VM. As a reference point, this is the amount of time it takes AWS to get to the running state, after which you still need to wait for the OS to boot, for a total of 120 seconds on a good day, and 300 on a bad one (data points taken from us-east-1).
Boot times are measured in seconds.
We don’t know what sort of sorcery Google does here, but they clearly demonstrate engineering prowess. That’s 4-10x faster.
Volumes
Those of you familiar with Amazon’s EBS volumes know that you can attach and detach volumes to any instance, anytime. On GCE, you can’t (at least not yet). This precludes you from switching drives to minimize downtime: attaching a volume on a running server allows you to skip the boot and configure stages of bringing a new node up, which is useful when promoting an existing mysql slave to master and you just need to swap out storage devices.
While GCE’s “disks” (as they call them) have that one disadvantage, they offer some unique advantages over Amazon volumes. For example, disks can be mounted read-only on multiple instances, which makes for more convenient fileserving than object stores, especially for software such as WordPress (see disclosure) or Drupal that expect a local filesystem. Disks are really fast too, and don’t seem to have the variable performance that plagued EBS before the introduction of Provisioned IOPS. See for yourself in the following benchmarks.
As you can see, GCE and EC2 are equivalent on reads, but GCE is 2-4x faster on writes.
Read/write speeds are measured in MB/s. Higher numbers mean faster throughput.
Network
A short note about multi-cloud. I’m talking here about services that span multiple clouds, such as replicating a database from us-east-1 to us-west-1, for disaster recovery or latency-lowering purposes, not the multi-cloud management capabilities widely used in the enterprise. I believe that first kind of multi-cloud is a myth driven by the industry’s less tech-savvy folks. I’ve seen too many people attempt it unsuccessfully to recommend it: what usually happens is the slave database falls behind on the master, with an ever-increasing inconsistency window, because the load on the master exceeds the meager bandwidth available between master and slave. Our friends at Continuent are doing great work with Tungsten to accelerate that, but still.
Google’s network is so fast, however, that this kind of multi-cloud might just be possible. To illustrate the difference in speeds, we ran a bandwidth benchmark in which we copied a single, 500 Mb file between two regions. It took 242 seconds on AWS at an average speed of 15 Mbit/s, and 15 seconds on GCE with an average speed of 300Mbit/s. GCE came out 20x faster.
Higher bandwidth is better and means faster up and downlinks.
After being so very much impressed, we made a latency benchmark between the same regions. We got an average of 20ms for GCE and 86ms for AWS. GCE came out 4x faster.
Lower latency is better and means shorter wait times.
This might allow new architectures, and high-load replicated databases might just become possible. Put a slave in different regions of the US (and if/when GCE goes international, why not different regions of the world?) to dramatically speed up SaaS applications for read performance.
Of course, unless Amazon and Google work together to enable Direct Connect, bandwidth from GCE to EC2 will still be slow. I also hear that Amazon is working on creating a private backbone between regions to enable the same use cases, which would be an expected smart move from them.
Multi-region images
We’re not quite sure why AWS doesn’t support this, but images on GCE are multi-region (“multi-zone” in their terms), that is to say when you snapshot an instance into an image, you can immediately launch new instances from that image in any region. This makes disaster recovery that much easier and makes their scheduled region maintenance (which occurs a couple of times a year) less of a problem. On that note, I’d also like to add that it forces people to plan their infrastructure to be multi-region, similar to what AWS did for instance failure by making local disk storage ephemeral.
So should you switch?
AWS offers an extremely comprehensive cloud service, with everything from DNS to database. Google does not. This makes building applications on AWS easier, since you have bigger building blocks. So if you don’t mind locking yourself into a vendor, you’ll be more productive on AWS.
But that said, with Google Compute Engine, AWS has a formidable new competitor in the public cloud space, and we’ll likely be moving some of Scalr’s production workloads from our hybrid aws-rackspace-softlayer setup to it when it leaves beta. There’s a strong technical case for migrating heavy workloads to GCE, and I’ll be grabbing popcorn to eagerly watch as the battle unfolds between the giants.
Sebastian Stadil is the founder of Scalr, a simple, powerful cloud management suite, and SVCCG, the world’s largest cloud computing user group. When not working on cloud, Sebastian enjoys making sushi and playing rugby.
Note: Data scientists from LinkedIn, Continuuity, Quantcast and NASA will talk about their hardware and software stacks at our “guru panel” at Structure:Data next week, March 20-21, in New York City.
Disclosure: Automattic, maker of WordPress.com, is backed by True Ventures, a venture capital firm that is an investor in the parent company of this blog, GigaOM. Om Malik, founder of GigaOM, is also a venture partner at True.
Full Disclosure: I’m a GigaOm registered analyst.


• Charles Babcock (@babcockcw) asked “VMware announces Hybrid Cloud Services unit. Does that mean VMware IaaS, competing directly with Amazon, or continued reliance on partners?” in a deck to his Will VMware Challenge Amazon Head On? article of 3/14/2013 for InformationWeek.com:
VMware told Wall Street analysts Wednesday that it is launching an approach to hybrid cloud computing that will enable its customers to use their VMware-based data center environments in conjunction with infrastructure-as-a-service providers in the public cloud.
In VMware's view, its virtualization management console will be the command post for both sets of workloads and will allow movement out to the cloud and back again. Before such a situation can become a reality, however, VMware must move further down the road to virtualized networks that act as an integral part of a software-defined data center.
A key building block for that, VMware CEO Pat Gelsinger said in an analyst briefing Wednesday, will be the Nicira Network Virtualization Platform, an OpenFlow-based approach to networking that VMware obtained with its $1.26 billion acquisition of startup Nicira last year. Nicira NVP will become VMware NSX as it's combined with VMware's vCloud Network and Security product line. The move will get VMware out of a proprietary rut of managing primarily VMware resources and give it a neutral networking platform from which it can deal with Red Hat KVM, open source Xen and Microsoft's Hyper-V, which are starting to occupy more of the data center.
VMware's vision for the future is that when a network fits the needs of a virtual machine, it can be assigned to the VM as the VM is created. In the future data center, that network will follow the VM around as it's moved from point to point, much as storage does in the current VMware vSphere environment. Security specifications will have to move the same way.
By virtualizing the network, NSX "will allow customers to accelerate application deployment, lower both capital and operational costs, and transform network operations," said a company statement on the launch of NSX. It will also bring closer the day of hybrid operations, where part of the enterprise software runs internally and another part runs on a public infrastructure provider. Management techniques such as vMotion, where a running virtual machine is transplanted from one location to another without interrupting users, are in a pre-cloud stage today. But they could work across clouds in the future.
VMware's vCloud Hybrid Service will launch in the second quarter. It will allow customers "to reap the benefits of the public cloud without changing their existing applications while using a common management, orchestration, networking and security model," the VMware announcement said Wednesday.
Meanwhile, a debate broke out over whether VMware's statements mean it will launch its own public cloud service in the second quarter or continue to work with a broad set of partners who run their own public cloud data centers. Cloud expert James Staten, a Forrester Research analyst, explained it this way: vCloud Hybrid Service equals "VMware's public cloud service -- yep, a full public IaaS cloud meant to compete with AWS, IBM SmartCloud and HP Cloud, Rackspace. (It) won't be fully unveiled until Q2 2013, so much of the details about the service remain under wraps."
CRN, a sister publication to InformationWeek, and others interpreted the announcements as a sign of VMware's intent to plunge into infrastructure as a service based on its own software with its own data centers. But VMware maintained it will make vCloud Hybrid Service available "through its existing channel, working with its extensive partner ecosystem."
Thus far, VMware's own statements have stopped short of announcing such a service direct from VMware.
The dilemma for VMware is that Amazon is driving public cloud pricing down as VMware tries to bring up an extensive network of vCloud Director suppliers. It has primary suppliers, such as Dell, CSC and Bluelock in the U.S. and Colt in Europe, plus a long list of 175 regional suppliers." But in many instances, customers are not viewing them as the same bargain basement service provider that they find with Amazon, or for that matter, Rackspace, Google or Microsoft.
Gelsinger's recent urging of the ecosystem to take up arms against the growing presence of Amazon struck many observers as a sense of heightened competition. …


Read more: Page 2: Where Do VMware Partners Fit In?![]()
• Jeff Barr (@jeffbarr) reported Amazon RDS Scales Up - Provision 3 TB and 30,000 IOPS Per DB Instance on 3/13/2013:
The Amazon Relational Database Service (RDS) handles all of the messy low-level aspects of setting up, managing, and scaling MySQL, Oracle Database, and SQL Server databases. You can simply create an RDS DB instance with the desired processing power and storage space and RDS will take care of the rest.
The RDS Provisioned IOPS feature (see my recent blog post for more information) gives you the power to specify the desired number of I/O operations per second when you create each DB instance. This allows you to set up instances with the desired level of performance while keeping your costs as low as possible.
Today we are introducing three new features to make Amazon RDS even more powerful and more scalable:
- Up to 3 TB of storage and 30,000 Provisioned IOPS.
- Conversion from Standard Storage to Provisioned IOPS storage.
- Independent scaling of IOPS and storage.
Let's take an in-depth look at each of these new features.
Up to 3 TB of Storage and 30,000 Provisioned IOPS
We are tripling the amount of storage that you can provision for each DB instance, and we're also tripling the number of IOPS for good measure.You can now create DB instances (MySQL or Oracle) with up to 3 TB of storage (the previous limit was 1 TB) and 30,000 IOPS (previously, 10,000). SQL Server DB Instances can be created with up to 1TB of storage and 10,000 IOPS.
For a workload with 50% reads and 50% writes running on an m2.4xlarge instance, you can realize up to 25,000 IOPS for Oracle and 12,500 IOPS for MySQL. However, by provisioning up to 30,000 IOPS, you may be able to achieve lower latency and higher throughput. Your actual realized IOPS may vary from what you have provisioned based on your database workload, instance type, and choice of database engine. Refer to the Factors That Affect Realized IOPS section of the Amazon RDS User Guide to learn more.
Obviously, you can work with larger datasets, and you can read and write the data faster than before. You might want to start thinking about scaling PIOPS up and down over time in response to seasonal variations in load. You could also use a CloudWatch alarm to make sure that you are the first to know
You can modify the storage of existing instances that are running MySQL or Oracle Database. When you do this you can grow storage by 10% or more, and you can raise and lower PIOPS in units of 1,000. There will be a performance impact while the scaling process is underway.
Conversion from Standard Storage to Provisioned IOPS Storage
You can convert DB instances with Standard Storage to Provisioned IOPS in order to gain the benefits of fast and predictable performance. You can do this from the AWS Management Console, the command line, or through the RDS APIs. Simply Modify the instance and specify the desired number of PIOPS.There will be a brief impact on availability when the modification process starts. If you are running a Multi-AZ deployment of RDS, the availability impact will be limited to the amount of time needed for the failover to complete (typically three minutes). The conversion may take several hours to complete and there may be a moderate performance degradation during this time.
Note: This feature is applicable to DB instances running MySQL or Oracle Database.
Independent Scaling of IOPS and Storage
You can now scale Provisioned IOPS and storage independently. In general, you will want to have between 3.0 and 10.0 IOPS per GB of storage. You can modify the ratio over time as your needs change.Again, this feature is applicable to DB instances running MySQL or Oracle Database.
Available Now
All three of these features are available now, and they are available in every AWS Region where Provisioned IOPS are supported (all Regions except AWS GovCloud (US)).You can use these features in conjunction with RDS Multi-AZ deployments and RDS Read Replicas.


• Jeff Barr (@jeffbarr) reported Amazon RDS - SQL Server Major Version Upgrade on 3/13/2013:
The Amazon Relational Database Service (RDS) takes care of the low-level drudgery associated with setting up, managing, and scaling a relational database. With support for multiple versions of MySQL, Oracle Database, and Microsoft SQL Server, RDS can be used in a wide variety of appliations.
Without RDS, upgrading to a new version of your chosen database engine can be a complex and time-consuming exercise. You need to find extra servers and storage to do a test upgrade, create and verify backups, test all of your applications, and then upgrade the production database.
We added SQL Server 2012 support to RDS late last year. Today we are introducing a new feature to allow you to perform an in-place upgrade of your SQL Server 2008 R2 database instances to SQL Server 2012 with just a few clicks.
To upgrade, select the target database instance in the AWS Management Console and initiate a Modify operation. Choose the SQL Server 2012 engine and click on Continue:
The upgrade is not reversible, so make sure that this is what you want to do:
There will be some downtime while the new database engine is installed. RDS will automatically take snapshots before the upgrade starts and after it completes.
After you have upgraded, you can take advantage of a number of new SQL Server 2012 features including contained databases, columnstore indexes, sequence objects, and user-defined roles.
It is always advisable to test your applications before upgrading to a new major version of a database. Amazon RDS makes that process easy. You can create a snapshot of the existing database instance (the one running SQL Server 2008 R2 in this case), create a new database running SQL Server 2012, and run your tests without having to buy any hardware.
As always, this feature is available now and you can start using it today!


• Jeff Barr (@jeffbarr) described Cross Region EC2 AMI Copy on 3/12/2013:
We know that you want to build applications that span AWS Regions and we're working to provide you with the services and features needed to do so. We started out by launching the EBS Snapshot Copy feature late last year. This feature gave you the ability to copy a snapshot from Region to Region with just a couple of clicks. In addition, last month we made a significant reduction (26% to 83%) in the cost of transferring data between AWS Regions, making it less expensive to operate in more than one AWS region.
Today we are introducing a new feature: Amazon Machine Image (AMI) Copy. AMI Copy enables you to easily copy your Amazon Machine Images between AWS Regions. AMI Copy helps enable several key scenarios including:
- Simple and Consistent Multi-Region Deployment - You can copy an AMI from one region to another, enabling you to easily launch consistent instances based on the same AMI into different regions.
- Scalability - You can more easily design and build world-scale applications that meet the needs of your users, regardless of their location.
- Performance - You can increase performance by distributing your application and locating critical components of your application in closer proximity to your users. You can also take advantage of region-specific features such as instance types or other AWS services.
- Even Higher Availability - You can design and deploy applications across AWS regions, to increase availability.
Console Tour
You can initiate copies from the AWS Management Console , the command line tools, the EC2 API or the AWS SDKs. Let's walk through the process of copying an AMI using the Console.From the AMIs view of the AWS Management console select the AMI and click on Copy:
Choose the Copy AMI operation and the Console will ask you where you would like to copy the AMI:
After you have made your selections and started the copy you will be provided with the ID of the new AMI in the destination region:
Once the new AMI is in an Available state the copy is complete.
A Few Important Notes
Here are a few things to keep in mind about this new feature:
- You can copy any AMI that you own, EBS or instance store (S3) backed, and with any operating system.
- The copying process doesn't copy permissions or tags so you'll need to make other arrangements to bring them over to the destination region.
- The copy process will result in a separate and new AMI in the destination region which will have a unique AMI ID.
- The copy process will update the Amazon RAM Image and Amazon Kernel Image references to point to equivalent images in the destination region.
- You can copy the same AMI to multiple regions simultaneously.
- The console-based interface is “push-based”; you log in to the source region and select where you'd like the AMI to end up. The API and the command line are, by contrast, are “pull-based” and you must run them against the destination region and specify the source region.


Amazon keeps generating grist for their IaaS marketing mill.
• Werner Vogels (@werner) sounded off about Elastic Beanstalk a la Node on 3/11/2013:
I spent a lot of time talking to AWS developers, many working in the gaming and mobile space, and most of them have been finding Node.js well suited for their web applications. With its asynchronous, event-driven programming model, Node.js allows these developers to handle a large number of concurrent connections with low latencies. These developers typically use EC2 instances combined with one of our database services to create web services used for data retrievals or to create dynamic mobile interfaces.
Today, AWS Elastic Beanstalk just added support for Node.js to help developers easily deploy and manage these web applications on AWS. Elastic Beanstalk automates the provisioning, monitoring, and configuration of many underlying AWS resources such as Elastic Load Balancing, Auto Scaling, and EC2. Elastic Beanstalk also provides automation to deploy your application, rotate your logs, and customize your EC2 instances. To get started, visit the AWS Elastic Beanstalk Developer Guide.
Two years, lots of progress, and more to come…
Almost two years ago, we launched Elastic Beanstalk to help developers deploy and manage web applications on AWS. The team has made significant progress and continues to iterate at a phenomenal rate.
Elastic Beanstalk now supports Java, PHP, Python, Ruby, Node.js, and .NET. You can deploy and manage your applications in any AWS region (except for GovCloud). Many tools are available for you to deploy and manage your application, just choose your favorite flavor. If you’re building Java applications, you can use the AWS Toolkit for Eclipse. If you’re building .NET applications, you can use the AWS Toolkit for Visual Studio. If you prefer to work in a terminal, you can use a command line tool called ‘eb’ along with Git. Partners like eXoCloud IDE also offer integration with Elastic Beanstalk.
Elastic Beanstalk seamlessly connects your application to an RDS database, secures your application inside a VPC, and allows you to integrate with any AWS resource using a new mechanism called configuration files. Simply put, Elastic Beanstalk is highly customizable to meet the needs of your applications.
Who is using Elastic Beanstalk?
Companies of all sizes are using Elastic Beanstalk. Intuit for example uses Elastic Beanstalk for a mobile application backend called txtweb. Peel uses Elastic Beanstalk to host a real-time web service that interacts with DynamoDB.
The one commonality for all these customers is the time savings and the productivity increase that they get when using Elastic Beanstalk. Elastic Beanstalk helps them focus on their applications, on scaling their applications, and on meeting tight deadlines. Productivity gains don’t always mean that you merely deliver things faster. Sometimes with increased productivity, you can also do more with less.
The Elastic Beanstalk team helped me get some data around how small teams can build large scale applications. One company with less than 10 employees runs a mobile backend on Elastic Beanstalk that handles an average of 17,000 requests per second and peak traffic of more than 20,000 requests per second. The company drove the project from development to delivery in less than 2 weeks. It’s very impressive to see the innovation and scale that Elastic Beanstalk can provide even for small teams.


Derrick Harris (@derrickharris) asserted Google BigQuery is now even bigger in a 3/14/2013 post to GigaOm’s Cloud blog:
Google might be upsetting a lot of people with some of its recent “spring cleaning” decisions, but its latest batch of updates to BigQuery should make data analysts happy, at least.
With the latest updates — announced in a blog post by BigQuery Product Manager Ku-kay Kwek on Thursday — users can now join large tables, import and query timestamped data, and aggregate large collections of distinct values. It’s hardly the equivalent of Google launching Compute Engine last summer, but as (arguably) the inspiration for the SQL-on-Hadoop trend that’s sweeping the big data world right now, every improvement to BigQuery is notable.
BigQuery is a cloud service that lets users analyze terabyte-sized data sets using SQL-like queries. It’s based on Google’s Dremel querying system, which can analyze data right where it’s located (i.e., in the Google File System or BigTable) and which Google uses internally to analyze a variety of different data sets. Google claims queries in BigQuery run at interactive speeds, which is something that MapReduce — the previous-generation tool for dealing with such large data sets — simply couldn’t handle within a reasonable time frame or level of complexity. Of course, if you want to schedule batch jobs, BigQuery lets you do that, too, for a lower price.
This constraint — and therefore the potential benefits of something like Dremel and its commercial incarnation, BigQuery — wasn’t lost on the Hadoop community, which itself had been largely reliant on MapReduce processing for years. In the past year, we’ve seen numerous startups and large vendors pushing their own Dremel-like (or MPP-like) technologies for data sitting in the Hadoop Distributed File System. If you happen to be in New York next week, you can hear some of the pioneers in this space talk about it at our Structure: Data conference.
Background aside, the ability to join large data sets in BigQuery is probably the most-important of the three new functions. Joins are an essential aspect of data analysis in most environments because pieces of data that are relevant to each other don’t always reside within the same table or even within the same cluster. And joining tables of the size BigQuery is designed for can take a long time without the right query engine in place.
How to do a join in BigQuery
Kwek offers an anecdote from Google that shows why joins, and the new aggregation function, are important:
[W]hen our App Engine team needed to reconcile app billing and usage information, Big JOIN allowed the team to merge 2TB of usage data with 10GB of configuration data in 60 seconds. Big Group Aggregations enabled them to immediately segment those results by customer. Using the integrated Tableau client the team was able to quickly visualize and detect some unexpected trends.
Related research and analysis from GigaOM Pro:
Subscriber content. Sign up for a free trial.


Full disclosure: I’m a registered GigaOm analyst.
Jeff Barr (@jeffbarr) announced DynamoDB - Price Reduction and New Reserved Capacity Model on 3/7/2013 (missed when published):
We're making Amazon DynamoDB an even better value today, with a price reduction and a new reserved capacity pricing model.
Behind the scenes, we've worked hard to make this happen. We have fine-tuned our storage and our processing model, optimized our replication pipeline, and taken advantage of our scale to drive down our hardware costs.
You get all of the benefits of DynamoDB - redundant, SSD-backed storage, high availabilty, and the ability to quickly and easily create tables that can scale to handle trillions of requests per year. To learn more about how we did this, check out Werner's post.
DynamoDB Price Reduction
We are reducing the prices for Provisioned Throughput Capacity (reads and writes) by 35% and Indexed Storage by 75% in all AWS Regions. Here's a handy chart:


This reduction takes effect on March 1, 2013 and will be applied automatically.
DynamoDB Reserved Capacity
If you are able to predict your need for DynamoDB read and write throughput within a given AWS Region, you can save even more money with our new Reserved Capacity pricing model.You can now buy DynamoDB Reserved Capacity. If you need at least 5,000 read or write capacity units over a one or three year time period you can now enjoy savings that range from 54% to 77% when computed using the newly reduced On-Demand pricing described in the previous section. The net reduction with respect to the original pricing works out to be 85%.
If you purchase DynamoDB Reserved Capacity for a particular AWS Region, it will apply to all of your DynamoDB tables in the Region. For example, if you have a read-heavy application, you might purchase 20,000 read capacity units and 10,000 write capacity units. Once you have done this, you can use that capacity to provision tables as desired, for the duration of the reservation.
To purchase DynamoDB Reserved Capacity, go to the DynamoDB console, fill out the Reserved Capacity form (click on the button labeled "Purchase Reserved Capacity"), and we'll take care of the rest. Later this year we'll simplify the purchasing process, add additional Reserved Capacity options, and give you the ability to make purchases using tools and APIs.
DynamoDB Resources
If you would like to learn more about DynamoDB, you can watch the following sessions from AWS re:Invent:
- DAT 101: Understanding AWS Database Options
- DAT 102: Introduction to Amazon DynamoDB
- DAT 302: Under the Covers of Amazon DynamoDB
- MBL 301: Data Persistence to Amazon DynamoDB for Mobile Applications
I have been applying updates to my DynamoDB Libraries, Mappers, and Mock Implementations post as I become aware of them. Send updates to me (awseditor@amazon.com) and I'll take care of the rest.
DynamoDB and Redshift
Amazon Redshift is a fast, fully managed, petabyte-scale data warehouse service. You might want to start thinking about interesting ways to combine the two services. You could use DynamoDB to store incoming data as it arrives at "wire" speed, do some filtering and processing, and then copy it over to Redshift for warehousing and deep analytics.You can copy an entire DynamoDB table into Redshift with a single command:
copy favoritemovies FROM 'dynamodb://my-favorite-movies-table'
credentials 'aws_access_key_id=;aws_secret_access_key='
readratio 50;Read the Redshift article Loading Data from an Amazon DynamoDB Table to learn more.
Werner Vogels (@werner) riffed on DynamoDB One Year Later: Bigger, Better, and 85% Cheaper… on 3/7/2013 (missed when published):
Time passes very quickly around here and I hadn’t realized until recently that over a year has gone by since we launched DynamoDB. As I sat down with the DynamoDB team to review our progress over the last year, I realized that DynamoDB had surpassed even my own expectations for how easily applications could achieve massive scale and high availability with DynamoDB. Many of our customers have, with the click of a button, created DynamoDB deployments in a matter of minutes that are able to serve trillions of database requests per year.
I’ve written about it before, but I continue to be impressed by Shazam’s use of DynamoDB, which is an extreme example of how DynamoDB’s fast and easy scalability can be quickly applied to building high scale applications. Shazam’s mobile app was integrated with Super Bowl ads, which allowed advertisers to run highly interactive advertising campaigns during the event. Shazam needed to handle an enormous increase in traffic for the duration of the Super Bowl and used DynamoDB as part of their architecture. After working with DynamoDB for only three days, they had already managed to go from the design phase to a fully production-ready deployment that could handle the biggest advertising event of the year.
In the year since DynamoDB launched, we have seen widespread adoption by customers building everything from e-commerce platforms, real-time advertising exchanges, mobile applications, Super Bowl advertising campaigns, Facebook applications, and online games. This rapid adoption has allowed us to benefit from the scale economies inherent in our architecture. We have also reduced our underlying costs through significant technical innovations from our engineering team. I’m thrilled that we're are able to pass along these cost savings to our customers in the form of significantly lower prices - as much as 85% lower than before.
The details of our price drop are as follows:
Throughput costs: We are dropping our provisioned throughput costs for both read requests and write requests by 35%. We are also introducing a Reserved Capacity model that offers customers discounted pricing if they reserve read and write capacity for one or three years. For customers reserving capacity for three years, the price of throughput will drop from today’s prices by 85%. For customers reserving capacity for one year, the price of throughput will drop from today’s prices by 70%. For more details on reserved capacity, please read the DynamoDB FAQs.
Indexed Storage costs: We are lowering the price of indexed storage by 75%. For example, in our US East (N. Virginia) Region, the price of data storage will drop from $1 per GB per month to $0.25. All data items continue to be stored on Solid State Drives (SSDs) and are automatically replicated across multiple distinct Availability Zones to provide very high durability and availability.
How are we able to do this?
DynamoDB runs on a fleet of SSD-backed storage servers that are specifically designed to support DynamoDB. This allows us to tune both our hardware and our software to ensure that the end-to-end service is both cost-efficient and highly performant. We’ve been working hard over the past year to improve storage density and bring down the costs of our underlying hardware platform. We have also made significant improvements to our software by optimizing our storage engine, replication system and various other internal components. The DynamoDB team has a mandate to keep finding ways to reduce the cost and I am glad to see them delivering in a big way. DynamoDB has also benefited from its rapid growth, which allows us to take advantage of economies of scale. As with our other services, as we’ve made advancements that allow us to reduce our costs, we are happy to pass the savings along to you.
When is it appropriate to use DynamoDB?
I am often asked: When is it appropriate to use DynamoDB instead of a relational database?
We used relational databases when designing the Amazon.com ecommerce platform many years ago. As Amazon’s business grew from being a startup in the mid-1990s to a global multi-billion-dollar business, we came to realize the scaling limitations of relational databases. A number of high profile outages at the height of the 2004 holiday shopping season can be traced back to scaling relational database technologies beyond their capabilities. In response, we began to develop a collection of storage and database technologies to address the demanding scalability and reliability requirements of the Amazon.com ecommerce platform. This was the genesis of NoSQL databases like Dynamo at Amazon. From our own experience designing and operating a highly available, highly scalable ecommerce platform, we have come to realize that relational databases should only be used when an application really needs the complex query, table join and transaction capabilities of a full-blown relational database. In all other cases, when such relational features are not needed, a NoSQL database service like DynamoDB offers a simpler, more available, more scalable and ultimately a lower cost solution.
We now believe that when it comes to selecting a database, no single database technology – not even one as widely used and popular as a relational database like Oracle, Microsoft SQL Server or MySQL - will meet all database needs. A combination of NoSQL and relational database may better service the needs of a complex application. Today, DynamoDB has become very widely used within Amazon and is used every place where we don’t need the power and flexibility of relational databases like Oracle or MySQL. As a result, we have seen enormous cost savings, on the order of 50% to 90%, while achieving higher availability and scalability as our internal teams have moved many of their workloads onto DynamoDB.
So, what should you do when you’re building a new application and looking for the right database option? My recommendation is as follows: Start by looking at DynamoDB and see if that meets your needs. If it does, you will benefit from its scalability, availability, resilience, low cost, and minimal operational overhead. If a subset of your database workload requires features specific to relational databases, then I recommend moving that portion of your workload into a relational database engine like those supported by Amazon RDS. In the end, you’ll probably end up using a mix of database options, but you will be using the right tool for the right job in your application.


<Return to section navigation list>


0 comments:
Post a Comment