Windows Azure and Cloud Computing Posts for 10/14/2013+
Top Stories This Week:
- Scott Guthrie (@scottgu) announced general availability of the Windows Azure Pack for free download in the Windows Azure Virtual Machines, Virtual Networks, Web Sites, Connect, RDP and CDN section below.
- Steven Martin (@stevemar_msft) posted Announcing Availability of Windows Server 2012 R2 in Azure Image Gallery & Reduced Instance Pricing for Windows Azure on 10/18/2013 in the Windows Azure Virtual Machines, Virtual Networks, Web Sites, Connect, RDP and CDN section below.
- Scott Guthrie (@scottgu) posted Announcing the Release of Visual Studio 2013 and Great Improvements to ASP.NET and Entity Framework on 10/17/2013 in the Windows Azure Infrastructure and DevOps section below.
- Vittorio Bertocci (@vibronet) described ADAL, Windows Azure AD and Multi-Resource Refresh Tokens in the Windows Azure Access Control, Active Directory, and Identity section below
- Carlos Figueira (@carlos_figueira) described Azure Mobile Services QuickStart for WPF in the Windows Azure SQL Database, Federations and Reporting, Mobile Services section below.
| A compendium of Windows Azure, Service Bus, BizTalk Services, Access Control, Caching, SQL Azure Database, and other cloud-computing articles. |
•• Updated 10/19/2013 with new articles marked ••.
‡ Updated 10/18/2013 with new articles marked ‡.
• Updated 10/17/2013 with new articles marked •.
Note: This post is updated weekly or more frequently, depending on the availability of new articles in the following sections:
- Windows Azure Blob, Drive, Table, Queue, HDInsight and Media Services
- Windows Azure SQL Database, Federations and Reporting, Mobile Services
- Windows Azure Marketplace DataMarket, Power BI, Big Data and OData
- Windows Azure Service Bus, BizTalk Services and Workflow
- Windows Azure Access Control, Active Directory, and Identity
- Windows Azure Virtual Machines, Virtual Networks, Web Sites, Connect, RDP and CDN
- Windows Azure Cloud Services, Caching, APIs, Tools and Test Harnesses
- Windows Azure Infrastructure and DevOps
- Windows Azure Pack, Hosting, Hyper-V and Private/Hybrid Clouds
- Visual Studio LightSwitch and Entity Framework v4+
- Cloud Security, Compliance and Governance
- Cloud Computing Events
- Other Cloud Computing Platforms and Services
Windows Azure Blob, Drive, Table, Queue, HDInsight and Media Services
<Return to section navigation list>
• Andrew Brust (@andrewbrust) reported “Apache Software Foundation announces general availability of watershed Big Data release” in a summary of his Hadoop 2.0 goes GA article of 10/16/2013 for ZDNet’s Big Data blog:
The latest open source version of Apache Hadoop, the iconic parallel, distributed, Big Data technology is finally ready to roll.
This version of Hadoop includes the addition of YARN (sometimes called MapReduce 2.0 or MRv2) to the engine. YARN, a typically-silly open source acronym for "yet another resource negotiator" factors out the management components of Hadoop 1.0's MapReduce engine from the MapReduce processing algorithm itself. The MapReduce algorithm is still there, but it is now effectively a plug-in to YARN that can be swapped out for other processing algorithms, including those that run interactively, rather than using a batch mode of operation.
Some major distributions of Hadoop, such as Cloudera's Distribution including Apache Hadoop (CDH) already included YARN, but were in fact using what the Apache Software Foundation considered pre-release code. But YARN and Hadoop 2.0 are pre-release no more.
Arun C. Murthy, the release manager of Apache Hadoop 2.0 and Founder of Hortonworks, had this to say: "Hadoop 2 marks a major evolution of the open source project that has been built collectively by passionate and dedicated developers and committers in the Apache community who are committed to bringing greater usability and stability to the data platform."
Just yesterday, the Apache Hive project also released a new version (0.12.0), for full compatibility with Hadoop 2.0. Hive, which allows for SQL queries against data in Hadoop, is currently based on the MapReduce algorithm. But now that Hadoop 2.0 is fully released, look for a corresponding production release of Apache Tez (incubating) and Hortonworks' Stinger Initiative (projects on which Murthy also provides leadership), which extend Hive to use YARN for direct SQL querying of Hadoop data, bypassing the MapReduce algorithm completely.
It's not all about YARN though. Hadoop 2.0 also sports the following features:
- High Availability for Apache Hadoop HDFS (the Hadoop Distributed File System)
- Federation for Apache Hadoop HDFS for significant scale compared to Apache Hadoop 1.x.
- Binary Compatibility for existing Apache Hadoop MapReduce applications built for Apache Hadoop 1.x.
- Support for Microsoft Windows.
- Snapshots for data in Apache Hadoop HDFS.
- NFS-v3 Access for Apache Hadoop HDFS.
That's not a bad manifest. Honestly, this is a very exciting day in the world of Big Data, as Hadoop will morph into more of a general-purpose Big Data operating platform and less of a rigid tool that must be programmed directly.
And, hey, MapReduce, don't let the door hit your butt on the way out!


Here’s hoping HDInsight Services for Windows Azure gain Hadoop 2.0 features quickly.
Brian O’Donnell explained Setting up a Recommendation Engine (Mahout) on Windows Azure in a 10/15/2013 post:
A Brief Background
In my previous posts I have walked through setting up Hadoop on Windows Azure using HDInsight. Hadoop is an extremely powerful distributed computing platform with the ability to process terabytes of data. Many of the situations when you hear the term “Big Data”, Hadoop is the enabler. One of the complications with “Big Data” is how to purpose it. After all, what is the point of having terabytes worth of data and not being able to use it. One of the most practical uses is to generate recommendations. The amount of data needed to generate good recommendations can not be understated. To process all of that data you need a distributed computing platform (Hadoop) and algorithms to generate the recommendations (Mahout). Mahout is much more than simply a recommendation engine. Apart from recommendations one of my favorite features is frequent itemset mining. Itemset mining is evaluation of sets of item groups that may have high correlation. Have you ever shopped on Amazon? Towards the middle of a product page Amazon will tell you what items are frequently purchased together. That is what Mahout’s itemset mining is capable of.
Installing Mahout on your HDInsight Cluster
There are a couple things we will need to do to install Mahout.
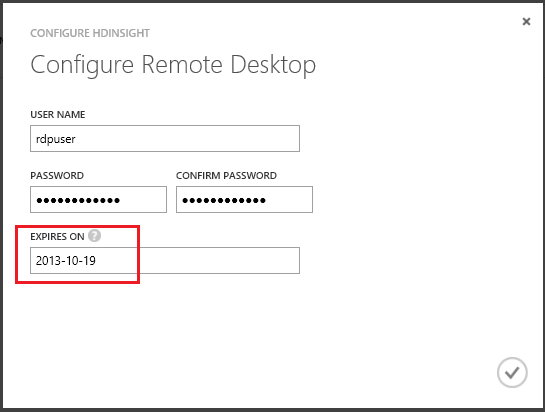
- Enable Remote Desktop on the head node of your cluster
- To enable RDP on your cluster select “Configuration” and at the bottom of your screen select “Enable Remote Desktop”

- Enter in a new username and password for the account. You must also specify a length of time that the RDP user is valid for. The maximum time is 7 days.
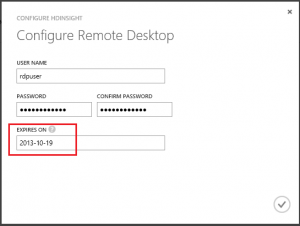
- Note: While enabling RDP is a nice feature it does not come without its frustrations. The RDP user you create is not an administrator on the server, it is a standard user. There is also no way to authenticate as an administrator. So you will have to deal with things like IE being in Security Enhanced mode and not being able to use Server Manager.
- Login to your cluster via RDP and download the latest version of Mahout
- Go to the Mahout download site to get the latest version.
- If you click on System Requirements you will see that Mahout has Java as a prerequisite. Not to worry, Hadoop is also Java dependent so there is no need to install Java on your system.
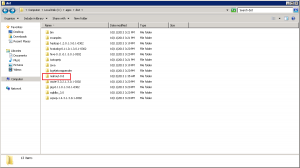
- Extract the Mahout zip file. Rename the extracted folder to mahout-0.8 and copy it to the ‘C:\apps\dist’ folder.
That’s it! Mahout is installed on your cluster! Now lets run a sample Mahout job on your Hadoop cluster.
Running a Mahout recommendation job
The job we will run is from the GroupLens 1,000,000 movie ratings data set. Every data consumption mechanism has a data format that is necessary for proper import. Mahout is no exception. For recommendations, data must be put in a CSV file consisting of three sections; userid, itemid, rating. While still connected to your HDInsight cluster download the data set and extract the contents into a folder (any folder will do but take note where you are extracting it to). Note: To skip the data conversion and download pre-converted files click here.
The files we are interested in are ratings.dat and users.dat. The data files are not formatted for Mahout but can be easily converted. Here is a utility that will convert the data for you. Extract the zip file and examine the structure. If you are unfamiliar with compiling and running a program using Visual Studio, I recommend downloading the pre-converted files above.
Note: Due to the Enhanced Security of IE running on your head node, you may need to download the files locally and copy/paste them to your head node through Remote Desktop
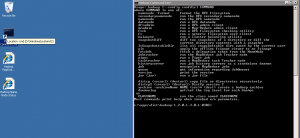
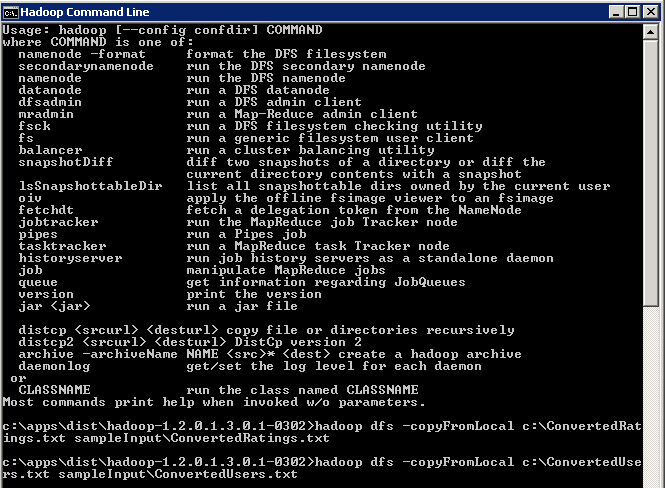
Now that the data is formatted for Mahout we can copy it to our Hadoop cluster and run the Mahout job. Open the Hadoop Command Prompt on the desktop of the head node.
Copy both files from your local system to the Hadoop Distributed File System (HDFS) using the command: hadoop dfs -copyFromLocal <source filepath> <dest filepath> (example: my files are located in c:\ so my command will look like this – haddop dfs -copyFromLocal c:\ConvertedRatings.txt sampleInput\ConvertedRatings.txt (run this command for ConvertedRatings.txt AND ConvertedUsers.txt)
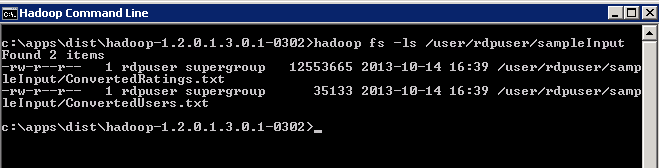
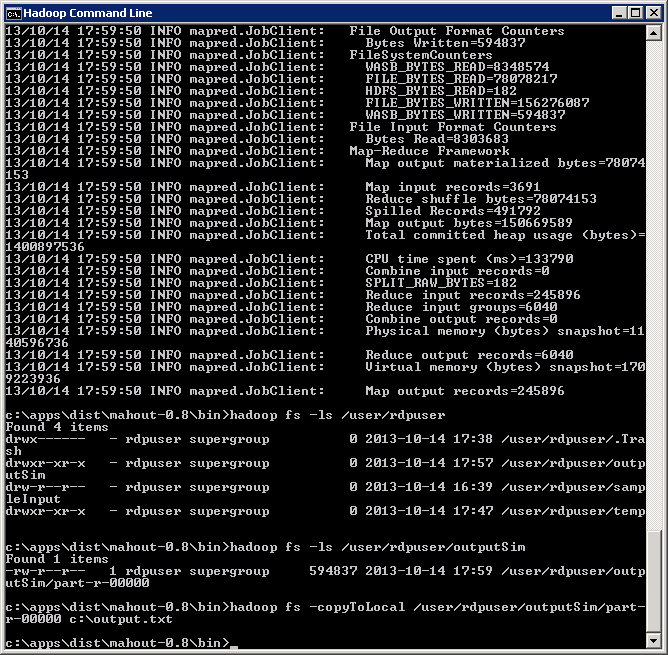
To verify the files copied correctly list the directory contents at the command prompt: hadoop fs -ls /user/<yourRDPusername>/<dest filepath> (example: hadoop fs -ls /user/rdpuser/sampleInput)
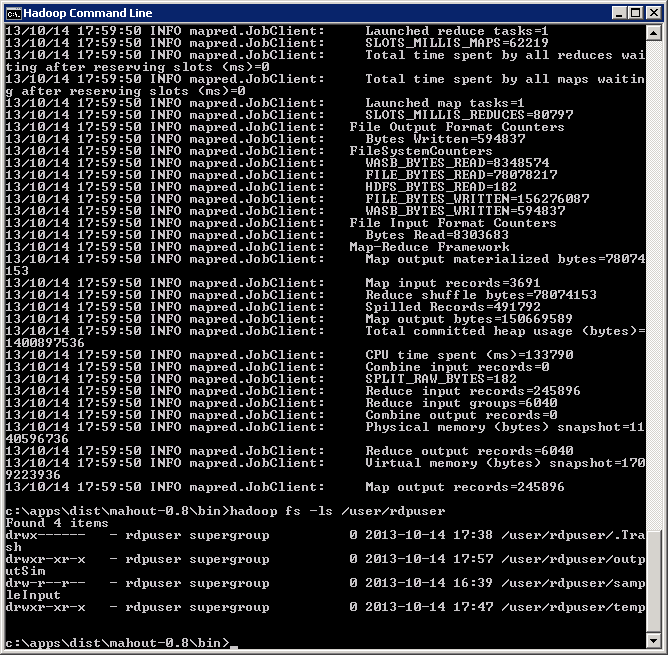
Navigate the command prompt to your Mahout bin directory (c:\apps\dist\mahout-0.8\bin). Run the Mahout job with this command: hadoop jar c:\Apps\dist\mahout-0.8\mahout-core-0.8-job.jar org.apache.mahout.cf.taste.hadoop.item.RecommenderJob -s SIMILARITY_COOCCURRENCE --input=<path to ConvertedRatings.txt> --output=/user/<yourRDPusername>/output --usersFile=<path to ConvertedUsers.txt> ( example: hadoop jar c:\apps\dist\mahout-0.8\mahout-core-0.8-job.jar org.apache.mahout.cf.taste.hadoop.item.RecommenderJob -s SIMILARITY_COOCCURRENCE --input=/user/rdpuser/sampleInput/ConvertedRatings.txt --output=/user/rdpuser/output --UsersFile=/user/rdpuser/sampleInput/ConvertedUsers.txt )Note: The portion of the command -s SIMILARITY_COOCCURRENCE should stick out. It is one of the several different Mahout algorithmic classes to run your job on. Going into detail on these is well beyond the scope of this tutorial. If you wish to learn more on them I highly recommend this book.
The process will take approximately 20-30 minutes for a 4 node cluster, but once complete you should see something like this:
The final step is to copy the output file to your local system for viewing. List the directory contents of the output folder (example: hadoop fs -ls /user/rdpuser/output). Copy the file in the output folder to your local drive as a text file (example: hadoop fs -copyToLocal /user/rdpuser/output/part-r-00000 c:\output.txt)
The text file will contain userids and recommended itemids for those users. It should look similar to this:
You may open the file and notice that there is still work to be done. You have a list a recommendations based on userid and itemid which can’t be directly translated into using in a web or back end application. If you have the users and items already stored in a SQL database then you have the foundation to begin using these immediately. Simply create a new table with foreign keys or you can use a more complete, highly flexible solution called Hive. Hive is another Apache platform that specializes is distributed storage of large data sets. Microsoft has embraced the Apache ecosystem and has created the Hadoop .NET SDK utilizing LINQ to Hive functionality.
Next we will dig into Hive and begin making queries to our Mahout generated data through Hive and Hadoop.


Kevin Remde (@KevinRemde) asked and answered Can Windows Azure Backup support a bare-metal restore? (So many questions. So little time. Part 52.) on 10/14/2013:
Recently we’ve been showing off a capability (currently in preview) called “Windows Azure Backup”, which is a simple file system backup and restore to/from Windows Azure storage.
At our IT Camp in Saint Louis a few weeks back, David asked:
“Can Windows Azure Backup do a bare metal restore in the event of total failure of a physical server?”
Short answer: no.
Longer answer: Not directly, no. But consider this…
You have other tools such as Windows Server Backup and System Center 2012 SP1 Data Protection Manager that can do a full system, system state, or even bare-metal image restore of a backed up machine.
With Window Server Backup, you could use a two-step process of additionally saving the WSB-created image up to Windows Azure storage using Windows Azure Backup. And the restore would be to retrieve the image using WAB and then recover it.
With Data Protection Manager, the new functionality to store your backup data into Windows Azure already exists as of System Center 2012.
“So I can just put my image backup into Azure, right?”
No. DPM only supports Volume, SQL DB, and Hyper-V Guest backups to Azure. So, in the same two-step process we discussed for Windows Server Backup, you could do your bare metal backup to a file share and then use DPM to protect that share to Windows Azure.


<Return to section navigation list>
Windows Azure SQL Database, Federations and Reporting, Mobile Services
Brian Benz (@bbenz) reported on 10/14/2013 a Free Webinar on October 16 - MongoDB, Jaspersoft and Windows Azure: Building Open Source Reporting and Analytics in the Cloud:
Microsoft Open Technologies, Inc., Jaspersoft and MongoDB have teamed up to deliver a webinar on building open source reporting and analytics for your NoSQL solutions in the Cloud. Join our free webinar on October 16 to see how to deliver interactive reporting, analytics, and dashboards for MongoDB on Windows Azure, enabling rapid, meaningful, actionable insights for NoSQL data stores.
In this webinar we will cover:
An overview of Windows Azure
- An overview of MongoDB
- The Jaspersoft BI Suite
- Key considerations in selecting cloud vs. on-premises data systems
The webinar is 1pm EST, this Wednesday, October 16th, so Sign-up now!

Carlos Figueira (@carlos_figueira) described Azure Mobile Services QuickStart for WPF in a 10/14/2013 post:
One of the great features in my opinion of Azure Mobile Services is the “quickstart” app – a ready-to-use, fully-functional application which you can get from the portal in many of the supported platforms, and start running right away. I find it to be a great way to learn about the service and the client SDK for the selected platform.
In the portal one can download a QuickStart app for the most used platforms. But every once in a while someone asks about another platform which is not in the list. Since not all platforms will make its way to the portal (unless there is strong demand for that), I’ll try to answer that question, specifically about WPF, with this post.
Creating the QuickStart app for WPF isn’t too hard – after all, the NuGet package with the client SDK for Azure Mobile Services actually supports WPF apps as well (as long as they target the .NET Framework 4.5). It has most of the functionality as the more prominent platforms, with the notable exception of the lack of the UI-based login feature (which can be implemented as an extension, as I’ve shown in another post). So, without further ado, here are the steps I took to create the app.
If you only want to download the project and skip the process, you can go ahead to the Code Gallery sample.
Create a new WPF project
Make sure that the framework is set to 4.5.
Add reference to the Azure Mobile Services SDK
Right-click on the project itself, or in the References link, then select “Manage NuGet Packages…” (make sure that you have the latest version of the NuGet Package Manager – check the “Tools –> Extensions and Updates” menu)
On the package manager, type “mobileservices” in the search box, then search online for the “Windows Azure Mobile Services” package, and click the “Install” button.
Setting up the UI
At this point we have an empty WPF application. Since both WPF and the Windows Store use XAML as their UI framework, I decided to download the QuickStart for the Windows Store app for my mobile service, and use it as a template. The first thing I noticed is that it uses a custom user control to display some caption, inside the “Common” folder. So let’s replicate it here as well.
And inside that folder, let’s add a new user control. Name the control QuickStartTask.xaml.
Open the QuickStartTask.xaml, and copy the following code over the <Grid> declaration (which I copied from the Windows Store quickstart):
- <Grid VerticalAlignment="Top">
- <StackPanel Orientation="Horizontal">
- <Border BorderThickness="0,0,1,0" BorderBrush="DarkGray" Margin="0,10" MinWidth="70">
- <TextBlock Text="{Binding Number}" FontSize="45" Foreground="DarkGray" Margin="20,0"/>
- </Border>
- <StackPanel>
- <TextBlock Text="{Binding Title}" Margin="10,10,0,0" FontSize="16" FontWeight="Bold"/>
- <TextBlock Text="{Binding Description}" Margin="10,0,0,0" TextWrapping="Wrap" MaxWidth="500" />
- </StackPanel>
- </StackPanel>
- </Grid>
And do the same for the QuickStartTask.xaml.cs – replace the class contents with the code below (again, copied verbatim from the Windows Store quickstart):
- public QuickStartTask()
- {
- this.InitializeComponent();
- this.DataContext = this;
- }
- public int Number
- {
- get { return (int)GetValue(NumberProperty); }
- set { SetValue(NumberProperty, value); }
- }
- // Using a DependencyProperty as the backing store for Number. This enables animation, styling, binding, etc...
- public static readonly DependencyProperty NumberProperty =
- DependencyProperty.Register("Number", typeof(int), typeof(QuickStartTask), new PropertyMetadata(0));
- public string Title
- {
- get { return (string)GetValue(TitleProperty); }
- set { SetValue(TitleProperty, value); }
- }
- // Using a DependencyProperty as the backing store for Title. This enables animation, styling, binding, etc...
- public static readonly DependencyProperty TitleProperty =
- DependencyProperty.Register("Title", typeof(string), typeof(QuickStartTask), new PropertyMetadata(default(string)));
- public string Description
- {
- get { return (string)GetValue(DescriptionProperty); }
- set { SetValue(DescriptionProperty, value); }
- }
- // Using a DependencyProperty as the backing store for Description. This enables animation, styling, binding, etc...
- public static readonly DependencyProperty DescriptionProperty =
- DependencyProperty.Register("Description", typeof(string), typeof(QuickStartTask), new PropertyMetadata(default(string)));
You should be able to build your solution at this point to make sure that everything is ok. Now with the custom user control ready, we can start defining the main page of the WPF app. In the Windows Store app, that page is defined in the MainPage.xaml[.cs], while in the WPF, I’ll use the MainWindow.xaml[.cs]. First, update the title / height / width properties of the window so that the elements will show up nice as if it was a full-screen Windows Store app. Also, we need to define a XML namespace for the user control which we created before. In the code below, it’s defined with the ‘local’ prefix.
- <Window x:Class="WPFQuickStart.MainWindow"
- xmlns="http://schemas.microsoft.com/winfx/2006/xaml/presentation"
- xmlns:x="http://schemas.microsoft.com/winfx/2006/xaml"
- xmlns:local="clr-namespace:WPFQuickStart.Common"
- Title="Azure Mobile Serivces QuickStart" Height="768" Width="1280">
And after that, the body of the XAML. Copy the XML below on top of the empty <Grid> element in the MainWindow.xaml page. Notice that this was copied exactly from the Windows Store MainPage.xaml file, with the exception of the service name (which I replaced with a generic ‘YOUR-SERVICE-NAME’).
- <Grid Background="White">
- <Grid Margin="50,50,10,10">
- <Grid.ColumnDefinitions>
- <ColumnDefinition Width="*" />
- <ColumnDefinition Width="*" />
- </Grid.ColumnDefinitions>
- <Grid.RowDefinitions>
- <RowDefinition Height="Auto" />
- <RowDefinition Height="*" />
- </Grid.RowDefinitions>
- <Grid Grid.Row="0" Grid.ColumnSpan="2" Margin="0,0,0,20">
- <StackPanel>
- <TextBlock Foreground="#0094ff" FontFamily="Segoe UI Light" Margin="0,0,0,6">WINDOWS AZURE MOBILE SERVICES</TextBlock>
- <TextBlock Foreground="Gray" FontFamily="Segoe UI Light" FontSize="45" >YOUR-SERVICE-NAME</TextBlock>
- </StackPanel>
- </Grid>
- <Grid Grid.Row="1">
- <StackPanel>
- <local:QuickStartTask Number="1" Title="Insert a TodoItem" Description="Enter some text below and click Save to insert a new todo item into your database" />
- <StackPanel Orientation="Horizontal" Margin="72,0,0,0">
- <TextBox Name="TextInput" Margin="5" MinWidth="300"></TextBox>
- <Button Name="ButtonSave" Click="ButtonSave_Click">Save</Button>
- </StackPanel>
- </StackPanel>
- </Grid>
- <Grid Grid.Row="1" Grid.Column="1">
- <Grid.RowDefinitions>
- <RowDefinition Height="Auto" />
- <RowDefinition />
- </Grid.RowDefinitions>
- <StackPanel>
- <local:QuickStartTask Number="2" Title="Query and Update Data" Description="Click refresh below to load the unfinished TodoItems from your database. Use the checkbox to complete and update your TodoItems" />
- <Button Margin="72,0,0,0" Name="ButtonRefresh" Click="ButtonRefresh_Click">Refresh</Button>
- </StackPanel>
- <ListView Name="ListItems" Margin="62,10,0,0" Grid.Row="1">
- <ListView.ItemTemplate>
- <DataTemplate>
- <StackPanel Orientation="Horizontal">
- <CheckBox Name="CheckBoxComplete" IsChecked="{Binding Complete, Mode=TwoWay}" Checked="CheckBoxComplete_Checked" Content="{Binding Text}" Margin="10,5" VerticalAlignment="Center"/>
- </StackPanel>
- </DataTemplate>
- </ListView.ItemTemplate>
- </ListView>
- </Grid>
- </Grid>
- </Grid>
Some of the items in the XAML above also require a reference which I didn’t have by default (System.Windows.dll), so if this is the case in your project, add it as well.
Implementing the class
The XAML above defines some event handlers (button click, checkbox checked) which need to be implemented. As before, here’s the code for the MainWindow.cs. This is copied from the Windows Store version, and the only changes are the call to the message dialog (the usage of the MessageDialog class in the store app was replaced with a call to MessageBox.Show) and the OnNavigatedTo override was replaced by the OnActivated in the WPF app).
- public class TodoItem
- {
- public int Id { get; set; }
- [JsonProperty(PropertyName = "text")]
- public string Text { get; set; }
- [JsonProperty(PropertyName = "complete")]
- public bool Complete { get; set; }
- }
- public partial class MainWindow : Window
- {
- private MobileServiceCollection<TodoItem, TodoItem> items;
- private IMobileServiceTable<TodoItem> todoTable = App.MobileService.GetTable<TodoItem>();
- public MainWindow()
- {
- InitializeComponent();
- }
- private async void InsertTodoItem(TodoItem todoItem)
- {
- // This code inserts a new TodoItem into the database. When the operation completes
- // and Mobile Services has assigned an Id, the item is added to the CollectionView
- await todoTable.InsertAsync(todoItem);
- items.Add(todoItem);
- }
- private async void RefreshTodoItems()
- {
- MobileServiceInvalidOperationException exception = null;
- try
- {
- // This code refreshes the entries in the list view by querying the TodoItems table.
- // The query excludes completed TodoItems
- items = await todoTable
- .Where(todoItem => todoItem.Complete == false)
- .ToCollectionAsync();
- }
- catch (MobileServiceInvalidOperationException e)
- {
- exception = e;
- }
- if (exception != null)
- {
- MessageBox.Show(exception.Message, "Error loading items");
- }
- else
- {
- ListItems.ItemsSource = items;
- }
- }
- private async void UpdateCheckedTodoItem(TodoItem item)
- {
- // This code takes a freshly completed TodoItem and updates the database. When the MobileService
- // responds, the item is removed from the list
- await todoTable.UpdateAsync(item);
- items.Remove(item);
- }
- private void ButtonRefresh_Click(object sender, RoutedEventArgs e)
- {
- RefreshTodoItems();
- }
- private void ButtonSave_Click(object sender, RoutedEventArgs e)
- {
- var todoItem = new TodoItem { Text = TextInput.Text };
- InsertTodoItem(todoItem);
- }
- private void CheckBoxComplete_Checked(object sender, RoutedEventArgs e)
- {
- CheckBox cb = (CheckBox)sender;
- TodoItem item = cb.DataContext as TodoItem;
- UpdateCheckedTodoItem(item);
- }
- protected override void OnActivated(EventArgs e)
- {
- RefreshTodoItems();
- }
- }
Make sure that you have all necessary “import” statements (Newtonsoft.Json and Microsoft.WindowsAzure.MobileServices). Now the only thing remaining is the declaration of the mobile service client itself. Open the file App.xaml.cs and insert this declaration (it can be copied from the portal itself, in the section about “connect an existing app” in the QuickStart page):
- public static MobileServiceClient MobileService = new MobileServiceClient(
- "https://YOUR-SERVICE-HERE.azure-mobile.net/",
- "YOUR-KEY-HERE"
- );
At this point (after replacing the service name and key with the actual values) you should be able to build and run the app.
Just want the app? Go to the MSDN Code Gallery sample.


No significant articles so far this week.

<Return to section navigation list>
Windows Azure Marketplace DataMarket, Cloud Numerics, Big Data and OData
‡ The Apache Software Foundation (@TheASF) announced the availability of the Apache Olingo Release 1.0.0 incubator project on 10/16/2013:
Apache Olingo OData2 is a collection of Java libraries for implementing OData V2 protocol clients or servers.
Release 1.0.0 (2013-10-16)
Full download page, release notes
The Apache Olingo OData2 1.0.0 release is a major release.
Commodity Packages
Package zip Description Olingo OData2 Library Download (md5, sha1, pgp) All you need to implement an OData V2 client or server. Olingo OData2 Sources Download (md5, sha1, pgp) Olingo OData2 source code. Olingo OData2 Docs Download (md5, sha1, pgp) Documentation and JavaDoc. Olingo OData2 JPA Processor Download (md5, sha1, pgp) All you need to expose your JPA model as OData service. Olingo OData2 Reference Scenario Download (md5, sha1, pgp) Deployable WAR files with reference scenario services using Apache CXF. Maven
Apache Olingo OData2 artifacts are available at Maven Central. For POM dependencies see here.
Older Releases
For older releases please refer to Archives or you can get them using Maven.
Verify Authenticity of Downloads package
While downloading the packages, make yourself familiar on how to verify their integrity, authenticity and provenience according to the Apache Software Foundation best practices. Please make sure you check the following resources:
- Artifact verification details
- Developers and release managers PGP keys are publicly available here.
Disclaimer
Apache Olingo™ is an effort undergoing incubation at The Apache Software Foundation (ASF) sponsored by the Apache Incubator PMC. Incubation is required of all newly accepted projects until a further review indicates that the infrastructure, communications, and decision making process have stabilized in a manner consistent with other successful ASF projects. While incubation status is not necessarily a reflection of the completeness or stability of the code, it does indicate that the project has yet to be fully endorsed by the ASF.
© Copyright 2013 The Apache Software Foundation, Licensed under the Apache License, Version 2.0. Apache and the Apache feather logo are trademarks of The Apache Software Foundation.
No significant articles so far this week.
<Return to section navigation list>
Windows Azure Service Bus, BizTalk Services and Workflow
•• Clemens Vasters (@clemensv) produced a 00:18:02 Service Bus for Windows Server 1.1 Release video for his Subscribe series on Channel9:
Today we're releasing Service Bus for Windows Server 1.1. Ziv Rafalovich gave me (and you) a tour through one of the most exciting additions we for the server version, the new Windows Azure Pack portal.
For background on Service Bus for Windows Server 1.1 read this blog post by Brad Anderson and then go grab the bits. The best way to do that is to get it as part of Windows Azure Pack, but you can also install the Service Bus 1.1 runtime standalone. Both you can do with the Web Platform Installer.


<Return to section navigation list>
Windows Azure Access Control, Active Directory, Identity and Workflow
• Phillip Fu posted [Sample Of Oct 15th] How to use Windows Azure ACS to authenticate in WPF application on 10/16/2013:
Sample Download :
- CS Version: http://code.msdn.microsoft.com/How-to-use-Windows-Azure-4dc64908
- VB Version: http://code.msdn.microsoft.com/How-to-use-Windows-Azure-4990163e
Windows Azure Access Control Service integrates WIF, so ASP.NET developers can easily create Claims-Aware Application by Identity and Access extension. But for C/S application, developers can't add STS reference to their client, it's harder to use ACS with client application and web service.
This code sample demonstrates how to use Azure ACS work with third part Identity provider such as google, yahoo. You can find the answers for all the following questions in the code sample:
- How to use third part IDP such as google, yahoo in WPF.
- How to get RP's claims information in WPF client app.
- How to desterilize security token provided by google or yahoo.
- How to secure a web service using Windows Azure ACS.
- How to verify SWT issued by the specific realm in Windows Azure ACS.
You can find more code samples that demonstrate the most typical programming scenarios by using Microsoft All-In-One Code Framework Sample Browser or Sample Browser Visual Studio extension. They give you the flexibility to search samples, download samples on demand, manage the downloaded samples in a centralized place, and automatically be notified about sample updates. If it is the first time that you hear about Microsoft All-In-One Code Framework, please watch the introduction video on Microsoft Showcase, or read the introduction on our homepage http://1code.codeplex.com/.
Vittorio Bertocci (@vibronet) described ADAL, Windows Azure AD and Multi-Resource Refresh Tokens in a 10/14/2013 post:
After a ~one-week hiatus, I am back to cover the new features you can find in ADAL .NET.
Today I am going to write about Multi-Resource Refresh Tokens. As I am not a great typist, I am going to abbreviate that in “MRRT”; that does not mean that it’s the official acronym, what I write here is just my personal opinion and does not constitute official guidance, the usual yadda yadda yadda.
What is a MRRT?
Simply put: a MRRT is a refresh token that can be used to obtain an access token for a resource that can be different from the resource for which the MRRT was obtained in the first place.
Let’s unpack that concept with one example. Say that I have two Web API projects, resource1 and resource2, both provisioned in the same Windows Azure AD tenant. Say that I have a native client, also provisioned in the same tenant, with the right entries in the permissions table which allow it to call both Web APIs.
If I ask for a token for resource1, I’ll go through whatever authentication flow the operation requires, for example getting prompted via browser dialog, if there’s no existing session. After a successful flow I’ll get back an access token AT1 and a refresh token RT1.
Say that now I want to access resource2. If RT1 is a MRRT, I can simply use RT1 just like I’d use it in the classic refresh flow, but ask for resource2 instead. That will result in getting back an access token AT2 for resource2 (and a RT2 as well) without having to prompt the end user!
This is exceptionally useful. To put things in perspective: a MRRT can play for all the resources in a tenant a role similar to the one played by a TGT in Kerberos. Prompts are reduced to their bare minimum, and you can start to think about sessions it terms that are closer to the ones we are used to on-premises, while at the same time maintaining the flexibility and boundaries-crossing capabilities that OAuth2 affords. Is your mind blown yet?
Let’ See Some Code
This is not just some theoretical mumbo jumbo: you can experience this in your code today (though the endpoint used in the process is still in preview).
Here there’s some code that defines in ADAL terms the scenario described earlier:
 // the tenant
 string authority = "https://login.windows.net/cloudidentity.net";

// the client coordinates
 string clientId = "a4836f83-0f69-48ed-aa2b-88d0aed69652";
 string redirectURI = "https://cloudidentity.net/myWebAPItestclient";

// the IDs of the Web APIs
 string resource1 = "https://cloudidentity.net/WindowsAzureADWebAPITest";
 string resource2 = "https://cloudidentity.net/cisNAPAoidc1";

 // the AuthenticationContext representing the tenant in your code
 AuthenticationContext ac = new AuthenticationContext(authority);
Let’s use ADAL to get a token for accessing resource1:
AuthenticationResult arOriginal =
    ac.AcquireToken(resource1, clientId, new Uri(redirectURI));
Assuming that we started from a clean state (empty cache, no cookies for Windows Azure AD) that line of code will cause ADAL to show the browser dialog and the authentication experience. Go through it to completion.
Since I was at it, I took a Fiddler trace to show what happens while AcquireToken runs. Let’s take a look.
That’s quite a lot of stuff for a little line of code!
All the part marked (1) is about getting to render the initial authentication experience in the browser dialog.
The GET in (2) takes place after I type in my username and hit TAB, the page tries to establish whether it should also gather my password or if my tenant has SSO configured and I should be redirected to another endpoint (a local ADFS). My tenant is cloud-only, so I don’t get redirected.
The part in (3) finalizes the user authentication part and results in an authorization code. At this point the ADAL dialog closes down and everything else is handled directly at the HTTP request level.
The part in (4) represents the call to the Windows Azure AD’s Token endpoint, to exchange the code for an access token and associated data(refresh token, expirations, etc).
In fact, I think it’s interesting to take a look at the content of the request to the Token endpoint. Here it is:POST https://login.windows.net/cloudidentity.net/oauth2/token HTTP/1.1
Content-Type: application/x-www-form-urlencoded
Host: login.windows.net
Content-Length: 654
Expect: 100-continue
Connection: Keep-Alivegrant_type=authorization_code&
code=AwABAAA[SNIP]v-YgAA&
client_id=a4836f83-0f69-48ed-aa2b-88d0aed69652&
redirect_uri=https%3A%2F%2Fcloudidentity.net%2FmyWebAPItestclient&
resource=https%3A%2F%2Fcloudidentity.net%2FWindowsAzureADWebAPITestI edited it a bit for readability. As you can see, that’s a pretty standard code grant request. I have formatted in bold the parts I want you to notice: the fact that we are performing a code grant request, and the fact that we are referring to the resource URI that in our example corresponds to resource1. Those details will become relevant in a moment.
Now let’s take a look at the AuthenticationResult we got back:
We have both an access token and a refresh token, which is great (does not always happen, ADFS will send refresh tokens only under special conditions and ACS never does).
Actually, our refresh token is not a normal one: it’s special! As signaled by the property IsMultipleResourceRefreshToken, what we got back is a MRRT.The good news is that ADAL is fully aware of how MRRTs work, and can take advantage of those automatically if it has one in its cache.
To see that in action, let’s append a line of code which asks for a token for resource2:// ... AuthenticationContext ac = new AuthenticationContext(authority); AuthenticationResult arOriginal = ac.AcquireToken(resource1, clientId, new Uri(redirectURI)); // get a token for resource2 right after having gotten one for resource1 AuthenticationResult arViaMultiResourceRefreshToken = ac.AcquireToken(resource2, clientId, new Uri(redirectURI));Let’s run the code again. You will notice that you get prompted on the first AcquireToken, but not on the second. But that doesn’t prove anything, does it: this behavior might be caused by any number of causes, including the presence of a session cookie (not true, but until I don’t write that post on session I’ve promised I can’t explain more
).
To verify that this was really made possible by the use of a MRRT, let’s get back to Fiddler:
This is the same flow as before, but this time you can see the effect of the second AcquireToken call for resource2: a single request to the Token endpoint. Let’s take a look at its content:
POST https://login.windows.net/cloudidentity.net/oauth2/token HTTP/1.1
Content-Type: application/x-www-form-urlencoded
Host: login.windows.net
Content-Length: 537
Expect: 100-continuegrant_type=refresh_token&
resource=https%3A%2F%2Fcloudidentity.net%2FcisNAPAoidc1&
refresh_token=AwABAA[SNIP]1IAA&
client_id=a4836f83-0f69-48ed-aa2b-88d0aed69652This time we are using the refresh token, as shown by the grant_type; we are using RT1 (I shortened it for readability but you can see it matches the screenshot of AuthenticationResult) and we are requesting the resource that we mapped to resource2.
If you want to get tokens for other resources provisioned in the same tenant… rinse and repeat!
Applicability
As you have seen, if there is a suitable MRRT in its cache ADAL .NET will take advantage of it automatically. If for some reason you do NOT want this behavior, you can opt out by passing to AcquireToken PromptBehavior.Always (which will force the authentication prompt to show up no matter what) or opt out from using the cache (by passing null at AuthenticationContext construction time). Note that if you opted out from the cache but you still want to take advantage of this feature, you can do so by using AcquireTokenByRefreshToken and passing the target resource.
A refresh token is a MRRT only if IsMultiResourceRefreshToken in the authentication result is set to true.
As of today, only Windows Azure AD can issue MTTR; ADFS in Windows Server 2012 R2 (I really need to find if I can use a shorter name for it) does not support this, and neither does ACS (which does not support any form of refresh tokens anyway).
Well, there you have it: the MRRT is a super-useful construct, which you are very likely to take advantage of without even knowing it’s there. It will substantially reduce the times in which you need to prompt the end user, shrink traffic and make sessions more manageable. And on that topic, I still want to write a longer post… stay tuned!


<Return to section navigation list>
Windows Azure Virtual Machines, Virtual Networks, Web Sites, Connect, RDP and CDN
‡ Steven Martin (@stevemar_msft) posted Announcing Availability of Windows Server 2012 R2 in Azure Image Gallery & Reduced Instance Pricing for Windows Azure on 10/18/2013:
We are making two announcements today to provide additional choice and cost savings to customers using Infrastructure Services: Availability of Windows Server 2012 R2 in the image gallery and price reduction for Memory Intensive compute instances.
Windows Server 2012 R2 in Virtual Machines and Cloud Services
Windows Server 2012 R2 is now generally available for customers to run in their own data centers and is available in the Windows Azure image gallery. Whether you are thinking of migrating your app to this newly released operating system or just want to check out the new functionality, it’s easy to get started by spinning the image up on Windows Azure. Customers looking for faster deployment times will enjoy approximately 30% faster deployments with this new image vs. the Windows Server 2008 R2 image (per internal testing results).
Today we are also making Windows Server 2012 R2 available as a guest operating system for web and worker roles as part of Windows Azure Cloud Service. [Emphasis added.]
Up to 22% Price Reduction on Memory-Intensive Instances
We’re also pleased to announce up to a 22% price reduction on memory-intensive compute instances across Windows, Linux and Cloud Services.
Memory-intensive instances are great for running applications such as SharePoint, SQL Server, 3rd party databases, in-memory analytics and other enterprise applications. As the usage trend for adopting memory-intensive instances continues to grow, we are pleased to be able to meet customer demand with additional cost savings. This price reduction will take effect in November.
For an overview of new capabilities in Windows Server 2012 R2 capabilities, please read the whitepaper on the topic. For more information on these announcement, check out Scott Guthrie's blog post [see below].
We love to hear your feedback, so let us know what you think on Twitter @WindowsAzure.


‡ Scott Guthrie (@scottgu) reported Windows Azure: Announcing Support for Windows Server 2012 R2 + Some Nice Price Cuts on 10/18/2013:
Today we released some great updates to Windows Azure:
- Virtual Machines: Support for Windows Server 2012 R2
- Cloud Services: Support for Windows Server 2012 R2 and .NET 4.5.1
- Windows Azure Pack: Use Windows Azure features on-premises using Windows Server 2012 R2
- Price Cuts: Up to 22% Price Reduction on Memory-Intensive Instances
Below are more details about each of the improvements:
Virtual Machines: Support for Windows Server 2012 R2
This morning we announced the release of Windows Server 2012 R2 – which is a fantastic update to Windows Server and includes a ton of great enhancements.
This morning we are also excited to announce that the general availability image of Windows Server 2012 RC is now supported on Windows Azure. Windows Azure is the first cloud provider to offer the final release of Windows Server 2012 R2, and it is incredibly easy to launch your own Windows Server 2012 R2 instance with it.
To create a new Windows Server 2012 R2 instance simply choose New->Compute->Virtual Machine within the Windows Azure Management Portal. You can select the “Windows Server 2012 R2” image and create a new Virtual Machine using the “Quick Create” option:
Or alternatively click the “From Gallery” option if you want to customize even more configuration options (endpoints, remote powershell, availability set, etc):
Creating and instantiating a new Virtual Machine on Windows Azure is very fast. In fact, the Windows Server 2012 R2 image now deploys and runs 30% faster than previous versions of Windows Server.
Once the VM is deployed you can drill into it to track its health and manage its settings:
Clicking the “Connect” button allows you to remote desktop into the VM – at which point you can customize and manage it as a full administrator however you want:
If you haven’t tried Windows Server 2012 R2 yet – give it a try with Windows Azure. There is no easier way to get an instance of it up and running!
Cloud Services: Support for using Windows Server 2012 R2 with Web and Worker Roles
Today’s Windows Azure release also allows you to now use Windows Server 2012 R2 and .NET 4.5.1 within Web and Worker Roles within Cloud Service based applications. Enabling this is easy. You can configure existing existing Cloud Service application to use Windows Server 2012 R2 by updating your Cloud Service Configuration File (.cscfg) to use the new “OS Family 4” setting:
Or alternatively you can use the Windows Azure Management Portal to update cloud services that are already deployed on Windows Azure. Simply choose the configure tab on them and select Windows Server 2012 R2 in the Operating System Family dropdown:
The approaches above enable you to immediately take advantage of Windows Server 2012 R2 and .NET 4.5.1 and all the great features they provide.
Windows Azure Pack: Use Windows Azure features on Windows Server 2012 R2
Today we also made generally available the Windows Azure Pack, which is a free download that enables you to run Windows Azure Technology within your own datacenter, an on-premises private cloud environment, or with one of our service provider/hosting partners who run Windows Server.
Windows Azure Pack enables you to use a management portal that has the exact same UI as the Windows Azure Management Portal, and within which you can create and manage Virtual Machines, Web Sites, and Service Bus – all of which can run on Windows Server and System Center.
The services provided with the Windows Azure Pack are consistent with the services offered within our Windows Azure public cloud offering. This consistency enables organizations and developers to build applications and solutions that can run in any hosting environment – and which use the same development and management approach. The end result is an offering with incredible flexibility.
You can learn more about Windows Azure Pack and download/deploy it today here.
Price Cuts: Up to 22% Reduction on Memory Intensive Instances
Today we are also reducing prices by up to 22% on our memory-intensive VM instances (specifically our A5, A6, and A7 instances). These price reductions apply to both Windows and Linux VM instances, as well as for Cloud Service based applications:
These price reductions will take effect in November, and will enable you to run applications that demand larger memory (such as SharePoint, Databases, in-memory analytics, etc) even more cost effectively.
Summary
Today’s release enables you to start using Windows Server 2012 R2 within Windows Azure immediately, and take advantage of our Cloud OS vision both within our datacenters – and using the Windows Azure Pack within both your existing datacenters and those of our partners.
If you don’t already have a Windows Azure account, you can sign-up for a free trial and start using all of the above features today. Then visit the Windows Azure Developer Center to learn more about how to build apps with it.


<Return to section navigation list>
Windows Azure Cloud Services, Caching, APIs, Tools and Test Harnesses
‡ Tim Anderson (@timanderson) answered Visual Studio 2013 is released. What’s new? in a 10/18/2013 post:
Microsoft released Visual Studio 2013 yesterday:
VS 2013 can be installed side by side with previous versions of Visual Studio or, if you have a VS 2013 pre-release, it can be installed straight over top of the pre-release.
I installed over the top of the pre-release and I’m happy to say that this worked without incident. This is how it should be.
Oddly, the launch of Visual Studio 2013 is not until November 13th, proving that in Microsoft’s world products can “launch” before, at or after general release.
So what’s new in Visual Studio 2013? Tracking Visual Studio is difficult, because many important features show up as updates and add-ons. After all, at heart Visual Studio is just a shell or platform in which development sit. The Visual Studio LightSwitch HTML client, for example, which made LightSwitch into a strong tool for rapid application development of mobile web apps, appeared as part of Visual Studio 2012 Update 2. Now in Visual Studio 2013 we have LightSwitch support for Cloud Business Apps, though the new project type is shown under Office/SharePoint rather than under LightSwitch:
A Cloud Business App is an add-on for SharePoint typically running on Office 365. In the new model SharePoint apps do not really run on SharePoint, but are web apps that integrate with SharePoint. This is great in an Office 365 context, since you can write a web app that is accessible through the Office 365 site and which is aware of the logged-on user; in other words, it uses Azure Active Directory automatically. There’s more on the subject here.
What else is new? Here are some highlights:
- Better ISO C/C++ compliance in Visual C++
- Upgraded F# with language tweaks and improved performance
- .NET Framework 4.5.1 with minor enhancements
- Support for new Windows 8.1 controls and APIs in Windows Store apps – these are extensive.
- “Just my code” debugging for C++ and JavaScript, and Edit and Continue for 64-bit .NET apps
- Graphics diagnostics for apps running remotely
- Sign into Visual Studio with a Microsoft account. Microsoft pulls developers further into its cloud platform.
- Windows Azure Mobile Services – build a back end for an app running on Windows, Windows Phone, iOS, Android or web
Does that amount to much? Compared to the changes between Visual Studio 2010 and 2012, no. That is a good thing, since what we have is a refinement of what was already a capable tool, rather than something which gives developers a headache learning new ways to work.


‡ The patterns & practices (@mspnp) - Windows Azure Guidance group released a new alpha version of Cloud Design Patterns to CodePlex on 10/17/2013:
Recommended Download
Cloud Design Patterns, documentation, 2548K, uploaded Thu - 156 downloads
Release Notes
1st drop of Cloud Design Patterns project. It contains 14 patterns with 6 related guidance.
Reviews for this release
No reviews yet for this release. (Previous release: 5 stars out of five with 1 rating and no reviews)

• Soma Somasegar (@SSomasegar) announced Visual Studio 2013 available for download in a 10/17/2013 post:
I’m excited to announce that the final releases of Visual Studio 2013, .NET 4.5.1, and Team Foundation Server 2013 are now available for download! MSDN subscribers can download from the MSDN Subscriber Downloads page.
Visual Studio 2013 is the best tool for developers and teams to build and deliver modern, connected applications on all of Microsoft’s platforms. From Windows Azure and SQL Server to Windows 8.1 and Windows Phone 8, Visual Studio 2013 supports the breadth of Microsoft’s developer platforms.
As part of the Cloud OS vision, Visual Studio 2013 enables developers to build modern business applications that take advantage of the cloud and target a variety of devices and end-user experiences, all delivered within today’s rapid and dynamic application lifecycles.
There are great new features and capabilities in Visual Studio 2013 for every developer, including innovative editor enhancements such as Peek and CodeLens, diagnostics tools for UI responsiveness and energy consumption, major updates for ASP.NET web development, expanded ALM capabilities with Git support and agile portfolio management, and much, much more. Check out what’s new with Visual Studio 2013 for details.
Today’s release of Visual Studio 2013 supports development of great Windows Store applications for Windows 8.1, which is also available for download today.
On November 13th, we’re excited to be hosting the Visual Studio 2013 launch. At launch, we’ll be highlighting the breadth and depth of new features and capabilities in the Visual Studio 2013 release.
Save the date, download Visual Studio 2013, and we’ll see you on November 13th.
Namaste!


Return to section navigation list>
Windows Azure Infrastructure and DevOps
• Scott Guthrie (@scottgu) posted Announcing the Release of Visual Studio 2013 and Great Improvements to ASP.NET and Entity Framework on 10/17/2013:
Today we released VS 2013 and .NET 4.5.1. These releases include a ton of great improvements, and include some fantastic enhancements to ASP.NET and the Entity Framework. You can download and start using them now.
Below are details on a few of the great ASP.NET, Web Development, and Entity Framework improvements you can take advantage of with this release. Please visit http://www.asp.net/vnext for additional release notes, documentation, and tutorials.
One ASP.NET
With the release of Visual Studio 2013, we have taken a step towards unifying the experience of using the different ASP.NET sub-frameworks (Web Forms, MVC, Web API, SignalR, etc), and you can now easily mix and match the different ASP.NET technologies you want to use within a single application.
When you do a File-New Project with VS 2013 you’ll now see a single ASP.NET Project option:
Selecting this project will bring up an additional dialog that allows you to start with a base project template, and then optionally add/remove the technologies you want to use in it.
For example, you could start with a Web Forms template and add Web API or Web Forms support for it, or create a MVC project and also enable Web Forms pages within it:
This makes it easy for you to use any ASP.NET technology you want within your apps, and take advantage of any feature across the entire ASP.NET technology span.
Richer Authentication Support
The new “One ASP.NET” project dialog also includes a new Change Authentication button that, when pushed, enables you to easily change the authentication approach used by your applications – and makes it much easier to build secure applications that enable SSO from a variety of identity providers.
For example, when you start with the ASP.NET Web Forms or MVC templates you can easily add any of the following authentication options to the application:
- No Authentication
- Individual User Accounts (Single Sign-On support with FaceBook, Twitter, Google, and Microsoft ID – or Forms Auth with ASP.NET Membership)
- Organizational Accounts (Single Sign-On support with Windows Azure Active Directory )
- Windows Authentication (Active Directory in an intranet application)
The Windows Azure Active Directory support is particularly cool. Last month we updated Windows Azure Active Directory so that developers can now easily create any number of Directories using it (for free and deployed within seconds). It now takes only a few moments to enable single-sign-on support within your ASP.NET applications against these Windows Azure Active Directories. Simply choose the “Organizational Accounts” radio button within the Change Authentication dialog and enter the name of your Windows Azure Active Directory to do this:
This will automatically configure your ASP.NET application to use Windows Azure Active Directory and register the application with it. Now when you run the app your users can easily and securely sign-in using their Active Directory credentials within it – regardless of where the application is hosted on the Internet.
For more information about the new process for creating web projects, see Creating ASP.NET Web Projects in Visual Studio 2013.
Responsive Project Templates with Bootstrap
The new default project templates for ASP.NET Web Forms, MVC, Web API and SPA are built using Bootstrap. Bootstrap is an open source CSS framework that helps you build responsive websites which look great on different form factors such as mobile phones, tables and desktops. For example in a browser window the home page created by the MVC template looks like the following:
When you resize the browser to a narrow window to see how it would like on a phone, you can notice how the contents gracefully wrap around and the horizontal top menu turns into an icon:
When you click the menu-icon above it expands into a vertical menu – which enables a good navigation experience for small screen real-estate devices:
We think Bootstrap will enable developers to build web applications that work even better on phones, tablets and other mobile devices – and enable you to easily build applications that can leverage the rich ecosystem of Bootstrap CSS templates already out there. You can learn more about Bootstrap here.
Visual Studio Web Tooling Improvements
Visual Studio 2013 includes a new, much richer, HTML editor for Razor files and HTML files in web applications. The new HTML editor provides a single unified schema based on HTML5. It has automatic brace completion, jQuery UI and AngularJS attribute IntelliSense, attribute IntelliSense Grouping, and other great improvements.
For example, typing “ng-“ on an HTML element will show the intellisense for AngularJS:
This support for AngularJS, Knockout.js, Handlebars and other SPA technologies in this release of ASP.NET and VS 2013 makes it even easier to build rich client web applications:
The screen shot below demonstrates how the HTML editor can also now inspect your page at design-time to determine all of the CSS classes that are available. In this case, the auto-completion list contains classes from Bootstrap’s CSS file. No more guessing at which Bootstrap element names you need to use:
Visual Studio 2013 also comes with built-in support for both CoffeeScript and LESS editing support. The LESS editor comes with all the cool features from the CSS editor and has specific Intellisense for variables and mixins across all the LESS documents in the @import chain.
Browser Link – SignalR channel between browser and Visual Studio
The new Browser Link feature in VS 2013 lets you run your app within multiple browsers on your dev machine, connect them to Visual Studio, and simultaneously refresh all of them just by clicking a button in the toolbar. You can connect multiple browsers (including IE, FireFox, Chrome) to your development site, including mobile emulators, and click refresh to refresh all the browsers all at the same time. This makes it much easier to easily develop/test against multiple browsers in parallel.
Browser Link also exposes an API to enable developers to write Browser Link extensions. By enabling developers to take advantage of the Browser Link API, it becomes possible to create very advanced scenarios that crosses boundaries between Visual Studio and any browser that’s connected to it. Web Essentials takes advantage of the API to create an integrated experience between Visual Studio and the browser’s developer tools, remote controlling mobile emulators and a lot more.
You will see us take advantage of this support even more to enable really cool scenarios going forward.
ASP.NET Scaffolding
ASP.NET Scaffolding is a new code generation framework for ASP.NET Web applications. It makes it easy to add boilerplate code to your project that interacts with a data model. In previous versions of Visual Studio, scaffolding was limited to ASP.NET MVC projects. With Visual Studio 2013, you can now use scaffolding for any ASP.NET project, including Web Forms.
When using scaffolding, we ensure that all required dependencies are automatically installed for you in the project. For example, if you start with an ASP.NET Web Forms project and then use scaffolding to add a Web API Controller, the required NuGet packages and references to enable Web API are added to your project automatically. To do this, just choose the Add->New Scaffold Item context menu:
Support for scaffolding async controllers uses the new async features from Entity Framework 6.
ASP.NET Identity
ASP.NET Identity is a new membership system for ASP.NET applications that we are introducing with this release.
ASP.NET Identity makes it easy to integrate user-specific profile data with application data. ASP.NET Identity also allows you to choose the persistence model for user profiles in your application. You can store the data in a SQL Server database or another data store, including NoSQL data stores such as Windows Azure Storage Tables. ASP.NET Identity also supports Claims-based authentication, where the user’s identity is represented as a set of claims from a trusted issuer.
Users can login by creating an account on the website using username and password, or they can login using social identity providers (such as Microsoft Account, Twitter, Facebook, Google) or using organizational accounts through Windows Azure Active Directory or Active Directory Federation Services (ADFS).
To learn more about how to use ASP.NET Identity visit http://www.asp.net/identity.
ASP.NET Web API 2
ASP.NET Web API 2 has a bunch of great improvements including:
Attribute routing
ASP.NET Web API now supports attribute routing, thanks to a contribution by Tim McCall, the author of http://attributerouting.net. With attribute routing you can specify your Web API routes by annotating your actions and controllers like this:
OAuth 2.0 support
The Web API and Single Page Application project templates now support authorization using OAuth 2.0. OAuth 2.0 is a framework for authorizing client access to protected resources. It works for a variety of clients including browsers and mobile devices.
OData Improvements
ASP.NET Web API also now provides support for OData endpoints and enables support for both ATOM and JSON-light formats. With OData you get support for rich query semantics, paging, $metadata, CRUD operations, and custom actions over any data source. Below are some of the specific enhancements in ASP.NET Web API 2 OData.
- Support for $select, $expand, $batch, and $value
- Improved extensibility
- Type-less support
- Reuse an existing model
OWIN Integration
ASP.NET Web API now fully supports OWIN and can be run on any OWIN capable host. With OWIN integration, you can self-host Web API in your own process alongside other OWIN middleware, such as SignalR.
For more information, see Use OWIN to Self-Host ASP.NET Web API.
More Web API Improvements
In addition to the features above there have been a host of other features in ASP.NET Web API, including
- CORS support
- Authentication Filters
- Filter Overrides
- Improved Unit Testability
- Portable ASP.NET Web API Client
To learn more go to http://www.asp.net/web-api/
ASP.NET SignalR 2
ASP.NET SignalR is library for ASP.NET developers that dramatically simplifies the process of adding real-time web functionality to your applications.
Real-time web functionality is the ability to have server-side code push content to connected clients instantly as it becomes available. SignalR 2.0 introduces a ton of great improvements. We’ve added support for Cross-Origin Resource Sharing (CORS) to SignalR 2.0. iOS and Android support for SignalR have also been added using the MonoTouch and MonoDroid components from the Xamarin library (for more information on how to use these additions, see the article Using Xamarin Components from the SignalR wiki).
We’ve also added support for the Portable .NET Client in SignalR 2.0 and created a new self-hosting package. This change makes the setup process for SignalR much more consistent between web-hosted and self-hosted SignalR applications.
To learn more go to http://www.asp.net/signalr.
ASP.NET MVC 5
The ASP.NET MVC project templates integrate seamlessly with the new One ASP.NET experience and enable you to integrate all of the above ASP.NET Web API, SignalR and Identity improvements. You can also customize your MVC project and configure authentication using the One ASP.NET project creation wizard. The MVC templates have also been updated to use ASP.NET Identity and Bootstrap as well. An introductory tutorial to ASP.NET MVC 5 can be found at Getting Started with ASP.NET MVC 5.
This release of ASP.NET MVC also supports several nice new MVC-specific features including:
- Authentication filters: These filters allow you to specify authentication logic per-action, per-controller or globally for all controllers.
- Attribute Routing: Attribute Routing allows you to define your routes on actions or controllers.
To learn more go to http://www.asp.net/mvc
Entity Framework 6 Improvements
Visual Studio 2013 ships with Entity Framework 6, which bring a lot of great new features to the data access space:
Async and Task<T> Support
EF6’s new Async Query and Save support enables you to perform asynchronous data access and take advantage of the Task<T> support introduced in .NET 4.5 within data access scenarios. This allows you to free up threads that might otherwise by blocked on data access requests, and enable them to be used to process other requests whilst you wait for the database engine to process operations. When the database server responds the thread will be re-queued within your ASP.NET application and execution will continue. This enables you to easily write significantly more scalable server code.
Here is an example ASP.NET WebAPI action that makes use of the new EF6 async query methods:
Interception and Logging
Interception and SQL logging allows you to view – or even change – every command that is sent to the database by Entity Framework. This includes a simple, human readable log – which is great for debugging – as well as some lower level building blocks that give you access to the command and results. Here is an example of wiring up the simple log to Debug in the constructor of an MVC controller:
Custom Code-First Conventions
The new Custom Code-First Conventions enable bulk configuration of a Code First model – reducing the amount of code you need to write and maintain. Conventions are great when your domain classes don’t match the Code First conventions. For example, the following convention configures all properties that are called ‘Key’ to be the primary key of the entity they belong to. This is different than the default Code First convention that expects Id or <type name>Id.
Connection Resiliency
The new Connection Resiliency feature in EF6 enables you to register an execution strategy to handle – and potentially retry – failed database operations. This is especially useful when deploying to cloud environments where dropped connections become more common as you traverse load balancers and distributed networks.
EF6 includes a built-in execution strategy for SQL Azure that knows about retryable exception types and has some sensible – but overridable – defaults for the number of retries and time between retries when errors occur. Registering it is simple using the new Code-Based Configuration support:
These are just some of the new features in EF6. You can visit the release notes section of the Entity Framework site for a complete list of new features.
Microsoft OWIN Components
Open Web Interface for .NET (OWIN) defines an open abstraction between .NET web servers and web applications, and the ASP.NET “Katana” project brings this abstraction to ASP.NET.
OWIN decouples the web application from the server, making web applications host-agnostic. For example, you can host an OWIN-based web application in IIS or self-host it in a custom process. For more information about OWIN and Katana, see What's new in OWIN and Katana.
Summary
Today’s Visual Studio 2013, ASP.NET and Entity Framework release delivers some fantastic new features that streamline your web development lifecycle. These feature span from server framework to data access to tooling to client-side HTML development. They also integrate some great open-source technology and contributions from our developer community.
Download and start using them today!


![clip_image002[4]](http://weblogs.asp.net/blogs/scottgu/clip_image0024_2CEC7258.jpg "clip_image002[4]")
• Guarav Mantri (@gmantri) reported A New Version Of Windows Azure Service Management API Is Available with Delete Specific Role Instances and More Goodies in a 10/16/2013 post:
Yesterday, while answering a question on Stack Overflow I came to know about the availability of some new features in Windows Azure Service Management API. This blog post will summarize some of those changes and will show some code to perform these new operations.
Version Number
As you know, each release of Service Management API has a unique version number and in order to use the features available in that version you must specify that version number in “x-ms-version” request header. The version number for this release (which includes all the cool new features) is “2013-08-01”.
Now that we have talked about the version number, let’s talk about the features.
Delete Role Instances
IMHO, this is one of the coolest and useful feature included in this release. In short, this operation allow you to specify the role instances you wish to remove from your cloud deployment. Earlier you didn’t have the control over which instances you want to remove but now you do. So, more power to you, which is always good. You can read more about this feature here: http://msdn.microsoft.com/en-us/library/windowsazure/dn469418.aspx.
There are some scenarios where this feature is super useful:
- You can use this option to intelligently scale down. Earlier scaling down would mean changing the “instance count” in your service configuration file and then perform “Change Deployment Configuration” operation. While this is perfectly fine however I see two issues with this approach:
- This is an error prone operation and you may end up making changes which you didn’t intend to make. This may create a havoc with your service.
- When you perform this operation, it is applied to all roles in your service and for a short amount of time your role instances will go down to apply these changes.

Picture above shows the status of my service immediately when I was trying to scale down my instance count. As you can see all of my services are in “RunningTransitioning” mode. However when you use “Delete Role Instances” operation, you know exactly which instances you want to take down and only those instances will be taken off of your deployment. All other instances and other services are not impacted at all. While scaling down, you can simply check which instances are not being used (using Windows Azure Diagnostics or other measures) and you remove those instances while scaling down.- Sometimes you just want to remove an instance which is not working properly. This feature would allow you to accomplish that.
One important thing: You can’t delete all role instances in your role using this operation.
Sample Code: [Deleted for brevity.]
List Subscription User Accounts
Ever wondered who all have management access to your subscription? Well you could always visit Windows Azure Portal to find that information but why go there when you can do it right from a console app (or PowerShell or whatever) without going through the portal. This can be accomplished by performing this operation. You can read more about this feature here: http://msdn.microsoft.com/en-us/library/windowsazure/dn469420.aspx.
Sample Code: [Deleted for brevity.]
List Role Sizes
As the name suggests, this operation list the role sizes that are available under your subscription. You can read more about this feature here: http://msdn.microsoft.com/en-us/library/windowsazure/dn469422.aspx.
Sample Code: [Deleted for brevity.]
Summary
Pretty interesting new features. Right??? My personal favorite is obviously “Delete Role Instances”. Let’s hope more new features are announced which will empower us developers. As always, if you find any issues with the post please let me know and I will fix them ASAP. Please feel free to share your thoughts by providing comments below.


Pradeep M G described Windows Azure support - How it works and how to receive help in a 2/14/2013 post to the Windows Azure Technical Support (WATS) blog:
Windows Azure is a great new family of cloud based services and features offered by Microsoft. As new innovations are made in the technology field, users may need help to- learn, understand different offerings and receive support to solve specific issues.
The purpose of this post is to present you with the various available options to receive support regarding Windows Azure components and its offerings. This post gives you an overview of the scenarios in which you may ask for help/suggestions in public forums, contact a Windows Azure support representative or simply provide feedback about the Windows Azure platform.
Compared to the still appealing on-premises products, the support model dedicated to Windows Azure is a bit different and I will try to outline the key points around it.
Windows Azure support scenarios can vary from commerce related topics to specific technical support ones. Based to the customer type, they can come from a person in their room developing the next killer app, or from one of the biggest manufacturing company moving to the cloud. I will write more about “size” in the Technical Support chapter below, because sometimes size does matter!
Topics covered in following chapters
- Classification of the two main support scenarios: Commerce support Vs. Technical support.
- Available Technical support plans with some tips to better understand which would be the best choice for you.
- How to open a generic service request from one of the Azure portals.
- Useful links to read more about Windows Azure.
Commerce/Billing support
Commerce support is also known as “Billing” support. Scenarios where you do not have any question or problem related to the delivery of a running service, already deployed in Windows Azure platform, will fall under the scope of commerce/billing support.
Examples of scenarios which fall under the commerce support scope are:
- Purchase/Pricing
- Account management
- Subscription management
- Usage/billing
- Portal feedback
- Credit/refund
- Invoicing enablement
- Enterprise Agreement assistance
- Technical integration (ie. Quota increase, Penetration testing)
- Legal and Compliance
The above list is not exhaustive although it gives you basic understanding to distinguish Billing support from Technical support.
Billing service requests can be created in both Azure Billing portal as well as Azure Management portal.
You get Commerce/Billing support for FREE
Currently, Commerce/Billing support is FREE for all Windows Azure users.
Even if you are trying Windows Azure for the first time using a Free Trial subscription, you are very welcome to open commerce tickets.
You can open an unlimited number of billing service requests in order to receive answers to your questions, clarifications to your doubts, step-by-step guidance through procedures.
You can use billing service requests to provide us feedback or clarify if a given problem you faced requires technical support or not.
In case your request does not fall under Commerce support scope, we will suggest you the best way to receive support for a specific topic according to your current plan.
Who usually needs commerce support?
Usually, commerce support is used by account administrators and enterprise administrators because the majority of the scenarios cover topics related to general management of the accounts/subscriptions.
Service administrators may request quota increase or clarifications about current services usage.
Based on the specific request, support team may ask account/enterprise administrator’s approval to proceed with service administrator’s request, for security compliance.
Technical support
You may need our Technical support to solve deployment specific problems involving production or test environment hosted on Windows Azure platform.
According to official WindowsAzure.com public portal:
Windows Azure offers flexible support options for customers of all sizes - from developers starting their journey in the cloud to enterprises deploying business critical applications. These support options provide you with the best available expertise to increase your productivity, reduce your business costs, and accelerate your application development.
Free support through public forums
Currently, free technical support can be received using the two main forums listed in http://www.windowsazure.com/en-us/support/forums/ :
Post questions in the Windows Azure forums.
Link
Tag questions with the keyword Azure.
LinkWindows Azure technical experts will help you with your queries.
There are also some interesting official blogs containing many technical articles that can help you. Check Useful links and references section at the bottom of this post for a couple of blog links!
Paid Technical Support plans
If you are a developer or a company who needs dedicated technical support, you can choose to purchase one of the paid plans offered by Microsoft.
Currently, the entry-level plan is called “Developer” which includes Web Incident Submission, Unlimited Break/Fix (24x7), Fastest Response Time< 8 hours.
“Standard” plan includes more features, eg. Phone support and faster response time (< 2 hours).
If you want Service Delivery Management, Priority case handling, Escalation phone Line and Advisory Support, you can choose “Professional Direct” plan.
The top technical support plan is called “Premier”, which includes all the features available in “Professional Direct” plus further benefits. Additional information on Premier Support, including how to purchase it, can be found here.
Windows Azure Support Features:
Note: Above offerings may vary in future and this table is indicative only. It is strongly suggested to visit http://www.windowsazure.com/en-us/support/plans/ for up to date plans and conditions.How to open a Billing/Technical support request
Service requests can be created from both Billing portal as well as Management portal following the below steps:
- Billing portal:
- Select target subscription and click on Contact Microsoft Support on the right side of the webpage.

Management Portal:
- Click on your account name and then click on Contact Microsoft Support
- Choose target subscription from dropdown menu and the specific Support type (Note: you need a paid technical support plan for Technical support enablement).
- You can also specify the preferred language and your location.It is very important you properly choose country/region and preferred language in order to receive support by an engineer close to your time frame and, possibly, speaking your language.
- Click on Create Ticket
- Follow on screen instructions to properly classify your request and provide a clear and specific description of the scenario/problem.
Once you complete these steps and submit your request, a support engineer will contact you as soon as possible to proceed with your request.
Useful links and references


David Linthicum (@DavidLinthicum) asserted “Even though they're derived from proven principles, these rules are often ignored by cloud deployers” in a deck for his 3 rules for getting top enterprise cloud performance article of 11/15/2013 for Infoworld’s Cloud Computing blog:
Cloud computing and high performance should go hand in hand. However, I've recently seen many cloud deployments with major performance issues. These issues could be easily avoided, given some good forethought and planning.
For the most part, companies that deploy cloud-based systems don't think much about performance. They are busy with other aspects or benefits of cloud, such as provisioning and elasticity.
To get the best performance, companies moving to cloud computing platforms -- whether public or private -- should consider these three rules.
Rule 1: The cloud rides on the network, so the network must be able to keep up
Companies that move applications and data to cloud, or perhaps build new systems on cloud-based platforms, often don't consider the network infrastructure. When relying on systems that are connected via the network, the network is everything. Slow networks mean slow systems and poor performance.Rule 2: Applications not optimized for cloud-based platforms rarely perform well
Many enterprise IT pros believe they can lift an application from a traditional on-premises platform and place it on a public cloud without a significant amount of redesign, and everything will end up fine. But how can applications not optimized for cloud-based platforms perform optimally on them? They can't, so you get higher operational costs and substandard performance.Rule 3: Consider the data
The manner in which the data is linked to the application is very important to cloud computing performance. Data that's tightly coupled to the application may not be able to take advantage of many performance-enhancing features of public clouds, such as placing database processing in a series of elastic instances or using database as a service in the host public cloud. You should place the data in its own domain to provide alternatives for faster performance, as well as the opportunity to reduce costs.These three rules are not complex or overreaching. The concepts are based on older, proven architecture principles. In other words, the more things change, the more they stay the same.

<Return to section navigation list>
Windows Azure Pack, Hosting, Hyper-V and Private/Hybrid Clouds
‡ Scott Guthrie (@scottgu) announced general availability of the Windows Azure Pack for free download in the Windows Azure Virtual Machines, Virtual Networks, Web Sites, Connect, RDP and CDN section above.
‡ Microsoft’s Server and Cloud Platform Team asserted “The Windows Azure Pack delivers Windows Azure technologies for you to run inside your datacenter. Offer rich, self-service, multi-tenant services and experiences that are consistent with Microsoft’s public cloud offering” in a deck for its new Windows Azure Pack product pages:
The Windows Azure Pack is a collection of Windows Azure technologies available to Microsoft customers at no additional cost. Once installed in your datacenter, the Windows Azure Pack integrates with System Center and Windows Server to help provide a self-service portal for managing services such as websites, Virtual Machines, and Service Bus; a portal for administrators to manage resource clouds; scalable web hosting; and more.
Cloud Cruiser (@CloudCruiserInc) asserted “Windows Azure private and hosted public clouds just got a lot more business savvy” in a preface to its Cloud Cruiser Cloud Financial Management Available with Windows Server 2012 R2 press release of 10/7/2013 (missed when published):
Cloud Cruiser, the pioneer in cloud financial management, today announced that Microsoft is making Cloud Cruiser available with Windows Server 2012 R2 via Windows Azure Pack, delivering advanced financial management, chargeback, and cloud billing to enterprises and hosters utilizing cloud solutions based on Windows Azure.
Cloud Cruiser works directly from the Windows Azure portal so customers can seamlessly manage both the operational and financial aspects of their Windows Azure cloud from a single pane of glass. The product enables customers to answer questions about their cloud business, such as:
- How can I automate my cloud billing or chargeback?
- Is my cloud profitable?
- Who are my top customers by revenue?
- What is the forecasted demand for my services?
- How can I use pricing as a strategic weapon?
“With Windows Azure Pack, enterprises and hosters gain the powerful capabilities of the Windows Azure public cloud in their datacenter or a hosted cloud,” states Ryan O’Hara, Director, Program Management, Microsoft Cloud and Enterprise Division. “Cloud Cruiser’s financial management solution gives customers insight into the transformative economics of Microsoft’s cloud technologies. With Microsoft and Cloud Cruiser customers can make real-time strategic business decisions that can drive greater efficiency and profitability.” ;
“The inclusion of Cloud Cruiser with Windows Server is a clear signal from the largest software company in the world that financial management is integral to every cloud strategy,” states Nick van der Zweep, VP of Strategy for Cloud Cruiser. “This relationship helps ensure that businesses can deliver innovative, scalable, and profitable cloud services.”
Cloud Cruiser’s latest release includes a next generation user interface (UI) that transforms IT usage data into financial intelligence. The new capabilities further empower business decisions through dynamic customer analysis, demand forecasting, profit analysis, and more. Additional capabilities include support for heterogeneous computing environments, such as industry-standard public and private cloud platforms, storage management, and applications.
Cloud Cruiser will be hosting a webinar to present a live demonstration of the financial management capabilities available with Windows Azure Pack on Wednesday, October 23 at 10:00 a.m. PST. Register here. For more information about the solution, visit Cloud Cruiser’s Microsoft Windows Azure page.
About Cloud Cruiser
Cloud Cruiser offers an innovative cloud financial management solution that was built from the ground up for the cloud economy. It maximizes freedom of choice for enterprises and service providers by providing dynamic financial intelligence, chargeback, and billing across heterogeneous IT environments. The solution is used by finance and IT professionals to achieve the low cost promise of the cloud and maximize profitability. Cloud Cruiser investors include ONSET Ventures and Wavepoint Ventures.

Microsoft’s Servers and Tools Business (STB) group published more details of the Windows Azure Pack in October 2013:
Overview
The Windows Azure Pack delivers Windows Azure technologies for you to run inside your datacenter, enabling you to offer rich, self-service, multi-tenant services that are consistent with Windows Azure.
The Microsoft Cloud OS: One Consistent Platform
The Cloud OS is Microsoft's vision of a consistent, modern platform for the world's apps running across multiple clouds; enterprise datacenters, hosting service provider datacenters and Windows Azure. The Windows Azure Pack helps to deliver on this vision by bringing consistent Windows Azure experiences and services to enterprise and hosting service provider datacenters with existing investments in System Center and Windows Server.
Benefits
The Windows Azure Pack is a collection of Windows Azure technologies available to Microsoft customers at no additional cost. Once installed in your datacenter, the Windows Azure Pack integrates with System Center and Windows Server to help provide the following capabilities:
Management portal for tenants
A Windows Azure-consistent, customizable self-service portal experience for provisioning, monitoring and management of services such as Web Sites, Virtual Machines and Service Bus.
Management portal for administrators
A portal for administrators to configure and manage resource clouds; user accounts; and tenant offers, quotas and pricing.
Service management API
The foundation for the capabilities in the management portal, the service management API is an OData REST API that helps enable a range of integration scenarios including custom portals and billing systems.
Web Sites
Consistent with Windows Azure Web Sites, this service helps provide a high-density, scalable shared web hosting platform for ASP.NET, PHP and Node.js web applications. It includes a customizable web application gallery of popular open source web applications and integration with source control systems for custom-developed web sites and applications.
Virtual Machines
Consistent with Windows Azure Virtual Machines, this service helps provide Infrastructure-as-a-Service (IaaS) capabilities for Windows and Linux virtual machines (VMs). It includes a VM template gallery, scaling options and virtual networking capabilities.
Service Bus
Consistent with Windows Azure Service Bus, this service helps provide reliable messaging services between distributed applications. It includes queued and topic-based publish/subscribe capabilities.
Automation and extensibility
The Windows Azure Pack also includes capabilities for automation and integrating additional custom services into the services framework, including a runbook editor and execution environment.

<Return to section navigation list>
Visual Studio LightSwitch and Entity Framework 4.1+
•• Beth Massi (@bethmassi) began a series with Beginning LightSwitch in VS 2013 Part 1: What’s in a Table? Describing Your Data on 10/17/2013:
NOTE: This is the Visual Studio 2013 update of the popular Beginning LightSwitch article series. For previous versions see:
- Visual Studio 2012: Part 1: What’s in a Table? Describing Your Data
- Visual Studio 2010: Part 1: What's in a Table? Describing your Data
Welcome to Part 1 of the Beginning LightSwitch in Visual Studio 2013 series! To get things started, we’re going to begin with one of the most important building blocks of a LightSwitch application, the table. Simply put, a table is a way of organizing data in columns and rows. If you’ve ever used Excel or another spreadsheet application you organize your data in rows where each column represents a field of a specific type of data you are collecting. For instance, here’s a table of customer data:
Customer table.
When you work with databases, the data is stored in a series of tables this way. You then create relationships between tables to navigate through your data properly. We’ll talk about relationships in the next post. For this post let’s concentrate on how to create and work with tables in LightSwitch.
Tables (Entities) in LightSwitch
Applications you build with LightSwitch are data-centric applications that provide user interfaces for viewing, adding, and modifying data. LightSwitch simplifies the development of these applications by using screens and tables. Because LightSwitch can work with other external data sources that do not necessarily have to come from a database, we sometimes call tables “Data entities” or just “entities” in LightSwitch. So whether you have a table in a database or a list in SharePoint, both the table and the list are entities in LightSwitch. Similarly, a field in a table or a column in a list is referred to as a “property” of the entity.
Entities are how LightSwitch represents data and are necessary to assemble an application. You create these data entities by using the built-in application database, or by importing data from an external database, OData service, a SharePoint list, or other data source. When you create a new project in LightSwitch, you need to choose whether you want to attach to an existing data source or create a new table. If you choose to create a new table, LightSwitch will create it in the built-in database, also referred to as the intrinsic database. You then design the table using the Data Designer.
When you create tables and relate them together you are designing a data model, or schema. Describing your data this way takes some practice if you’ve never done it before, however, you will see that it’s pretty intuitive using LightSwitch. The better you are at describing your data model, the more LightSwitch can do for you when you create screens later.
The LightSwitch Data Designer
The Data Designer is where all your data modeling happens in LightSwitch whether you’re attaching to an existing data source or creating a new database. By using the Data Designer, you can define properties on your entities and create relationships between them. LightSwitch handles many typical data management tasks such as field validation, transaction processing, and concurrency conflict resolution for you but you can also customize these tasks by modifying properties in the Properties window, and/or by writing code to override or extend them.
Not only is LightSwitch managing the underlying database tables for you as you model entities, it is also is creating a service layer automatically that can expose data via the OData protocol. This allows other business systems and external clients (like Excel for instance) to connect to your data easily and securely. Any business logic and user permissions that you have written on your entities will execute as well, no matter what client is accessing the services.
- For a tour of the Data Designer, see Data: The Information Behind Your Application
- For a video demonstration on how to use the Data Designer, see: How Do I: Define My Data in a LightSwitch Application?
- For more information on OData services in LightSwitch see: Creating and Consuming LightSwitch OData Services.
- For more information on the overall architecture of a LightSwitch application see: Exploring LightSwitch Architecture
Creating a “Contact” Entity
Let’s walk through a concrete example of creating an entity. Suppose we want to create an application that manages contacts, like an address book. We need to create an entity that stores the contact data. First open Visual Studio 2013 (Professional or higher). Then select your language of choice, Visual Basic or C#, then select the LightSwitch node and choose the type of application you want to build. For this series we will build an HTML application. (If you want to build a desktop Silverlight application, see the 2012 series.) Name the project ContactManager.
After you click OK on the New Project dialog, the LightSwitch home page will ask you if you want to create a new table or attach to an external data source.
Click “Create new table” and this will open the Data Designer. Now you can start describing the contact entity. Your cursor will be sitting in the title bar of the entity window when it opens. Name it “Contact” and hit the Enter key.
Once you do this you will see “Contacts” in the Solution Explorer under the ApplicationData node in the Data Sources folder. ApplicationData represents the intrinsic (internal) database that LightSwitch creates for you. Contacts refers to the table in the database that stores all the contact rows (or records). You can also think of this as a collection of entities, that’s why LightSwitch makes it plural for you.
Now we need to start defining properties on our entity, which correlates to the columns (or fields) on the table. You should notice at this point that the Contact entity has a property called “Id” that you cannot modify. This is an internal field that represents a unique key to the particular row of data. When you model tables in a database, each row in the table has to have a unique key so that a particular row can be located in the table. This Id is called a primary key as indicated by the picture of the key on the left of the property name. It is always required, unique, and is stored as an integer. LightSwitch handles managing primary keys automatically for you.
So we now need to think about what properties we want to capture for a contact. We also will need to determine how the data should be stored by specifying the type and whether a value is required or not. I’ve chosen to store the following pieces of data: LastName, FirstName, BirthDate, Gender, Phone, Email, Address1, Address2, City, State and ZIP. Additionally, only the LastName is required so that the user is not forced to enter the other values.
Also notice that I selected types that most closely match the type of data I want to store. For Phone and Email I selected the “Phone Number” and “Email Address” types. These business types give you built-in validation and editors on the screens. The data is still stored in the underlying table as strings, but is formatted and validated on the screen automatically for you. Validation of user input is important for keeping your data consistent. From the Properties window you can configure rules like required values, maximum lengths of string properties, number ranges for numeric properties, date ranges for date properties, as well as other settings. You can also write your own custom validation code.
If you don’t see the Properties window hit F4 to open it. Select a property on the entity and you will see the related settings you can configure for it depending on the perspective as indicated at the bottom of the designer. The Server perspective allows you to configure the storage and validation properties as well as the default display name of the field.
Depending on the type of data you chose for the property, you will see different settings. All properties have an “Appearance” section in the property window that allow you specify the Display Name that will appear in field labels on screens in the application. By default, if you use upper camel case (a.k.a Pascal case) for your entity property names then LightSwitch will put a space between the phrases. For instance, the Display Name for the “LastName” property will become “Last Name” automatically. So it’s best practice to use this casing for your entity properties.
If you are supporting multiple languages then you will use the Display Name to set the resource identifier instead. For more information, see this Walkthrough: Localizing a LightSwitch Application
Settings you make here in the Data Designer affect all the screens in the application. Although you can make additional customizations on particular screens if needed, you will spend the bulk of your time configuring your data model here in the Data Designer. That way, you don’t have to configure settings every time you create a new screen. The better you can model your entities, the more LightSwitch can do for you automatically when creating the user interface.
For the Contact entity let’s set a few additional settings. First, select the Id field and in the Appearance section, uncheck “Display by default”. This makes it so that the property doesn’t show up anywhere in the user interface. As mentioned earlier, the primary key is an internal field used to locate a row in the table and isn’t modifiable so the user does not need to see it on any screens in the application.
For BirthDate, set the minimum value to 1/1/1900 so that users can’t enter dates before that.
You could also set a maximum value here, but that would hard-code a static value in the validation check. Instead, we probably want to check the value dynamically in code. In fact, it’s going to be very common to write snippets of code to perform common validations on data. For instance, what if we want to make sure that the user doesn’t enter a date in the future? Click on the “Custom Validation” link in the properties window and provide the code to do the check. This check always runs on the server any time a contact is being saved.
VB:
Private Sub BirthDate_Validate(results As EntityValidationResultsBuilder)
    'Write code here:
    If Me.BirthDate.HasValue AndAlso Me.BirthDate > DateTime.Today Then
        results.AddPropertyError("Birthdate cannot be in the future.")
    End If
End Sub
C#:
partial void BirthDate_Validate(EntityValidationResultsBuilder results)
{
    //Write code here:
    if (this.BirthDate.HasValue && this.BirthDate > DateTime.Today)
    {
        results.AddPropertyError("Birthdate cannot be in the future.");
    }
}
For more information on validation rules see: Common Validation Rules in LightSwitch Business Applications
For Gender, we want to display a fixed set of static values to the user: “Female”,“Male”. In order to do this in LightSwitch we can use a Choice List. A choice list is appropriate for choices that are always static and relatively small like gender in this case or “Yes/No” values. If your list of choices is dynamic (or is a very large list) then you should create a table to hold the lookup values and then relate that to your master table via a many-to-one relationship. This will cause LightSwitch to automatically create a picker list for you on screens. More on relationships in the next post.
Click on “Choice List…” on the Properties window and this will open a window that will let you define the values that are stored in the table and the display name you want the user to see. For our purposes, we just want to store an “F” or “M'” in the underlying database table. Therefore, also set the Maximum Length to 1.
By default, maximum lengths of strings are set to 255 characters and should handle most cases, but you can change this for your needs. (Tip: If you want to store a string as varchar(max) in the database, just erase the 255 value so the field remains blank.)
Using the Properties window you can also configure settings on the entity itself. Select the title bar of the Contact entity in the Server perspective. You’ll notice a checkbox on in the properties window that defaults to “Enable Created/Modified properties”. When checked, this tells LightSwitch to automatically track when the record was created or modified and by who. This will automatically add four fields to the table: Created (DateTime), CreatedBy (String), Updated (DateTime) and UpdatedBy (String). The fields are not shown in the Data Designer, but will appear in the Screen Designer so you can choose whether to display them or not.
Now switch to the Client Perspective. Notice that there is a setting called Summary Property. Summary properties are used to “describe” your entity and are used by LightSwitch to determine what to display when a row of data is represented on a screen. By default, LightSwitch selects the first string property you defined on your entity but you can change that here.
For more information on Summary Properties see: Getting the Most out of LightSwitch Summary Properties
Testing the Contact Entity
Now that we have the Contact entity designed, let’s quickly test it out by creating a screen. At the top of the Data Designer click the “Screen…” button to open the Add New Screen dialog. We’ll talk more about screens in a future post but for now just select the Browse Data screen. Then drop down the Screen Data and select Contacts and then click OK.
This will open the screen designer with a default layout which shows the contacts in a simple list. We’ll talk more about how to customize screens later. For now, let’s add some adding & editing capabilities to this app. Expand the Command Bar node, Click Add… to add a new button, then choose an existing method: addAndEditNew.
Notice that LightSwitch provides predefined actions to automatically interact with our entities. We’ll dive more into these commands later.
When we select addAndEditNew command we need to also specify the screen to navigate to. LightSwitch detects we need a new screen so just click OK. This will open up the Add New Screen dialog again with all the selections made for us. Click OK to add the new AddEditContact screen to our app.
We can also wire up a tap event so that when a user touches/clicks a contact in the list, they can also edit the details as well. Flip back to the BrowseContact screen, select the Contacts list, and in the Properties window click the Tap action.
Choose an existing method but this time select editSelected. LightSwitch will notice that we already have a screen that can do this and automatically fills that in for us. Click OK.
To build and launch the application hit F5. Now you can enter information into the contact table using this screen. Click the Add Contact button on bottom of the screen to add new contacts.
Notice that if we do not enter a Last Name an error will display on the screen indicating it’s a required field. Also if you enter invalid data as specified by the settings we made, a validation error will also be displayed. Also notice that as you resize your screen, LightSwitch will automatically resize the layout for you. This responsive design makes it so that the app will display nicely on tablets, phones, and any modern device that supports HTML5.
For more information on the user experience LightSwitch provides with its HTML client see: A New User Experience
When you are done editing, click the Save button at the top of the dialog. This will save the data back into your development database. This is just test data stored in your internal database while you develop the application. Real data doesn’t go into the system until you deploy the application to your users.
In the next post we’ll talk about relationships and build upon our data model.


•• Rowan Miller reported EF6 RTM Available in a 10/17/2013 post to the ADO.NET Blog:
Today we are pleased to announce the RTM of Entity Framework 6. The RTM of Visual Studio 2013 was also released today – you can read more about this release on Soma’s blog. Be sure to save the date for Visual Studio 2013 Launch on Nov 13th.
Getting EF6
The runtime is available on NuGet. If you are using Code First then there is no need to install the tooling. Follow the instructions on our Get It page for installing the latest version of Entity Framework runtime.
The tooling for Visual Studio 2013 is included in-the-box. If you are using Visual Studio 2012, the tooling is available on the Microsoft Download Center. You only need to install the tooling if you want to use Model First or Database First.
Note: In some cases you may need to update your EF5 code to work with EF6, see Updating Applications to use EF6.
What’s New in EF6
Tooling
The focus for the tooling in EF6 was to add support for the EF6 runtime and to enable shipping out-of-band between releases of Visual Studio.
The tooling itself does not include any new features, but most of the new runtime features can be used with models created in the EF Designer.
Runtime
The following features work for models created with Code First or the EF Designer:
- Async Query and Save adds support for the task-based asynchronous patterns that were introduced in .NET 4.5.
- Connection Resiliency enables automatic recovery from transient connection failures.
- Code-Based Configuration gives you the option of performing configuration – that was traditionally performed in a config file – in code.
- Dependency Resolution introduces support for the Service Locator pattern and we've factored out some pieces of functionality that can be replaced with custom implementations.
- Interception/SQL logging provides low-level building blocks for interception of EF operations with simple SQL logging built on top.
- Testability improvements make it easier to create test doubles for DbContext and DbSet when using a mocking framework or writing your own test doubles.
- DbContext can now be created with a DbConnection that is already opened which enables scenarios where it would be helpful if the connection could be open when creating the context (such as sharing a connection between components where you can not guarantee the state of the connection).
- Improved Transaction Support provides support for a transaction external to the framework as well as improved ways of creating a transaction within the Framework.
- Enums, Spatial and Better Performance on .NET 4.0 - By moving the core components that used to be in the .NET Framework into the EF NuGet package we are now able to offer enum support, spatial data types and the performance improvements from EF5 on .NET 4.0.
- Improved performance of Enumerable.Contains in LINQ queries.
- Improved warm up time (view generation), especially for large models.
- Pluggable Pluralization & Singularization Service.
- Custom implementations of Equals or GetHashCode on entity classes are now supported.
- DbSet.AddRange/RemoveRange provides an optimized way to add or remove multiple entities from a set.
- DbChangeTracker.HasChanges provides an easy and efficient way to see if there are any pending changes to be saved to the database.
- SqlCeFunctions provides a SQL Compact equivalent to the SqlFunctions.
The following features apply to Code First only:
- Custom Code First Conventions allow write your own conventions to help avoid repetitive configuration. We provide a simple API for lightweight conventions as well as some more complex building blocks to allow you to author more complicated conventions.
- Code First Mapping to Insert/Update/Delete Stored Procedures is now supported.
- Idempotent migrations scripts allow you to generate a SQL script that can upgrade a database at any version up to the latest version.
- Configurable Migrations History Table allows you to customize the definition of the migrations history table. This is particularly useful for database providers that require the appropriate data types etc. to be specified for the Migrations History table to work correctly.
- Multiple Contexts per Database removes the previous limitation of one Code First model per database when using Migrations or when Code First automatically created the database for you.
- DbModelBuilder.HasDefaultSchema is a new Code First API that allows the default database schema for a Code First model to be configured in one place. Previously the Code First default schema was hard-coded to "dbo" and the only way to configure the schema to which a table belonged was via the ToTable API.
- DbModelBuilder.Configurations.AddFromAssembly method allows you to easily add all configuration classes defined in an assembly when you are using configuration classes with the Code First Fluent API.
- Custom Migrations Operations enabled you to add additional operations to be used in your code-based migrations.
- Default transaction isolation level is changed to READ_COMMITTED_SNAPSHOT for databases created using Code First, allowing for more scalability and fewer deadlocks.
- Entity and complex types can now be nested inside classes.
Improving Startup Performance
The 6.0.1 Patch Release
The 6.0.0 version of the EF package needed to be locked down early to be included in Visual Studio, ASP.NET, etc. After this lock down a number of important issues came to our attention that we felt were important to fix ASAP.
To deal with this, we are also publishing an EF 6.0.1 patch on NuGet today. If you install from NuGet you will automatically get the latest patch version. If you use a VS2013 project template that already has EF6 installed, or if the EF6 tooling installs the NuGet package for you, we would recommend updating to the latest patch version. You can do this by running Update-Package EntityFramework in Package Manager Console.
The 6.0.1 patch release is limited to fixing issues that were introduced in the EF6 release (regressions in performance/behavior since EF5). The most notable changes are to fix some performance issues during warm-up for EF models – this was important to us as we significantly improved model warm-up time in other areas in EF6 and have been listing it as a feature. You can see a complete list of the individual fixes on our CodePlex site.
Improving Performance with Ngen
Prior to EF6, a large portion of Entity Framework was included in the .NET Framework. This meant that most of Entity Framework automatically has native image generation run on it to reduce the just-in-time (JIT) compilation cost.
Because EF6 ships as a completely out-of-band release, native image generation is no longer performed automatically. This can result in an increased warm-up time for your application while JIT compilation occurs – we have seen results of around 1 second.
To remove this JIT time you can use Ngen to generate native images for the Entity Framework assembly on your machine.
- Run the Developer Command Prompt for VS2013 as an administrator
- Navigate to the directory that contains EntityFramework.dll
This will be something like <my_solution_directory>\packages\EntityFramework.6.0.1\lib\net45- Run Ngen Install EntityFramework.dll
Make sure you read the Ngen.exe one-page documentation in MSDN to determine what strategy makes more sense for you. Not all scenarios will benefit equally from an ngen’d EntityFramework assembly. Furthermore, as with any use of ngen, determine if your scenario degrades when ngen isn’t applied with Hard Binding. Test your options and do what gives you best results.
Contributors
For EF6 we moved to an open source development model. We would like to thank the following contributors for helping to make EF6 a great release.
- AlirezaHaghshenas
- brentmckendrick
- ErikEJ
- hvdijk
- iceclow
- IDisposable
- martincostello
- Tamasflamich
- UnaiZorrilla
- XIU
What’s Next
We’re currently in the planning phase for the releases that will follow EF6. We’ll post up a roadmap and plans once we’ve got something a little more concrete.

• Beth Massi (@bethmassi) and the Visual Studio LightSwitch Team reported Visual Studio 2013 Released – Thank You LightSwitch Community! on 10/17/2013:
Soma just announced that Visual Studio 2013 has been released to the web!
We are super excited to get this release out the door and into your hands. Visual Studio 2013 contains a ton of new tools for developers to build best of breed, modern applications and services.
WHAT’S NEW?
For starters, all the goodness we released starting in Visual Studio 2012 Update 2 is also part of Visual Studio 2013. This means you can build cross-browser, mobile-first HTML5 apps that can run on any modern touch device and optionally publish these apps to a SharePoint 2013 app catalog.
In addition, you’ll find a lot of new LightSwitch features in this release, things like:
New Office 365 Cloud Business App project type
- Better Team Development Support:
- Database Projects (SSDT) Support
- Solution Explorer Enhancements & Multi-Designer Support
- New Table Control
- DateTimeOffset Support
- Choice List Improvements
- Created By / Modified By fields on tables
- Person Business Type
- SharePoint social & Lync integration
- And much more!
We’ll continue to dive into the details with more posts. For now, head to the LightSwitch Developer Center and take a look at some of our new resources. You can also read about What’s New in Visual Studio 2013.
We are also happy to announce the release of a new LightSwitch Extensibility Toolkit for Visual Studio 2013! Head to the Extensibility page on the Dev Center for more details.
THANK YOU!
On behalf of the LightSwitch team I want to thank all of you who reported bugs and suggestions through our forum, connect, UserVoice, this blog, and emails to the team. Many of the most valuable product improvements are drawn from forum posts and discussions. We very much appreciate you taking the time to try the Visual Studio 2013 prereleases and provide feedback. Thank you especially to these folks who helped us track down the trickiest of bugs and dedicated time out of their busy schedules to work with us directly on fixing issues and making LightSwitch the best release it could be!
LAUNCH!
Mark your calendars and join us on the Visual Studio 2013 virtual launch event on November 13th. There will be live streaming of the launch keynotes and a ton of on-demand videos on all the new features in Visual Studio – directly from Visual Studio team members. And stay tuned for more samples, articles and videos here from the LightSwitch team!
Enjoy,
-Beth Massi, Community Manager, Visual Studio LightSwitch Team


Julie Lerman (@julielerman) described The somewhat super secret MSDN docs on EF6 in a 10/15/2013 post:
Along with all of the great info on entityframework.codeplex.com, the MSDN Library has a bunch of documents targeting EF6, currently listed as “Future Version”. There is a “Future Version of EF” page but it doesn’t have links to these articles. And I’ve found some of these to be more current than their related specs on Codeplex.
I’ve only ever found them accidentally via GoogleBing or when bugging someone on the EF team and they send me a link. Since I haven’t found a single location with these links, I am really just selfishly creating this list for myself.
Keep in mind that I may have missed some!
- Testing with a mocking framework (EF6 onwards)
- Testing with your own test doubles
- Limitations with Retrying Execution Strategies
- Entity Framework Code-Based Configuration
- Entity Framework Async
- Entity Framework Connection Management
- Entity Framework 6 (EF6) Providers
- Entity Framework Custom Code First Conventions
- Entity Framework IQueryable doesn't implement IDbAsyncEnumerable
- Entity Framework IDbDependencyResolver Services
- Entity Framework Customizing the Migrations History Table


<Return to section navigation list>
Cloud Security, Compliance and Governance
• Sandrino Di Mattia (@sandrinodm) described Using your Belgian eID or any other smartcard to securely deploy Windows Azure Cloud Services on 10/16//2013:
Just like most people I love how easy it is to work with the Windows Azure platform. You download a publish settings file, import it in Visual Studio and now you have access to the complete subscription. Besides that you can use it in the PowerShell Cmdlets, in the azure-cli, use it in combination with the Service Management API…
But what happens when other people get a hold of your publish settings file? Do you realize they can access all your data? That they can connect to your Cloud Services using Remote Desktop and get a hold of your code? That they can stop Virtual Machines and download the disks? …
Now before reading the rest of this post, I suggest you go to the Windows Azure portal, to the Settings menu and finally the Management Certificates tab. How many certificates do you see? 10? 20? 100? Most of these certificates come from a publish settings file (which is just an XML file that contains your subscriptions and a certificate). For each certificate you see there, do you know who has access to them?
Oh and while we’re at it, do you know how secure these publish settings file are exactly? Well, … they’re not. If someone steals your USB-stick, your laptop or any other device holding your publish settings file then I suggest you quickly remove those certificates from the portal.
Reducing the attack surface
So what we tend to do is split up our subscriptions. For example, we have a subscription that we use for Trainings and Demos and for each project we have a subscription in which we run the Test and CI environments. The worst thing that could happen here is that if people get access to these subscriptions they might get a hold of our code. But the data and the privacy of our users could not be compromised.
Now for each production environment of our projects we have a different subscription. And only a handful of people have access to these subscriptions. Now in order to improve security (I’m not saying you’ll close down everything) you could choose not to use a publish settings file.
If you remember the good olden days of Windows Azure, you had to generate a certificate, upload it to the portal and copy your subscription id from here to there. Let’s see how we can integrate this with a smartcard (or something similar like a dongle).
Smartcards…
So here in Belgium most of us have a Belgian eID (a smartcard) which holds our personal information, including 2 certificates which can be used for authentication and for signing. Here is a picture of my eID (where I look like an escaped convict):
If you connect the smartcard using a card reader it will install the public key of the certificate on your machine (in the Current User\Personal Store):
But the private key will remain on the card and as soon as you’ll try to access it you’ll need to enter a pin code. This means that you’ll have 2 extra layers of security before people could access that certificate. First they would need to get a hold of your card and second they would also need to know your PIN code.
Linking your smartcard to your subscription
So the first thing I’ll do is go to my Personal store (using Start > Run > certmgr.msc) and export the certificate intended for authentication. I’m unable to export the private key (which is a good thing!) and I’ll simply export it to sandrino.cer
Now go to the Management Portal, open the Settings menu, open the Management Certificates tab and click the Upload button. This is where you’ll be uploading the *.cer file (the public key):
As you can see it’s very clear which certificate belongs to me. If I would ever leave the company or no longer work for that customer, the administrator could simply remove the certificate with my name on it and that would be the end of it.
Securely deploying our Cloud Service
Now whenever you want to deploy a Cloud Service in Visual Studio you’ll see the Sign In page:
This is where you typically import the publish settings file. Don’t. In the dropdown choose the Manage option and add a new subscription. Choose the certificate from your smartcard (the thumbprint will match the one you’ll see in the portal) and enter the subscription ID (also from the portal). Press OK:
Uh-oh!? Visual Studio is trying to access my private key and the smartcard kicks in, which requires me to enter my PIN code first. Something you’ll want to try next is remove the card, restart Visual Studio and try to publish your project:
Yes indeed. In order to authenticate to the Service Management API, Visual Studio needs your private key (which is stored on your smartcard). By using this for you “production subscriptions”, it would mean Visual Studio will always ask for your smartcard & PIN code before it can do anything with your subscription.
What about my PowerShell scripts?
Just like Visual Studio, you can use the PowerShell Cmdlets with a publish settings file or with a certificate. If you want to use a certificate, you’ll need to run this:
Set-AzureSubscription -SubscriptionName “My Subscription” -SubscriptionId <paste-your-id-here> -Certificate C:\path\to\your\public\key.cer
Now this means you can also use the PowerShell Cmdlets together with you smartcard (the “insert smartcard” and “enter PIN” screens are handled automatically by your smartcard):
Just my 2 cents
Authenticating using a smartcard will add some friction to the “Windows Azure experience”, but it’s up to you to decide whether you need it or not on your project. Just keep in mind that users are trusting you with their personal information, so you should at least have some governance in place.


<Return to section navigation list>
Cloud Computing Events
• Christian Booth (@ChBooth) announced the Cloud OS Community Relay (UK) to be held in November 2013 throughout the UK:
Join Microsoft and a panel of MVP speakers at the Cloud OS Relay, to learn about the Cloud OS and how this technology suite from Microsoft can transform your business. Speakers such as Gordon McKenna, David Allen, Damian Flynn, and Simon Skinner and more will be covering all things Cloud OS! The big topics of these sessions will be:
- Windows Hyper-V
- Servicing the Private Cloud
- System Center in Action
Windows Azure Pack
- System Center: Operations Manager
- System Center: Configuration Manager
Simon Skinner, one of our Cloud and Datacenter MVP will be hosting these sessions throughout the UK at the following locations:
Where and when are the events;
- 11/11/13 Reading Microsoft Campus Thames Valley Park, Reading, RG6 1WG - Register
- 12/11/13 Southampton Wells Place Centre, Wells Place, Eastleigh, Hampshire, SO50 5LJ - Register
- 13/11/13 Cardiff Bay Creative Centre, Aberdare House, Mount Stuart Square, Cardiff Bay, CF10 5FJ - Register
- 14/11/13 Birmingham Highbury Hall, 4 Yew Tree Road, Moseley, Birmingham, B13 8QG - Register
- 15/11/13 Hemel Hempstead Shendish Manor, London Road, Hemel Hempstead, Herts, HP3 0AA - Register
- 25/11/13 Newcastle St James Park, Newcastle upon Tyne, NE1 4ST - Register
- 26/11/13 Manchester Mechanics Conference Centre, 103 Princess St, Manchester, M1 6DD - Register
- 27/11/13 Norwich The King's Centre, King Street, Norwich NR1 1PH - Register
- 28/11/13 Bristol Thistle Bristol City Centre,The Grand, Broad Street, Bristol BS1 2EL - Register
- 29/11/13 London Microsoft, Cardinal Place, 80-100 Victoria Street, London SW1E 5JL - Register
You can find out more details, and see any additional dates at http://www.cloudoscommunity.com/cloudOSrelay
/Enjoy!
Christian Booth (ChBooth) | Sr. Program Manager | System Center

Steve Evans (@scevans) will present Learn what Azure developers need to know about networking (The TCP/IP kind) to the San Francisco Bay Area Azure Developers group at 6:30 pm on 10/22/2013 at Microsoft’s San Francisco office:
In today’s world it’s rare to write an application that doesn’t rely on the network, and it's really rare for an Azure developer, but so few of us know how to troubleshoot networking issues. Stop wondering if it’s your code or the network, I’ll show you how to point the finger at the right culprit.
We will follow the life of an HTTP packet as it goes from your web browser to your Azure application and back. Learn how to determine what stopped the mission of that packet and why. Was it name resolution? TCP Port availability issues? Do we need to sniff the packets to find the problem? This session will make you a better programmer regardless of the technology you are using.
Speaker Bio
Steve Evans is a Microsoft Most Valuable Professional (MVP), Pluralsight Author, and technical Speaker at various industry events. He has worked as a Senior Systems Engineer for over 14 years. Steve focuses on improving technology by bridging the gap between IT and Development teams.
You can follow his technical blog at http://www.LoudSteve.com or find him on twitter at @scevans.

<Return to section navigation list>
Other Cloud Computing Platforms and Services
•• Jeff Barr (@jeffbarr) described Audio Support for the Amazon Elastic Transcoder in a 10/17/2013 post:
The Amazon Elastic Transcoder gives you the power to convert or transcode media files from one format to another, making it possible for you to create files that are compatible with smart phones, tablets, PCs, and other devices without having to worry about servers, storage, scalability, or a host of other issues.
We are adding audio transcoding support to the Elastic Transcoder today. You can transcode existing audio files (e.g. music and podcasts) to new formats, and you can strip out the audio tracks from video files to create audio-only streams. You can use this option to create audio podcasts from video originals and to support iOS applications that require an audio-only HTTP Live Streaming (HLS) file set.
You transcode audio files in much the same way that you transcode video files. You create a transcoding pipeline (or use an existing one), and then create a transcoding job. The transcoding job can use one of the new audio transcoding system presets or your own custom presets. You can create audio output using the AAC, Vorbis, or MP3 codecs.
Audio transcoding is billed at the rate of $0.0045 (less than 1/2 of a cent) per minute of audio output in the US East (Northern Virginia) Region; see the Elastic Transcoder Pricing page for information on pricing in the other AWS Regions. You also get 20 minutes per month of audio transcoding as part of the AWS Free Usage Tier.
As always, this new feature is available now and you can start using it today!


• Jeff Barr (@jeffbarr) reported the availability of Amazon CloudFront - Content Uploads Via POST, PUT, other HTTP Methods in a 10/15/2013 post:
As a regular reader of this blog you probably know a thing or two about Amazon CloudFront and have a decent understanding of the basic value proposition: it is a scalable, easy to use web service for content delivery, with a pay-as-you-go pricing model and the ability to accelerate the delivery of static and dynamic web content. With features such as SSL support, root domain hosting, and custom error pages, CloudFront addresses the needs of just about any web site.
The Round Trip
Today we are adding an important new feature that will make CloudFront even more useful. You can now configure any of your CloudFront distributions so that they support five additional HTTP methods: POST, PUT, DELETE, OPTIONS, and PATCH.
Up until today, you could use CloudFront to efficiently distribute content from the "center" (the static or dynamic origin) out to the edges, where the customers are located. With today's release you can also use CloudFront to accelerate the transfer of information from the end-user back to the origin. This has been the top feature request for CloudFront.
You will see a number of architectural and operational benefits from this feature.
First and foremost, you can now place a single CloudFront distribution in front of your site, including the dynamic or interactive portions that make use of HTML forms or accept user data in some other way. You no longer have to create and manage multiple distributions or domain names in order to accept POST or PUT requests.
Second, your users can now benefit from accelerated content uploads. After you enable the additional HTTP methods for your application's distribution, PUT and POST operations will be sent to the origin (e.g. Amazon S3) via the CloudFront edge location, improving efficiency, reducing latency, and allowing the application to benefit from the monitored, persistent connections that CloudFront maintains from the edge locations to the origin servers.
Last, but not least, you can now use CloudFront for web sites that support a resource-oriented REST-style web service API, where the GET, PUT, DELETE, and PATCH operations act on stored information. In case you didn't know (I definitely didn't), the PATCH operation allows you to replace all or part of an existing object.
Accelerate!
You can add this behavior to an existing distribution or you can enable it when you create a new distribution, by setting the Allowed HTTP Methods option:

You shouldn't need to make any changes to your application: CloudFront simply proxies the requests for the new HTTP methods via the edge. HEAD and GET requests are cached; all others are passed along to the origin.
Available Now
This new feature is available now and you can start using it today.Data transfer from the edge to the origin is priced up to 83% lower than data transfer from the edge to end users. For example, data transfer from CloudFront edge locations in the US or Europe to your origin server is $0.02 / GB. Detailed pricing information is available on the Amazon CloudFront Pricing Page.


Marcel van den Berg (@marcelvandenber) reported Release: VMware announces vCloud Operations Management Suite 5.8 in a 10/15/2013 post to the CloudComputing.info blog:
vCenter Operations Management Suite version 5.8 has 4 new features:
monitor business critical applications
- monitor fiber channel storage
- monitor Hyper-v servers
- monitor Amazon AWS services
Monitor business critical applications
In the 5.8 release application monitoring is limited to Microsoft Exchange Server and SQL Server. vCenter Operations Management Packs for Microsoft applications will be available to get insight into the health of Microsoft applications. A management pack (MP) provides knowledge about an application. The MP will be able to discover application inter-dependencies and services. Also there is knowledge about what metrics to measure, what thresholds to set etc. The management packs for SQL and Exchange will provide health information for clusters. So it shows servers and instances in Database Availability Groups for example. And it shows the status of services like MSSQL Agent, MSSQL Analysis, MSSQL Report and MSSQL database. It also shows when for example the CPU has a high utilization indicating something is wrong.The 3th pary OS and application management packs are part of the vCenter Operations Management Suite Enterprise edition.Microsoft System Center Operations Manager (SCOM) also uses Management Packs. However these will go much deeper inside the applications than vCenter Operations. I believe vCenter Operations focusses mainly at the infrastructure level of the application.
Monitor fiber channel storage
Storage Analytics is another new feature of vCOPS. It allows a deep insight into the status of the Host Bus Adapter, Fabric and Storage array. It will answer questions like ‘why is my virtual machine slow?’. In this 5.8 release monitoring is limited to fiber channel storage. iSCSI and NFS support will come soon. The admin will get insight in latency and throughput. Errors like CRC, link loss and timeouts are being monitored and admins gets alerts.The infrastructure management packs are part of the vCenter Operations Management Suite Advanced & Enterprise edition.
Amazon AWS and Hyper-V support
vCOPS uses vCenter Hyperic and Hyperic Management Pack for monitoring Hyper-V. An Hyperic agent is deployed on the Hyper-V server to get insight. It does monitoring of CPU, memory, disk and network. It is able to show capacity and performance of storage volumes. There are two ways to get information form the Hyper-V servers and VM’s running on it. Either by the Hyperic management pack for vCenter Operations, or by the SCOM management pack for vCenter Operations. The later is usefull for SCOM users. It is a kind of gateway between SCOM and vCenter Operations Manager.
Amazon services like EC2, Elastic Block Store, Elastic Map Reduce, Elastic Load Balancing and Auto Scaling Group can be monitored using the AWS management pack. The MP connects to the Cloudwatch service provided by Amazon. This is a REST API service. vCOPS provides a VM utilization dashboard showing performance statistics like cpu usage, memory usage, disk read etc for Amazon VM’s.


<Return to section navigation list>


0 comments:
Post a Comment