Windows Azure and Cloud Computing Posts for 9/20/2012+
| A compendium of Windows Azure, Service Bus, EAI & EDI, Access Control, Connect, SQL Azure Database, and other cloud-computing articles. |

•• Updated 9/22/2012 12:00 PM PDT with new articles marked ••.
• Updated 9/21/2012 4:30 PM PDT with new articles marked •.
Tip: Copy bullet(s) or dagger, press Ctrl+f, paste it/them to the Find textbox and click Next to locate updated articles:
Note: This post is updated daily or more frequently, depending on the availability of new articles in the following sections:
- Windows Azure Blob, Drive, Table, Queue, Hadoop and Media Services
- Windows Azure SQL Database, Federations and Reporting, Mobile Services
- Marketplace DataMarket, Cloud Numerics, Big Data and OData
- Windows Azure Service Bus, Access Control, Caching, Active Directory, and Workflow
- Windows Azure Virtual Machines, Virtual Networks, Web Sites, Connect, RDP and CDN
- Live Windows Azure Apps, APIs, Tools and Test Harnesses
- Visual Studio LightSwitch and Entity Framework v4+
- Windows Azure Infrastructure and DevOps
- Windows Azure Platform Appliance (WAPA), Hyper-V and Private/Hybrid Clouds
- Cloud Security and Governance
- Cloud Computing Events
- Other Cloud Computing Platforms and Services
Azure Blob, Drive, Table, Queue, Hadoop and Media Services
• Haddy El-Haggan (@hhaggan) described Windows Azure Table Storage in a 2/19/2012 post:
Introducing Windows Azure Storage Architecture, here is a new kind of Windows Azure Storage. Just remember it is windows azure storage because the data management service on windows azure has several types of storage.
Windows Azure Table Storage is another type of windows azure storage, you might think of it as table but however I would prefer to think of it as special type of storage. You might think of it as table and comparing it to the SQL Azure, there are a lot of points of points that you may want to differ and others in common. You will find all the require things about the SQL Azure in this post. So the table storage is composed of tables and has something like the primary key for SQL Azure, called the partition key.
The partition key is not for the whole table it is made to partition your table along the whole infrastructure. In other words, let’s imagine a table with hundreds of names, when searching for a specific name; you will need to write a query that goes all along the table name by name. When using the partition key you will have the opportunity to partition the table into several partitions, for the previous example, let’s assume that you will partition the table using the first character of each name.
The second main thing is called the row key. That’s what defines the entity; it must be unique along the whole application. For example when adding a new entity, you can define the entity with a string, like its id or email.
So for the development, there are main two classes that must be created, one for defining what the entities will contain and the second one for the operations done on these entities like adding new entities, searching the table for entities or a specific one.
You can find the source code for an application I developed that adds and searches entities in the table in this link.


Henry Zhang posted a Known Issues and Workarounds for HOA.com message to the HadoopOnAzureCTP Yahoo! Group on 9/19/2012:
Please see below known issues and workarounds for your hadoop cluster. We will address them in our next service update.
Problem 1: Excel Hive plugin cannot connect to Hadoop on Azure cluster
Cause: We introduced a bug with logging for hive jobs after we revved the Hive bits on Azure from 0.7.1 to 0.8.1.
Workaround:
- Download the lastest HiveODBC driver from the “Downlonad” tile on the dashboard. You will need to uninstall the existing driver from your machine and then install the new driver
- Execute a hive query on the cluster dashboard under “Interactive console” tile. Executing a job here will automatically create the log folder needed for Excel to connect and other job execution.
- Connect to your cluster in Excel, things should work now.
Problem 2: Executing fs.read() on Hadoop on Azure Portal JS console fails with “File does not exist.”
Cause: Introduced a bug when fixing Dashboard certificate issue.
Workaround:
- If the purpose is just to output file contents, use #cat <filename> instead.
- If read functionality is really required. The same command can be executed using the JS console on the dashboard: Go to .cloudapp.net">.cloudapp.net">.cloudapp.net">.cloudapp.net">.cloudapp.net">.cloudapp.net">.cloudapp.net">.cloudapp.net">.cloudapp.net">.cloudapp.net">.cloudapp.net">.cloudapp.net">.cloudapp.net">.cloudapp.net">.cloudapp.net">.cloudapp.net">.cloudapp.net">https://<clustername>.cloudapp.net, click “Interactive Console” and perform the commands here.
Problem 3: When using ASV as the filesystem for external Hive table. The following location doesn’t work: asv://container
Cause: Bug in ASV driver
Workaround:
- Use asv://container/ instead of asv://container.
Problem 4: Directing job output to ASV container fails with error ‘Output directory asv://container already exists.”
Cause: Bug in ASV driver prevents jobs from outputting to an ASV container, such as:
Hadoop jar hadoop-examples-1.1.0-SNAPSHOT.jar wordcount /example/data/gutenberg/davinci.txt asv://container
Workaround:
- Direct job output to an ASV folder instead. For example, in the WordCount sample, use asv://container/folder: Hadoop jar hadoop-examples-1.1.0-SNAPSHOT.jar wordcount /example/data/gutenberg/davinci.txt asv://container/folder
Problem 5: Hadoop streaming job fails with “Job not successful. Error: # of failed Map Tasks exceeded allowed limit. FailedCount: 1.â€
Cause: Hadoop streaming job cannot find the specified mapper and reducer.
Workaround:
- Use the “files” option. For example, instead of the following:
Hadoop jar hadoop-streaming.jar -input "/example/data/gutenberg/davinci.txt" -output "/example/data/StreamingOutput/wc2/" -mapper "/example/apps/wc.exe" -reducer "/example/apps/cat.exe"
Use:
Hadoop jar hadoop-streaming.jar -files "hdfs:///example/apps/wc.exe,hdfs:///example/apps/cat.exe" -input "/example/data/gutenberg/davinci.txt" -output "/example/data/StreamingOutput/wc.txt" -mapper "cat.exe" -reducer "wc.exe"
-HadooponAzure Team


<Return to section navigation list>
Windows Azure SQL Database, Federations and Reporting, Mobile Services

2-18. Click Save and add optional Notes to Testers:
2-19. Click Save to return to the Dashboard and scroll to the bottom of the form:
2-20. Click the Submit for Certification button
2-21. Click the Go to Dashboard button to return to the Dashboard.


‡ Tim Anderson (@timanderson) posted Microsoft’s Azure Mobile Services: node.js and more in beginnings of easy cloud to device development on 9/23/2012:
Microsoft announced Azure Mobile Services last month and it was mentioned by Microsoft Server and Tools boss Satya Nadella at the launch of Visual Studio 2012, as an example of where Microsoft is going with its “Modern app” vision, continuous services and connected devices (but with a Windows 8 or Windows Phone 8 flavour).
Azure Mobile Services is in some ways a reworking of the WCF RIA Services developed to support Silverlight applications, and in fact I swear I saw a reference to RIA Services flash past when I was opening my first Azure Mobile Services project in Visual Studio. It consists of a service type in Microsoft’s Azure cloud combined with a client SDK which is currently for Windows Runtime apps in Windows 8, though the REST protocol used could be called from any client platform.
Looking at the dashboard for a Mobile Services project in the Azure portal, you can see what Microsoft is going for here. Mobile Services handles authenticated access to data stored in SQL Server Azure. It is designed to be simple and cost-effective to get started, but can be scaled out by moving from a service on a shared host, to a dedicated VM with multiple instances.
It is easy to think of cases where the cloud component of a cloud plus device app need do little more than authenticate users, and retrieve and update data. Azure Mobile Services also provides for server-side scripts which you can modify to handle validation and other tasks.
I was interested to see that the server-side scripts are written in JavaScript and executed by node.js. Node.js is fantastic, and one of the benefits is that if you have an HTML and JavaScript client, you can use JavaScript both on the client and on the server. On the other hand, I wonder if Microsoft’s community would rather work with C# on the server, which is more mature and more familiar. Scott Guthrie’s introductory tutorial does not mention node.js.
I had a quick go at creating my own Azure Mobile Service. I have only been partially successful so far.
Things started well enough. I created a mobile service and the Quick Start opened.
Both Guthrie’s blog and the Quick Start wizard in the Azure portal are based on a todo list app. I went slightly off-piste here, deciding instead to create an app to track my articles on the web. I wanted to see how Azure Mobile Services copes with related tables, as opposed to a single table.
I had a frustrating time trying to create the database tables. I had to add my IP address to a firewall rule, enable popups, and deal with connection failures caused by unknown network issues.
Finally I was able to get into the database designers. I created an Articles table joined to a Publications table, with a very few fields.
Next I downloaded an automatically generated Windows 8 app from the portal. I had hoped this would magically work with my data. Unfortunately though, it seems to be hard-coded for the todo list app. If you do not want a todo list, you have to write your own code; and so far I have not had time to figure out from the reference what to do next. I looked at the Get started with data article, and guess what, it is the todo list again.
When you create a database, you can specify simple permissions. The todo list example depends on an application key stored in your app and sent over SSL, to grant permission to read and modify data. I selected authenticated user access instead.
There is an article explaining how to add authentication, though note that it presumes use of a Microsoft Live ID (the service formerly known as passport). This is perfect in the context of Windows 8 and Windows Store apps, but businesses will want to use Active Directory instead, whether hosted in Azure or Office 365 or on premise. I presume Microsoft will add this at some point though it is not mentioned currently.
My initial conclusion is that Azure Mobile Services shows lots of promise, but that the introductory documentation could be usefully improved, for example not to assume that you want to make a single table todo list app.
In this context the partnership with Xamarin, which is extending the SDK to Apple iOS and Google Android, is excellent news. This makes Azure Mobile Services useful more broadly, and I have a hunch that Xamarin’s support will soon improve the documentation and tutorials. The client SDK is open source and on github.
Note that according to Microsoft’s Kirill Gavrylyuk, in answer to a question from Roger Jennings, Microsoft plans to “roll out full support for iOS and Android including native SDKs soon”, rather than leaving the non-windows support entirely to Xamarin and C#.


I wrote my Windows Azure Mobile Services Quintet (with apologies to Lawrence Durrell) because Microsoft’s “introductory documentation could be usefully improved.” I needed several workaround to successfully apply for admission to the Windows Store, which I haven’t received yet. I’m glad I didn’t create anything more complex for my first Windows Store attempt.
Carlos Figueira (@carlos_figueira) explains related tables in him Supporting complex types in Azure Mobile Services clients – implementing 1:n table relationships post of 9/10/2012.
‡ Glenn Gailey (@ggailey777) posted a Visual Basic Version of the Get started with data in Mobile Services Tutorial on 9/23/2012:
Folks have been asking for a Visual Basic version of the Windows Azure Mobile Services quickstart and tutorial. This is probably because the Windows Azure Management Portal currently does not support the generation of the quickstart project in Visual Basic—it’s only C# and JavaScript at this time. So, in the meantime, I have created a Visual Basic version of the Get Started with Data tutorial from WindowsAzure.com.
Note: The Visual Basic version of the GetStartedWithData sample is attached at the end of this post. If you are looking for a Visual Basic project that is essentially equivalent to the project generated by the Mobile Services quickstart, I have published a version on the MSDN Developer Code Samples site.
Hopefully, this will help unblock VB developers and get them started using the Mobile Services preview (there’s a free trial available too). I will get content from this post migrated to WindowsAzure.com as soon as I am able to do so.
Get started with data in Mobile Services
Language: Visual Basic and XAML | C# and XAML
This topic shows you how to use Windows Azure Mobile Services to leverage data in a Windows Store app. In this tutorial, you will download an app that stores data in memory, create a new mobile service, integrate the mobile service with the app, and then login to the Windows Azure Management Portal to view changes to data made when running the app.
Note: This tutorial is intended to help you better understand how Mobile Services enables you to use Windows Azure to store and retrieve data from a Windows Store app. As such, this topic walks you through many of the steps that are completed for you in the Mobile Services quickstart. If this is your first experience with Mobile Services, consider first completing the tutorial Get started with Mobile Services.
This tutorial walks you through these basic steps:
- Download the Windows Store app project
- Create the mobile service
- Add a data table for storage
- Update the app to use Mobile Services
- Test the app against Mobile Services
This tutorial requires the Mobile Services SDK. …


Glenn continues with a translation from C# to VB of the initial phase of the walkthrough.
•• Updated Section 8, “Viewing the Push Notification Log” of My (@rogerjenn) Windows Azure Mobile Services Preview Walkthrough–Part 3: Pushing Notifications to Windows 8 Users (C#) tutorial with a workaround for more multiple notification problems on 9/21/2012:
•• 8 – Viewing the Push Notification Log
Despite having removed duplicate rows in the Channel table, as described in the preceding section’s steps 7-3 through 7-9, I again encountered duplicate notifications for single ToDo Items. So I started a Why Do I Receive Three Notifications for a Single ToDo Entry? thread in the Windows Azure Mobile Services forum about this issue.
The Mobile Services team’s Josh Twist made the following observation in a reply to my question:
It is technically possible to receive multiple active (different) channelUrls for the same installed app on the same device. I'd recommend taking a look at our push implementation in the doto client sample which stores an 'installation id' in the channel table to ensure we only have one channel url per actual device installation.
The doto sample is available here: http://code.msdn.microsoft.com/windowsapps/doto-a-simple-social-todo-7e6ba464
If you’ve removed duplicate Channel rows and continue to incur multiple notifications for individual ToDo Item insertions, check the Push Notification Log and solve the problem by following these steps:
8–1. Open the oakleaf-todo WAMoS in the Management Portal, click the Logs tab to display the latest notification messages and select an Info item for a successful notification:
The preceding 21 items (7 successful (Info) and 14 failed (Error)) log entries are for inserting a single new ToDo Item.
8-2. Click the Details (i) button to display the Log Entry Details form:
8-3. Select an Error item and click the Details button to display the full error message:
The MSDN Library’s Push notification service request and response headers topic says the following about notificationstatus = dropped:
Josh Twist added the following comment in the forum thread after viewing the log entries in step 8-1:
I can't see the image clearly above but I suspect your app has multiple active channels for the device (you sent three notifications to three different channel urls, but they all point to your device). Take a look at the RegisterDevice method from the doto sample: https://github.com/WindowsAzure/azure-mobile-services/blob/master/samples/doto/C%23/ViewModels/MainViewModel.cs which uses the InstallationId type: https://github.com/WindowsAzure/azure-mobile-services/blob/master/samples/doto/C%23/Common/InstallationId.cs.
Then check the script we have on insert: https://github.com/WindowsAzure/azure-mobile-services/blob/master/samples/doto/ServerScripts/devices.insert.js
Following is the C# code for the InstallationId class:
using System;
using System.Collections.Generic;
using System.Linq;
using System.Text;
using System.Threading.Tasks;
using Windows.Storage;


namespace Doto
{
    /// <summary>
    /// Generates a persistant unique identifier for this installation that is persisted in
    /// local storage. This is used by Doto to manage channelUrls for push notifications
    /// </summary>
    public static class InstallationId
    {
        private static string _fileName = "installation-id.dat";
        private static string _value = null;
        private static object _lock = new object();


        public static async Task<string> GetInstallationId()
        {
            if (_value != null)
            {
                return _value;
            }


            var file = await ApplicationData.Current.LocalFolder.CreateFileAsync(_fileName, CreationCollisionOption.OpenIfExists);
            _value = await FileIO.ReadTextAsync(file);
            if (string.IsNullOrWhiteSpace(_value))
            {
                _value = Guid.NewGuid().ToString();
                await FileIO.WriteTextAsync(file, _value);
            }


            return _value;
        }
    }
}
And this is the JavaScript code for an insert event handler for an added Devices table, which would replace the Channel table:
function insert(item, user, request) {
    // we don't trust the client, we always set the user on the server
    item.userId = user.userId;
    // require an installationId
    if (!item.installationId || item.installationId.length === 0) {
        request.respond(400, "installationId is required");
        return;
    }
    // find any records that match this device already (user and installationId combo)
    var devices = tables.getTable('devices');
    devices.where({
        userId: item.userId,
        installationId: item.installationId
    }).read({
        success: function (results) {
            if (results.length > 0) {
                // This device already exists, so don't insert the new entry,
                // update the channelUri (if it's different)
                if (item.channelUri === results[0].channelUri) {
                    request.respond(200, results[0]);
                    return;
                }
                // otherwise, update the notification id
                results[0].channelUri = item.channelUri;
                devices.update(results[0], {
                    success: function () {
                        request.respond(200, results[0]);
                        return;
                    }
                });
            }
            else
            {
                request.execute();
            }
        }
    });
}
Accommodating the added class, as well as a new table and event handler, requires considerable effort to modify the original code. Simply deleting all existing rows of the Channel and, optionally, the TodoItem table(s) solved the problem for me, at least temporarily.
If I encounter multiple notifications for individual ToDo Item entries during further tests, I’ll update the source code with the preceding class and event handler.


•• Wade Wegner (@WadeWegner) described Getting the Application ID and Hardware ID in Windows Store Applications in a 9/21/2012 post:
So far I’ve really enjoyed developing applications for Windows 8. I still can’t claim to be particularly good at XAML design work yet, but I’m getting the hang of Windows Store Apps in C# using Windows RT. That said, there are have been a number of times when I’ve been lost and had to hit MSDN and search engines in order to figure things out. What makes this particularly challenging is that much of the information you’ll find is old and not appropriate for Windows 8 RTM. Consequently, I thought I’d share with you at least one thing I learned today.
- Get an ID specific to the application.
- Get an ID specific to the device/hardware (also called App Specific Hardware ID or ASHWID).
While trying to figure out how to get the Application ID wasn’t particularly difficult – that is, if you find the RTM documentation – I did struggle to figure out how to get the device/hardware ID. Finally, I found an answer on Stack Overflow that helped.
Here’s how to get the application ID with C#:
string appId = CurrentApp.AppId.ToString();Note that during development the GUID comes back as “00000000-0000-0000-0000-000000000000″. Once released through the Windows Store you will get a specific value.
Getting the ASHWID is a bit more difficult. Prior to the RTM release a lot of folks created their own GUID and stored it in the Windows.Storage.ApplicationData.Current.LocalSettings. This is a reasonable hack but of course the user can delete local storage and then your application would change the value – not good if you’re depending on something unique.
Fortunately the RTM release includes the GetPackageSpecificToken class that can return the ASHWID. Of course, I looked at some guidance and MSDN method documentation on getting the ASHWID and never found a good sample on how to get the ASHWID and store it as a string. Consequently, I hope this short snippet – again, found on Stack Overflow, helps:
private string GetHardwareId()
{
    var token = HardwareIdentification.GetPackageSpecificToken(null);
    var hardwareId = token.Id;
    var dataReader = Windows.Storage.Streams.DataReader.FromBuffer(hardwareId);

    byte[] bytes = new byte[hardwareId.Length];
    dataReader.ReadBytes(bytes);

    return BitConverter.ToString(bytes);
}
From here you can just load it into a string and do whatever you desire.
string deviceId = GetHardwareId();Now you’ll get a value that’s something like 03-00-F0-7E-03-00-76-F3-05-00-5C-54-05-00-8A-DE-06-00-01-00-04-00-54-49-04-00-C2-4A-04-00-DE-4D-01-00-A4-52-02-00-2E-B2-09-00-42-88 that you can store for future use.
Nothing groundbreaking here but hopefully this saves you a few minutes.

• Carlos Figueira (@carlos_figueira) described Playing with the query object in Read operations on Azure Mobile Services in a 9/20/2012 post:
As I was writing the last post (about storing per-user data in Azure Mobile Services), I used the where method in the Query object (passed to the read function) to filter the results only to those for the logged in user.
- function read(query, user, request) {
- query.where({ UserId: user.userId });
- request.execute();
- }
I did that following the example in the "Authorize Users in Scripts” tutorial in the Azure web page. But later on I started looking more into the documentation of the Query object, and noticed that there are other ways to do the same thing, so I decided to explore them, and found them interesting enough for a blog post.
It’s all additive
Before we start, let’s look at exactly what the first line in the “read” function means:
- query.where({ UserId: user.userId });
By adding calling “where” on the Query object and passing an object as a parameter, we’re telling it to filter the results to those whose UserId column contain the value passed to it (user.userId). Also, this filter is applied in addition to whatever filter the client request had, essentially adding an AND expression in the end of the WHERE clause which is passed to the database when retrieving the data (the runtime could simply pass the original request and later filter based on that object, but that would be woefully inefficient). Also notice that by doing that we’re modifying the query object itself. For example, if this request arrived for the read operation in our table:
GET /tables/MovieRating?$filter=(Rating+gt+2) HTTP/1.1
The request would normally be translated roughly into the following SQL query
SELECT *
FROM MovieRating
WHERE Rating > 2But once the where method is called on the query object, the query translation becomes something along the lines of
SELECT *
FROM MovieRating
WHERE Rating > 2 AND UserId = ?Where the ‘?’ is the parameter which is passed to the query.
Now, that object which is passed to the where method can have an arbitrary number of parameters, and they’ll all be interpreted as AND clauses to the query. For example, the line below
- query.where({ UserId: user.userId, Category: "Fiction", Studio: "Paramount" });
Would be roughly translated (for the same request shown before) as
SELECT *
FROM MovieRating
WHERE Rating > 2 AND UserId = ?
AND Category = ‘Fiction’
AND Studio = ‘Paramount’So that’s the simple way to filter based on some parameters. There is, however, another way to write the same query. As I mentioned, a .where call on the Query object will add an AND expression to the WHERE clause, so we could have written that in three lines instead:
- query.where({ UserId: user.userId });
- query.where({ Category: "Fiction" });
- query.where({ Studio: "Paramount" });
Or using the fluent API:
- query.where({ UserId: user.userId })
- .where({ Category: "Fiction" })
- .where({ Studio: "Paramount" });
But we’re not really limited to where clauses; as the documentation of the Query object shows, we can affect other parts of the query as well. And again, it’s all additive, so we can just keep calling them and we’ll each time affect more of the query. One more example:
- function read(query, user, request) {
- query.where({ UserId: user.userId })
- .select('id', 'MovieName', 'MovieRating')
- .orderBy('MovieName')
- .take(10);
- request.execute();
- }
This will be roughly translated to the following clause:
SELECT TOP 10 [id], [MovieName], [MovieRating]
FROM MovieRating
WHERE Rating > 2 AND UserId = ?
ORDER BY MovieNameSo that’s the simple usage of the Query object.
Complex filtering
So far all the where calls we made to the query object took an object with some parameters, and we compare them with the data from the database. But all the comparison we can make with that overload are all equality. We cannot, passing an object to the where method of the Query object,, say that we want to filter all movies whose rating is less than 5, for example. There is, however, another overload for the query method, which takes a function instead of the object. In this function we can then write more complex expressions, using operators such as inequality and other relational operations.
There is a big caveat in this method, which wasn’t clear for me at first. The body of the function which is passed to the where method is never executed. Instead, just like with the “template object” method, its expression is translated into a SQL expression which will be sent to the backend database. That makes sense, since we want to filter directly at the source instead of returning several rows, many of which will be discarded (notice that you can still do that, as I’ll show later on). But the function must consist of a single “return” statement with a supported expression. If, for example, you try to write the function below:
- query.where(function () {
- var i = 1;
- return this.Rating > i;
- });
You’d get a 500 response to requests, with the following entry in the mobile service logs:
Error in 'read' script for table 'MovieRating'. Expected a predicate with a single return statement, not function () { var i = 1; return this.Rating > i; }
So not all functions can be used. In order to be used as the parameter of a query method, a function must follow those rules:
- Have only one return statement, as mentioned before
- The row being filtered is represented by the this object in the function
- Any values outside the function must be passed to it as parameters (no closures)
The last rule originally threw me off. When I tried writing the user filtering code, I wrote the read function below:
- function read(query, user, request) {
- query.where(function () {
- return this.UserId == user.userId;
- });
- request.execute();
- }
But when trying to run it, the request returned a 500, and the logs complained about a “missing parameter”. This is how it should be written:
- function read(query, user, request) {
- query.where(function (user) {
- return this.UserId == user.userId;
- }, user);
- request.execute();
- }
Or by passing the user id directly:
- function read(query, user, request) {
- query.where(function (userId) {
- return this.UserId == userId;
- }, user.userId);
- request.execute();
- }
So, as long as we follow the rules, we can add more complex filters to our database queries. For example, the query below returns the ratings for the logged in user, for fiction or action movies, whose ratings is greater than 2.
- function read(query, user, request) {
- query.where(function (userId) {
- return this.UserId == userId &&
- (this.Category == "Fiction" || this.Category == "Action") &&
- this.Rating > 2;
- }, user.userId);
- request.execute();
- }
And that’s the option for complex queries.
Post-query filtering
I mentioned that calling the where method on the Query object affects the actual query which will be sent to the backend database. But there are some scenarios where a post-retrieval filtering may be useful: some additional data may be required (such as data from other table), some expression may not be supported to be translated into a SQL WHERE clause, among others. In those cases, we can pass a parameter to the execute method of the Request object, and define a “success” member whose value is a function which will receive the results of the query. At that point, we’re free to execute any JavaScript (node.js) code which we want – the only thing that we need to do is to call request.respond to signal the runtime that the response is ready to be returned. In the example below, we’re filtering the ratings for the movies from the 1980’s using a regular expression (which is not supported on pre-query filtering.
- function read(query, user, request) {
- query.where(function (userId) {
- return this.UserId == userId;
- }, user.userId);
- request.execute({
- success: function (results) {
- var regex = /\(198\d\)/;
- var filtered = results.filter(function(item) {
- return regex.test(item.MovieName);
- });
- request.respond(statusCodes.OK, filtered);
- }
- });
- }
Another way to implement the same method above would be to call read directly on the Query object (instead of request.execute):
- function read(query, user, request) {
- query.where(function (userId) {
- return this.UserId == userId;
- }, user.userId).read({
- success: function (results) {
- var regex = /\(198\d\)/;
- var filtered = results.filter(function(item) {
- return regex.test(item.MovieName);
- });
- request.respond(statusCodes.OK, filtered);
- }
- });
- }
The two implementations above are equivalent.
Bypassing the query object
Just a little not for completeness sake. The read scripts receive the Query object as a parameter, but it doesn’t necessarily need to use it. It’s actually possible to completely ignore the query object (and even the backing database), as we can respond to the request directly. The script below does exactly that.
- function read(query, user, request) {
- request.respond(statusCodes.OK, [
- { id: 1, name: 'Scooby', age: 10 },
- { id: 2, name: 'Shaggy', age: 19 },
- { id: 3, name: 'Velma', age: 20 }
- ]);
- }
Also, the response doesn’t even need to be an array, any valid JSON object would also be a valid response to the operation.
Wrapping up
In this post I showed some ways of interacting with the query object to customize the data retrieval in read operations. I hope that this helped you understand how the read scripts work, so if you need to customize one, those examples can help you with that.


• Nuno Filipe Godinho (@NunoGodinho) explained How to choose the right Relational Database Service you should use in Windows Azure in a 9/21/2012 post:
Now with Windows Azure SQL Database as well as SQL Server inside a Windows Azure Virtual Machine an important question comes up, and that is, Which Relational Database Service should I use for my solution in Windows Azure?
In order to help answering this question I did a flowchart that should help. (this is a simplification of the process but should answer most of the questions)
What are the features that aren’t supported in SQL Database you might be asking. Here’s a list:
- SQL Server Utility
- SQL Server PowerShell Provider. PowerShell scripts can be run on an on-premise computer, however, and connect to Windows Azure SQL Database using supported objects (such as System Management Objects or Data-tier Applications Framework).
- Master Data Services
- Change Data Capture
- Data Auditing
- Data Compression
- Extension of spatial types and methods through Common Language Runtime (CLR)
- External Key Management / Extensible Key Management
- FILESTREAM Data
- Integrated Full-Text Search
- Large User-Defined Aggregates (UDAs)
- Large User-Defined Types (UDTs)
- Performance Data Collection (Data Collector)
- Policy-Based Management
- Resource Governor
- SQL Server Replication
- Transparent Data Encryption
- Common Language Runtime (CLR) and CLR User-Defined Types
- Database Mirroring
- Service Broker
- Table Partitioning
- Typed XML and XML indexing is not supported. The XML data type is supported by Windows Azure SQL Database.
- Backup and Restore
- Replication
- Extended Stored Procedures
- SQL Server Agent/Jobs
More about this Windows Azure SQL Database:
- General Guidelines and Limitations (Windows Azure SQL Database)
- SQL Server Feature Limitations (Windows Azure SQL Database)
- Security Guidelines and Limitations (Windows Azure SQL Database)
- Federation Guidelines and Limitations
- Announcing Updates to Windows Azure SQL Database
More about SQL Server inside a Windows Azure Virtual Machine:
- Data Series: How To Setup SQL Server on Windows Azure Virtual Machines
- Getting Started Running SQL Server in Windows Azure Virtual Machine
Hope this helps you to make the right choice.


Added Section “8 – Viewing Push Notification Logs” to my (@rogerjenn) Windows Azure Mobile Services Preview Walkthrough–Part 3: Pushing Notifications to Windows 8 Users (C#) post of 9/12/2012:
•• 8 – Viewing Push Notification Logs
8–1. Open the oakleaf-todo WAMoS in the Management Portal and click the Logs tab to display the latest notification messages and select an Info item for a successful notification:
8-2. Click the Details (i) button to display the Log Entry Details form with the expected message:
8-3. Select an Error item and click the Details button to display the full error message:
A question about the source and significance of the above messages is pending in the Windows Azure Mobile Services forum. I’ll update this post if and when I receive an answer.


Kirill Gavrylyuk (@kirillg_msft) posted Announcing Open Sourcing of Windows Azure Mobile Services SDK on GitHub, and Partnership with Xamarin to the Windows Azure blog on 9/20/2012:
A little over three weeks ago, we debuted Windows Azure Mobile Services—a turnkey backend solution for your Windows Store app. As part of our continuing commitment to open source, we are happy to announce today that the Mobile Services SDK will be available on GitHub, and as always we are welcoming community contributions. We are also proud to announce that we are partnering with Xamarin to deliver the ability to write iOS and Android apps in C# and then tie them to a scalable and secure Mobile Services backend.
Subsequent Mobile Services preview releases will add full support for native iOS, Android, and Windows Phone apps through the Windows Azure portal.
For more information, please visit the Mobile Services developer center.
Mobile Services on GitHub
The Windows Azure Mobile Services Repository contains the Mobile Services SDK. We will continue to develop the Mobile Services SDK openly and transparently in this repository. All code in this repository will be fully supported by Microsoft, and community contributions are welcome! You can find Windows Azure SDK contribution guidelines here.
Mobile Services & Xamarin
Xamarin is partnering with Windows Azure Mobile Services to expand the Mobile Services SDK to iOS and Android platforms. Xamarin products empower more than 175,000 developers to write native apps for iOS and Android—all in C#.
Mobile Services and Xamarin share a common goal: freeing developers to focus on what really matters. Mobile Services reduces the friction of configuring a scalable and secure backend and lets mobile app developers focus on delivering a fantastic user experience. Xamarin allows mobile app developers to make the most of C#, and enables mobile developers to support more devices with less code.
For tutorials and more information on how to get started, please visit the Xamarin blog and developer center.
Questions? Ask in the Mobile Services Forum. Feedback? Email us at: mobileservices@microsoft.com.


Ryan Paul (@segphault) reported Xamarin partners with Microsoft to support Windows Azure Mobile Services on Android and iOS in a 9/20/2012 post:
Our friends at Microsoft recently introduced Windows Azure Mobile Services, a cloud platform that provides a scalable backend for mobile applications. It’s an easy way to add login capabilities and remote data storage to your application without building your own backend.
We are really pleased to announce that we have partnered with Microsoft to bring Mobile Services to iOS and Android developers, enabling them to easily use Microsoft’s cloud service from a common C# code base. While we have long enjoyed a productive relationship with Microsoft, we are excited to collaborating with Microsoft at a new level and to help Windows Azure Mobile Services and Microsoft reach additional platforms.
We are making a preview of our cross-platform Azure Mobile Services client framework available today on GitHub under a permissive open source software license. The framework, which is a port of Microsoft’s own Mobile Services client library, will make it easy for developers to use Microsoft’s hosted backend in their Xamarin-powered Android and iOS applications. You can start using it today in your own projects.
Azure Mobile Services offers elastic scalability, allowing you to get the capacity that you need as the popularity of your application grows. The client framework takes advantage of your favorite C# features to simplify data storage and retrieval. For example, you can access your remote data with LINQ queries instead of crafting your own REST API calls. Instead of dealing with a schema and parsing database output, you use attributes to associate remote data fields with class properties.
The following code snippet from a simple todo list application demonstrates how to retrieve database entries that match a specific condition:
publicclassTodoItem
{
publicintId {get;set; }
[DataMember (Name ="text")]
publicstringText {get;set; }
[DataMember (Name ="complete")]
publicboolComplete {get;set; }
}
...
this.table = MobileService.GetTable<TodoItem>();
this.table.Where (ti => !ti.Complete).ToListAsync()
.ContinueWith (t => {this.items = t.Result; }, scheduler);With Xamarin and Azure Mobile Services, you can write your database logic once and use it across platforms. The code above will work seamlessly across iOS, Android, and Windows.
In addition to data storage and retrieval, Azure Mobile Services also supports simple account management. It allows you to authenticate your users against their Windows Live identity, sparing you the trouble of having to build and maintain your own account system.
Mobile Services for Xamarin gives you cross-platform support for the data storage and authentication features. We welcome code contributions from the community and would love to hear about the apps you’re building that leverage Windows Azure Mobile Services.
To learn more about the framework and how you can put it to use in your own applications, check out code samples. For more information about Mobile Services, you can visit the official Windows Azure blog or dev center.


Is this the official release of the WAMS team’s promised support for iOS and Android devices? If so, you’ll need to pay for either or both SDKs.
Jim O’Neil (@jimoneil) described Adding Notifications to Your Windows 8 Game in a 9/19/2012 post:
Successful apps are sticky; they make us want to come back again and again, whether it’s to check in on Foursquare, send a Tweet, or get a quick answer from ChaCha. Of all the types of apps, games can be the stickiest – Angry Birds anyone? or in my case Wordament! A great idea and implementation are obvious ingredients for success, but you also want to capitalize on opportunities to get your users re-engaged when they aren’t running your app or game.
Enter notifications, which come in two main flavors – tiles and toast – and the great thing is that your application doesn’t have to be running to receive them! A tile can update itself on a regularly occurring interval, and an external service can push information at any time to your users via the tile or by triggering a toast notification. The more engaging and dynamic your application tile is, the more likely it will beckon the user to re-launch it from the Start screen. Likewise, the more compelling and personalized a toast message is the more likely the user will switch to your app from whatever they are doing.
Must-Have Resources
- Generation App
- Windows Azure
- Mobile Services Developer Center
- Mobile Services SDK
- Samples: JavaScript and HTML 5 touch game
It’s this latter scenario we’ll take a look at in this article – specifically in the context of an HTML5 game. What could be a stronger call to action to drop what you’re doing and re-play a game than just being informed that someone has knocked you out of the top position on the leaderboard!
During the course of this post, I’ll cover four primary themes, with supplementary materials available from the right sidebar:
- Connecting to the cloud – setting up a Windows Azure Mobile Service
- Setting up the HTML 5 Sample Game – modifying the sample game to use the mobile service
- Adding a leaderboard – creating a very rudimentary leaderboard in the mobile service
- Trigging the notification – triggering a toast notification to the user that was ousted from first place
Connecting to the Cloud
It should come as no surprise that you’ll need some sort of centralized repository for managing game assets that are shared by all the users – like the leaderboard. The cloud, Windows Azure specifically, is a great place to host common data with little work on your part: the cloud provider, Microsoft in this case, manages all of the hardware assets and provides guaranteed uptime backed by Service Level Agreements. And with the newly launched Windows Azure Mobile Services, you can set up both storage and push notification capabilities with minimal coding on your part – freeing you up to concentrate on your game!
To take advantage and explore the possibilities, get yourself a free 90-day Windows Azure Trial Account and be sure to activate the Windows Azure Mobile Services feature as shown below. The feature is currently in preview, so it does not appear automatically when you view the various services in the management portal.
I’ve found the option is provisioned nearly immediately, so you should be able to create a new Mobile Service right away.
The key elements you need to supply to create the new service are highlighted in the two wizard screens below. Each service will have a public endpoint – mine is simplegame.azure-mobile.net. There is also a Windows Azure SQL Database supporting this service with the admin login I provided. Both the database and the services are located in the East US data center, which is currently the only data center available in this phase of the preview.
After the service has been created, take note of the Application Key, which is accessible via the menu bar at the bottom of the portal. You’ll need that and the unique service endpoint URL (*.azure-mobile.net) later.
Setting up the HTML 5 Sample Game
To keep the article focused on the notification theme, versus the game itself, I opted to start with the HTML 5 JavaScript game sample on the Windows 8 Dev Center. It’s pretty simple: you simply see how many times you can touch the bouncing ball before time runs out, and it does maintain a local leaderboard which we’ll expand into the cloud.
After you’ve downloaded and installed the Mobile Services SDK, add a reference to it within the sample application.
You’ll also want to insert a reference to the Windows Runtime Component in the default.html file as follows:
7: <!-- WinJS references -->8: <link rel="stylesheet" href="//Microsoft.WinJS.1.0/css/ui-dark.css" />9: <script src="//Microsoft.WinJS.1.0/js/base.js"></script>10: <script src="//Microsoft.WinJS.1.0/js/ui.js"></script>11: <script src="/MobileServicesJavaScriptClient/MobileServices.js"></script>12:13: <!-- App references -->14: <link rel="stylesheet" href="/css/default.css" />15: <script src="/js/assetManager.js"></script>16: <script src="/js/movingAverage.js"></script>The sample game implementation leverages a game JavaScript template that you could adapt for your own games as well. A key component of the template is the GameManager class, declared at the end of the default.js file. That’s a convenient singleton object to which to add a client reference to the Windows Azure Mobile Services, as shown below:
 WinJS.Namespace.define("GameManager", {
     navigateHome: navigateHome,
     navigateGame: navigateGame,
     navigateRules: navigateRules,
     navigateScores: navigateScores,
     navigateCredits: navigateCredits,
     showPreferences: showPreferences,
     onBeforeShow: onBeforeShow,
     onAfterHide: onAfterHide,
     game: game,
     state: state,
     assetManager: assetManager,
     scoreHelper: scoreHelper,
     gameId: gameId,
     touchPanel: touchPanel,
     mobileService: new Microsoft.WindowsAzure.MobileServices.MobileServiceClient
         ("https://simplegame.azure-mobile.net/", “<<<---- REDACTED ---->>>")
    });
Adding a Leaderboard
The premise of the notification I want to implement is that when you are knocked out of first place in the leaderboard by another player, a notification will be initiated letting you know and inciting you to reclaim your position at the top. That necessitates having at least a rudimentary leaderboard implemented, so to do that, I’ll leverage the data feature of Windows Azure Mobile Services. There will be a server component, configured in the Windows Azure management portal, and some code added to the existing sample application.
Server component
This leaderboard is quite simple and tracks only the player name, score, and level. This game doesn’t have a player registration system, so the players will be identified by whatever name was supplied on the Game Options on the Settings flyout (see right).
You might decide to incorporate your own player registration system or perhaps tap into existing identity providers like Microsoft accounts, Facebook or Twitter to authenticate player identity. Windows Azure Mobile Services can help with that too, but that’s a topic for another post!
To store the scores, I created a table within my mobile service called leaderboard. I didn’t provide a schema, because by default the schema will be created dynamically when I add data to the table; however, an unique clustered index column called id is generated for me. In production you’d turn the dynamic schema feature off (via the CONFIGURE tab of the mobile service), but for now it’s quite convenient.
Via the DATA tab of the mobile service, I created a table called leaderboard. You’ll notice there are options to control the access permissions for the various CRUD operations; this is where you might lock down access to only authenticated users or even allow access to say the leaderboard from other applications. As alluded to previously, for this scenario access to the table data is via the application key, which was used to initialize the mobile service client in the GameManager class earlier.
I also created a second table called users to contain additional information needed to implement push notifications, as you’ll see later.
Client Component
With the server table in place, I just needed to hook up the client code to add a new record to the database every time a game has been completed. The sample code already has some hooks in it for the local leaderboard, so I add just a bit of code in scores.js to add a new record to the leaderboard table. The insert method here is asynchronous, and I did not supply a callback routine, so the actual leaderboard displayed in the game will continue to function as it did previously.
Here I was just interested in sending the score to the mobile service. Creating a user experience for a second ‘global’ leaderboard is beyond the scope of this article, but if you look as the functionality of the sample application (specifically in scoresPage.js), you’ll see there is some infrastructure there for multiple high score tables.
    // Check if a newly achieved score should be added to the score table, ...
    // Return value of 0 indicates the submitted score was not good enough to ...
    newScore: function (score) {

        scoresTable = GameManager.mobileService.getTable("leaderboard");
        scoresTable.insert(
            {
                player: score.player,
                score: score.score
                skill: score.skill
            });


        var newScoreRank = 0;

        // TODO: Update this function to match the sort of your score table
If you were to add this code and play the game a few times, you’d see new records added into table via the BROWSE menu of the leaderboard table as shown below.
Triggering the Notification
In Windows 8, push notifications are handled via the Windows Push Notification Service (WNS), which is hosted and managed by Microsoft. WNS works in conjunction with the Notification Client Platform, which is part of the Windows 8 operating system, as well as with your Windows Store application and a service that you maintain in the cloud to trigger the notifications. The process is captured by the image below, with a complete explanation of the workflow available on the Windows Dev Center.
For our gaming scenario in particular, the workflow is as follows:
The game requests a push notification channel from the Notification Client Platform on the local machine (1). The Notification Client Platform communicates with WNS (2) which returns the notification channel URI to the application (3). This URI uniquely identifies the device and the application and so will be the endpoint for future push notifications. The URI is opaque and should not be modified; furthermore, it expires after 30 days, so best practice dictates that the application renew its channel each time it runs or even as part of a background task.
The Windows Store application is responsible for maintaining the list of notification channels, which it does typically via a cloud service that triggers notifications at the appropriate times and sends them to the affected application users. In this simple HTML 5 game, the URIs are keyed by player name (4) with each player name associated with the device on which they last played the game. Remember there is currently no authentication mechanism in the game, so the last user to claim a name ‘wins.’ Obviously this would need to be rectified for a production-ready game, but it’s not a critical to understanding the push notification scenario.
When a player completes a game, his or her score is sent to the cloud service, which then checks to see if the new score is the high score. If so, the service looks up the notification channel URI for the player who was just ousted, creates a toast notification, and fires it off via WNS (5). At that point, WNS takes over and delivers the toast to the appropriate client (6) where it is surfaced to the former champion.
The steps to implement push notifications include a configuration step in which the application is registered to receive notifications followed by bit of coding in both the Windows Store application and the “Cloud Service.” In this case, the “Cloud Service” is Windows Azure Mobile Services, but in general any network accessible server that can authenticate with WNS can be used.
Notification Registration
To set up the application to receive notifications, the Package Display Name and Publisher of the application as shown in the Package.appxmanifest are provided to Step 2 of the Windows Push Notifications & Live Connect page:
On Step 3 of the Live Connect page, three values are provided. The first, Package Name, replaces the package name in the Package.appxmanifest within Visual Studio, and the other two are provided to the mobile service (PUSH tab) in the Windows Azure Portal.
Client Component
As shown in the workflow diagram, the process starts with the client application securing a notification channel. An applications request the channel, typically at startup, using the asynchronous createPushNotificationChannelForApplicationAsync method. In default.js, I added the following code to set a notificationChannel property on the GameManager when the success callback fires.
    Windows.Networking.PushNotifications.PushNotificationChannelManager.
       createPushNotificationChannelForApplicationAsync().done(
           function (c)
           {
               GameManager.notificationChannel = c.uri;
           }
       );
Since the game provides an option to change player name, it doesn’t make sense to record the notification channel at the start of the application, because no one has yet played a game or registered as score. In fact, it’s possible multiple players might play on that same device, so there may not be a one-to-one correspondence of user and notification channel.
Instead, I opted to store the notification channel with the player name whenever a player completes a game. Since I established the simple rule that the user will be notified on the last device from which he or she played, the easiest way to ‘update’ the users table is issue a delete followed by an insert, right before the code that was added to update the leaderboard table.
        if (GameManager.usersSeen[score.player] === undefined) {
            userList = GameManager.mobileService.getTable("users");
            userList.where({ user: score.player }).read().done(
                function (results) {
                    for (var i in results) userList.del(results[i]);
                    userList.insert(
                        {
                            user: score.player,
                            uri: GameManager.notificationChannel
                        });

                    GameManager.usersSeen[score.player] = true;
                }
            );
        }
The usersSeen associative array records the players who have played during the current application execution, so they are not repeatedly registered in the users table every time they complete a game.
Server Component
Earlier in this post, I showed how to set up Windows Azure Mobile Services to send push notifications to the HTML 5 game. The only step left is to trigger those notifications (and craft some compelling notification text, of course).
A notification should go out to the previous top scorer whenever the newly entered score is higher. The easiest place to trigger the notification then is within the insert script of the leaderboard. Each of the CRUD operations on a data table has an associated server script, implemented via node.js, which can be used to execute custom business logic on the server.
The default insert script (right) simply executes the incoming request, but additional logic can be added, such as to detect when a new high score has been achieved and then push a notification to the dethroned player. The script I used to accomplish this appears below, followed by a line-by-line breakdown:
1: function insert(item, user, request) {2:3: mssql.query("select player, score, uri " +4: "from leaderboard l, users u " +5: "where (l.player = u.[user]) and " +6: "(l.player != ?) and " +7: "(l.score = (select max(score) from simplegame.leaderboard))",8: [item.player],9: {10: success: function(results) {11: if (results.length > 0 && results[0].score < item.score)12: {13: notify(results, item);14: }15: request.execute();16: },17: error: function(err) {18: console.log(err);19: request.execute();20: }21: }22: );23: }24:25: function notify(results, item)26: {27: for (var i in results)28: {29: push.wns.sendToastText02(results[i].uri,30: {31: text1: "HTML 5 Sample has a new champ!",32: text2: "Hey, " + results[i].player + ", " + item.player +33: " just took high score with " + item.score + " points. " +34: "Time for revenge?!"35: });36: }37: }Line 1
The insert function takes three arguments: the item to be insert (JSON), the user identity requesting the insert (when authentication is set), and the request object that carries out the insert.Lines 3 - 7
A query is defined against the leaderboard and users tables. The players with the highest score are returned along with their associated notification channel URIs (the latter stored in the users table).Line 8
This JavaScript object array defines the parameters for the query, noted in the query text by ‘?.’ Here the query is passed the name of the player just completing the game. If that player bested her own top score, it doesn’t make sense to send her a notification, hence the clause on Line 6.Line 10 - 14
success defines the asynchronous callback that occurs when the query has completed. If the player just achieved the high score, the results object will contain the information for the players that were just knocked out of first place. That object is passed to the helper function, notify, defined later in the script.Line 15
The original request, namely to add the score to the leaderboard for the just completed game, is carried out.Line 17-20
If there’s some problem with the query, a message is written to the log, which is viewable from the LOGS tab of the mobile service in the Windows Azure portal. The original request to add the new game’s score to the leaderboard is still performed.Line 25-37
The function notify is called whenever a new high score has been achieved. Passed to the function is the information for the new high score (item) and the information (results) for the players who previously ranked at the top.Line 29-25
For each player that had or shared the high score, a notification is sent to his device informing him that his reign is over! Here I’ve used a toast notification consisting of one emboldened line followed by two lines of wrapping text. There are eight different toast notification options that might be used, however, with different display characteristics, including images support.
The experience might look a bit like that on the left for Joe, assuming that Julie just played a game on her Windows 8 tablet, and he was busy doing some Excel spreadsheet analysis at work.
What happens next? When Joe clicks on the notification, the activated event is triggered and so he’ll start up the HTML 5 game in his bid to reclaim the top position.
What if Joe happens to already be playing the game when the toast arrives and he clicks on it? Well, nothing in this case. He’s already in the application, so a click on the toast will be ignored (unless there is a launch attribute, which has not been provided in this case).
That does bring up a user experience point to consider: should a toast be displayed at all if the user is already running the application. In most cases, the application should simply absorb the new information into its display without additional fanfare. Think of Outlook for instance. When you are working with your in-box, do you really need to see toast notifications of new e-mails? They are popping up in your in-box already so the toast adds little value and can even be annoying. If you do want to ignore notifications for any reason, subscribe to the pushnotificationreceived event and set the cancel property to true; you can still introspect the notification content and act on it silently.
And that’s it! With just a little bit of coding and some great support from Windows Azure Mobile Services, we’ve put the ‘social’ into a previously solitary and isolated experience and hopefully addicted a few more users to our game!


My Windows Azure Mobile Services Preview Walkthrough–Part 3: Pushing Notifications to Windows 8 Users (C#) article of 9/12/2012 provides a simpler example.
<Return to section navigation list>
Marketplace DataMarket, Cloud Numerics, Big Data and OData
‡ Colin Banfield began an PowerPivot series with an Excel 2013 – Implications for PowerPivot and Excel Data Import Users–Part I post of 9/19/2012 to the PowerPivot Pro blog:
Quick Intro From Rob
First of all, it’s good to have Colin back on the blog!
Second, Colin underestimates, I think, how far ahead of the curve he typically is, so as a quick prelude to his post below, I thought I’d share a few quick points:
- Excel 2013 should be releasing sometime in the next month or two
- Much of PowerPivot is now built-in to Excel, rather than being a separate addin!
- Those built in features are being called the “data model,” and this post on the official Excel blog provides an introduction.
- The rest of PowerPivot’s capabilities, the ones that are NOT built in to Excel 2013, are still included as an addin that gets installed when you install 2013 – no more separate download!
OK, now on to Colin’s post
Guest post by Colin Banfield
[LinkedIn]
By now, most readers are aware of the new Data Model object in Excel 2013. But what is the Data Model, and how is it created? What can we do with the Model after it is created? Where does PowerPivot fit in? We will address these, and other questions in this two-part post.
The Data Model is a new Excel object that you use to create PivotTables, PivotCharts, and Power View reports. The Data Model uses a built-in version of xVelocity, which is an in-memory, column-based version of engine that powers Analysis Services. xVelocity stores data that you import in-memory (compressed), and calculates implicit measures (created by dragging a a table field to the values area of a PivotTable) and explicit measures (created using DAX functions). We can create the Data Model using one or more tables. Generally, we create relationships between tables in the Data Model, but there is no absolute requirement to do so. Another key characteristic of the Data Model is it’s ability to consume large amounts of data.
Excel 2013 is, in my view, the first version of Excel that that has fully transitioned beyond its spreadsheet roots (while still maintaining these roots) to become a BI tool that can compete with the likes of Tableau, QlikView, SpotFire, etc. Two key additions to the product has facilitated this transition: the Data Model, and the Power View add-in. Power View is a visual analytic tool – an very important component in any serious BI application.
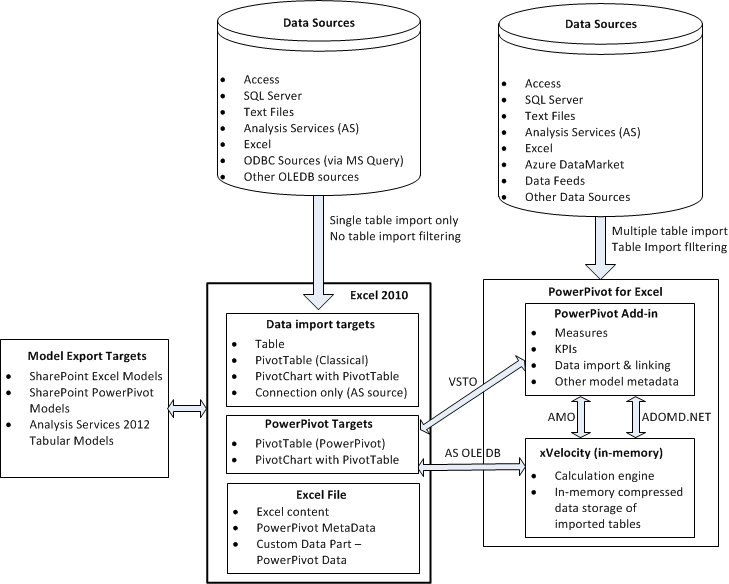
Excel 2013 can act as a central hub for tabular BI development. For example, we can develop simple or complex analytical models that we can store centrally on an Analysis Services server (and extended with partitions and roles), or that we can store centrally on a SharePoint server. Of course, we could already do these things in Excel 2010 and PowerPivot. However, for basic models we create in Excel 2013, we don’t need PowerPivot at all. Also, Excel 2013 allows us build Power View reports that can be stored centrally in SharePoint. Figure 1 shows how the BI components are related in Excel 2010, and figure 2 shows how they are related in Excel 2013 (with changes highlighted in red).
Figure 1 – Excel 2010 BI Architecture
Figure 2 – Excel 2013 BI Architecture
The main changes in figure 2 compared to figure 1 are the built-in xVelocity engine (the Data Model) and the Power View add-in.

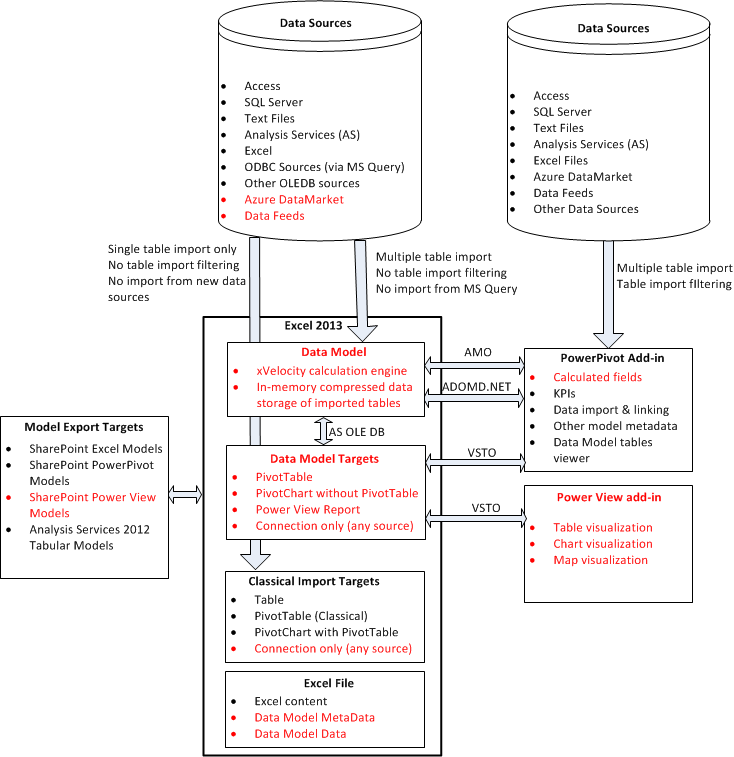
Colin continues with detailed instructions for “Creating the Data Model” and “Adding Data to the Data Model.”
No significant articles today
<Return to section navigation list>
Windows Azure Service Bus, Access Control Services, Caching, Active Directory and Workflow
‡ Jay Conner described Agile path ways into the Azure Universe – Access Control Service [ACS] in a 9/22/2012 post to the Elastacloud blog:
Preparation Tasks and Concepts
The main content of this article depends upon an Azure Service called ‘Access Control Service’. To make use of this service, you’ll need to sign up for an Azure Account. At the time of writing this article there is a 90 day free trial available.
You can find the portal entry page and sign up page at this web address : [ http://www.windowsazure.com/en-us/ ]
The wizard will take you through the sign up process, including signing up for a live account if you do not have one currently.
What is Azure?
- Upload and consume Virtual Machines
- Upload your own websites, applications and services
- Consume specialist services for example Access Control Service [ACS]
- Distribute your content worldwide via the Content Delivery Network [CDN]
- Make use of Object based data storage using a variant of NoSQL concept called Table Storage
- Online SQL server instances , known as Azure SQL
- Distributed messaging and workflow via powerful and custom service bus offering.
In simple terms, Azure gives you the power to focus on writing world class software whilst it handles the hardware and costing concerns. All this power comes with a price tag, but when you take into account the cost of physical data canters Azure is more than competitive. In this article we will only utilise a tiny fraction of the power of Azure, but we would encourage you to explore it in more depth if you haven’t already.
What Is the Access Control Service [ ACS ] ?
Web Address – [ http://msdn.microsoft.com/en-us/library/windowsazure/gg429786.aspx ]
The Access Control Service offered by Microsoft via the Azure platform is a broker for Single Sign On Solutions. In simple terms this provides the capability for users to Authenticate to use your application. This authentication uses commercial and trusted Identity Providers such as:
- Windows Live Id
- A custom identity provider or a corporate Active Directory.
Once a user has authenticated they are issued with a token. We can receive and use this token as a unique identifier for the user inside the target software system.
This is as far as we will go to explain ACS, there is a lot of high quality material available on the internet that covers the basics of getting up and running with ACS . We have included a number of in depth links below, but the rest of this article will focus on Test driving ACS. …

Jay continues with very detailed “Adding Internet Identity Providers like Facebook, Google, LiveID and Yahoo to your MVC web application using Windows Azure AppFabric Access Control Service and jQuery in 3 steps” sections.
Manu Cohen-Yashar (@ManuKahn) described how to Discover Identity Providers from ACS in a 9/19/2012 post:
A customer asked me how to dynamically discover the identity providers of a certain namespace in ACS.
The request is simple:
Let’s assume we have an application (RP) in http:\\localhost\myAppIf will send the following request to acs:
https://xxx.accesscontrol.windows.net:443/v2/metadata/IdentityProviders.js?protocol=wsfederation&realm=http%3a%2f%2flocalhost%2fmyapp%2f&version=1.0
[{"Name":"Windows Live™ ID","LoginUrl":"https://login.live.com/login.srf?wa=wsignin1.0&wtrealm=https%3a%2f%2faccesscontrol.windows.net%2f&wreply=https%3a%2f%2fxxx.accesscontrol.windows.net%3a443%2fv2%2fwsfederation&wp=MBI_FED_SSL&wctx=cHI9d3NmZWRlcmF0aW9uJnJtPWh0dHAlM2ElMmYlMmZsb2NhbGhvc3Q1","LogoutUrl":"https://login.live.com/login.srf?wa=wsignout1.0","ImageUrl":"","EmailAddressSuffixes":[]},
{"Name":"Google","LoginUrl":"https://www.google.com/accounts/o8/ud?openid.ns=http%3a%2f%2fspecs.openid.net%2fauth%2f2.0&openid.mode=checkid_setup&openid.claimed_id=http%3a%2f%2fspecs.openid.net%2fauth%2f2.0%2fidentifier_select&openid.identity=http%3a%2f%2fspecs.openid.net%2fauth%2f2.0%2fidentifier_select&openid.realm=https%3a%2f%2fxxx.accesscontrol.windows.net%3a443%2fv2%2fopenid&openid.return_to=https%3a%2f%2fxxx.accesscontrol.windows.net%3a443%2fv2%2fopenid%3fcontext%3dcHI9d3NmZWRlcmF0aW9uJnJtPWh0dHAlM2ElMmYlMmZsb2NhbGhvc3QmcHJvdmlkZXI9R29vZ2xl0&openid.ns.ax=http%3a%2f%2fopenid.net%2fsrv%2fax%2f1.0&openid.ax.mode=fetch_request&openid.ax.required=email%2cfullname%2cfirstname%2clastname&openid.ax.type.email=http%3a%2f%2faxschema.org%2fcontact%2femail&openid.ax.type.fullname=http%3a%2f%2faxschema.org%2fnamePerson&openid.ax.type.firstname=http%3a%2f%2faxschema.org%2fnamePerson%2ffirst&openid.ax.type.lastname=http%3a%2f%2faxschema.org%2fnamePerson%2flast","LogoutUrl":"","ImageUrl":"","EmailAddressSuffixes":[]},{"Name":"Yahoo!","LoginUrl":"https://open.login.yahooapis.com/openid/op/auth?openid.ns=http%3a%2f%2fspecs.openid.net%2fauth%2f2.0&openid.mode=checkid_setup&openid.claimed_id=http%3a%2f%2fspecs.openid.net%2fauth%2f2.0%2fidentifier_select&openid.identity=http%3a%2f%2fspecs.openid.net%2fauth%2f2.0%2fidentifier_select&openid.realm=https%3a%2f%2fxxx.accesscontrol.windows.net%3a443%2fv2%2fopenid&openid.return_to=https%3a%2f%2fxxx.accesscontrol.windows.net%3a443%2fv2%2fopenid%3fcontext%3dcHI9d3NmZWRlcmF0aW9uJnJtPWh0dHAlM2ElMmYlMmZsb2NhbGhvc3QmcHJvdmlkZXI9WWFob28h0&openid.ns.ax=http%3a%2f%2fopenid.net%2fsrv%2fax%2f1.0&openid.ax.mode=fetch_request&openid.ax.required=email%2cfullname%2cfirstname%2clastname&openid.ax.type.email=http%3a%2f%2faxschema.org%2fcontact%2femail&openid.ax.type.fullname=http%3a%2f%2faxschema.org%2fnamePerson&openid.ax.type.firstname=http%3a%2f%2faxschema.org%2fnamePerson%2ffirst&openid.ax.type.lastname=http%3a%2f%2faxschema.org%2fnamePerson%2flast","LogoutUrl":"","ImageUrl":"","EmailAddressSuffixes":[]}]Now we can use (http get) the LoginUrl of each provider which will send us directly to its login page.
If we call ACS with: https://xxx.accesscontrol.windows.net:443/v2/wsfederation?wa=wsignin1.0&wtrealm=http%3a%2f%2flocalhost%2fmyapp%2f
We will get the good old identity providers list from ACS from which the user can choose his identity provider.

<Return to section navigation list>
Windows Azure Virtual Machines, Virtual Networks, Web Sites, Connect, RDP and CDN
•• Nathan Totten (@ntotten) and Nick Harris (@cloudnick) produced and uploaded Episode 90 - Windows Azure Web Sites Update on 9/22/2012:
In this episode Nick and Nate checkout the latest updates to Windows Azure Web Sites and Windows Azure SQL Database.
In the News:

• Shaun Xu (@shaunxu) explained GitHub Integration in Windows Azure Web Site in a 9/21/2012 post:
Microsoft had just announced an update for Windows Azure Web Site (a.k.a. WAWS). There are four major features added in WAWS which are free scaling mode, GitHub integration, custom domain and multi branches.
It’s very simple to establish the GitHub integration in WAWS. First we need a clean WAWS. In its dashboard page click “Set up Git publishing”.
Currently WAWS doesn’t support to change the publish setting. So if you have an existing WAWS which published by TFS or local Git then you have to create a new WAWS and set the Git publishing.
Then in the deployment page we can see now WAWS supports three Git publishing modes:
- Push my local files to Windows Azure: In this mode we will create a new Git repository on local machine and commit, publish our code to Windows Azure through Git command or some GUI.
- Deploy from my GitHub project: In this mode we will have a Git repository created on GitHub. Once we publish our code to GitHub Windows Azure will download the code and trigger a new deployment.
- Deploy from my CodePlex project: Similar as the previous one but our code would be in CodePlex repository.
Now let’s back to GitHub and create a new publish repository.
Currently WAWS GitHub integration only support for public repositories. The private repositories support will be available in several weeks.
We can manage our repositories in GitHub website. But as a windows geek I prefer the GUI tool. So I opened the GitHub for Windows, login with my GitHub account and select the “github” category, click the “add” button to create a new repository on GitHub.
You can download the GitHub for Windows here.
I specified the repository name, description, local repository, do not check the “Keep this code private”. After few seconds it will create a new repository on GitHub and associate it to my local machine in that folder.
We can find this new repository in GitHub website. And in GitHub for Windows we can also find the local repository by selecting the “local” category.
Next, we need to associate this repository with our WAWS. Back to windows developer portal, open the “Deploy from my GitHub project” in the deployment page and click the “Authorize Windows Azure” link. It will bring up a new windows on GitHub which let me allow the Windows Azure application can access your repositories.
After we clicked “Allow”, windows azure will retrieve all my GitHub public repositories and let me select which one I want to integrate to this WAWS. I selected the one I had just created in GitHub for Windows.
So that’s all. We had completed the GitHub integration configuration. Now let’s have a try. In GitHub for Windows, right click on this local repository and click “open in explorer”. Then I added a simple HTML file.
1: <html>2: <head>3: </head>4: <body>5: <h1>6: I came from GitHub, WOW!7: </h1>8: </body>9: </html>Save it and back to GitHub for Windows, commit this change and publish. This will upload our changes to GitHub, and Windows Azure will detect this update and trigger a new deployment.
If we went back to azure developer portal we can find the new deployment. And our commit message will be shown as the deployment description as well.
And here is the page deployed to WAWS.


<Return to section navigation list>
Live Windows Azure Apps, APIs, Tools and Test Harnesses
•• Arra Derderian (@arraderderian) explained Enabling Orchard CMS Multi-Tenancy on Windows Azure in a 9/22/2012 post:
I have had a lot of feedback from my presentation on Deploying Orchard CMS to Windows Azure last month at Boston Orchard CMS. You can find the slides for this presentation at our event page here.
To clarify on some of the demo pieces for people who missed the presentation on Multi-tenancy, this is a nice feature because we can host multiple Orchard sites in a single application domain and have different content and configurations for each site. This is also very nice because if traffic became too heavy we can always horizontally scale the site because we are running in Azure.
There are two types of deployments available for Orchard CMS in Azure.
- Orchard CMS as a Cloud Service.
- Windows Azure websites.
Orchard CMS as a Cloud Service.
1. For our first example we will use the Cloud Service.
2. A cloud service will run inside a web role and uses a different storage provider for our Database and Media Folder. Installing themes and modules in production is not supported.
3. You will want to download the Orchard source code from Codeplex. You can do a new pull request or download the zip file.
4. Once you have the source code you can then run ClickToBuildAzurePackage.cmd from the command line as an Administrator.
5. This will build your package that is needed to deploy to Azure.
6. You will need a Windows Azure account that allows you to deploy a Web Role and also SQL Azure for your databse.
7. After your build is complete, modify the csfcg file with your Azure specific configurations.
8. Publish a new build to Orchard.
9. Link up your Orchard site to your SQL Azure instance.
10. Go to your Azure portal :
11. Verify your cloud service is up and running, for example : Cloud Service Boston
12. Login to your site and enable multi-tenancy module. (As a note, you should normally not install modules in production on Azure. Tthey will be there after a role restarts. You should always add the module in your dev environment and to your project, and then deploy again. The multi-tenancy module should come with the code base anyways.
13. Browse to the new Dashboard item Tenants.
14. You will need to add a new tenant via the Add menu option. (Yours will not have an entry yet.)
15. Because Windows Azure issues you a CNAME address like http://orchardcmsboston.cloudapp.net , you will need a DNS service that supports wildcard CNAMES if you want to get routing like http://orchardcmsseattle.orchardcmsboston.cloudapp.net to work. In our case Orchard saves us by allowing us to setup our tenant with a url prefix. Our address will be http://orchardcmsboston.cloudapp.net/orchardcmsseattle.
16. Enter the tenant name in the URL Prefix box and the windows azure address for your service in the host box. Select Use Built In Storage SQLCE. Click Save.
17. You will now see your tenant added, and you can click the Set Up link to begin working with your website at http://orchardcmsboston.cloudapp.net/orchardcmsseattle.
18. Your original site is your tenant landlord and you can being adding more and more tenants!
Windows Azure websites
1. Windows Azure websites can be spun up in the cloud and multi-tenancy can be enabled pretty fast.
2. Windows Azure websites are basically setup on a shared server with other users and you own your own network storage for your site.
3. For you to enable multi-tenancy you will need to go into your Windows Azure websites account and move your Orchard site from a Shared instance to a Reserved instance. This will allow you to enter CNAMES for your various site tenants. You do this under the Configuration tab for your website in the Windows Azure portal. You will then see a section labeled domains appear on that screen for you to enter your two tenant addresses.
4. Login to your Windows Azure website and enable multi-tenancy.
5. Browse to Tenants administration item and you should see a list of tenants. (Yours will only have the default tenant)
6. You will now add a new Tenant via the menu.
7. Enter your new host for your site : orchardcmsseattle.azurewebsites.net
8. Use SQLCE as your data source.
9. Click Save.
10. You will now have your two tenants, who will answer at http://orchardcmsboston.azurewebsites.net and http://orchardcmsseattle.azurewebsites.net
11. When you hit your new tenant, you can setup your admin account, and the original site will be the tenant landlord.
12. You should be all set now!
Related posts
Azure Series Part 1 : Migrating your Existing Site to a Windows Azure Web RoleA step by step process of migrating an existing .NET website to the Windows Azure platform.Azure Series Part 3: Migrating Http Modules and Handlers to Windows AzureFor some legacy ASP.NET sites you may notice your old HTTP Handlers and Modules being configured in ...Orchard CMS Front-End StylingI’ve been a front-end developer for over a decade now and some of my favorite sites to style-u...


• Clint Edmonson (@clinted) reported Free Windows Store and Phone Developer Accounts for MSDN Subscribers in a 9/21/2012 post:
If you are a member/subscriber to any of the following programs you are eligible to receive one-time, 12-month Windows Store and Windows Phone developer accounts.
- Visual Studio Professional with MSDN
- Visual Studio Test Professional with MSDN
- Visual Studio Premium with MSDN
- Visual Studio Ultimate with MSDN
- BizSpark
On September 11, 2012 Microsoft announced that Windows Store is open to individual developers (Company only registration became available on August 1st). This means that eligible MSDN subscribers will be able to select between an individual and company account when registering for their developer account benefit. New or existing subscribers will see developer accounts listed as a benefit on the Getting Started page as well as various MSDN overview pages.
Now that you have this benefit why not get started.
To acquire and redeem the token:
1. Log into My Account.
2. Click on ‘Get Code’. A unique token will be delivered to each subscriber.
3. Click on ‘How to Register’ (link will appear once code is claimed). A developer account details page will display that includes an overview of the benefit, token and registration information.
4. Click on the link to ‘Register your code’. This launches the developer account registration process.
Ready to start developing? Head over to Generation App to get started.

See My week-old How Not to Get a Free Windows Store Developer Account with Your MSDN Subscription Benefit to save yourself potential grief when registering for the Windows Store developer account.
• Proximex (@proximex) posted a Proximex Announces Physical Security Information Management (PSIM) Solution Implemented on the Windows Azure Platform press release on 9/20/2012:
Proximex™, a global leader in physical security information management (PSIM), announced today that its Physical Security Information Management (PSIM) solution has been implemented on the Windows Azure cloud computing platform. The Proximex Surveillint™ Cloud Edition implementation serves as a signal of marketplace acceptance of the Windows Azure cloud-based solution delivery model from Microsoft Corp. for mission-critical enterprise applications.
Surveillint by Proximex connects and correlates information from disparate systems into one centralized view to help mitigate risk, ensure compliance and lower total cost of ownership. Cloud enabled deployment options for Surveillint offer a number of potential advantages to PSIM users, including:
- Capital savings, by eliminating the requirement for customers to procure, deploy and maintain system hardware to support their infrastructure software environments
- Flexibility, by providing customers with the ability to quickly expand capacity to support changing operational needs on demand
- For management, the ability to better understand and plan for the operational requirements and costs associated with PSIM deployment and operation
Valley Inception, a Silicon Valley venture capital firm and business incubator has deployed the solution to help manage its access control and physical security systems. Since there was no need to procure and install additional infrastructure software, the Proximex Surveillint Cloud Edition solution was able to be deployed rapidly into the company’s environment.
“Proximex Surveillint Cloud Edition is easy for us to maintain because the database and web infrastructure are deployed and managed by Microsoft in the Windows Azure cloud,” said Jack Smith, Founding Partner, Valley Inception. “We anticipate that this cloud-based solution will allow us to very easily scale our solution and service levels as our needs change for years to come.”
Satory Global, a consulting firm specializing in IT deployment and cloud computing and a Microsoft Azure Circle West Region partner of the year, assisted Proximex in the implementation of Surveillint on the Windows Azure cloud platform.
“We are working with several Fortune 1000 customers who are looking to implement IT infrastructures in the cloud, and Proximex Surveillint Cloud Edition represents state-of-the-art cloud-based IT implementation,” said Neil Mackenzie, Microsoft Azure Architect, Satory Global. “I believe many of our customers will be keenly interested in this solution because of the many potential benefits offered by the cloud computing model.”
For more information about Proximex Surveillint Cloud Edition, please visit http://proximex.com/surveillint-cloud.
About Proximex
Based in San Jose, Calif., Proximex is the global leader in physical security information management and situational intelligence. Transportation, defense and corporate customers applaud Proximex solutions for delivering the fastest set up and deployment, the highest in scalability, availability and failover capabilities, and the most robust integrations in the industry. Proximex solutions join and correlate information from disparate security systems into one centralized environment, thereby transforming massive amounts of data into useable, actionable information. Leveraging the company’s IT heritage, Proximex solutions integrate physical and logical security systems with network and health monitoring technologies to catch multi-pronged attacks and relay important business-level information. For more information, visit www.proximex.com.
The names of actual companies and products mentioned herein may be the trademarks of their respective owners.
<Return to section navigation list>
Visual Studio LightSwitch and Entity Framework 4.1+
‡Paul Van Bladel (@paulbladel) explained Eager loading related entities in LightSwitch 2012 in a custom control in a 9/23/2012 post:
Introduction
In a regular LightSwitch project, related entities are always lazy loaded, which is fine in a large majority of typical line of business applications built with LightSwitch. Nonetheless, there are circumstances where eager loading would be much better.
We will discuss here such a case and explain how eager loading can be enabled when loading data in a custom control. We can do this thanks to the introduction of the OData stack in LightSwitch 2012. (in V1 eager loading is impossible!)
Lazy loading in a standard LightSwitch project.
Let’s say have a customer entity with related orders and you put these on a list-detail screen (so both customers with related orders). When the screen is loaded, all customers (at least the amount of customers equal to the page size of your customer visual collection) are loaded and only for the “selected” customer, the corresponding orders are loaded as well. When navigating to another customer, there is again a call to the server for retrieving the related orders of the newly selected customer.
That’s lazy loading and it is a very clever data loading strategy, perfectly suited for the type of standard applications you build with LightSwitch. Imagine, that our aforementioned customer/order screen would “eager load” everything? Would that be better? Probably in 95% of the cases definitely not.
A case for eager loading?
Well.. when would eager loading be more suitable than lazy loading? In other words: which are the rare cases we would need it?
I wrote once about a custom control I have build which can represent (hotel) rooms with its corresponding reservations.
Instead of a typical customer-order visualization, this room reservation control shows the rooms are rows and the “state” of the reservation in a timeline based manner as columns. (so basically you have kind of undefined amount of columns)
Here is a screenshot of this custom control. (you find all details here: http://blog.pragmaswitch.com/?p=318)
Although my customers are quite happy with this control, a drawback of this 1mplementation is that reservations are lazy loaded and the reason is simple because eager loading was not possible in LightSwitch 2011 (V1), even not via a RIA service. In fact the actual implementation makes use a Value Converter which which is fired during the load of every room and will load the corresponding reservations, which results in a very chatty client server communication !
Ok, so far so good : we have a case for eager loading related entities in a custom control. I repeat, in the standard LightSwitch you will almost never need this. …


Paul continues with the details of implementing lazy loading.
•• Paul Van Bladel (@paulbladel) described Extending the LightSwitch pivotviewer with colored cards and slider based numeric filtering in a second 9/21/2012 post:
Introduction
This post is part of a series. First read http://blog.pragmaswitch.com/?p=441.
We will extend our rudimentary pivot viewer of the first post with card coloring and filtering on numeric values with a slider.
We will use coloring to visualize the movie category (e.g. comedy = red).
We will introduce also a budget value in the movie entity type. We want to be able to filter by means of a kind of slider control.
By the way, when you look to the pivot viewer screen, well… it looks very metro, no? Not bad for a silverlight control, hehe
Colored cards
This is the final result we have in mind:
How do we achieve this? We want that based on the movie’s category a specific color is used. Furthermore, we would like this to be configurable. In our first implementation the movie entity had a field Category. We will refactor this field into a new table “MovieCategory”, which can carry as well the color used for the category.
Obviously, in order to cope with this change we need to update our method for generating the test data:
    public partial class MoviesListDetail
    {
        partial void AddTestData_Execute()
        {
            //make sure to have the categories
            if (this.DataWorkspace.ApplicationData.MovieCategories.FirstOrDefault() == null)
            {
                    MovieCategory cat = this.DataWorkspace.ApplicationData.MovieCategories.AddNew();
                    cat.CategoryName = "Thriller";
                    cat.DisplayColor = "Blue";
                    cat.CategoryNumber = 1;
                    cat = this.DataWorkspace.ApplicationData.MovieCategories.AddNew();
                    cat.CategoryName = "Comedy";
                    cat.DisplayColor = "Red";
                    cat.CategoryNumber = 2;
                    cat = this.DataWorkspace.ApplicationData.MovieCategories.AddNew();
                    cat.CategoryName = "Children";
                    cat.DisplayColor = "Green";
                    cat.CategoryNumber = 3;
                    cat = this.DataWorkspace.ApplicationData.MovieCategories.AddNew();
                    cat.CategoryName = "Science Fiction";
                    cat.DisplayColor = "Purple";
                    cat.CategoryNumber = 4;
                    cat = this.DataWorkspace.ApplicationData.MovieCategories.AddNew();
                    cat.CategoryName = "Documentary";
                    cat.DisplayColor = "Yellow";
                    cat.CategoryNumber = 5;
                    cat = this.DataWorkspace.ApplicationData.MovieCategories.AddNew();
                    cat.CategoryName = "Musical";
                    cat.DisplayColor = "DarkGray";
                    cat.CategoryNumber = 6;
                    this.DataWorkspace.ApplicationData.SaveChanges();
            }

            int startNumber = 1;

            var lastMovieRecord = this.DataWorkspace.ApplicationData.Movies.OrderByDescending(m => m.Id).FirstOrDefault();
            if (lastMovieRecord != null)
            {
                startNumber = lastMovieRecord.Id + 1;
            }

            Random random = new Random();
            for (int i = startNumber; i <= startNumber + 333; i++)
            {
                Movie newMovie = this.Movies.AddNew();
                int randomCategoryNumber = random.Next(1, 6);
                newMovie.MovieCategory = this.DataWorkspace.ApplicationData.MovieCategories.Where(cat => cat.CategoryNumber == randomCategoryNumber).Single();
                newMovie.ReleaseDate = DateTime.Now.AddDays(-1 * random.Next(3000));
                newMovie.MovieName = "Movie " + i.ToString();
                newMovie.Budget = Convert.ToDecimal(random.Next(100000, 100000000));
            }
            this.Save();
        }
    }
You may notice that we need more code for genering test data than for the actual implementation of the pivotviewer,:)
In order to convert the string present in the movieCategory table, we need a ValueConverter and apply it to the border of our card:
            <pivot:PivotViewer.ItemTemplates>
                <pivot:PivotViewerItemTemplate>
                    <Border Width="300" Height="300" Background="{Binding MovieCategory.DisplayColor, Converter={StaticResource BackgroundConverter}}" >
                        <StackPanel Orientation="Vertical">
                            <TextBlock Text="{Binding MovieName}"
                            FontSize="30"
                            FontWeight="Bold"
                            Foreground="White"
                            HorizontalAlignment="Center"
                            VerticalAlignment="Center" />
                            <TextBlock Text="{Binding MovieCategory.CategoryName}"
                            FontSize="30"
                            FontWeight="Bold"
                            Foreground="White"
                            HorizontalAlignment="Center"
                            VerticalAlignment="Center" />
                        </StackPanel>
                    </Border>
                </pivot:PivotViewerItemTemplate>
            </pivot:PivotViewer.ItemTemplates>
The backgroundconverter implementation is very simple:
public class BackgroundConverter : IValueConverter
    {
        public object Convert(object value, Type targetType, object parameter, CultureInfo culture)
        {
            string color = value.ToString();

            var xaml = "<SolidColorBrush " +
                "xmlns='http://schemas.microsoft.com/client/2007' " +
                "Color=\"" + color + "\"/>";
            return XamlReader.Load(xaml);
        }

        public object ConvertBack(object value,
                            Type targetType,
                            object parameter,
                            CultureInfo culture)
        {
            return value;
        }
    }
Note that the backgroundconverter would have been much more cumbersome to maintain if we have not stored the color value directly in the MovieGenre table. Now, there is no direct mapping between the category and the color in the converter implementation. As a result the application administrator can choose her favourite color scheme.
Filtering on the budget field
The idea is to use a slider to show all movies with a budget larger than the slider value.
This is nothing more than adding a new PivotViewerNumericProperty for the budget field:
                <pivot:PivotViewerNumericProperty
                        Id="Budget"
                        DisplayName="Movie budget"
                        Options="CanFilter"
                        Binding="{Binding Budget}"/>
            </pivot:PivotViewer.PivotProperties>
As you can see: Simple comme bonjour !
We will cover more in a next post.


• Paul Van Bladel (@paulbladel) posted A gentle introduction to the semantic zoom pivot viewer in LightSwitch on 9/21/2012:
Introduction
Silverlight 5 has an amazing control called the PivotViewer which has semantic zoom capabilities. What is semantic zoom? Well, stop reading and open following link:
http://www.bluesware.ch/parlament/ .
Play with it and if you like this, continue reading and be confident that you can leverage all this in LightSwitch as well, without having to buy expensive 3rd party extensions or controls. Furthermore the fact that the control is part of the silverlight framework is a garantee for high quality !
Let’s get started with a basic example.
We’ll build an example to visualize a fictious movie database. I have no real movie database at my disposal. So we’ll make sure we can easily construct some random test data. The idea is that you have the pivotviewer up and running in less than 3 minutes. I’m using visual studio 2012.
Let’s start with a very basic movie table containing only following fields:
Next, generate a simple ListDetail screen for the movie entity type and attach a button to the screen and call it “AddTestData”.
With this button we will… create test data:
publicpartialclassMoviesListDetail
{
partialvoidAddTestData_Execute()
{
Int32 startNumber = 1;
var lastMovieRecord =this.DataWorkspace.ApplicationData.Movies.OrderByDescending(m => m.Id).FirstOrDefault();
if(lastMovieRecord !=null)
{
startNumber = lastMovieRecord.Id + 1;
}
Random random =newRandom();
for(inti = startNumber; i <= startNumber + 100; i++)
{
Movie newMovie =this.Movies.AddNew();
var mod = i % 6;
switch(mod)
{
case0:
newMovie.Category ="Thriller";
break;
case1:
newMovie.Category ="Comedy";
break;
case2:
newMovie.Category ="Adult";
break;
case3:
newMovie.Category ="Sience Fiction";
break;
case4:
newMovie.Category ="Documentary";
break;
case5:
newMovie.Category ="Adult";
break;
}
newMovie.ReleaseDate = DateTime.Now.AddDays(-1 * random.Next(3000));
newMovie.MovieName ="Movie "+ i.ToString();
}
this.Save();
}As you can see, you can call this method consecutively (each time more test data are added).
Add the Pivot Viewer Wilverlight control
First add a new Silverlight class library in which we will add a new Silverlight user control which we will call “MoviePivotControl”.
Add a reference to the System.Windows.Controls.Pivot.dll.
This is the xaml for the control:
<UserControlx:Class="SilverlightPivot.MoviePivotControl"
xmlns="http://schemas.microsoft.com/winfx/2006/xaml/presentation"
xmlns:x="http://schemas.microsoft.com/winfx/2006/xaml"
xmlns:d="http://schemas.microsoft.com/expression/blend/2008"
xmlns:mc="http://schemas.openxmlformats.org/markup-compatibility/2006"
xmlns:pivot="clr-namespace:System.Windows.Controls.Pivot;assembly=System.Windows.Controls.Pivot"
mc:Ignorable="d"
d:DesignHeight="300"d:DesignWidth="400">
<Gridx:Name="LayoutRoot"Background="White">
<pivot:PivotViewerx:Name="pViewer"ItemsSource="{Binding Screen.Movies}">
<pivot:PivotViewer.PivotProperties>
<pivot:PivotViewerStringProperty
Id="MovieName"
Options="CanSearchText"
Binding="{Binding MovieName}"/>
<pivot:PivotViewerDateTimeProperty
Id="ReleaseDate"
Options="CanFilter"
Binding="{Binding ReleaseDate}"/>
<pivot:PivotViewerStringProperty
Id="Category"
Options="CanFilter"
Binding="{Binding Category}"/>
<pivot:PivotViewerNumericProperty
Id="Value"
Options="None"
Binding="{Binding Value}"/>
</pivot:PivotViewer.PivotProperties>
<pivot:PivotViewer.ItemTemplates>
<pivot:PivotViewerItemTemplate>
<BorderWidth="300"Height="300"Background="Red">
<StackPanelOrientation="Vertical">
<TextBlockText="{Binding MovieName}"
FontSize="30"
FontWeight="Bold"
Foreground="White"
HorizontalAlignment="Center"
VerticalAlignment="Center"/>
<TextBlockText="{Binding Category}"
FontSize="30"
FontWeight="Bold"
Foreground="White"
HorizontalAlignment="Center"
VerticalAlignment="Center"/>
</StackPanel>
</Border>
</pivot:PivotViewerItemTemplate>
</pivot:PivotViewer.ItemTemplates>
</pivot:PivotViewer>
</Grid>
</UserControl>There is no specific code in the associated code file.
Consume the PivotViewer in your LightSwitch project.
We are almost finished. Start from a “New Data Screen” and do not attach it to any screen data. Now simply add the custom control to this screen:
Make sure to click in properties Change… and select the MoviePivotControl. Disable paging on the Movies query and change in the properties of the custom control also the label position to “None”.
Start using the pivot viewer.
F5 your LightSwitch project and first generate some test data in the Movie ListDetail screen. Go then to the pivot screen and you should see this:
You can click on a card which will visualize the movie details:
Of course the real fun is the filtering and searching:
You can search on the movie name. The following example shows all movies with “3″ in the name:
You can filter as well on the Release date, but also on the category. In order to see the category filters, first click on the ReleaseDate header which will unhide the Category filter:
The following reveals the real intelligence of the PivotViewer control: first make a filtering on the ReleaseDate for a year where there are less than 4 movies. Now, go to the Category filter. You will see that only the categories can be selected applicable to what’s relevant given your selection on release date:
Conclusion
I limited deliberately this demo to a very basic example. Trust me, the real fun comes in later posts I’m planning to do on this subject:
- We’ll introduce colored cards (e.g. every movie category is represented by a specific color,
- we’ll make the cards really responsive to semantic zoom (meaning that a card’s morphology changes when you zoom !),
- we can introduce adorners,
- …


Beth Massi (@bethmassi) listed Visual Studio LightSwitch Books in a 9/19/2012 post:
I recently had a couple emails asking for LightSwitch books so I thought I’d create a list of the ones I know about here. I haven’t read all of them so take a look at the reviews and decide for yourself. I do, however, know many of the authors that are active in the community and they are very knowledgeable and helpful. If I missed any book you’d recommend, please add a comment below!
I’ve ordered them in the list purely by title so not to play favorites :-) However I did tech review Microsoft Visual Studio LightSwitch Unleashed and more recently LightSwitch Succinctly, both great reads. So here ya go!

Beginning Microsoft Visual Studio LightSwitch Development
By ISTVÁN NOVÁK
Publication Date:June 24, 2011Learn how LightSwitch can accelerate and simplify application development. This introductory, full-color book shows you how to quickly create, modify, and distribute information for your business with LightSwitch. Packed with simple example programs, this beginner-level resource guides you through a complete small business application using LightSwitch to demonstrate the capabilities of this exciting new tool.

Creating Visual Studio LightSwitch Custom Controls (Beginner to Intermediate)
By Michael Washington
Publication Date: July 16, 2011LightSwitch is a powerful MVVM (Model - View- View Model) toolkit, that enables a professional developer the ability to achieve incredible productivity. LightSwitch custom controls, provide the professional developer, the tool to unleash the power of this incredible product. Creating Visual Studio LightSwitch Custom Controls (Beginner to Intermediate), will walk you through creating LightSwitch custom controls, even if you are a total beginner and have not created a Silverlight control before.

Developing Real-world Applications with LightSwitch
By Gill Cleeren
Publication Date: October 12, 2011
This ebook provides a great introduction to LightSwitch, and walks you through the various parts of LightSwitch that a developer needs to know.
LightSwitch Succinctly (FREE)
by Jan Van der Haegen
Publication Date: July, 2012
The author of this e-book, Jan Van der Haegen, is a self-described green geek who writes a monthly LightSwitch column for MSDN magazine. In LightSwitch Succinctly, he provides a quick tour of the different parts of the LightSwitch development environment so that you can judge whether Visual Studio LightSwitch would be an ideal tool to add to your belt.
Microsoft Visual Studio LightSwitch Business Application Development
by Jayaram Krishnaswamy
Publication Date: September 21, 2011This book is for developers who are beginning to use Visual Studio LightSwitch. Small business houses should be able get a jump start on using LightSwitch. The book does not assume prior knowledge of Visual Studio LightSwitch but exposure to SQL Server, Silverlight, and Microsoft IDEs such as Visual Studio (any version) will be of great help.

Microsoft Visual Studio LightSwitch Unleashed- (Download chapter 3 for free here)
By Alessandro Del Sole
Publication Date: March 5, 2012Microsoft Visual Studio LightSwitch represents a breakthrough in business application development for Windows clients, the Web, and the cloud. Using this new tool, you can build powerful data-centric applications with far less code than ever before. Microsoft Visual Studio LightSwitch Unleashed is the first comprehensive, start-to-finish guide to this powerful new tool. Written by longtime Visual Basic expert and Microsoft MVP Alessandro Del Sole, this book covers everything Microsoft developers need to know to make the most of LightSwitch–from the absolute basics to the most advanced enterprise techniques.

OData And Visual Studio LightSwitch Using ASP.NET / Windows Phone / jQuery / datajs / Knockout
By Michael Washington
Publication Date: June 2, 2012Visual Studio LightSwitch is a development tool that provides the easiest and fastest way to create ‘forms over data, line of business applications’. It allows you to build applications for the desktop and the cloud. It does this by allowing you to quickly and easily define and connect to your data, program your security and business rules, and expose this via OData to practically any ‘client’ such as mobile devices and web pages. This book will show you how to publish and consume OData services. A standard order entry LightSwitch application is used to demonstrate real world scenarios where you will need to expose your application to web pages, tablets, and other mobile devices. Technologies covered include jQuery Mobile, Windows Phone, datajs and Knockout.

Pro Visual Studio LightSwitch 2011 Development
By Tim Leung & Yann Duran
Publication Date: March 26, 2012For serious developers building, enhancing and deploying advanced business applications using LightSwitch, Pro Visual Studio LightSwitch 2011 Development is the guide for going beyond the "click-and-you're-done" interface, while still maintaining the elegance and convenience of rapid application development.

SharePoint Apps with LightSwitch
By Paul Ferrill
Publication Date: April 13, 2012Build custom business applications for SharePoint with Visual Studio LightSwitch—including intuitive apps that don’t require a single line of code. This example-driven guide takes non-programmers step-by-step through the process of creating simple apps and utilities, and shows programmers familiar with C# or Visual Basic how to build customized applications with more functionality.


And don’t forget, another great place for learning resources like videos, samples and more is the LightSwitch Developer Center.
Return to section navigation list>
Windows Azure Infrastructure and DevOps
•• Jim O’Neil (@jimoneil) posted a Windows Azure Interactive Feature Map on 9/21/2012:
One of my favorite ways to present an overview of Windows Azure is via the following image. Well, this is really the last image of a typical presentation, since I start with a blank slate and successively add service blocks and a bit of narrative along the way.
The image below is interactive, so you can hover over each of the components and click to go to the relevant section of the Windows Azure web site to learn more about the feature.

View Larger Image (non-interactive)
I can't take credit for the graphic’s design. It was my colleague Clint Edmonson who introduced me to the original version, which was the creation of another colleague of ours in Germany, Holger Sirtl; however, I’ve definitely adapted and evolved them a bit as various services have come on-line, and others have been rebranded.
• David Linthicum (@DavidLinthicum) asserted “PaaS and IaaS are getting mixed up in a way that may confuse you at first, but that is ultimately good for you” in a deck for his PaaS promises devops in the cloud article of 9/21/2012 for InfoWorld’s Cloud Computing blog:
Platform as a service is the fastest-growing area of cloud computing: Gartner forecasts the worldwide enterprise market for PaaS platforms will grow from $900 million in 2011 to $2.9 billion in 2016, representing a 26.6 percent rise each year.
The problem is that no two PaaS offerings are alike. Plus, as the market expands, anything and everything that looks like development is adopting the PaaS label, further confusing the field. As a result, I see weak excuses for PaaS clouds these days as wannabes toss their hats into the arena and chase the gold in them thar clouds. But ignore them. The truth is that a small set of established providers rule -- and will continue to rule -- PaaS.
The core PaaS providers are Amazon.com, Red Hat, Google, Microsoft, Heroku (now part of Salesforce.com), and Engine Yard. Dozens of others may wave their tiny little arms, but the game is shifting toward big infrastructure and devops, both of which these core companies are already covering. The reality is that the smaller providers don't have the money to make the investments, so the larger providers have little to worry about. Thus, the smaller providers will become niche players quickly.
The clear trend for the vendors is that they need to have IaaS in their PaaS, else they'll be SOL. For IT and developers, that means app dev and raw cloud capacity are becoming part of a larger cloud context -- in other words, devops in the cloud.
Given this industry direction, the best way to think about PaaS is as a means to extend core cloud services to solve business problems. IaaS is the pool of infrastructure resources, such as storage, data, and compute power that you need to execute those services. PaaS is how you're able to transform those services into application and business processes. Because the apps and their enabling infrastructure are in the cloud, you can operate those applications reliably with an increasing set of services and features.

Jason Zander (@jlzander) announced New Team, New Challenges in a 9/19/2012 post:
Last week we officially launched VS2012 and the .NET Framework 4.5. I’ve spent the last couple of weeks in launch activities in London, Seattle, Atlanta, and New York, sharing details on the new versions and doing whatever I can to help people get going on the new release. I can honestly say this is the best release I’ve worked on (and I’ve worked on basically all of them). We have been able to use half the milestones and land with higher quality this release thanks to several internal improvements as well as the new toolset we just released (I will have to share some of those improvements in future posts; I’ve heard from many of you that you are trying to do similar things).
Wish me luck <g>

Lots of luck!
General Chicken listed The 4 Building Blocks of Architecting Systems for Scale in a 9/19/2012 post to the High Scalability blog:
If you are looking for an excellent overview of general architecture principles then take a look at Will Larson's Introduction to Architecting Systems for Scale. Based on his experiences at Yahoo! and Digg, Will covers key concepts in some depth. A quick gloss on the building blocks:
- Load Balancing: Scalability & Redundancy. Horizontal scalability and redundancy are usually achieved via load balancing, the spreading of requests across multiple resources.
- Smart Clients. The client has a list of hosts and load balances across that list of hosts. Upside is simple for programmers. Downside is it's hard to update and change.
- Hardware Load Balancers. Targeted at larger companies, this is dedicated load balancing hardware. Upside is performance. Downside is cost and complexity.
- Software Load Balancers. The recommended approach, it's software that handles load balancing, health checks, etc.
- Caching. Make better use of resources you already have. Precalculate results for later use.
- Application Versus Database Caching. Databases caching is simple because the programmer doesn't have to do it. Application caching requires explicit integration into the application code.
- In Memory Caches. Performs best but you usually have more disk than RAM.
- Content Distribution Networks. Moves the burden of serving static resources from your application and moves into a specialized distributed caching service.
- Cache Invalidation. Caching is great but the problem is you have to practice safe cache invalidation.
- Off-Line Processing. Processing that doesn't happen in-line with a web requests. Reduces latency and/or handles batch processing.
- Message Queues. Work is queued to a cluster of agents to be processed in parallel.
- Scheduling Periodic Tasks. Triggers daily, hourly, or other regular system tasks.
- Map-Reduce. When your system becomes too large for ad hoc queries then move to using a specialized data processing infrastructure.
- Platform Layer. Disconnect application code from web servers, load balancers, and databases using a service level API. This makes it easier to add new resources, reuse infrastructure between projects, and scale a growing organization.

Apress published Michael Hüttermann’s DevOps for Developers book on 9/12/2012 (missed when published):
DevOps for Developers delivers a practical, thorough introduction to approaches, processes and tools to foster collaboration between software development and operations. Efforts of Agile software development often end at the transition phase from development to operations. This book covers the delivery of software, this means “the last mile”, with lean practices for shipping the software to production and making it available to the end users, together with the integration of operations with earlier project phases (elaboration, construction, transition).
DevOps for Developers describes how to streamline the software delivery process and improve the cycle time (that is the time from inception to delivery). It will enable you to deliver software faster, in better quality and more aligned with individual requirements and basic conditions. And above all, work that is aligned with the “DevOps” approach makes even more fun!
- Provides patterns and toolchains to integrate software development and operations
- Delivers an one-stop shop for kick-starting with DevOps
- Provides guidance how to streamline the software delivery process
What you’ll learn
- Know what DevOps is and how it can result in better and faster delivered software
- Apply patterns to improve collaboration between development and operations
- Introduce unified processes and incentives to support shared goals
- Start with or extend a tool infrastructure that spans projects roles and phases
- Address pain points in your individual environment with appropriate recipes
- Break down existing walls that make up an unnecessarily sluggish delivery process
Who this book is for
DevOps for Developers is for motivated software engineers, particularly programmers, testers, QA, system admins, database admins, both beginners and experts, who want to improve their software delivery process. It’s the perfect choice for engineers who want to go the next step by integrating their approaches for development and delivery of software. This book is for engineers who want to shape their processes and decide on and integrate open source tools and seek for guidance how to integrate standard tools in advanced real world use cases.
Table of Contents
Part I. Fundamentals
1. Getting started
2. Introducing DevOps
3. Building blocks of DevOpsPart II. Metrics and Measurement View
4. Quality and testing
5. Introduce shared incentivesPart III. Process View
6. Gain fast feedback
7. Unified and holistic processPart IV. Technical View
8. Automatic releasing
9. Specification by Example
10. Infrastructure as Code
No significant articles today
<Return to section navigation list>
Windows Azure Platform Appliance (WAPA), Hyper-V and Private/Hybrid Clouds
J. C. Hornbeck (@MS_SystemCenter) posted Step by step: From bare metal to the private cloud with Microsoft System Center 2012 to the System Center: Operations Manager Engineering blog on 9/19/2012:
This is something we mentioned a few months ago but it’s such a great series I wanted to mention it again in case some of you missed it.
Microsoft’s own Travis Wright spent quite a bit of time with customers over the last 6-12 months helping them plan out and deploy their first private clouds managed by System Center 2012, and to help people get started faster he went to the Enterprise Engineering Center (EEC) on the Redmond campus, arranged for some really nice hardware and set up a System Center managed private cloud from bare metal all the way up. All along the way he recorded everything he did. In his 8 part webcast series below he shows you some of the best practices and process for getting started with your System Center 2012 managed private cloud. He deploys a Hyper-V host cluster, Virtual Machine Manager, Operations Manager, Service Manager, Orchestrator and the Cloud Service Process Management Pack, and integrate them all together in a high performance and high availability configuration.
If this is something you have planned, or maybe you’re just dreaming of how powerful and easy your life would be in a System Center 2012 environment, this is one series you won’t want to miss.
_____________
Bare Metal to Private Cloud (Part 1 of 8): Beginning with the End in Mind
http://go.microsoft.com/?linkid=9809577 or http://bit.ly/JTGtJK
Abstract: In this session, we take a look at the end state of managing a private cloud with Microsoft System Center, including the Cloud Services management pack. The sessions that follow this session describe how to go from bare metal to a private cloud managed by System Center.
_____________Bare Metal to Private Cloud (Part 2 of 8): Hardware and Prerequisite Software Platform
http://go.microsoft.com/?linkid=9809578 or http://bit.ly/KJc41E
Abstract: In this session, we take a look at the hardware used for these sessions as examples of the kind of hardware that you can use to run a private cloud. We’ll also discuss how to install and configure the prerequisite software, such as the Windows Server operating system, SQL Server data management software, and Active Directory Domain Services.
_____________Bare Metal to Private Cloud (Part 3 of 8): Clustering Hyper-V and Installing a Highly Available Virtual Machine Manager Cluster
http://go.microsoft.com/?linkid=9809579 or http://bit.ly/KvgVAM
Abstract: In this session, we take a look at how to create a Hyper-V host cluster and install a highly available cluster by using Virtual Machine Manager, a component of Microsoft System Center 2012.
_____________
Bare Metal to Private Cloud (Part 4 of 8): Configuring System Center 2012 - Virtual Machine Manager
http://go.microsoft.com/?linkid=9809580 or http://bit.ly/KlsCYU
Abstract: In this session, we talk about how to configure Virtual Machine Manager, a component of Microsoft System Center 2012. We explore how to deploy agents, create a host group, create a cloud, and create virtual networks.
_____________
Bare Metal to Private Cloud (Part 5 of 8): Installing and Configuring System Center 2012 - Operations Manager
http://go.microsoft.com/?linkid=9809581 or http://bit.ly/J2WDgE
Abstract: In this session, we show how to install a highly available Microsoft System Center 2012 - Operations Manager and deploy agents to manage the private cloud.
_____________
Bare Metal to Private Cloud (Part 6 of 8): Installing and Configuring System Center 2012 - Service Manager
http://go.microsoft.com/?linkid=9809582 or http://bit.ly/Ms8GtP
Abstract: In this session, we show how to install a highly available Microsoft System Center 2012 Service Manager, including the configuration management database (CMDB), data warehouse, reporting, self-service portal, and service catalog.
_____________
Bare Metal to Private Cloud (Part 7 of 8): Installing and Configuring System Center 2012 - Orchestrator
http://go.microsoft.com/?linkid=9809583 or http://bit.ly/JXQgPA
Abstract: In this session, we show how to install a highly available Microsoft System Center 2012 - Orchestrator and installing the System Center and other integration packs for automated administration of the private cloud.
_____________
Bare Metal to Private Cloud (Part 8 of 8): Integrating System Center 2012
http://go.microsoft.com/?linkid=9809584 or http://bit.ly/JcGHxd
Abstract: In this session, we configure the many integration points between the Microsoft System Center components and also between System Center and Active Directory Domain Services.
_____________
J.C. Hornbeck | Knowledge Engineer | Management and Security Division
Get the latest System Center news on Facebook and Twitter:

App-V Team blog: http://blogs.technet.com/appv/
ConfigMgr Support Team blog: http://blogs.technet.com/configurationmgr/
DPM Team blog: http://blogs.technet.com/dpm/
MED-V Team blog: http://blogs.technet.com/medv/
Orchestrator Support Team blog: http://blogs.technet.com/b/orchestrator/
Operations Manager Team blog: http://blogs.technet.com/momteam/
SCVMM Team blog: http://blogs.technet.com/scvmm
Server App-V Team blog: http://blogs.technet.com/b/serverappv
Service Manager Team blog: http://blogs.technet.com/b/servicemanager
System Center Essentials Team blog: http://blogs.technet.com/b/systemcenteressentials
WSUS Support Team blog: http://blogs.technet.com/sus/The Forefront Server Protection blog: http://blogs.technet.com/b/fss/
The Forefront Endpoint Security blog : http://blogs.technet.com/b/clientsecurity/
The Forefront Identity Manager blog : http://blogs.msdn.com/b/ms-identity- support/
The Forefront TMG blog: http://blogs.technet.com/b/isablog/
The Forefront UAG blog: http://blogs.technet.com/b/edgeaccessblog/

<Return to section navigation list>
Cloud Security and Governance
• Gerry Grealich (@GerryND88) reported Massachusetts Healthcare Provider Pays a Steep Price for Patient Data Privacy Breach on 9/20/2012:
Earlier this week, the Massachusetts Eye and Ear Infirmary and Massachusetts Ear and Eye, Inc. (MEEI) agreed to pay a hefty $1.5 million settlement to the U.S. Department of Health & Human Services for alleged HIPAA violations. According to MEEI, a personal laptop that contained unencrypted electronic protected health information (ePHI) was stolen, exposing a large amount of personal, clinical, and patient prescription data.
The government’s investigation found that MEEI failed to take steps necessary to comply with several HIPAA Security Rule requirements regarding data protection, and that the failures occurred over an extended period of time. And while this healthcare data breach involved a laptop, data security risks like this extend to larger “secure” IT environments as well. Just take a look at the largest healthcare data breaches in the last few years, and you’ll see that intrusions have taken place not only on portable devices, but on enterprise servers, client-server systems, centralized back-up systems, and cloud implementations.
Healthcare organizations must take notice. With the growing use of electronic medical records (EMRs), security risks are becoming much more widespread, and healthcare is one of the most susceptible industries. According to the Identity Theft Research Center, so far in 2012, more than 27 percent of reported data breaches have been in the medical/healthcare industry.
As shown by the MEEI case, government regulators are becoming a lot more aggressive about imposing monetary penalties for non-compliance. But practical solutions do exist – key among them are data encryption and tokenization systems for cloud applications and cloud storage. As we have proven with Inland Empire Health Plan, a cloud data security solution that incorporates encryption and/or tokenization can help healthcare IT and compliance managers tackle this critical (and potentially costly) data protection challenge.
By rendering ePHI undecipherable, and therefore unusable, when it’s outside an enterprise firewall, healthcare organizations can protect patient information in the cloud, comply with regulations, and stay out of headline news with reports of image-damaging security breaches.


<Return to section navigation list>
Cloud Computing Events
•• Chris Woodruff (@cwoodruff) reported I’m speaking at Cloud & Virtualization Live!, Dec. 10-14 in Orlando – will you be there? in a 9/21/2012 post:
I’ll be speaking at a brand new cloud & virtualization conference for IT professionals, systems administrators, developers and consultants – Cloud & Virtualization Live!, December 10-14 in Orlando, FL. http://bit.ly/CVSPEAK25
- Developing Mobile Solutions with Azure and Windows Phone
- Pushing Data to and from the Cloud with SQL Azure Data Sync
This event will have something for everyone, and will provide intelligent training on the real-world applicability of today’s cloud and virtualization technologies. Across 5 days, attendees will develop their skill sets in evaluating, deploying and optimizing cloud and virtual-based environments.
SPECIAL OFFER: As a speaker, I can extend $500 savings on the 5-day package. Register here: http://bit.ly/CVSPK25Reg and use code CVSPK25.
The extra-cool part about Cloud & Virtualization Live!: four events in one! This year, the event will be co-located with SQL Server Live!, SharePoint Live!, and Visual Studio Live!. You can customize your conference agenda and attend ANY sessions from all four events. Register now: http://bit.ly/CVSPK25Reg

• Jeff Price reported that Neil MacKenzie (@mknz) will present Azure, Hadoop and Big Data to the San Francisco Bay Area Azure Developers group on 10/23/2012 at 6:30 PM PDT:
There is now enormous interest in Big Data and the Hadoop ecosystem used with it. This ecosystem encompasses several components – such as Pig and Hive - focused on simplifying (and democratizing) the analysis of Big Data. Microsoft has partnered with Hortonworks to bring Hadoop to Windows Azure, and this is currently available as a preview. In this presentation, Neil Mackenzie will show where Hadoop sits in the Windows Azure Platform and how it can be used within a broader business-intelligence framework.
After 6:00 p.m., please enter through the lobby so the guard an provide elevator access to the 7th Floor.
Location: Microsoft San Francisco (in Westfield Mall where Powell meets Market Street)
835 Market Street
Golden Gate Rooms - 7th Floor
San Francisco, CA (map)835 Market Street at Powell Street - Right next to the Powell Street BART Station
• Himanshu Singh (@himanshuks) posted a Windows Azure Community News Roundup (Edition #37) on 9/21/2012:
Welcome to the latest edition of our weekly roundup of the latest community-driven news, content and conversations about cloud computing and Windows Azure. Here are the highlights for this week.
Articles and Blog Posts
- Role Instance Restarts Due to OS Upgrades by Kevin Williamson (posted Sept 19)
- Getting Started with Windows Azure (VIDEO) Visual Studio Toolbox, Channel 9 (posted Sept 19)
- Mobile Geolocation Apps with Windows Azure Web Sites Part 2: Displaying Points of Interest in iOS by @chrisrisner (posted Sept 19)
- From Server to Service: How Microsoft Moved TFS to Windows Azure by Grant Holliday (posted Sept 18)
- Continuous Deployment from GitHub to Windows Azure by @VishalRJoshi (posted Sept 18)
- Announcing the New Windows Azure Web Sites Shared Scaling Tier by @clinted (posted Sept 18)
- Migrating TailspinSpyworks Web Forms to Windows Azure by @benjguin (posted Sept 18)
North America
- August 20 – October 11: Windows Azure Developer Camp – Various (20+ North American cities)
- September 6-October 11: Cloud OS Signature Event Series – Various (16 cities)
- October 4: Vancouver Windows Azure Meetup – Vancouver, British Columbia
- October 10-14: Cloud & Virtualization LIVE – Orlando, FL
- October 30-November 2: Microsoft BUILD 2012 – Redmond, WA
- November 12: (Satory Global) Windows Azure Developer Camp – Mtn. View, CA
Europe
- September 25: Windows Azure Web Sites Deep Dive with Brady Gaster – Mechelen, Belgium
- September 27: Windows Azure IT Pro Camp – London, UK
- September 27: An Evening in the Cloud: The Old, The New and The Big – Kontich, Belgium
- September 27-28: CloudBurst 2012 – Stockholm, Sweden
- October 11: UK Windows Azure User Group – London, UK
- October 25: Catching the Long Tail with SaaS and Windows Azure – Leuven, Belgium
Rest of World/Virtual
- September 26-27: Windows Azure Camp – Hyderabad, India
- October 12,16,19: TechDays 2012 – South Africa (three cities)
- Ongoing: Windows Azure Virtual Labs – On-demand
Recent Windows Azure MSDN Forums Discussion Threads
- SQL Azure – On Premise Backup/Restore – 1,801 views, 5 replies
- How Can I Leverage On-premise Domain User Credentials for a Remote Desktop Client – 614 views, 7 replies
- Service Bus Authentication At Subnamespace Level – 361 views, 5 replies
Recent Windows Azure Discussions on Stack Overflow
- Is There Any Open Source Folder/Browser/Creator for (Windows) Azure Blob Storage? – 3 answers, 1 vote
- Clustered Index and Distributed Databases – 2 answers, 1 vote
Send us articles that you’d like us to highlight, or content of your own that you’d like to share. And let us know about any local events, groups or activities that you think we should tell the rest of the Windows Azure community about. You can use the comments section below, or talk to us on Twitter @WindowsAzure.

Steve Plank (@plankytronixx) recommended an Event: Don’t forget the free UK Windows Azure Camp for the IT Pro, 27th Sept. in a 9/19/2012 post:
This camp is aimed at the IT Pro. On it you will build and deploy an entire SharePoint infrastructure with a dual-machine server-farm, Active Directory Domain Controller and SQL Server. On the road to that infrastructure you will create a dual-server, load-balanced IIS website, a Windows Azure Virtual Network in to which you will deploy the Active Directory Domain plus all the member servers (SQL and SharePoint) and you’ll also learn how to generalise your images and add them to your library of images to make future deployment simpler. It’s a very lab focused camp.
This camp follows the Windows Server 2012 launch event and the Windows Server 2012 IT Pro Camp so if you are attending one or the other, or even both, you might find it useful to extend your time by another day.
Links for registration/details to the various events are here:
- 25th September: Windows Server 2012 Technical Launch event
- 26th September: Windows Server 2012 IT Pro Camp
- 27th September: Windows Azure IT Pro Camp
- 28th September: Windows Server 2012 IT Pro Camp


<Return to section navigation list>
Other Cloud Computing Platforms and Services
‡ Chris Karanacus reported Oracle to announce cloud infrastructure service at OpenWorld, Ellison says in a 9/21/2012 to NetworkWorld’s Cloud Computing blog:
Oracle will announce a new IaaS (infrastructure-as-a-service) offering at the upcoming Oracle OpenWorld conference in San Francisco, CEO Larry Ellison said on Thursday.
The service will provide customers with access to secure, virtualized compute power hosted in an Oracle data center, Ellison said. Oracle will also sell software for customers to build "identical services" in their own data centers, allowing them to move workloads back and forth between the public and private clouds, he said.
Ellison made his remarks during a conference call to discuss Oracle's quarterly earnings.
The new service means Oracle will be able to provide "all three tiers of cloud computing," Ellison said, spanning applications, a PaaS (platform as a service) in the form of a Java development platform and database, and now an infrastructure offering that could put it into competition with Amazon Web Services, which Ellison has praised in the past.
The public-private cloud aspects of the service mean it will also rival services and products from IBM, Hewlett-Packard and others. …
“Others” include Microsoft, I suppose.
• Jeff Barr (@jeffbarr, pictured below) posted David Yanacek’s (@dyanacek) Optimizing Provisioned Throughput in Amazon DynamoDB article on 9/21/2012:
David Yanacek of the Amazon DynamoDB team [pictured below] is back with another guest post, this one on the topic of optimizing the use of DynamoDB's unique provisioned throughput feature.
While I'm on the topic of DynamoDB, I should mention that we will be running an 8-hour DynamoDB bootcamp session at re:Invent. You'll need to have some development experience with a relational or non-relational database system in order to benefit.
-- Jeff;
DynamoDB offers scalable throughput and storage by horizontally partitioning your data across a sufficient number of servers to meet your needs. When you need more throughput for your table, you simply use the AWS Management Console or call an API. When your table grows in size, DynamoDB automatically adds more partitions for storing your growing dataset.
With traditional databases, you may be accustomed to buying larger and larger databases as your demands grow. This is known as a "scale-up" solution. However, when your dataset grows too large for even the largest database server, you must "scale-out" your database, implementing logic in your application to route each query to the correct database server. DynamoDB offers you this "scale-out" architecture, while handling all the complex components that are needed to run a secure, durable, scalable, and highly available data store.
While DynamoDB allows you to specify your level of throughput, your application needs to be designed with the DynamoDB architecture in mind to make use of it all. The Amazon DynamoDB Developer Guide describes some best practices for achieving your full provisioned throughput.
One of those recommendations is about how to efficiently store time series data in DynamoDB. Often when you store time series data, you access recent .hot. data more frequently than older, "cold" data. When storing time series data in DynamoDB, it is recommended that you spread your data across multiple tables - one per time period (month, day, etc). This article describes the reasons behind that advice, and the benefits of designing your application in this way.
Non-Uniform Workloads
To understand why hot and cold data separation is important, consider the advice about Uniform Workloads in the developer guide:When storing data, Amazon DynamoDB divides a table's items into multiple partitions, and distributes the data primarily based on the hash key element. The provisioned throughput associated with a table is also divided evenly among the partitions, with no sharing of provisioned throughput across partitions. Consequently, to achieve the full amount of request throughput you have provisioned for a table, keep your workload spread evenly across the hash key values. Distributing requests across hash key values distributes the requests across partitions.
For example, if a table has a very small number of heavily accessed hash key elements, possibly even a single very heavily used hash key element, traffic is concentrated on a small number of partitions - potentially only one partition. If the workload is heavily unbalanced, meaning disproportionately focused on one or a few partitions, the operations will not achieve the overall provisioned throughput level. To get the most out of Amazon DynamoDB throughput, build tables where the hash key element has a large number of distinct values, and values are requested fairly uniformly, as randomly as possible.
Another example of a non-uniform workload is where an individual request consumes a large amount of throughput. Expensive requests are generally caused by Scan or Query operations, or even single item operations when items are large. Even if these expensive requests are spread out across a table, each request creates a temporary hot spot that can cause subsequent requests to be throttled.
For instance, consider the Forum, Thread, and Reply tables from the Getting Started section of the developer guide, which demonstrate a forums web application on top of DynamoDB. The Reply table stores messages sent between users within a conversation, and within a thread, are sorted by time.
If you Query the Reply table for all messages in a very popular thread, that query could consume lots of throughput all at once from a single partition. In the worst case, this expensive query could consume so much of the partition's throughput that it causes subsequent requests to be throttled for a few seconds, even if other partitions have throughput to spare.
To spread that workload out over time, it is recommended to take advantage of the pagination features of the Query operation, and limit the number of items retrieved per call. Since a forums web application displays a fixed number of replies to a thread at a time, pagination lends itself well to this use case.Impact of Non-Uniform Workloads on Throughput for Large Tables
As your table grows in size, DynamoDB adds more partitions behind the scenes to handle your storage needs. As the number of partitions in your table increases, each partition is given a smaller portion of your overall throughput.In the case of a non-uniform workload, as your dataset increases some of your requests could be throttled even though you did not see this throttling when the table was smaller in size, and even if you are not utilizing your table's full provisioned throughput. When you first create your table, you may have hot spots that go unnoticed because each partition is allotted a larger amount of your overall table throughput. However, when your application adds large amounts of data to your table, DynamoDB automatically adds more partitions, which decreases your per-partition throughput, and can lead to increased throttling for non-uniform workloads.
However, if your request workload is uniform across your table, even as the number of partitions grows, your application will continue to run smoothly.
Tip: Separate Hot and Cold Data
Applications that store time series data, often with a range key involving a timestamp, fall into this category. The developer guide describes the best practices for storing time series data in DynamoDB, which involves creating a new table for each time period. This approach offers several benefits, including:
- Cost: You can provision higher throughput for tables which contain hot data, and provision lower throughput for the tables containing cold data. This keeps your per-partition throughput higher on you hot tables, helping them better tolerate non-uniformity in your workloads.
- Simplified Analytics: When analyzing your data for periodic reports, you use the built-in integration with Amazon Elastic Map Reduce, and run complex data analysis queries that are otherwise not supported natively in DynamoDB. Since analytics tends to be recurring on a scheduled basis, separating tables into time periods makes it so that the analytics job only needs to access the new data for analysis.
- Easier Archival: If older data is no longer relevant to your application, you can simply archive to cheaper storage systems like Amazon S3 and delete the old table without having to delete items one at a time, which would otherwise cost a great deal of provisioned throughput.
In Conclusion
Unlike traditional databases, DynamoDB lets you scale up your throughput requirements with the push of a button. DynamoDB also automatically manages your storage as your table grows in size. As your table grows, its provisioned throughput is spread out across your additional partitions. In order to fully utilize your provisioned throughput in DynamoDB, you have to take this partitioning into consideration when you design your application. You can find additional best practices and suggestions for application designs that work well on DynamoDB in the Amazon DynamoDB Developer Guide.


<Return to section navigation list>


0 comments:
Post a Comment